제품 업데이트
Tencent Cloud 오디오/비디오 단말 SDK 재생 업그레이드 및 권한 부여 인증 추가
TRTC 월간 구독 패키지 출시 관련 안내
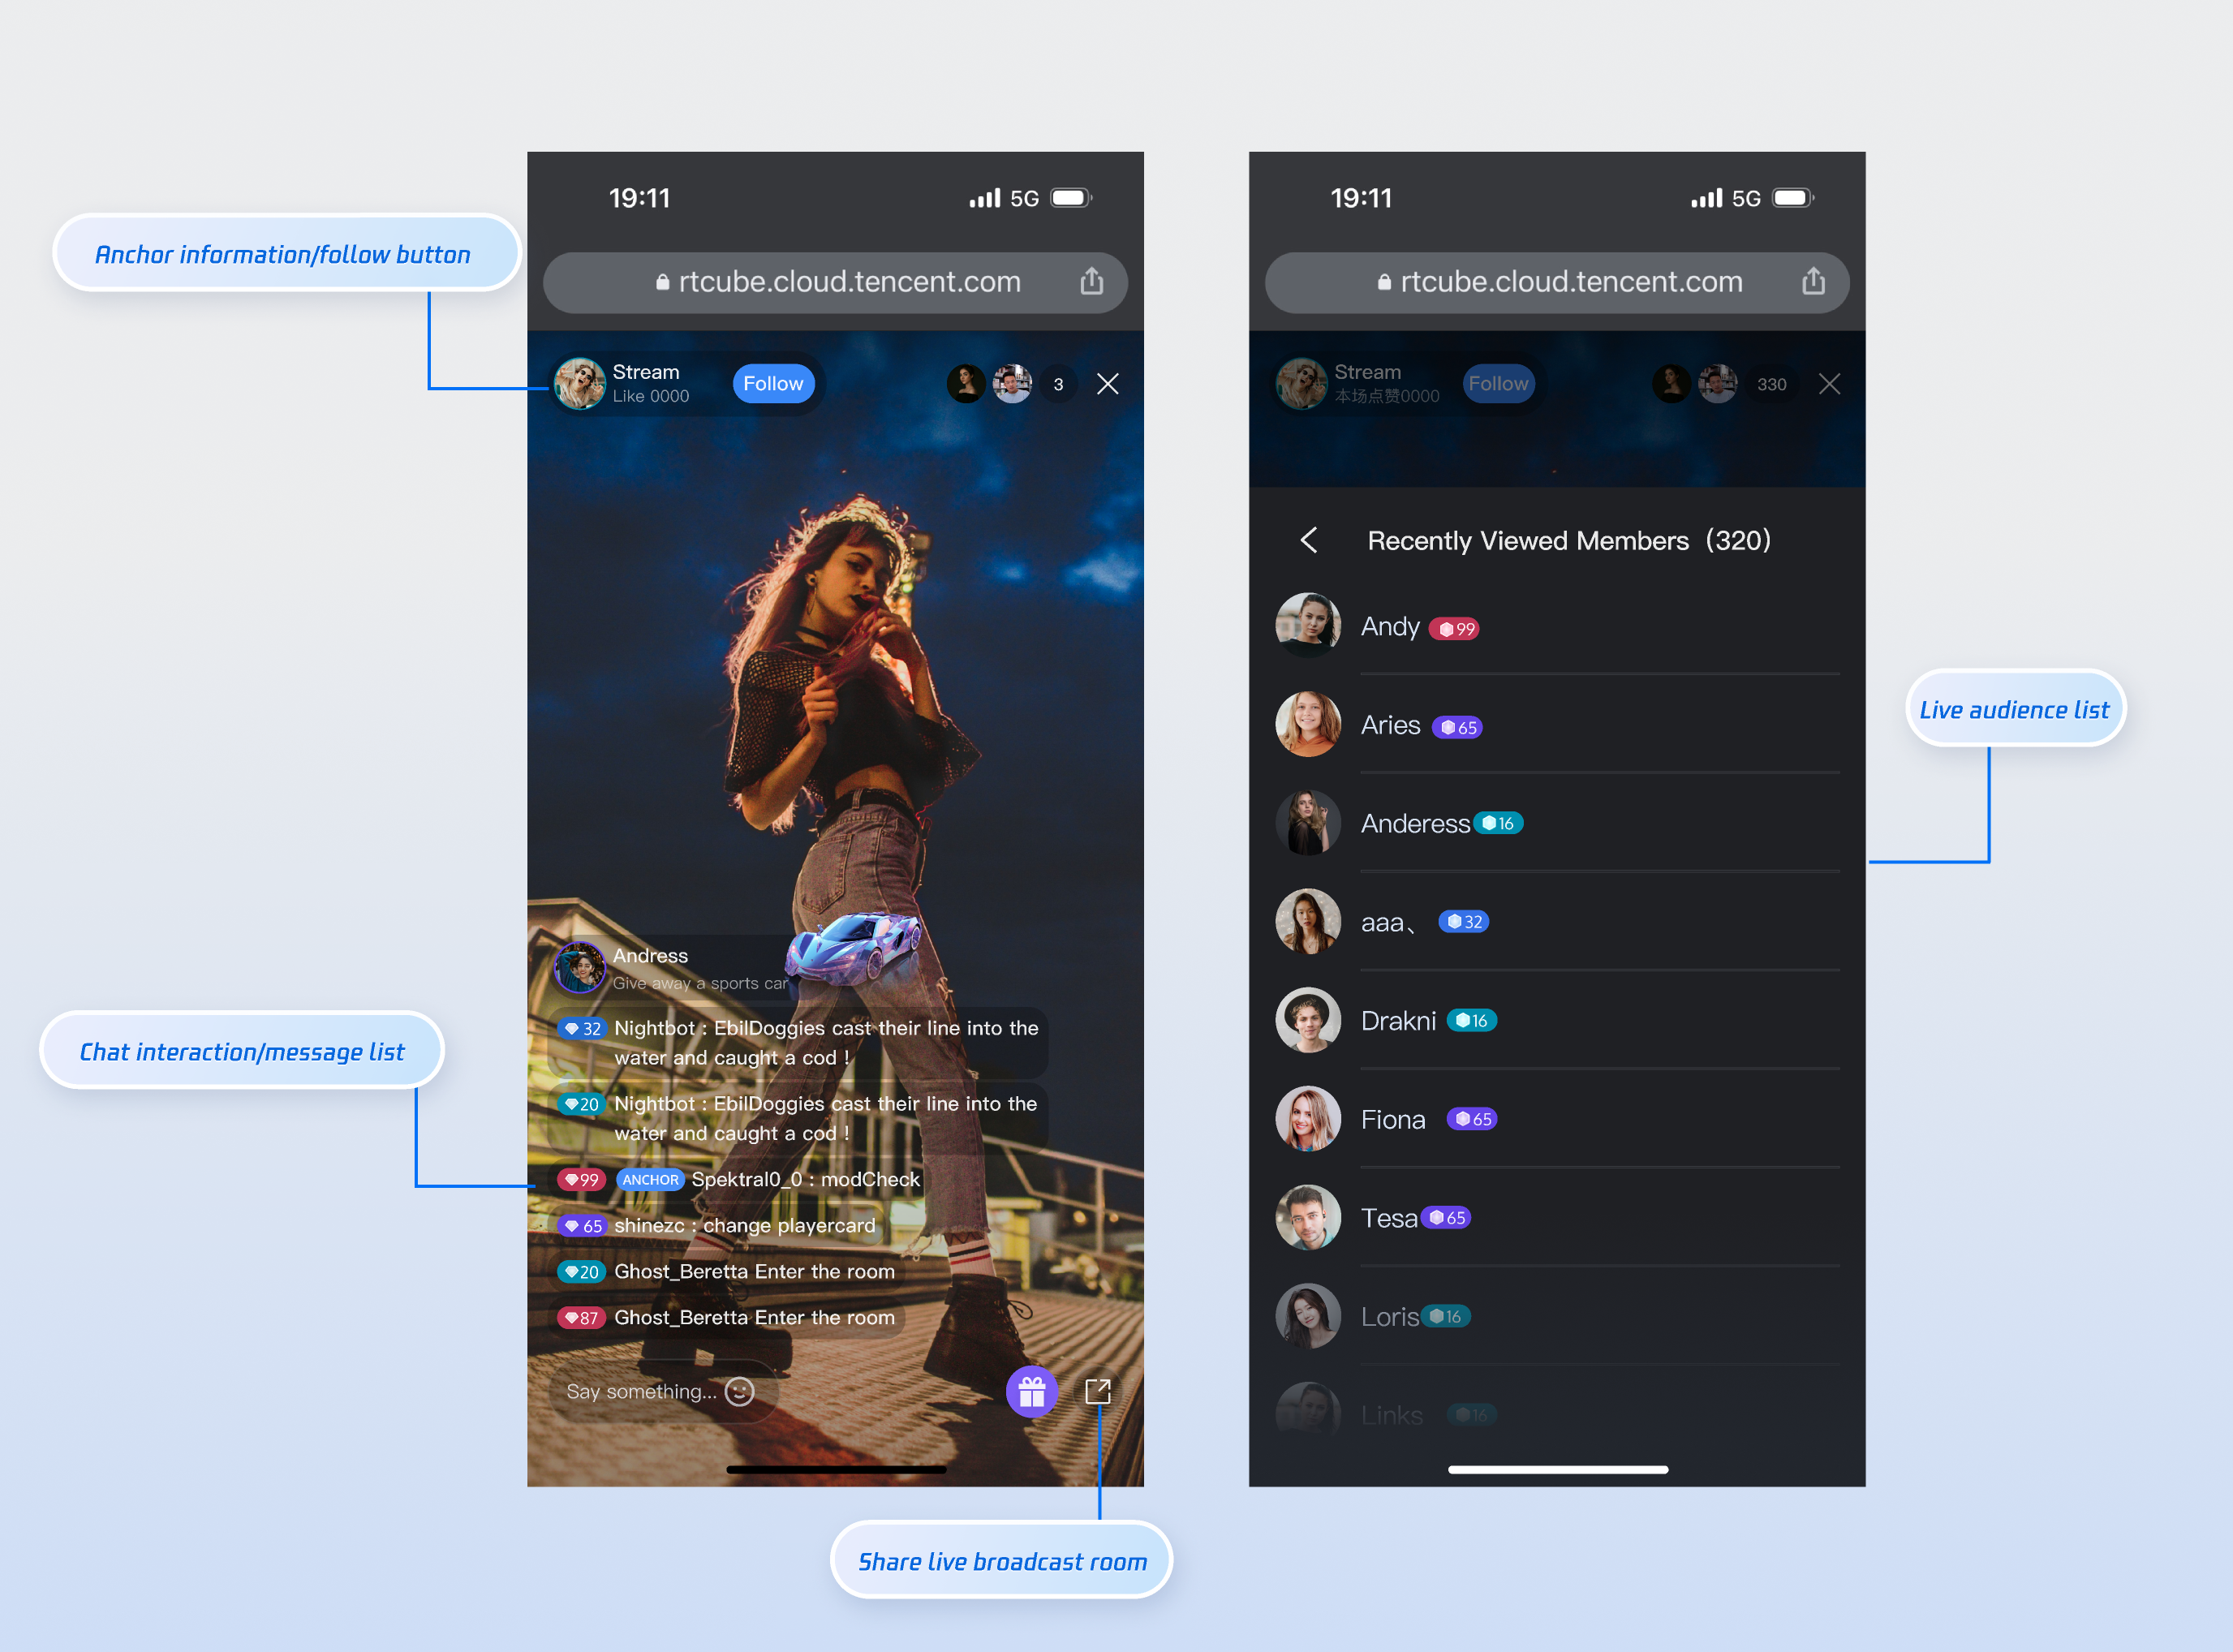
Functional classification | Specific capabilities |
Live video playback | HD and smooth live streaming experience |
Barrage Interaction | Real-time Barrage chat |
Viewer List | View online viewer information |
Follow Streamer | Follow your favorite streamers with one click |
Full Screen Play | Immersive viewing experience |
npm install tuikit-atomicx-vue3 @tencentcloud/uikit-base-component-vue3 --save
pnpm add tuikit-atomicx-vue3 @tencentcloud/uikit-base-component-vue3
yarn add tuikit-atomicx-vue3 @tencentcloud/uikit-base-component-vue3
<template><UIKitProvider language="zh-CN"><div class="container"><!-- Live core area --><section class="live"><header class="header"><IconArrowStrokeBack class="back-btn" size="20" /><Avatar :src="currentLive?.liveOwner.avatarUrl" :size="32" class="avatar" /><span class="user-name">{{ currentLive?.liveOwner.userName || currentLive?.liveOwner.userId }}</span></header><LiveCoreView class="player" /></section><div class="sidebar"><!-- Online viewers list --><section class="audience"><header class="section-header"><h3> online viewers <span>({{ audienceList.length }})</span></h3></header><LiveAudienceList class="list" /></section><!-- Message List & Message List --><section class="barrage"><header class="section-header"><h3>MessageList</h3></header><BarrageList class="list" /><BarrageInput class="input" height="48px" /></section></div></div></UIKitProvider></template><script setup lang="ts">import { LiveAudienceList, BarrageList, BarrageInput, useLiveAudienceState, LiveCoreView, useLiveState, Avatar, useLoginState } from 'tuikit-atomicx-vue3';import { UIKitProvider, IconArrowStrokeBack } from '@tencentcloud/uikit-base-component-vue3';const { audienceList } = useLiveAudienceState();const { currentLive } = useLiveState();const { login } = useLoginState();async function initLogin() {try {await login({sdkAppId: 0, // SDKAppId, refer to step 1 to obtainuserId: '', // UserID, refer to step 1 to obtainuserSig: '', // userSig, refer to step 1 to obtain});} catch (error) {console.error('Login Failed:', error);}}onMounted(async () => {await initLogin();});</script><style>:global(body){height:100vh;width:100vw;margin:0;padding:0;overflow:hidden;font-size:15px;line-height:1.6;text-rendering:optimizeLegibility;}:global(*),:global(*::before),:global(*::after){box-sizing:border-box;margin:0;}.container{display:grid;grid-template-columns:70% 30%;height:100vh;width:100vw;gap:16px;padding:16px;background:var(--bg-color-default);box-sizing:border-box;overflow:hidden;}.live{display:flex;flex-direction:column;background:var(--bg-color-operate);border-radius:12px;overflow:hidden;box-shadow:0 2px 8px var(--shadow-color);}.header{display:flex;align-items:center;gap:12px;padding:16px;border-bottom:1px solid var(--stroke-color-primary);}.back-btn{cursor:pointer;color:var(--text-color-tertiary);transition:color 0.2s;}.back-btn:hover{color:var(--text-color-link-hover);}.avatar{border:1px solid var(--uikit-color-white-7);}.user-name{color:var(--text-color-primary);font-weight:500;}.player{flex:1;background:var(--uikit-color-black-1);}.sidebar{display:flex;flex-direction:column;gap:16px;height:100%;overflow:hidden;}.audience{display:flex;flex-direction:column;background:var(--bg-color-operate);border-radius:12px;overflow:hidden;box-shadow:0 2px 8px var(--shadow-color);flex:1;min-height:0;}.barrage{display:flex;flex-direction:column;background:var(--bg-color-operate);border-radius:12px;overflow:hidden;box-shadow:0 2px 8px var(--shadow-color);flex:1;min-height:0;}.section-header{padding:16px;border-bottom:1px solid var(--stroke-color-primary);background:var(--bg-color-operate);}.section-header h3{margin:0;font-size:16px;font-weight:600;color:var(--text-color-primary);}.section-header span{font-weight:400;color:var(--text-color-secondary);font-size:14px;}.list{flex:1;min-height:0;overflow-y:auto;}.input{border-top:1px solid var(--stroke-color-primary);flex-shrink:0;height:48px;}@media (max-width:1200px){.container{grid-template-columns:1fr;grid-template-rows:60% 20% 20%;gap:12px;}.sidebar{gap:12px;}.audience,.barrage{min-height:200px;}}@media (max-width:768px){.container{padding:8px;gap:8px;grid-template-rows:50% 25% 25%;}.header,.section-header{padding:12px;}.sidebar{gap:8px;}}</style>
npm run dev
Category | Function | Description |
Live information display | Customize the display of the watch page information area | Supports: Show/hide the logo, replace it with your desired logo UI customization, show/hide the follow button, and replace it with your desired button style |
Online viewers | Customize audience information display | Supports: Show/hide audience level Customize audience information font and color UI Replace icon style with your desired style |
MessageList | Custom message barrage area display | Supports: Show/hide chat input area Supports UI customization for chat bubble style, audience level, etc. |
//live-player.vueimport { onMounted } from 'vue';import { useLiveState } from 'tuikit-atomicx-vue3';const { joinLive } = useLiveState();onMounted(async () => {// Enter liveId to join the live broadcast room. For the specific meaning of the parameters,// please refer to the preparation work in step 1.await joinLive({ liveId: 'xxx' });});
//src/router/index.tsimport { createRouter, createWebHistory } from 'vue-router';const routes = [{path: '/live-player',component: () => import('../views/live-player.vue'),},// If you need the live broadcast list function, you can add the following route// {// path: '/live-list',// component: () => import('../views/live-list.vue'),// },];const router = createRouter({history: createWebHistory(),routes,});export default router;// src/main.tsimport { createApp } from 'vue';import App from './App.vue';import router from './router';const app = createApp(App);app.use(router);app.mount('#app');
Function | Description | Integration Guide |
Host Streaming | The complete workflow for a host to start a stream, including pre-stream setup and various in-stream interactions. | |
Live Stream List | Display the live broadcast list interface and functions, including live broadcast list and room information display function |
피드백