Parameter Template
Parameter Template refers to a predefined group of parameter settings. One template can be applied to multiple database instances simultaneously.
By creating a custom parameter template in the TencentDB for PostgreSQL console and applying it to instances, you can conveniently and efficiently implement batch parameter settings for similar instances.
You can log in to the PostgreSQL console and select the Parameter Templates page in the left sidebar to manage it. The parameter template supports the following features:
create template, generate a custom parameter optimization scheme.
Use the PostgreSQL configuration file
**.conf to import and create a template.Save existing parameter settings as a template.
When setting parameters for one or multiple instances, directly import an existing template.
Compare the content between two parameter templates.
Note:
Database instances that have used parameter template will not be synchronously updated as the parameter template are modified. You need to manually apply the updated parameter template to the instances.
If you need to apply the newly created parameter template to batch instances, click Apply Template in parameter settings on the instance details page to import.
Create New Parameter Template
When you want to use your own database parameter templates, just create a new one, modify the desired parameters and apply it to your database instance, and then you can use the new database parameter templates.
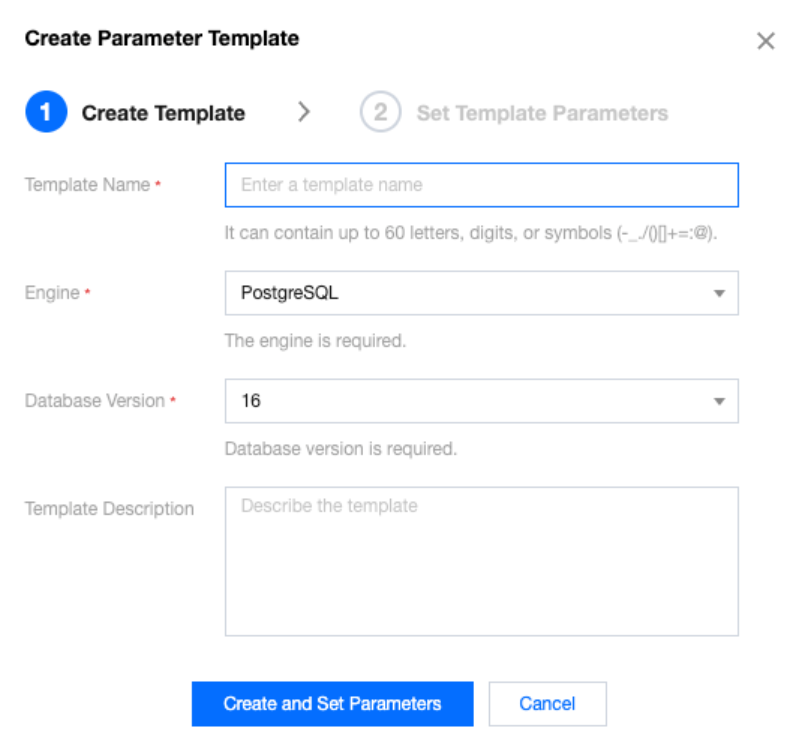
1. Log in to the PostgreSQL console, select the Parameter Templates page in the left sidebar, and click Create Template.
2. In the pop-up dialog box, configure the following parameters and click Create and Set Parameters.
Template Name: Enter the name of the input parameter template. The name must be unique. It only supports numbers, English uppercase and lowercase letters, Chinese characters, and some special characters such as _ - / () + = : @. The length should not exceed 60 characters.
Engine: Select the corresponding database engine based on the database type required by the template, such as PostgreSQL or SQL Server-compatible. Different database engines support different parameters.
Database Version: Parameter templates can only be applied to database instances with the same database version. If you want to apply it to database instances of multiple versions, it is advisable to create a separate parameter template for each version individually to ensure that the parameter items match the version.
Template Description: Briefly explain the input parameter template.
3. After the instance is created, you can click to view details and perform operations such as modifying, importing, and exporting parameters on the template details page.
Apply Parameter Template to Instance
Note:
When applying the parameter templates to multiple instances, please confirm the database engine and version of the parameters to ensure that they are applicable to the target instances. Proceed with caution to prevent database performance anomalies.
1. Log in to the PostgreSQL console and select the Parameter Templates page in the left sidebar.
2. In the parameter template list, find the template to be applied and click Apply to Instance in the Operation column.

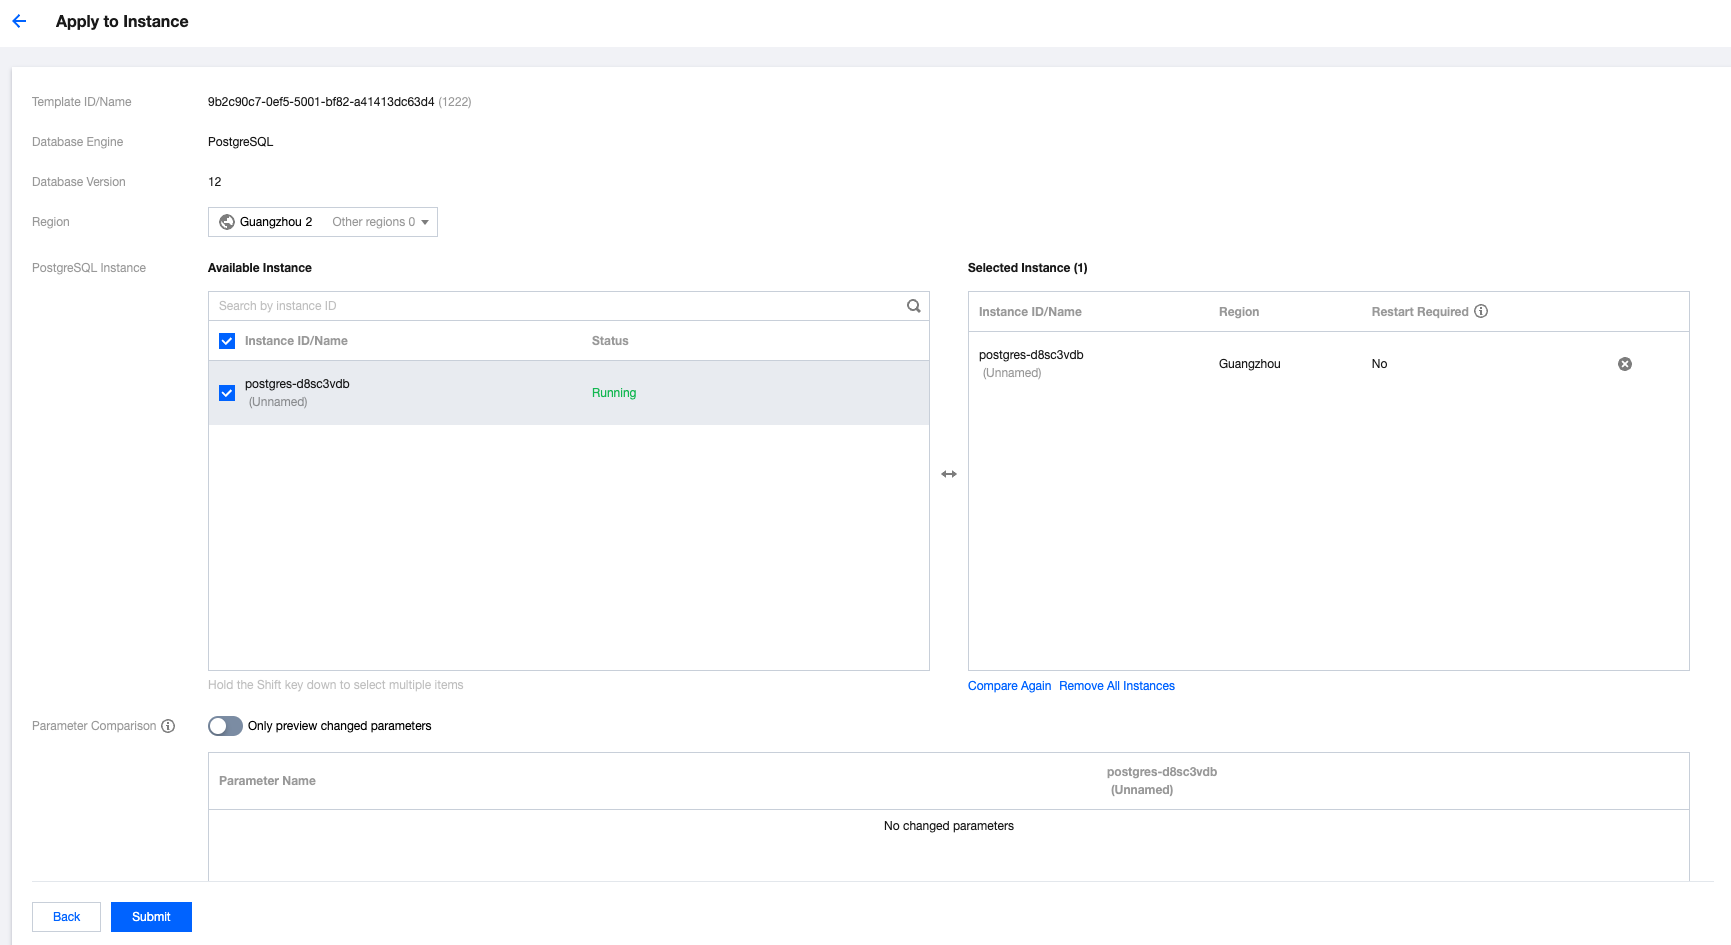
3. In the pop-up page, select the instances for parameter application, check that the parameter modifications are correct, and then click Submit.
PostgreSQL instance: After selecting the corresponding region, the system will display the instances in that region whose database version matches that of the parameter template. You can select the instances to which the parameter template needs to be applied.
Parameter comparison: The parameter values of the selected instance before and after applying the template are viewable.
Copy Parameter Template
If you've created a database parameter template and want to include most of its custom parameters and values in a new one, copying the parameter template is a convenient solution.
Method One: Copy a Parameter Template From an Existing One
1. Log in to the PostgreSQL console, select the Parameter Templates page in the left sidebar, click the Template ID or Operation column's View Detail, and enter the template details page.
2. On the template details page, click Save as Template.

3. In the pop-up dialog box, configure the following parameters:
Template name: Enter the name of the input parameter template. The name must be unique.
Template description: Briefly explain the input parameter template.
The new copied template will have the same engine and database version as the original template.

4. Confirm that everything is correct. Click OK to save the current parameter template as a new one and complete the copy operation.
Method Two: Copy a Parameter Template through the Feature Setting of an Instance
1. Log in to the PostgreSQL console, select the Instance List page in the left sidebar, and click the Instance ID to enter the management page.
2. Select the Parameter Settings page and click Save as Template.
3. In the pop-up dialog box, configure the following parameters:
Template name: Enter the name of the input parameter template. The name must be unique.
Template description: Briefly explain the input parameter template.
The newly copied template will have the same engine and database version as the current instance information.
4. Confirm that everything is correct. Click OK to save the current parameter template as a new one and complete the copy operation.
Modify the Parameter Value of a Parameter Template
1. Log in to the PostgreSQL console, select the Parameter Templates page in the left sidebar, click the Template ID, and enter the template details page.
2. On the template details page, click Batch Modify Parameters or click the "Modify Parameter Value" icon in the parameter runtime value column.

Import Parameter Template
1. Log in to the PostgreSQL console, select the Parameter Templates page in the left sidebar, click the Template ID, and enter the template details page.
2. On the template details page, click Export Parameters.

Note:
Select import parameters, which means choosing a configuration file (.conf format) from the local file for import. Need to pay attention that the format of the configuration file should be consistent with that of the PostgreSQL database server's configuration file, or use the file template of the exported parameters. Otherwise, it will prompt that the import is unsuccessful.
3. In the pop-up dialog box, select a file and click Import and Overwrite Original Parameters.
Export Parameter Template
Method 1: Export From the Parameter Template List
1. Log in to the PostgreSQL console and select the Parameter Templates page in the left sidebar.
2. In the parameter templates list, in the Operation column of the desired template, click Export.
Method 2: Export From the Parameter Template Details
1. Log in to the PostgreSQL console, select the Parameter Templates page in the left sidebar, click the Template ID, and enter the template details page.
2. On the template details page, click Export Parameters at the top.
Delete Parameter Template
If you've created extra parameter template or confirmed that a parameter template has no used value, you can use the deleting parameter template functionality to delete the parameters used no longer.
1. Log in to the PostgreSQL console and select the Parameter Templates page in the left sidebar.
2. In the parameter templates list, in the Operation column of the desired template, click Delete.

3. In the pop-up dialog box, click OK.
Ajuda e Suporte
Esta página foi útil?
Você também pode entrar em contato com a Equipe de vendas ou Enviar um tíquete em caso de ajuda.
comentários