iOS端集成文档
下载
聚焦模式
字号
开发准备
1. 注册腾讯云账号,点击进入eKYC的控制台,即可开通相应服务。
2. 从eKYC SDK下载链接中下载对应版本的SDK,并集成到本地。
3. 联系官网的商务或者客服人员,获取对应版本的license文件。
iOS端eKYC SDK接入流程
依赖环境
1. 开发环境 Xcode 12.0 及以上版本,推荐使用最新的版本。
2. 慧眼iOS SDK 适用于iOS11.0及以上版本。
接入步骤
导入相关库及文件
1. Link Binary With Libraries导入相关Framework SDK依赖的库如下:
├──HuiYanEKYCVerification.framework├──tnn.framework├──tnnliveness.framework├──YTCommonLiveness.framework├──YTFaceAlignmentTinyLiveness.framework├──YTFaceDetectorLiveness.framework├──YTFaceLiveReflect.framework├──YTFaceTrackerLiveness.framework├──YTPoseDetector.framework├──YtSDKKitActionLiveness.framework├──YtSDKKitFramework.framework├──YtSDKKitOcrVideoIdent.framework├──YtSDKKitReflectLiveness.framework└──YtSDKKitSilentLiveness.framework├── HKOCRSDK.framework├── tiny_opencv2.framework└── YtSDKKitOcrVideoIdent.framework
2. Link Binary With Libraries导入系统Framework
└── Accelerate.framework└── CoreML.framework
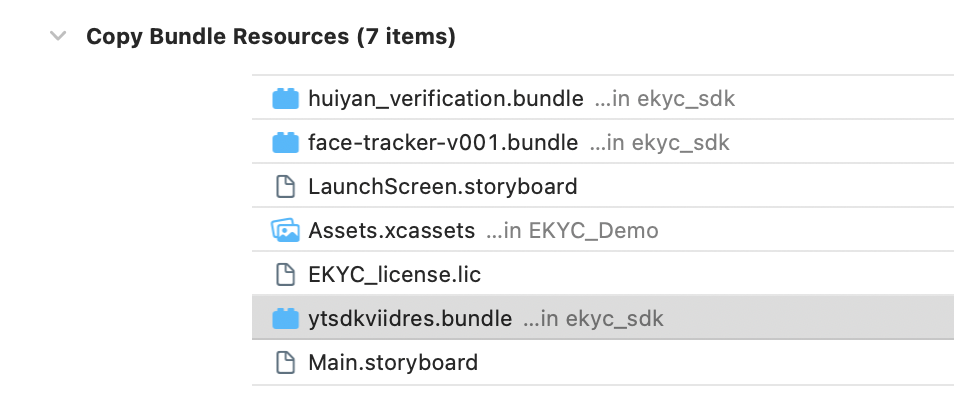
3. Copy Bundle Resources中导入bundle文件
└── face-tracker-v001.bundle└── huiyan_verification.bundle└── ytsdkviidres.bundle
4. Build Phases设置
4.1 Other Linker Flags 新增 -ObjC
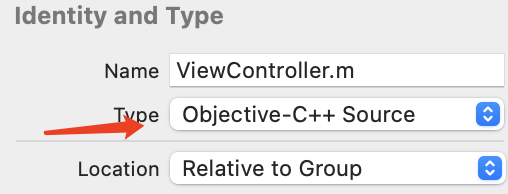
4.2 接入.m文件 设置后缀为.mm 或文件更改Type:Objective-C++ Source
5. 权限设置
SDK需要摄像头使用权限,请添加对应的权限声明。在主项目info.plist 配置中添加下面key-value值
<key>Privacy - Camera Usage Description</key><string>eKYC SDK 需要访问您的相机权限</string>
SDK接口使用说明
初始化
在您APP初始化的时候调用,主要是进行一些SDK的初始化操作
#import <HuiYanEKYCVerification/VerificationKit.h>- (void)viewDidLoad {[[VerificationKit sharedInstance] initWithViewController:self];}
启动身份认证eKYC检测流程
当您需要启动身份认证eKYC检测流程的时候,只需要调用startVerifiWithConfig方法,配置ekycToken,和一些自定义配置。
- (IBAction)startVerificationEvent:(id)sender {NSLog(@"startVerificationEvent");VerificationConfig *config = [[VerificationConfig alloc] init];config.licPath = [[NSBundle mainBundle] pathForResource:@"eKYC_license.lic" ofType:nil];config.languageType = (LanguageType)(selectTag + 1);config.verAutoTimeOut = 30000;//鉴伪超时时间设置config.hyFaceTimeOut = 15000;//人脸单动作超时设置config.ekycToken = self.eKYCTokenTextField.text;[[VerificationKit sharedInstance] startVerifiWithConfig:config withSuccCallback:^(int errorCode, id _Nonnull resultInfo, id _Nullable reserved) {NSLog(@"ErrCode:%d msg:%@",errorCode,resultInfo);NSString *showMsg = [NSString stringWithFormat:@"ErrCode:%d msg:%@",errorCode,resultInfo];[self showAlertViewWithMsg:showMsg];} withFialCallback:^(int errorCode, NSString * _Nonnull errorMsg, id _Nullable reserved) {NSLog(@"ErrCode:%d msg:%@ extra:%@",errorCode,errorMsg,reserved);NSString *showMsg = [NSString stringWithFormat:@"ErrCode:%d msg:%@ extra:%@",errorCode,errorMsg,reserved];[self showAlertViewWithMsg:showMsg];}];}
ekycToken 为从服务器兑换的本次身份认证流程的唯一凭证。
注意: **"eKYC_license.lic"**文件是需要联系商务或者客服人员进行license申请。将申请完成后的license文件放到Copy Bundle Resources下。
SDK资源释放
在您调用完SDK不在使用时,可以调用SDK资源释放接口
- (void)dealloc {[VerificationKit clearInstance];}
常见问题
1. 若出现很多类似这样的报错
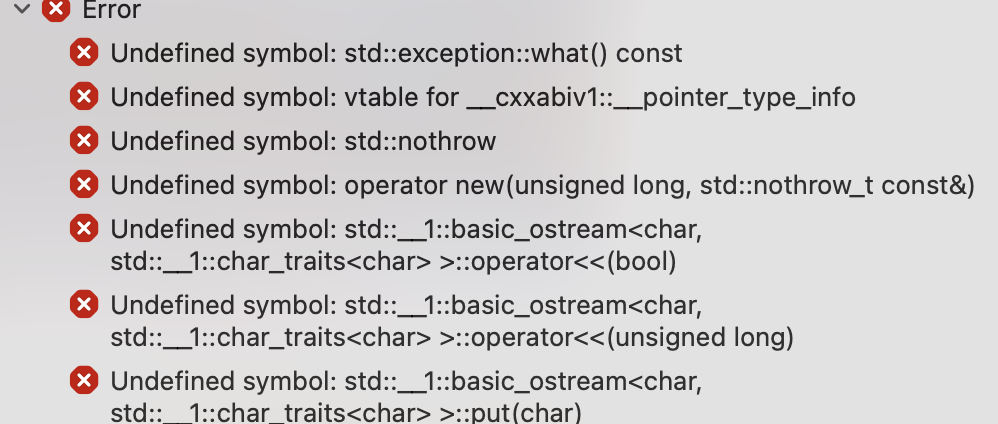
需要更改调用SDK的文件属性为:Objective-C++ Source
2. 出现进入sdk没有画面
TARGETS -> Build Settings -> other Linker Flags 新增设置 -ObjC
3. 出现如下图提示错误

在TARGETS -> BuildPhases -> Link Binary With Libraries 添加系统Accelerate.framework
文档反馈