iOS 自定义能力
下载
聚焦模式
字号
本文主要介绍如何使用自定义多语言和自定义 UI。
一、自定义多语言
1.1 修改多语言
打开 Demo 工程
Objective-C 版本:打开
demo/TencentCloudDemo/TencentCloudDemo.xcodeprojSwift 版本:打开
demo/OcrSwiftDemo/OcrSwiftDemo.xcodeproj定位多语言源文件
在左侧目录树中找到
OcrSDK 文件夹,展开 Localizable.strings 后可以看到多个语言目录:en.lproj/ - 英文zh-Hans.lproj/ - 简体中文zh-Hant.lproj/ - 繁体中文id.lproj/ - 印尼语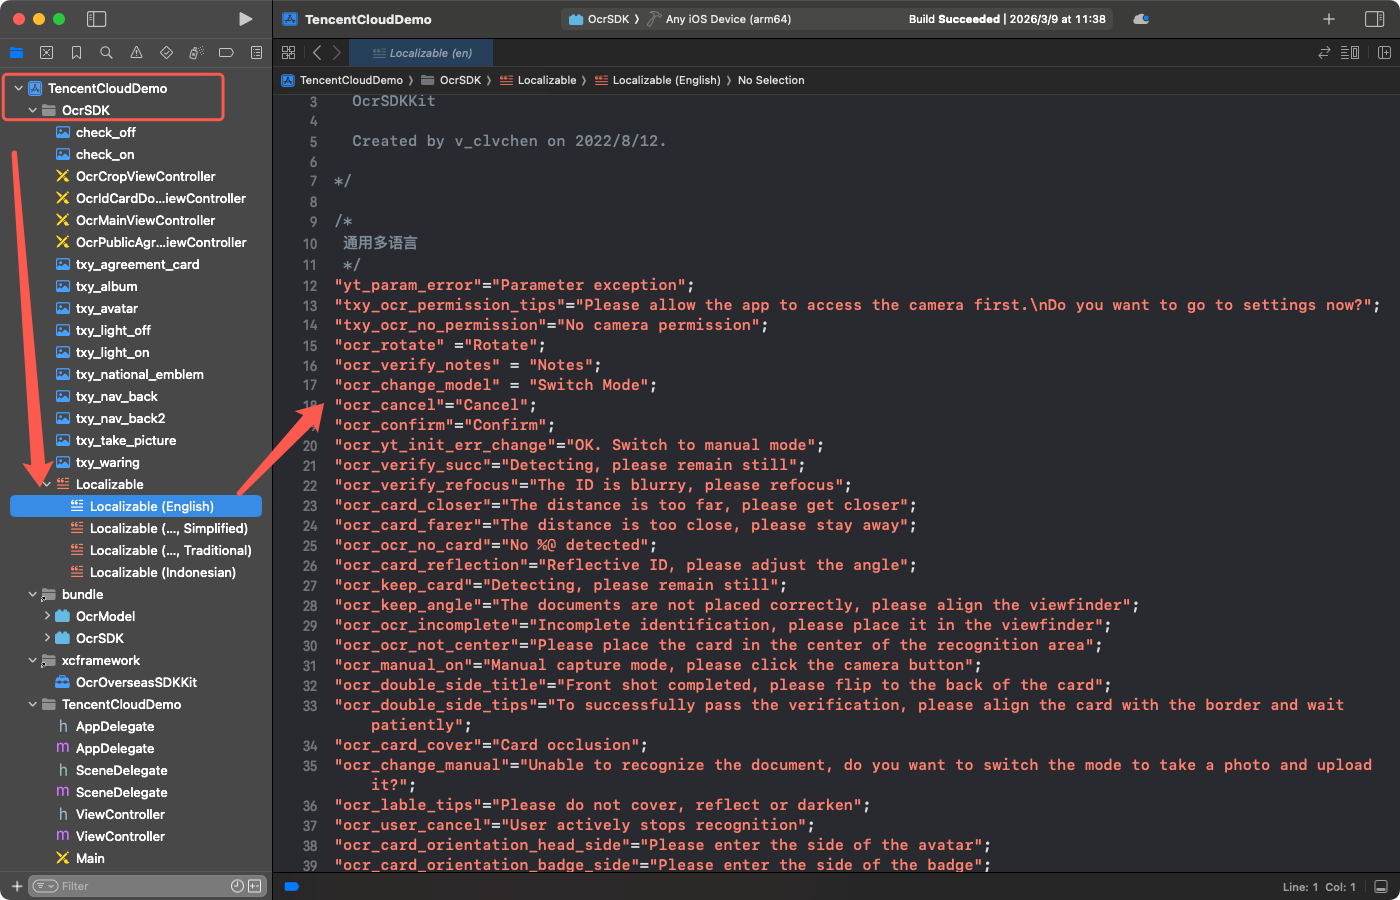
修改翻译内容
1. 展开对应语言目录,打开
Localizable.strings 文件2. 找到需要修改的 key,例如修改 "Cancel" 按钮文案:
// 修改前"ocr_cancel"="Cancel";// 修改为"ocr_cancel"="Close";
1.2 扩展新语言
添加新语言到工程
1. 在 Xcode 左侧选中项目根节点(如
TencentCloudDemo)2. 选择 PROJECT -> Info -> Localizations
3. 点击 + 按钮添加目标语言(如日语 ja、韩语 ko 等)
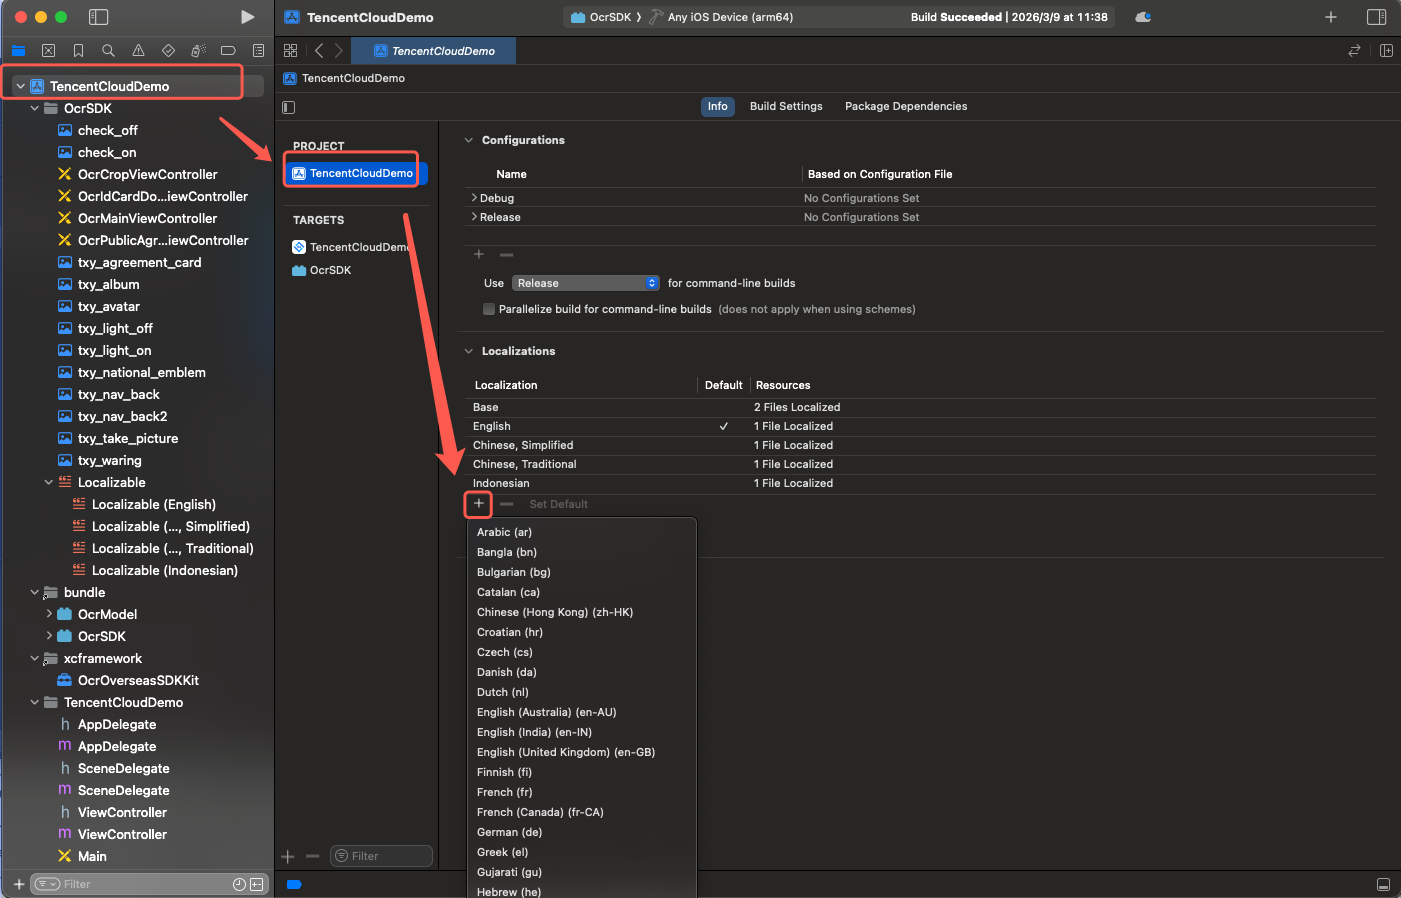
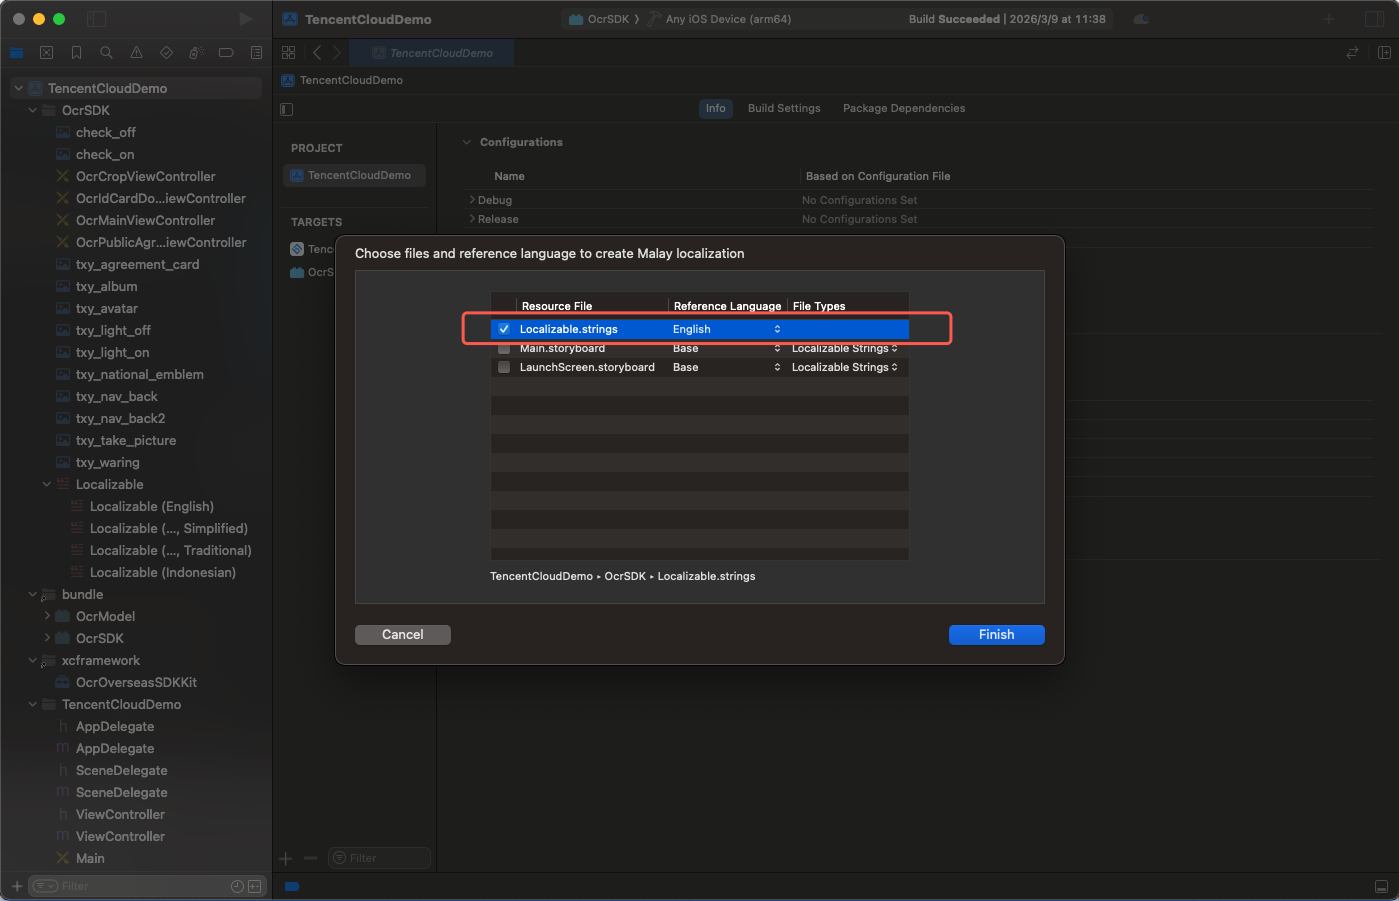
4. 在弹出的对话框中,选中
OcrSDK 文件夹下的 Localizable.strings 文件5. 点击 Finish 完成添加
翻译新语言文本
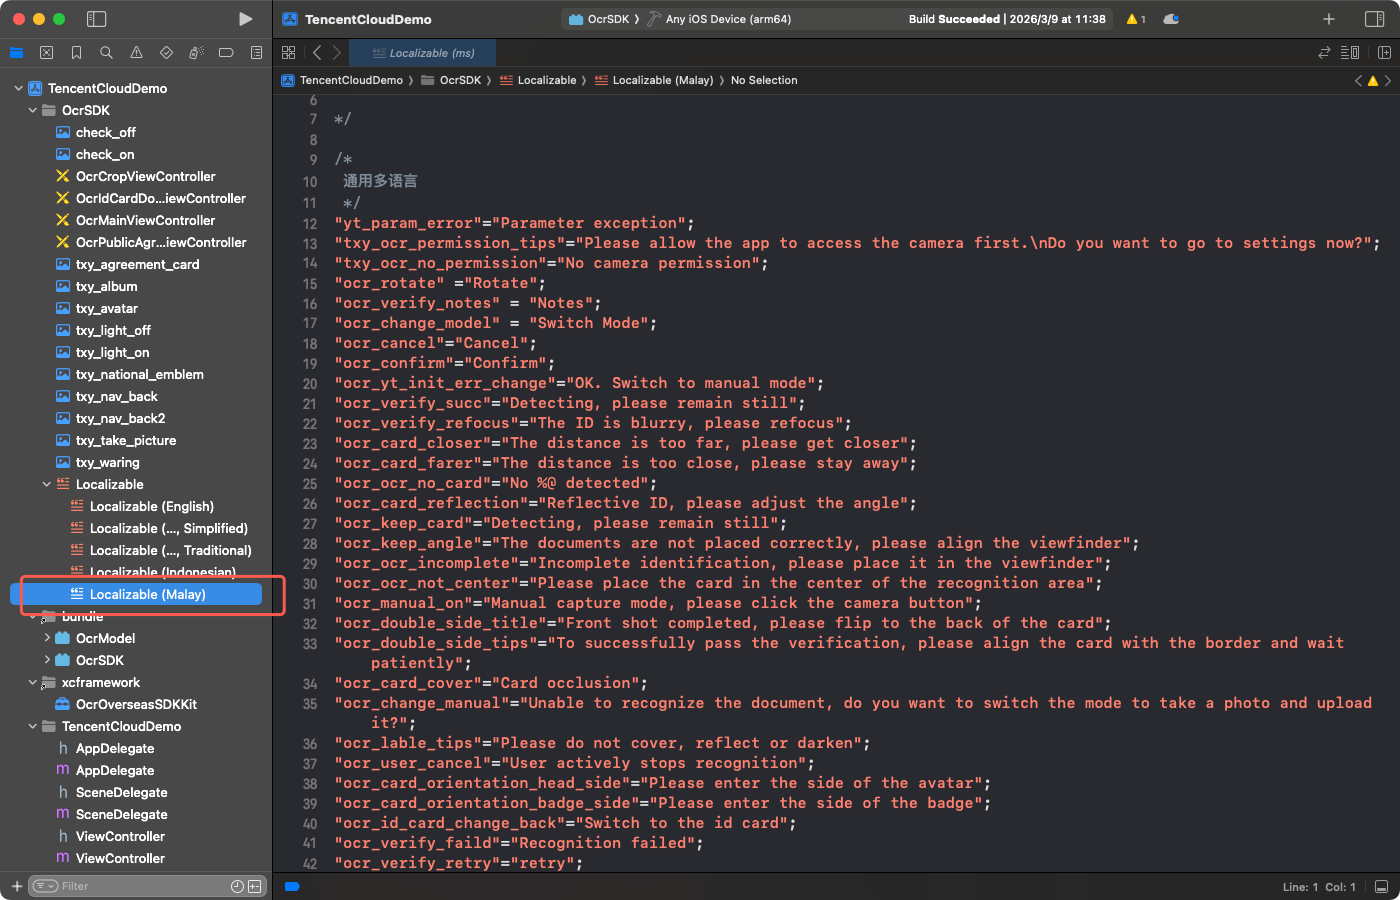
1. 在
OcrSDK 目录下会自动生成新的语言目录(如 ja.lproj/)2. 打开新生成的
Localizable.strings 文件(初始内容为英文)3. 将所有英文翻译替换为目标语言的翻译
1.3 编译多语言
1. Demo 工程中 Scheme 切换成
OcrSDK2. Command + B 进行编译,产物在 Products 目录下
3. 将 Products 目录下的产物替换掉旧版本 OcrSDK.bundle 文件
4. 如果新构建的 Bundle 中包含
Info.plist 文件,请删除它,避免影响 App Store 审核。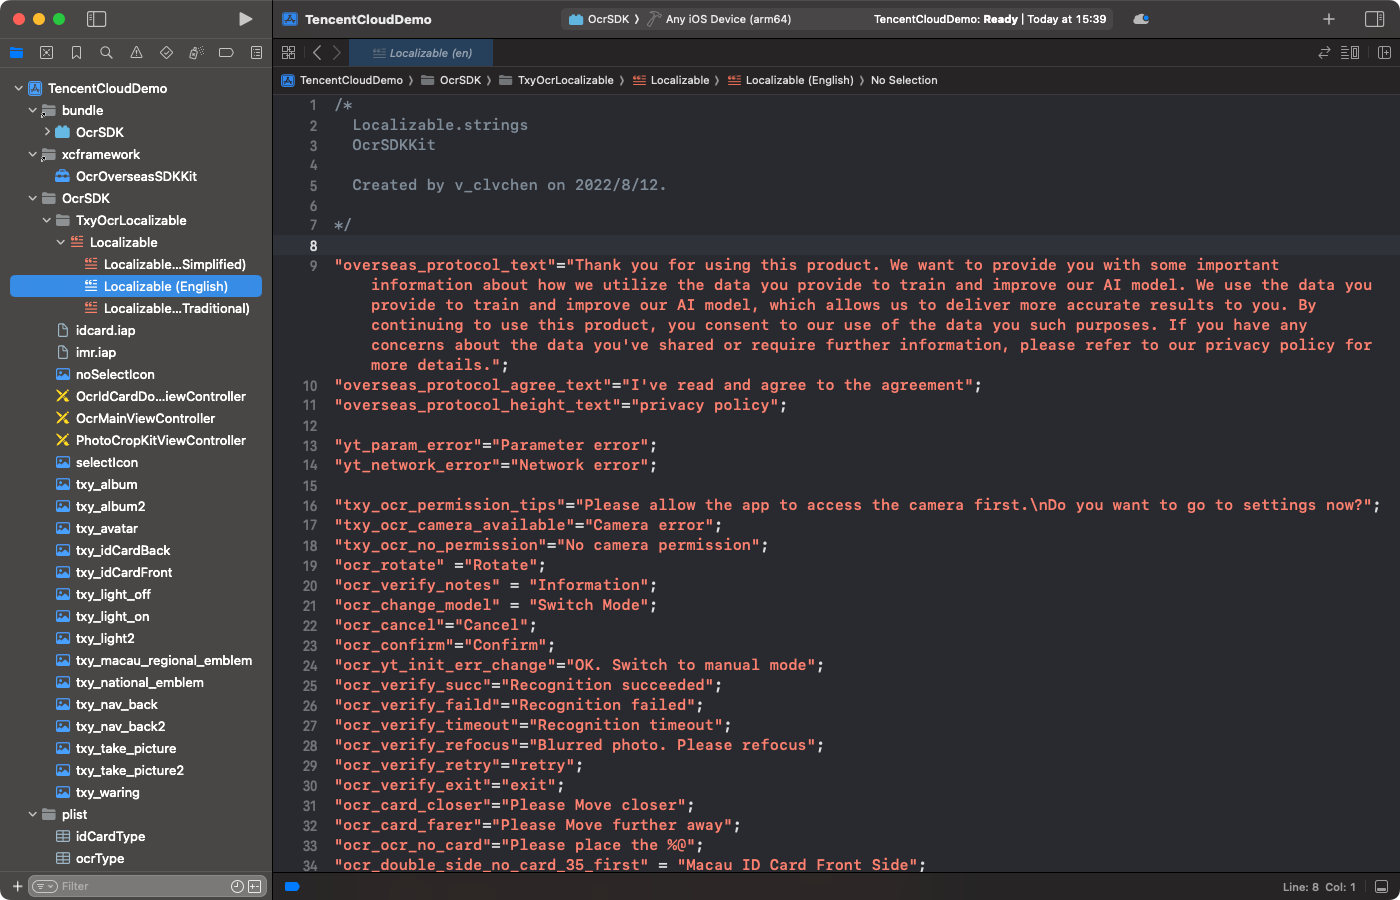
1.4 集成到项目
1. 将新编译的自定义
.bundle 文件(如 OcrSDK.bundle)拖拽到项目中2. 确保勾选 Copy items if needed 和正确的 Target Membership
3. 在初始化 SDK 时通过
CustomConfigUI 进行配置:OC 版本:
OcrOverseasCustomConfigUI *custom = [[OcrOverseasCustomConfigUI alloc] init];// 设置自定义多语言 bundle 路径custom.custLanguageBundlePath = [[NSBundle mainBundle] pathForResource:@"CustomOcrSDK" ofType:@"bundle"];// 指定使用的语言文件custom.custLanguageFile = @"zh-Hans.lproj";OcrCloudConfig *cloudConfig = [[OcrCloudConfig alloc] init];cloudConfig.customConfigUI = custom;
Swift 版本:
let custom = OcrOverseasCustomConfigUI()// 设置自定义多语言 bundle 路径custom.custLanguageBundlePath = Bundle.main.path(forResource: "CustomOcrSDK", ofType: "bundle")// 指定使用的语言文件custom.custLanguageFile = "en.lproj"let cloudConfig = OcrCloudConfig()cloudConfig.customConfigUI = custom
二、自定义 UI
2.1 自定义 Bundle(替换图标与 xib 布局)
打开 Demo 工程
Objective-C 版本:打开
demo/TencentCloudDemo/TencentCloudDemo.xcodeprojSwift 版本:打开
demo/OcrSwiftDemo/OcrSwiftDemo.xcodeproj构建步骤
1. 在 Xcode 的 Targets 列表中找到 OcrSDK 的 Bundle Target,按 Command + B 构建。

2. 构建完成后右键单击 bundle,选择显示包内容,删除整个 Info.plist 文件。否则上传 IPA 至 App Store 时会报错。
3. 将构建产物替换掉根目录 OcrSDK 目录下的 OcrSDK.bundle。(注:如果未修改 bundle 内容,可直接使用该目录下的原始 bundle,无需替换)
自定义内容
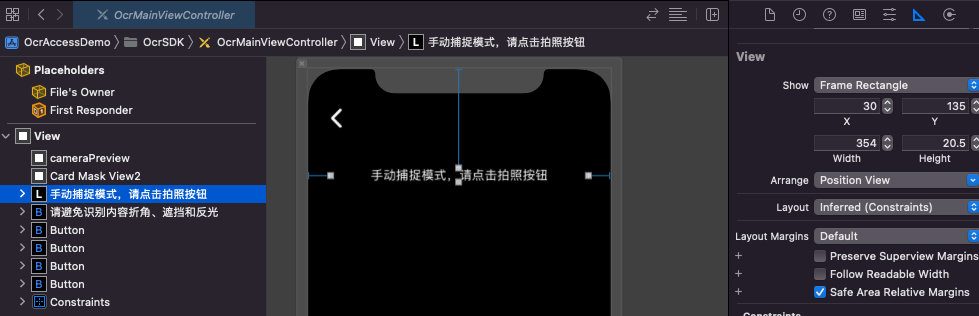
如 OcrMainViewController.xib 扫描页面,可修改 xib 内部分组件的布局、增加静态组件,但不允许删除组件。该页面逻辑由 SDK 内部 .m 文件完成,仅支持修改布局和增加无逻辑组件(如增加背景图)。
注意:
cameraPreview 与 CardMaskView 组件的 frame 均由 SDK 内部设置,不建议修改对应约束。若需要非全屏显示相机的效果,可通过添加 View 组件遮挡来实现。
集成自定义 Bundle
构建完成后,在初始化 SDK 时通过 OcrOverseasCustomConfigUI 传入路径:
Objective-C:
OcrOverseasCustomConfigUI *customUI = [[OcrOverseasCustomConfigUI alloc] init];// 设置自定义 UI bundle 路径customUI.custBundlePath = [[NSBundle mainBundle] pathForResource:@"CustOCR" ofType:@"bundle"];OcrCloudConfig *cloudConfig = [[OcrCloudConfig alloc] init];cloudConfig.customConfigUI = customUI;
Swift:
let customUI = OcrOverseasCustomConfigUI()// 设置自定义 UI bundle 路径customUI.custBundlePath = Bundle.main.path(forResource: "CustOCR", ofType: "bundle")let cloudConfig = OcrCloudConfig()cloudConfig.customConfigUI = customUI;
2.2 通过回调增加业务组件
OcrOverseasViewDelegate 是 SDK 与业务方进行 UI 交互的核心协议。所有方法均为 @optional,未实现时 SDK 使用默认行为。接入方式
Objective-C:
OcrOverseasCustomConfigUI *customUI = [[OcrOverseasCustomConfigUI alloc] init];customUI.delegate = self; // self 遵循 OcrOverseasViewDelegateOcrCloudConfig *cloudConfig = [[OcrCloudConfig alloc] init];cloudConfig.customConfigUI = customUI;
Swift:
let customUI = OcrOverseasCustomConfigUI()customUI.delegate = self // self 遵循 OcrOverseasViewDelegatelet cloudConfig = OcrCloudConfig()cloudConfig.customConfigUI = customUI
onMainViewCreate — 界面初始化回调
SDK 识别页面完成初始化后触发,
authView 为当前识别页面的根 View。可在此时向 authView 上添加自定义业务组件(如品牌 Logo、提示横幅等)。- (void)onMainViewCreate:(UIView *)authView;
使用示例:
- (void)onMainViewCreate:(UIView *)authView {// 在识别页右上角叠加 LogoUIImageView *logo = [[UIImageView alloc] initWithImage:[UIImage imageNamed:@"brand_logo"]];logo.translatesAutoresizingMaskIntoConstraints = NO;[authView addSubview:logo];[NSLayoutConstraint activateConstraints:@[[logo.topAnchor constraintEqualToAnchor:authView.safeAreaLayoutGuide.topAnchor constant:12],[logo.trailingAnchor constraintEqualToAnchor:authView.trailingAnchor constant:-16],[logo.widthAnchor constraintEqualToConstant:80],[logo.heightAnchor constraintEqualToConstant:30],]];}
onMainViewDestroy — 界面回收回调
SDK 识别页面即将被回收时触发。可在此清理在
onMainViewCreate 中添加的业务组件或释放相关资源。- (void)onMainViewDestroy;
使用示例:
- (void)onMainViewDestroy {NSLog(@"OCR 页面已关闭");// 清理自定义组件引用,释放资源}
onEventParamMap — 关键参数回调
SDK 在识别过程中会通过此回调实时传出关键运行参数,用于业务方更新自定义 UI 状态。
- (void)onEventParamMap:(NSDictionary *)paramMap;
paramMap 中包含的 Key:
Key 常量 | 类型 | 说明 |
TXYOcrSdkEventParamMapCenterMarkRect | NSString(CGRect 的字符串形式) | 当前取景框在屏幕中的位置和尺寸(CGRect),可用于对齐自定义组件 |
TXYOcrSdkEventTimeoutStatus | NSString | 倒计时状态: "start"(开始倒计时)、"stop"(倒计时暂停)、"end"(超时) |
TXYOcrSdkEventSwitchToManualMode | 任意非 nil 值 | 已切换至手动拍摄模式 |
使用示例:
- (void)onEventParamMap:(NSDictionary *)paramMap {// 获取取景框位置,用于对齐自定义提示组件NSString *rectStr = paramMap[TXYOcrSdkEventParamMapCenterMarkRect];if (rectStr) {CGRect markRect = CGRectFromString(rectStr);// 将自定义组件定位到取景框正下方self.hintLabel.frame = CGRectMake(markRect.origin.x,CGRectGetMaxY(markRect) + 12,markRect.size.width,30);}// 监听倒计时状态NSString *timeoutStatus = paramMap[TXYOcrSdkEventTimeoutStatus];if ([timeoutStatus isEqualToString:@"start"]) {NSLog(@"开始倒计时");} else if ([timeoutStatus isEqualToString:@"end"]) {NSLog(@"倒计时超时");}}
onShowBestFrameConfirmDialog — 自定义最佳帧确认弹窗
自动模式识别到最佳帧后,SDK 会调用此方法。返回
YES 时 SDK 不展示默认确认弹窗,由业务方自行实现。- (BOOL)onShowBestFrameConfirmDialog:(NSDictionary *)infoimageView:(UIImageView *)imageViewparentView:(UIView *)parentViewconfirmBlock:(void(^)(void))confirmBlockcancelBlock:(void(^)(void))cancelBlock;
注意:
需将
OcrOverseasCustomConfigUI.showBestImgConfirmDialog = YES,此回调才会触发。
参数说明:
参数 | 说明 |
info[OcrDialogInfoKeyTitle] | 弹窗标题文案(已按语言设置本地化) |
info[OcrDialogInfoKeyMessage] | 弹窗描述文案 |
imageView | 包含最佳帧图片的 UIImageView,可直接添加到自定义弹窗中展示 |
parentView | 当前识别页面的根 View,将自定义弹窗添加到此 View 上 |
confirmBlock | 用户确认后必须调用,SDK 将继续上传流程 |
cancelBlock | 用户取消后必须调用,SDK 将重新采集 |
使用示例:
- (BOOL)onShowBestFrameConfirmDialog:(NSDictionary *)infoimageView:(UIImageView *)imageViewparentView:(UIView *)parentViewconfirmBlock:(void(^)(void))confirmBlockcancelBlock:(void(^)(void))cancelBlock {// 构建自定义弹窗UIAlertController *alert = [UIAlertControlleralertControllerWithTitle:info[OcrDialogInfoKeyTitle]message:info[OcrDialogInfoKeyMessage]preferredStyle:UIAlertControllerStyleAlert];[alert addAction:[UIAlertAction actionWithTitle:@"Use This Photo"style:UIAlertActionStyleDefaulthandler:^(UIAlertAction *_) {if (confirmBlock) confirmBlock(); // 必须调用}]];[alert addAction:[UIAlertAction actionWithTitle:@"Retake"style:UIAlertActionStyleCancelhandler:^(UIAlertAction *_) {if (cancelBlock) cancelBlock(); // 必须调用}]];// 找到当前最顶层 ViewController 进行 presentUIViewController *topVC = [self topViewController];[topVC presentViewController:alert animated:YES completion:nil];return YES; // 返回 YES,SDK 不展示默认弹窗}
onShowNextSideDialog — 自定义翻面提示弹窗
双面证件识别完成一面后,SDK 调用此方法提示用户翻面。返回
YES 时由业务方展示自定义弹窗。- (BOOL)onShowNextSideDialog:(NSDictionary *)infoparentView:(UIView *)parentViewconfirmBlock:(void(^)(void))confirmBlock;
参数说明:
参数 | 说明 |
info[OcrDialogInfoKeyTitle] | 弹窗标题 |
info[OcrDialogInfoKeyMessage] | 弹窗描述 |
parentView | 当前识别页面的根 View |
confirmBlock | 用户点击确认后必须调用,SDK 继续翻面识别流程 |
使用示例:
- (BOOL)onShowNextSideDialog:(NSDictionary *)infoparentView:(UIView *)parentViewconfirmBlock:(void(^)(void))confirmBlock {UIAlertController *alert = [UIAlertControlleralertControllerWithTitle:info[OcrDialogInfoKeyTitle]message:info[OcrDialogInfoKeyMessage]preferredStyle:UIAlertControllerStyleAlert];[alert addAction:[UIAlertAction actionWithTitle:@"OK"style:UIAlertActionStyleDefaulthandler:^(UIAlertAction *_) {if (confirmBlock) confirmBlock(); // 必须调用}]];[[self topViewController] presentViewController:alert animated:YES completion:nil];return YES;}
onShowChangeModeDialog — 自定义切换手动模式弹窗
自动模式(
OCR_DETECT_AUTO_MANUAL)倒计时超时后,SDK 调用此方法询问用户是否切换为手动拍摄模式。返回 YES 时由业务方展示自定义弹窗。- (BOOL)onShowChangeModeDialog:(NSDictionary *)infoparentView:(UIView *)parentViewconfirmBlock:(void(^)(void))confirmBlockcancelBlock:(void(^)(void))cancelBlock;
参数说明:
参数 | 说明 |
confirmBlock | 用户点击"切换手动"后调用,SDK 进入手动拍摄模式 |
cancelBlock | 用户点击"继续等待"后调用,SDK 重启倒计时 |
使用示例:
- (BOOL)onShowChangeModeDialog:(NSDictionary *)infoparentView:(UIView *)parentViewconfirmBlock:(void(^)(void))confirmBlockcancelBlock:(void(^)(void))cancelBlock {UIAlertController *alert = [UIAlertControlleralertControllerWithTitle:info[OcrDialogInfoKeyTitle]message:info[OcrDialogInfoKeyMessage]preferredStyle:UIAlertControllerStyleAlert];[alert addAction:[UIAlertAction actionWithTitle:@"Switch to Manual"style:UIAlertActionStyleDefaulthandler:^(UIAlertAction *_) {if (confirmBlock) confirmBlock();}]];[alert addAction:[UIAlertAction actionWithTitle:@"Keep Waiting"style:UIAlertActionStyleCancelhandler:^(UIAlertAction *_) {if (cancelBlock) cancelBlock();}]];[[self topViewController] presentViewController:alert animated:YES completion:nil];return YES;}
onShowCloudErrorDialog — 自定义识别失败弹窗
云端识别失败时 SDK 调用此方法。返回
YES 时由业务方展示自定义错误弹窗。- (BOOL)onShowCloudErrorDialog:(NSDictionary *)infoparentView:(UIView *)parentViewretryBlock:(void(^_Nullable)(void))retryBlockexitBlock:(void(^)(void))exitBlock;
参数说明:
参数 | 说明 |
info[OcrDialogInfoKeyTitle] | 错误弹窗标题 |
info[OcrDialogInfoKeyMessage] | 错误描述(已按错误码本地化) |
info[OcrDialogInfoKeyErrorCode] | 服务端错误码(NSNumber,如 @(400101)) |
retryBlock | 用户点击"重试"后调用。为 nil 时表示此次错误不可重试,弹窗中不应显示重试按钮 |
exitBlock | 用户点击"退出"后调用,SDK 将触发失败回调,必须调用其中一个 |
使用示例:
- (BOOL)onShowCloudErrorDialog:(NSDictionary *)infoparentView:(UIView *)parentViewretryBlock:(void(^_Nullable)(void))retryBlockexitBlock:(void(^)(void))exitBlock {NSString *title = info[OcrDialogInfoKeyTitle] ?: @"Recognition Failed";NSString *message = info[OcrDialogInfoKeyMessage] ?: @"Please try again.";UIAlertController *alert = [UIAlertControlleralertControllerWithTitle:titlemessage:messagepreferredStyle:UIAlertControllerStyleAlert];// 仅在可重试时显示重试按钮if (retryBlock) {[alert addAction:[UIAlertAction actionWithTitle:@"Retry"style:UIAlertActionStyleDefaulthandler:^(UIAlertAction *_) {retryBlock();}]];}[alert addAction:[UIAlertAction actionWithTitle:@"Exit"style:UIAlertActionStyleCancelhandler:^(UIAlertAction *_) {exitBlock(); // 必须调用}]];[[self topViewController] presentViewController:alert animated:YES completion:nil];return YES;}
onShowCameraPermissionDialog — 自定义无相机权限弹窗
检测到相机权限未授权时 SDK 调用此方法。返回
YES 时由业务方展示自定义权限引导弹窗。- (BOOL)onShowCameraPermissionDialog:(NSDictionary *)infoparentView:(UIView *)parentViewsettingsBlock:(void(^)(void))settingsBlockcancelBlock:(void(^)(void))cancelBlock;
参数说明:
参数 | 说明 |
settingsBlock | 用户点击"前往设置"后调用,SDK 将自动跳转至系统设置页 |
cancelBlock | 用户点击"取消/不授权"后调用,SDK 触发失败回调( TXY_SDK_CAMERA_PERMISSION_ERROR_CODE) |
使用示例:
- (BOOL)onShowCameraPermissionDialog:(NSDictionary *)infoparentView:(UIView *)parentViewsettingsBlock:(void(^)(void))settingsBlockcancelBlock:(void(^)(void))cancelBlock {UIAlertController *alert = [UIAlertControlleralertControllerWithTitle:@"Camera Permission Required"message:@"Please allow camera access in Settings to continue."preferredStyle:UIAlertControllerStyleAlert];[alert addAction:[UIAlertAction actionWithTitle:@"Go to Settings"style:UIAlertActionStyleDefaulthandler:^(UIAlertAction *_) {settingsBlock(); // SDK 自动跳转设置}]];[alert addAction:[UIAlertAction actionWithTitle:@"Cancel"style:UIAlertActionStyleCancelhandler:^(UIAlertAction *_) {cancelBlock();}]];[[self topViewController] presentViewController:alert animated:YES completion:nil];return YES;}
onShowLoading / onHideLoading — 自定义 Loading
SDK 在提交识别请求或打开相册时会调用
onShowLoading,请求结束后调用 onHideLoading。返回 YES 时 SDK 不展示内置 Loading,由业务方完全控制 Loading UI。- (BOOL)onShowLoading:(NSDictionary *)info parentView:(UIView *)parentView;- (BOOL)onHideLoading:(UIView *)parentView;
info 中包含的 Key:
Key 常量 | 值 | 说明 |
OcrDialogInfoKeyLoadingType | OcrLoadingTypeOcrProcessing("loadingTypeOcrProcessing") | OCR 识别请求处理中 |
OcrDialogInfoKeyLoadingType | OcrLoadingTypeImagePicking("loadingTypeImagePicking") | 打开相册选图中 |
注意:配对原则:
onShowLoading 和 onHideLoading 必须配对实现。若 onShowLoading 返回 YES 但 onHideLoading 返回 NO,SDK 内部 HUD 隐藏逻辑将不会执行,可能导致 Loading 残留使用示例:
- (BOOL)onShowLoading:(NSDictionary *)info parentView:(UIView *)parentView {// 移除旧 Loading(防止重复添加)[[parentView viewWithTag:9527] removeFromSuperview];UIView *container = [[UIView alloc] initWithFrame:parentView.bounds];container.tag = 9527;container.backgroundColor = [UIColor colorWithWhite:0 alpha:0.4];container.autoresizingMask = UIViewAutoresizingFlexibleWidth | UIViewAutoresizingFlexibleHeight;UIActivityIndicatorView *indicator;if (@available(iOS 13.0, *)) {indicator = [[UIActivityIndicatorView alloc] initWithActivityIndicatorStyle:UIActivityIndicatorViewStyleLarge];} else {indicator = [[UIActivityIndicatorView alloc] initWithActivityIndicatorStyle:UIActivityIndicatorViewStyleWhiteLarge];}indicator.center = container.center;indicator.autoresizingMask = UIViewAutoresizingFlexibleTopMargin | UIViewAutoresizingFlexibleBottomMargin| UIViewAutoresizingFlexibleLeftMargin | UIViewAutoresizingFlexibleRightMargin;[container addSubview:indicator];[indicator startAnimating];[parentView addSubview:container];return YES;}- (BOOL)onHideLoading:(UIView *)parentView {UIView *loading = [parentView viewWithTag:9527];[loading removeFromSuperview];return loading != nil; // 有 Loading 才返回 YES}
2.3 注意事项
1. Block 必须调用:
confirmBlock、cancelBlock、exitBlock、settingsBlock 等 Block 在用户交互完成后必须调用其中一个,否则 SDK 流程将无法继续,识别页面将永久卡住。2. 返回值语义:
返回
YES:业务方接管该 UI,SDK 不展示默认实现。返回
NO(或不实现该方法):SDK 使用内置默认 UI。3. UI 操作线程:所有回调均在主线程触发,可直接操作 UI,无需切换线程。
4. parentView 生命周期:
parentView 是 SDK 识别页面的 View,在 onMainViewDestroy 后即被回收,请勿在回调外部长期持有。
文档反馈