You can create and attach elastic cloud disks to use them as data disks when the disk space on your CVM is insufficient.
You can purchase and attach elastic cloud disks to use them as data disks when you purchase a CVM without additional data disks.
When you have 10 GB of important data stored in an elastic cloud disk on CVM A and need to share the data with CVM B. You can directly detach the disk from CVM A, and then attach it to CVM B.
When a single maximum-sized cloud disk cannot meet your storage requirements, you can purchase multiple cloud disks with equal capacity and configure LVM logical volumes to provide a larger disk capacity.
When I/O performance of a single disk cannot meet your business requirements, you can purchase multiple cloud disks and configure RAID 0, RIAD 10, etc., to enhance I/O performance.
Determine your use cases before selecting a disk type.
For general use cases including Web/APP applications, logical processing, and small and medium sites, we recommend that you select Premium Cloud Disk for a higher cost efficiency.
For medium-sized databases and image processing users, we recommend SSD for a better performance.
For use cases with high requirements for workloads and performance, including large databases, video business, NoSQL, and Elasticsearch, we recommend that you select Enhanced SSD for optimal performance and minimum storage latency.
What are items I should look out for when using a cloud disk?
For an independently purchased cloud disk, use the file system's UUID or label as the file system ID when configuring the fstab static file system information. This will ensure kernel name consistency of the disk on CVM when any cloud disk is detached and re-attached.
If the cloud disk expires before CVM, the cloud disk will be restricted, detached, or even repossessed within a certain period. To prevent business interruption, please note the cloud disk's expiration date and renew it promptly.
Consider using the nofail option when configuring fstab if detaching a cloud disk from your CVM does not severely impact your core business. This prevents the CVM from reporting an error when it restarts after the cloud disk is detached.
We recommend that you run san policy=OnlineAll in diskpart before using the cloud disk in Windows.
When detaching a cloud disk from Windows, we recommend that you first interrupt all read/write operations on the disk, and perform the offline operation.
If a custom image and a data disk snapshot is used, how do I automatically attach the data disk when starting a new instance?
For more information, see the "Automatic Attaching" section in Attaching Cloud Disks.
How do I purchase a cloud disk?
You can purchase a cloud disk by creating one via the console or an API. For more information, see Creating Cloud Disks.
2. At the top of the Cloud Block Storage page, select the region where the disk you want to view resides.
3. Locate the disk in the list, and view disk information.
To view more information, click the ID/Name of the disk to enter the details page.
How do I view the cloud disk usage on the console?
Cloud Monitor will automatically be enabled once a CVM instance is created. You can view the usage of an initialized cloud disk that is attached to CVMs by following the steps below:
1. Log in to the CVM console and access the Instances page.
2. Select the ID/Name of the target instance to access the details page.
3. Click on the Monitoring tab to view the instance disk usage.
Why can't I locate the CVM to which I want to attach a cloud disk?
Cloud disks cannot be attached across availability zones. Ensure that the CVM instance you want to use has not been released and that it is in the same region and availability zone as your cloud disk.
Why am I unable to view the new cloud disk capacity that I attached to a CVM instance?
Some Linux CVMs may not recognize an elastic cloud disk. You must first enable the disk hot swapping function in the CVM. For more information, see Enabling the disk hot swapping feature.
After manually attaching a cloud disk, you must perform subsequent operations shown below to make it usable.
What is the relationship between data writing and partition formatting?
A new data disk or data disk partition must be formatted before use. The disk should also be recorded with the data structure. Formatting the disk establishes a file system on the data disk for data writing. The write-in data size varies by the file systems:
Windows
Linux
Quick formatting: Assign the file system only to partitions and rewrites the directory table with little use of your disk capacity.
Standard formatting: In addition to the quick formatting tasks, normal formatting scans the partitions sector by sector to identify and mark bad sectors, and fills empty blocks in the cloud disk, which means it essentially writes data to the entire disk. Hence, the capacity of the first snapshot approximates that of the cloud disk.
After the cloud disk is formatted and before the instance is written with data, the capacity of the first snapshot depends on the format of the disk file system.
Can the data disk capacity and the system disk capacity be aggregated?
After expanding my cloud disk, do I need to unmount existing partitions when creating a new independent partition on Linux?
Yes. To do this, please follow the steps below:
1. Run the following command to detach the data disk.
umount<Mount point>
If the mount point is /data, then run the following command:
umount /data
2. Unmount the file systems from all partitions on the cloud disk, and perform the subsequent operations. You can run the command again to confirm that the unmounting operation is successful.
mount|grep'<Disk path>'
If the return is null, then all file systems have been unmounted from partitions on the cloud disk.
Can multiple CVMs access a cloud disk?
No. You can attach up to 20 cloud disks to the same CVM, but you cannot attach one cloud disk to multiple CVMs. To share data in the disk, you can detach the data disk from the original CVM and then attach it to the new CVM.
The cloud disks attached to the CVM is of the same size and type. How can I distinguish them?
Linux
Windows
Check the relationship between the elastic cloud disks and the device name by running the following command:
ls -l /dev/disk/by-id
Check the relationship between the elastic cloud disks and the device name by running the following command:
wmic diskdrive get caption,deviceid,serialnumber
Or
wmic path win32_physicalmedia get SerialNumber,Tag
Can I change a CVM system disk from a local disk to a cloud disk?
Can I detach the data disk that purchased together with the CVM?
Yes. You can detach the data disk and attach it to another CVM. In this case, the expiration time of the data disk and CVM may be different, which can bring in difficulties in lifecycle management. You can enable Unified Expiration Time or Auto-renewal to solve the problem.
I purchased a cloud disk independently to the CVM. But when I terminate the CVM, the cloud disk is released as well.
Check whether Release with instance is enabled for the cloud disk. You can disable this feature in the CBS console or by using the ModifyDiskAttributes API.
What should I do if I lost my data after restarting my Linux instance?
Follow the steps below if you lost all data in a directory (such as /data) after restart due to unmount data disk partitions:
1. Run the fdisk -l command to view the unmounted partitions.
2. Run the mount /dev/vdb /data command to mount partitions.
3. Run the df -h command to see if they are mounted successfully.
4. Complete your automatic mounting configurations. Then cloud disk will be automatically mounted when you start the Linux instance.
When I unmount a cloud disk, will its data be lost?
Data in cloud disks will not be modified during mounting or unmounting. To ensure data consistency, we strongly recommend that you follow the steps below:
In Linux, log in to the CVM instance and run the umount command on the cloud disk. After the command is executed, log in to the CVM console to unmount the cloud disk.
In Windows, stop all read and write operations on all file systems of the cloud disk before unmounting. Otherwise, the data that has not finished being read or written will be lost.
What happens to the system after my cloud disk expires?
The following instructions are only applicable to elastic cloud disks. The lifecycle of non-elastic cloud disks is the same as the associated CVMs. For more information, see Payment Overdue.
Monthly subscription
Pay-as-you-go
7 days before the resources expiration date, you will receive an expiration alert and a renewal reminder.
If your account balance is sufficient and auto-renewal is enabled, cloud disk will be auto-renewed on the expiry date.
If your cloud disk is not renewed before it expires (including on the expiration date), the system will begin to limit its performance at the point in time of its expiration. When using the cloud disk, you will notice a significant decrease in performance.
If your cloud disk is not renewed within 24 × 7 hours after it expires, the system will suspend its service processing (the cloud disk is unavailable, and can only store data), force release its relationship with the CVM (if any), and the cloud disk will be sent to the recycle bin. You can still retrieve the cloud disk from the recycle bin and renew it, but the start time of the cloud disk that has been renewed and retrieved will be the previous period's expiration date.
If your cloud disk is not renewed within 24 × 7 hours after it’s moved to the recycle bin, resources will be released and data in the expired cloud disk will be erased and cannot be recovered.
You can continue to use the pay-as-you-go cloud disk for 2 hours from the moment your account balance becomes negative. You will be billed for this period. After 2 hours, the services will be suspended and cloud disk will only store data. Until data is completely deleted, you will still be billed according to the billing standard even if the account balance is negative.
If your Tencent Cloud account is topped up to a positive balance within 15 days after the cloud disk has its services suspended, the disk can be restored.
If the account balance remains negative for more than 15 days after the cloud disk services are suspended, the pay-as-you-go disk will be repossessed. All data will be erased and cannot be recovered. When your cloud disk is repossessed, the Tencent Cloud account creator and all collaborators will receive a notification via email, SMS, and the console Message Center.
Please call 4009100100 if you need further information.
Can I change the cloud disk type after a successful purchase?
No. However, you can create a snapshot for data backup and then use the snapshot to create a cloud disk of your needed type.
Can I adjust the cloud disk capacity after a successful purchase?
Yes. Cloud disks support capacity adjustment. Cloud disk capacity can be expanded, but not reduced.
Do I have to shut down the CVM instance before a cloud disk expansion?
MBR partition supports disk with a maximum capacity of 2 TB. When you partition disk with a capacity greater than 2 TB, we recommend that you create and mount a new data disk and use the GPT partition format to copy data.
Why does the capacity seem unchanged after I expanded my data disk?
The expansion on the console only increases the storage capacity of the data disk. You also need to log in to your CVM instance and extend the partitions and file systems. For more information, see:
If the system disk of the CVM is a cloud disk, you can adjust its CPU and memory.
What should I do if the cloud disk is partitioned in MBR format and cannot be expanded?
MBR partition supports a disk with a maximum capacity of 2 TB. If you need to extend for over 2 TB, it’s recommended to create and attach a new data disk and use the GPT partition format.
What should I do if a cloud disk cannot meet my business requirements even at its maximum capacity?
What happens to the data when a CVM is terminated?
The lifecycle of a system disk is the same as that of the CVM. When the CVM is terminated, the data stored in the system disk will also be terminated.
The lifecycle of a data disk (that is, an elastic cloud disk) is independent from that of a CVM. You can decide if an elastic cloud disk and its data will be retained after a CVM expires.
Therefore, we recommend that you use elastic cloud disks to store data that needs to be saved for a long term.
How can cloud disks be recovered after being formatted?
Cloud disks cannot be recovered after being formatted. We recommend that you create a snapshot before formatting.
How do I delete a cloud disk?
The lifecycle of a system disk is the same as the CVM. It can only be deleted when the CVM instance is terminated.
The lifecycle of a data disk (that is, an elastic cloud disk) is independent from that of the CVM. It can be deleted separately. For more information, see Terminating cloud disks.
Can my system disk be partitioned?
Yes, but we recommend you not partition a system disk.
If you partition the system disk with a third-party tool, system crash or data loss may occur. You can perform partitioning after expanding the system disk capacity. For detailed directions, see Extending System Disk Partitions and File Systems Online.
How do I update the mounting information at the mount point?
LinuxOS supports the systemd mount command which will generate a mounting configuration file on top of the existing .mount file. Mounting to the same directory /run/systemd/generator/ will be affected by this command.
Problem
Assume you have mounted the data disk vdb to the directory /opt/apps (run the mount -a command on the fstab file based on disk uuid). Now, you want to mount a new data disk vdc to the same directory and replace the old one. If you directly mount vdc to the directory, you will not be able to read the data.
Solution
1. Delete the configuration of the corresponding mount point (for example, run the rm /run/systemd/generator/opt-apps.mount command).
2. Run the reload command (for example, use systemctl daemon-reload).
3. Attach the data disk (for example, run the mount /dev/vdc /opt/apps command).
How do I perform 4 KiB alignment for a cloud disk in a Linux instance?
Checking whether the cloud disk is 4 KiB-aligned.
Run the following command to check whether the cloud disk is 4 KiB-aligned.
fdisk -lu
As shown below, if the Start value in the command output is divisible by 8, then the disk is 4 KiB-aligned.
Directions
Note:
The alignment operation clears the existing data of the cloud disk; therefore, create a snapshot before proceeding to avoid data loss.
fdisk tool (MBR partition supported)
parted tool (GPT partition supported)
1. Run the following command to access the fdisk tool.
fdisk /dev/vdb
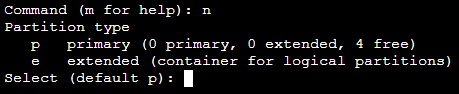
2. Enter n and press Enter to start creating a partition as shown below:
The displayed information indicates that the disk has two partition types:
p: Primary partition.
e: Extended partition.
3. Take creating a primary partition as an example. Enter p and press Enter to start creating a primary partition.
Partition number in the displayed information indicates the number of the primary partition as shown below. Valid range: 1-4.
4. Take selecting partition number 1 as an example. Enter the primary partition number 1 and press Enter.
First sector in the displayed information indicates the start sector. Valid range: 2048 (default value) - 125829119.
5. Take selecting the default start sector number 2048 as an example. Press Enter.
Last sector in the displayed information indicates the end sector. Valid range: 2048 - 20971519 (default value).
6. Take selecting the default end sector number 20971519 as an example. Press Enter.
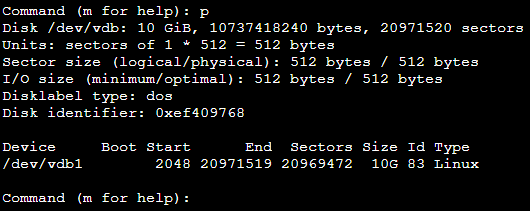
7. Enter p and press Enter to view the details of the newly created partition. If the following is displayed, 4 KiB alignment is completed.
8. Enter w and press Enter to write the partition result into the partition table.
1. Run the following command to access the parted tool:
parted /dev/vdb
2. Run the following command to set the disk partition format to GPT.
mklabel gpt
3. Enter unit s and press Enter to set the unit of the disk to sector.
4. Take creating one partition for the entire disk as an example, enter mkpart opt 2048s 100% and press Enter.
Where, 2048s indicates the initial disk capacity and 100% indicates the final disk capacity. This is for reference only. You can choose the number of disk partitions and their capacities based on business needs.
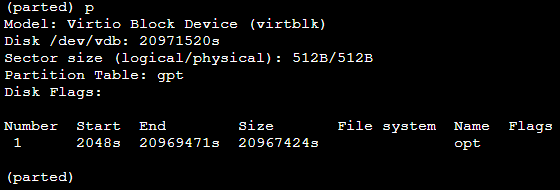
5. Enter p and press Enter to check whether the disk partition format has been configured successfully. If the following is displayed, 4 KiB alignment is completed.
6. Enter q and press Enter to exit the parted partition tool.


 Yes
Yes
 No
No
Was this page helpful?