TUIRoomKit is a multiperson audio/video UI component library launched by Tencent Cloud. It offers a rich array of features such as room management, audio and video control, screen sharing, member management, microphone position management, instant messaging, and custom layout switching, among others. It also supports switching between Chinese and English, and one-click skin changing capabilities.
This article introduces the access guidance for TUIRoomKit (Electron) to help you quickly launch business scenarios such as corporate meetings, online education, medical consultations, online patrols, and remote loss assessment.
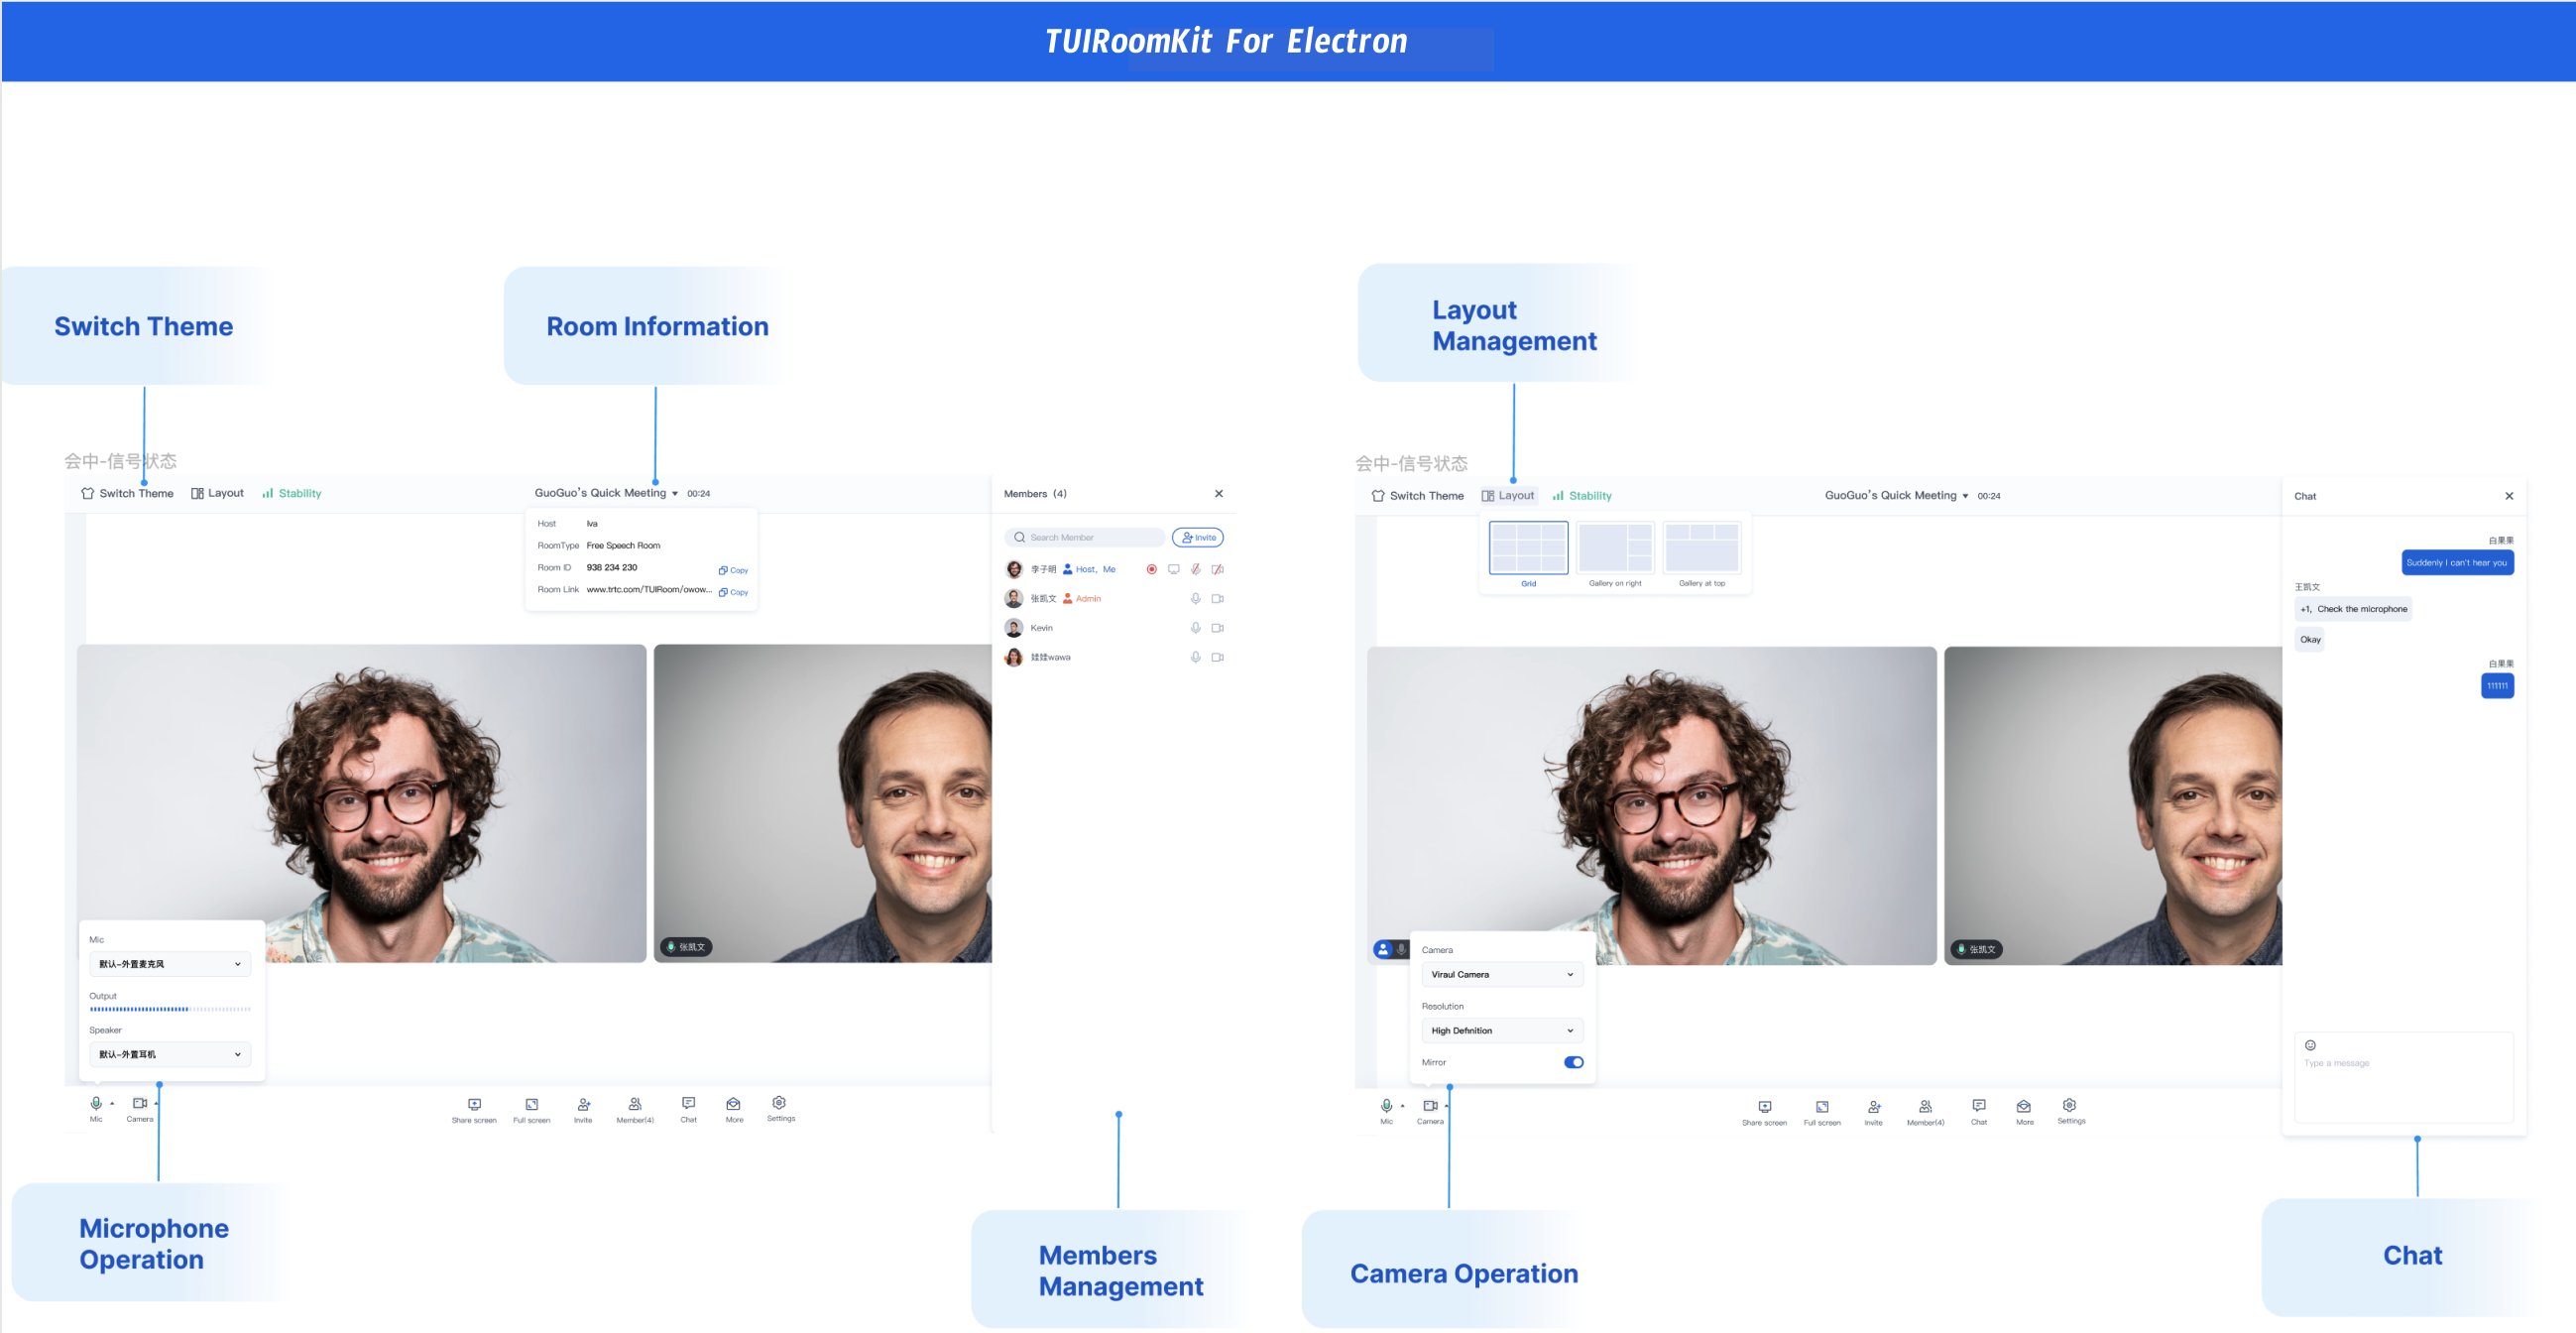
TUIRoomKit Demo Experience
You can click Mac OS Version and Windows Version to download and experience more features of TUIRoomKit Electron.
You can click GitHub to download the TUIRoomKit code, and refer to the README.md document in the code repository to run through the TUIRoomKit Electron sample project.
Environment preparations
Node.js version: Node.js ≥ 16.19.1 (Using the official LTS version is recommended; please ensure the npm version matches the node version).
If you don't have a Vue project, you can go to GitHub to download the TUIRoomKit code, and refer to the code repository's README.md to run the TUIRoomKit Electron sample project.
If you need to integrate it into an existing project, please follow the steps below.
Register Pinia: TUIRoom uses Pinia for room data management, so you need to register Pinia in the entry file of the project. The entry file is the src/main.ts file.
Vue3
Vue2
// src/main.ts file
import{ createPinia }from'pinia';
const app =createApp(App);
// Register pinia
app.use(createPinia());
app.mount('#app')
// src/main.ts file
import{ createPinia, PiniaVuePlugin }from'pinia';
Vue.use(PiniaVuePlugin);
const pinia =createPinia();
newVue({
pinia,
render:h=>h(App),
}).$mount('#app');
Configure vite.config.ts: To unify code style and import trtc-electron-sdk through import in the UI layer (otherwise, it must be imported via require), you need to configure in packages/renderer/vite.config.ts. Please replace the content in resolve with the following configuration items, refer to the file packages/renderer/vite.config.ts for details.
Introduce the ConferenceMainView component, which is defaulted to Permanent Mode (the component is always displayed, its visibility is not controlled internally. Without business side control, the component will remain visible).
// For access to sdkAppId, you can refer to the service opening section of the document, https://write.woa.com/document/139678220708134912#d9d2b8d1-f19f-441b-a436-457748c94997
sdkAppId:0,
// Unique Identification ID of users in your business
userId:'',
// For local development and debugging, you can quickly generate a userSig on the https://console.tencentcloud.com/trtc/usersigtool page. Note that there is a one-to-one correspondence between userSig and userId
userSig:'',
});
Parameter Description
Here is a detailed introduction to several key parameters required in the login function:
userId: The ID of the current user, a string type, can only contain letters (a-z and A-Z), digits (0-9), hyphens (-), and underscores (_).
userSig: By encrypting the information such as SDKSecretKey obtained in Activating Service, SDKAppID, UserID, etc., one can generate UserSig, which is an authentication ticket used by Tencent Cloud to recognize if the current user is eligible to use TRTC services. A temporary UserSig can be generated through the Auxiliary Tools in the console.
This step has received the most feedback from developers, with common issues as follows:
sdkAppId is set incorrectly. For domestic sites, the SDKAppID usually starts with 140 and is a 10-digit integer.
UserSig is mistakenly configured as the encryption key (SecretKey). UserSig is derived from encrypting information like SDKAppID, UserID, and expiration time with the SecretKey, rather than directly setting the SecretKey as UserSig.
userId is set to simple strings like "1", "123", "111". Since TRTC does not support multiple logins with the same UserID, in a collaborative development scenario, UserIDs such as "1", "123", "111" can easily be taken by your colleagues, leading to login failures. Therefore, we recommend using more unique UserIDs during testing.
GitHub sample code uses the genTestUserSig function to compute UserSig locally to expedite the integration process. However, this approach exposes your SecretKey in the code, which is not secure for future upgrades and protecting your SecretKey. Therefore, we strongly suggest moving the UserSig computation logic to the server-side and requesting a realtime computed UserSig from your server each time you use the TUIRoomKit component.
Step Five: Launch a New Meeting
The meeting host can initiate a new meeting by invoking the start interface. Other participants can refer to the description in Step Six and join the meeting by calling the join interface.
// Note the package name. If you are using the vue2 version, please change the package name to @tencentcloud/roomkit-web-vue2.7
// For access to sdkAppId, you can refer to the service opening section of the document, https://write.woa.com/document/139678220708134912#d9d2b8d1-f19f-441b-a436-457748c94997
sdkAppId:0,
// Unique Identification ID of users in your business
userId:'',
// For local development and debugging, you can quickly generate a userSig on the https://console.tencentcloud.com/trtc/usersigtool page. Note that there is a one-to-one correspondence between userSig and userId
userSig:'',
});
await conference.start('123456',{
roomName:'TestRoom',
isSeatEnabled:false,
isOpenCamera:false,
isOpenMicrophone:false,
});
}
startConference()
Step Six: Enter an Existing Meeting
Participants can join a meeting initiated by the host in Step Five by invoking the join interface and filling in the corresponding roomId parameter.
// Note the package name. If you are using the vue2 version, please change the package name to @tencentcloud/roomkit-web-vue2.7
// For access to sdkAppId, you can refer to the service opening section of the document, https://write.woa.com/document/139678220708134912#d9d2b8d1-f19f-441b-a436-457748c94997
sdkAppId:0,
// Unique Identification ID of users in your business
userId:'',
// For local development and debugging, you can quickly generate a userSig on the https://console.tencentcloud.com/trtc/usersigtool page. Note that there is a one-to-one correspondence between userSig and userId
userSig:'',
});
await conference.join('123456',{
isOpenCamera:false,
isOpenMicrophone:false,
});
}
joinConference()
Development Environment Operation
1. Execute the development environment command. (As an example, this uses a vue3 + vite default project, however, the dev command may differ for different projects. Please adjust according to your own project)
npm run dev
Note:
If there are eslint errors in the src/TUIRoom directory during execution, you can add the /src/TUIRoom/ path to the .eslintignore file to ignore the eslint checks.
2. Follow the console prompts to open the page in a browser, e.g., http://localhost:3000/.
3. Experience the TUIRoomKit component features.
Production environment deployment
1. Pack the dist file.
npm run build
2. Deploy the dist file to the server.
Note:
The production environment requires the use of an HTTPS domain name.

 Yes
Yes
 No
No
Was this page helpful?