This plugin's package name on pub.dev is: tencent_cloud_chat_push. You can include it in the pubspec.yaml dependencies directory, or execute the following command for automatic installation.
flutter pub addtencent_cloud_chat_push
Step 2: Manufacturer Configuration
iOS
Android
Before integrating the message push plugin, you need to apply to Apple for an APNs push certificate, then upload the push certificate to the Tencent RTC Console.
Operation step
Step 1: Apply for an APNs certificate
Activate remote push for the App
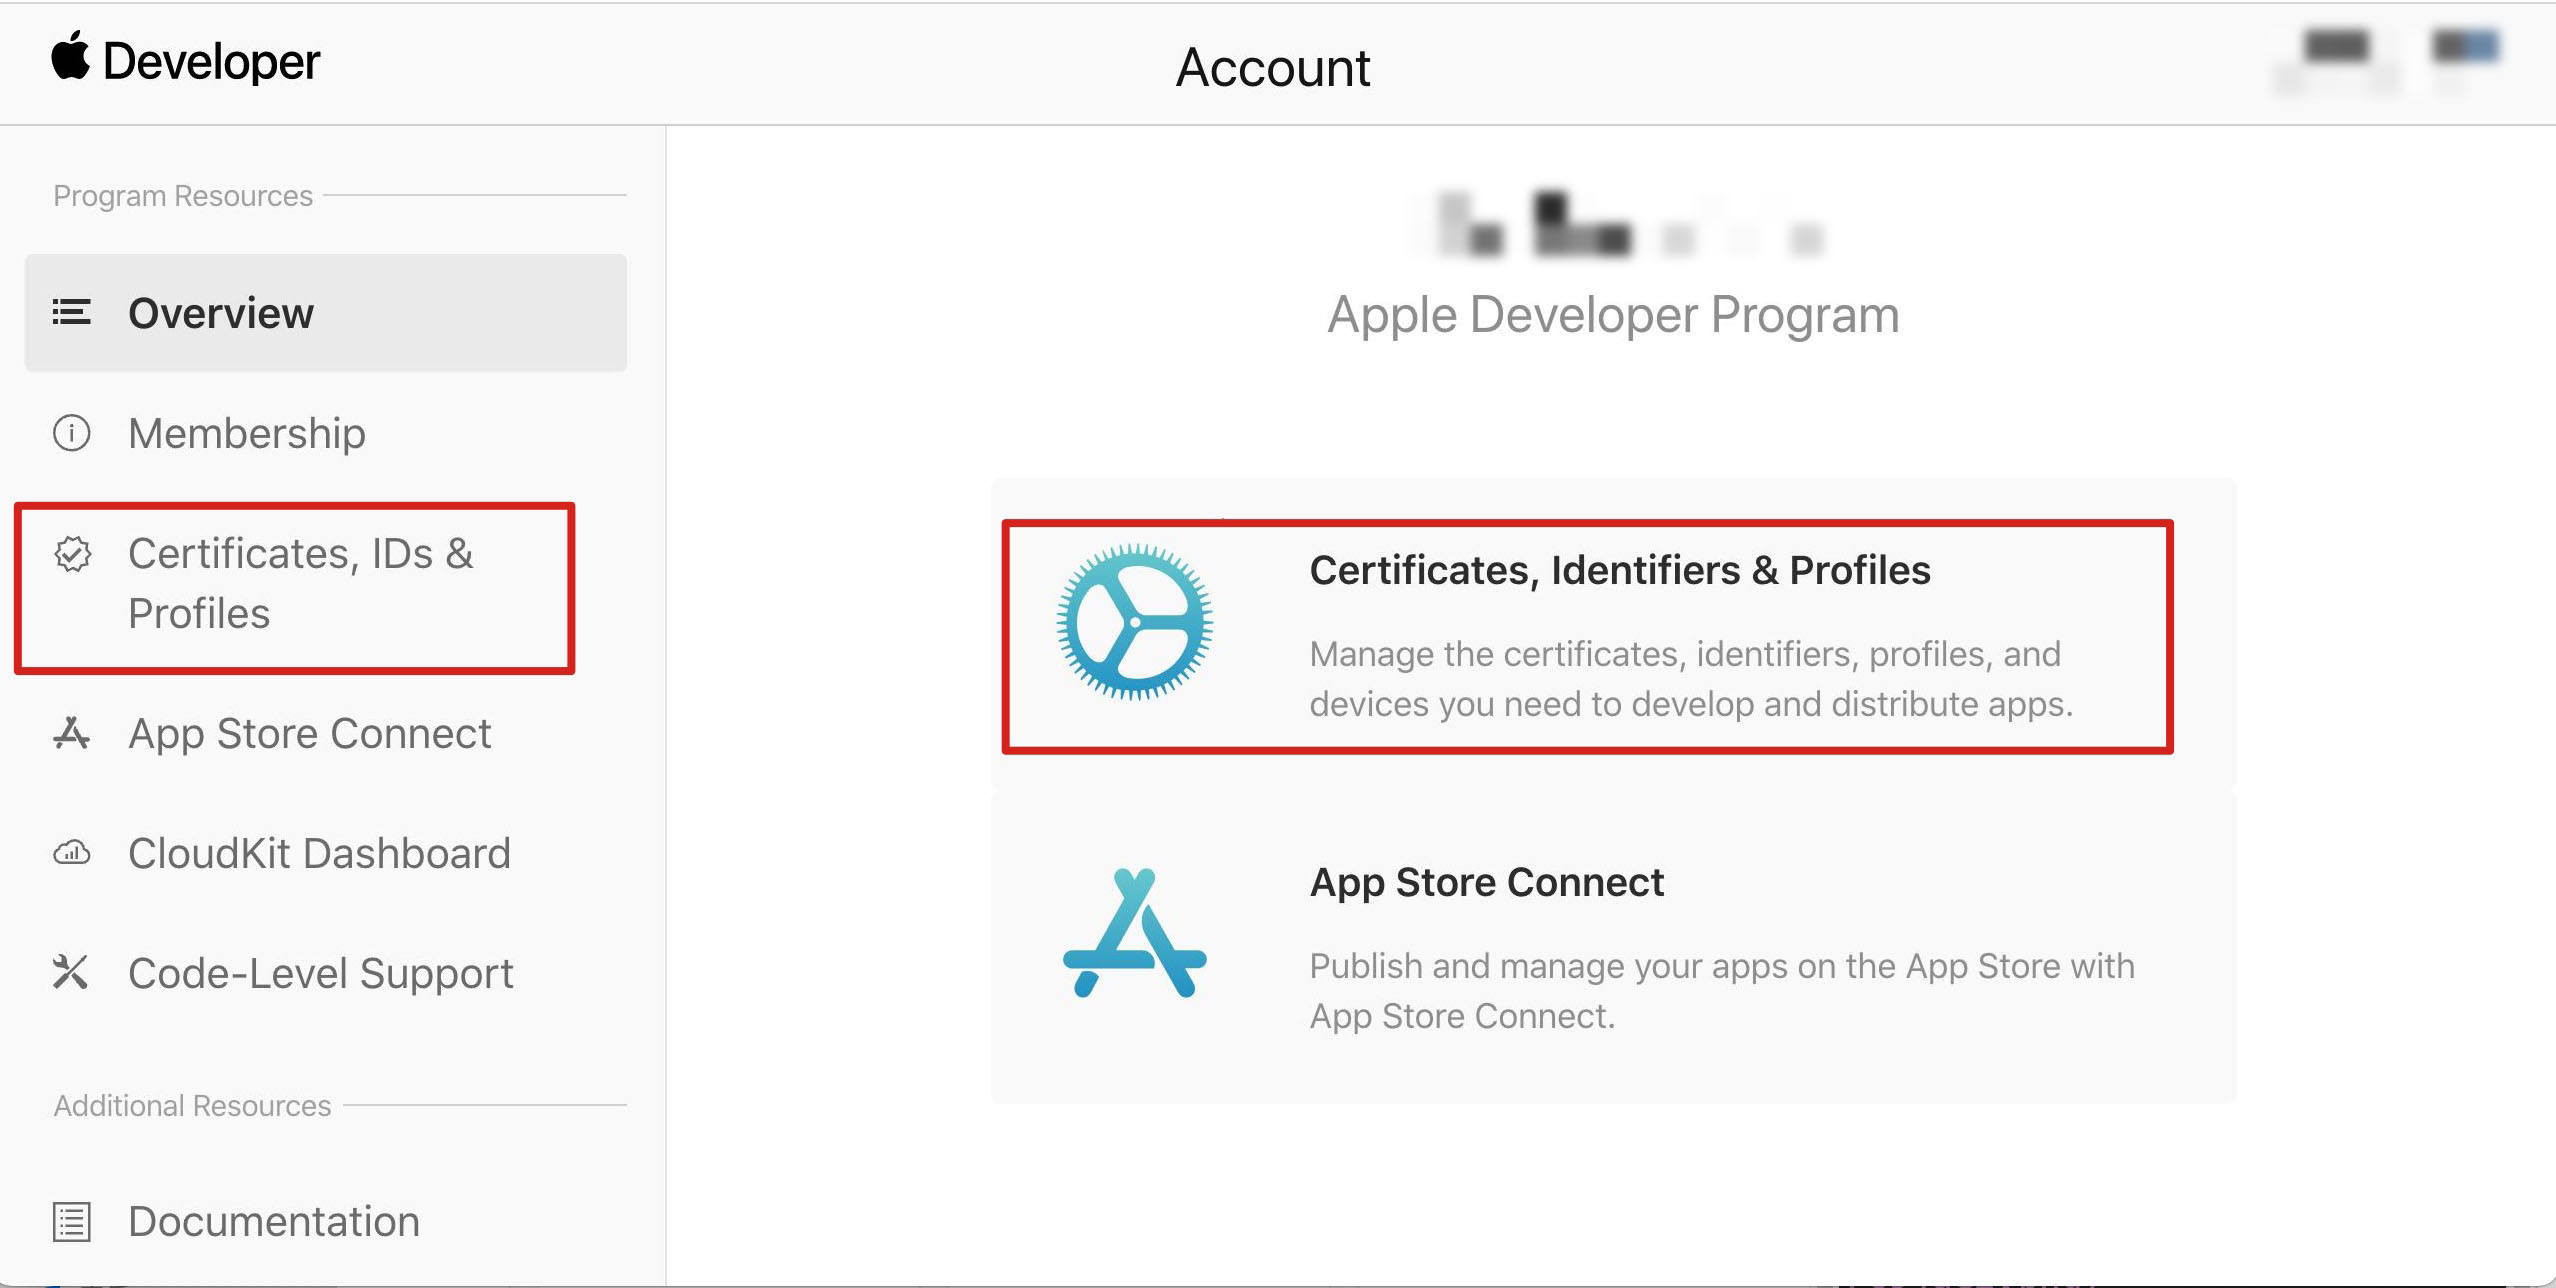
1. log in to Apple Developer Center Web Sites, click Certificates, Identifiers & Profiles or the sidebar's Certificates, IDs & Profiles, to enter the Certificates, IDS & Profiles page.
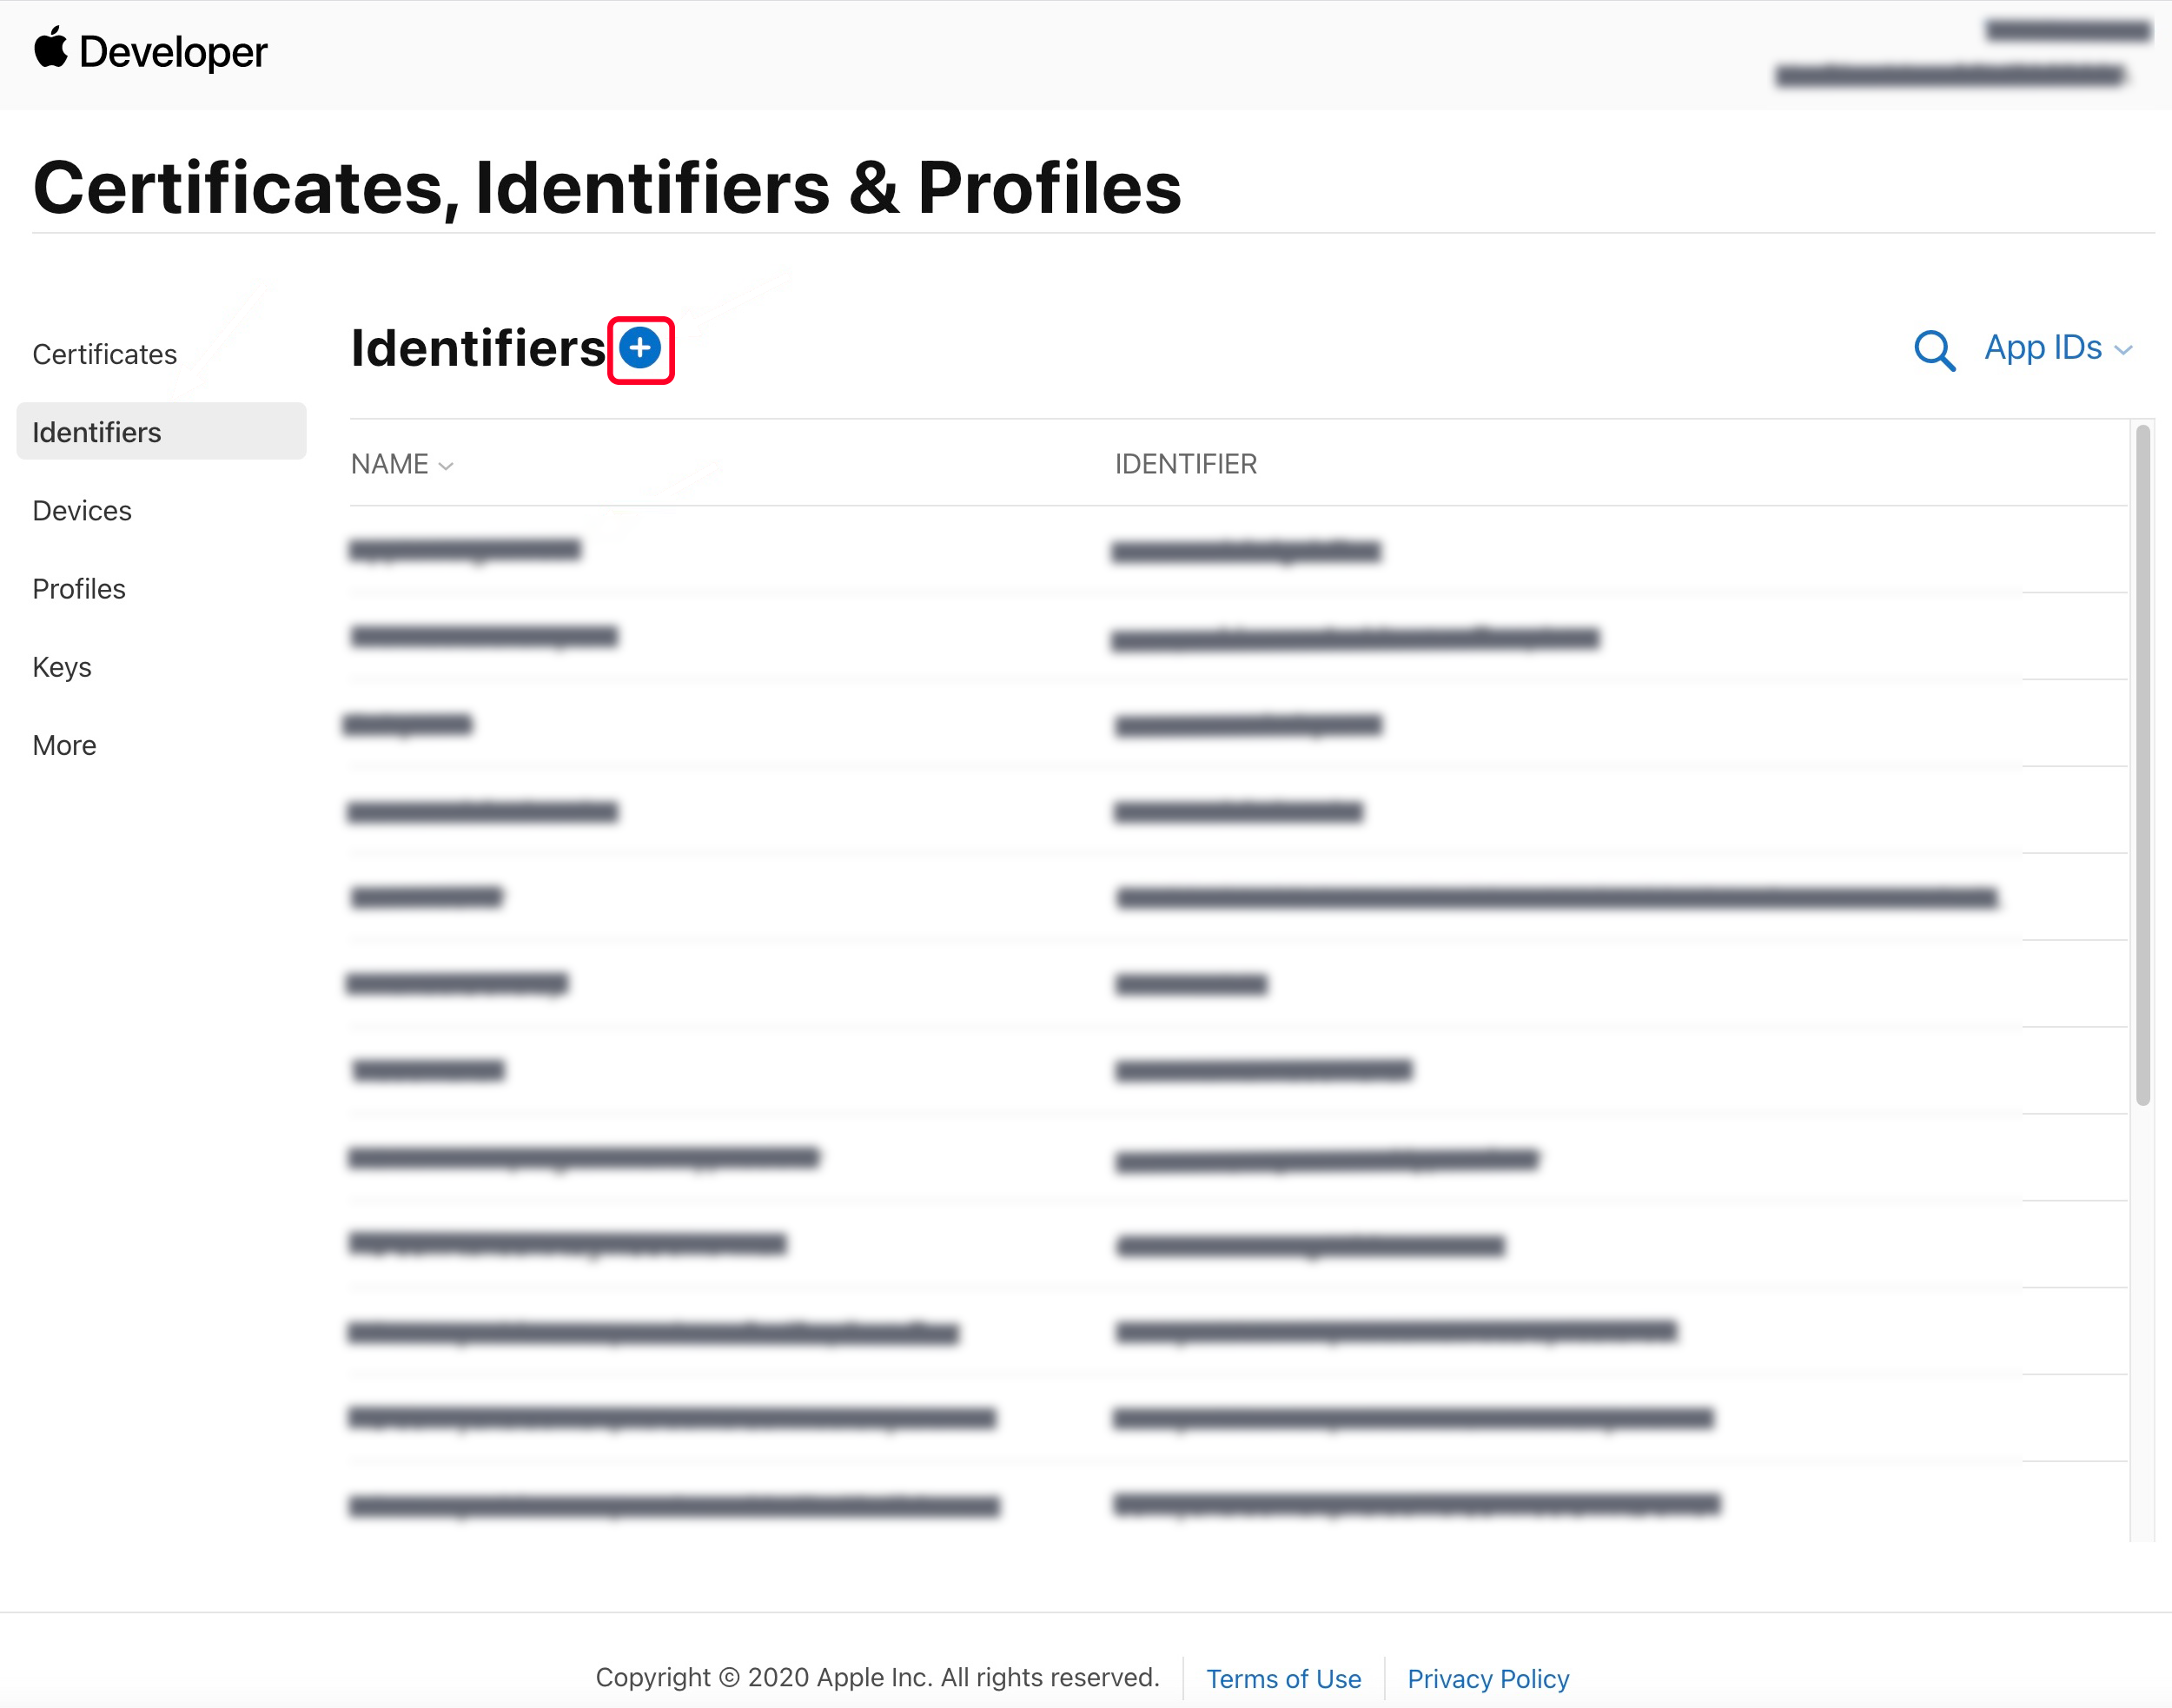
2. click on the identifier's right +.
3. You can follow the steps below to create a new AppID, or add the Push NotificationService to your existing AppID.
Note:
Your App's Bundle ID cannot use the wildcard *; otherwise, the remote push service cannot be used.
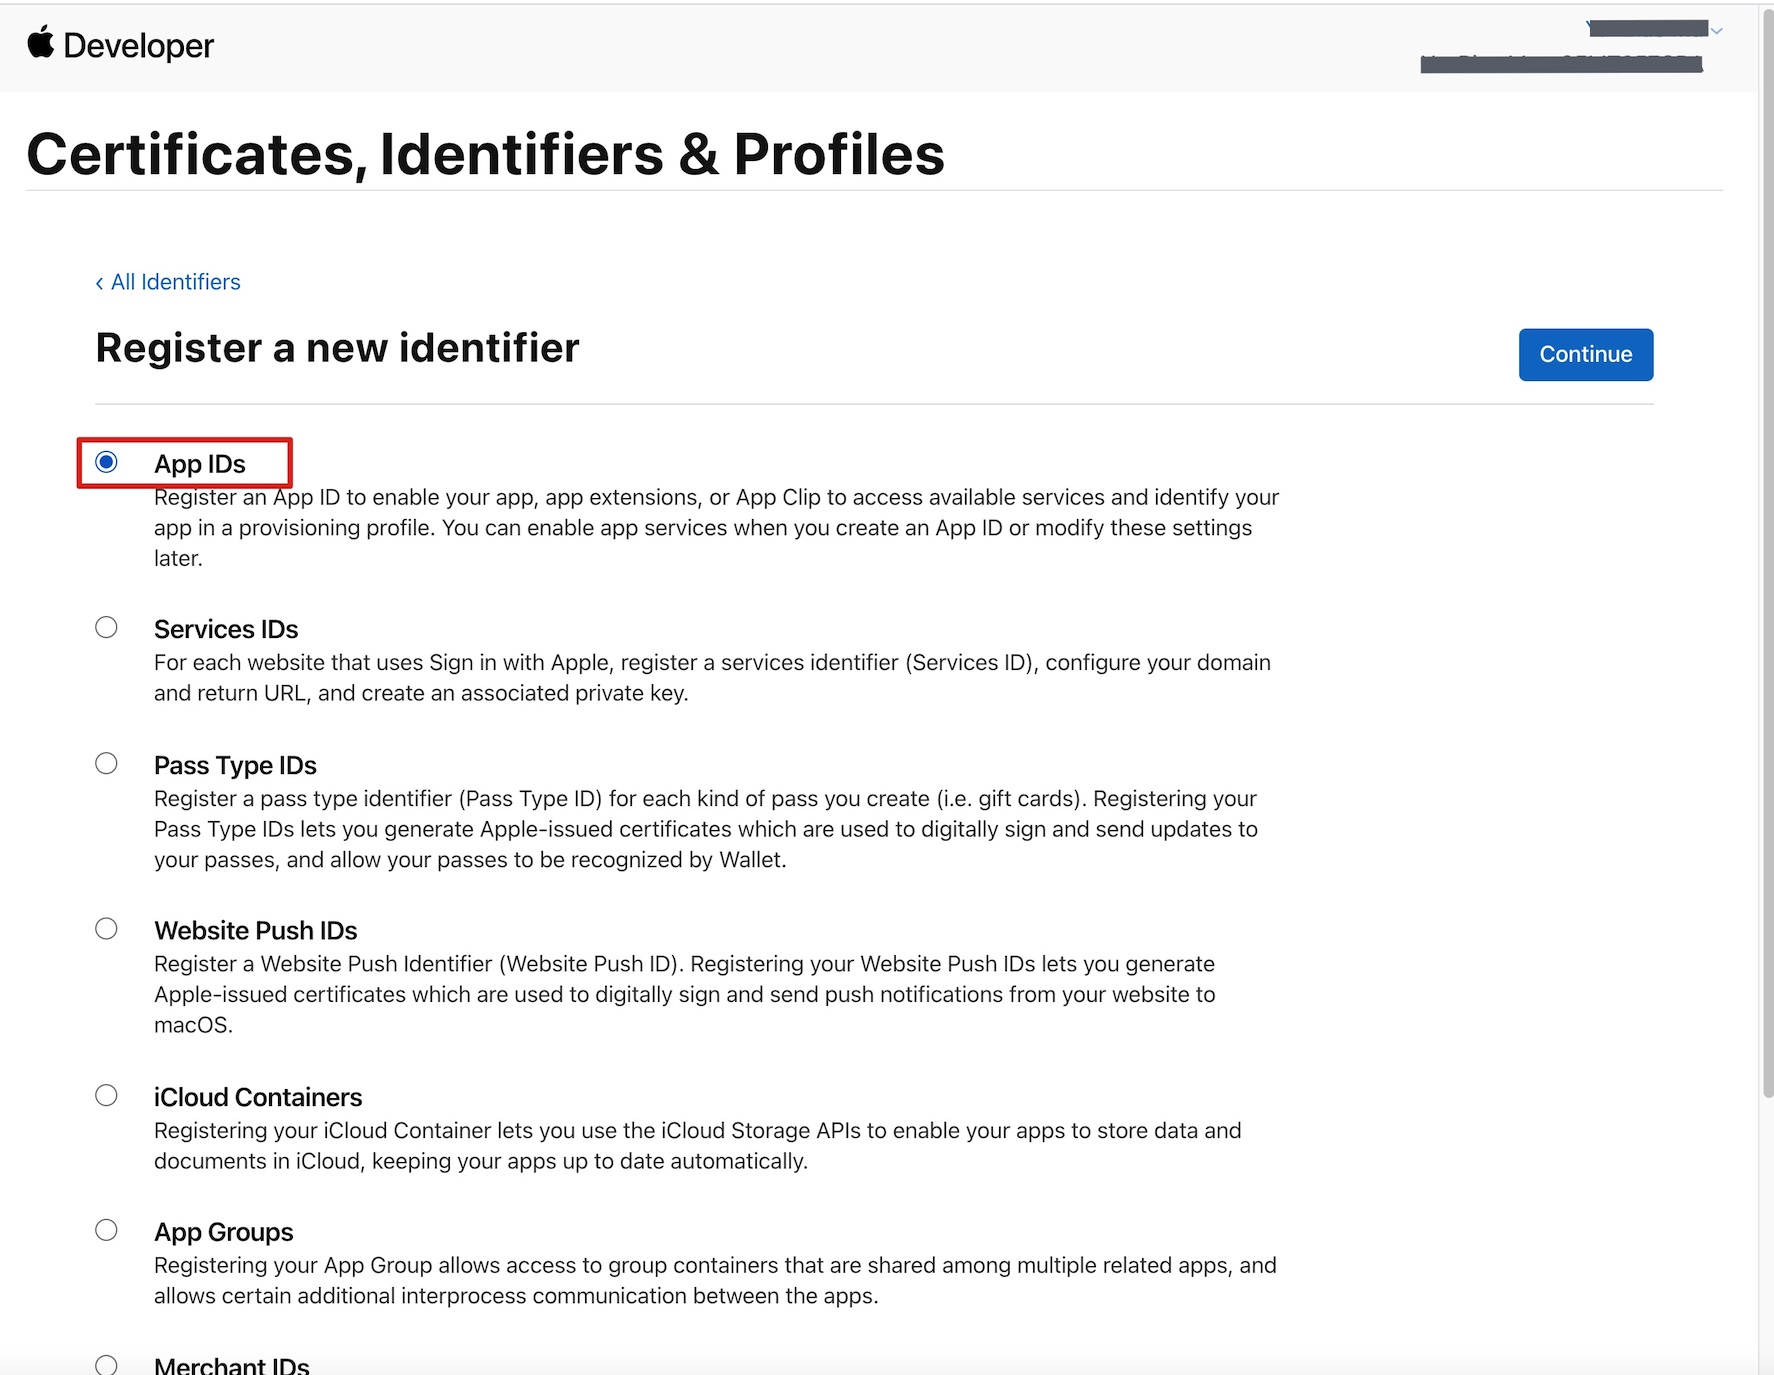
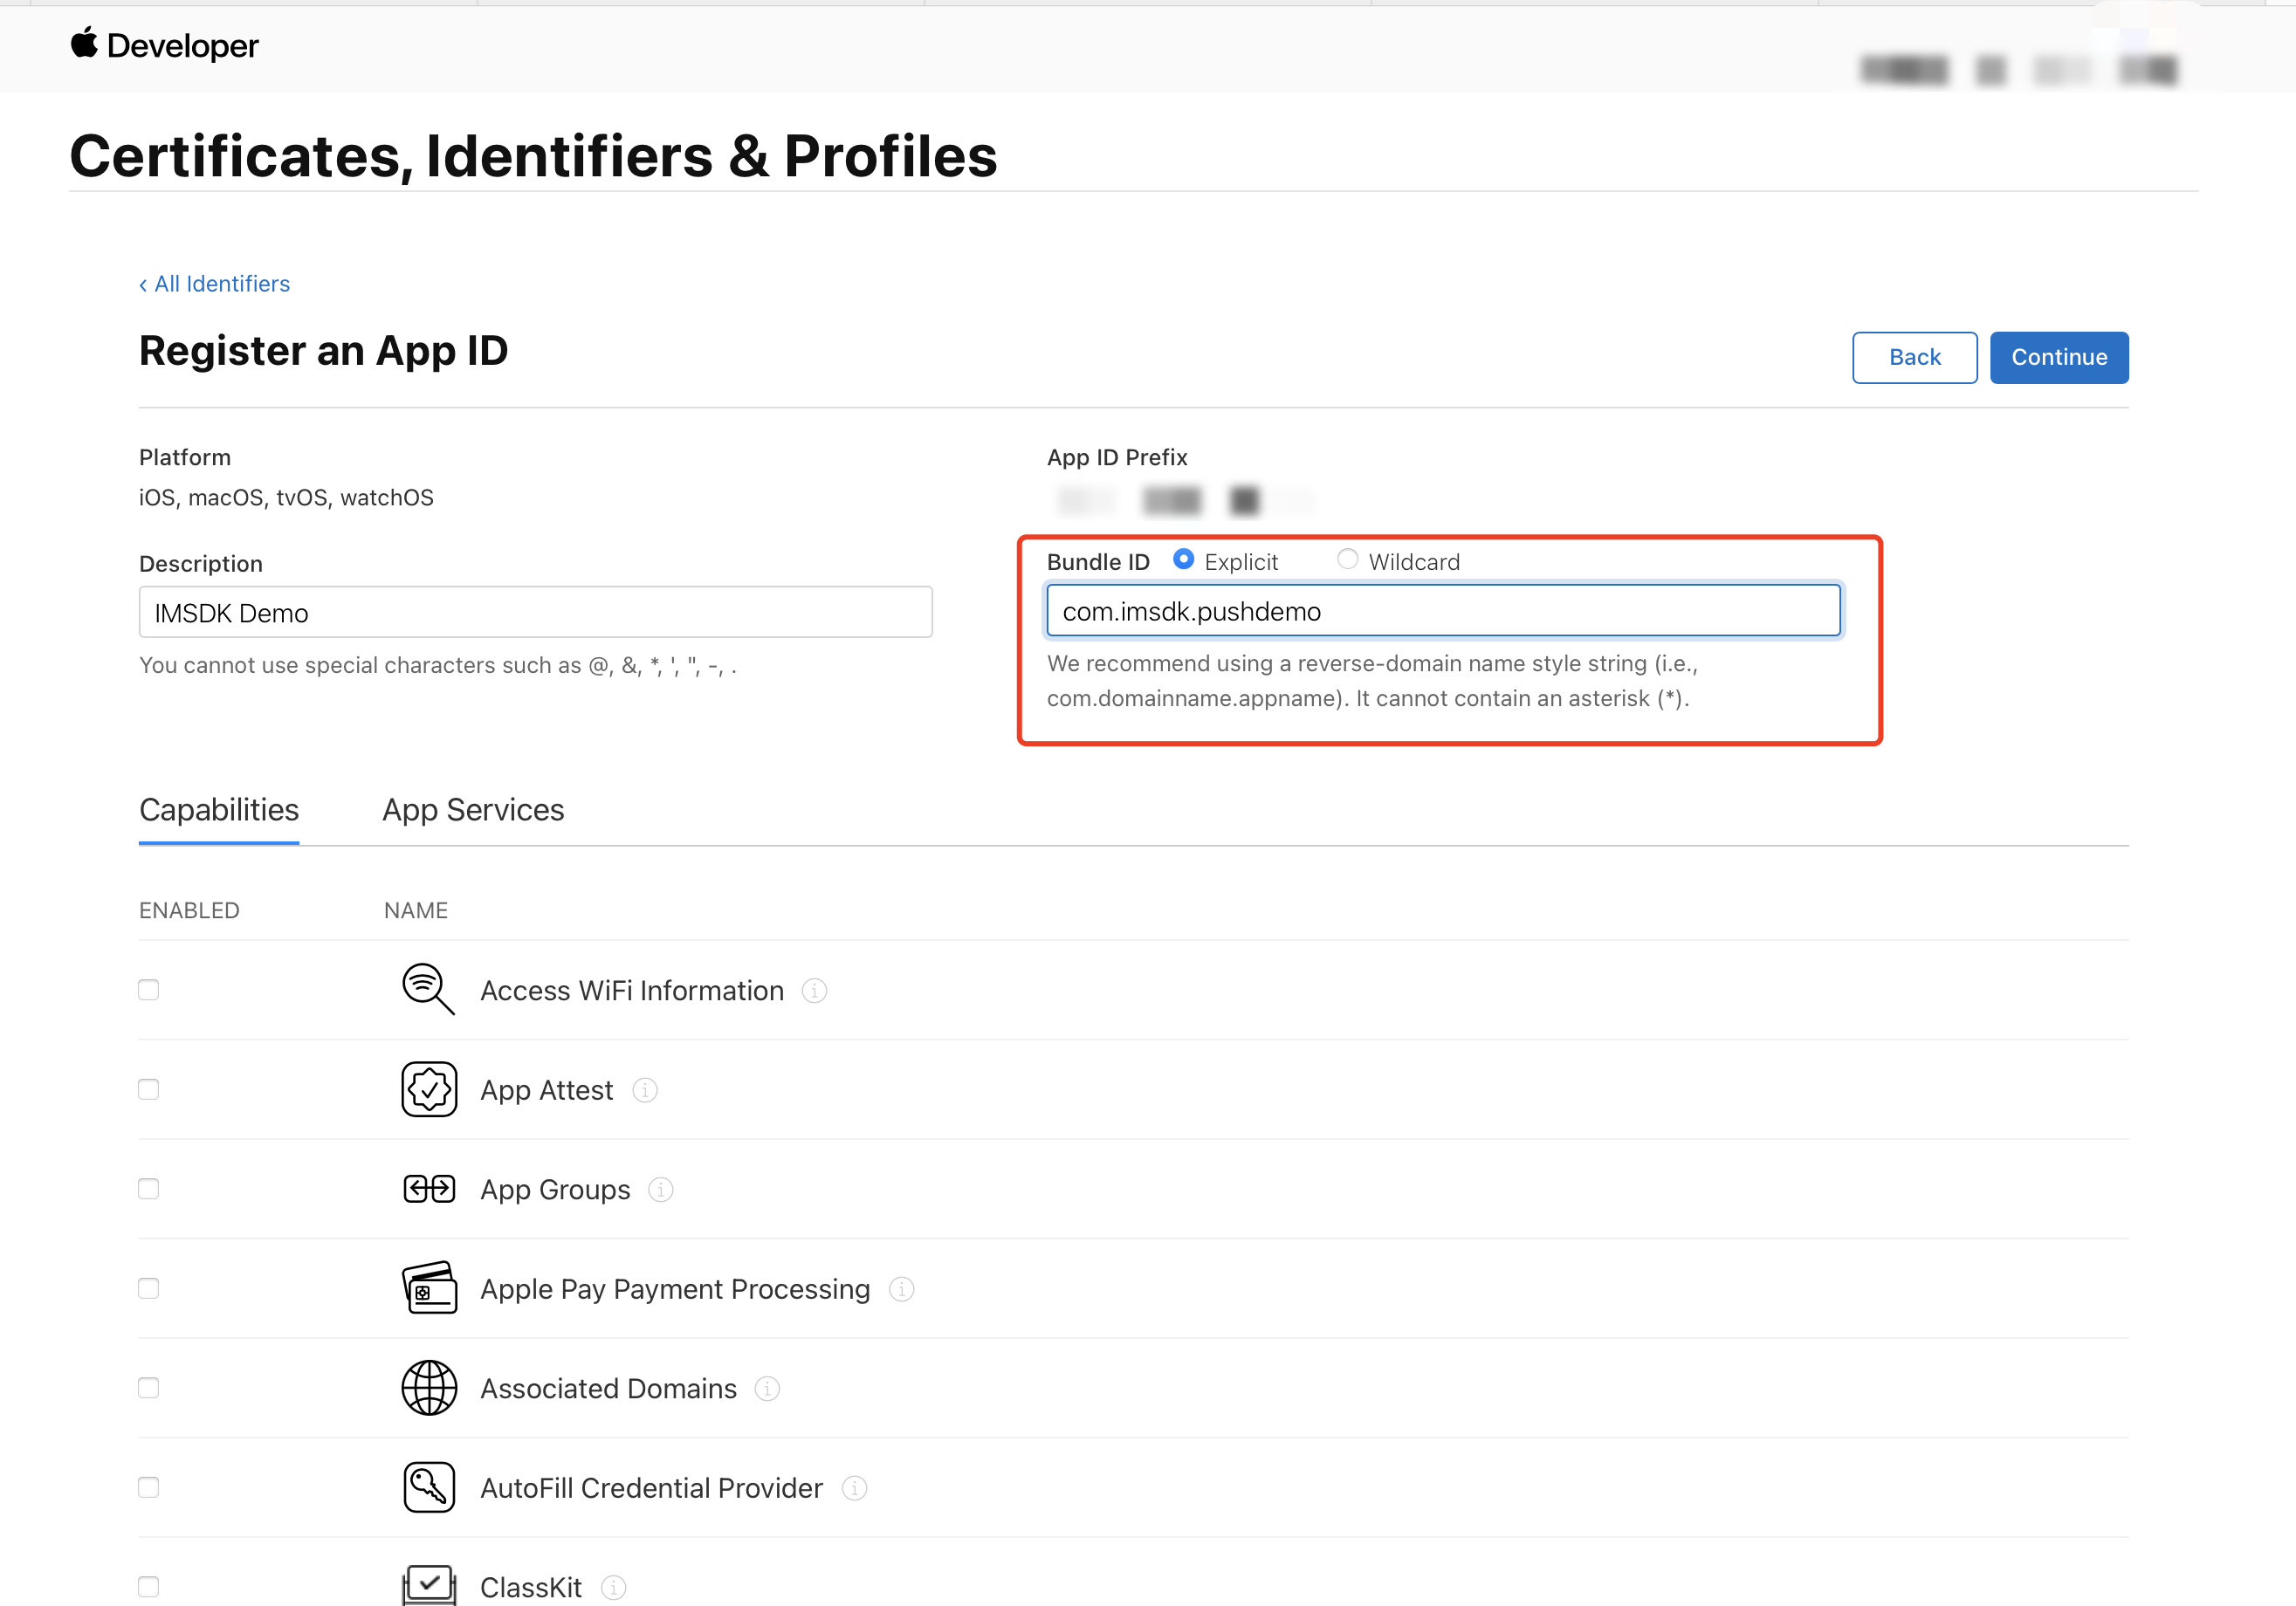
4. Select App IDs, click Continue to proceed to the next step.
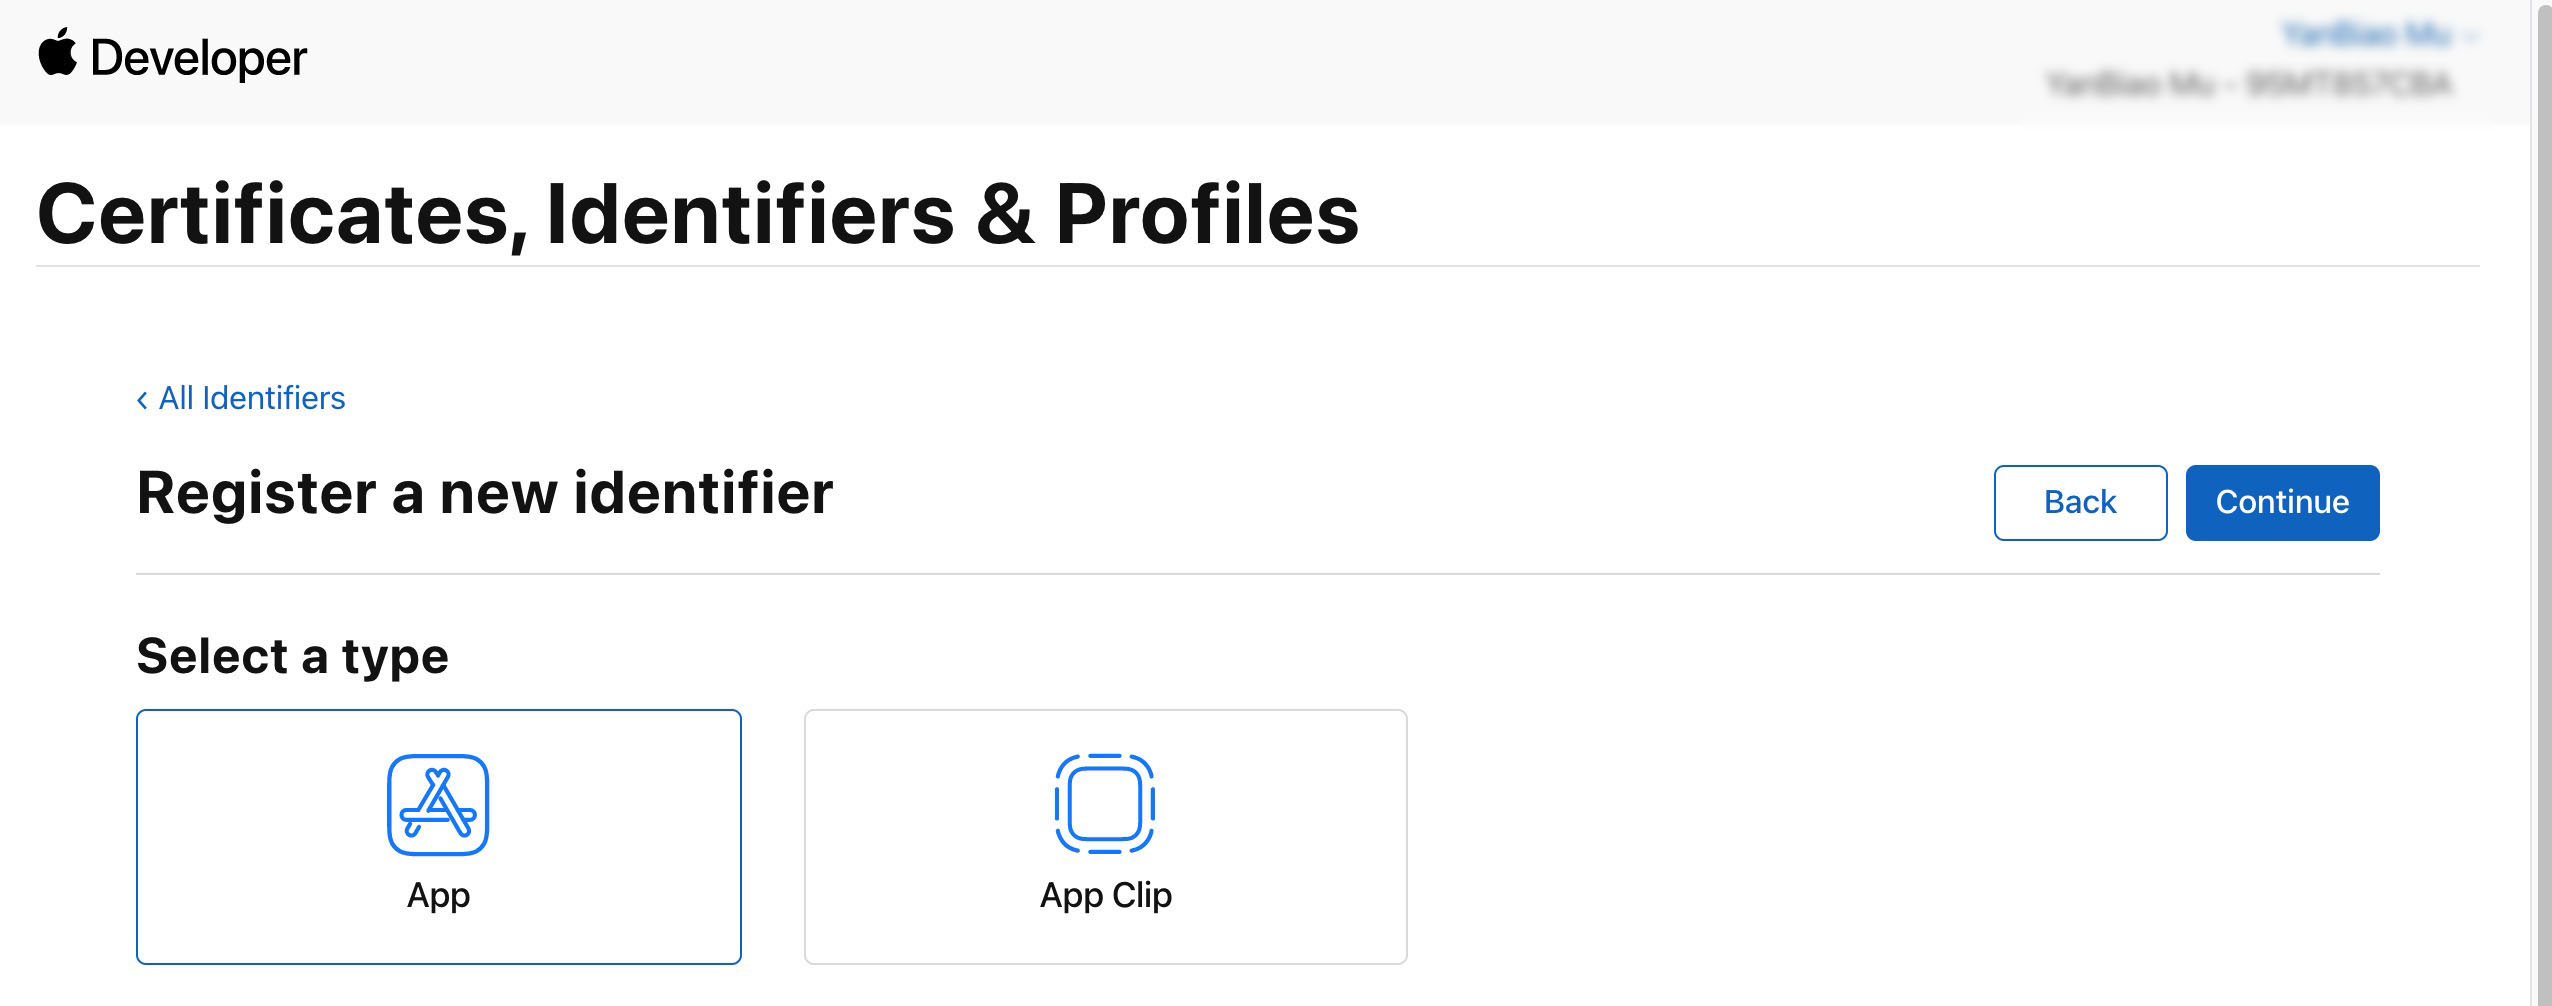
5. Select App, click Continue to proceed to the next step.
6. Configure Bundle ID and other information, click Continue to proceed to the next step.
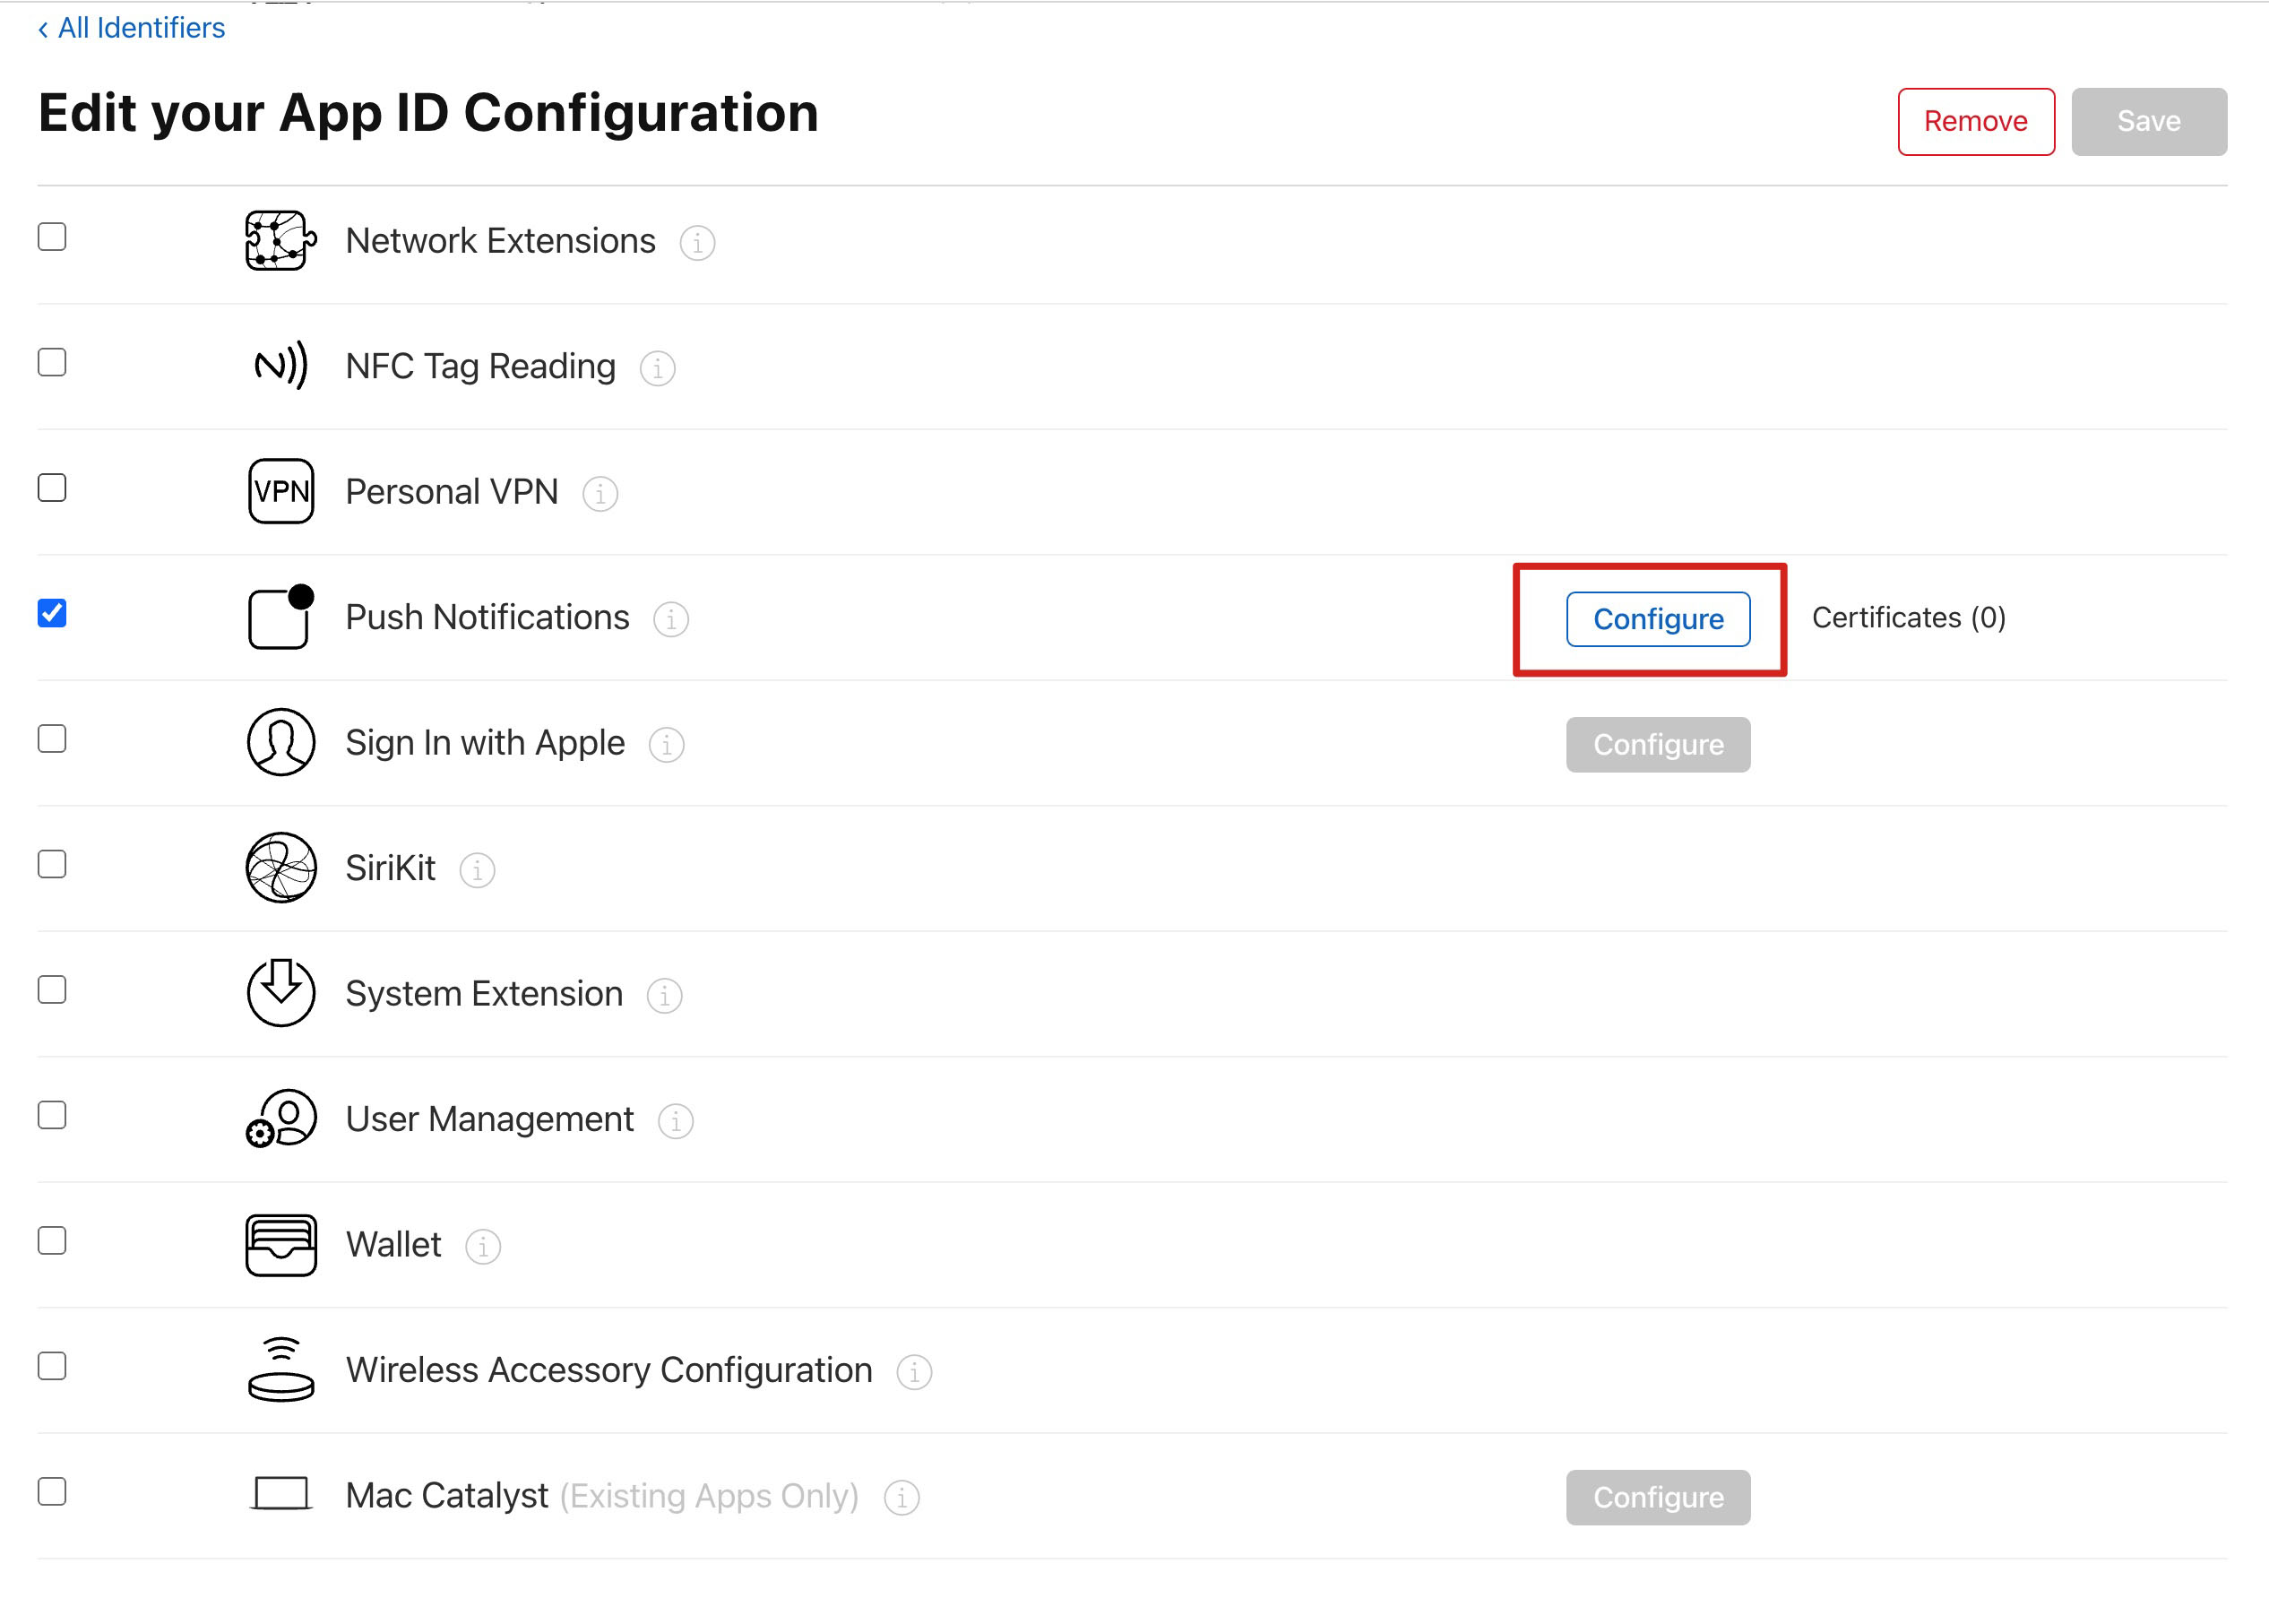
7. Select Push Notifications to activate the remote push service.
Certificate Generation
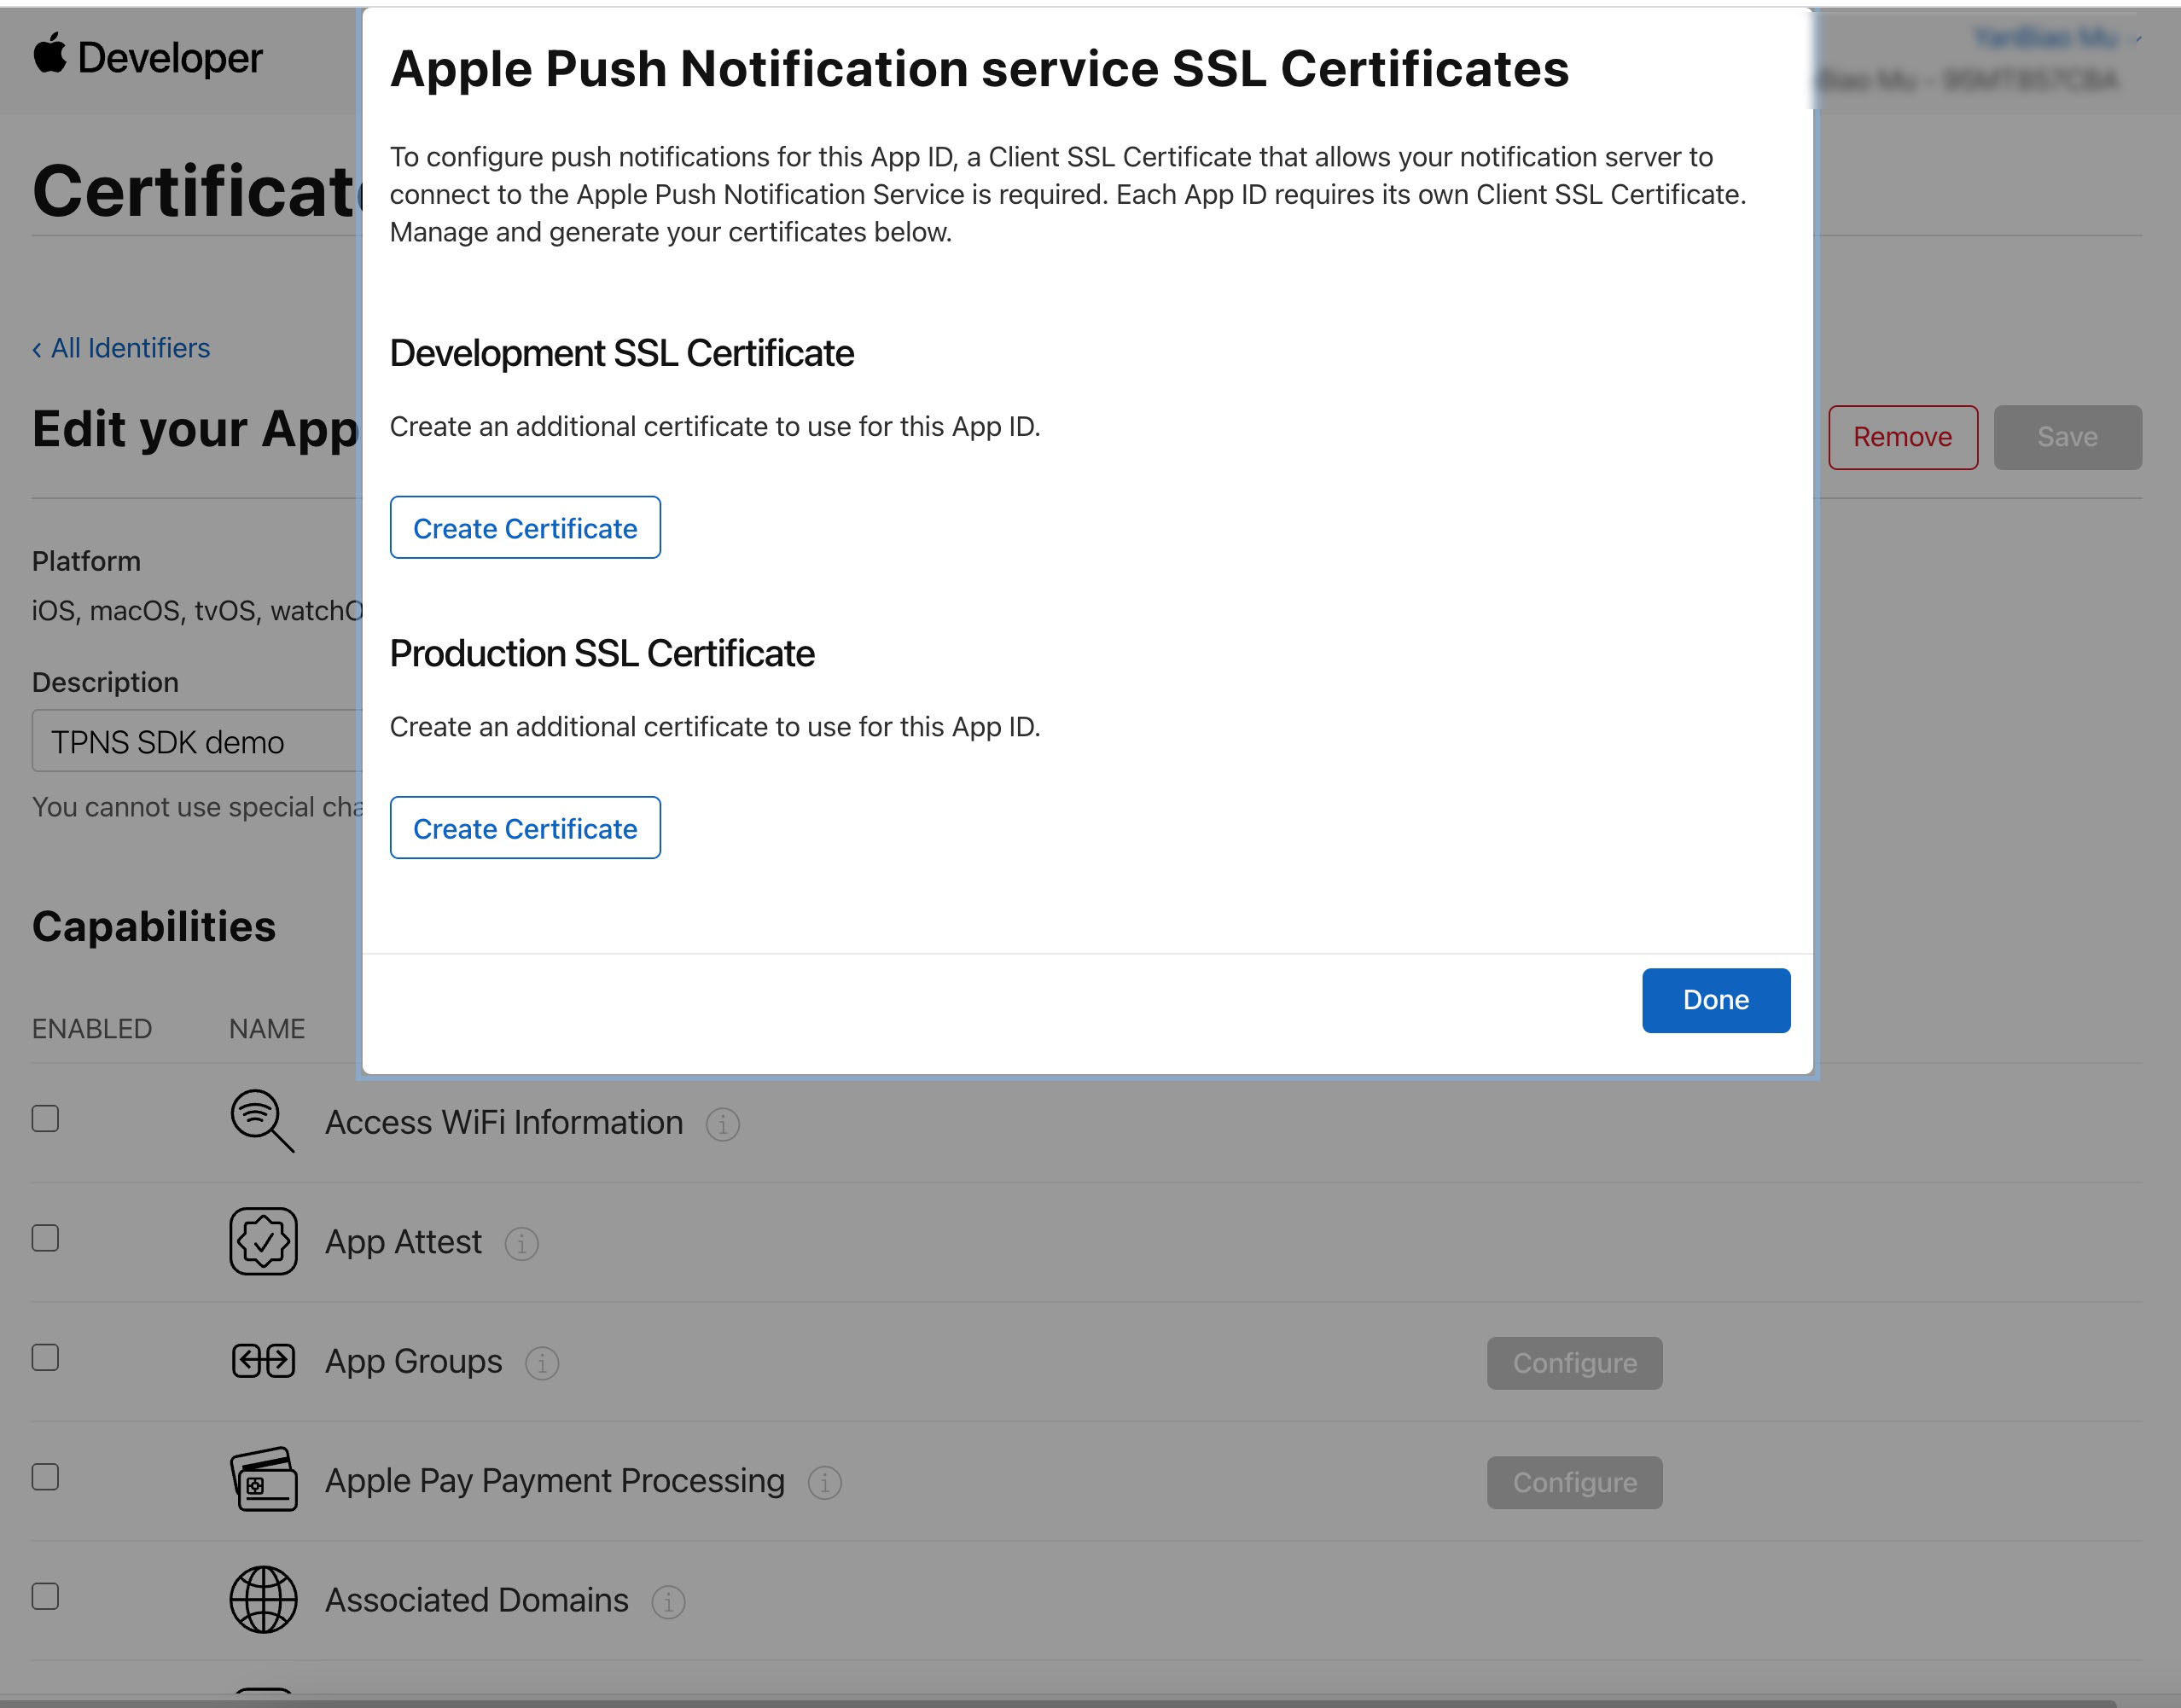
1. Select your AppID and choose Configure.
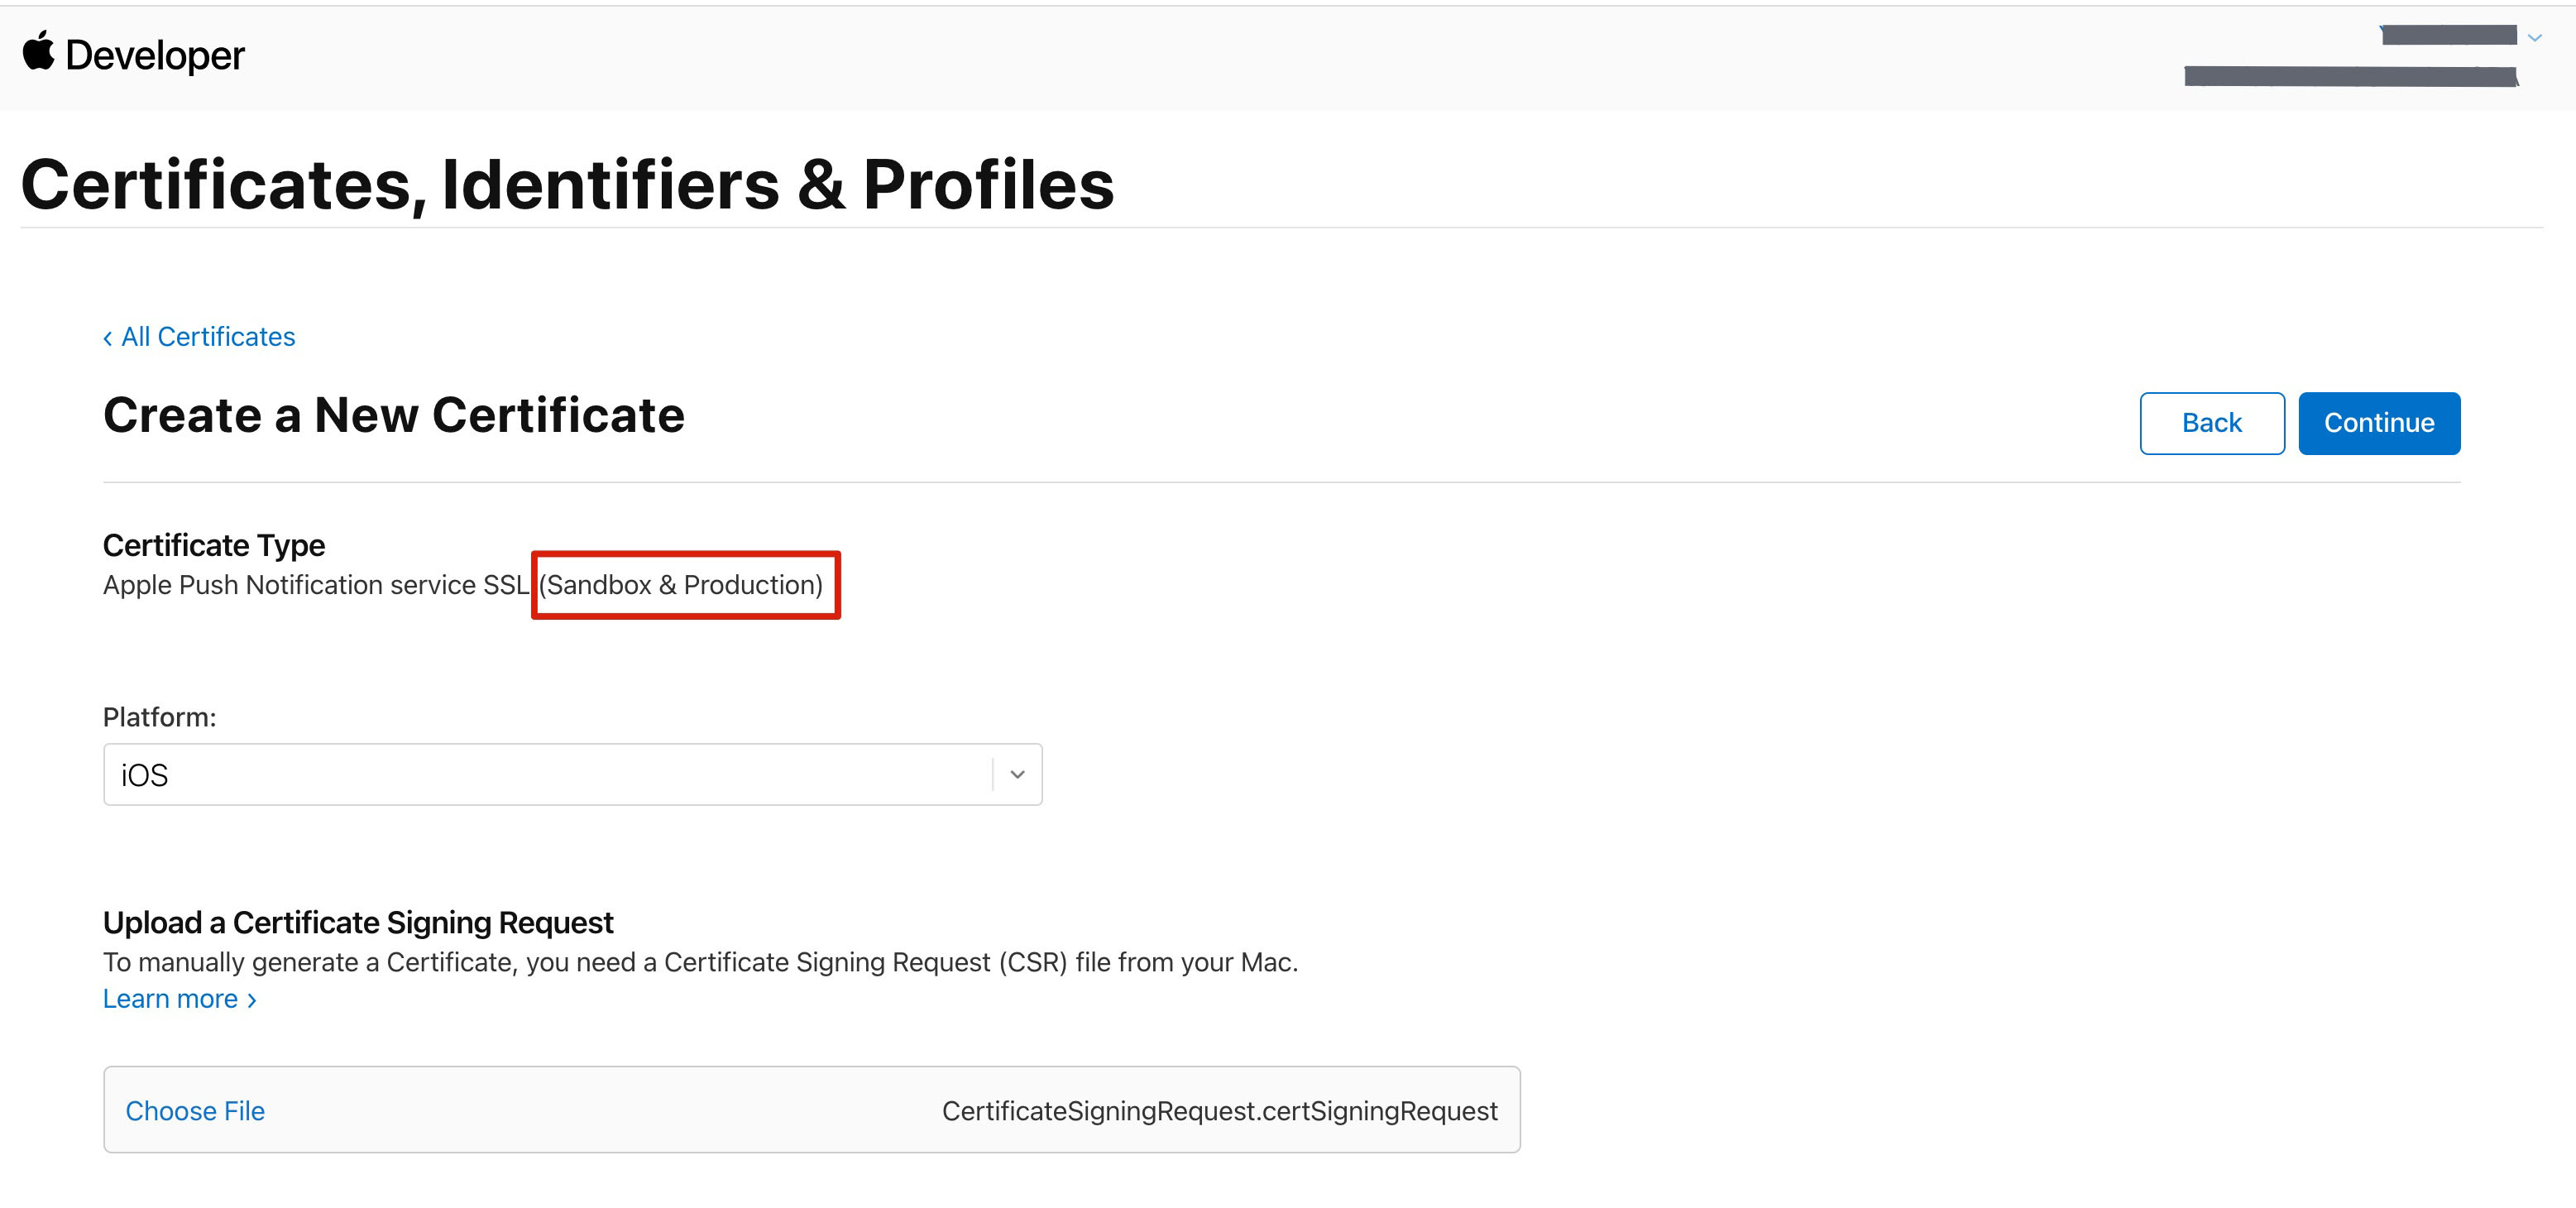
2. You can see in the Apple Push Notification Service SSL Certificates window, there are two SSL Certificates, one for the development environment (Development) and the other for the production environment (Production) remote push certificates, as shown below:
3.
We
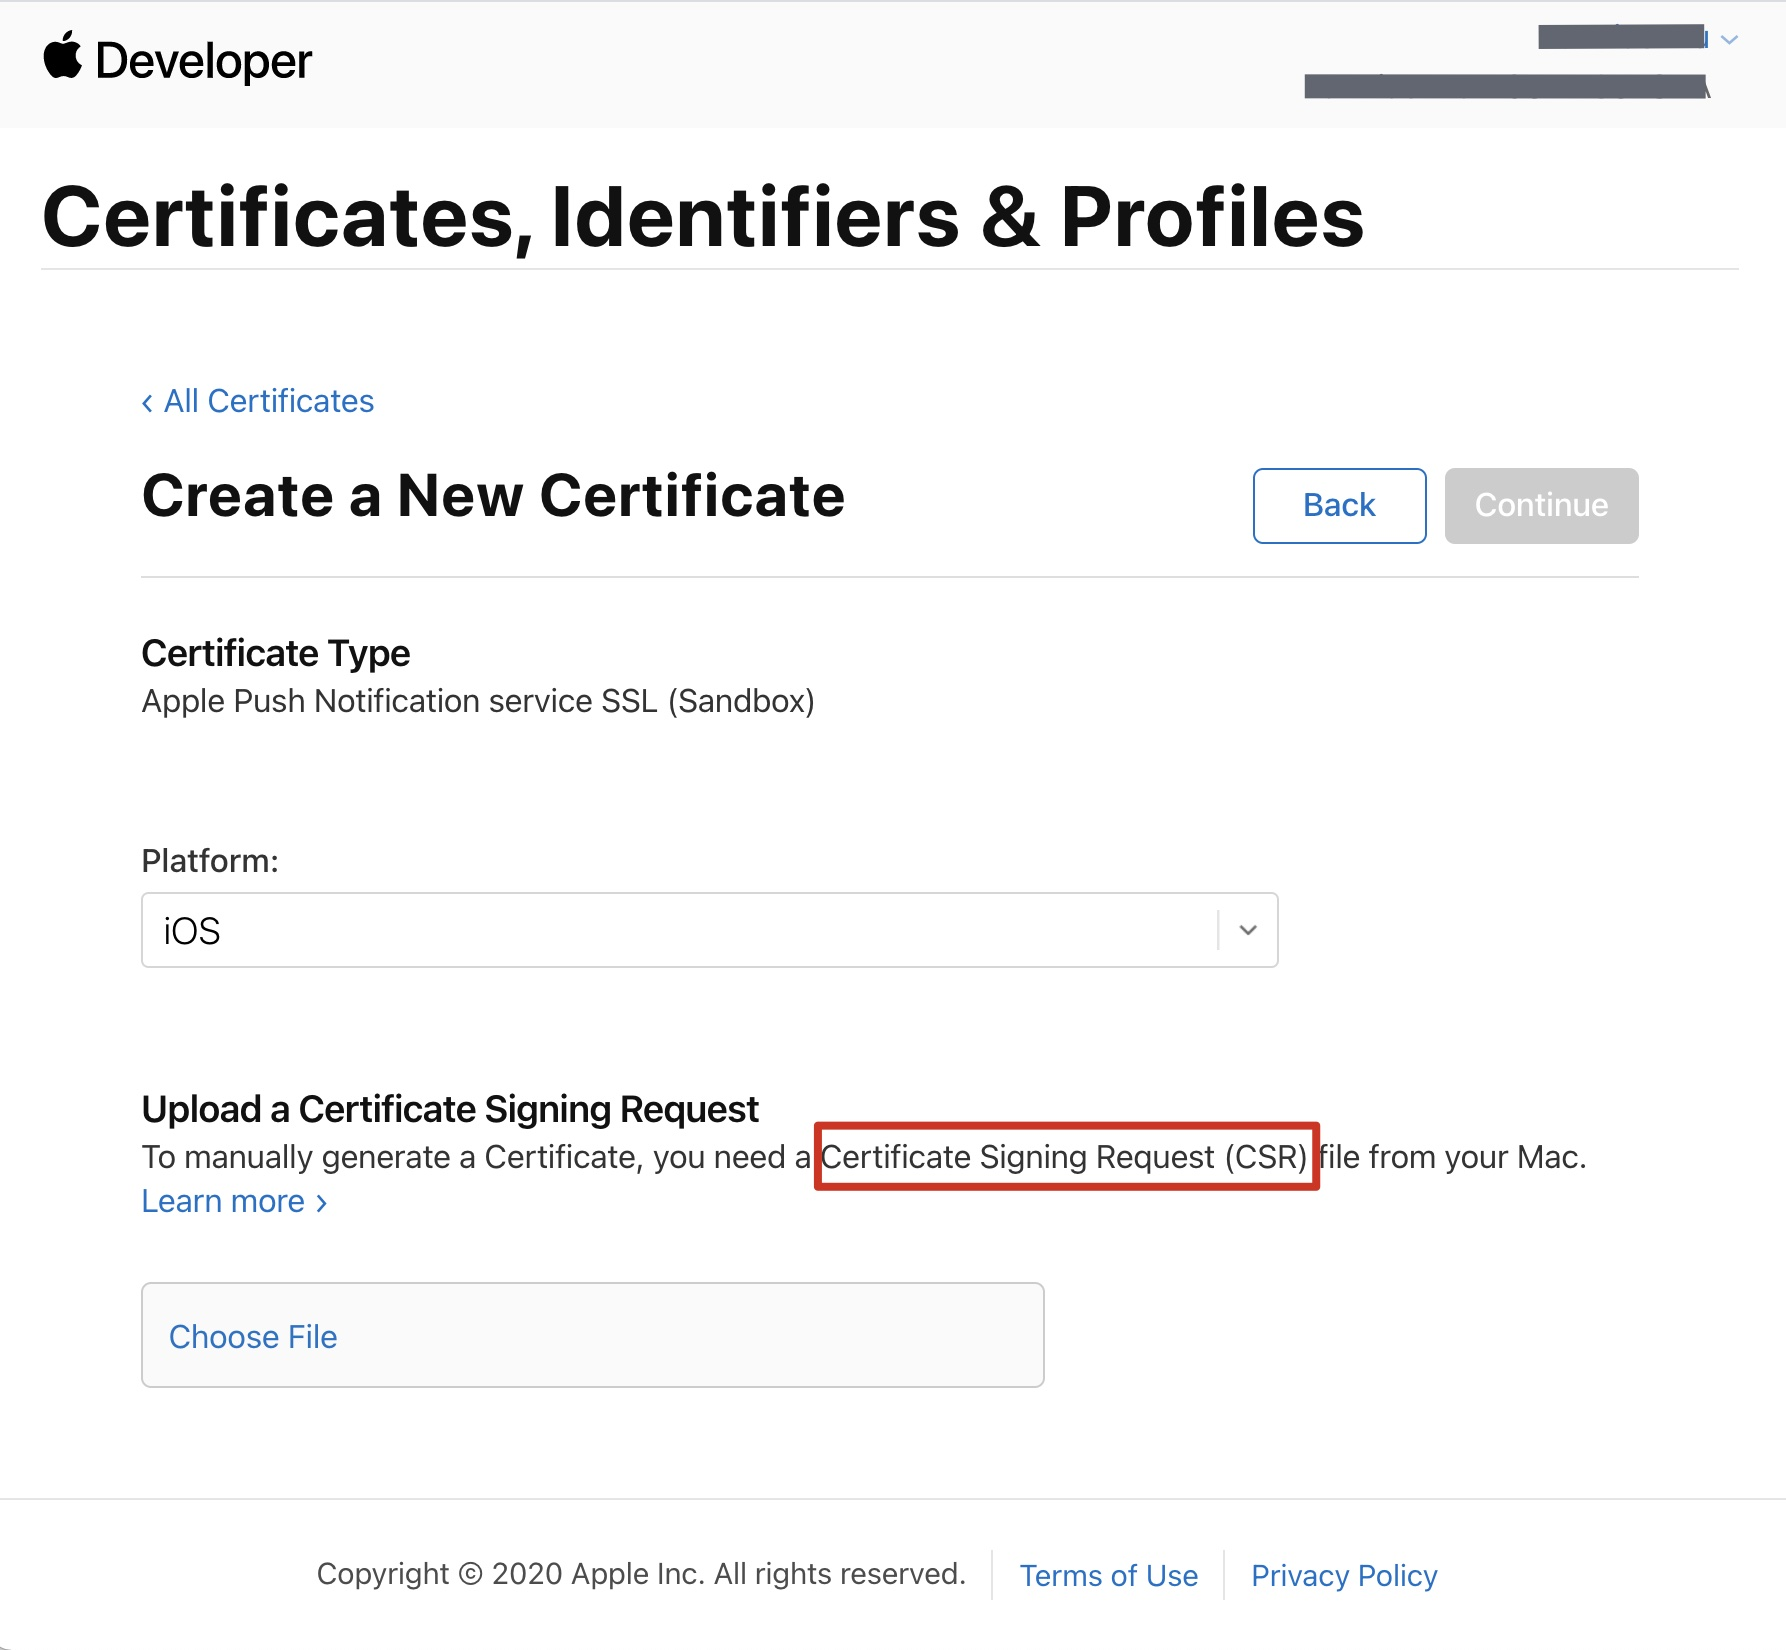
first select the development (Development) environment's Create Certificate, and the system will prompt you that a Certificate Signing Request (CSR) is required.
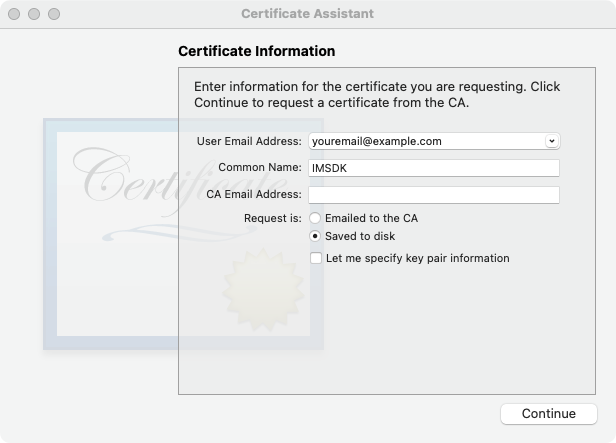
4. Open Keychain Access tool (Keychain Access) on Mac, select Keychain Access > Certificate Assistant > Request a Certificate From a Certificate Authority (Keychain Access - Certificate Assistant - Request a Certificate From a Certificate Authority).
5. Enter your email address (Your email), Common Name (Your name or company name), choose Save to disk, click continue, and the system will generate a *.certSigningRequest file.
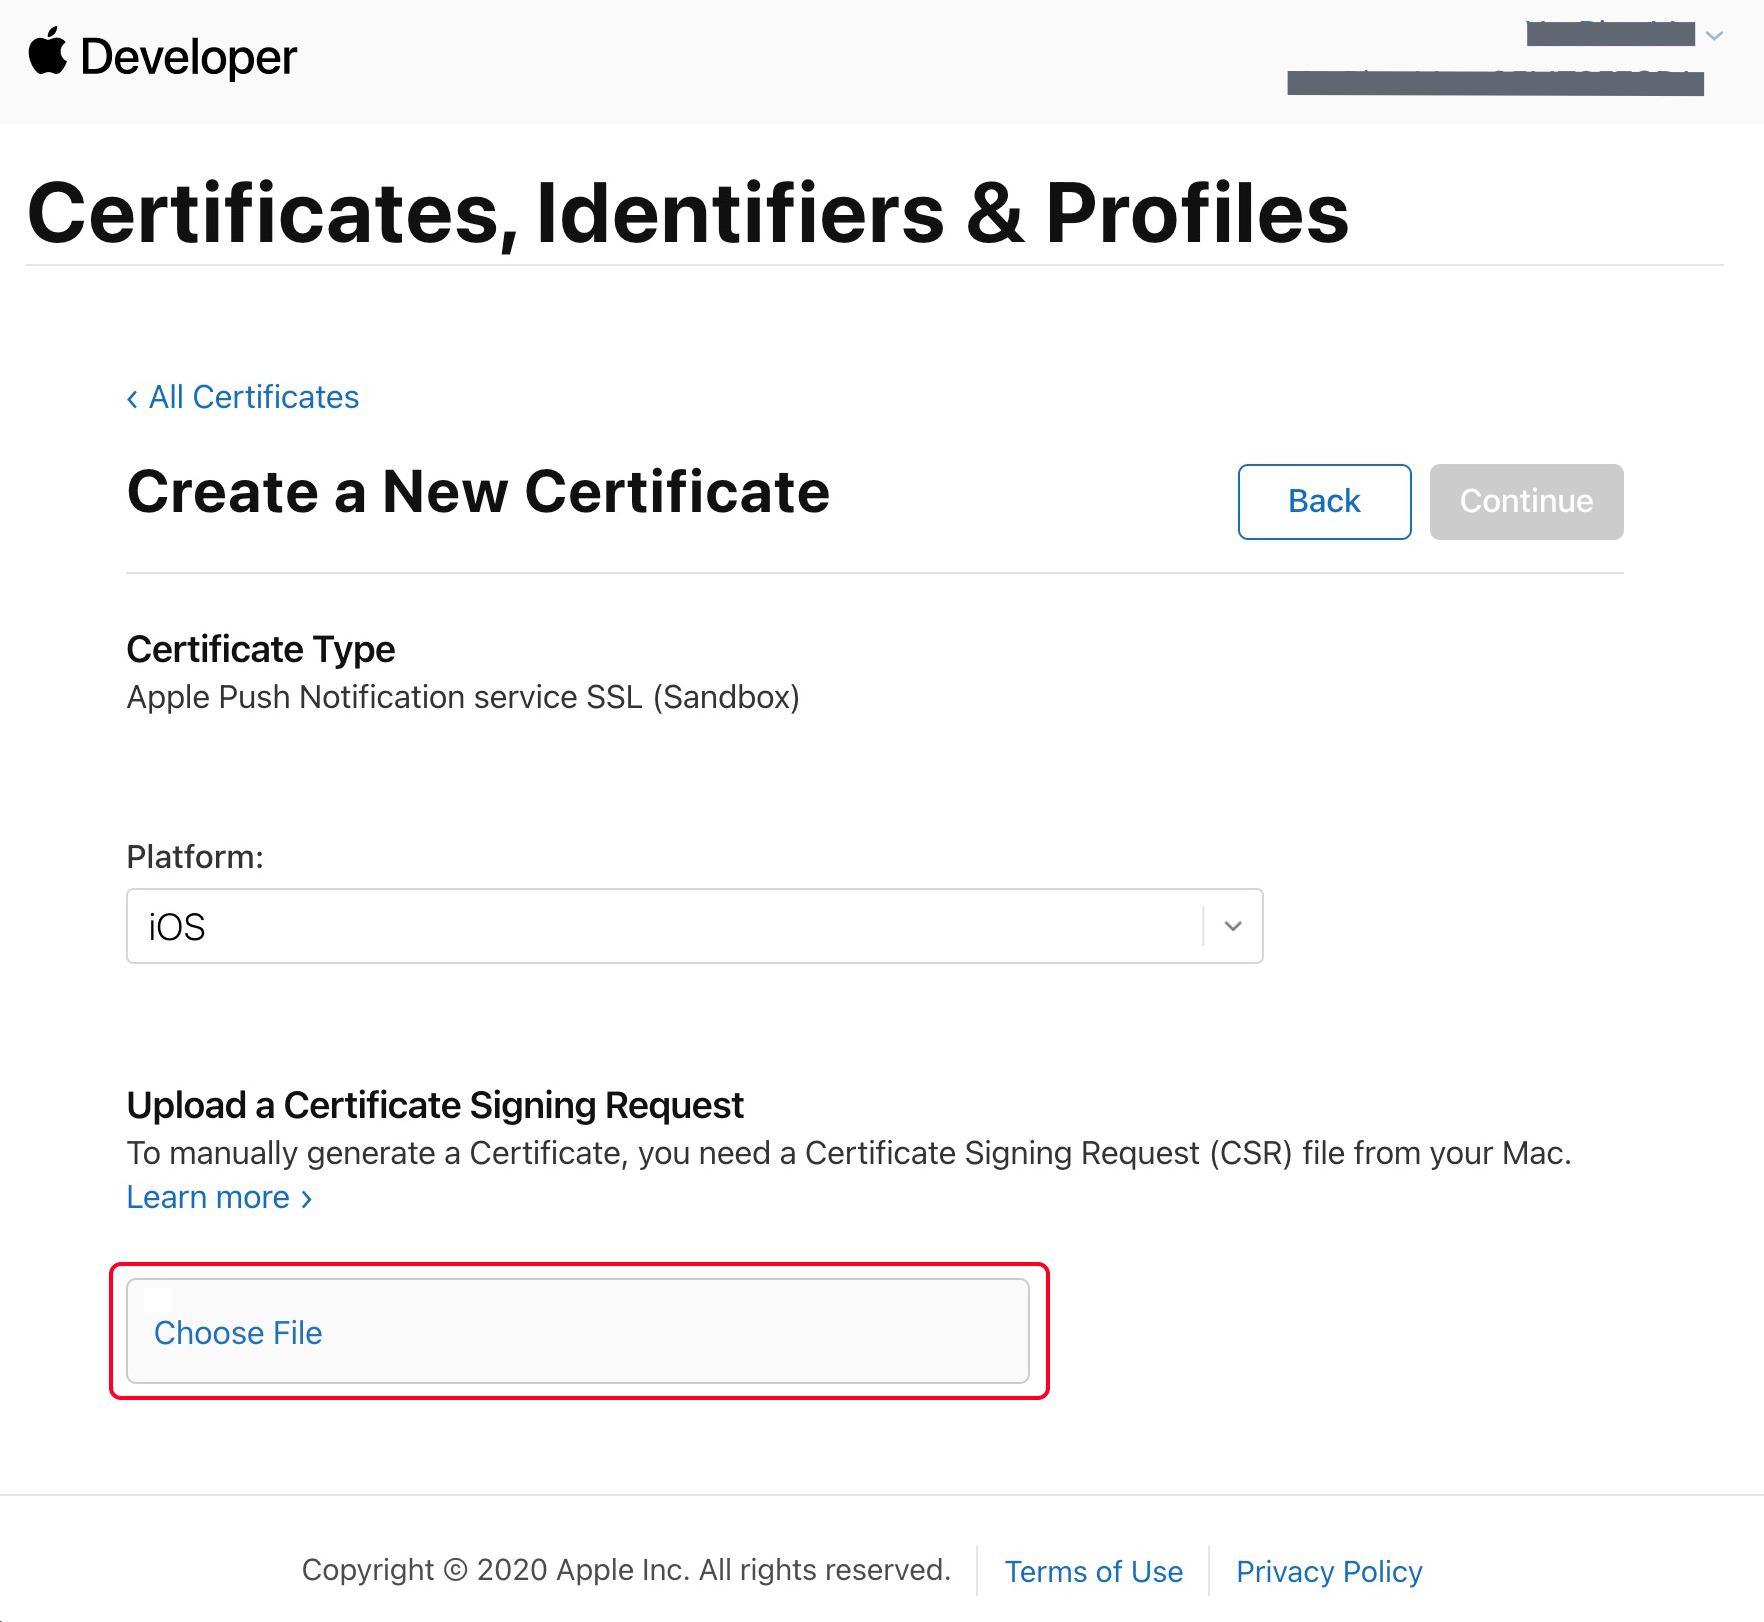
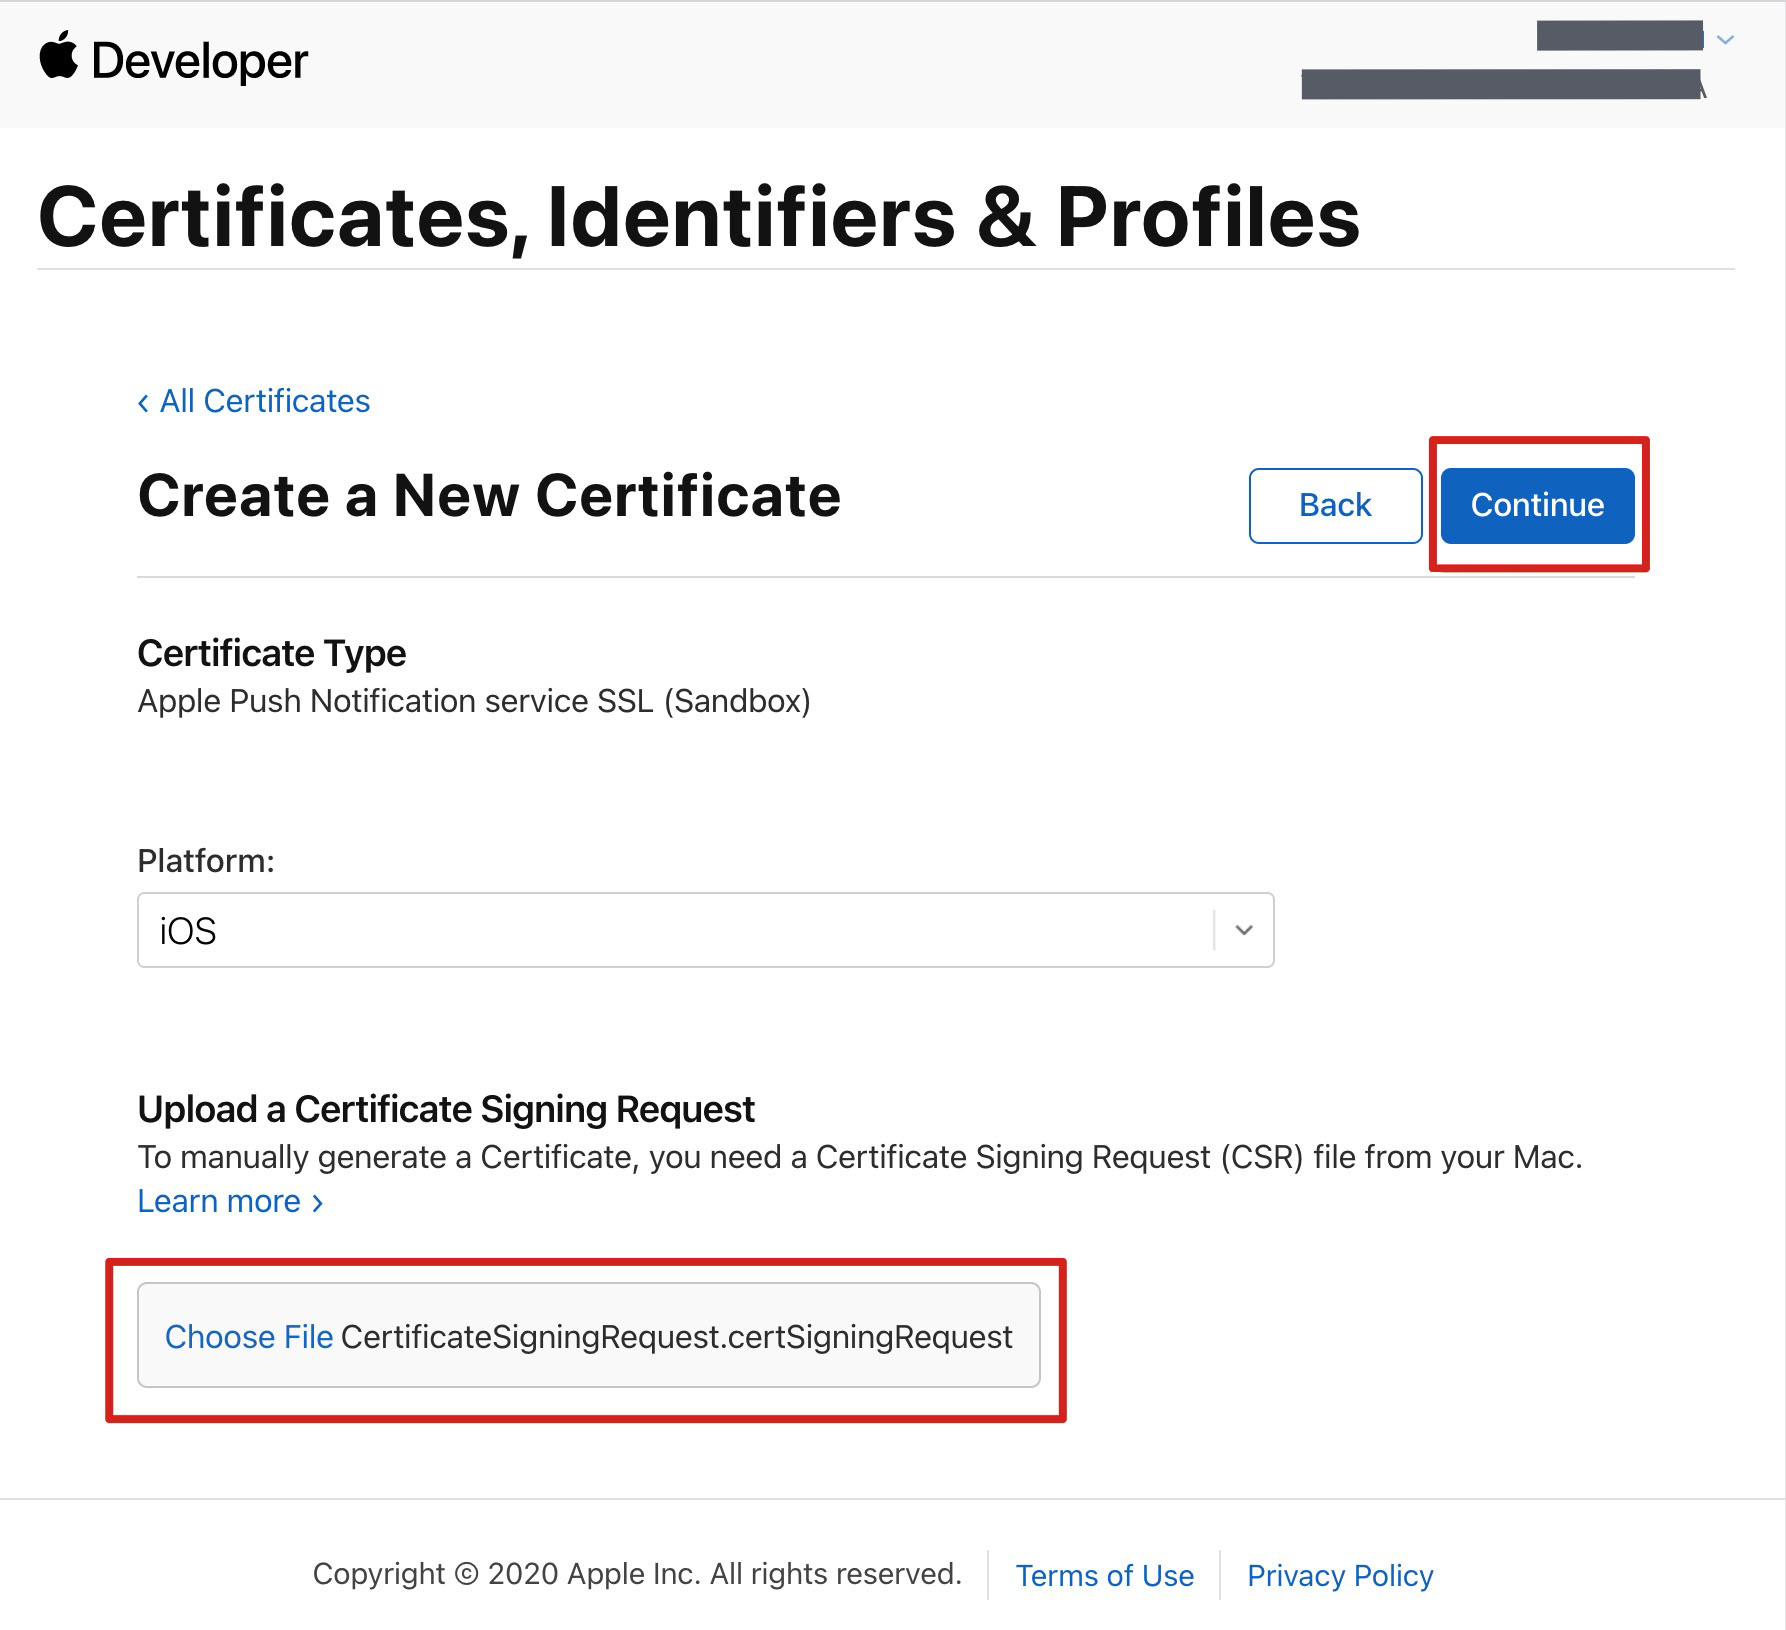
6. Return to the Apple Developer Website page mentioned in Step 3 above, click Choose File to upload the generated *.certSigningRequest file.
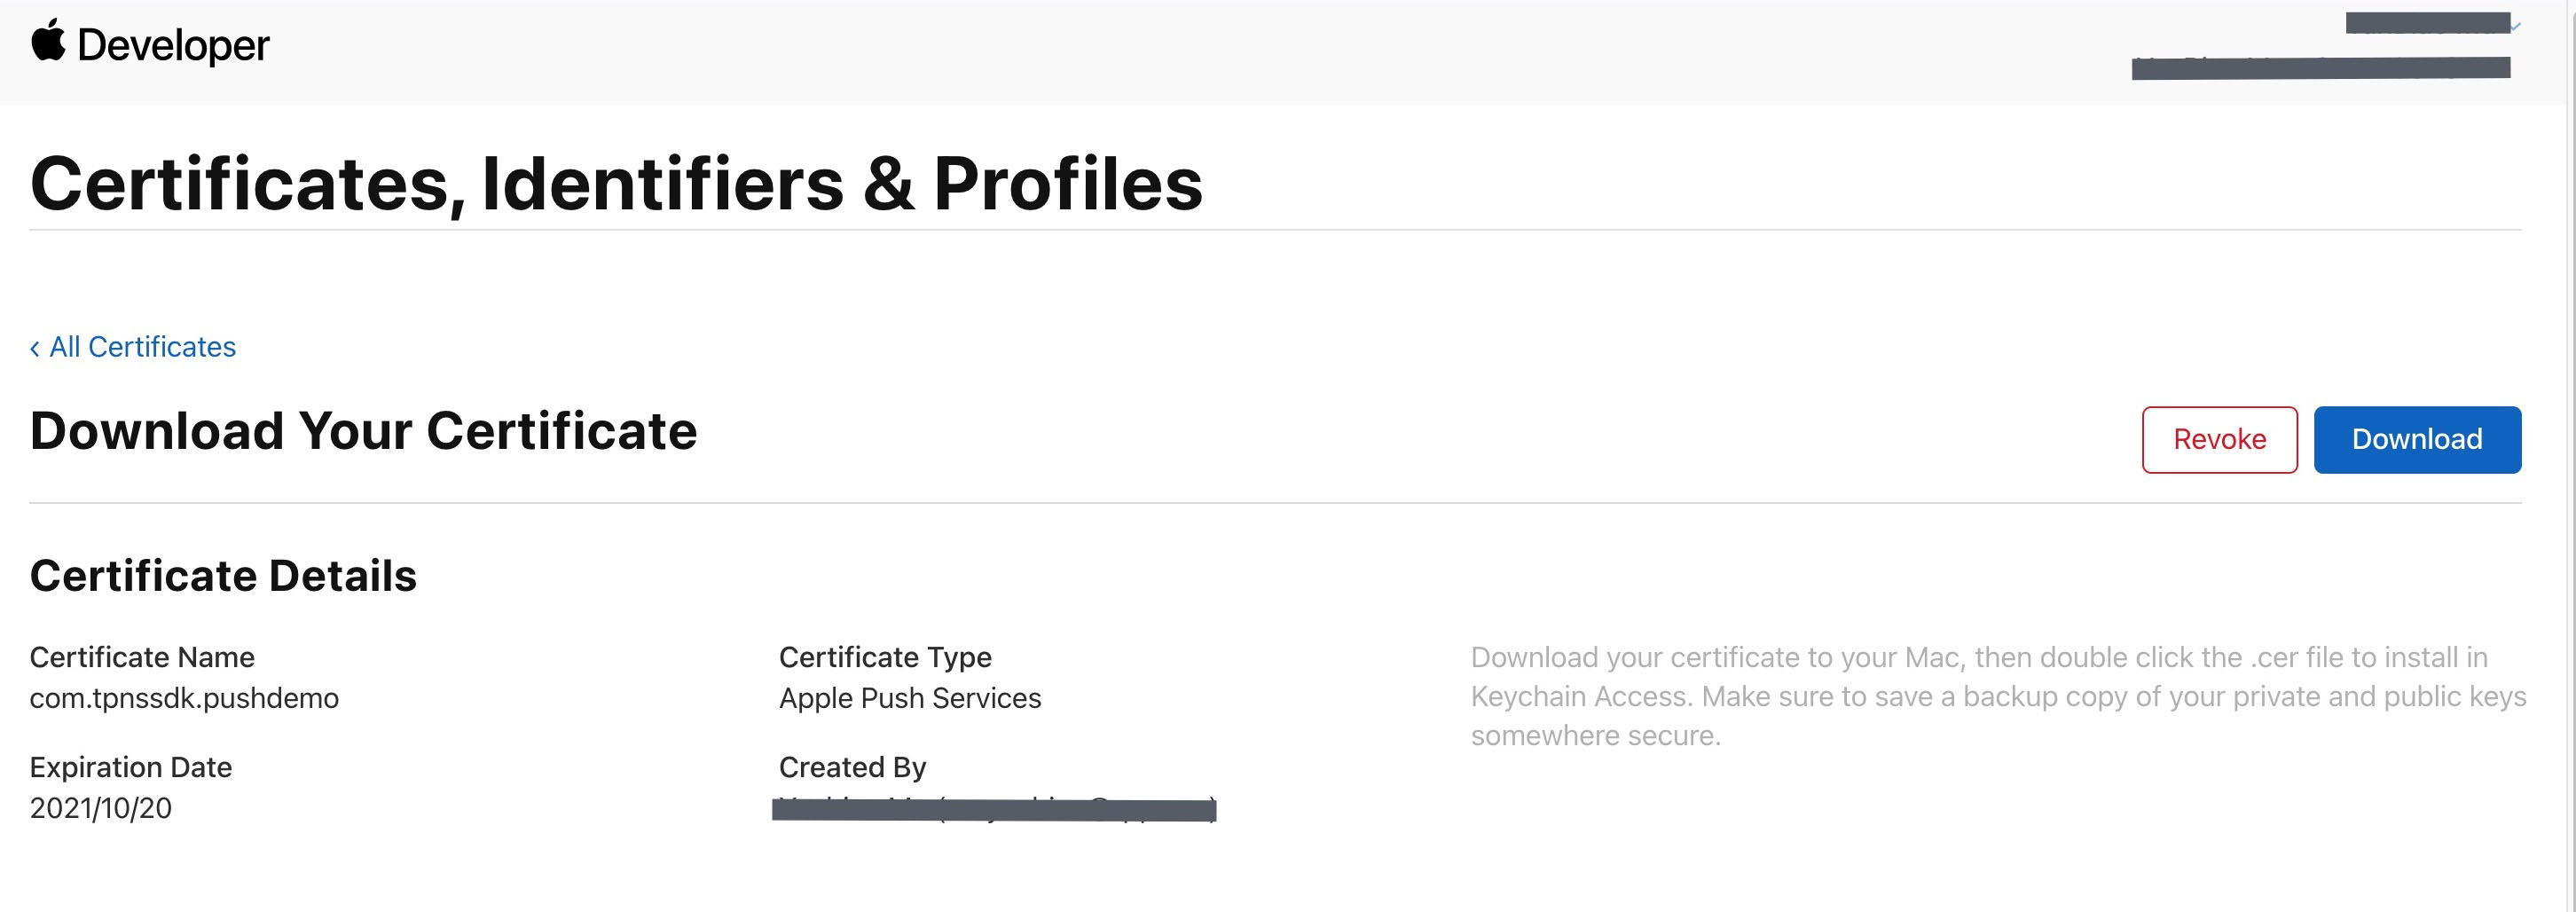
7. Click Continue to generate the push certificate.
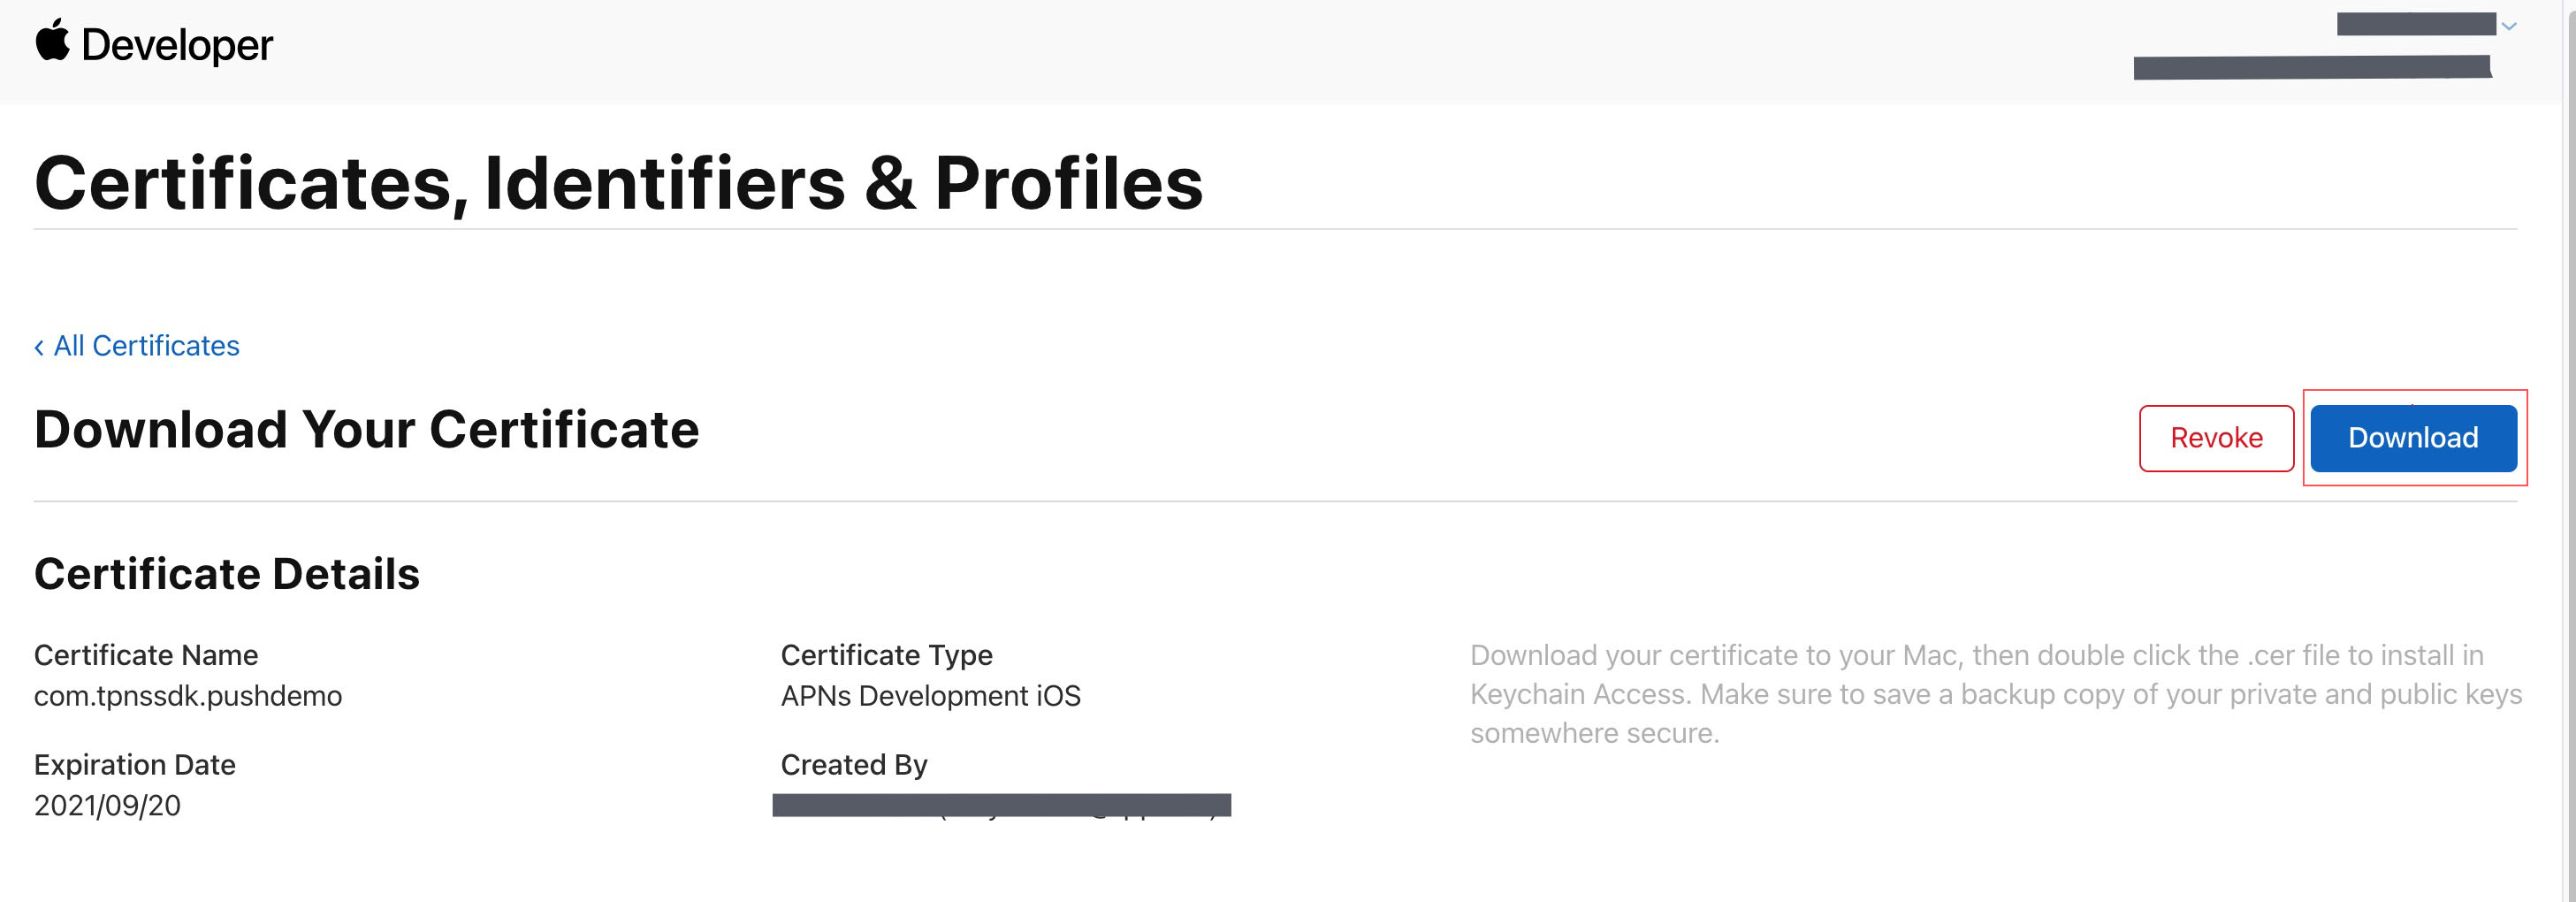
8. Click Download to download the Development SSL Certificate for your development environment to your local system.
9. Follow the steps 1-8 again to download the Production SSL Certificate for your production environment to your local system.
Note:
The certificate for the production environment is actually a merged Sandbox and Production certificate, which can be used for both development and production environments.
10. Double-click the downloaded SSL Certificate for both the development and production environments, and the system will import it into your keychain.
11. Open the Keychain application, navigate to log in toMy Certificates, and right-click to export the newly created Development (Apple Development IOS Push Service) and Production (Apple Push Services) environment's P12 files.
Note:
When saving the P12 file, be sure to set a password.
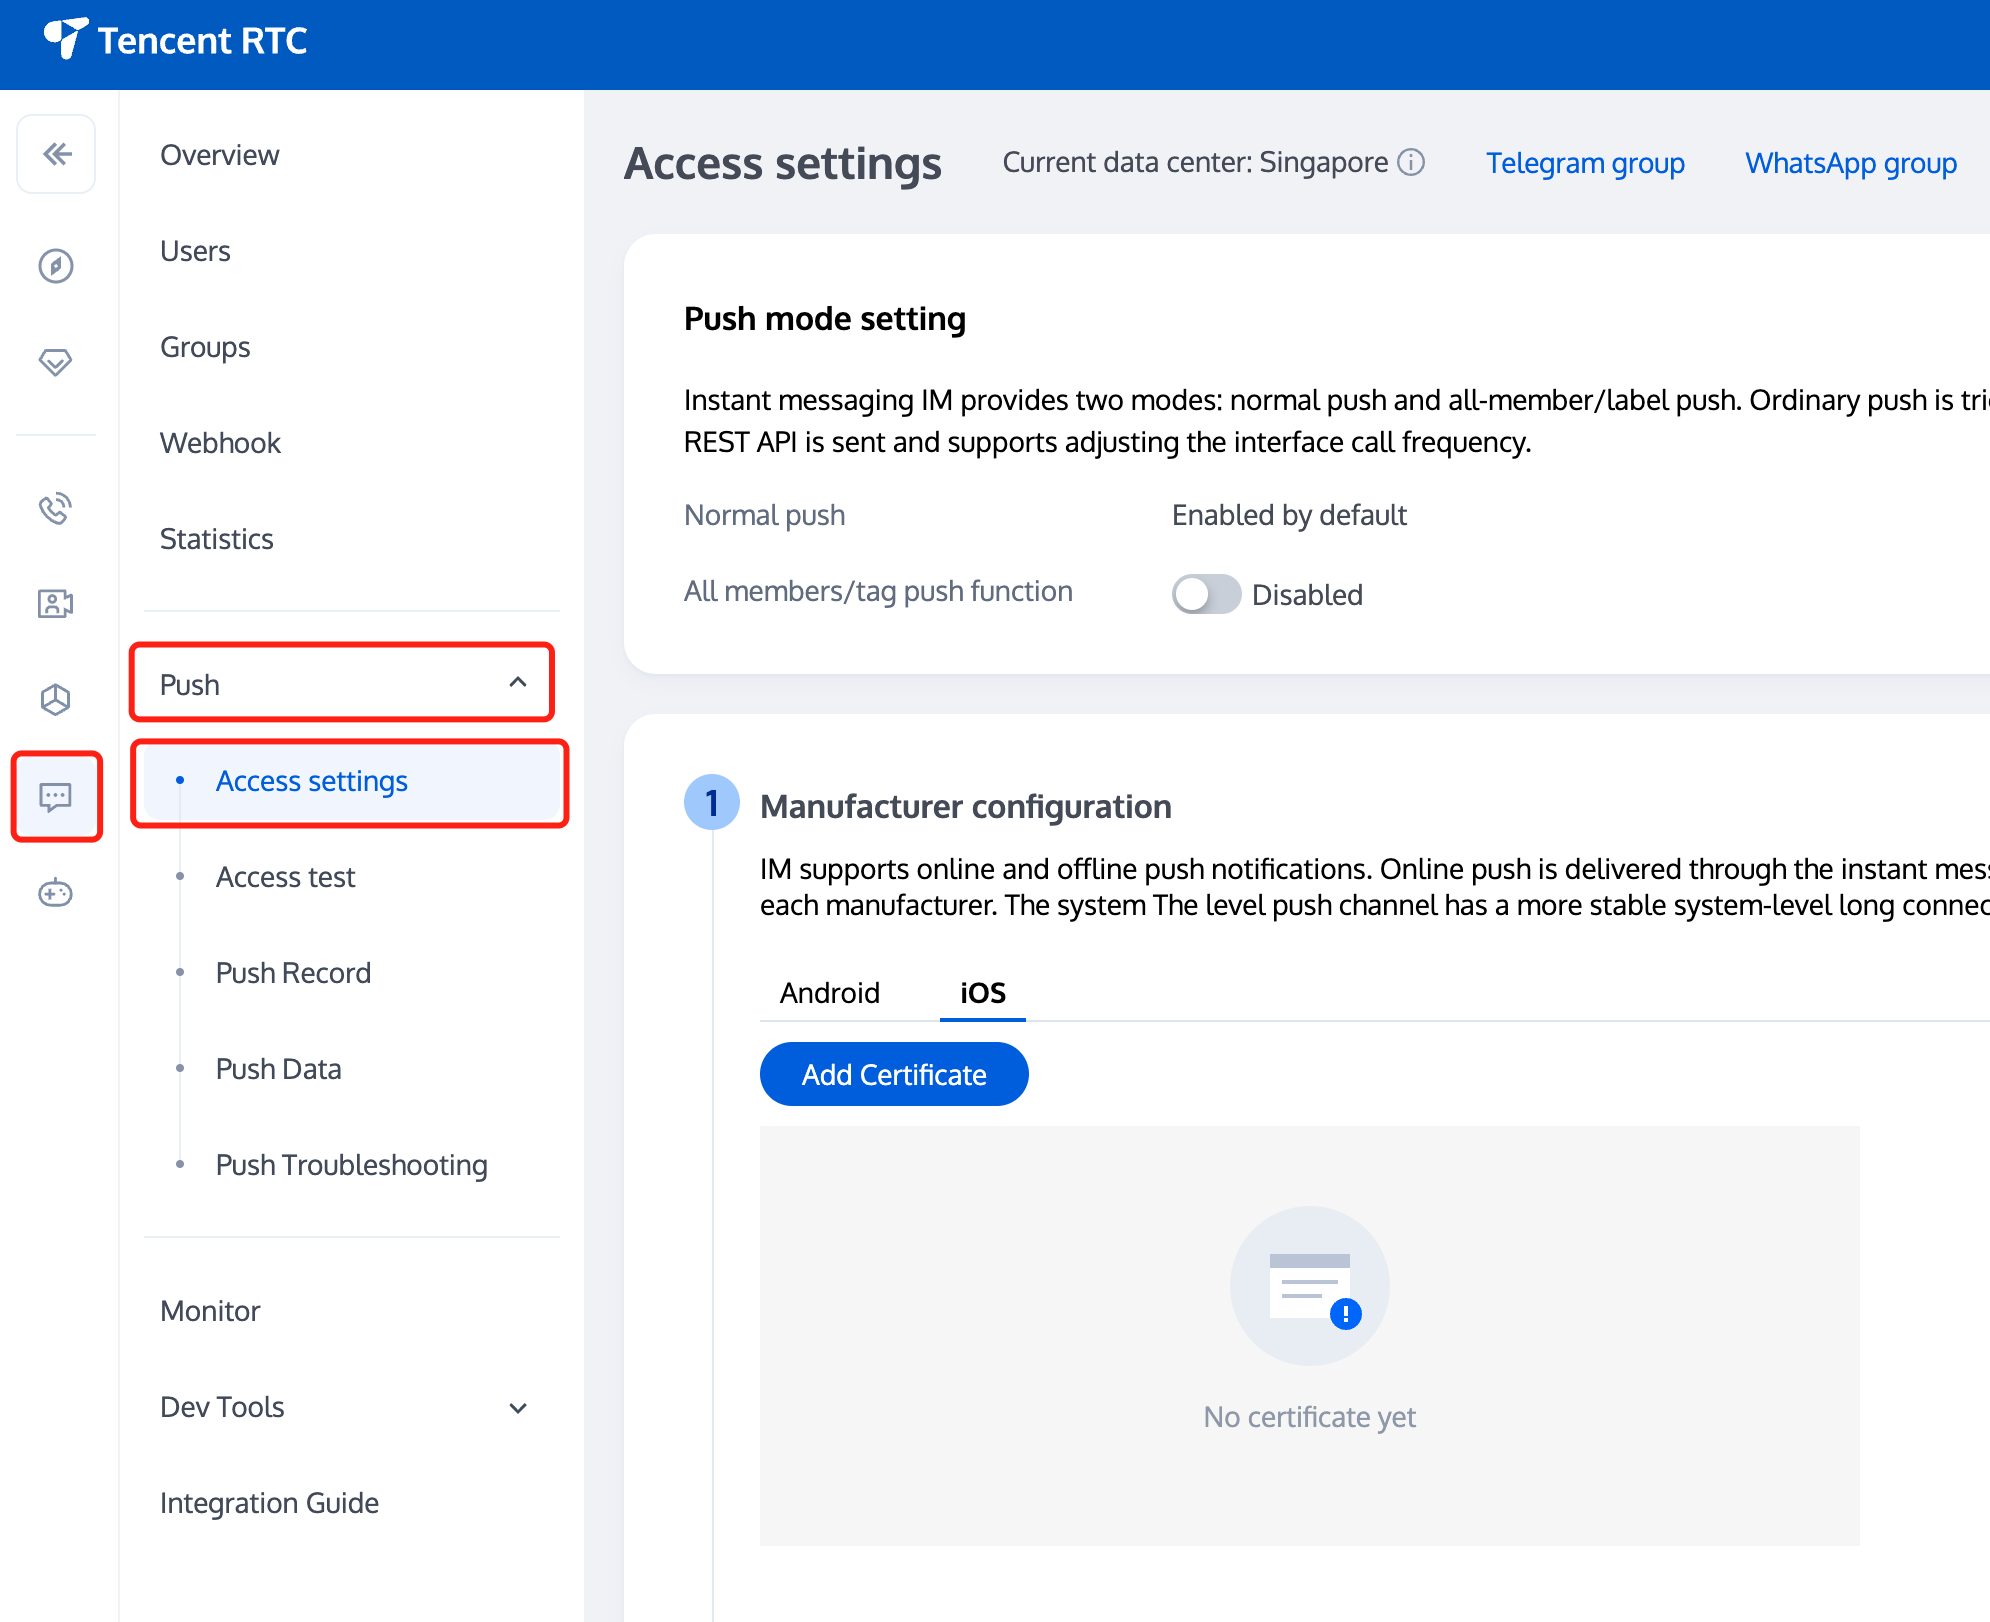
2. Click on the Target Application Card, select the Chat Tag on the left, click on Push, then click on Access settings.
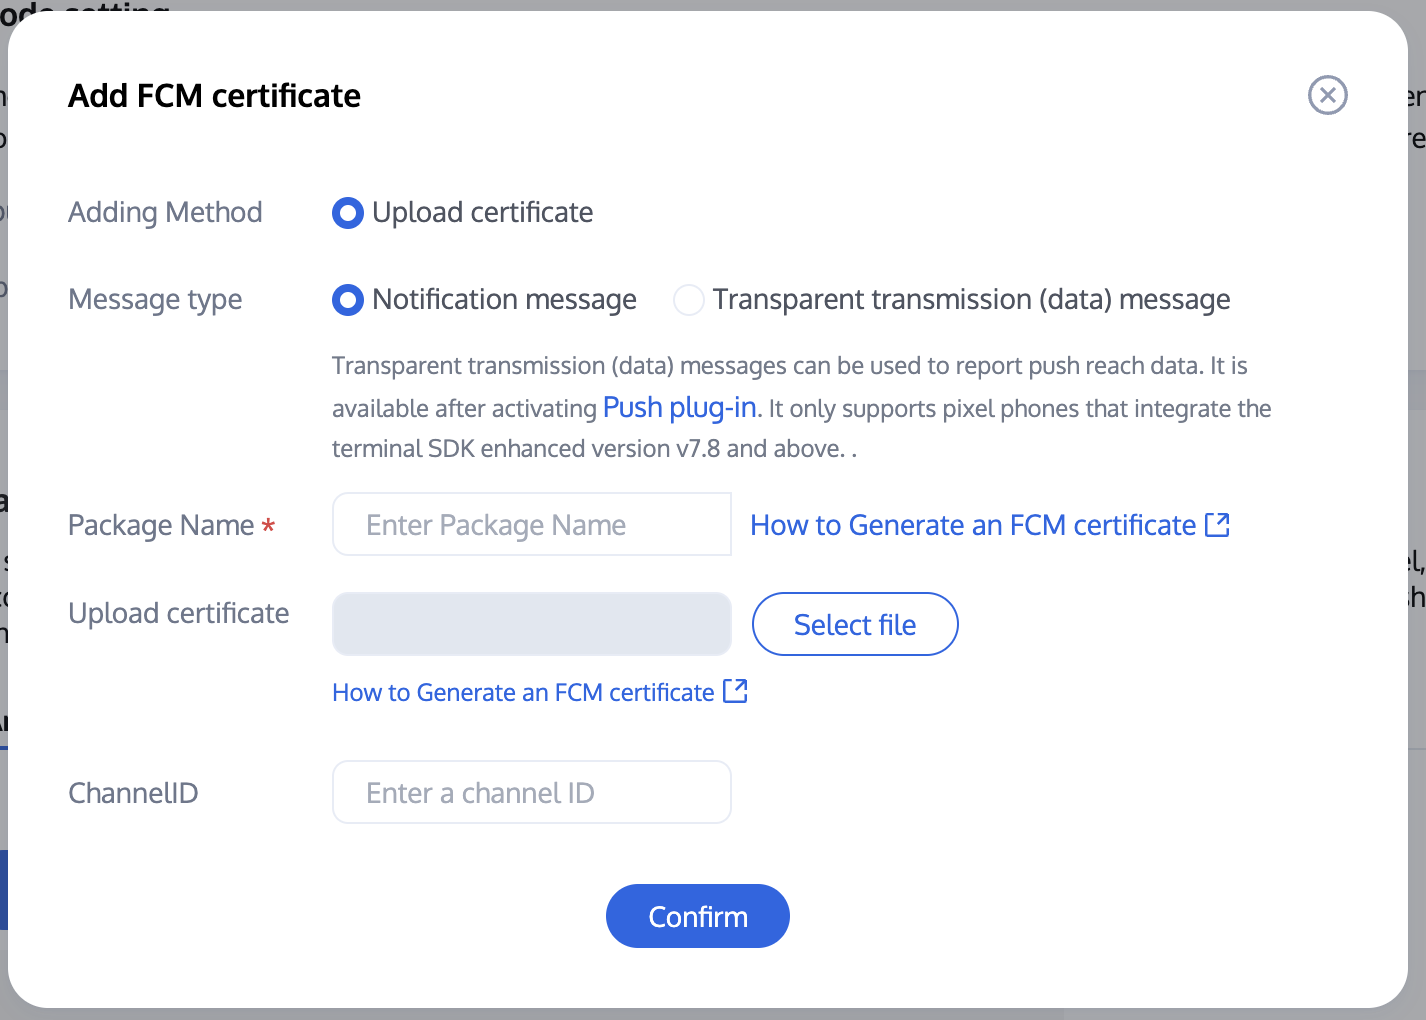
3. Click on iOS Native Offline Push Settings on the right side to Add Certificate.
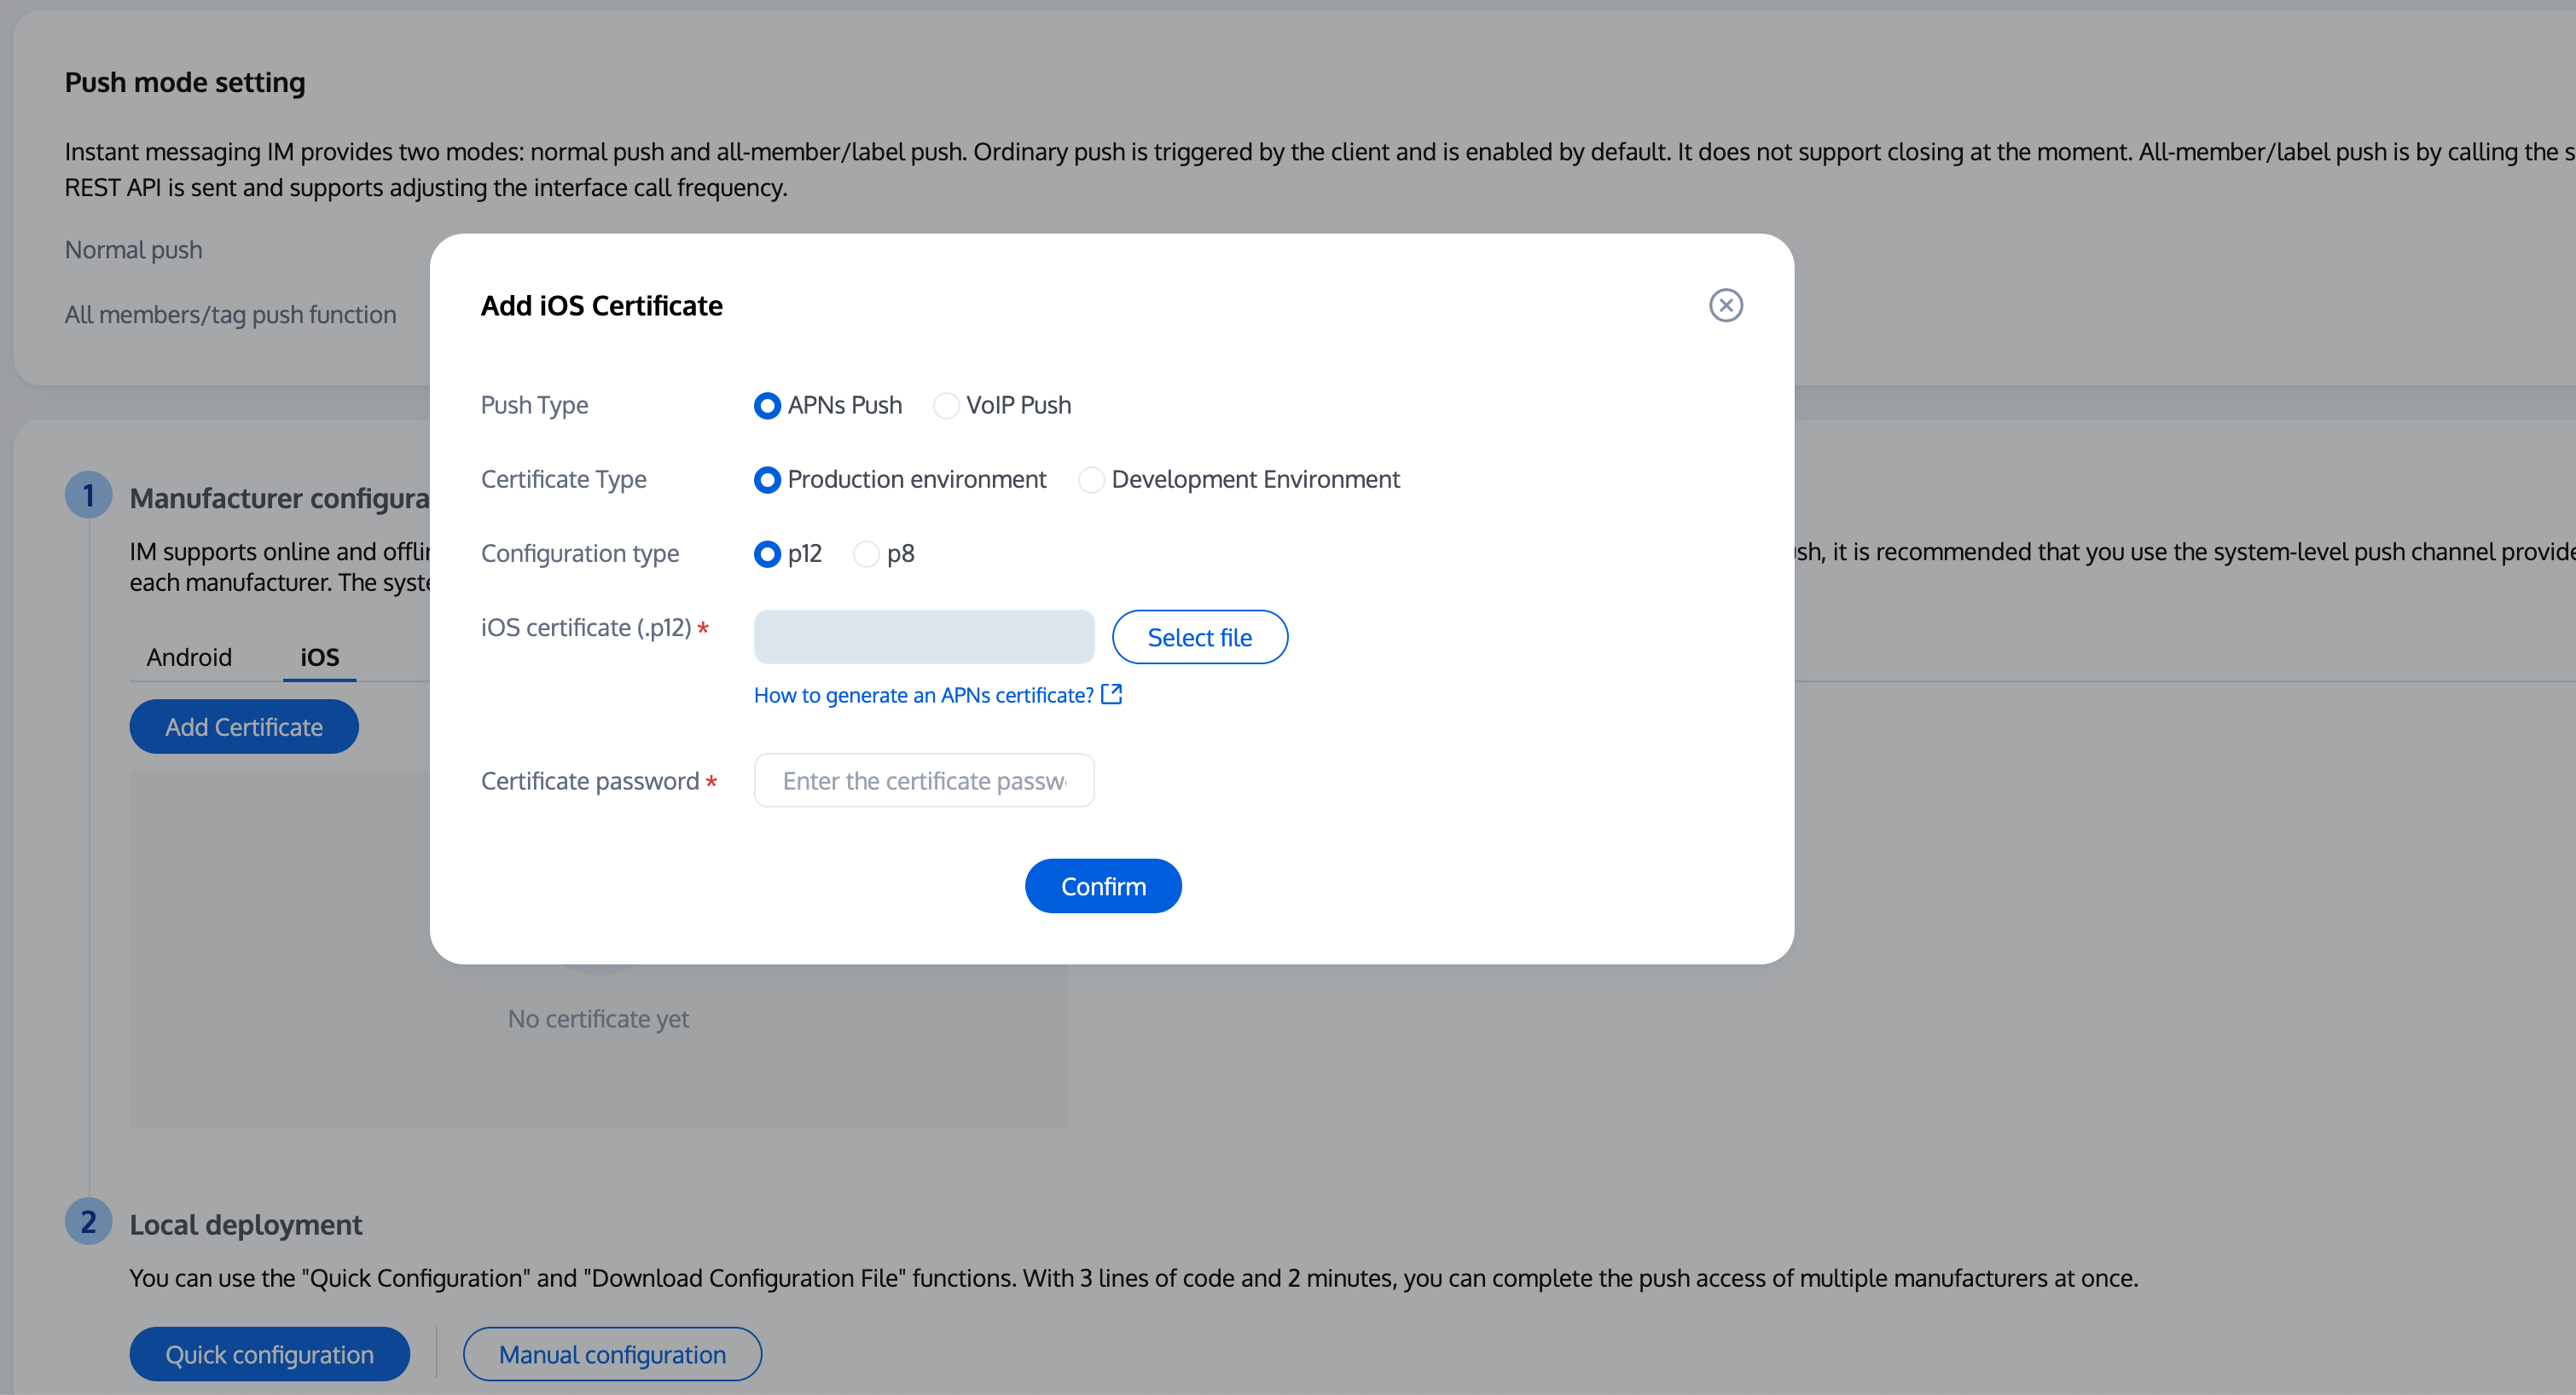
4. Select Certificate Type, upload the iOS Certificate (p12), set the Certificate Password, and click on Confirm.
Note
We recommend naming the uploaded certificate in English (special characters such as brackets are not allowed).
You need to set a password for the uploaded certificate. Without a password, push notifications cannot be received.
For an app published on App Store, the environment of the certificate must be the production environment. Otherwise, push notifications cannot be received.
The uploaded .p12 certificate must be your own authentic and valid certificate.
Operation step
Step 1. Register your app with vendor push platforms
Offline push requires registering your own app with each vendor's push platform to obtain parameters like AppID and AppKey, to implement the offline push feature.
Step 2: TRTC Console Configuration
log in to Tencent Cloud Tencent RTC Console, go to Chat > Push > Access settings feature bar to add push certificates from various vendors, and configure the AppId, AppKey, AppSecret and other parameters obtained in Step 1 to the added push certificates.
Note:
Regarding the Click for Subsequent Actions option:
if you wish to use this plugin's capability to redirect clicks, please keep the default values unchanged, which typically means `Opening a specified page within the application` with default settings.
If you also wish to use the Report Statistics feature, please keep this option at its default value,
Google FCM
Vendor Push Platform
Configuring in the IM console
Step 3: Push Parameter Configuration
iOS
Android
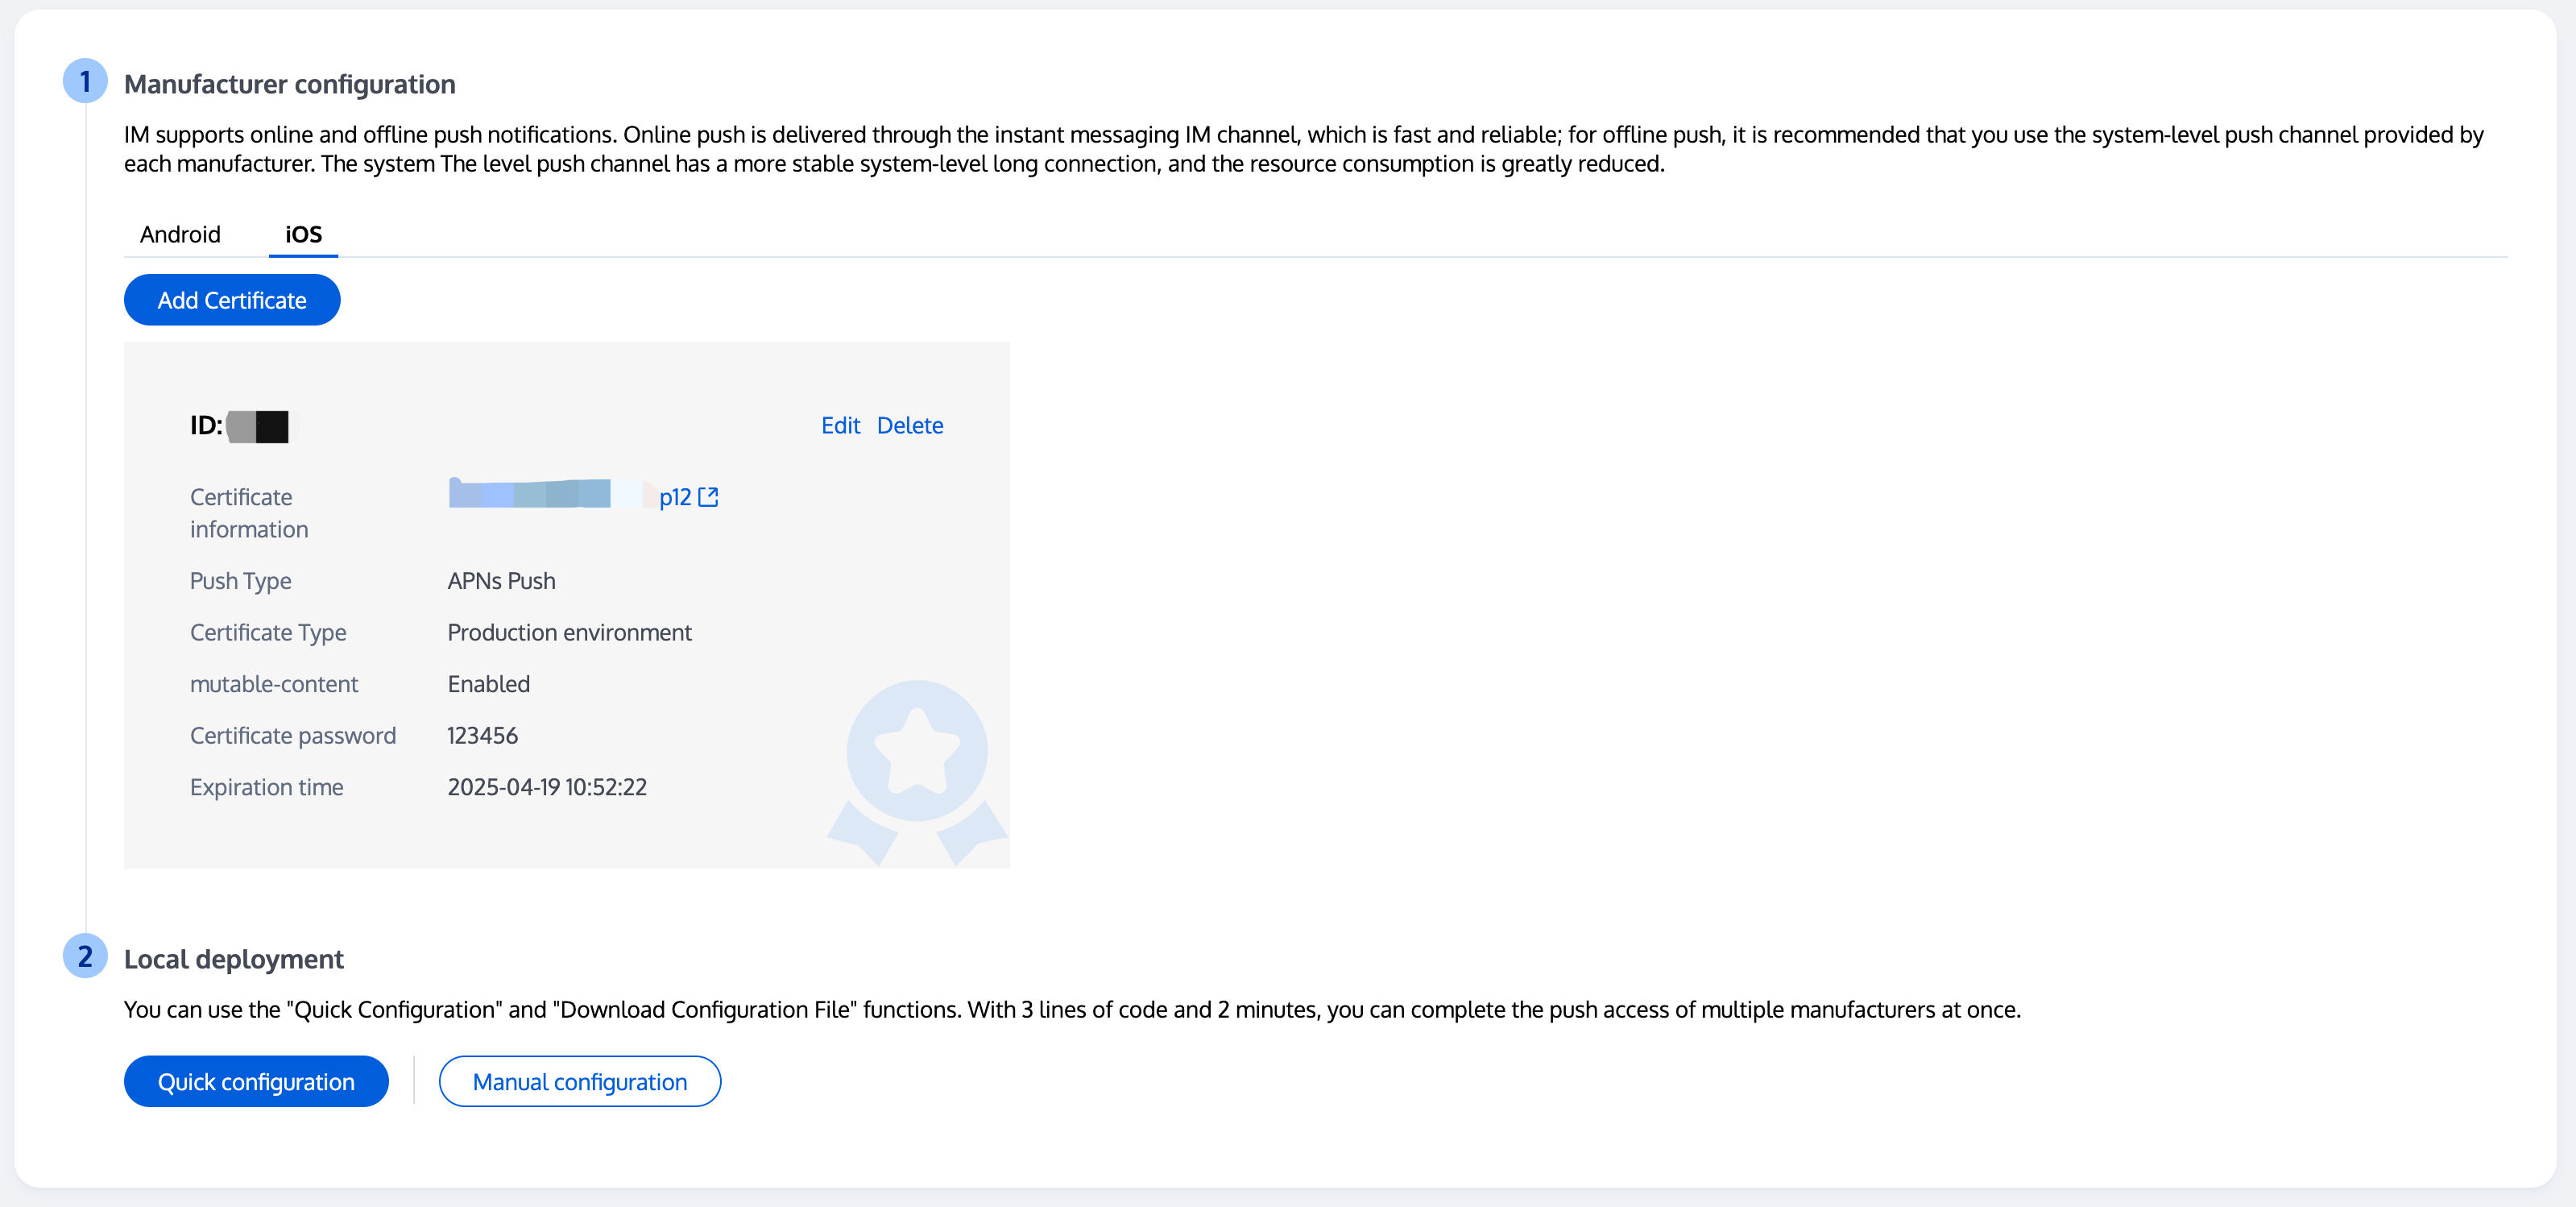
Please upload the iOS APNs push certificate you accessed in the Manufacturer Configuration step to the IM Console.
The IM console will allocate a Certificate ID for you, as shown in the figure below:
As soon as possible after your application starts, call the TencentCloudChatPush().setApnsCertificateID method to pass in this Certificate ID.
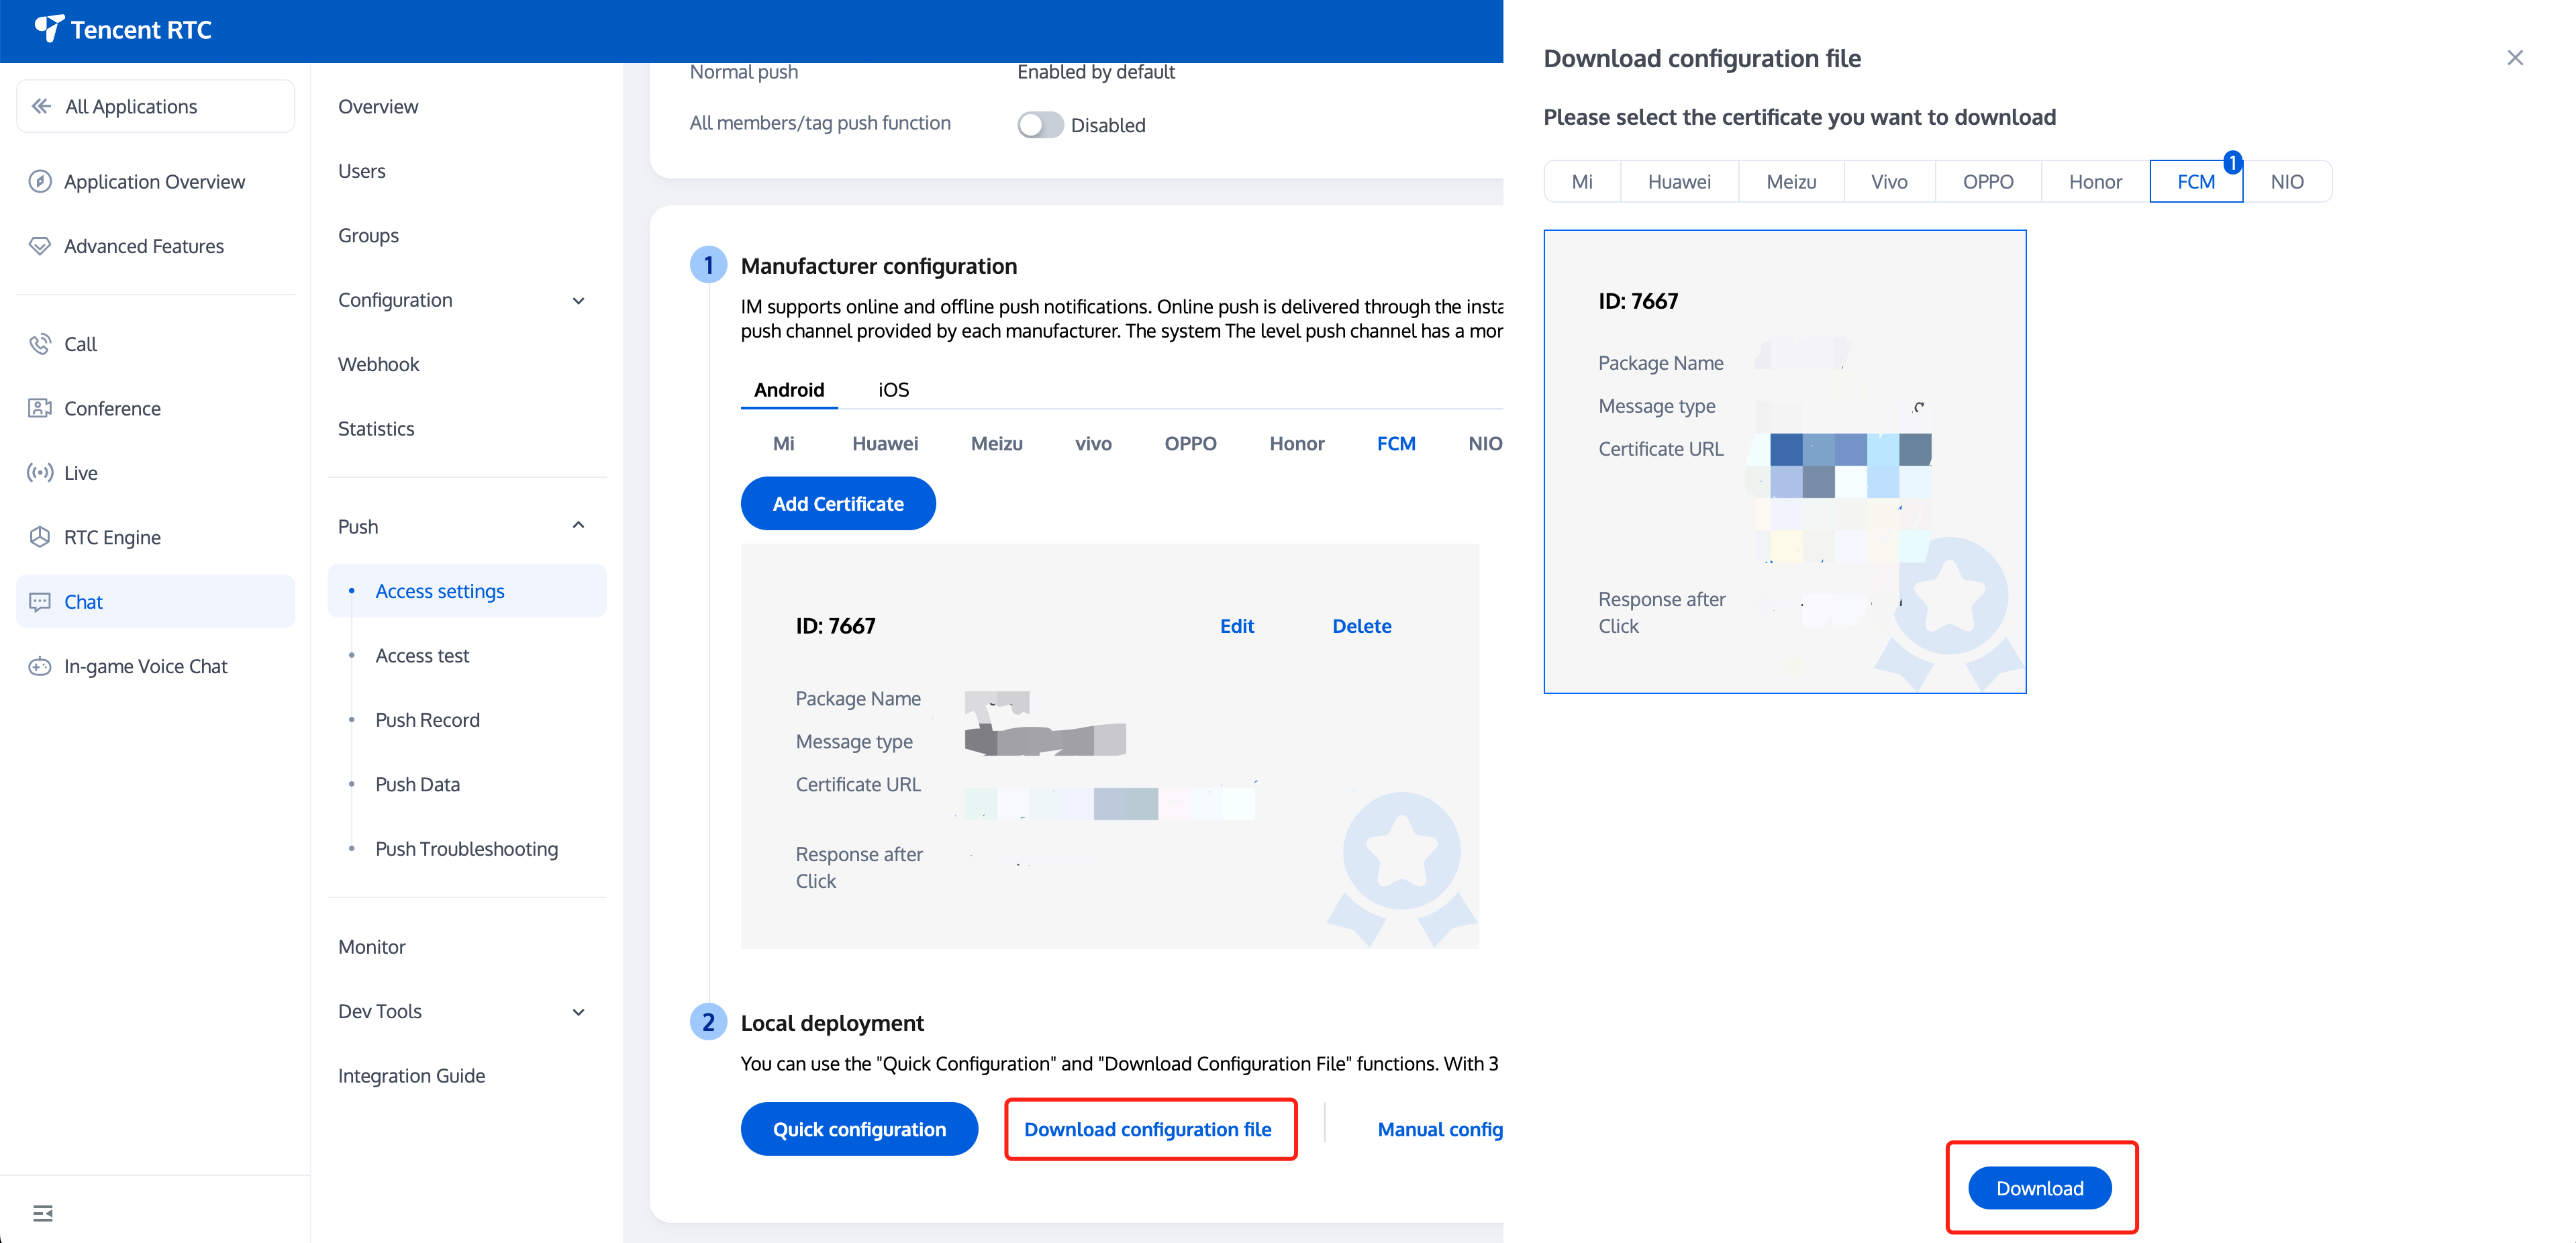
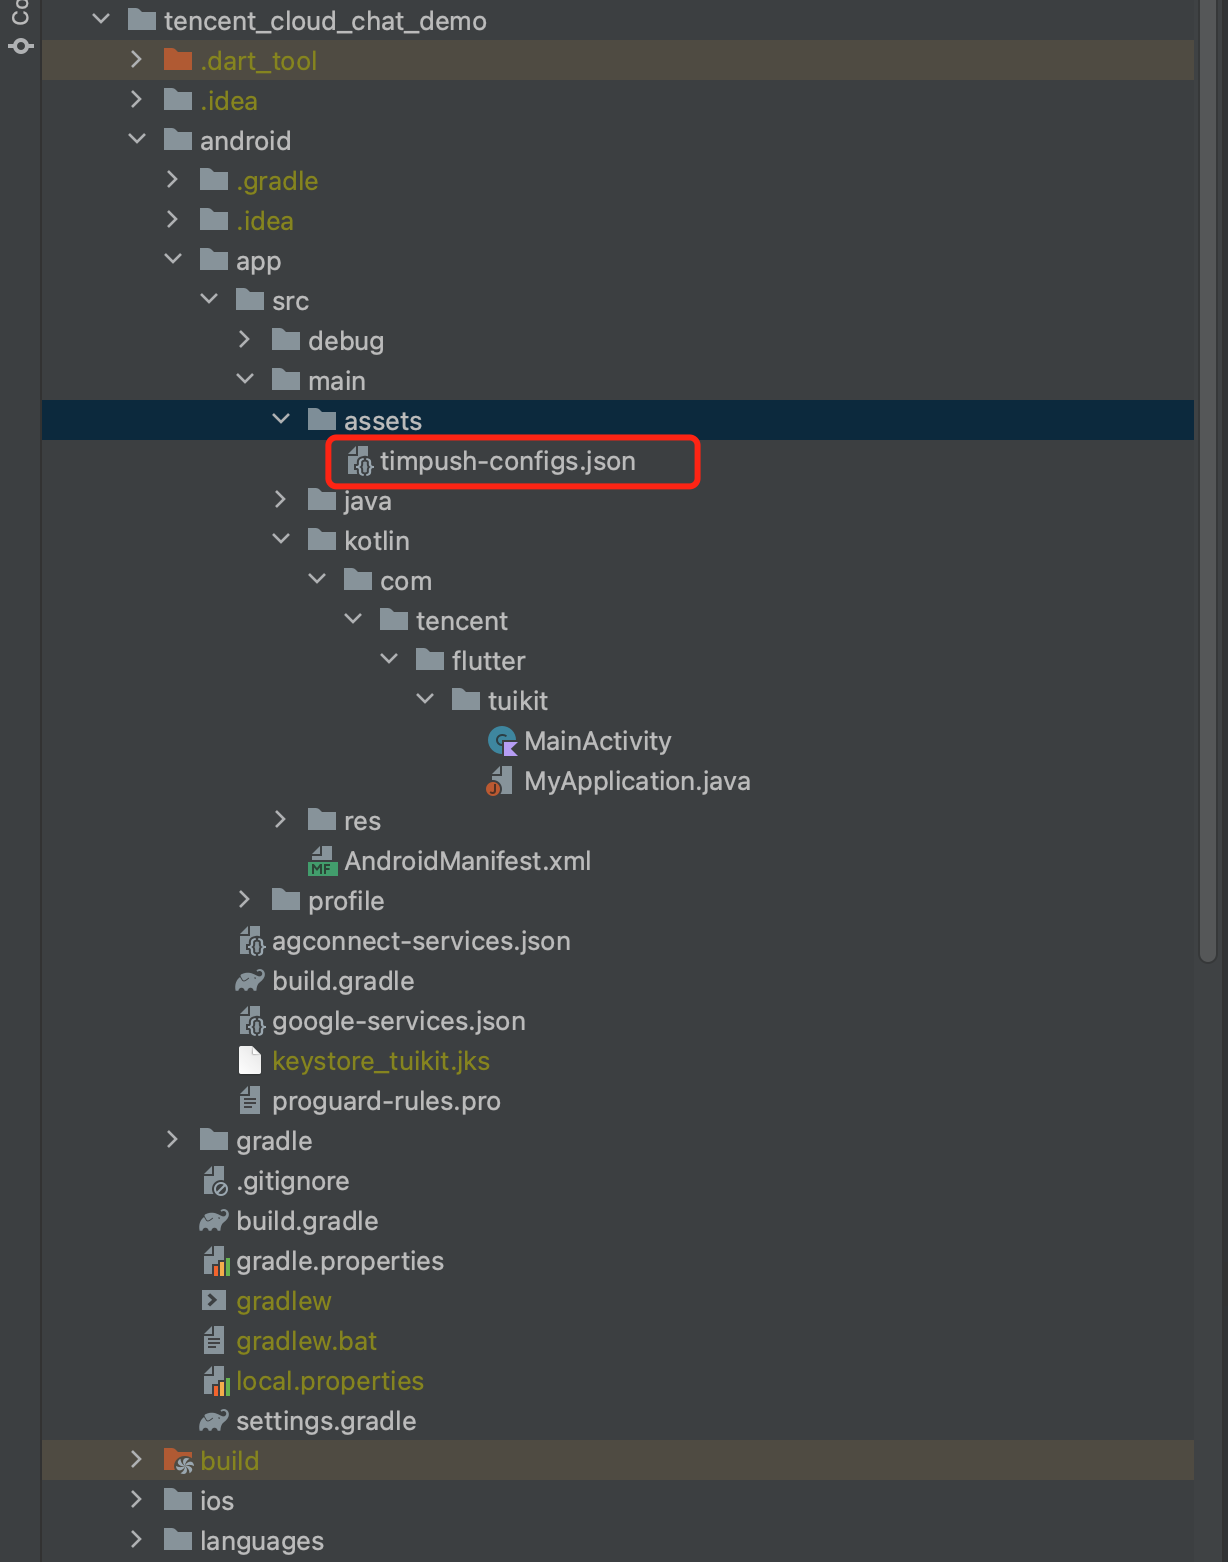
After completing the push info fill-in via console, download and add the configuration file to the project. Place the downloaded timpush-configs.json file under the android/app/src/main/assets directory. If the directory is non-existent, manually create it.
1. Select to download the configuration file timpush-configs.json
1. Add it to your project
Step 4: Client code configuration
In this step, several native codes are to be written, such as: Swift, Java, XML, etc.
Don't fret, simply follow the instructions and copy the code we provide into the specified files.
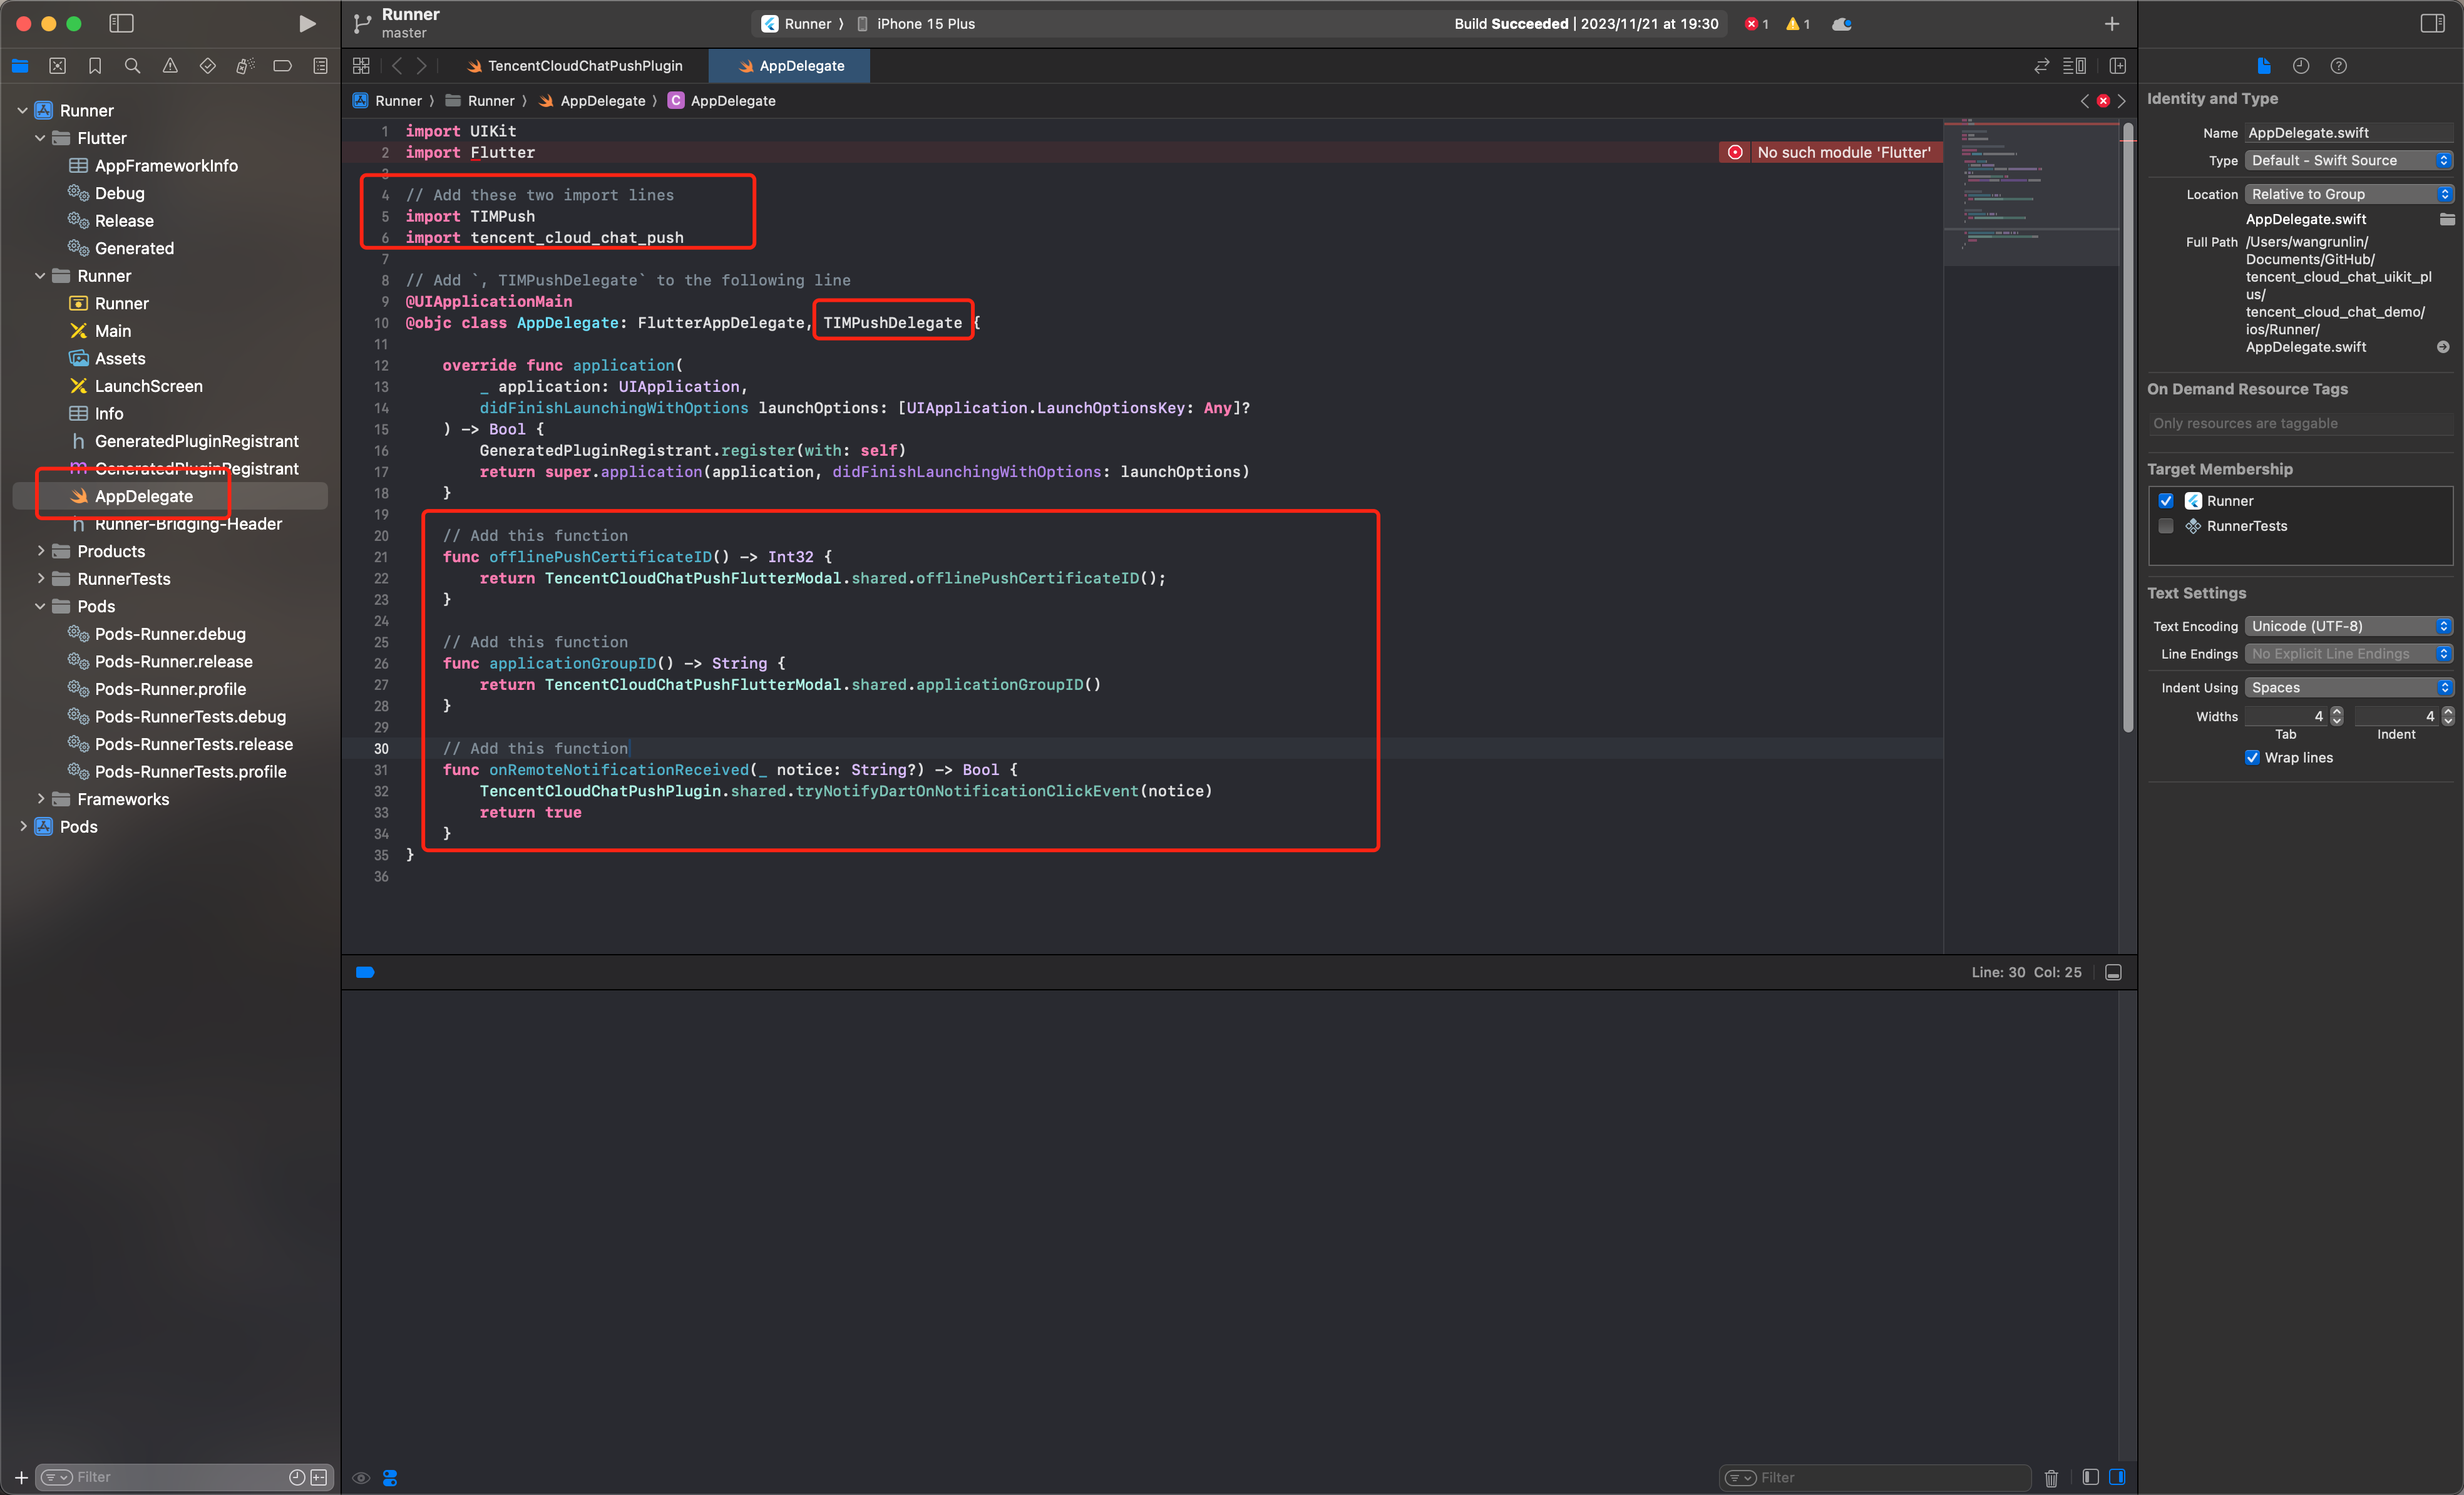
iOS
Android
You may use Xcode for editing, or directly edit in Visual Studio Code or Android Studio.
Open the ios/Runner/AppDelegate.swift file, paste the circled code below into it, as shown in the figure. The code is attached after the image.
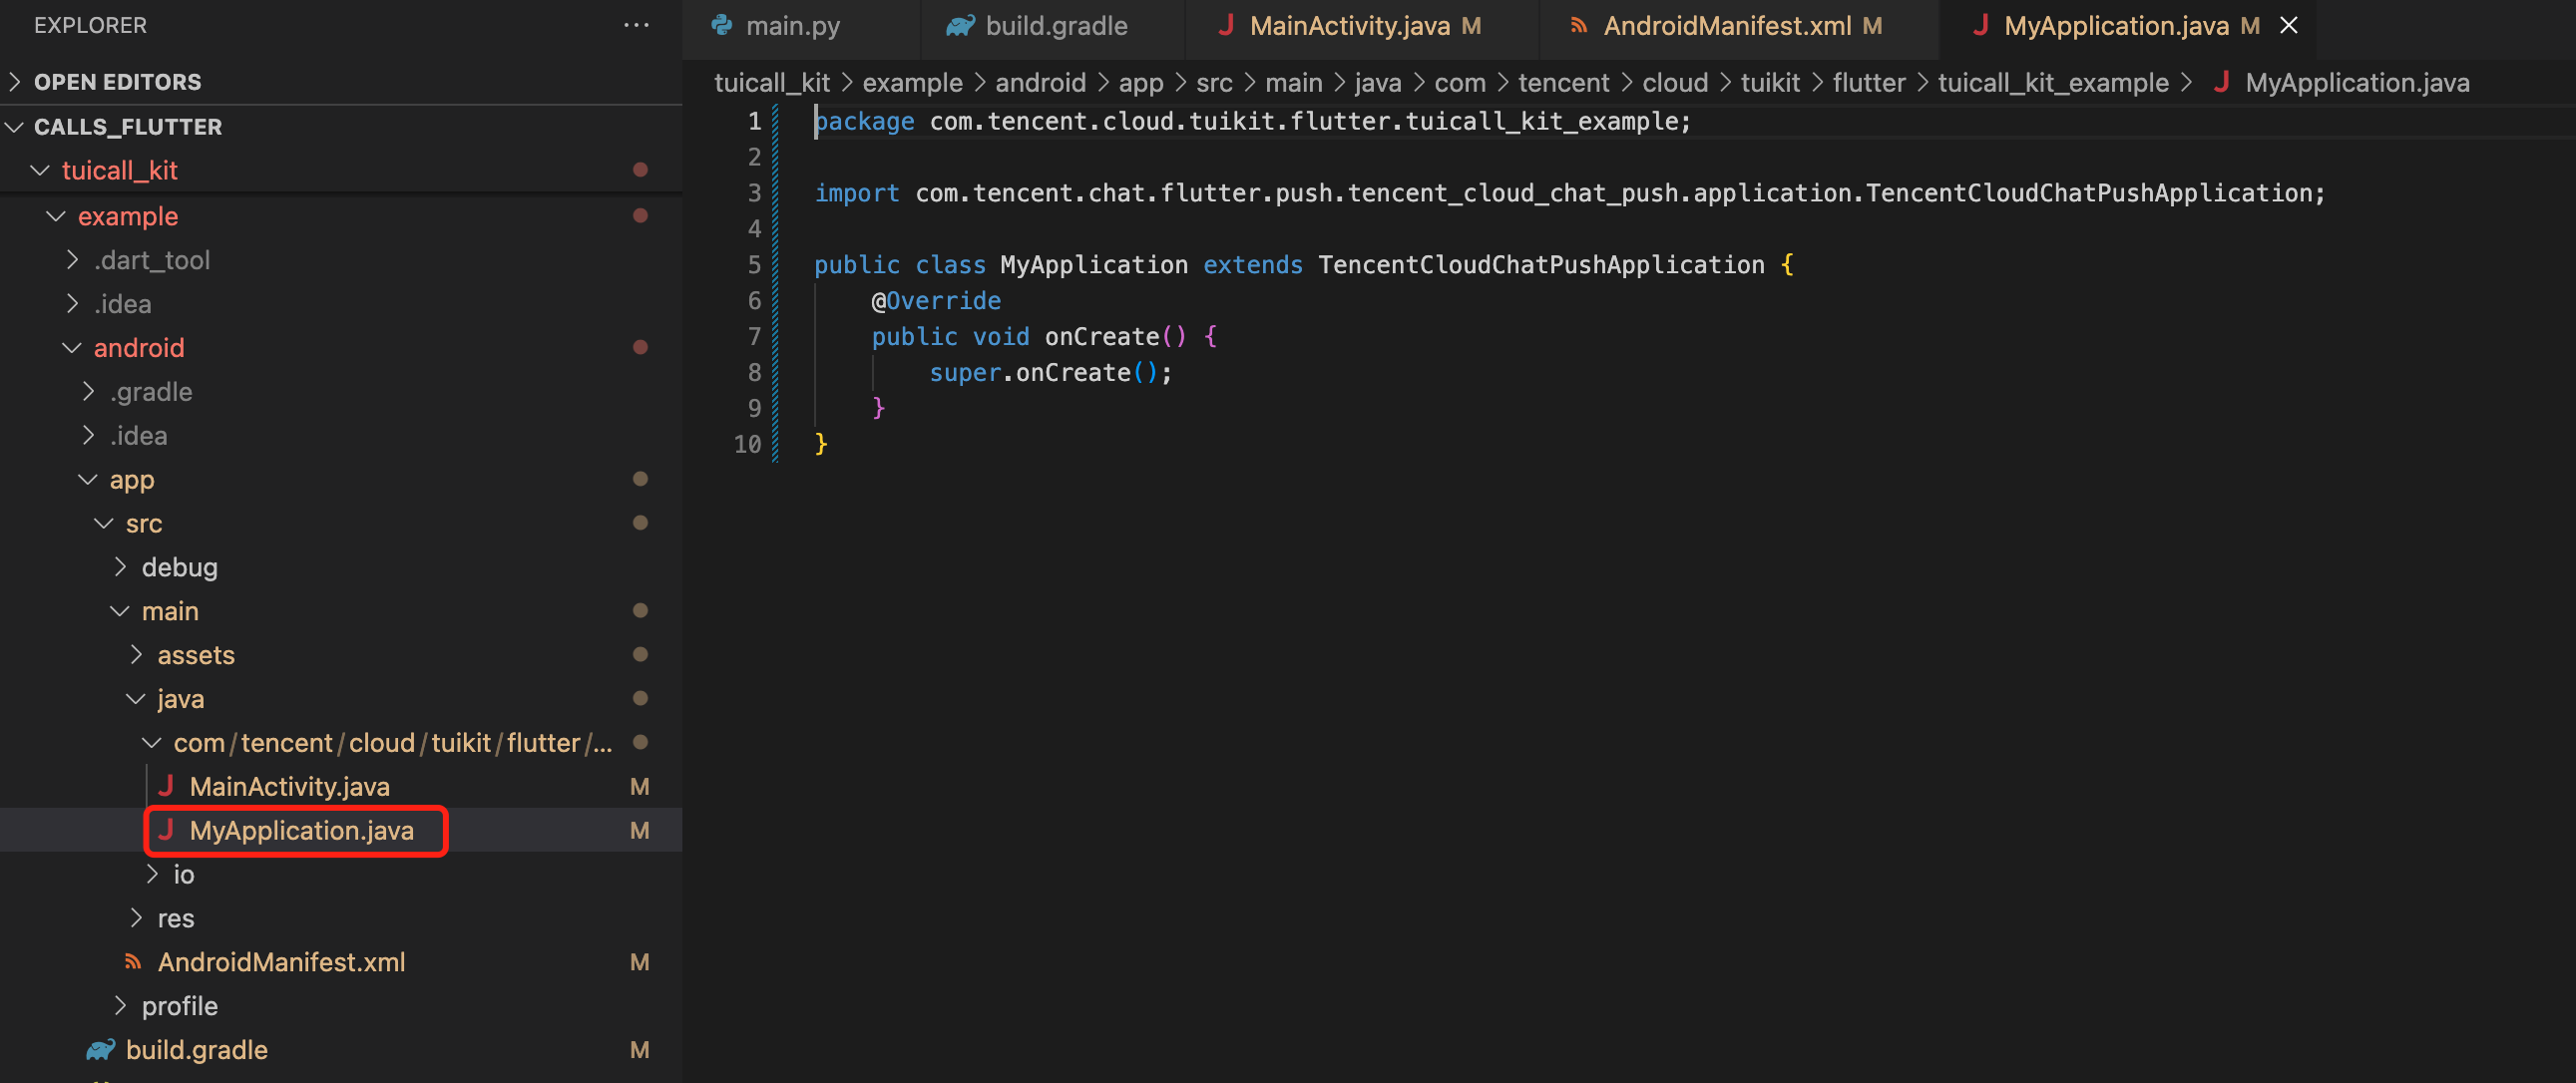
If you have already created your own Application for other purposes, simply extend TencentCloudChatPushApplication and ensure that onCreate() method is called in super.onCreate();.
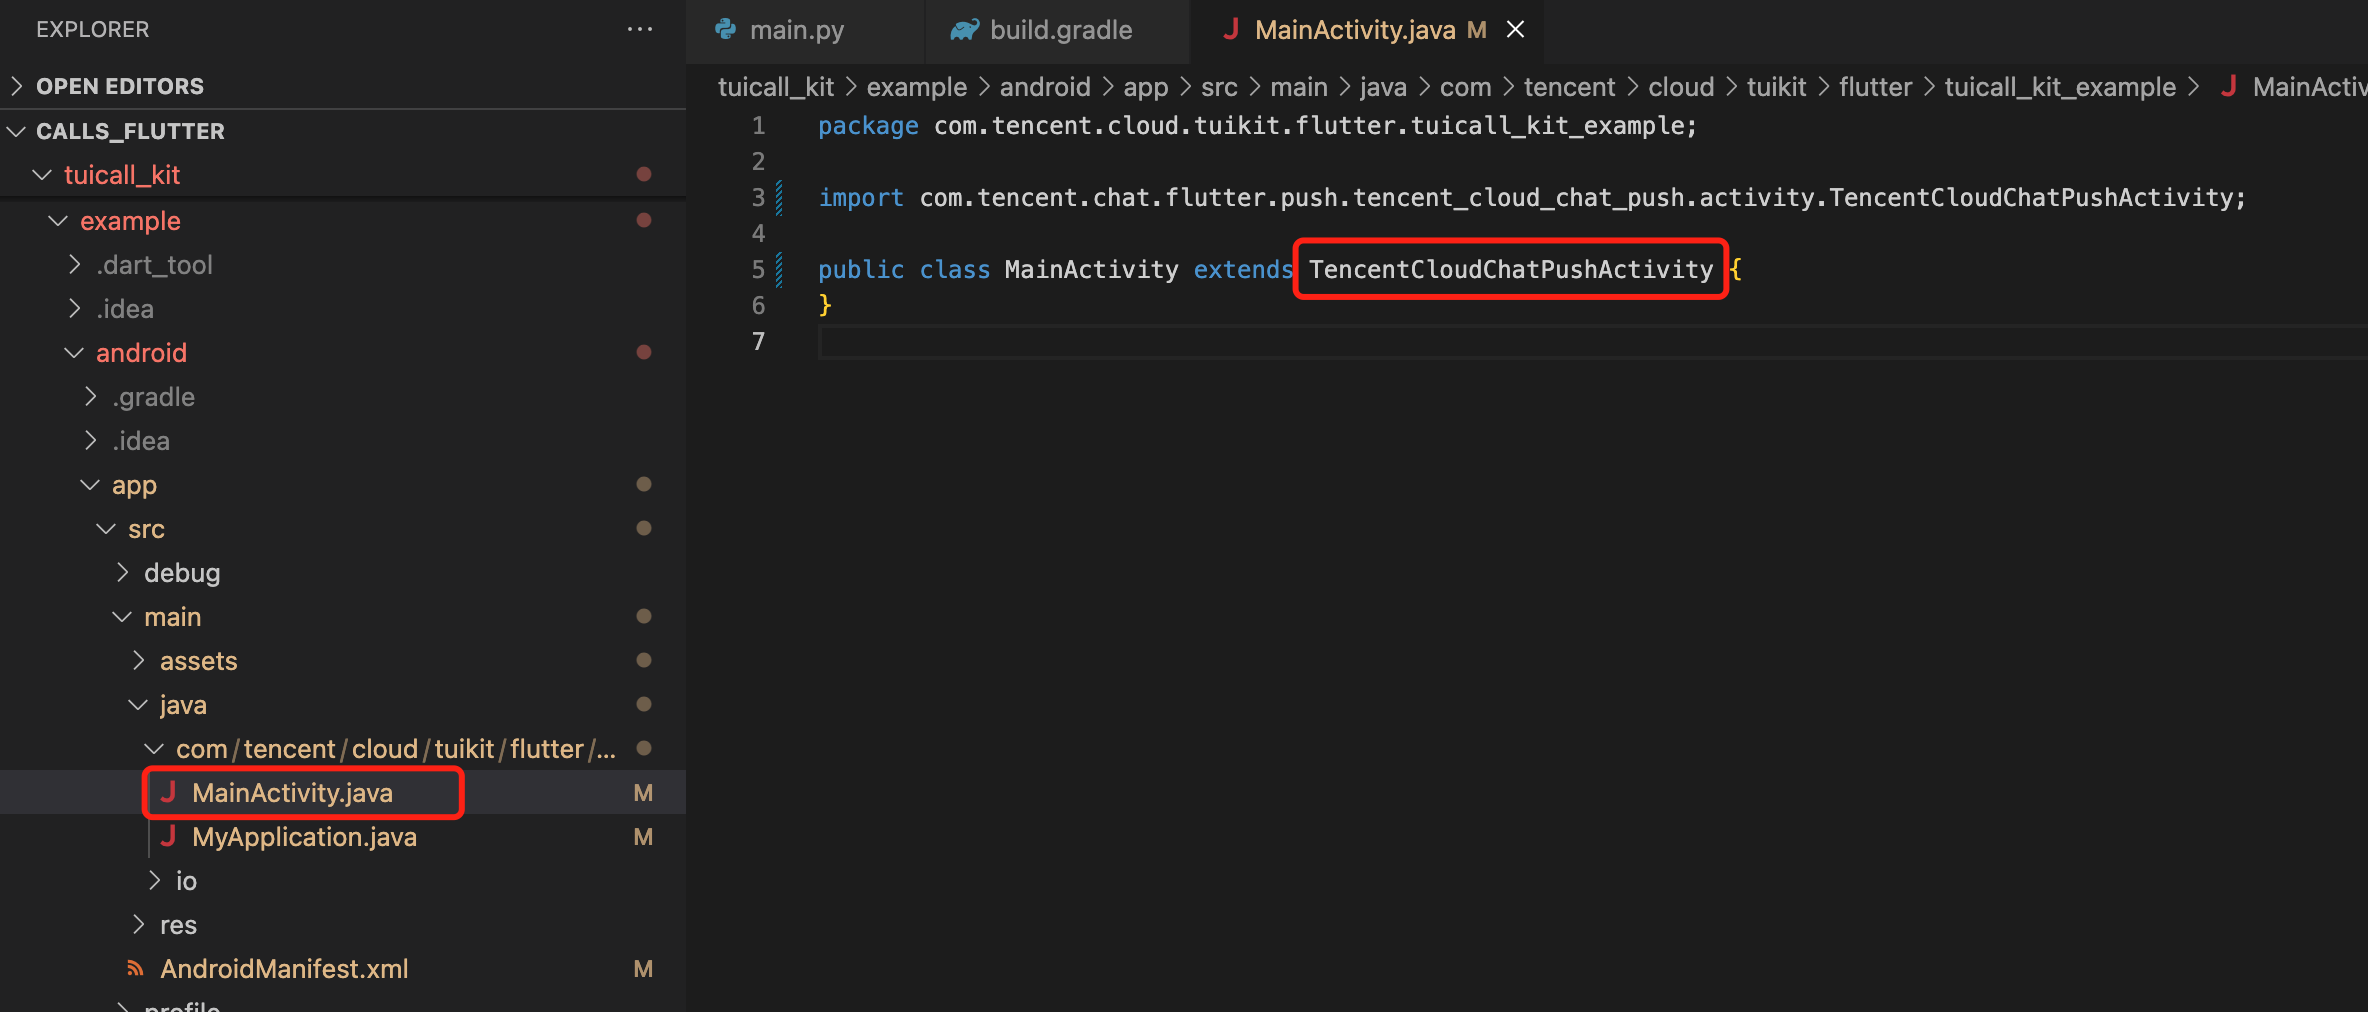
Meanwhile, you also need to modify your MainActivity File:
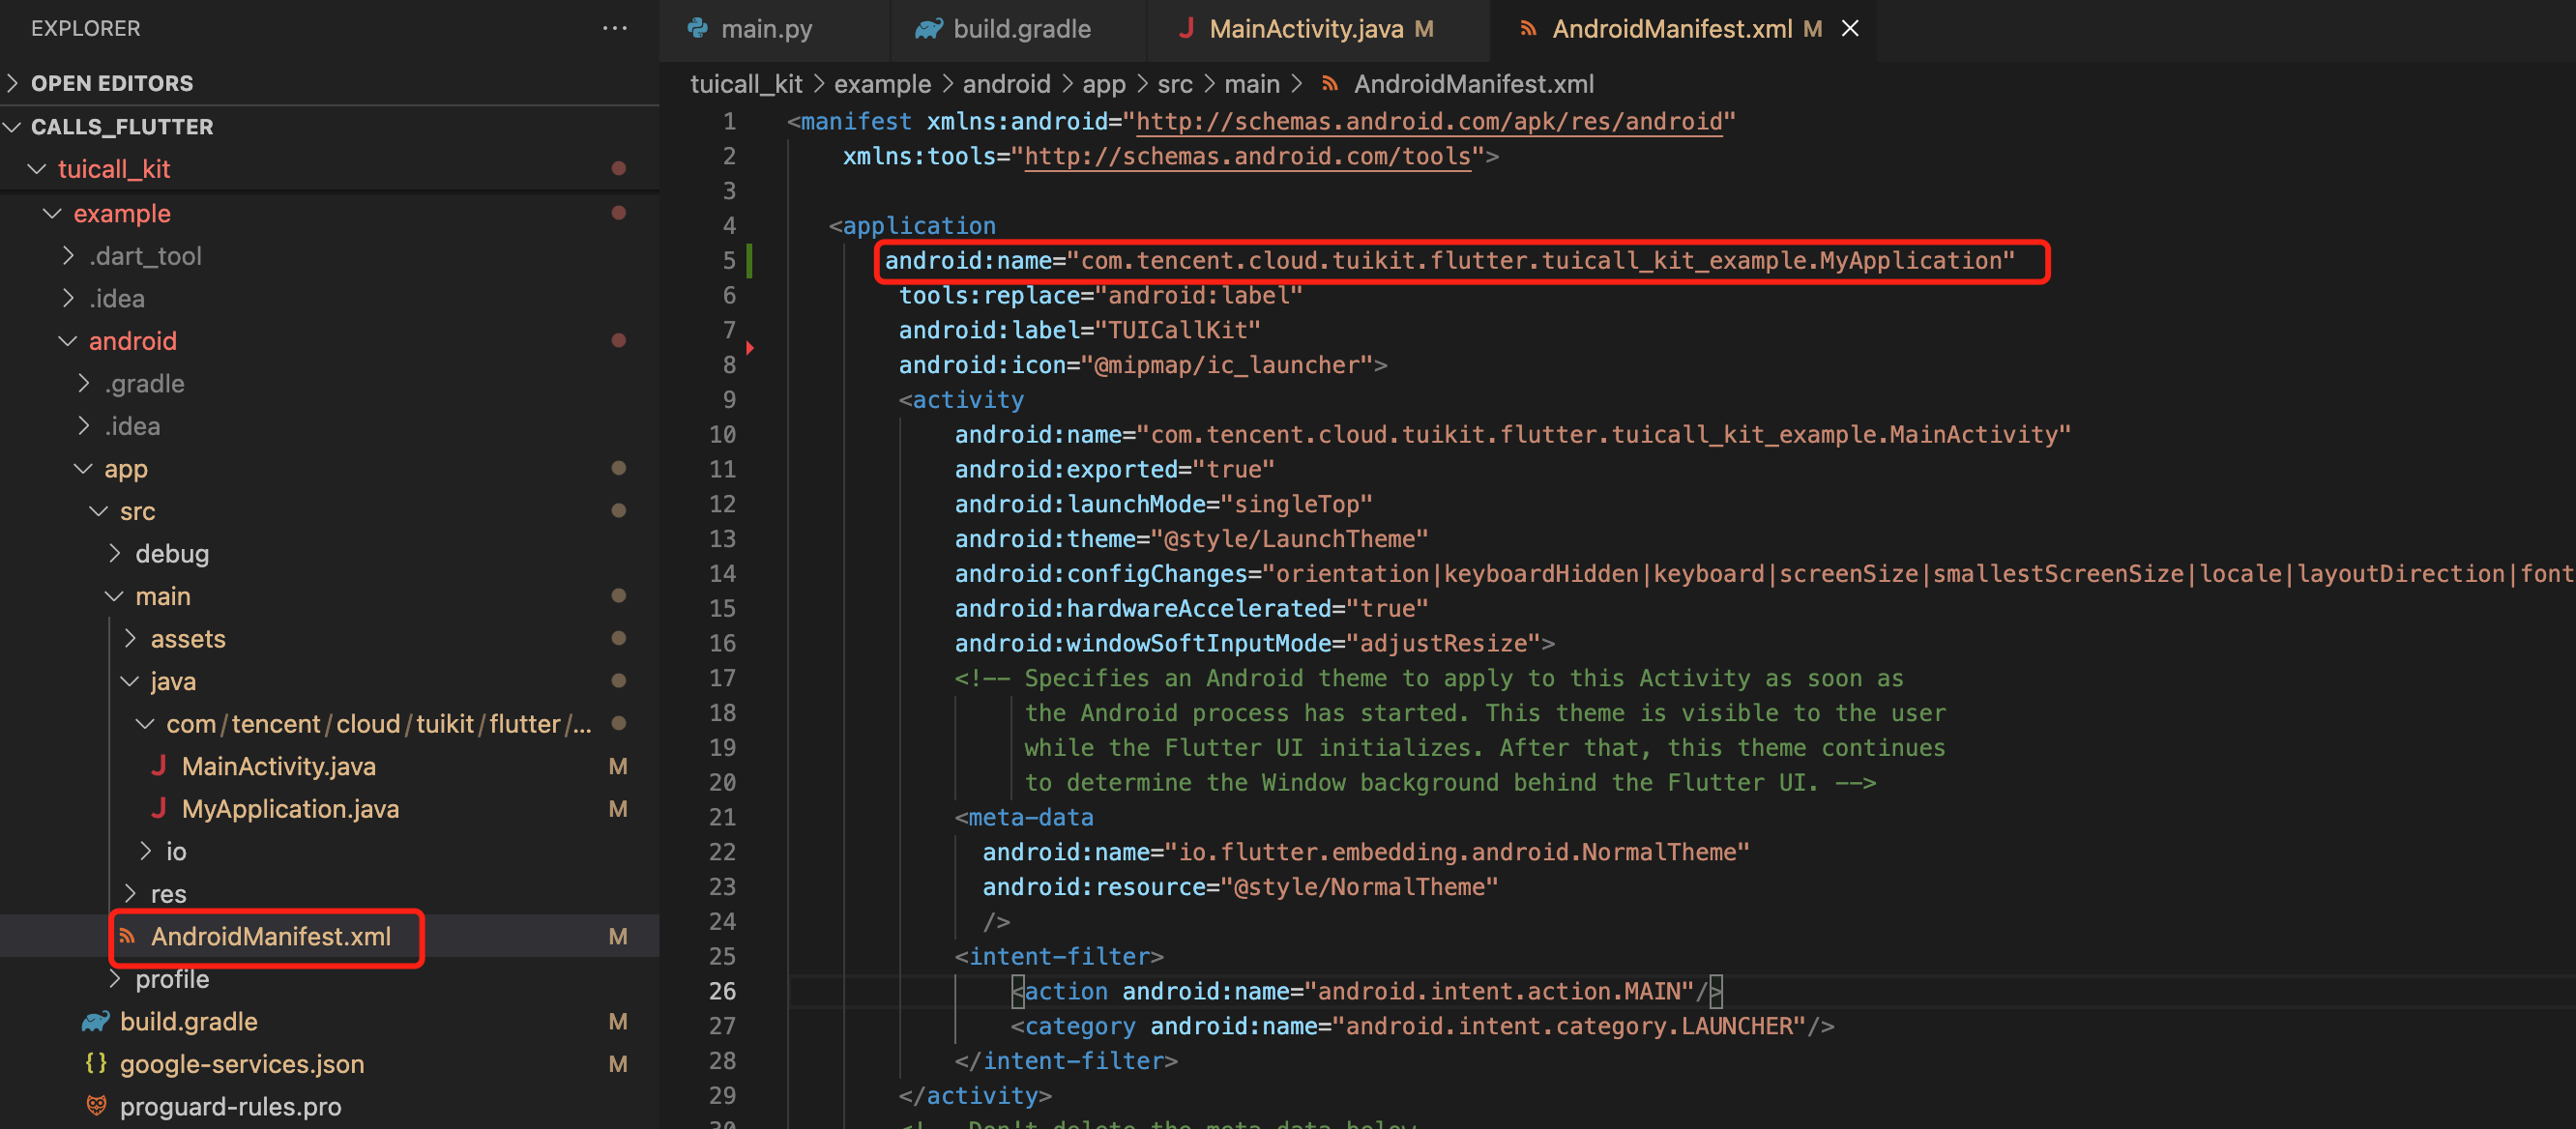
Open the android/app/src/main/AndroidManifest.xml file, then add a specific android:name parameter to the <application> Tag, which is linked to your newly created Definition Application class as shown in the figure:
Step 5: Client Vendor Configuration
iOS
Android
No need to perform this step on the iOS side.
Open the android/app/build.gradle file and add a new dependencies configuration at the end. Based on your requirements, incorporate the push packages from any or all of the vendors listed below. Only by including the push package from the respective vendor can you enable the native push capability of that vendor.
The version number described below should be consistent with that of this Flutter push plugin (tencent_cloud_chat_push).
dependencies {     // Google Firebase Cloud Messaging (Google FCM)     implementation 'com.tencent.timpush:fcm:${version number of push plugin}'
}
Google FCM Adaptation
Integrate the corresponding plugins and json configuration files according to the vendor's methods.
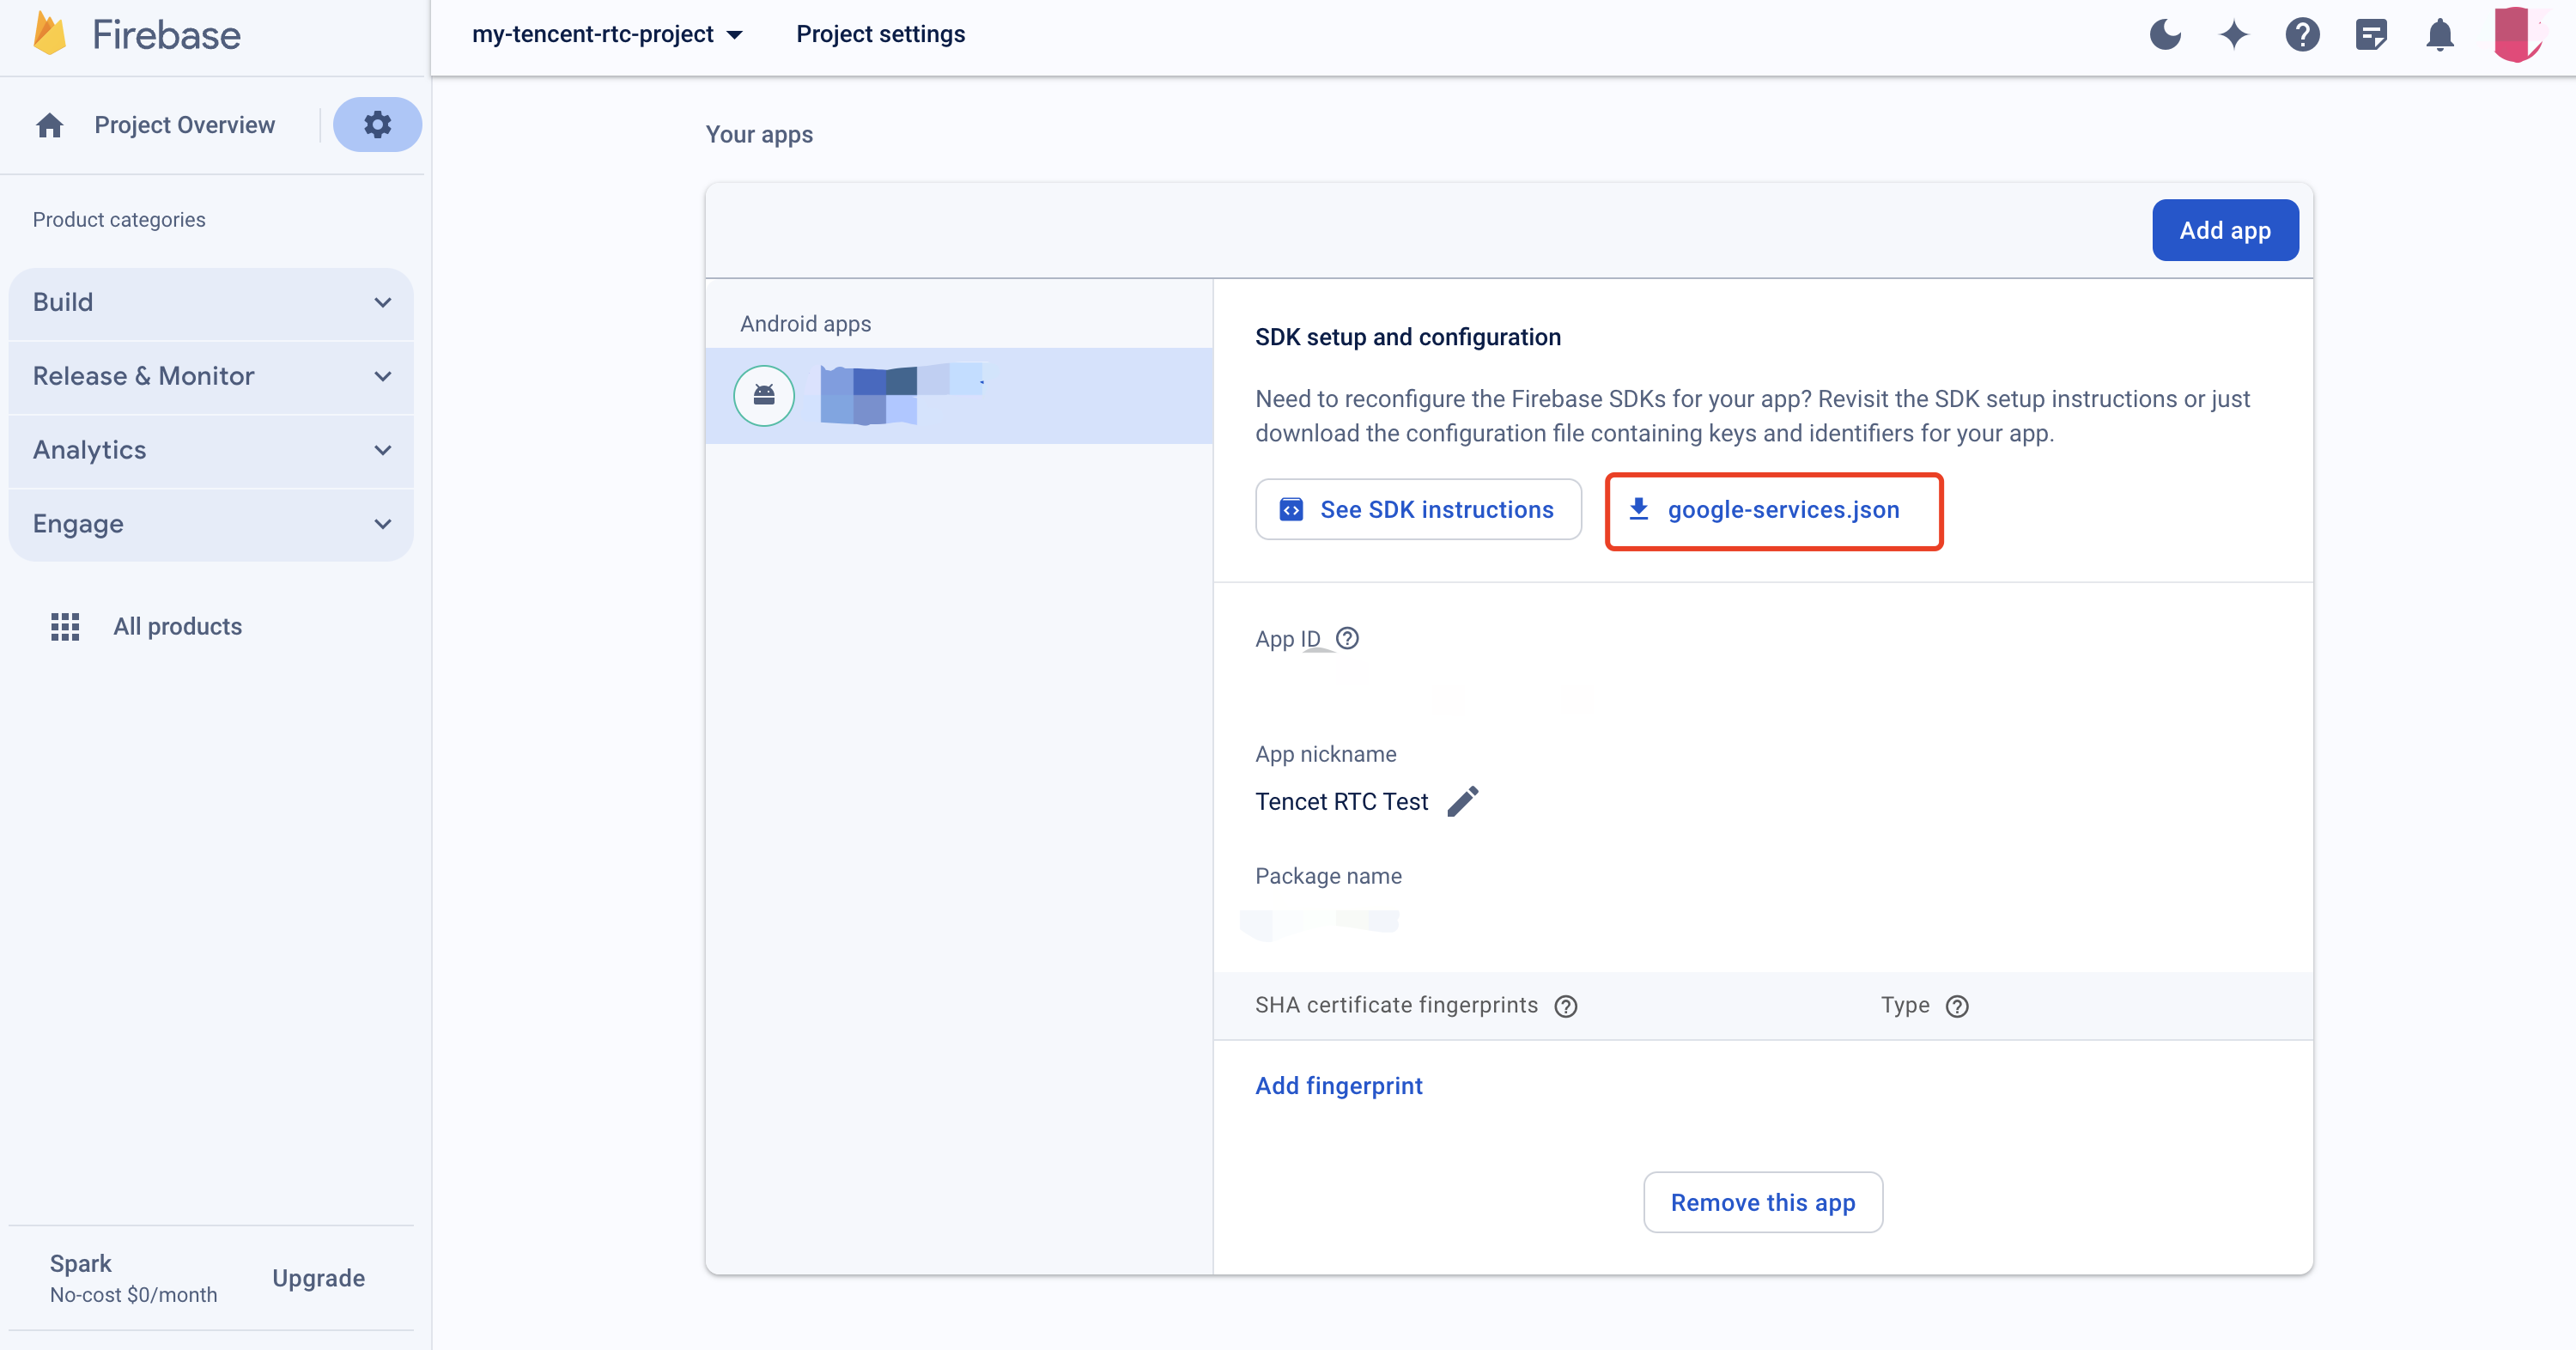
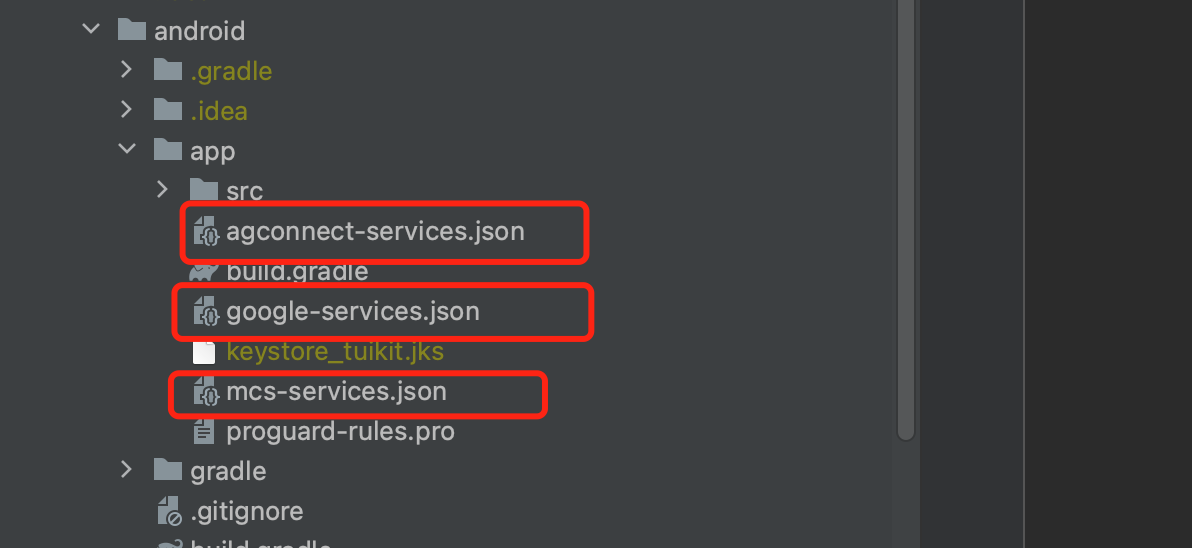
1.1 Download the configuration file and insert it into the project root directory/Android/app.
Google FCM
Operation Path
1.2 Add the following configuration under buildscript -> dependencies in the project level build.gradle file:
Gradle 7.1 and above versions
Version 7.0 of Gradle
Versions below Gradle 7.0
Add the following configuration under buildscript -> dependencies in the project level build.gradle file:
In your project-level settings.gradle file, add the following repositories under buildscript -> repositories and allprojects -> repositories configuration:
pluginManagementbuildscript {
repositories {
gradlePluginPortal()mavenCentral()
maven { url "https://mirrors.tencent.com/nexus/repository/maven-public/"}// The Maven repository address of HMS Core SDK.
maven {url 'https://developer.huawei.com/repo/'}
maven {url 'https://developer.hihonor.com/repo'}
}
}
allprojects {
...
repositories {
mavenCentral()
maven { url "https://mirrors.tencent.com/nexus/repository/maven-public/"}// Configuration of the Maven repository address for HMS Core SDK.
maven {url 'https://developer.huawei.com/repo/'}
maven {url 'https://developer.hihonor.com/repo'}
}
}
}
Add the following configuration under buildscript in the project-level build.gradle file:
buildscript {
repositories {
mavenCentral()
maven { url "https://mirrors.tencent.com/nexus/repository/maven-public/"}// Configuration of the Maven repository address for HMS Core SDK.
maven {url 'https://developer.huawei.com/repo/'}
maven {url 'https://developer.hihonor.com/repo'}
}
dependencies {
...
classpath 'com.google.gms:google-services:4.2.0'
classpath 'com.huawei.agconnect:agcp:1.4.1.300'
classpath 'com.hihonor.mcs:asplugin:2.0.1.300'
}
}
In the project-level settings.gradle file, add the following repository configuration under allprojects -> repositories:
allprojects {
...
repositories {
mavenCentral()
maven { url "https://mirrors.tencent.com/nexus/repository/maven-public/" }
// Configuration of the Maven repository address for HMS Core SDK.
maven {url 'https://developer.huawei.com/repo/'}
maven {url 'https://developer.hihonor.com/repo'}
}
}
Incorporate the following configuration under buildscript and allprojects in the project level build.gradle file:
buildscript {
repositories {
mavenCentral()
maven { url "https://mirrors.tencent.com/nexus/repository/maven-public/"}// Configuration of the Maven repository address for HMS Core SDK.
maven {url 'https://developer.huawei.com/repo/'}
maven {url 'https://developer.hihonor.com/repo'}
}
dependencies {
...
classpath 'com.google.gms:google-services:4.2.0'
classpath 'com.huawei.agconnect:agcp:1.4.1.300'
classpath 'com.hihonor.mcs:asplugin:2.0.1.300'
}
}
allprojects {
repositories {
mavenCentral()
maven { url "https://mirrors.tencent.com/nexus/repository/maven-public/"}// Configuration of the Maven repository address for HMS Core SDK.
maven {url 'https://developer.huawei.com/repo/'}
maven {url 'https://developer.hihonor.com/repo'}
}
}
1.3 In the application level build.gradle file, add the following configuration:
apply plugin: 'com.google.gms.google-services'
apply plugin: 'com.huawei.agconnect'
apply plugin: 'com.hihonor.mcs.asplugin'
Step 6: Process message click callbacks and parse parameters
Please define a function to accept the callback events of push message clicks.
Please define this function in the parameter format of {required String ext, String? userID, String? groupID}.
Among them, the ext field represents the complete ext information carried by this message, designated by the sender. If not specified, a default value exists. You can parse this field and navigate to the corresponding page.
The userID and groupID fields, in this plugin, automatically attempt to parse the ext Json String, carrying the userID of the individual chat counterpart and group chat groupID information in the access. If you have not self-defined the ext field, the ext field is default designated by the SDK or UIKit, then you can use the default parsing herein. If the parsing attempt fails, it becomes null.
You can define a function to receive this callback, and navigate to the corresponding session page or your business page based on it.
Following is an example:
void_onNotificationClicked({required String ext,String? userID,String? groupID}){print("_onNotificationClicked: $ext, userID: $userID, groupID: $groupID");if(userID !=null|| groupID !=null){// Navigate to the corresponding Message page based on `userID` or `groupID`.}else{// Based on the `ext` field, write your own parsing method to navigate to the corresponding page.}}
Step 7: Register the push plugin
Please register the push plugin immediately after logging in.
Invoke TencentCloudChatPush().registerPush method, it necessitates the transmission of BackDefinition's click callback function.
Moreover, you may also choose to input apnsCertificateID, the iOS push certificate ID, and androidPushOEMConfig, the Android push vendor configuration. These two configurations were previously specified in the initial steps; should there be no need for amendment, there is no requirement to input them again.
If your application needs to use push plugin for business message notifications , and does not immediately initiate and sign into the IM module after launching , or if you need to handle business navigation through the access message click callback before signing into the IM module , we suggest that you promptly invoke the TencentCloudChatPush().registerOnNotificationClickedEvent method, manually mount the message click callback, to access the message parameters in a timely manner.
Under such circumstances, it is advisable to run this function before invoking TencentCloudChatPush().registerPush and position it as early as feasible in the code.


 Yes
Yes
 No
No
Was this page helpful?