Protection configuration
Download
Focus Mode
Font Size
Protection Configuration is used to enable, disable, and tune parameters by detection capability (file scanning and killing, abnormal login, password cracking, AI-Link, reverse Shell, network attack, and so on), determining whether alarm records and automatic response actions are generated for corresponding scenarios.
Accessing Protection Configuration
1. Log in to the CSC console.
2. In the left sidebar, select
Alarm Center.
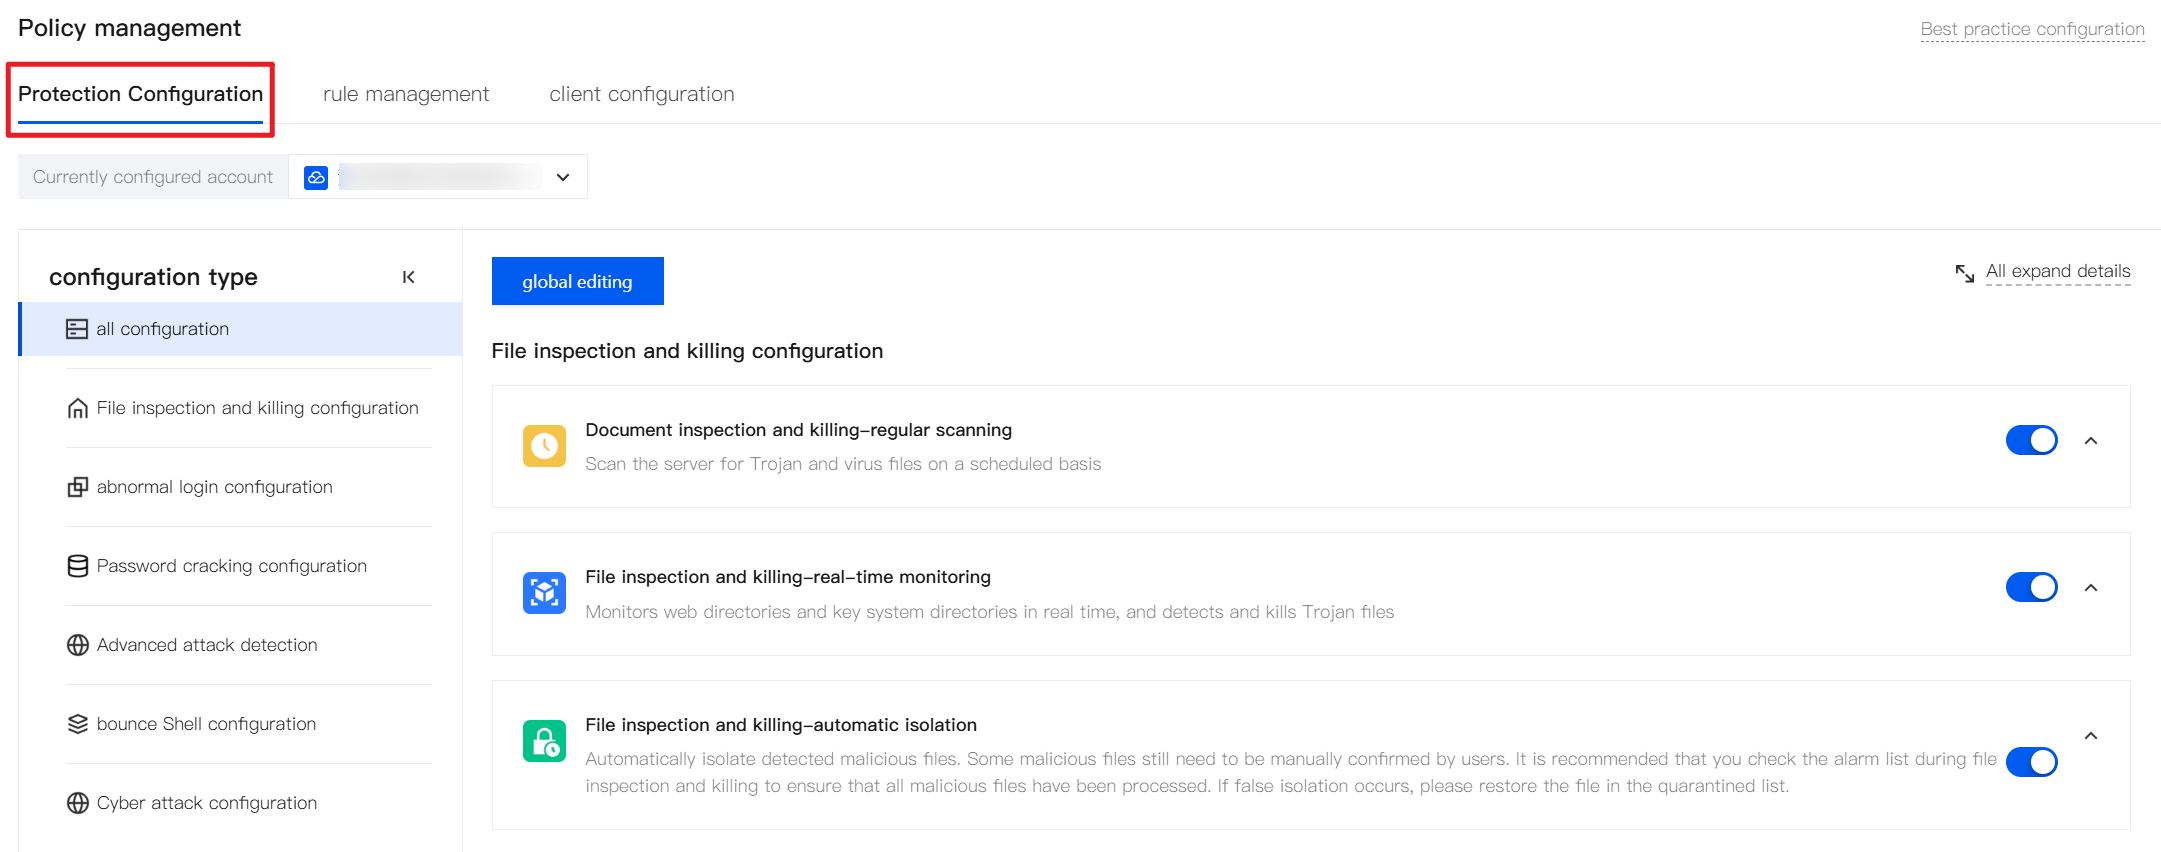
3. Click Policy management in the upper-right corner, and then select the Protection Configuration tab.
Note:
For the execution actions of detection rules, custom rules, and allowlisting, see Rule Management for details.
Click Best practice configuration in the upper-right corner to view recommended configuration items by scenario (daily operations/important period guarantee).
Configuration synchronization with CWPP: For customers who have switched from CWPP to CSC, abnormal login and password cracking settings are synchronized with CWPP configurations, and subsequent adjustments remain mutually effective.
File inspection and killing configuration
Scheduled Scans
Used to periodically scan host trojan and virus files to enhance security.
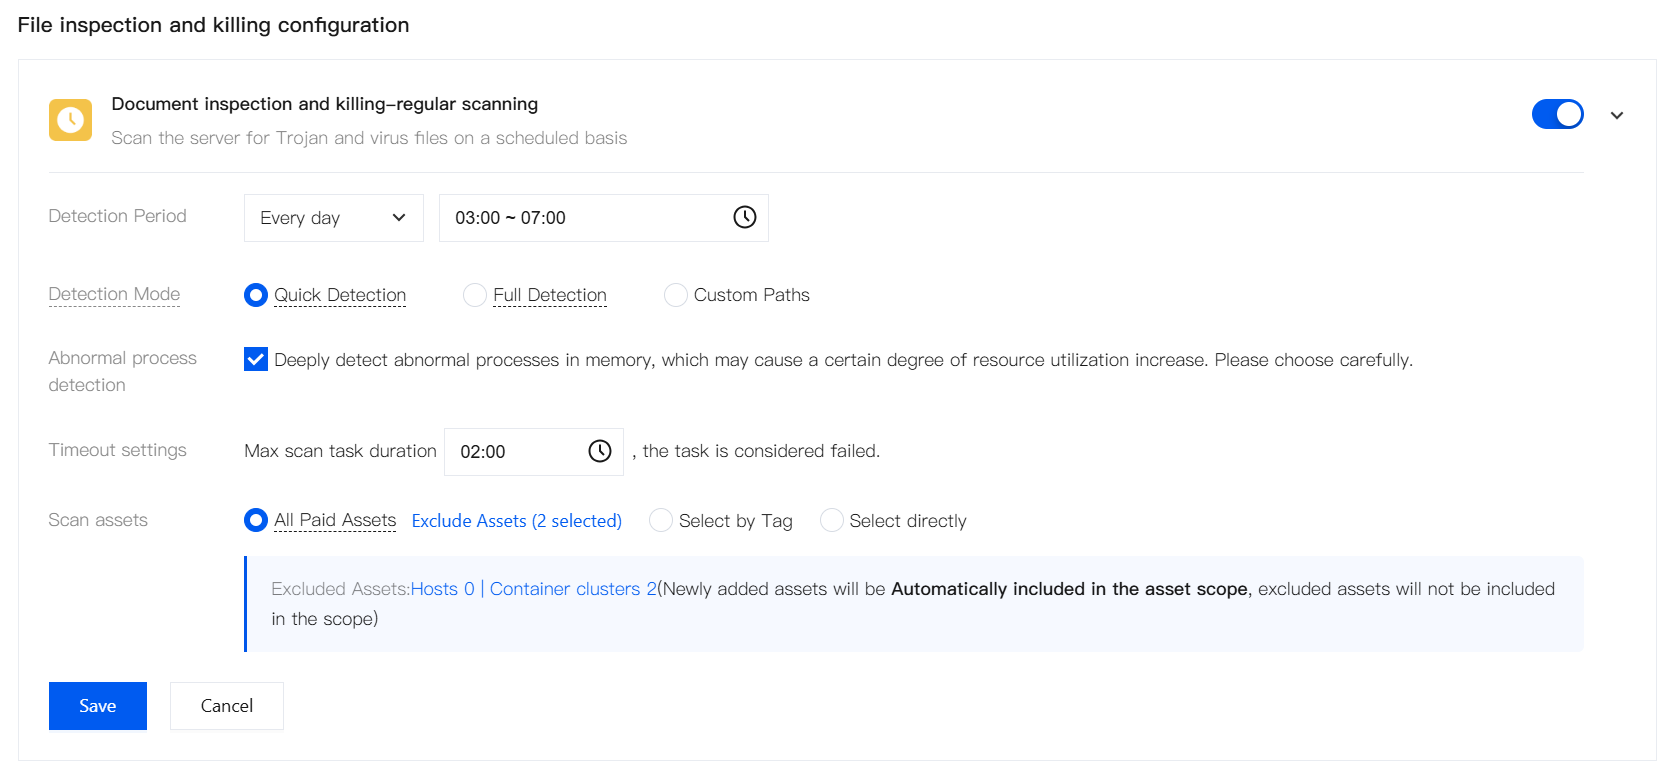
1. On the Protection Configuration tab, turn on the Document inspection and killing–regular scanning switch.
2. After configuring the following items, click Save.
Configuration Item | Description |
Detection Period | Scheduled Detection Period and specific time window. For example, every day, 02:00–07:00. |
Detection Mode | Detection mode determines the detection scope: Quick Detection: checks only running processes, critical directories, driver loads, and so on. Full Detection: scans all partitions on the system. Custom Paths: customize the scan scope. |
Abnormal process detection | Deeply detects abnormal processes in memory, which may cause a certain degree of increase in resource usage. Select with caution. |
Timeout settings | If a single scan exceeds the specified duration (for example, 02:00), the scan is considered failed. |
Scan assets | All Paid Assets (Exclude Assets),Select by Tag,Select directly |
Real-Time Monitoring
Used to monitor Web directories and critical system directories in real time and to scan for and kill trojan and virus files. After this feature is enabled, an alarm is reported immediately upon a hit.
1. On the Protection Configuration tab, turn on the
File inspection and killing–real-time monitoring switch.
2. After selecting a monitoring mode, click Save.

Monitoring Mode | Description |
Standard (recommended) | Monitor and scan for incremental files in common directories. |
Depth | Monitor and scan for incremental files in all directories. |
Custom path | Custom monitoring scope |
The automatic isolation process is triggered
Detected malicious files are automatically quarantined. However, some malicious files still require manual confirmation by users. We recommend that you check the alarm list in File Scan and Kill to ensure that all items are handled. If a file is quarantined by mistake, restore it from the quarantined file list.
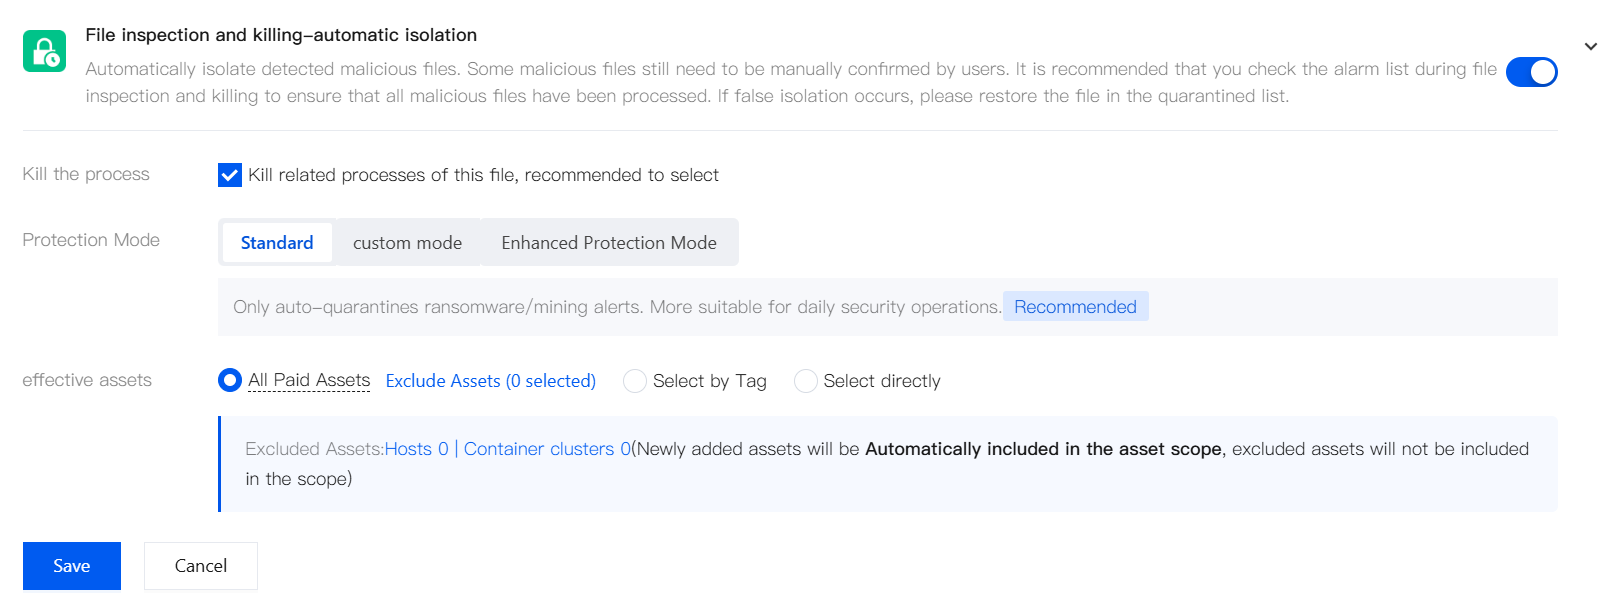
1. On the Protection Configuration tab, turn on the File inspection and killing–automatic isolation switch.
2. After configuring the following items, click Save.
Configuration Item | Description |
Kill the process | Kill processes related to this file (recommended). |
Protection Mode | Standard (recommended): automatically quarantines only ransomware/mining alarms, making it more suitable for daily security operations. custom mode mode: automatically quarantines malicious files. This may cause false blocking risks and is suitable for important period guarantee scenarios. Enable it with caution and limit the quarantine scope. Note: The file scanning and killing scope can be configured only in important period guarantee mode. All malicious files (except script files): automatically quarantine non-script malicious files. All malicious files (enable with caution): includes script-based malicious files. Quarantining scripts may cause service interruptions, so enable this option with caution. |
Effective Assets | All Paid Assets (Exclude Assets),Select by Tag,Select directly |
Abnormal Login Configuration
Note:
This item remains synchronized with the CWPP configuration, and adjustments on either side take effect on the other.
Abnormal login detection is divided into the following two types:
Built-in detection: No configuration is required. It covers logins from threat intelligence blacklisted IPs, logins after successful password cracking, logins with weak password accounts, logins with invalid accounts, and intrusion behaviors after login.
Optional detection: includes logins from overseas IP addresses, logins from unusual locations, and logins outside working hours. It is disabled by default. To enable it, go to Check settings below.
Check settings
Monitor host login behaviors for abnormal logins and generate alarms for suspicious logins.
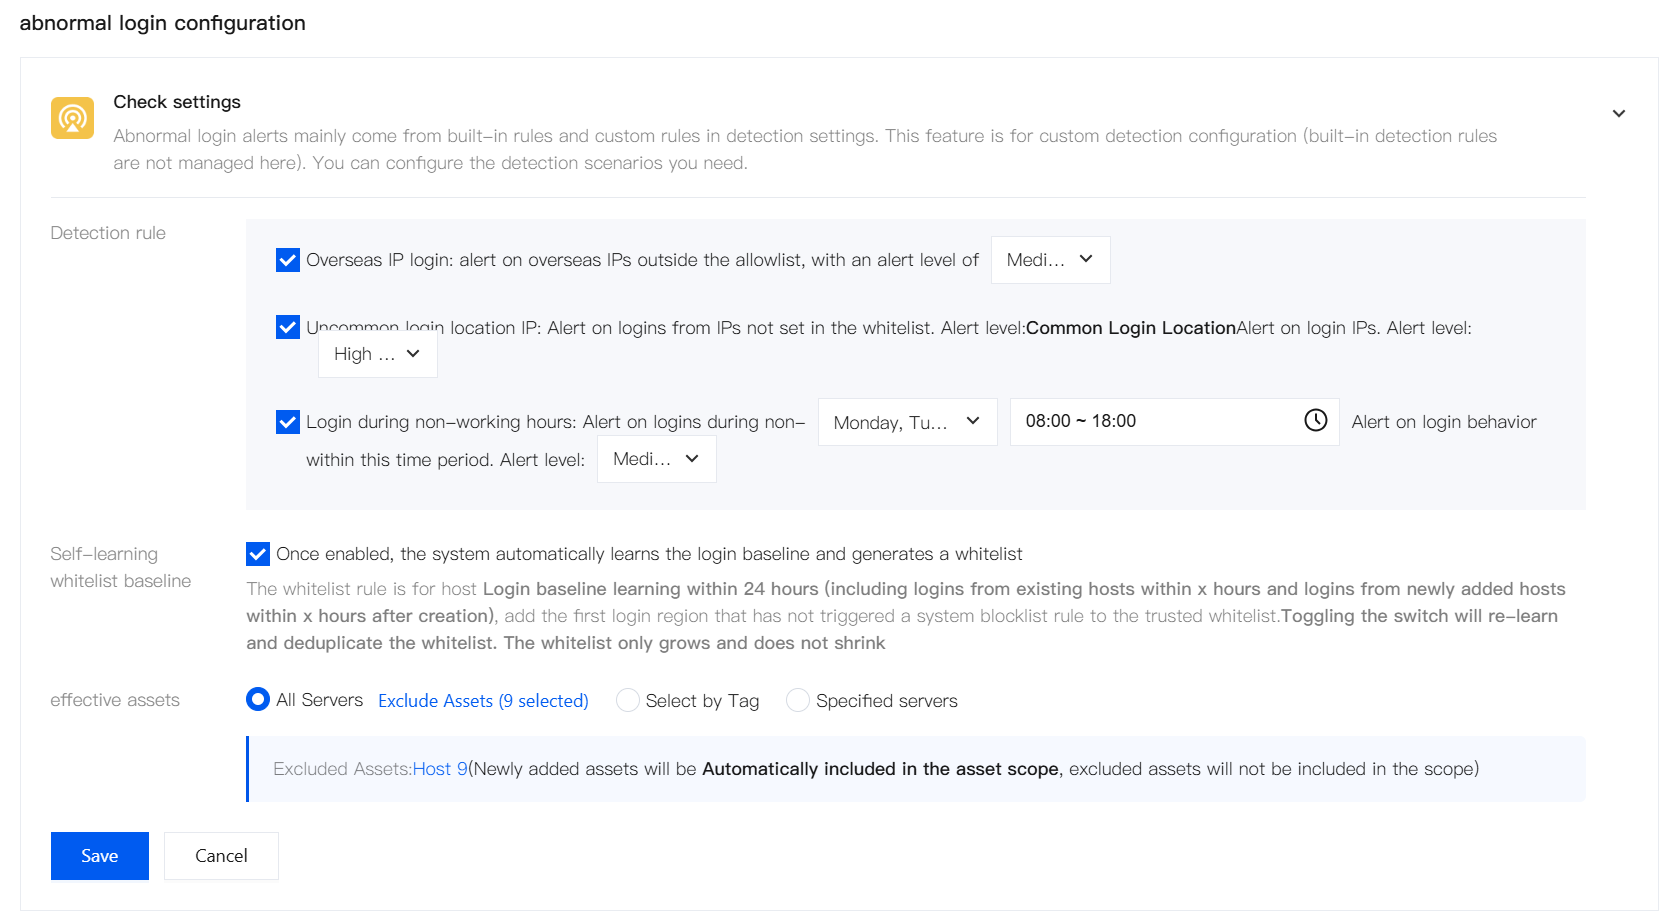
1. On the Protection Configuration tab, expand Check settings for abnormal login.
2. In Check settings, select detection rules and alarm levels as needed, enable self-learning allowlist baseline as needed, select the effective assets, and then click Save.
Configuration Item | Description |
Overseas IP login | Generates an alarm for logins from IP addresses outside the allowlist. You can configure the alarm level next to this item. |
IPs from Uncommon Login Locations | Generates an alarm for logins from source IP addresses that are not in the allowlist of common login locations. You can configure the alarm level next to this item. |
| Select days of the week and time ranges to generate alarms for logins outside these time ranges. You can configure the alarm level next to this item. |
Self-learning whitelist baseline | After this feature is enabled, the system automatically learns login baselines and generates an allowlist, and adds the first login locations that do not trigger built-in detection rules to the trusted allowlist. If you disable and then re-enable this feature, the system learns again and deduplicates the allowlist, which only increases and never decreases. |
Effective Assets | All hosts (assets can be excluded), select by Tag, or select hosts manually. |
Note:
Detection for logins from overseas IP addresses, logins from unusual locations, and logins outside working hours is disabled by default. To receive alarms for these scenarios, select and enable them in Check settings.
Abnormal Login Allowlist
The allowlist is identified by Login source IP, Login Username, Login time, and ommon login location, and these four items are in an AND relationship. If an item is left empty, no restriction is applied to that dimension.
1. On the Protection Configuration tab, expand abnormal login allowlist to view existing rules.
2. Click Add Allowlist, configure the following items, and then click OK.
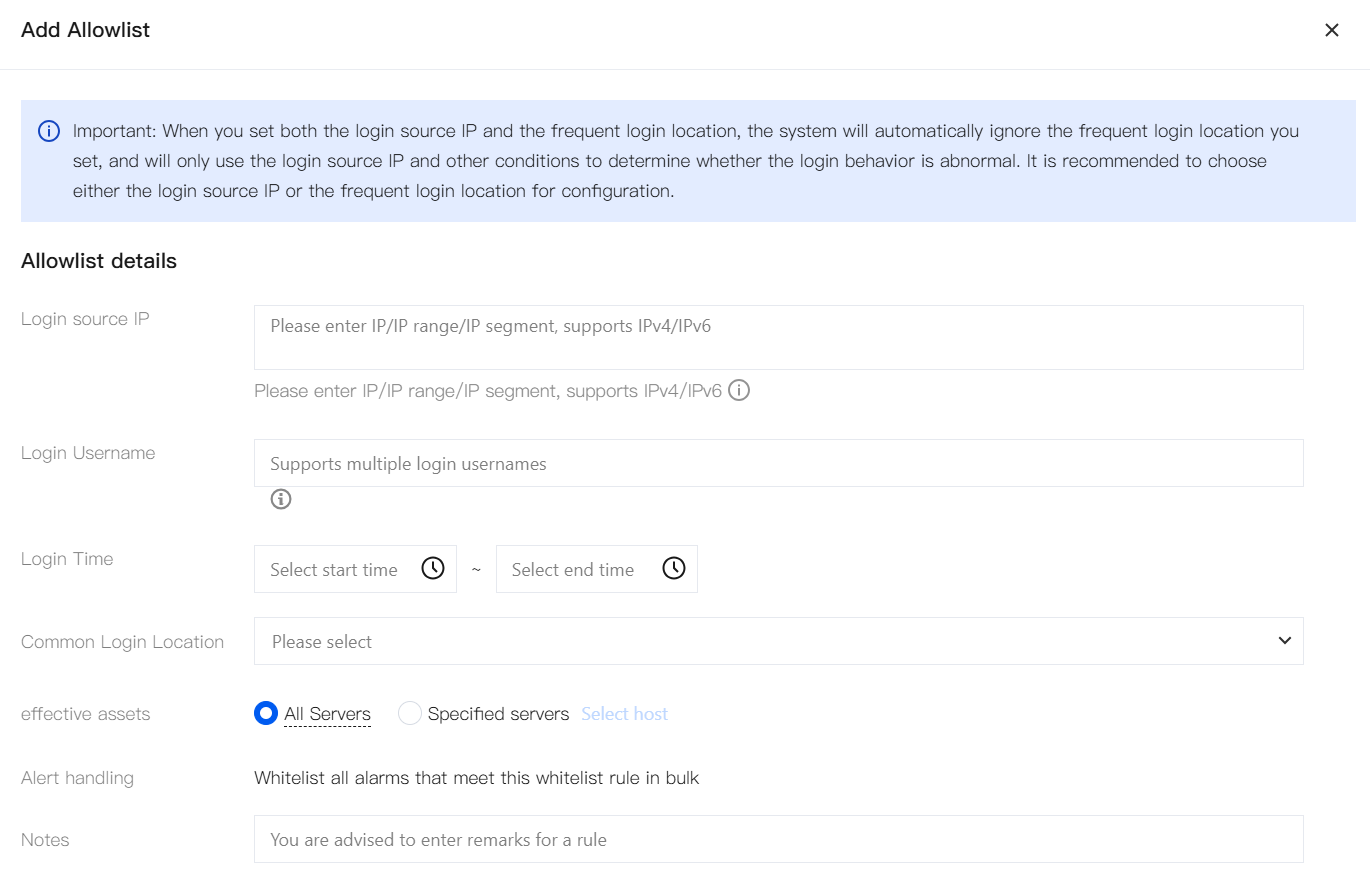
Configuration Item | Description |
Login source IP | Supports entering IP addresses, IP address ranges, or IP address segments, and supports IPv4/IPv6. IP address example: 1.1.1.1 IP address range example: 1.1.1.1-1.1.1.10 IP address segment example: 172.168.34.1/20 Supports adding multiple IP addresses/IP address segments at the same time, separated by commas. The input is limited to 1,024 characters, which is approximately 60 or more entries. |
Login Username | Supports configuring multiple login usernames, separated by commas. If left empty, all usernames are included. |
Login time. | Set the start and end time for common login periods. |
Common Login Location | Select a trusted geographic region. Note: If both the Login source IP and Common Login Location are configured, the system automatically ignores the
Common Login Location and determines whether a login is abnormal based only on the Login source IP and other conditions. We recommend that you configure only one of the two. |
Effective Assets | All Servers or Specified servers |
Alert handling | The system will add all alarms that match this allowlist rule to the allowlist in batches. |
Notes | Optional. Used to describe the purpose of adding to the allowlist. |
Password cracking settings
Note:
This item remains synchronized with the CWPP configuration, and adjustments on either side take effect on the other.
The password cracking alarm detection and blocking logic is as follows:
Alarm: An alarm is generated when your configured login rules are matched, or when built-in brute-force attack intelligence or vulnerability exploitation intelligence is matched.
Blocking: The host firewall is called, with WFP used on Windows and iptables used on Linux, to block the attack source IP address with the highest priority. Source IP addresses that have been added to the allowlist are neither blocked nor alarmed.
Configuring Detection and Blocking
Configure detection rules and blocking rules to monitor and block SSH and RDP password cracking behaviors on hosts in real time.
1. On the Protection Configuration tab, expand Password cracking settings.
2. After configuring the effective duration, custom rules, built-in intelligence rules, and effective scope, click Save.
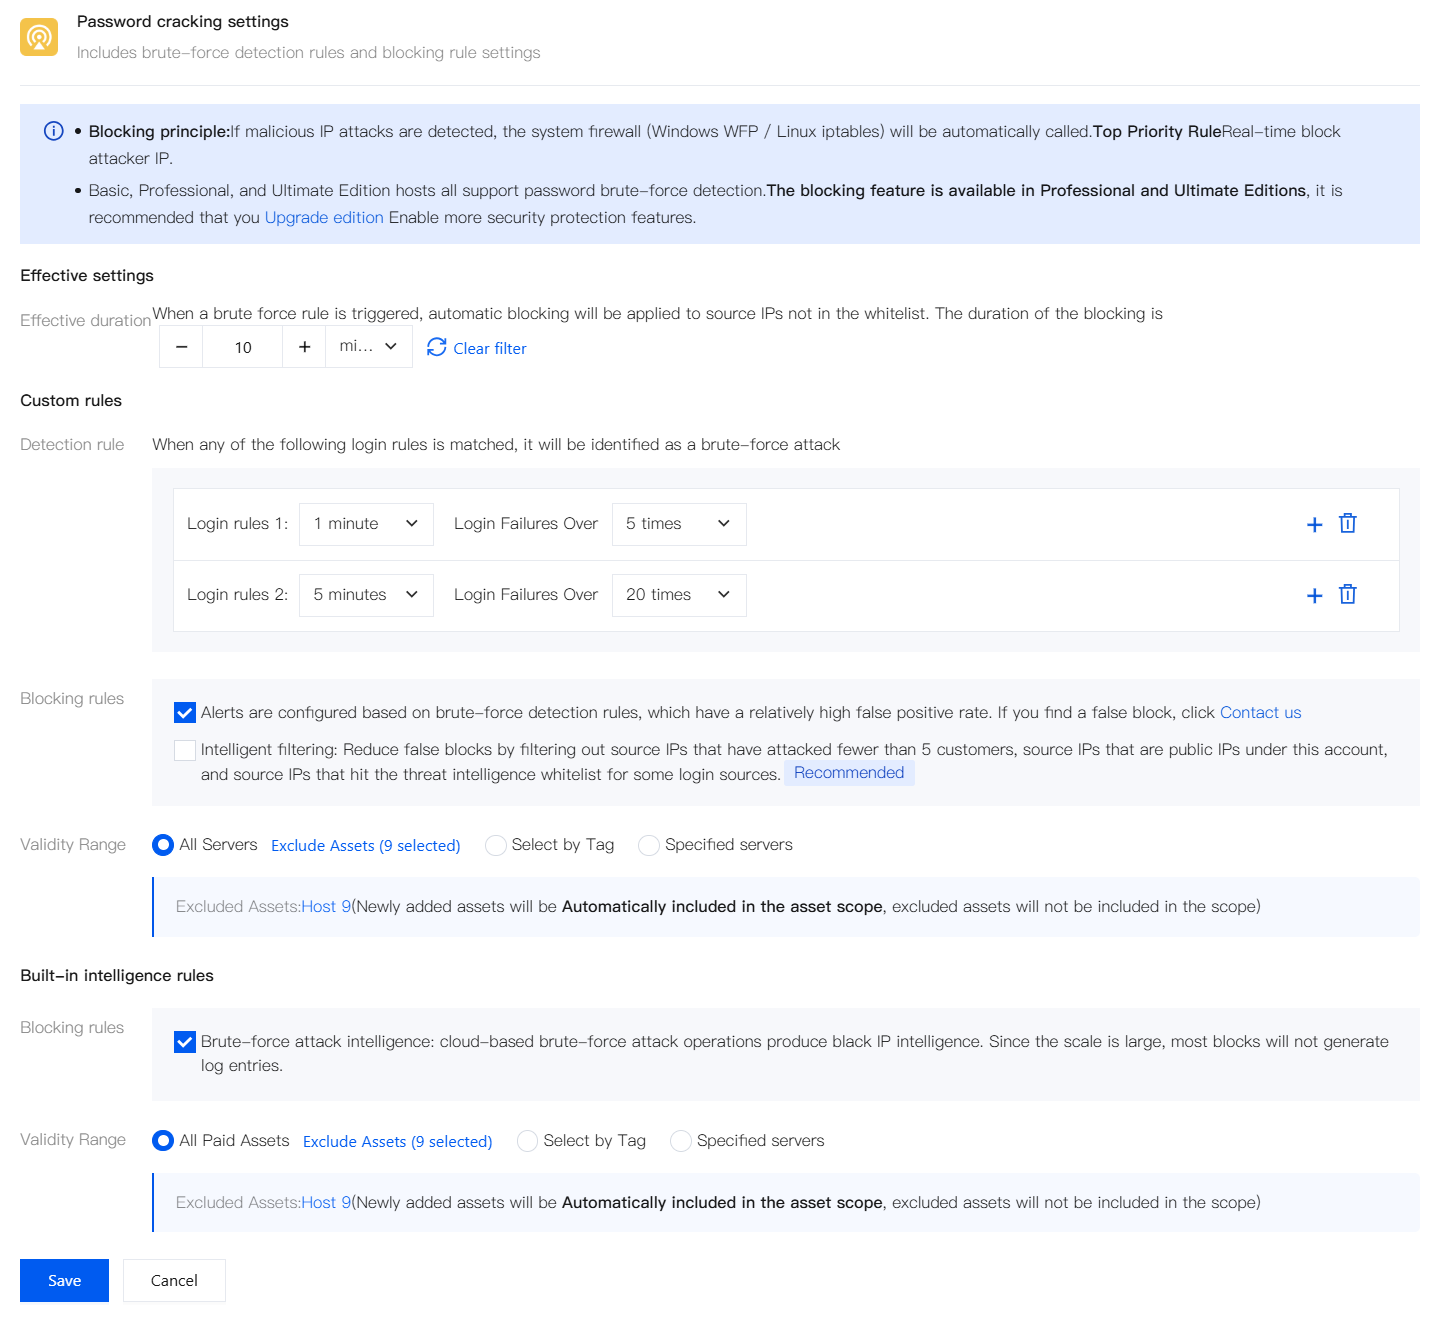
Configuration Item | Description |
Effective settings | Set the effective duration. When a brute force attack rule is hit, source IPs not in the allowlist are automatically blocked for a certain duration. |
Custom rule | Configure detection rules. When any login rule is matched, the login attempt is determined as a brute force attack. Each rule has a time window and a login failure threshold configured, and can be modified or deleted. Configure blocking rules. Blocking based on brute-force detection rules: Block source IPs that match the above detection rules. Note: This scenario has a relatively high false positive rate. If you encounter false blocking, click Contact Us. Intelligent filtering: Reduces false blocking when the source IP address has attacked fewer than 5 customers, when the source IP address is a public IP address under this account, or when the source IP address matches some login sources in the threat intelligence allowlist (recommended). Select the Validity Range: All Paid Assets (Exclude Assets),Select by Tag,Specified servers. |
Built-in intelligence rules | Select Brute-force attack intelligence. Blocking is performed based on black IPs produced by cloud brute force attack operations. Due to the large scale, most blocks will not generate records on the platform. Select the Validity Range: All Paid Assets (Exclude Assets),Select by Tag,Specified servers. |
Advanced Attack Detection
AI correlates time-series attack chains, identifies lateral movement and advanced combined attacks, and outputs high-confidence alarms through multi-behavior analysis. The system provides three types of independent detection rules that can be flexibly combined based on business scenarios.
1. On the Protection Configuration tab, turn on the AI-Link Intelligent Chain Engine switch.
2. After configuring the following items, click Save.
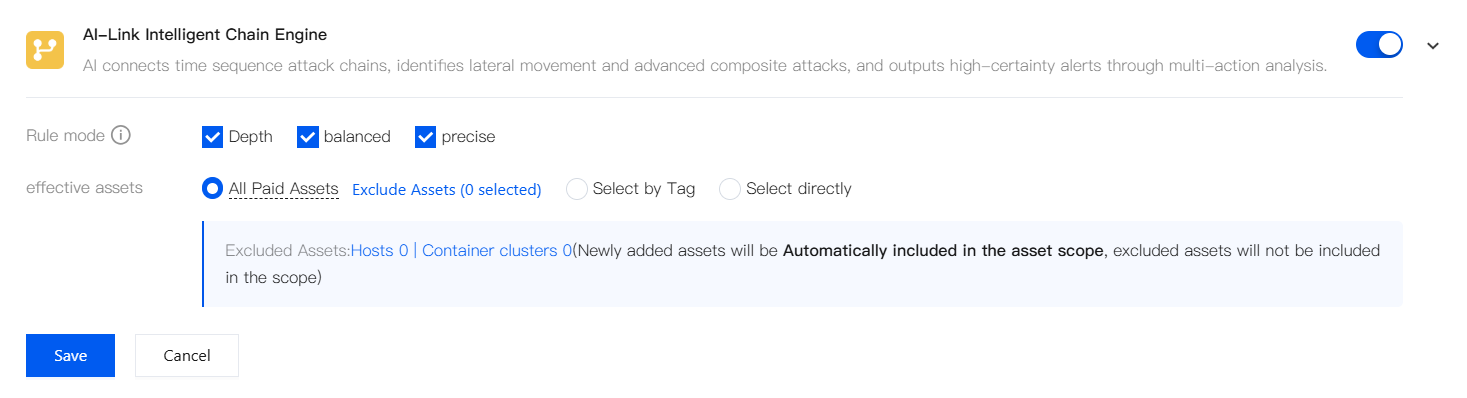
Configuration Item | Description |
Rule mode | Precision: covers known attack characteristics with minimal false positives. Balanced: covers common attack characteristics and provides some generalized detection capabilities, making it suitable for daily operations scenarios. Depth: supports identifying more latent attack behaviors, but carries a certain risk of false positives. It is suitable for important period guarantee scenarios. Note: Recommended configuration for daily operations: enable the "Precision" + "Balanced" rules. Recommended configuration for important period guarantee scenarios: enable the "Precision" + "Balanced" + "Depth" rules. |
Effective Assets | All Paid Assets (Exclude Assets),Select by Tag,Select directly |
Note:
The Precise/Balanced/Depth rule modes of AI-Link are used to control the enabling of detection rules.
The Precise/Balanced/Depth rule modes here correspond to the detection modes in the alarm list:
Selecting a rule mode enables the rules in that detection mode.
If no rule mode is selected, the corresponding rules do not take effect, and the Alarm Center will not generate new alarm records for that detection mode.
Bounce Shell configuration
After Rebound Shell–Intranet Alarm Detection is enabled, the backend will detect private network reverse Shell alarms. This type of alarm can be high in volume, so it is recommended to enable it with caution.
1. On the Protection Configuration tab, turn on the Rebound Shell–Intranet Alarm Detection switch.
2. After configuring the effective assets, click Save.
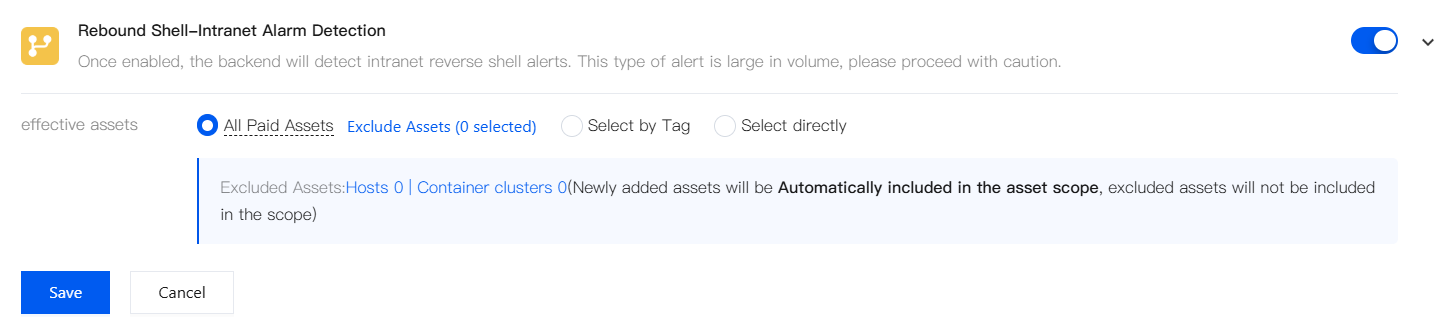
Cyber attack configuration
After Cyber attack–attempt attack detection is enabled, the backend will detect attempted attack alarms and send alarm notifications when attempted attack behaviors occur. This feature is used to capture weak attack signals that have not yet formed substantial exploitation on assets. It is recommended to enable this feature during important period guarantee scenarios.
1. On the Protection Configuration tab, turn on the Cyber attack–attempt attack switch.
2. After configuring the following items, click Save.
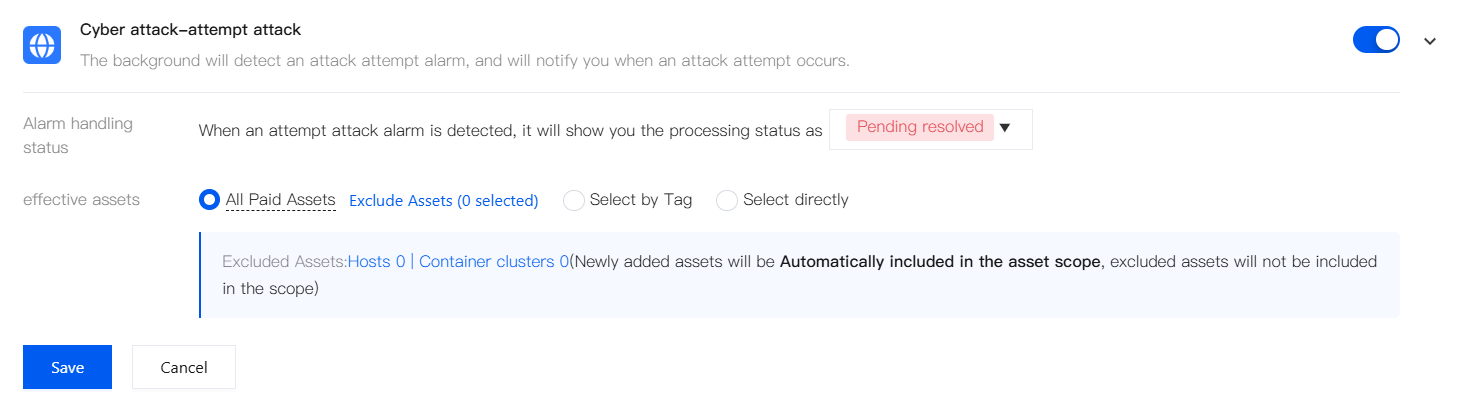
Configuration Item | Description |
Alarm handling status | Default handling status when an attempted attack alarm is detected: Pending resolved, handled, or ignored. |
Effective Assets | All Paid Assets (Exclude Assets),Select by Tag,Select directly |
Multi-Account Management
When the multi-account management feature (group administrator scenario) is used, alarm policies support unified Ops across accounts, and Protection Configuration uses the single-select switching mode, which differs from the tiled display in rule management:
1. The configuration of the currently logged-in account is displayed by default.
2. After switching to a different account, view and edit the corresponding configuration.
3. The protection configurations of each account are independent of each other.
Help and Support
Was this page helpful?
You can also Contact sales or Submit a Ticket for help.
Help us improve! Rate your documentation experience in 5 mins.
Feedback