Import from Standalone Instance to TDSQL Instance
Download
フォーカスモード
フォントサイズ
As the distributed architecture of a distributed database is imperceptible to the user, in general, only the table structure needs to be created in advance, and you can then migrate data using a MySQL client such as mysqldump, Navicat, or SQLyog in the following steps:
Step 1. Prepare the import and export environments
Step 2. Export the table structure and data of the source table
Step 3. Modify the statement for table creation and create a table structure in the target table
Step 4. Import data
Step 1. Prepare the import and export environments
Before migrating data, you need to get the following prepared:
A CVM instance
The specification of 2 CPU cores, 8 GB memory, and 500+ GB disk capacity (depending on data volume) is recommended
Linux
MySQL client installed
If the data volume is small (less than 10 GB), you can also import it directly over the public network (internet) with nothing prepared
TDSQL
Select a capacity as expected and perform initialization according to the source database character set, table name case sensitivity, and value of
innodb_page_size.Create an account with all global permissions enabled (recommended)
Enable a public IP address if necessary
Step 2. Export the table structure and data of the source table
Demonstration environment
Manipulated database: caccts
Manipulated table: t_acct_water_0
Source database: single-instance MySQL
Target database: TDSQL for Percona or MariaDB
Exporting table structure from source database
Run
mysqldump -u username -p password -d dbname tablename > tablename.sql to export the table structure// Command instancemysqldump -utest -ptest1234 -d -S /data/4003/prod/mysql.sock caccts t_acct_water_0 > table.sql
Exporting table data from source database
Run
mysqldump -c -u username -p password dbname tablename > tablename.sql to export the table data.// Command instancemysqldump -c -t -utest -ptest1234 -S /data/4003/prod/mysql.sock caccts t_acct_water_0 > data.sql
Note:
Data must be exported using mysqldump with the
-c parameter appended, because only in this way can all the exported data rows have a column name field. SQL data rows with no column name field will be rejected by TDSQL for Percona or MariaDB. -t indicates to export the table data only but not the table structure.Uploading files to directory on CVM instance
Before uploading files, you need to enable the public IP address of the CVM instance. Then, upload at least the following files just exported as instructed in Uploading Files to Linux CVM Through SCP:
Table structure SQL: table.sql
Data SQL: data.sql
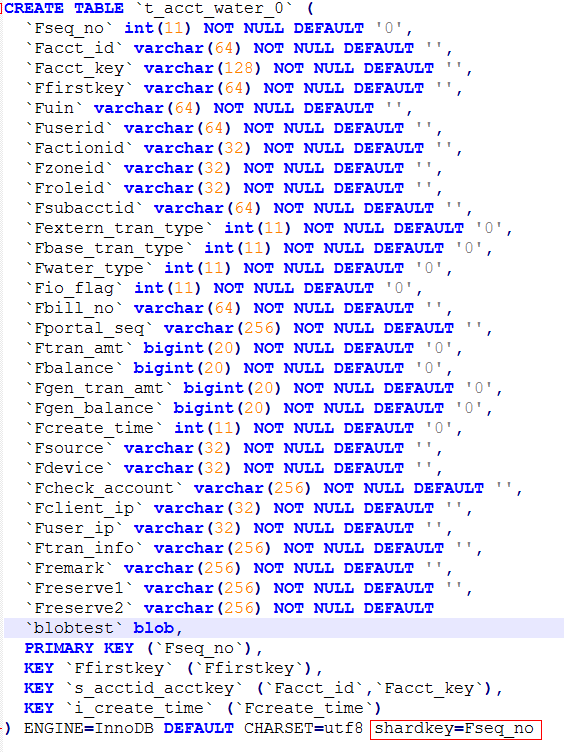
Step 3. Modify the statement for table creation and create a table structure in the target table
Open the exported table structure file
table.sql, add the primary key and shardkey through statements like the following ones, and save it as tablenew.sql.CREATE TABLE(column name 1 data type,column name 2 data type,column name 3 data type,....,PRIMARY KEY('column name n'))ENGINE=INNODB DEFAULT CHARSET=xxxxshardkey=keyname
Note:
Primary key and shardkey must be set. Pay attention to the table name case sensitivity. You are recommended to delete redundant comments; otherwise, the table may not be created successfully.
Step 4. Import data
Connecting to TDSQL for Percona or MariaDB instance
On the CVM instance, run
mysql -u username -p password -h IP -P port to log in to the MySQL server, and run use dbname to enter the database.Note:
You may need to create a database first.
Importing table structure
Use the uploaded files to import data by running the
source command.1. First, import the table structure:
source /file path/tablenew.sql2. Then, import the data:
source /file path/data.sql3. Verify the import result:
select count(*) from tablenameNote:
You need to import the table creation statements first and then import the data. You can also import the .sql files directly through MySQL's
source command.Other Solutions
Generally, you can import data smoothly as long as you have created the corresponding table structure with the shardkey specified in the target table before importing data.
フィードバック