Sync Operation Guide
ダウンロード
フォーカスモード
フォントサイズ
Scenarios
This document describes how to use Data Transfer Service (DTS) to synchronize data from a TDSQL for MySQL database to another TDSQL for MySQL database. The supported scenarios are as follows:
Source Database Type | Target Database Type |
Self-built TDSQL for MySQL | Tencent Cloud TDSQL for MySQL database |
Tencent Cloud TDSQL for MySQL database | Self-built TDSQL for MySQL Tencent Cloud TDSQL for MySQL database |
Preparations
1. Read the Use Instructions carefully to learn about feature constraints and must-knows.
2. Establish the access channel between DTS and the database in advance according to the access type you want to use. For details, see Network Preparations.
Internet Data Center (IDC) self-built databases: The access method can be set to Public Network/Direct Connect/VPN Access/CCN/Self-Built on CVM.
TencentDB instances: The access method can be set to Database.
3. You need to create the database named
__tencentdb__ in advance in the source TDSQL for MySQL. Refer to the syntax CREATE DATABASE __tencentdb__;.4. Grant permissions to the account used for task execution in the source database as follows:
GRANT RELOAD,LOCK TABLES,REPLICATION CLIENT,REPLICATION SLAVE,SHOW VIEW,PROCESS,SELECT ON *.* TO 'synchronization account'@'%' IDENTIFIED BY 'synchronization password';GRANT ALL PRIVILEGES ON `__tencentdb__`.* TO 'synchronization account'@'%';FLUSH PRIVILEGES;
5. Grant permissions to the account used for task execution in the target database. The account needs to have the following on the target database:
ALTER, ALTER ROUTINE, CREATE, CREATE ROUTINE, CREATE TEMPORARY TABLES, CREATE USER, CREATE VIEW, DELETE, DROP, EVENT, EXECUTE, INDEX, INSERT, LOCK TABLES, PROCESS, REFERENCES, RELOAD, SELECT, SHOW DATABASES, SHOW VIEW, TRIGGER, and UPDATE.
Operation Steps
Since the operation steps for migration to the cloud from self-built TDSQL for MySQL to Tencent Cloud TDSQL for MySQL and the steps for migration off the cloud are similar, the following uses the example of migration from self-built TDSQL for MySQL to Tencent Cloud TDSQL for MySQL for illustration.
1. Log in to the Data Sync Purchase Page, select the appropriate configuration, and click Buy Now.
Parameter | Description |
Billing Mode | The yearly/monthly subscription and pay-as-you-go modes are supported. |
Source Instance Type | Select TDSQL for MySQL. It cannot be modified after purchase. TDSQL for MySQL is available in three kernel editions (MySQL/MariaDB/Percona). There is no need to distinguish between these kernel editions in this scenario; set the database type to TDSQL for MySQL. |
Source Instance Region | When selecting the source region for the DTS migration service, if the source database is a TencentDB instance, select the region where the source resides. If the source database is self-built, select the region closest to the source to enable DTS to choose the optimal synchronization path and reduce synchronization duration. |
Target Instance Type | Select TDSQL for MySQL. It cannot be modified after purchase. |
Target Instance Region | Select the target instance region. It cannot be modified after purchase. |
Specification | Currently, only Standard Edition is supported. |
2. After the purchase is completed, return to the data synchronization task list to view the newly created data synchronization task. It requires configurations before it can be used.
3. In the data synchronization list, click Configure in the Operation column to go to the synchronization task configuration page.

4. On the synchronization task configuration page, configure the source instance, account, and password; configure the target instance, account, and password. After connectivity testing, click Next.
Configuration Item | Parameter | Description |
Task Configuration | Task Name | DTS automatically generates a task name. You can customize it based on your actual needs. |
| Running Mode | Support immediate execution and scheduled execution. |
Source Database Settings | Source Instance Type | Source instance type selected during purchase. It cannot be modified. |
| Source Instance Region | Source instance region selected during purchase. It cannot be modified. |
| Access Type | Select the access type based on your scenario. For this scenario, select Direct Connect or VPN Access. This scenario requires configuring the connection between VPN and IDC. For preparations of other access types, see Preparations Overview. Public Network: The source database is accessible through a public IP address. Self-Build on CVM: The source database is deployed on a Tencent Cloud CVM instance. Direct Connect: The source database can connect to Tencent Cloud Virtual Private Cloud (VPC) through Direct Connect. VPN Access: The source database can connect to Tencent Cloud VPC through VPN Access. Database: The source database is a TencentDB instance. CCN: The source database can connect to Tencent Cloud VPC through CCN. VPC: Both the source and target databases are deployed on Tencent Cloud with VPC configured. If you need to use the VPC access type, submit a ticket for application. |
| VPC-Based Direct Connect Gateway/VPN Gateway | Only the VPC-based Direct Connect gateway is supported for DC. Confirm the network type associated with the gateway. For the VPN gateway, select the VPN gateway instance for access. |
| VPC | Select the VPC network and subnet associated with the VPC-based Direct Connect gateway and VPN gateway. |
| Host - Proxy | Enter the Proxy address and port. |
| Node - SET | Enter the node IP addresses for the TDSQL for MySQL shard. Enter one node IP address per shard. For multiple nodes, enter each address on a new line. If the source database is self-built, you cannot add or delete SET nodes after completing the initial configuration and saving the connection. To add or delete SET nodes, you need to create a synchronization task. |
| Account | Source instance account. The account permissions should meet the requirements. |
| Password | Password of the source instance account. |
Target Database Settings | Target Instance Type | Target instance type selected during purchase. It cannot be modified. |
| Target Instance Region | Target instance region selected during purchase. It cannot be modified. |
| Access Type | Select the access type based on your scenario. For this scenario, set it to Database. If the source instance access type is set to Database, the target instance access type can be Public Network/Self-built on CVM/Direct Connect/VPN Access/Database/CCN. |
| Instance ID | Select the target instance ID. |
| Account | Target instance account. The account permissions should meet the requirements. |
| Password | Password of the target instance account. |
5. On the page of setting synchronization options and synchronization objects, set the data initialization, data synchronization, and synchronization object options. After the settings are completed, click Save and Go Next.
Note:
If the user plans to perform a rename operation on a table during synchronization (for example, renaming table A to table B), the Sync Object is required to include the entire database (or the entire instance) where table A is located. If only table A is selected, data from table B will not be synchronized to the target database after the rename operation.
Configuration Item | Parameter | Description |
Data Initialization Option | Initialization Type | Structure Initialization: When a synchronization task is executed, the table structures of the source instance are initialized to the target instance first. Full data initialization: When a synchronization task is executed, the data of the source instance is initialized to the target instance first. For scenarios where only full data initialization is selected, users need to create the table structures in the target database in advance. Both are selected by default and can be deselected if needed. You can deselect them based on actual needs. When only full data initialization is selected, users need to create the table structures in the target database in advance. |
| If Target Already Exists | Precheck and report error: If tables with the same name exist, an error will be reported, and the process will be stopped. Ignore and execute: Full and incremental data are directly appended to the tables in the target instance. |
| Specify Start Checkpoint | If Initialization Type is not specified, it indicates that only incremental synchronization is performed, and you can set the start checkpoint for incremental synchronization. Currently, you need to submit a ticket to apply for using this feature. 1. The incremental synchronization task starts synchronizing data from the set time point. The time point can be set within the range from the previous 14 days to the current time. 2. If full and incremental migrations are performed as separate tasks, ensure that no DDL operations (such as CREATE TABLE, ALTER TABLE, DROP TABLE, RENAME TABLE, CREATE INDEX, and DROP INDEX) occur between time point 1, when the full migration completes, and the set time point 2 for incremental migration. Otherwise, the task will report an error. 3. From the set time point 1 to the start point 2 of the incremental task (the task is considered started only after the task step changes from searching for the specified checkpoint to synchronizing increments). The must-knows for operations on the source database are as follows. It is recommended that you do not perform a primary-secondary switch, add shards, or recreate secondary servers on the source database; otherwise, it may affect the ability of DTS to obtain the global transaction identifier (GTID) checkpoint of the source database. You can perform DDL operations that are not related to the synchronization objects on the source. However, ensure that the previous DDL operation has been synchronized to the target before you execute a new one. Executing DDL operations too frequently may cause task errors. You cannot perform DDL operations related to the synchronization objects (such as CREATE TABLE, ALTER TABLE, DROP TABLE, RENAME TABLE, CREATE INDEX, and DROP INDEX) on the source; otherwise, the synchronization task will report an error. 4. Point-in-time synchronization determines the GTID based on the timestamp specified in the binlog context (SET TIMESTAMP=XXXX). To ensure data synchronization accuracy, it is recommended that users not modify this context. 5. Ensure that the time zone set in the database is consistent with the current console time zone (that is, the browser time zone), or convert the time to the database time zone. Otherwise, the synchronization results for the specified checkpoint may differ from expectations. 6. Ensure that the time is consistent across all cluster nodes in TDSQL for MySQL; otherwise, the synchronization results for the specified checkpoint may differ from expectations. 7. If the set time point falls within the duration of an XA transaction, that XA transaction will not be synchronized. In this case, it is recommended to set the time point earlier (before the XA START time). 8. When the point-in-time feature is used, gtid_mode must be set to ON on the source. |
Data synchronization options | Primary Key Conflict Resolution | Overwrite: When table primary key conflicts are detected during synchronization, the primary key record of the source database is used to overwrite that of the target database. |
| SQL Type | Supported operations: Insert, Update, Delete, and DDL. |
Synchronization object options | Database and Table Objects of the Source Instance | Select the objects to be synchronized; both database-level and table-level synchronization are supported. |
| Selected Object | Display the selected synchronization objects. Hover the mouse pointer over a database or table object to edit its mapping rules. 1. Support mapping of database names and table names. 2. Select individual table objects one by one to set the Where clause. For details, see Filtering Using the Where Clause. 3. In a synchronization link where the target is distributed TDSQL for MySQL, you can set the table type of the source tables after they are synchronized to the target. Supported table types: Hash, Range, and List. Note that when setting partitions for Range or List tables, ensure that the partition policy covers all full and incremental data from the source. Otherwise, data may fail to be written according to the partition rules, resulting in task errors. Primary Shardkey: Select the Shardkey you need to specify. |
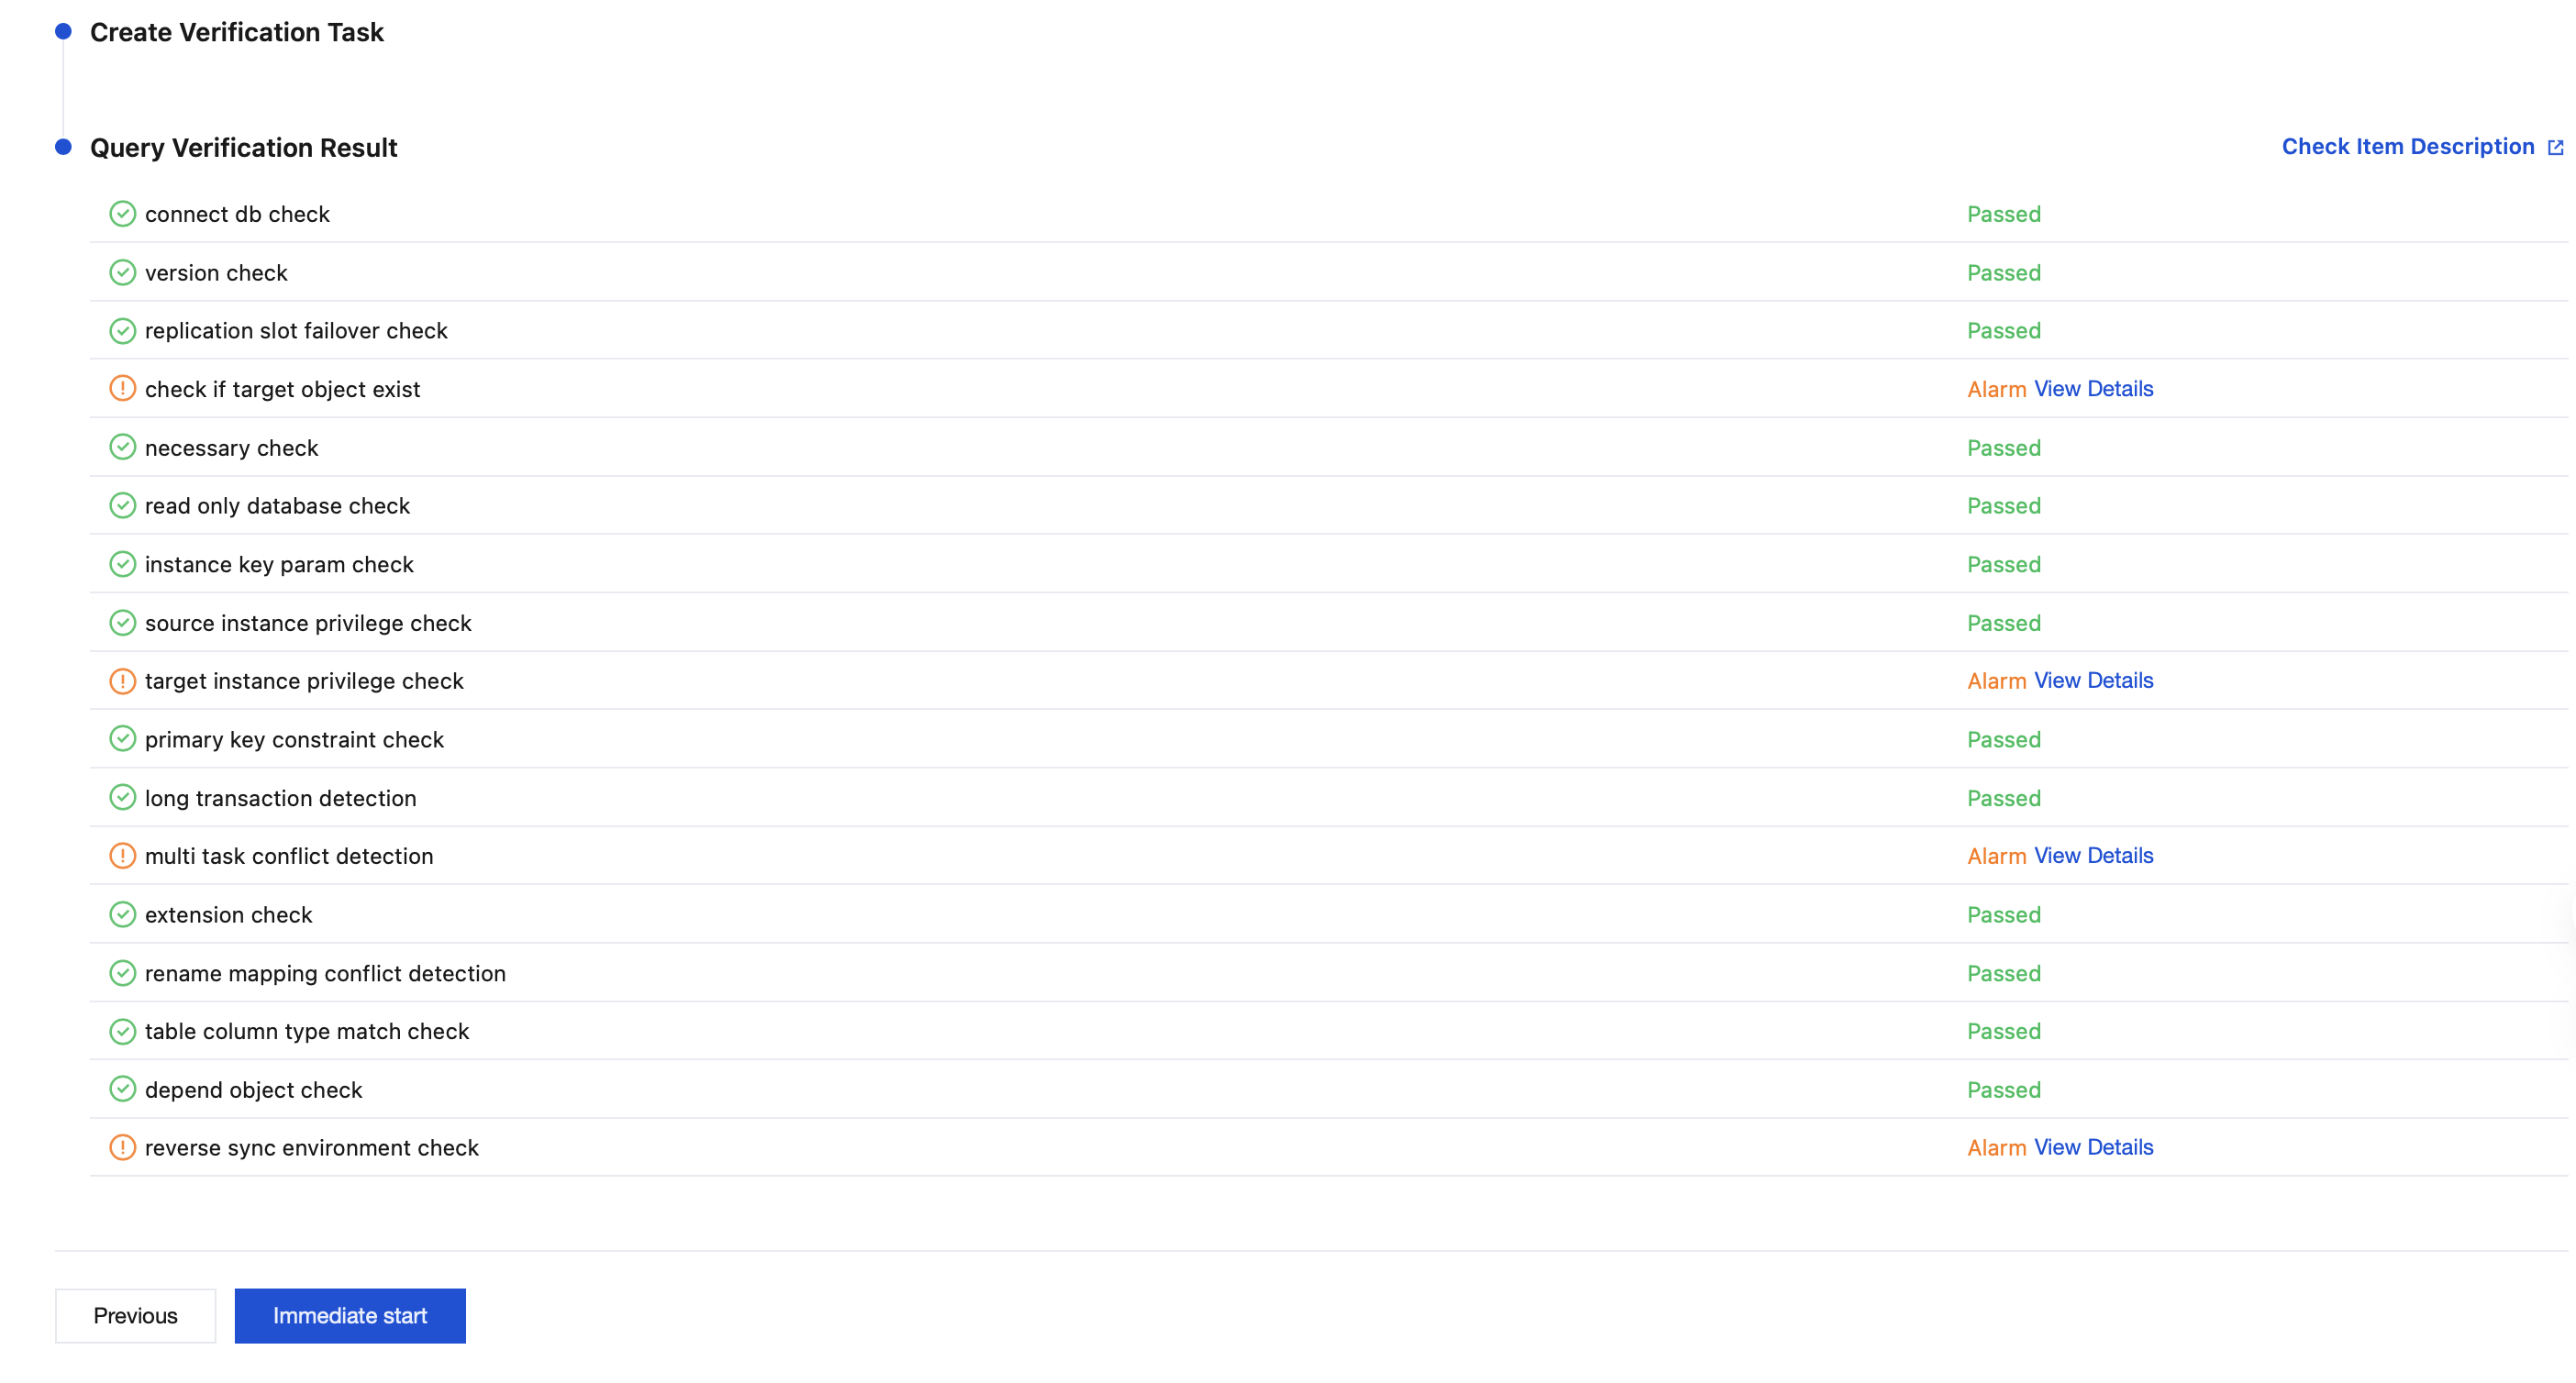
6. On the check task page, after the check is completed and all check items pass, click Start Task.
If the check task fails, you can see Check Failure Handling Methods to fix the issue and re-initiate a check task.
Failed: indicates that a check item fails and the task is blocked. Fix the issue and execute the check task again.
Warning: indicates that a check item does not completely meet the requirements, and the task can be continued, but the business may be affected. Users are required to assess whether to ignore the warning or fix the issue before continuing to execute the task based on the prompt.
7. Return to the data synchronization task list, and the task status is changed to Running.
Note:
Choose More > Stop in the Operation column to disable the synchronization task. Ensure that data synchronization is completed before disabling the task.

8. (Optional) You can click the Task ID / Name to go to the task details page and view the task initialization status and monitoring data.
フィードバック