The New Enterprise Security Group (New) is a completely redesigned security group control plane that re-engineers the configuration logic. It maintains a unified Access Control management page, significantly optimizing the security group user experience. The interface provides four-tuple rule configuration "source + destination + destination port + protocol", and automatically deploys security group policies through intelligent conversion algorithms, greatly simplifying security group configuration operations.
Based on the source and destination to define rules, the system automatically translates policies into traditional security group rules and deploys them to destination instances without the need for manual configuration on each instance.
By default, a single rule automatically generates bidirectional (inbound and outbound) security group rules. For unidirectional control, you can add specific keywords in the rule description to achieve this.
Supports using IP address/CIDR, region, asset instance, asset group, resource Tag, DNS domain name (resolved match), and parameter template as source or destination, and allows symmetric combination.
When the source or destination type is set to "IP Address", if the entered IP address matches your cloud assets, the system will automatically associate the asset. For example, entering 0.0.0.0/0 will synchronize all associated public network IP address assets.
The configuration page features clear logic that aligns with common access control list configuration practices, simplifying management complexity.
Note:
Enterprise Security Group (New) and the Internet Firewall feature operate independently. Even if the Internet Firewall is not enabled or bandwidth is insufficient, Enterprise Security Group (New) can still function normally.
Enterprise Security Group (New) supports both IPv4 and IPv6 types. You must select the corresponding type before creating rules. This document uses IPv4 as an example for illustration, and the IPv6 operation process is identical.
Any operations on Enterprise Security Group (New) rules will take effect within 1-3 minutes after the rules are saved.
View Security Group Visualization
1. Log in to CFW console, in the left navigation, choose Access Control > Enterprise Security Group (New).
2. On the Enterprise Security Group (New) page, click Security group details.
3. On the Security Group Visualization page, you can view the region where the instance resides and various quota information. The security group quota can be scaled out based on actual needs.
4. At the bottom of the Security Group Visualization page, you can view Associated instances, Security group lists, and Security group rules.
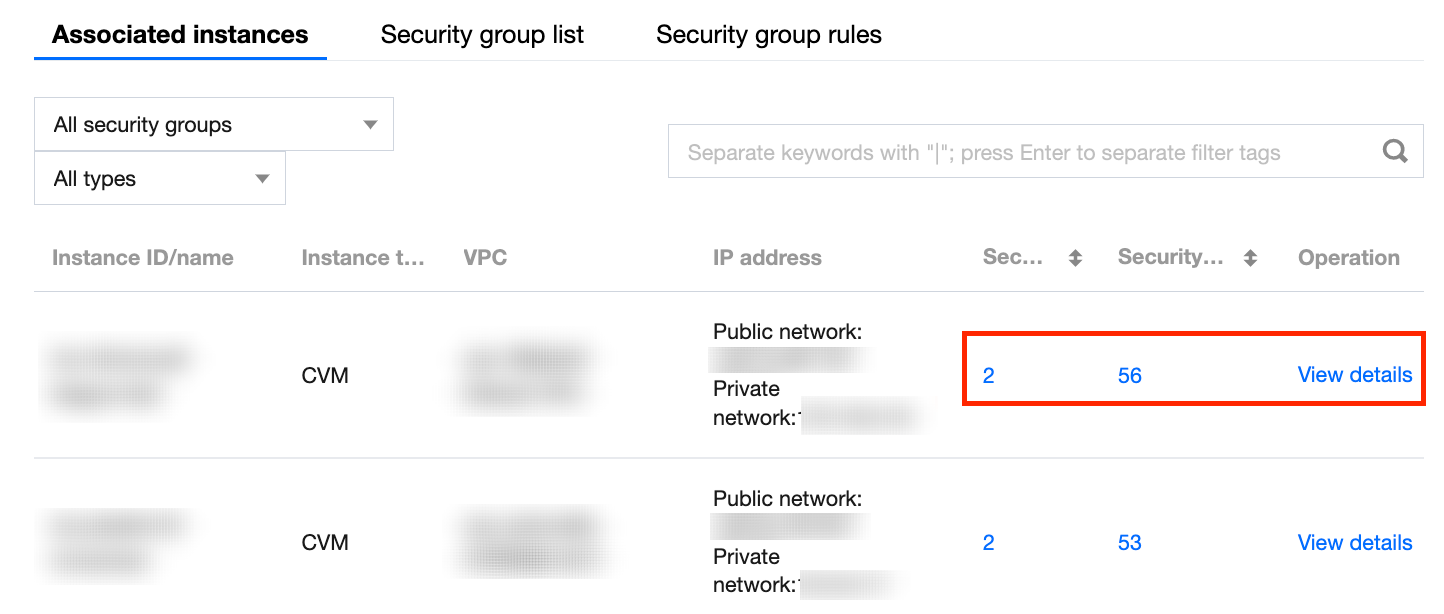
Associated instances: Displays all instances in the current region, including instance name, instance type, VPC, IP address, and so on. Click the "number" in the Security Group or Security Group Rules column to redirect to the security group list or security group rule details page of a single instance. Click View details to redirect to the instance details page.
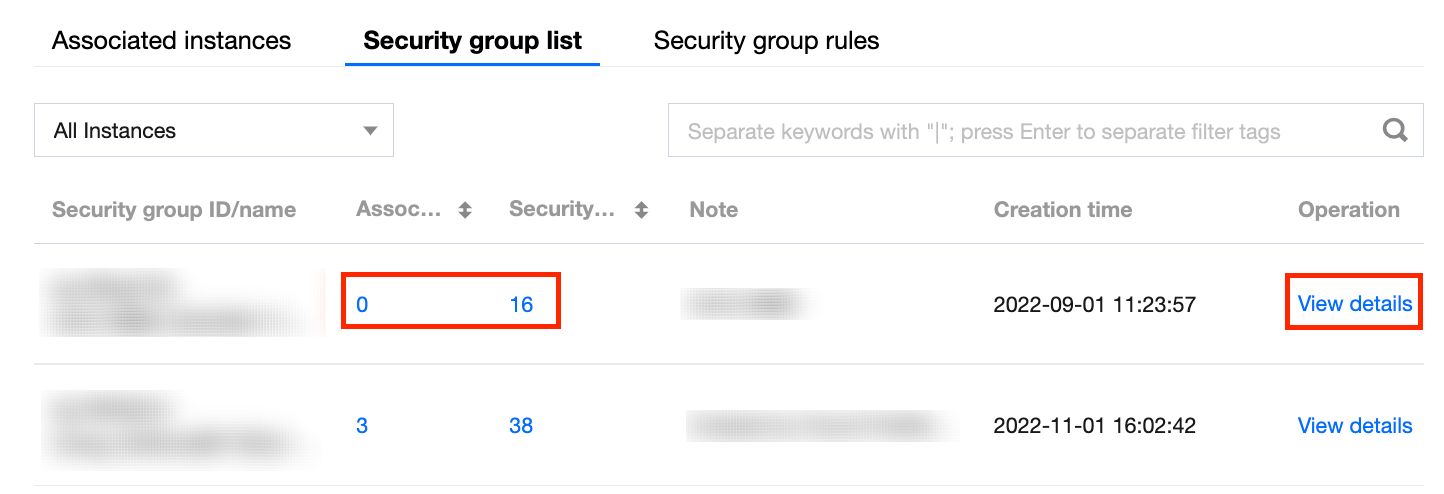
Security group list: Displays all security groups in the current region, including the instances associated with each security group, the number of security group rules, creation time, and so on. Click the "number" in the Associated Instances or Security Group Rules column to redirect to the security group list or security group rule details page corresponding to a single instance. Click View details to redirect to the security group details page in the VPC console.
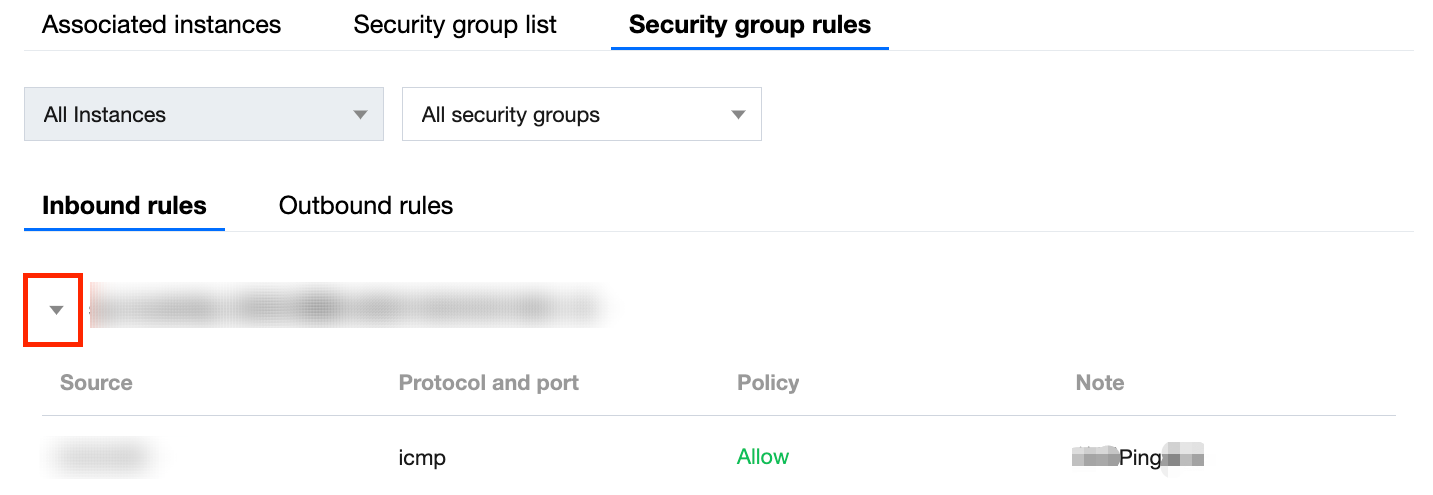
Security group rules: Displays the inbound and outbound rules of all security groups in the current region. Click
to view rule details. You can also verify whether the Enterprise Security Group has been deployed successfully.
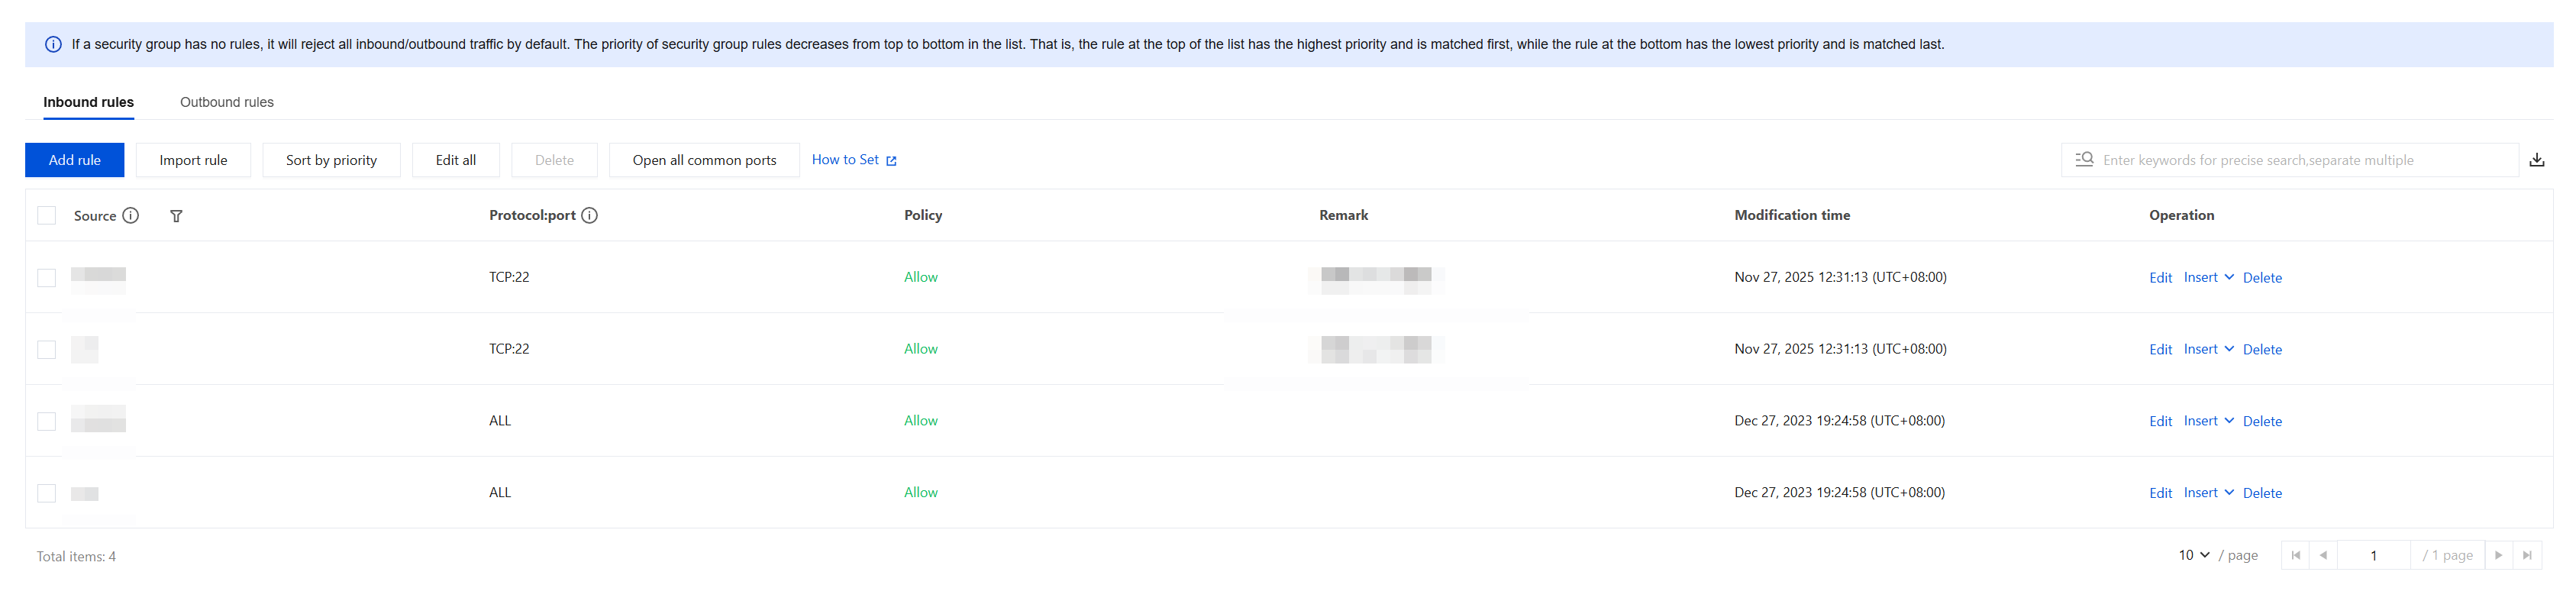
5. Log in to VPC console, in the left navigation, choose Security > Security Group, and select the desired region and project.
6. Click the "ID/Name" of any security group to immediately view its corresponding inbound rules, outbound rules, and associated instances.
Viewing Logs
1. Log in to CFW console, in the left sidebar, choose Access Control > Enterprise Security Group (New).
2. On the Enterprise Security Group (New) page, you can view recent operation logs and security group change logs:
Click Details to view details of this operation record or security group change log.
Click Operation logs > View operation logs to view detailed operation records.
Click Security group change logs > All change logs to redirect to Log Service > Operation logs > Access control, where you can view all security group change logs.
Note:
As log delivery takes approximately one minute, log updates may experience a slight delay.
2. On the IPv4 page, click Add rule, and the "Add rule" dialog will pop up.
Advanced Setting:
Port protocol type:
Custom: Manually enter the destination port and select the protocol.
Port protocol template: Select the required address template from the existing port template protocol content. For custom port protocol templates, refer to Address Template> Add Template.
Rule priority:
Earliest: Set the priority to 1.
Last: Set the priority to the highest number.
Custom: Customize rule priority. Custom rule priority only supports editing the first rule's priority, with subsequent rules increasing successively.
Priority: Editable only when Advanced Settings > Rule Priority is set to Custom. Priorities are numbered starting from 1, with smaller numbers indicating higher priority. When users customize rule priorities, other rules' priorities will be automatically adjusted in sequence.
Access source:
IP Address: Any IPv4 address or CIDR format address such as 10.10.10.10 or 10.10.10.10/24. Multiple objects are supported, separated by commas.
Note:
When 0.0.0.0/0 is entered in the access source field, the system will automatically associate all public IP addresses. Similarly, when a CIDR address is entered, it only applies to public IP addresses within that CIDR block.
Parameter template: a user-defined parameter template.
Asset Instance: Select a specific instance as the access source.
Asset Group: Select a user-defined asset group as the access source.
Resource Tag: Select the access destination based on the resource tags. The public IP addresses of instances associated with the tags will match the Enterprise Security Group rules.
Resource Region: Select a specific region as the access source.
Access destination:
IP address: The access destination only applies to your public IP addresses. If you enter a CIDR address, the system will automatically associate it with all your public IP addresses within that address segment. Multiple objects are supported, separated by commas.
DNS resolution matching: Dynamically resolves the IP address corresponding to the domain name, and only verifies that the access IP address belongs to the current DNS resolution results of the domain name.
Note:
Wildcard domain resolution is not supported.
only supports domain name resolution via Tencent Cloud DNS.
Supports A/AAAA/CNAME record types to resolve domain names.
Each domain name resolution will consume one quota of the parameter template IP address object (ipm).
Parameter template: a user-defined parameter template.
Asset instance: Select a specific instance as the access destination.
Asset group: Select a user-defined asset group as the access destination.
Resource Tag: Select the access destination based on the resource tags. The public IP addresses of instances associated with the tags will match the Enterprise Security Group rules.
Resource Region: Select a specific region as the access destination.
Destination port: Supports single port numbers, port ranges using '/', and discrete port values separated by commas. For example, "80", "80/80", "-1/-1", or "80,443,3380/3389".
Protocol: Supports ANY, TCP, UDP, and ICMP protocols.
Policy:
Allow: Allow traffic that hits a rule.
Deny: Block traffic that hits a rule.
Scope: Security groups and Lighthouse firewalls.
Description: Used to describe rules, supports up to 100 characters.
3. Click Save to complete the configuration.
Other Operation
On the Enterprise Security Group (New) page, click IPv4 to go to the IPv4 page. On the IPv4 page, you can perform the following operations on existing rules:
Toggle Operation: Click the toggle switch in the status column to enable/disable the corresponding rule. Newly added rules are automatically enabled after configuration is completed.
Basic Operations: After adding a rule, you can click Edit, Add one above, or Delete in the operation column to edit, insert, or delete the corresponding rule.
Copy Operation: When adding or inserting a rule, if you have completed editing the previous rule and the subsequent rule to be configured is similar to the former, you can use the copy feature to quickly generate a new rule, then adjust the details as needed.
Note:
In the pop-up window for "adding rules", one row represents one rule. Each newly added rule is inserted at the end of the list by default, which means it has the last execution order and the lowest priority.
You can add up to 10 rules at a time.
Click
in the operation bar to add a new rule below the currently selected rule position, automatically copying all content of the current rule;
Click the
below to add a new rule at the bottom of the rule list, automatically copying the content of the last rule in the list.
Import Rule: Click Import rule to select a file from your local device for import. You can download an import template, export existing rules, specify the import location, set the backup method for rules, and configure the enabling method after import.
Sort: Rules are sorted by the value of priority by default (the lower the value of priority, the higher the rule's position in the list and the higher its priority).
a. Click Sort, and hover the mouse over any blank area in the rule row that needs adjustment.
b. When the cursor changes to a draggable state, hold down the left mouse button and drag it up or down to the target position.
c. After adjustment, click Save to make it effective.
Note:
Rules above in the list have higher priority than those below. After the sorting operation is performed by dragging, no need to manually set values; saving will automatically update the priorities.
More Actions: Click More actions, then you can Delete all/Disable all/Enable all rules by clicking the corresponding options.
Export Rules: Click the
above the rule list to pop up the custom list export window. Select Export all or Export matched results, choose the search criteria, then click Export to export the rules.
Backup and Rollback Rules: See the Rule Backup documentation.