AI Security
다운로드
포커스 모드
폰트 크기
Overview
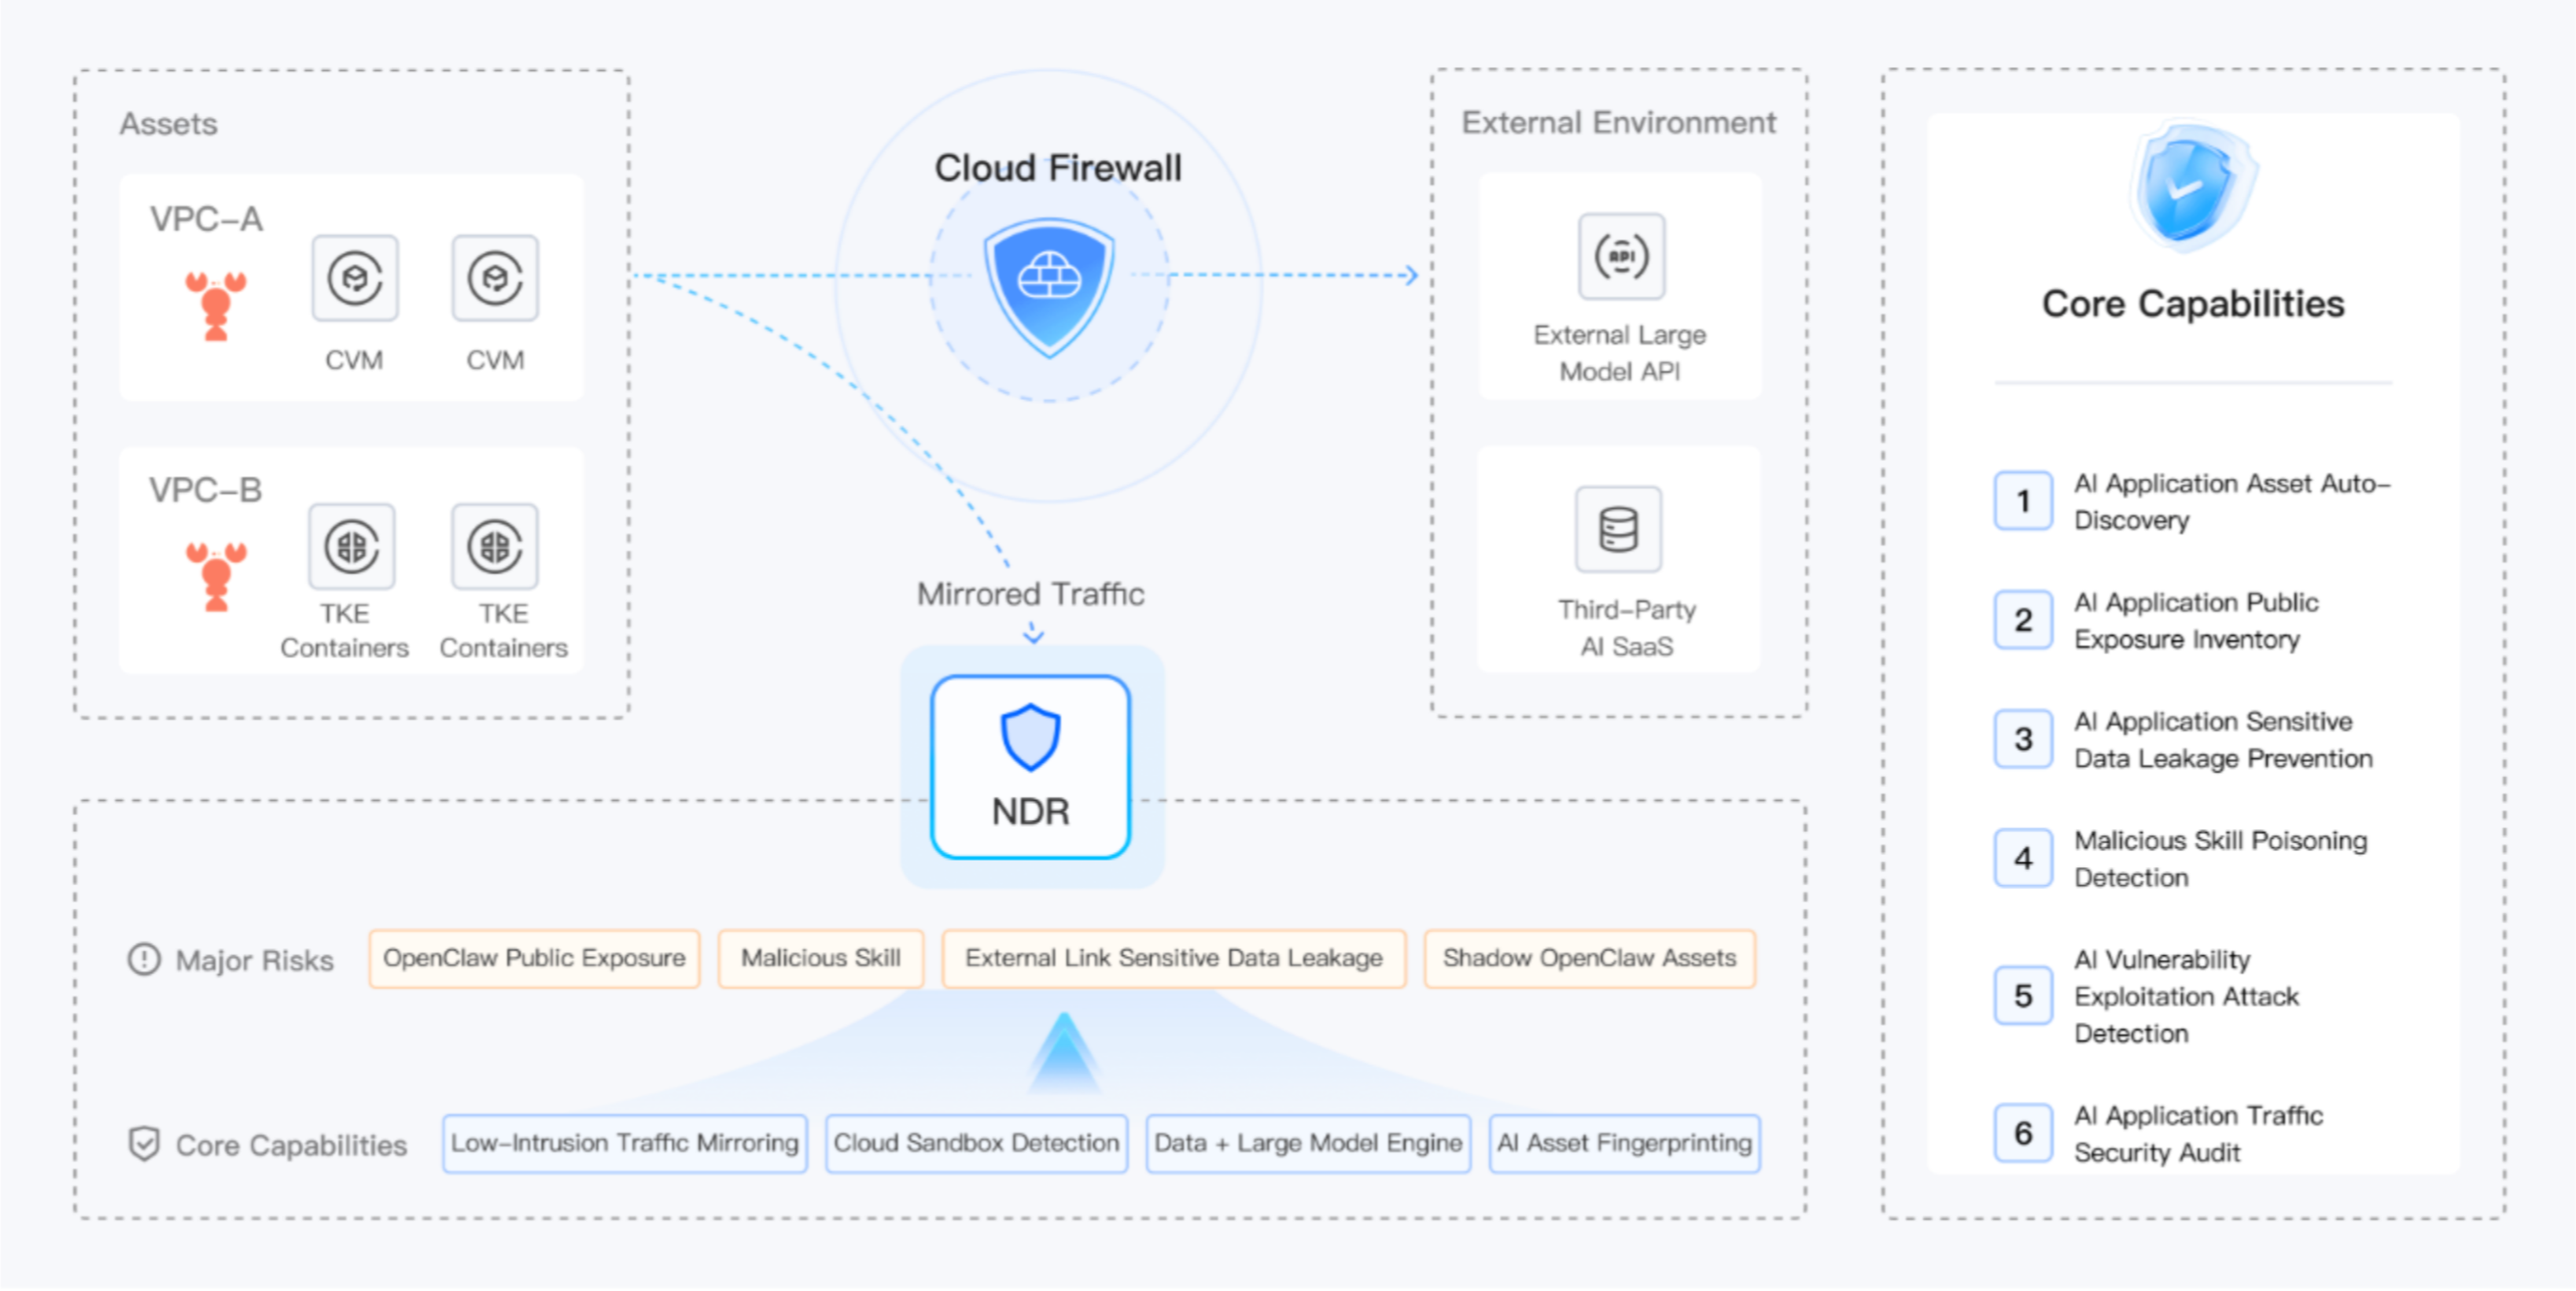
AI Security Scenario Protection is a dedicated security protection module launched by CFW for AI application scenarios. It provides capabilities such as AI asset inventory, AI data leakage protection, malicious Skill poisoning detection, AI vulnerability attack protection, and AI traffic auditing, covering security risks throughout the entire lifecycle of AI applications.
Prerequisite
Before using AI Security Scenario Protection, complete the following preparations:
1. Activate the NDR feature: You have already gone to the CFW purchase page to purchase the NDR feature, or you have submitted a ticket to apply for a trial of the NDR feature.
2. Ingest Asset Traffic: On the Traffic Access page, enable NDR and the encrypted traffic detection feature for the assets that require AI security capabilities. All capabilities described in this section take effect only for assets that have NDR enabled and the encrypted traffic detection feature activated.
3. Enable the Feature Switch: Before using any AI security capability, you must enable the corresponding NDR feature switch. For details, see the prerequisites in each module.
AI Asset Inventory
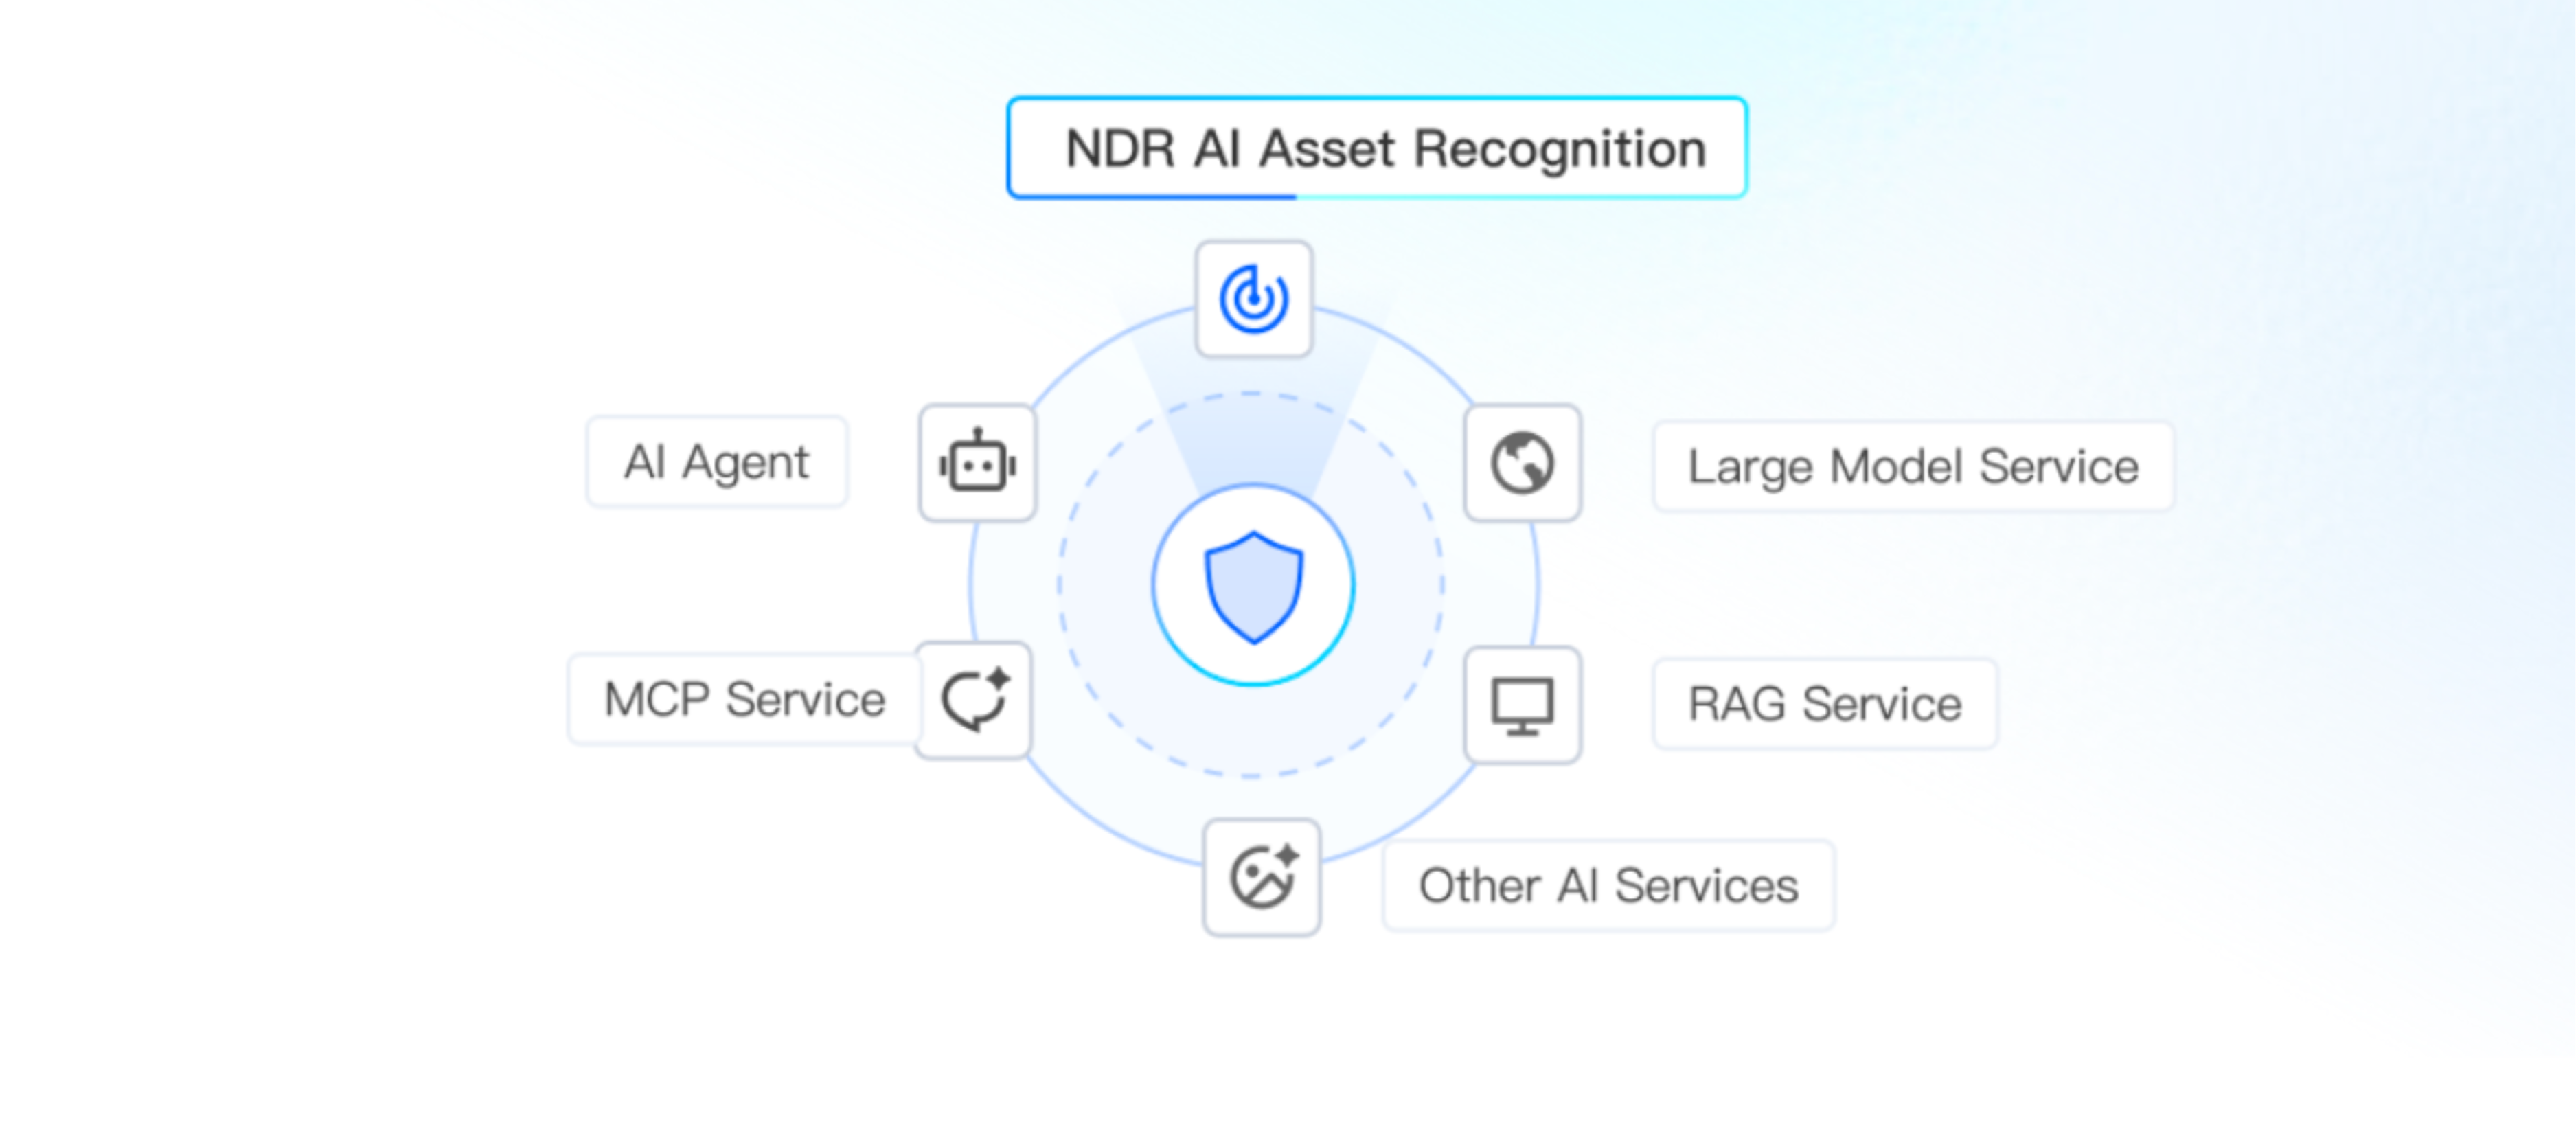
AI asset inventory uses a passive identification method based on traffic mirroring. It can automatically discover and catalog the primary AI assets in your network, typically without requiring Agent deployment or changes to the business architecture. Through deep analysis of network-wide traffic, it can identify common AI application categories such as large model services, AI Agents, MCP services, and RAG services. This helps promptly detect unauthorized "shadow AI" assets, reducing the risks associated with blind spots in AI usage.
Note:
Before using this feature, go to the Network Detection and Response > Asset Fingerprinting page and enable the Asset Fingerprinting Switch.
1. Log in to the CFW console. In the left sidebar, choose AI Security > AI Asset Inventory.
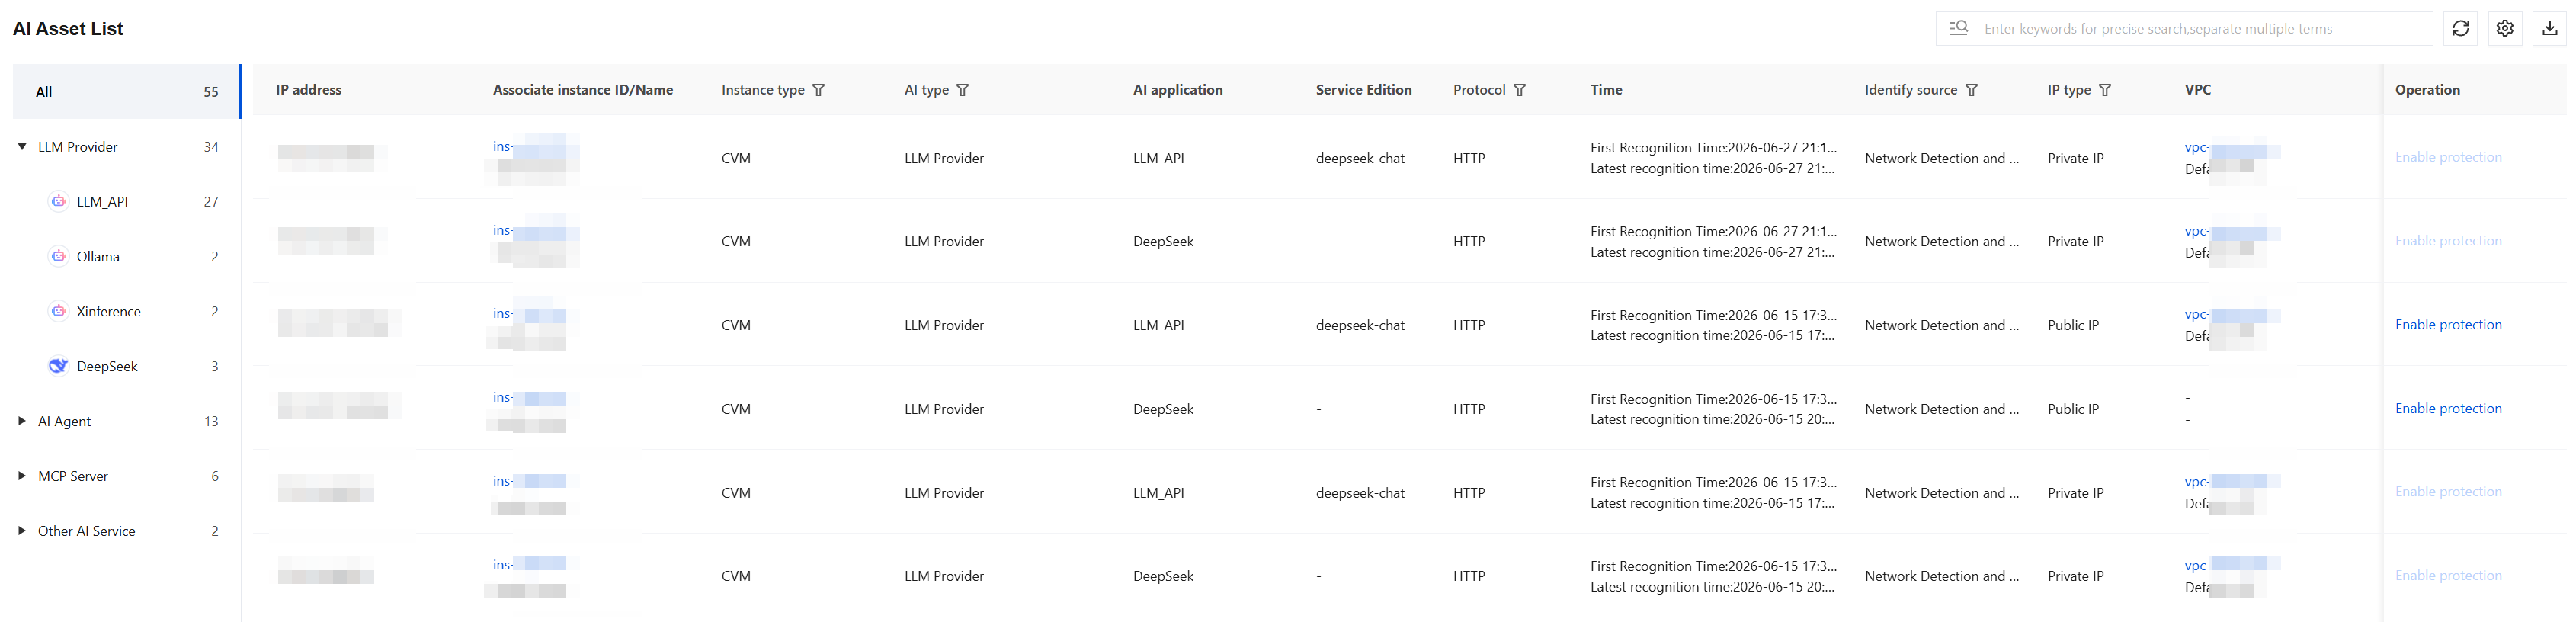
2. The AI Asset Statistics and Classification area displays an overview of AI asset statistics.

3. In the AI Asset List area, detailed information for all identified AI assets is displayed. You can perform the following operations:
Click a specific Associated Instance ID/Name or VPC to redirect to the corresponding asset details page in the Asset Center.
For assets whose firewall is not enabled, click Enable Protection to navigate to the Firewall Toggle > Internet Boundary page to enable it.
AI Exposed Surface
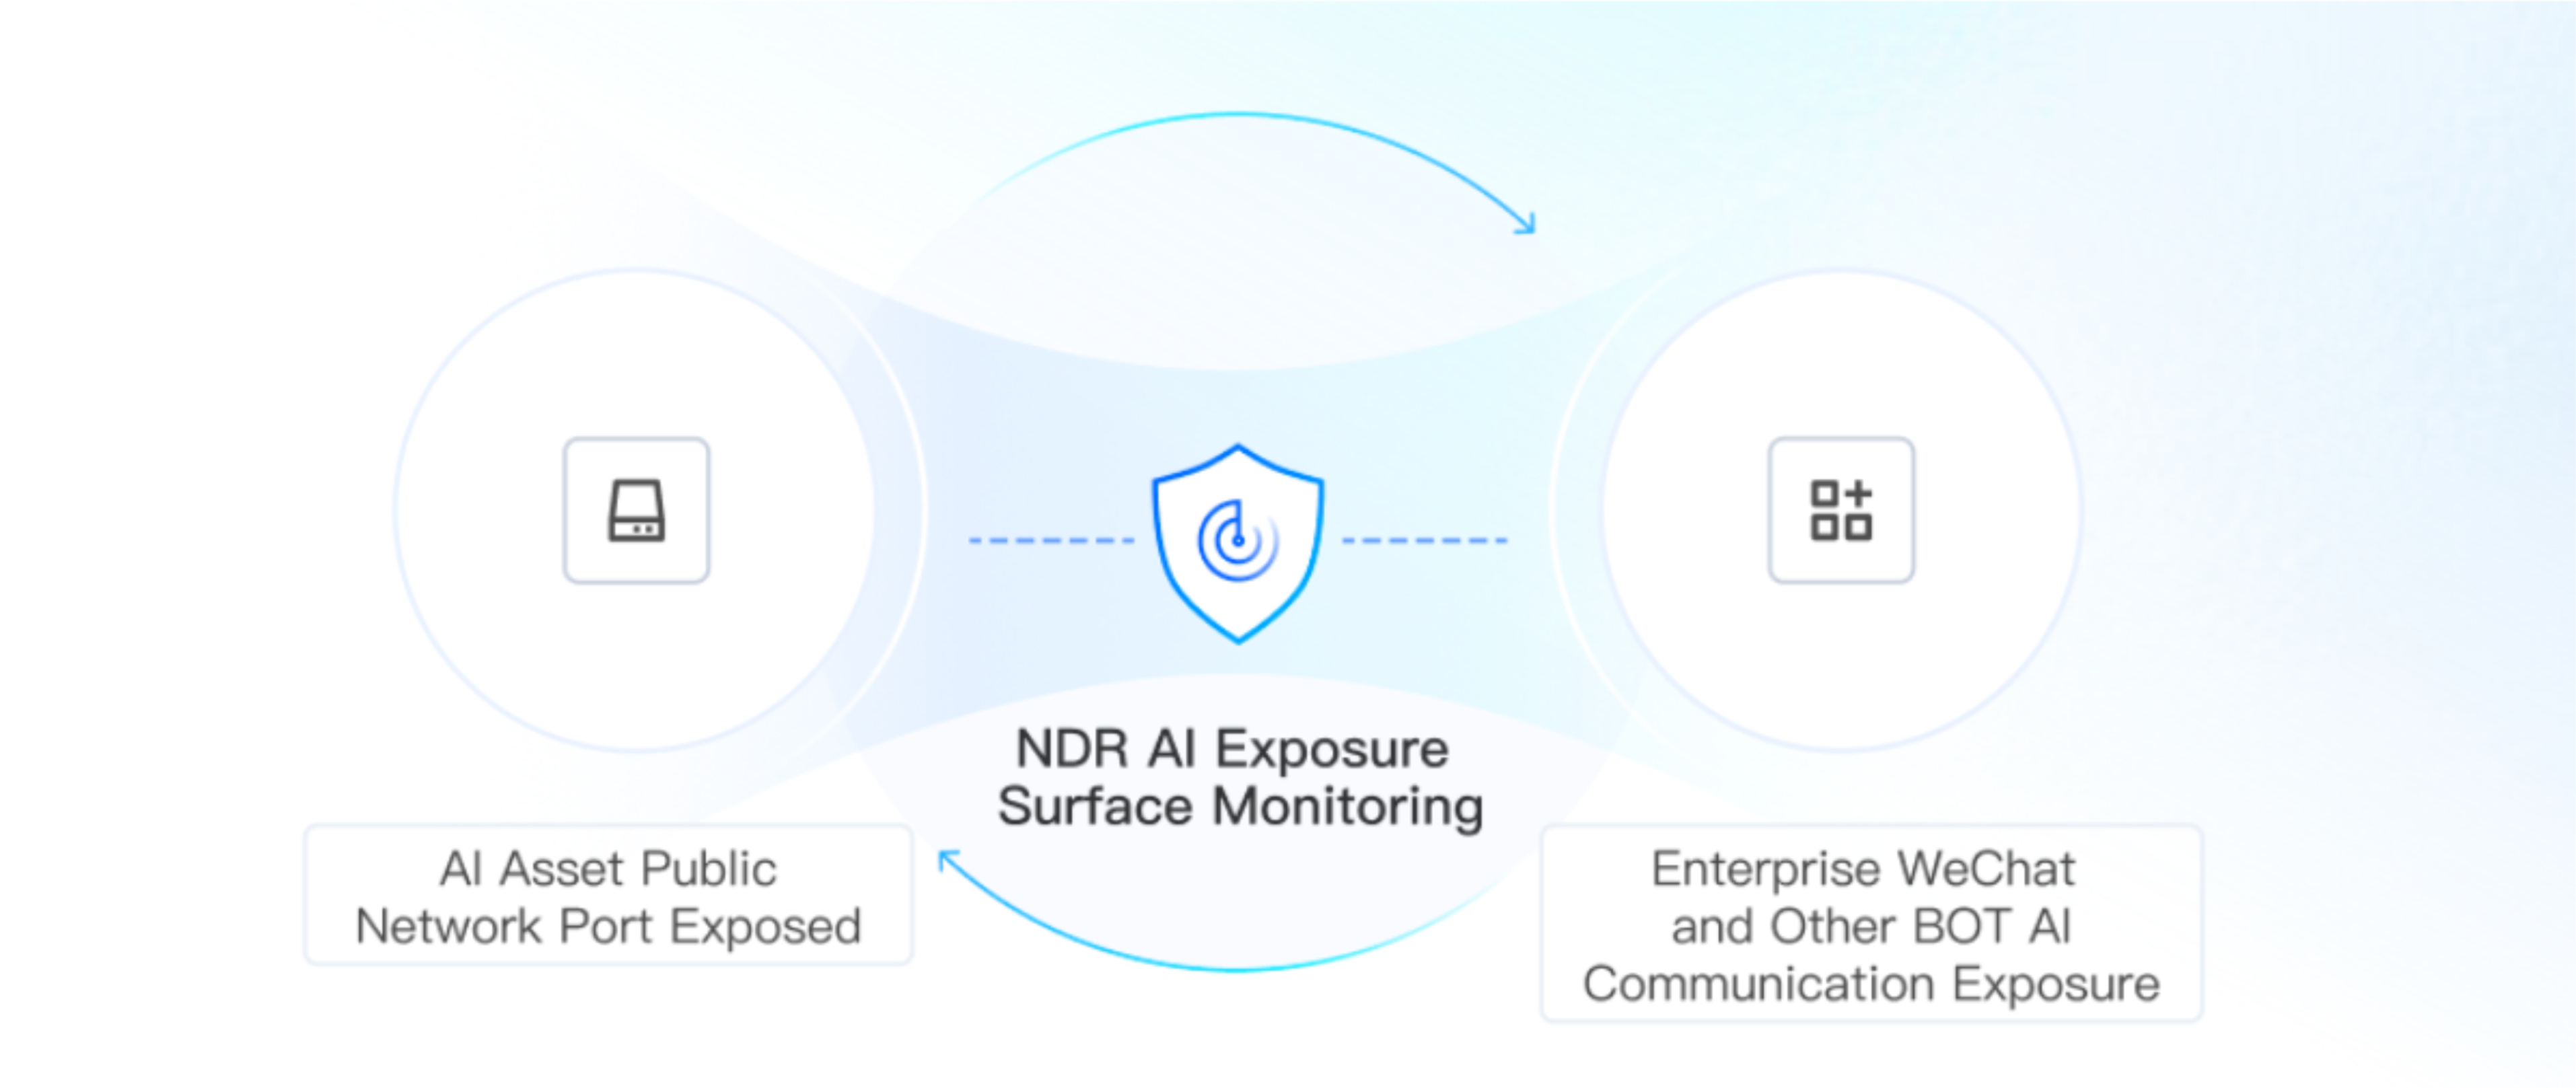
AI exposure surfaces are analyzed using NDR full-traffic deep analysis and passive identification technology. This process automatically discovers exposed ports, protocols, access paths, and the scope of exposure for AI assets. It identifies risks such as unauthenticated exposure, unauthorized calls, and sensitive API exposure. Structured remediation recommendations are then provided to help users reduce the AI attack surface.
1. Log in to the CFW console. In the left sidebar, choose AI Security > AI exposed surface.
2. On the AI exposed surface page, you can filter data by Last 24 hours, 7 days, 30 days, or All time ranges, or by a custom time period.
3. The AI exposure statistics area displays core statistical metrics for AI asset exposure. These metrics include Total Number of Exposed AI Assets, Number of Exposed AI Assets on Public Network, Number of AI assets exposed on the private network, Expose AI type, and Pending AI asset expose risks.
4. On the AI asset exposed surface tab, all exposed AI asset surfaces within the selected time range are displayed. You can perform the following operations:
Click Details in the operation column of a specific asset to view the AI asset exposure details. This page displays port exposure information, the identification timeline, associated AI asset information, and the associated risk list.
Click Associate AI traffic log in the operation column of a specific asset to view the details of the AI traffic logs related to that asset.
5. On the Exposed AI Asset Risk tab, all AI asset exposure risks within the selected time range are displayed. You can perform the following operations:
Click Details or Risk Name in the operation column of a specific risk to open the risk details drawer. The drawer displays basic information, associated AI asset information, AI traffic logs, and remediation suggestions.
Click Tag disposal in the operation column of a specific risk to update its status to Handled.
Click Mark as Ignored in the operation column of a specific risk to update its status to Ignored.
Click Unignore in the operation column of an ignored risk to restore its status to Not resolved.
Select multiple alarms, then click Tag disposal or Mark as Ignored to handle them in batches.
AI Data Leaks
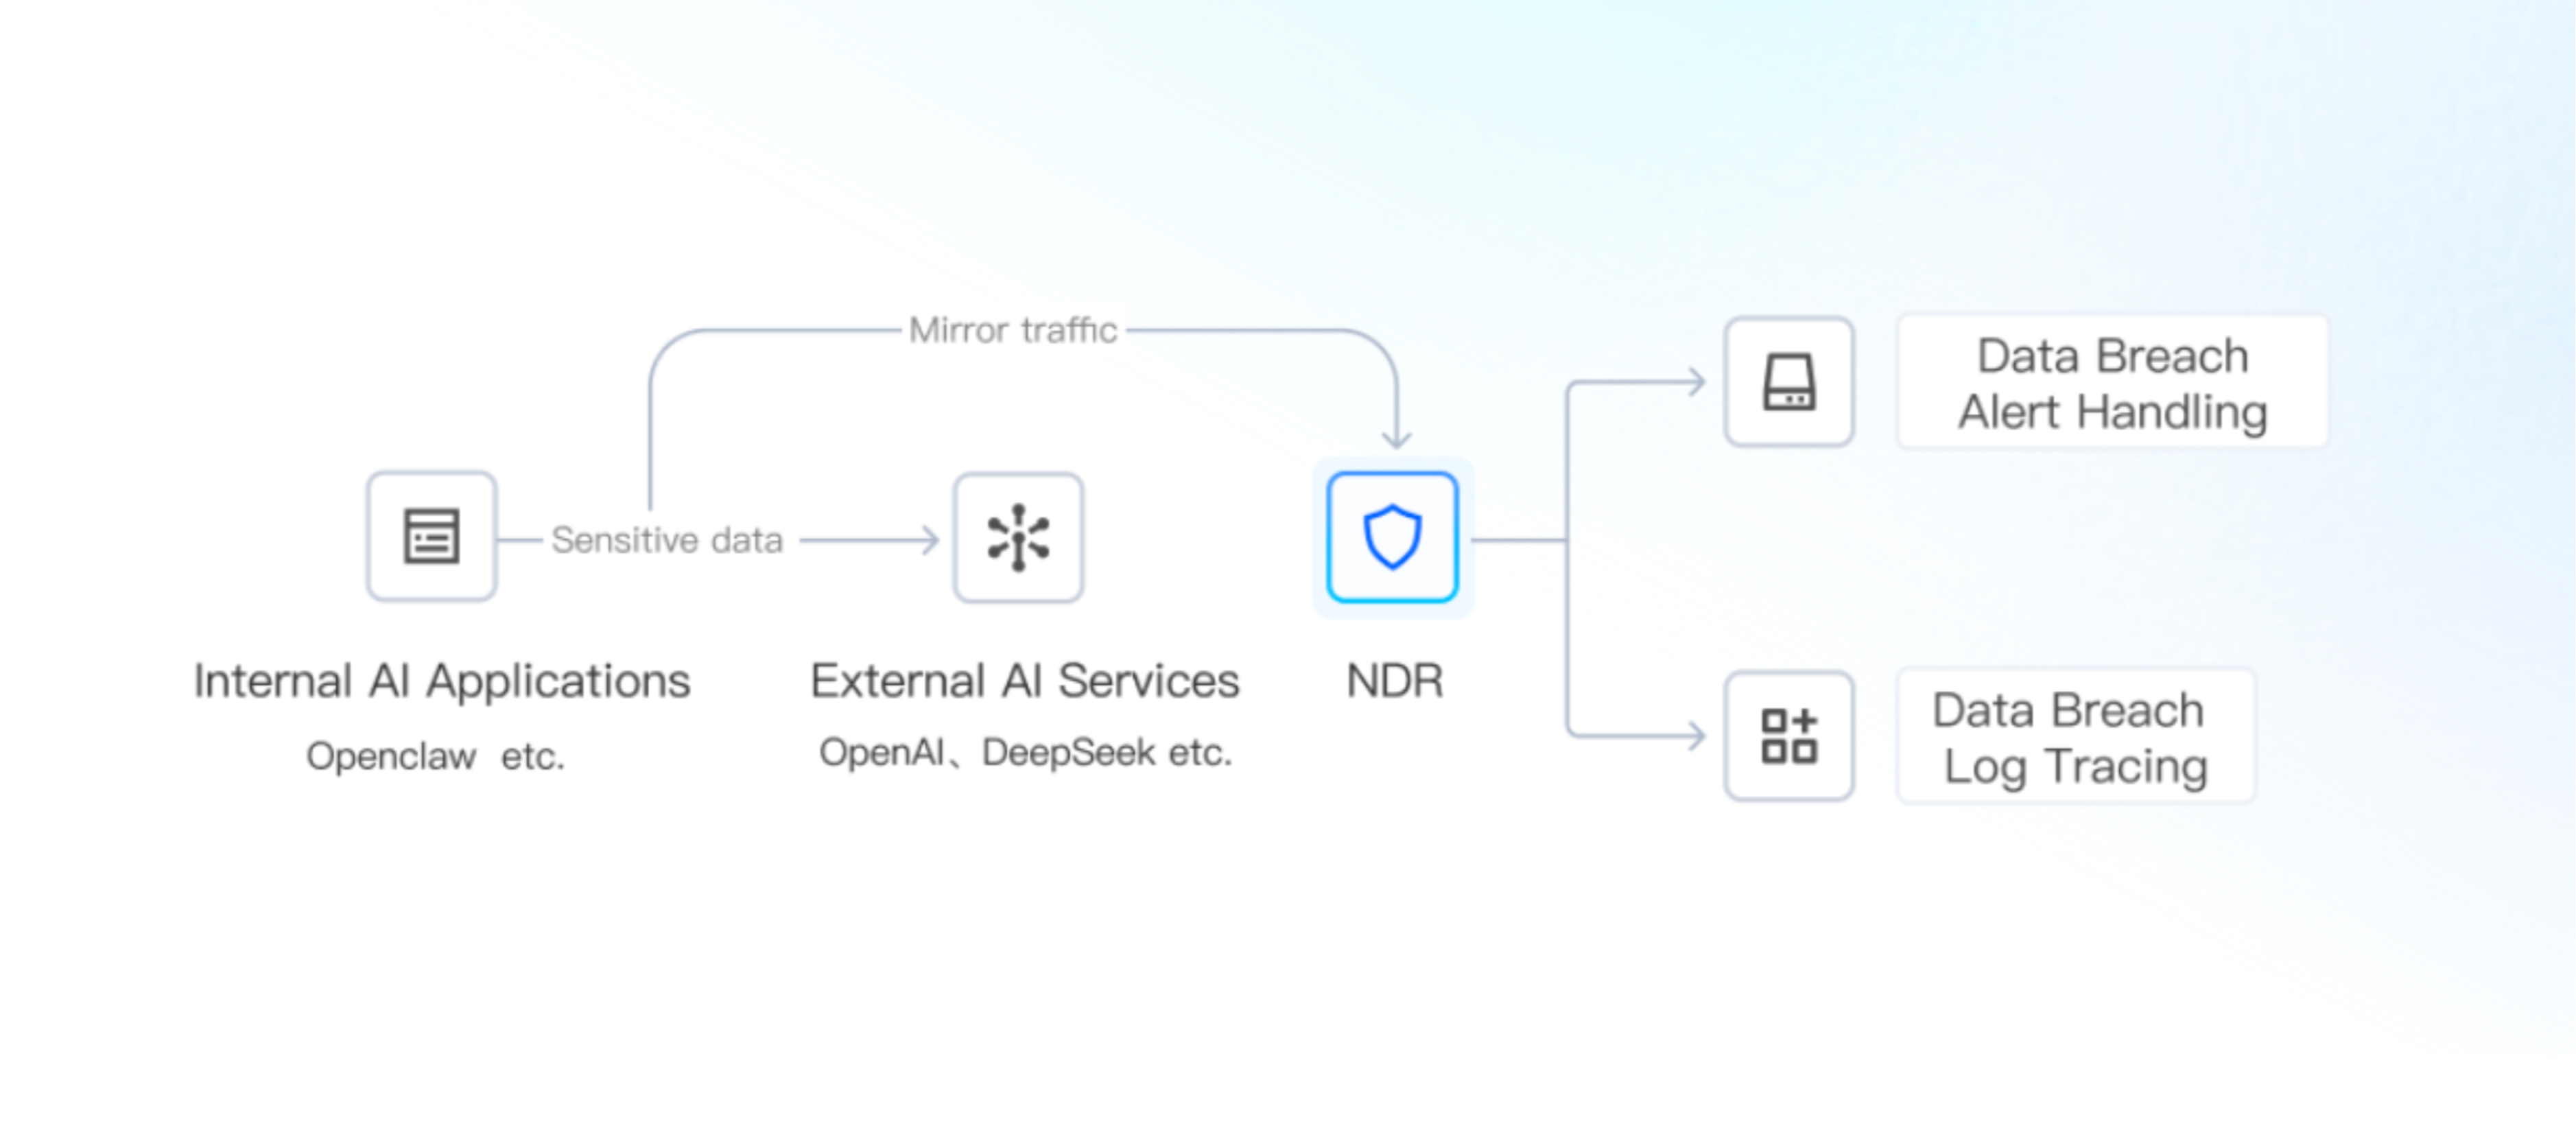
AI Data Leak Detection is based on NDR deep traffic analysis. It can detect behaviors where AI applications transmit sensitive data to external AI services (such as OpenAI, DeepSeek, and so on), and leverages AI large model engines to assist in risk assessment, thereby reducing the risk of sensitive data from core business operations being leaked externally.
Note:
Before using this feature, go to the Network Detection and Response > Traffic Risk Analysis > Sensitive Data Leak Detection page and enable the Sensitive Data Leak Detection Switch.
1. Log in to the CFW console. In the left sidebar, choose AI Security > AI Data Leak.
2. On the AI Data Leak page, you can filter data by a 24-hour or 7-day time range, or by a custom time period.
3. The AI Data Leak Statistics area displays AI data leak statistics for the selected time range.

4. In the Data Leak Risk List, each data leak risk event within the selected time range is displayed. You can perform the following operations:
Enable the Data masking display Switch, and sensitive data in the list will be displayed in a masked format. After you disable the switch, the data will be displayed in a semi-masked format.
Select multiple risks, then click Mark as handled or Ignored to batch update their status.
Select one or more risks and click Start AI analysis. This will invoke the AI large model for intelligent assessment, and the results will be displayed in the AI Assessment column.
Click Details in the specific risk operation column to view the detailed information of the risk.
Click Mark as Handled or Ignored in the specific risk operation column to mark the risk status.

Malicious Skill Injection
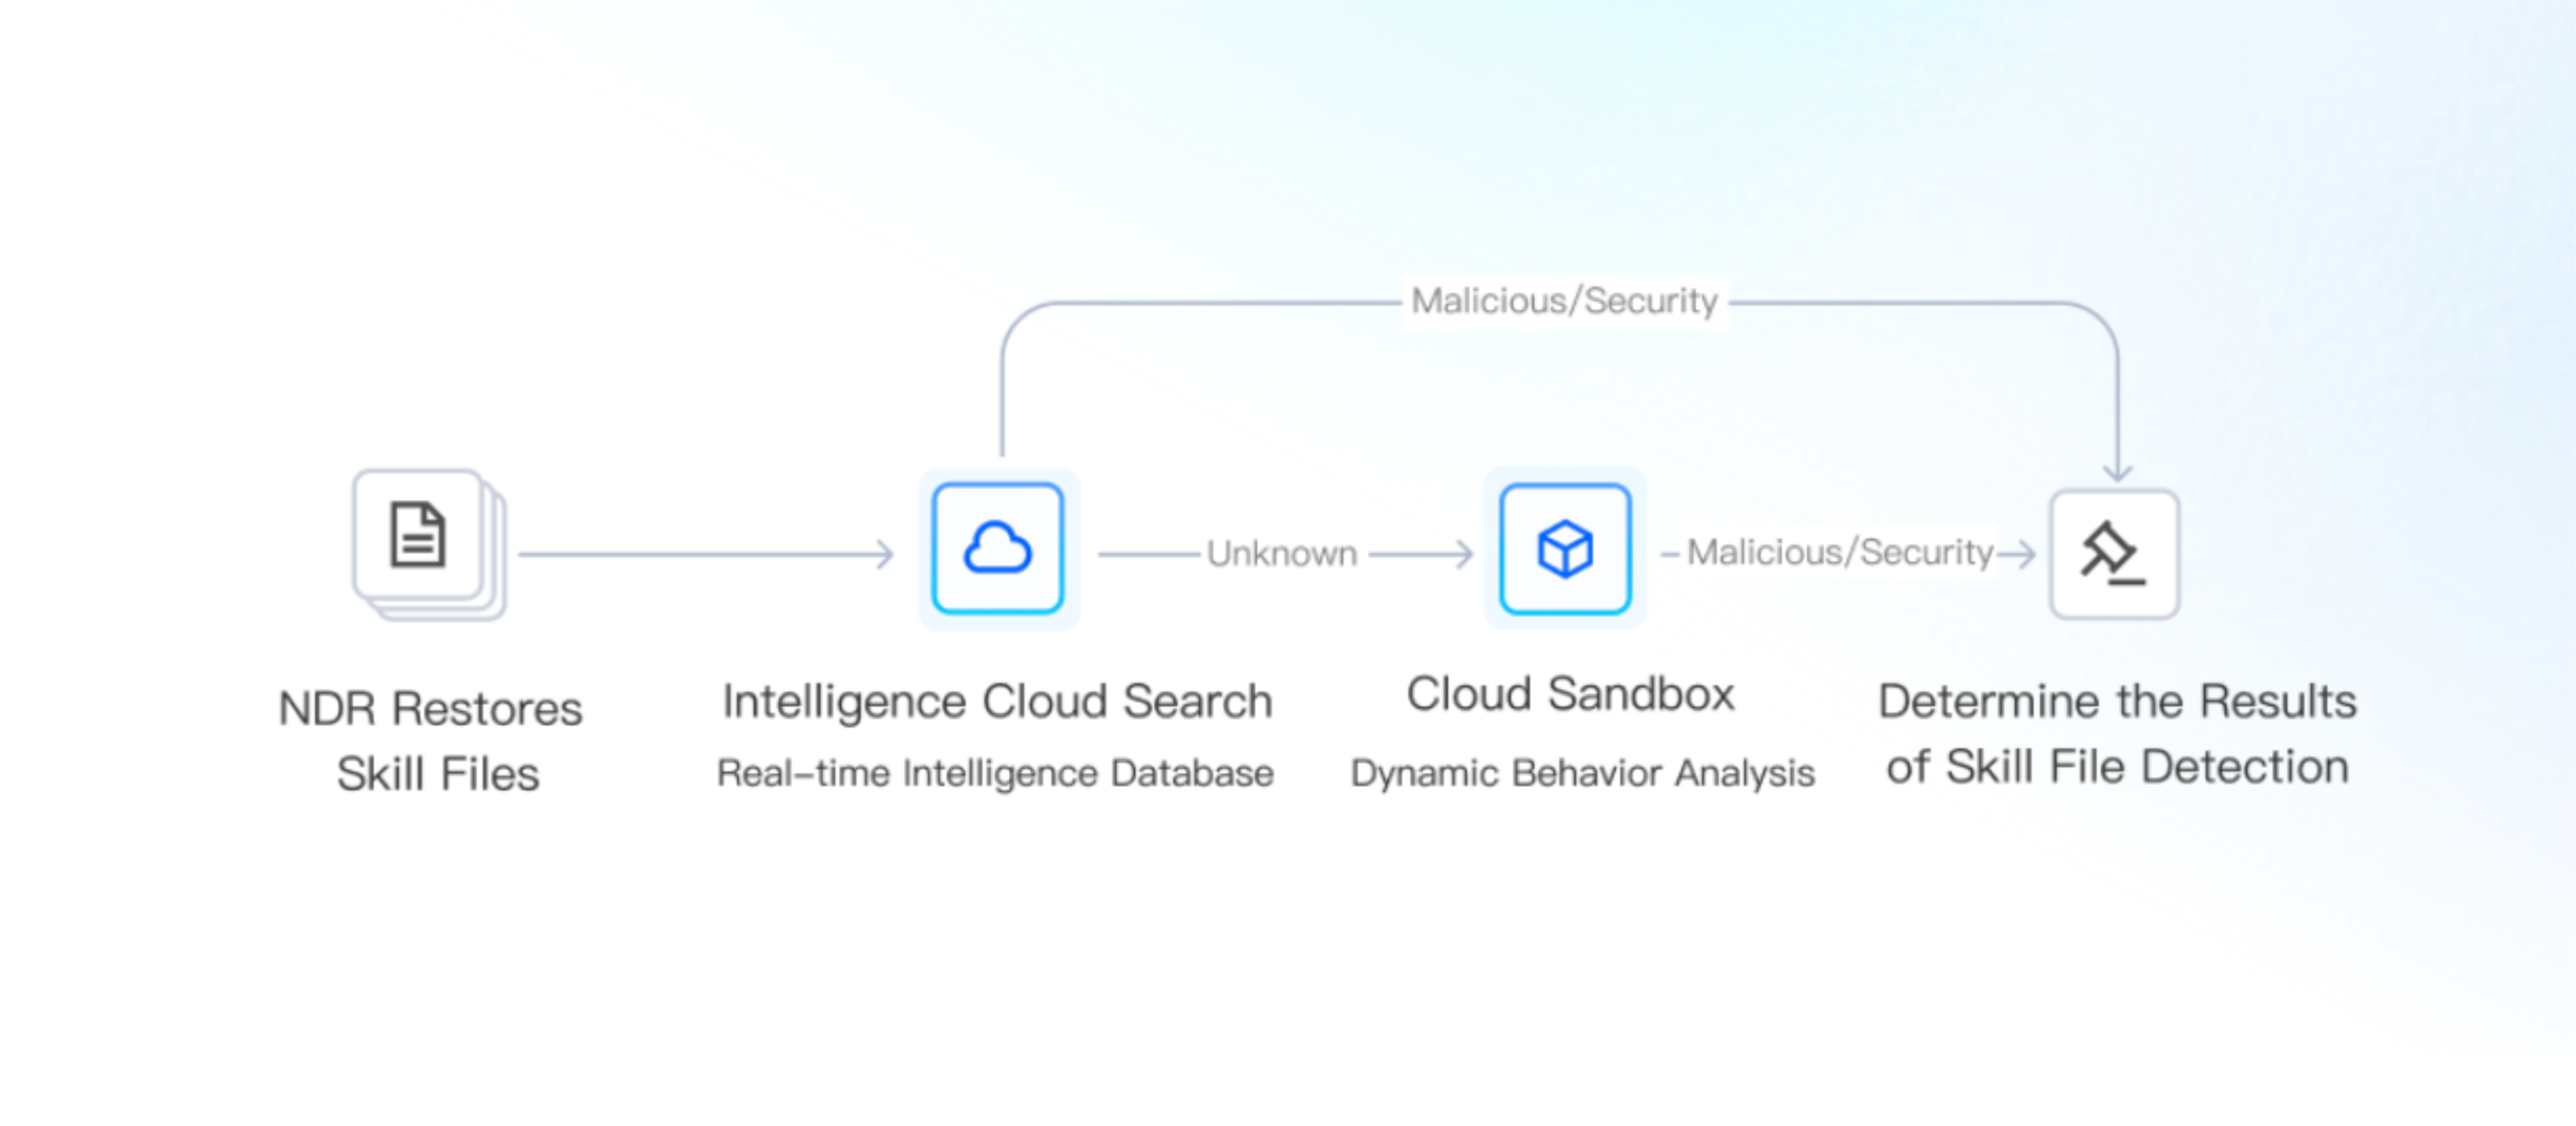
Malicious Skill Injection detection is designed to identify Skill poisoning attacks targeting AI Agents. It leverages a threat intelligence database to help identify known malicious signatures and attempts to drive a cloud sandbox for deep Behavior Analytics. By combining static and dynamic detection methods, it enhances the ability to discover malicious Skills and reduces the risks posed by Skill poisoning attacks.
Note:
Before using this feature, go to the Network Detection and Response > File Sandbox Detection page and enable the Skill Poisoning Detection switch.
1. Log in to the CFW console. In the left sidebar, choose AI Security > Malicious Skill Injection.
2. On the Malicious Skill Injection page, you can filter data by a 24-hour or 7-day time range, or by a custom time period.
3. The Malicious Skill Injection Statistics area displays malicious Skill Injection statistics for the selected time range.

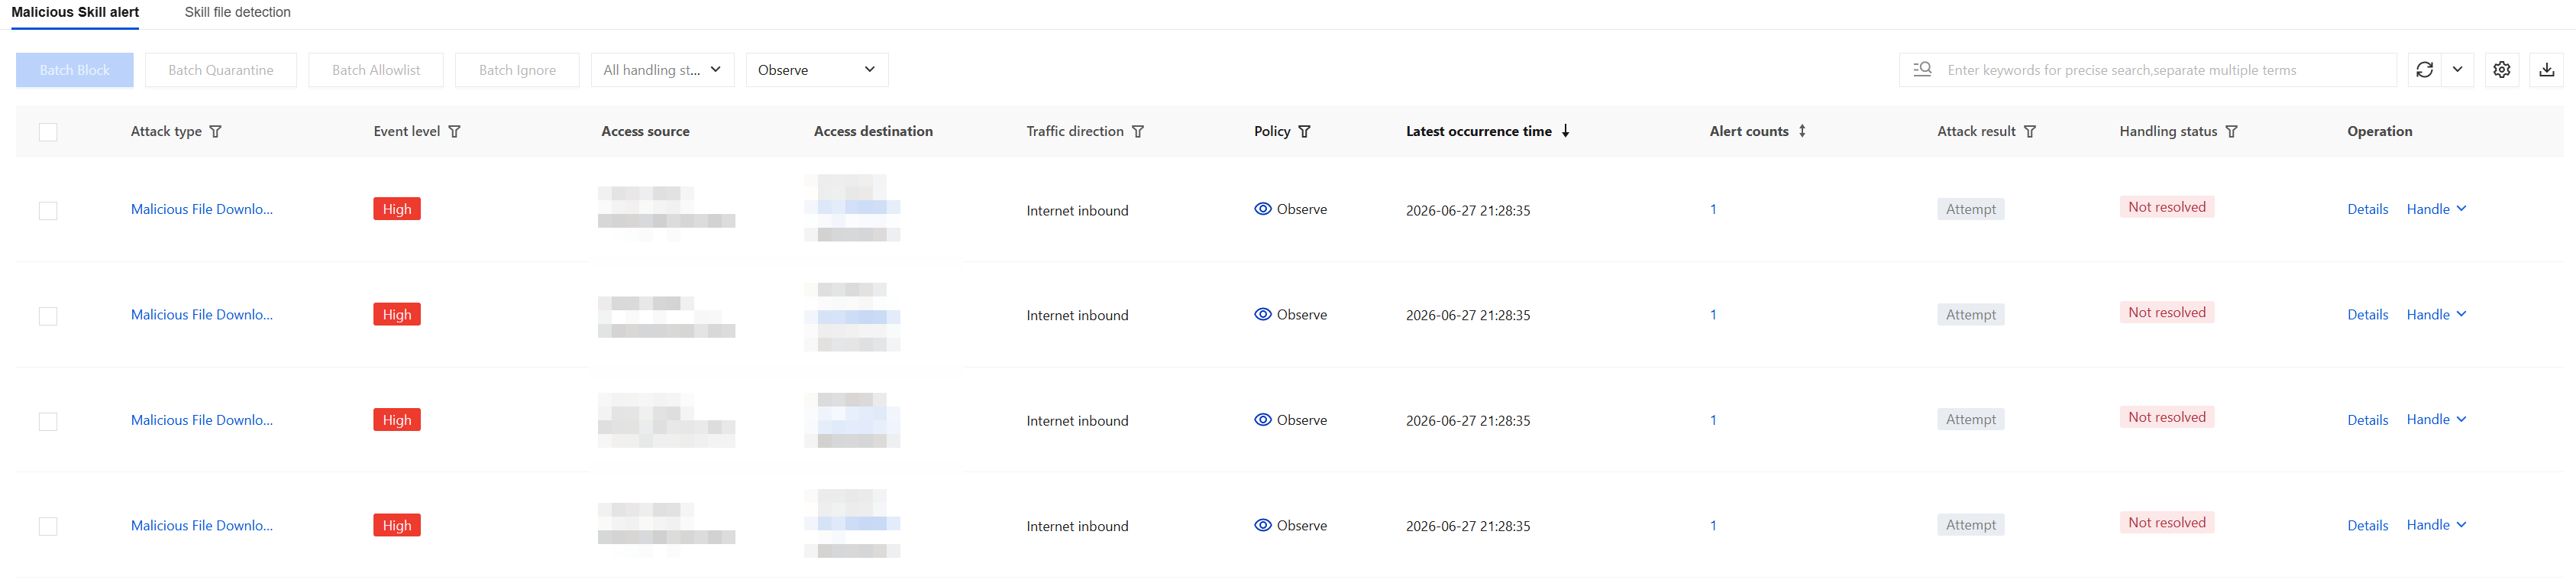
4. The Malicious Skill Alert tab displays all malicious Skill poisoning alarm events within the selected time range. You can perform the following operations:
Click Details in the specific alarm operation column to view the detailed information of the alarm.
Click Handle in the specific alarm operation column. You can then select Block, Quarantine, Allowlist, or Ignore to handle the alarm.
Select multiple alarms. Then click Batch Block, Batch Quarantine, Batch Allowlist, or Batch Ignore to handle the selected alarms in batches.
5. The Skill File Detection tab displays all detected Skill files and their detection results within the selected time range. You can perform the following operations:
Click View Traffic Logs to view the network traffic logs related to the file.
Click View Alarm Logs to view the alarm logs related to the file. (This option is available only for malicious Skills.)
Click Download to download the detected Skill file.

Note:
To view all Skill files detected 7 days ago and their detection results, go to the Log Auditing > NDR Logs > File Detection Logs > Detected File List page.
AI Vulnerability Attacks
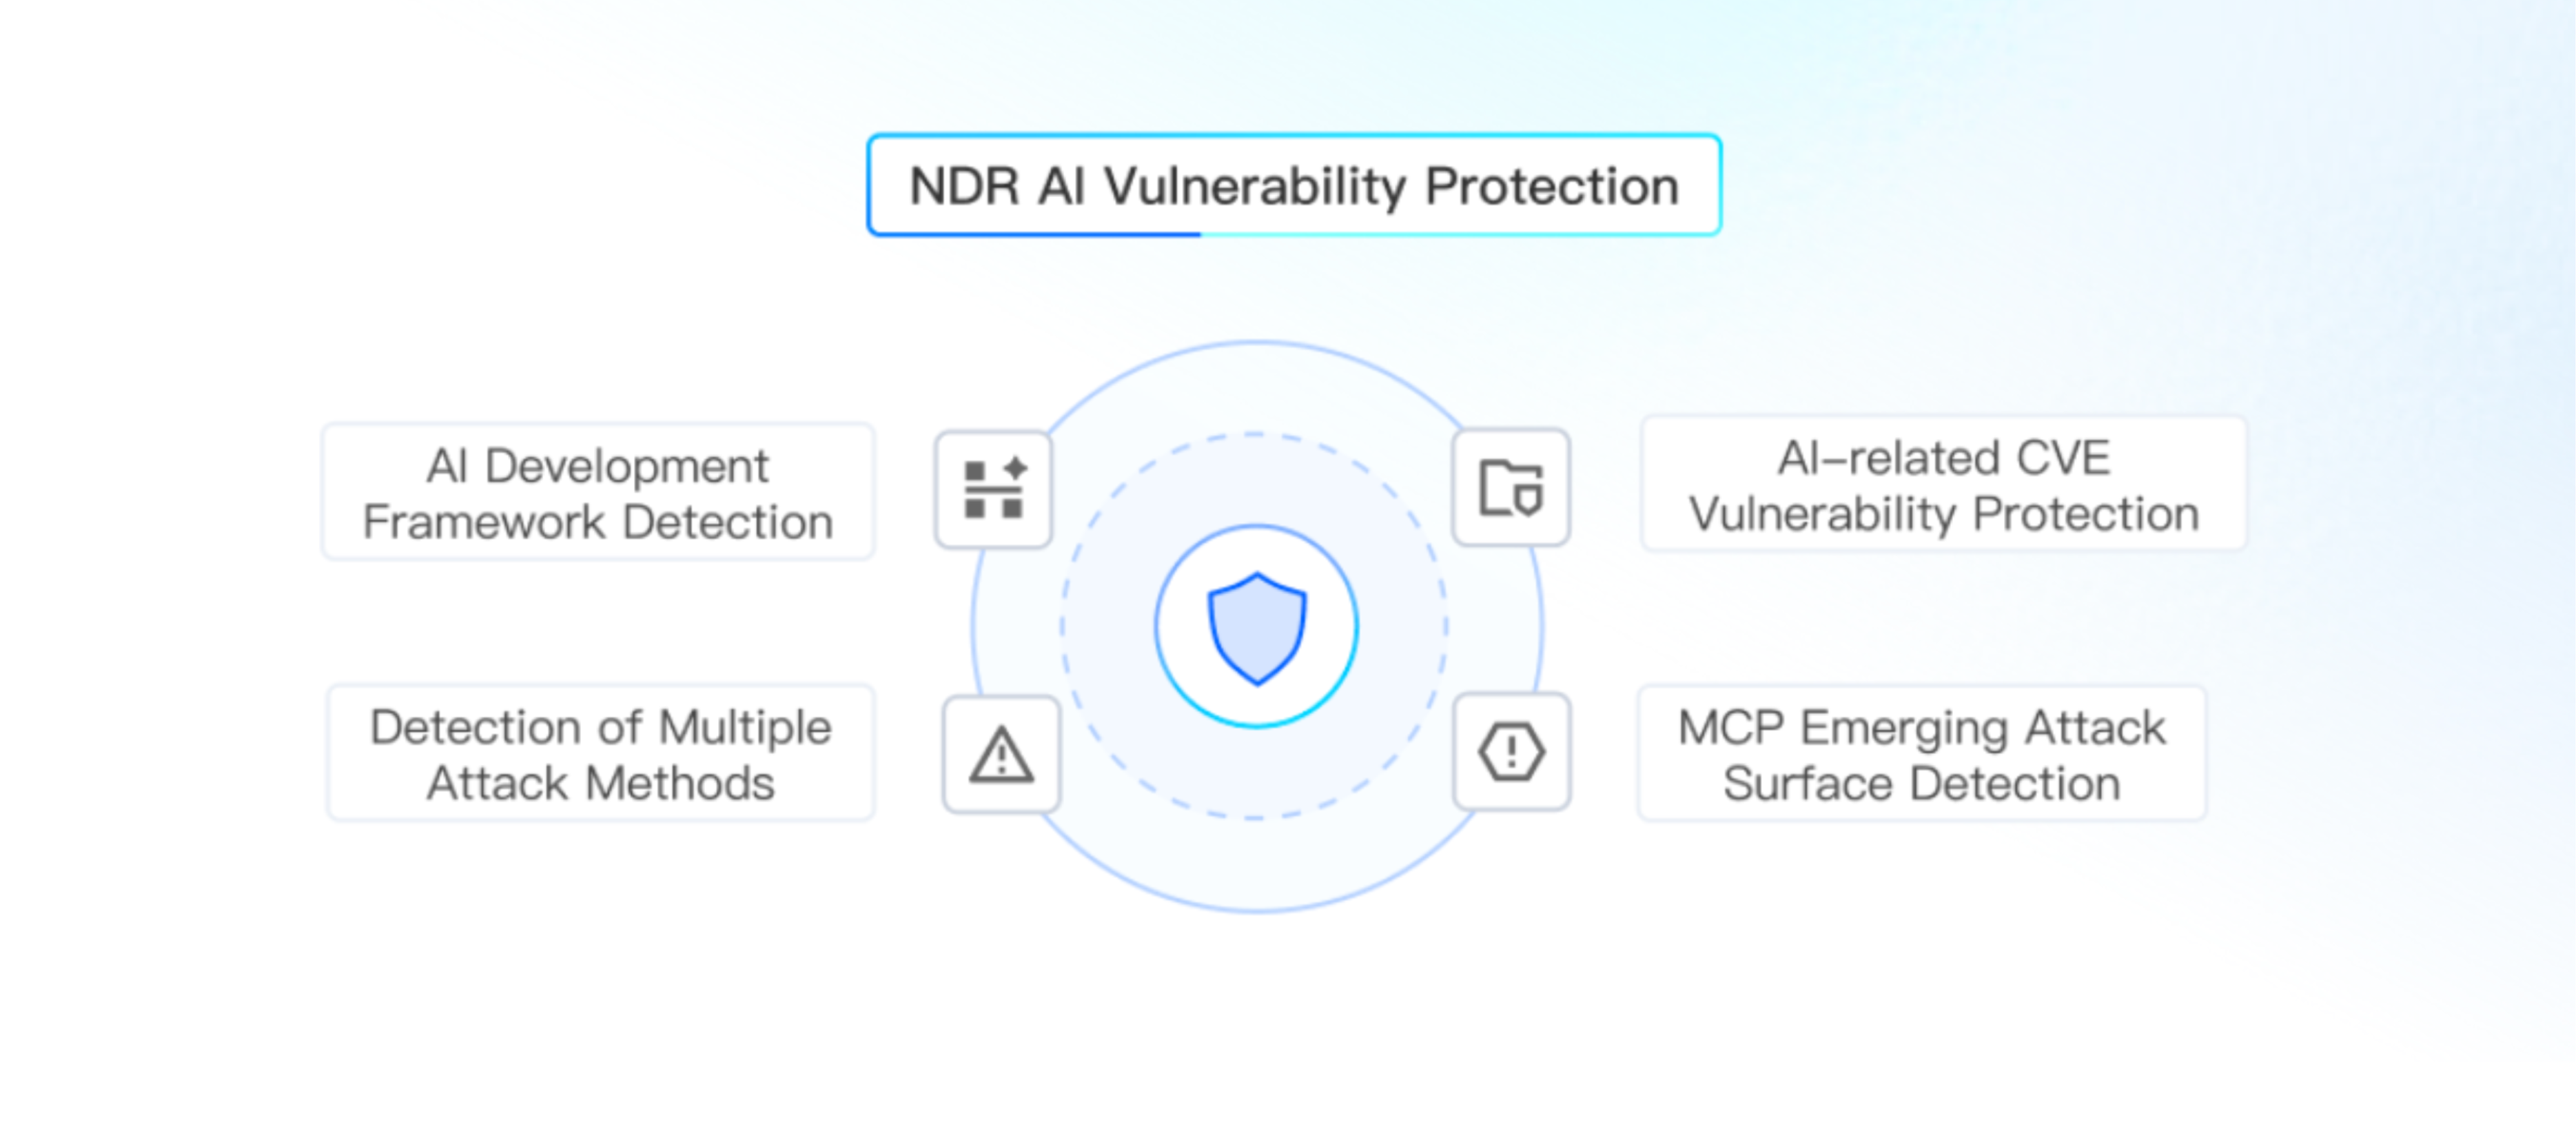
AI Vulnerability Attack Detection provides extensive coverage of mainstream AI development frameworks and components such as LangChain, Ollama, and MLflow. It instantly detects and responds to CVE vulnerabilities related to AI applications, and it detects and blocks various vulnerability exploitation attacks in real time, safeguarding the security of AI infrastructure and business applications from multiple aspects.
Note:
Before using this feature, go to the Network Detection and Response > Traffic Risk Analysis > Port Risk Detection page and enable the AI Vulnerability Attack Detection switch.
1. Log in to the CFW console. In the left sidebar, choose AI Security > AI Vulnerability Attack.
2. On the AI Vulnerability Attack page, you can filter data by a 24-hour or 7-day time range, or by a custom time period.
3. The AI Vulnerability Attack Statistics area displays AI vulnerability attack statistics for the selected time range.

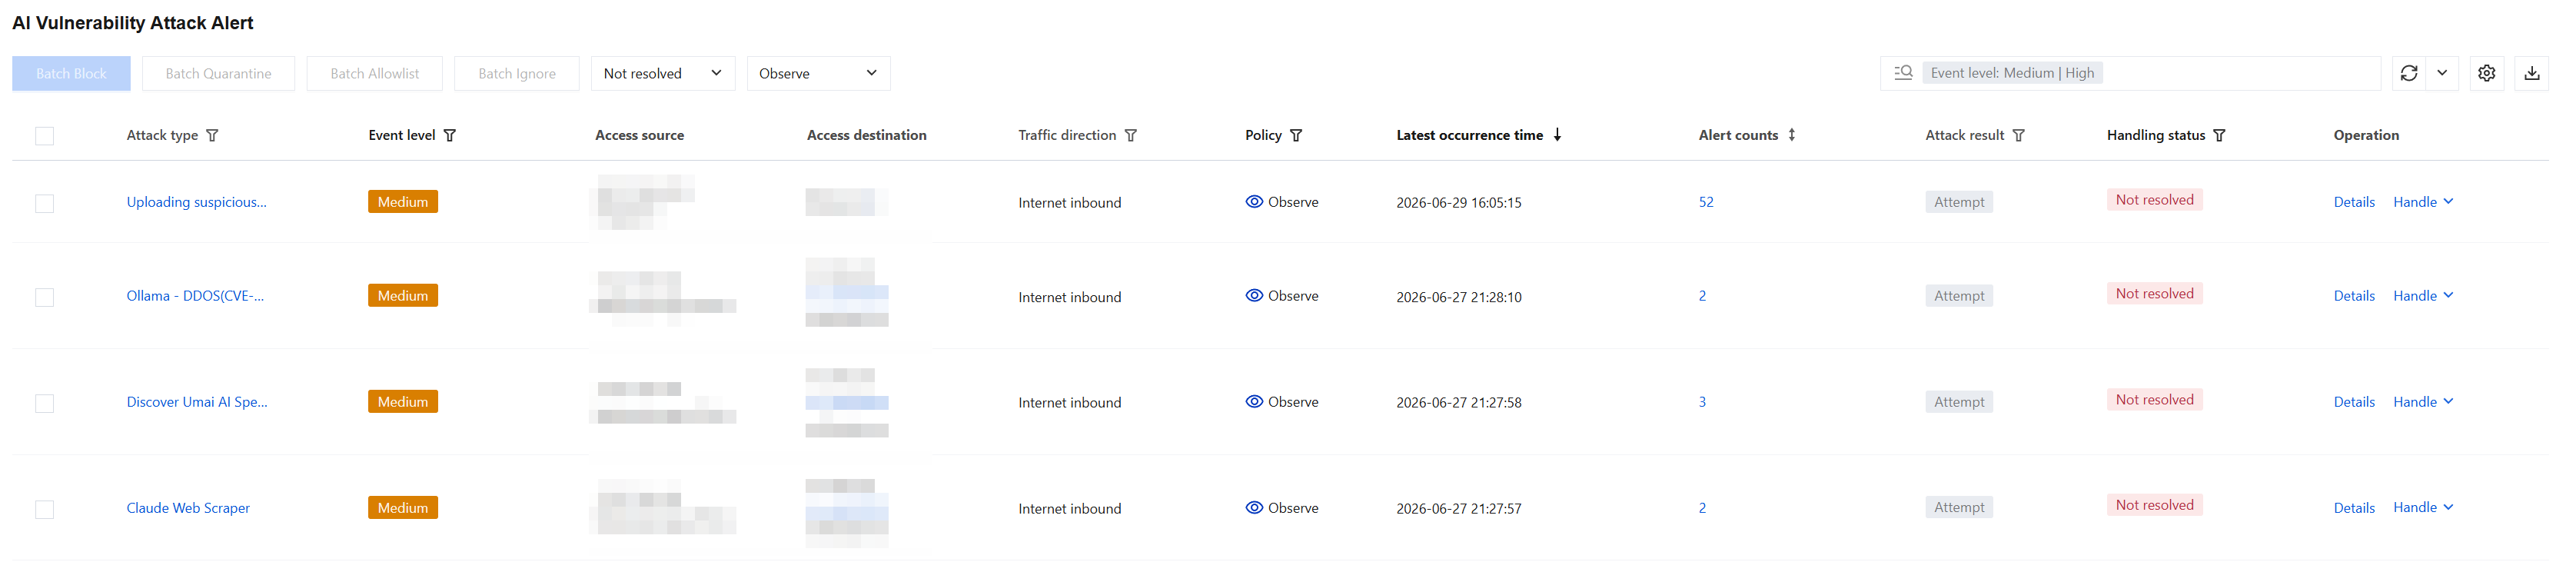
4. The AI Vulnerability Attack Alarm area displays all AI vulnerability attack alarm events within the selected time range. You can perform the following operations:
Click Details in the specific alarm operation column to view the detailed information of the alarm.
Click Handle in the specific alarm operation column. You can then select Block, Quarantine, Allowlist, or Ignore to handle the alarm.
Select multiple alarms. Then click Batch Block, Batch Quarantine, Batch Allowlist, or Batch Ignore to handle the selected alarms in batches.
AI Traffic Audit
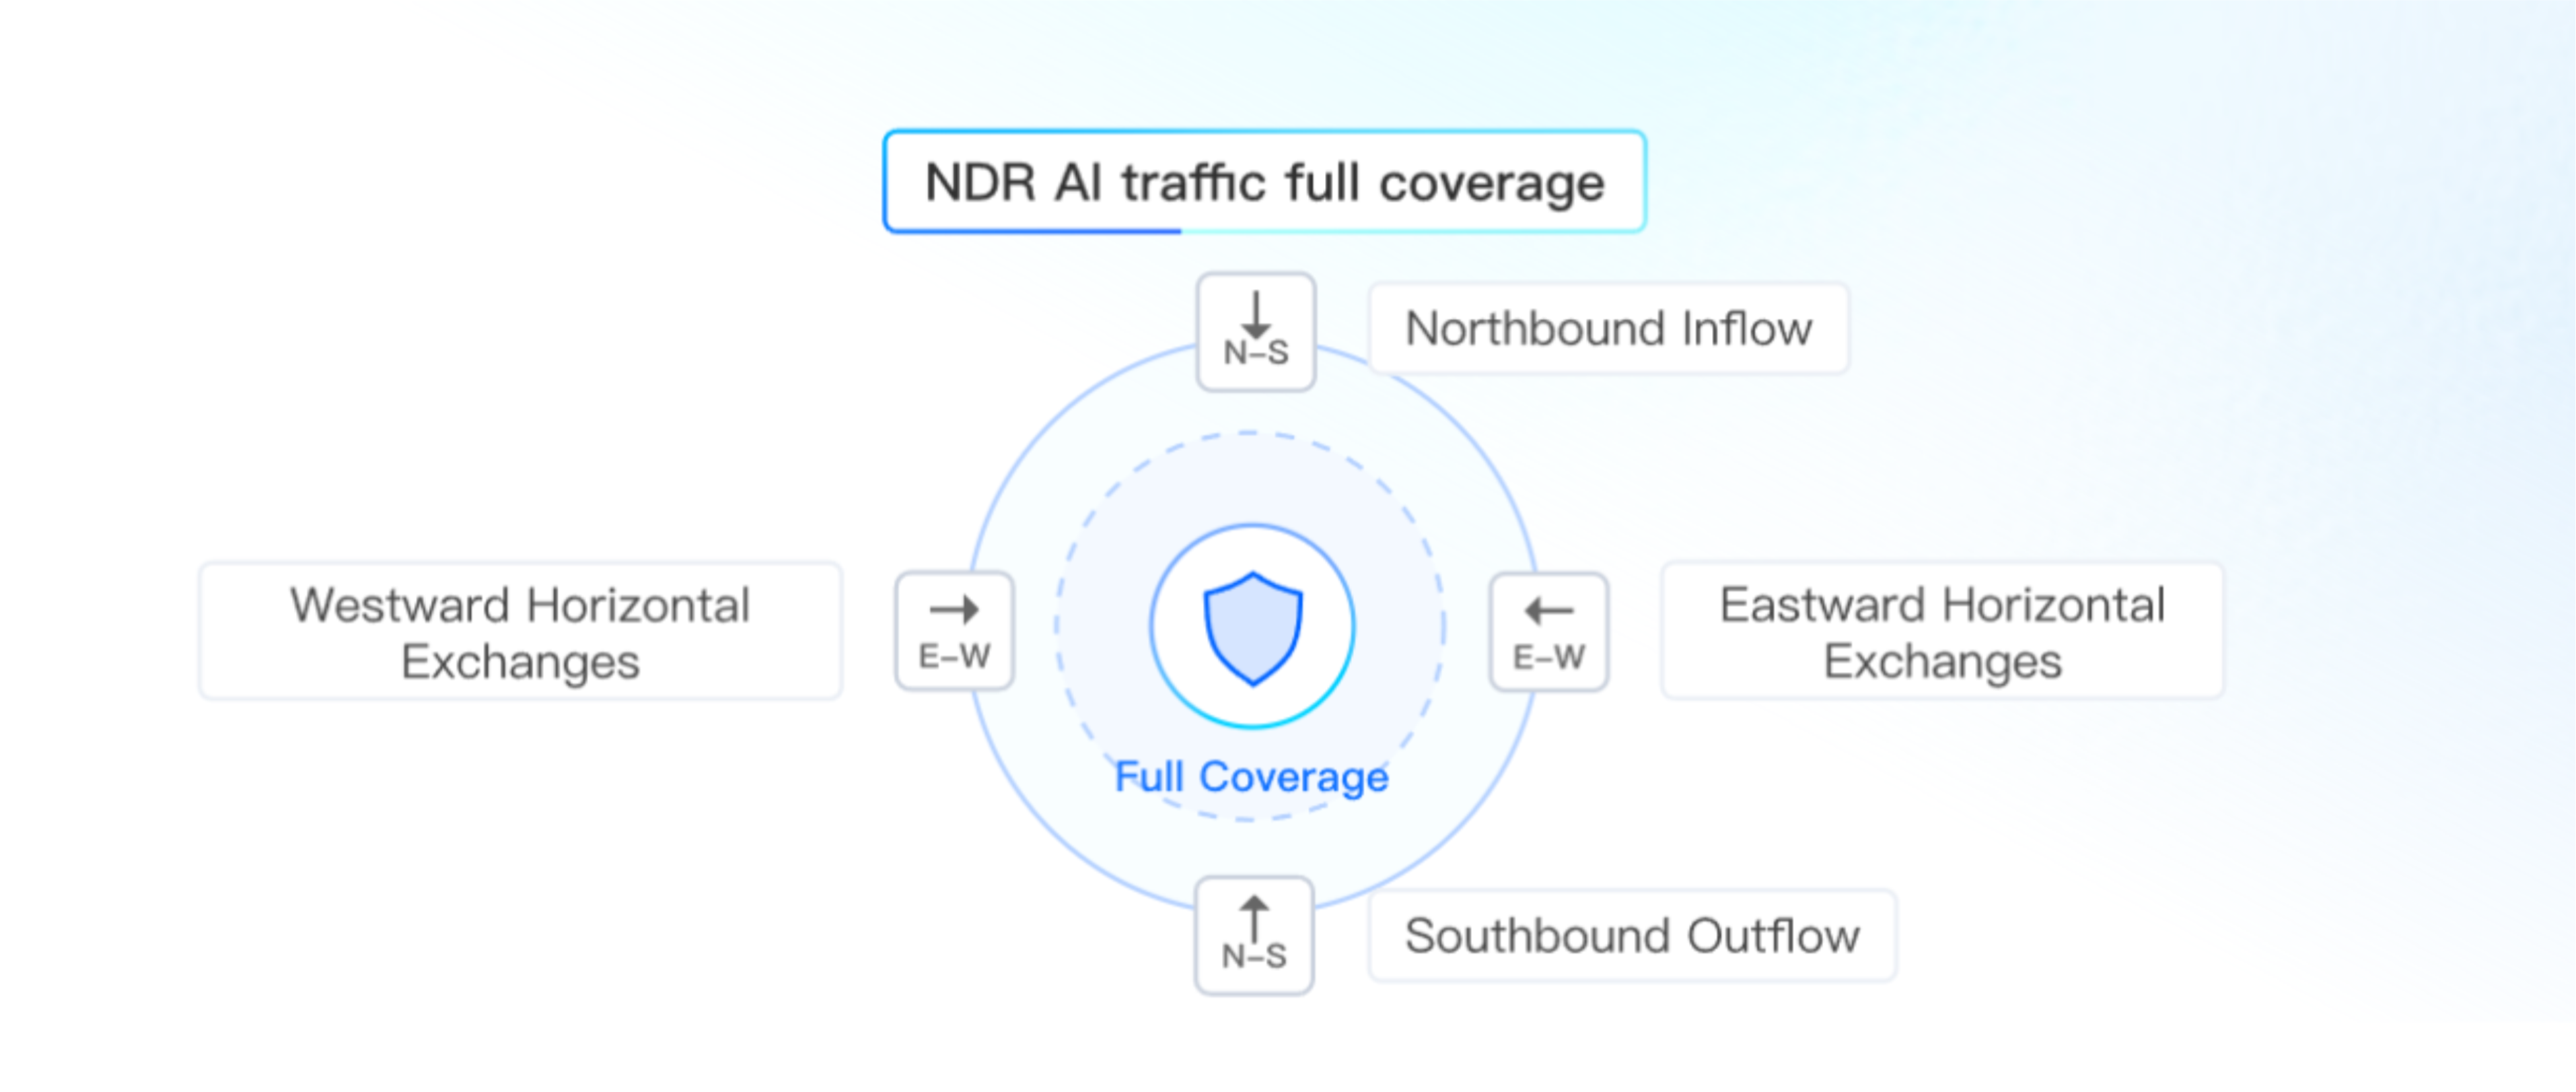
AI Traffic Auditing achieves full traceability and auditability for AI business traffic. It accomplishes this by performing comprehensive collection and analysis of both east-west and north-south traffic for AI applications. This enables deep analysis and passive identification of AI traffic, complete retention of full traffic logs, and provides attack traceback capabilities. It also facilitates the timely detection of abnormal AI invocation behavior.
Note:
Before using this feature, go to the Network Detection and Response > Protocol Parsing and Storage > AI Traffic Log Auditing page and enable the AI Traffic Log Auditing switch.
1. Log in to the CFW console. In the left sidebar, choose AI Security > AI Traffic Audit.
2. On the AI Traffic Auditing page, you can filter data by a custom time period. The page displays a list of audit logs within the selected time range.
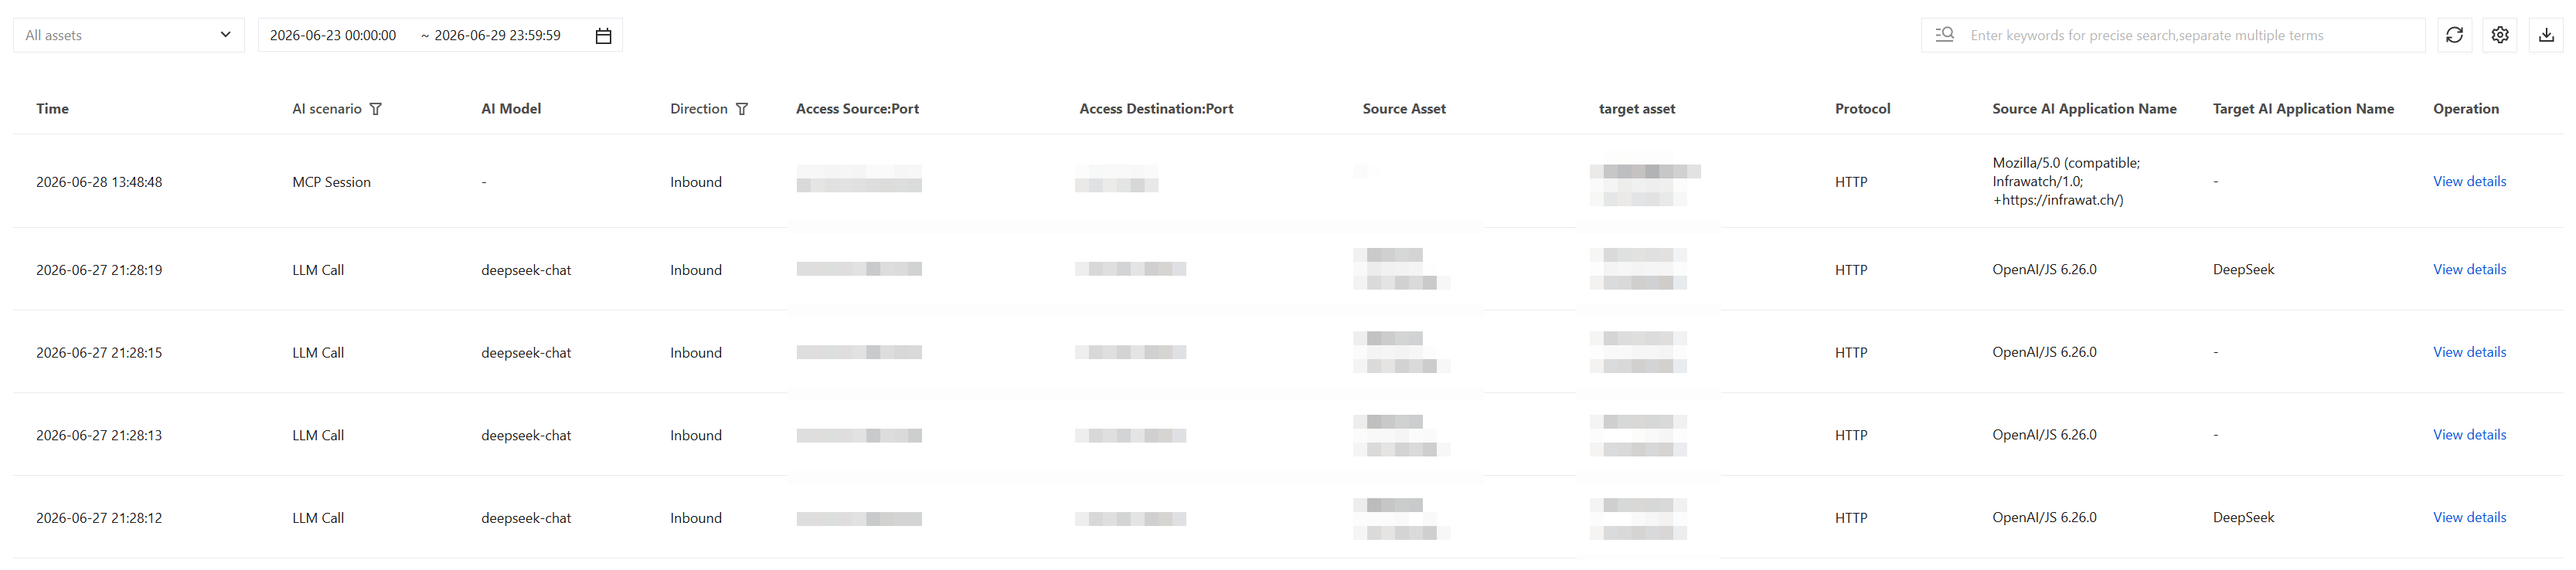
3. In the audit log list area, click View Details to view the complete AI traffic log details.
피드백