tencent cloud

Batch Compute

Product Introduction
What's Batch?
Scenarios
Strengths
Glossary
Quota & Limits
Data Security
Purchase Guide
Getting Started
Preparation
Using CLI - Submit a Job
Using CLI - Compute Environment
Configuring a Job
Using Console
Console User Guide
Task Template Management
Job Management
User Guide
How to create images usable by BatchCompute
Windows Custom Images
Environment Variables
Entering COS & CFS Paths
Event Notice & Callback
Cloud Access Management
Command Line Interface
Preparation
Quick Start
Running Remote Package
Mapping Remote Storage
Use Cases
Building Cluster Using Compute Environment
Example: 3ds Max 2018 Rendering
Example: Deep Learning
API Documentation
History
Introduction
API Category
Making API Requests
Compute Environment APIs
Configuration Viewing-related APIs
Task Template-related APIs
Job-related APIs
Data Types
Error Codes
SDK Documentation
Instructions
FAQs
Contact Us
Glossary
문서Batch ComputeUser GuideWindows Custom Images

Windows Custom Images

PDF
포커스 모드
폰트 크기
마지막 업데이트 시간: 2025-08-29 16:03:53

Overview

To use Windows services, you need to create custom images from existing Windows Server images. This document introduces how to create a Windows custom image.

Prerequisites

You have registered a Tencent Cloud account. If not, go to the Sign up page.

Directions

Installing required software on a CVM

Log in to the CVM Console to view details of the CVM you have created. After remote login, install all necessary software on the CVM and test the connectivity.

Creating a custom image

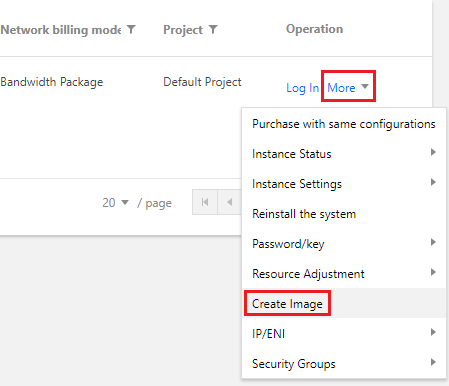
1. Locate the CVM for which you want to create a custom image, click More -> Create image under the Operation column, as shown below:


2. In the pop-up window, enter the image name and description, and click Create Image.
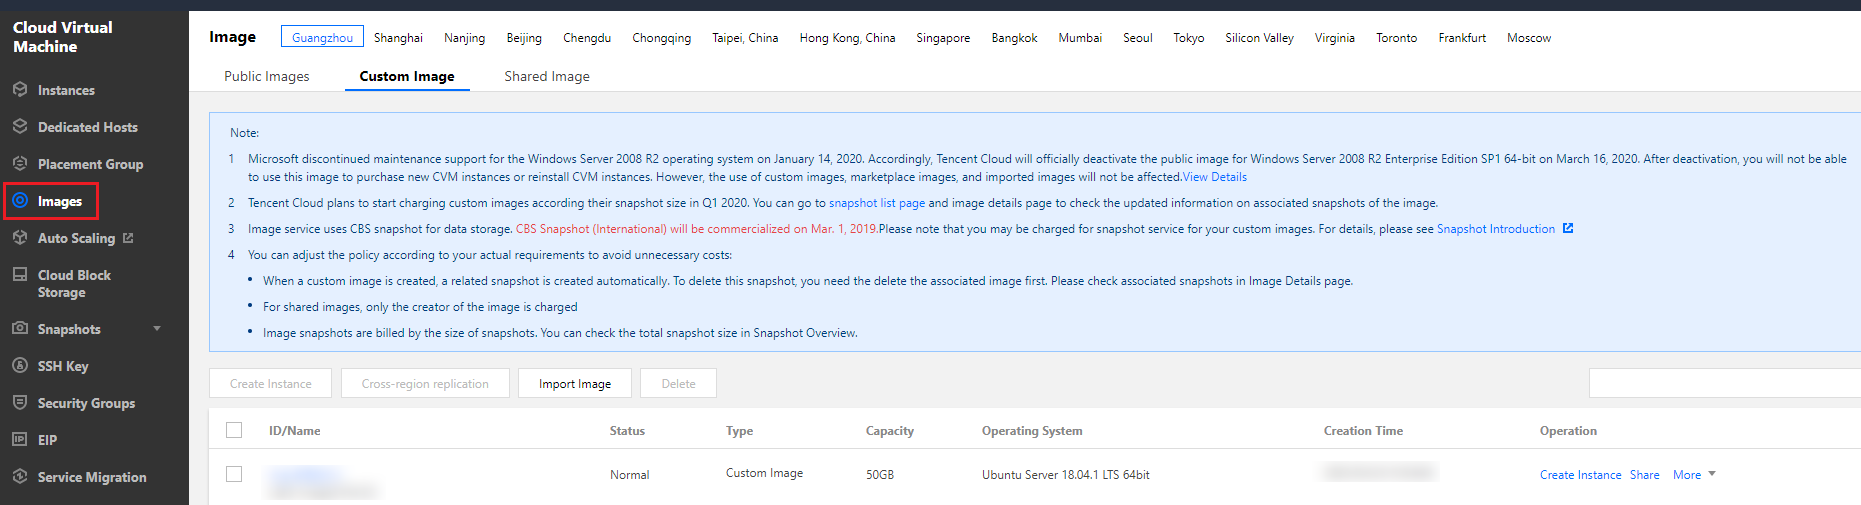
3. After the image is created, click Images on the left sidebar to view custom images, as shown below:
Note:
You can obtain the custom image ID on the Image page.


Using a custom image to submit the test job

You can obtain and modify the official sample to create a Batch Compute environment under your account. See below to learn about each configuration item in the compute environment.
tccli batch SubmitJob --version 2017-03-12 --Job '{
"JobName": "TestJob", // Job name
"JobDescription": "for test ", // Job description
"Priority": "1", // Job priority
"Tasks": [ // Task list (this example only has one task)
{
"TaskName": "Task1", // Task 1 name
"Application": { // Task execute command
"DeliveryForm": "LOCAL", // Run the local command
"Command": "python -c \\"fib=lambda n:1 if n<=2 else fib(n-1)+fib(n-2); print(fib(20))\\" " // Command content (Fibonacci summation)
},
"ComputeEnv": { // Compute environment configuration
"EnvType": "MANAGED", // Compute environment types: managed and unmanaged
"EnvData": { // Specific configuration (current type is managed. Refer to the CVM instance creation description)
"InstanceType": "S1.SMALL1", // CVM instance type
"ImageId": "", // CVM image ID (Replace with your custom image ID)
}
},
"RedirectInfo": { // Configuration of standard output redirection
"StdoutRedirectPath": "cos://dondonbatchv5-1251783334.cosgz.myqcloud.com/logs/", // Standard output (to be replaced)
"StderrRedirectPath": "cos://dondonbatchv5-1251783334.cosgz.myqcloud.com/logs/" // Standard error (to be replaced)
}
}
]
}'
--Placement'{
"Zone": "ap-guangzhou-6" // Availability zone (to be replaced)
}'
You can use the following sample codes. Refer to the “Job Configuration” section in Using CLI - Submit a Job, and replace the To be replaced fields with your actual information. For example, replace ImageId with your custom image ID.
tccli batch SubmitJob --version 2017-03-12 --Job '{"JobName": "TestJob", "JobDescription": "for test", "Priority": "1", "Tasks": [{"TaskName": "Task1", "TaskInstanceNum": 1, "Application": {"DeliveryForm": "LOCAL", "Command": "python -c \\"fib=lambda n:1 if n<=2 else fib(n-1)+fib(n-2); print(fib(20))\\" "}, "ComputeEnv": {"EnvType": "MANAGED", "EnvData": {"InstanceType": "S1.SMALL1", "ImageId": "To be replaced" } }, "RedirectInfo": {"StdoutRedirectPath": "To be replaced", "StderrRedirectPath": "To be replaced"}, "MaxRetryCount": 1 } ] }' --Placement '{"Zone": "ap-guangzhou-6"}'


도움말 및 지원

문제 해결에 도움이 되었나요?

피드백