tencent cloud

Tencent Real-Time Communication

Quick Start(React Native)

다운로드
포커스 모드
폰트 크기
마지막 업데이트 시간: 2026-05-26 15:42:49
This guide shows you how to use the core component LiveCoreView from the AtomicXCore SDK to quickly build a basic live streaming app with host broadcasting and audience viewing features.

Key Features

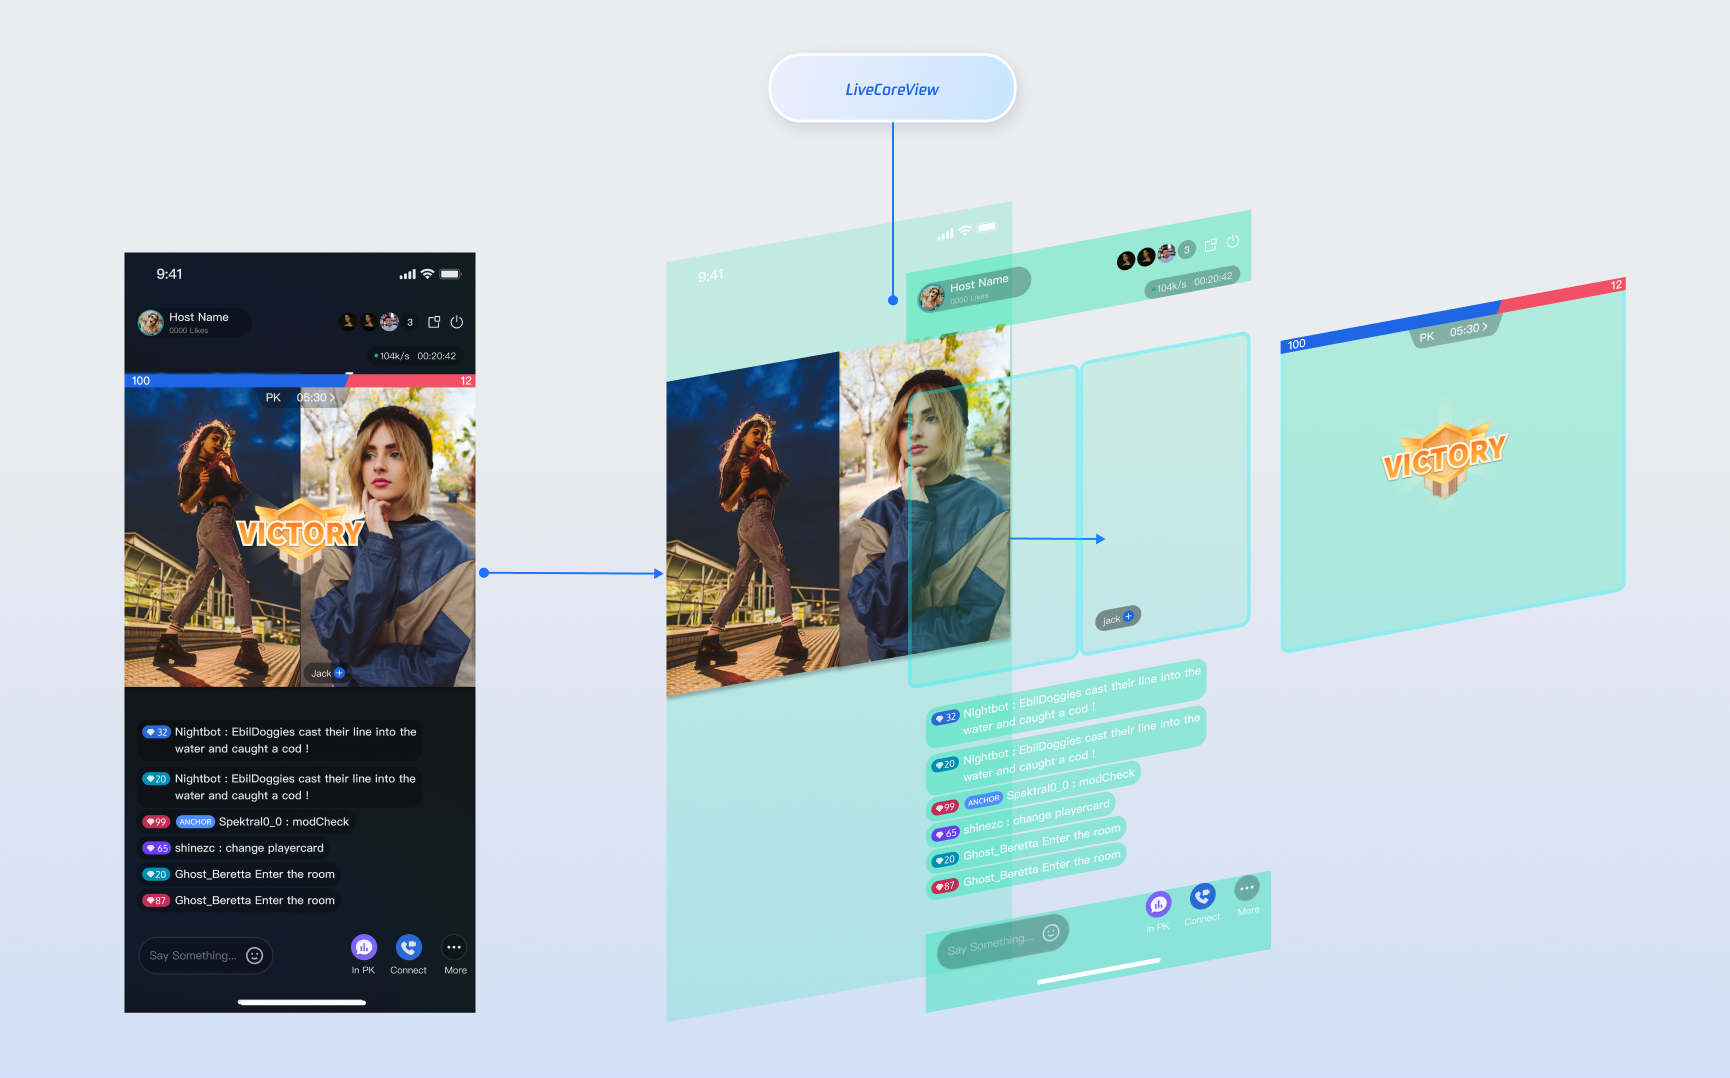
LiveCoreView is a lightweight UI component designed specifically for live streaming. It acts as the foundation of your live streaming interface, handling all the underlying technologies—including streaming, co-hosting, and audio/video rendering. Think of LiveCoreView as the “canvas” for your live broadcast, so you can focus on building your custom UI and interactive features.
The diagram below illustrates where LiveCoreView fits within the live streaming interface:


Preparation

Step 1: Activate the Service

Visit Activate the Service to obtain either the trial or paid version of the SDK.

Step 2: Import AtomicXCore into Your Project

1. Install components: Run the following commands in your project to add AtomicXCore dependencies:
# 1. Install live streaming core and native build tools (required)
npx expo install react-native-tuikit-atomic-x expo-dev-client expo-build-properties

# 2. Install UI adaptation and utility libraries (recommended)
npx expo install react-native-safe-area-context react-native-toast-message react-native-localize
2. Configure project permissions: Open the app.json file in your project root and set the required system permissions for live streaming (camera, microphone, background audio):
{
"expo": {
"name": "ExpoLive",
"slug": "ExpoLive",
// ... Other Configurations

"ios": {
// ... Other Configurations
"bundleIdentifier": "com.anonymous.ExpoLive",
"infoPlist": {
"NSMicrophoneUsageDescription": "This app requires access to your microphone for live streaming.",
"NSCameraUsageDescription": "This app requires access to your camera for live streaming.",
"UIBackgroundModes": [
"audio"
]
}
},
"plugins": [
"react-native-localize",

[
"expo-build-properties",
{
"ios": {
"useFrameworks": "static"
}
}
]

]
}
}
3. Rebuild the native development package: After adding the AtomicXCore native code library, recompile your native app in the project root to package the new C++/Java/Swift code. This step is required only for initial integration or SDK upgrades; for daily development, proceed directly to step 4.
# If you have local Android and iOS development environments, run:
npx expo run:ios # Make sure CocoaPods is installed
npx expo run:android

# Or use cloud build to regenerate the development installation package
npx eas build --profile development --platform all
4. Run the app: Execute the following command in your project root. On iOS, scan the app QR code with your device camera to launch the app. On Android, open the app installed in the previous step and scan the code. Subsequent JS code changes will be hot-reloaded automatically.
npx expo start

Step 3: Complete Login

Call the login method from LoginState in your project to log in. This step is required before you can use any features of AtomicXCore.
Note:
For clear and consistent login logic, call the login method in LoginState only after your app's own user account login is successful.
import { useLoginState } from 'react-native-tuikit-atomic-x/lib/module/atomic-x/state/LoginState';

const { login } = useLoginState();

const handleLogin = () => {
login({
sdkAppID: 1400000001, // Replace with your SDKAppID
userID: "test_001", // Replace with your UserID
userSig: "xxxxxxxxxx" // Replace with your UserSig
});
}
Parameter
Type
Description
SDKAppID
Int
UserID
String
The unique ID for the current user. Must contain only English letters, numbers, hyphens, and underscores.
userSig
String
A ticket for Tencent Cloud authentication. Please note:
Development Environment: You can use the local GenerateTestUserSig.genTestSig function to generate a UserSig or generate a temporary UserSig via the UserSig Generation Tool.
Production Environment: To prevent key leakage, you must use a server-side method to generate UserSig. For details, see Generating UserSig on the Server.
For more information, see How to Calculate and Use UserSig.

Build a Basic Live Room

Step 1: Implement Video Streaming

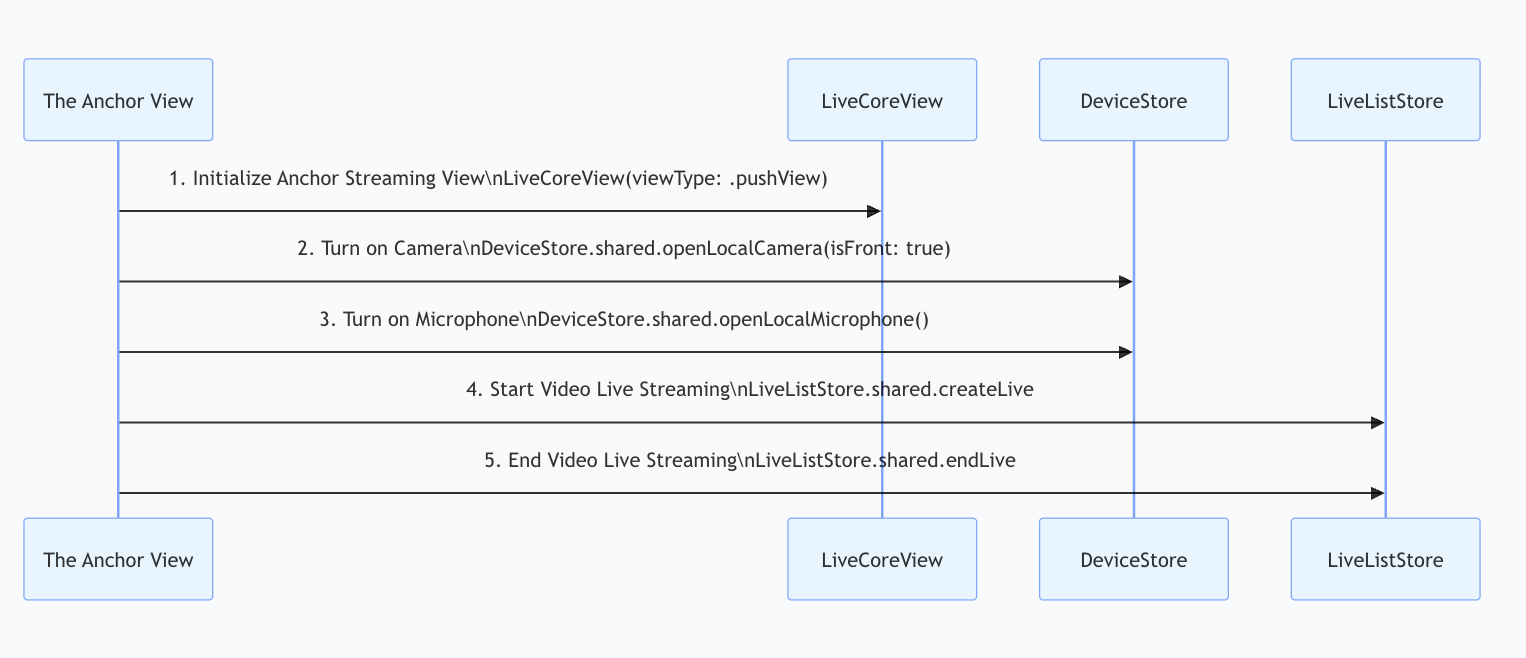
Follow these steps to quickly set up a video streaming as a host:


1. Initialize host streaming view
In your host page, import the LiveCoreView component, set coreViewType to pushView, and bind the current live ID to the component.
import { LiveCoreView } from 'react-native-tuikit-atomic-x/lib/module/components/LiveCoreView';

export default function YourAnchorScreen({ route, navigation }) {

// Define live room ID (must match the liveID used in createLive)
// liveID is set by the developer; use a unique identifier (such as UUID or timestamp)
// Format: Only English letters, numbers, and underscores, max 64 characters
const liveID = 'your_live_room_id'; // Replace with your live room ID

return (
<View style={styles.container}>
<LiveCoreView liveId={liveID} coreViewType="pushView" style={styles.pushView} />
</View>
);
}
2. Enable camera and microphone
Call the openLocalCamera and openLocalMicrophone methods from DeviceState to enable the camera and microphone. No extra steps are needed—LiveCoreView** will automatically preview the current camera video stream.** Example:
import { useEffect } from 'react';
import { useDeviceState } from 'react-native-tuikit-atomic-x/lib/module/atomic-x/state/DeviceState';

const { openLocalCamera, openLocalMicrophone } = useDeviceState();

useEffect(() => {
openLocalMicrophone({
onSuccess: () => { console.log('Microphone enabled successfully'); },
onError: (error) => { console.log('Failed to enable microphone', error); },
});
openLocalCamera({
isFront: true,
onSuccess: () => { console.log('Camera enabled successfully'); },
onError: (error) => { console.log('Failed to enable camera', error); },
});
}, []);
3. Start live streaming
Call the createLive method from LiveListState to start video live streaming. Example:
import { useLiveListState } from 'react-native-tuikit-atomic-x/lib/module/atomic-x/state/LiveListState';

const { createLive } = useLiveListState();

const startLive = () => {
createLive({
liveInfo: {
liveID: liveID, // Set the live room ID
liveName: 'live name', // Set the live room name
seatLayoutTemplateID: 600, // Layout template, default: 600 (dynamic grid)
keepOwnerOnSeat: true, // Keep host always on seat
},
onSuccess: () => { console.log('Live room created successfully'); },
onError: (error) => { console.log('Failed to create live room', error); },
});
};
LiveInfo parameter description:
Parameter Name
Type
Required
Description
liveID
string
Yes
Unique identifier for the live room.
liveName
string
No
Title of the live room.
notice
string
No
Announcement message for the live room.
isMessageDisable
boolean
No
Disable chat (true = yes, false = no).
isPublicVisible
boolean
No
Room is publicly visible (true = yes, false = no).
seatMode
string
No
Seat mode (FREE: free to take seat, APPLY: apply to take seat).
seatLayoutTemplateID
number
Yes
Seat layout template ID.
coverURL
string
No
Cover image URL for the live room.
backgroundURL
string
No
Background image URL for the live room.
activityStatus
number
No
Live activity status.
isGiftEnabled
boolean
No
Whether to enable gift functionality (true: yes, false: no).
4. End live streaming
After the live broadcast ends, the host can call the endLive method from LiveListState to stop the stream and close the room.
import { useLiveListState } from 'react-native-tuikit-atomic-x/lib/module/atomic-x/state/LiveListState';

const { endLive } = useLiveListState();

const handleEndLive = () => {
endLive({
onSuccess: () => { console.log('Live ended successfully'); },
onError: (error) => { console.log('Failed to end live', error); },
});
};

Step 2: Implement Audience Viewing

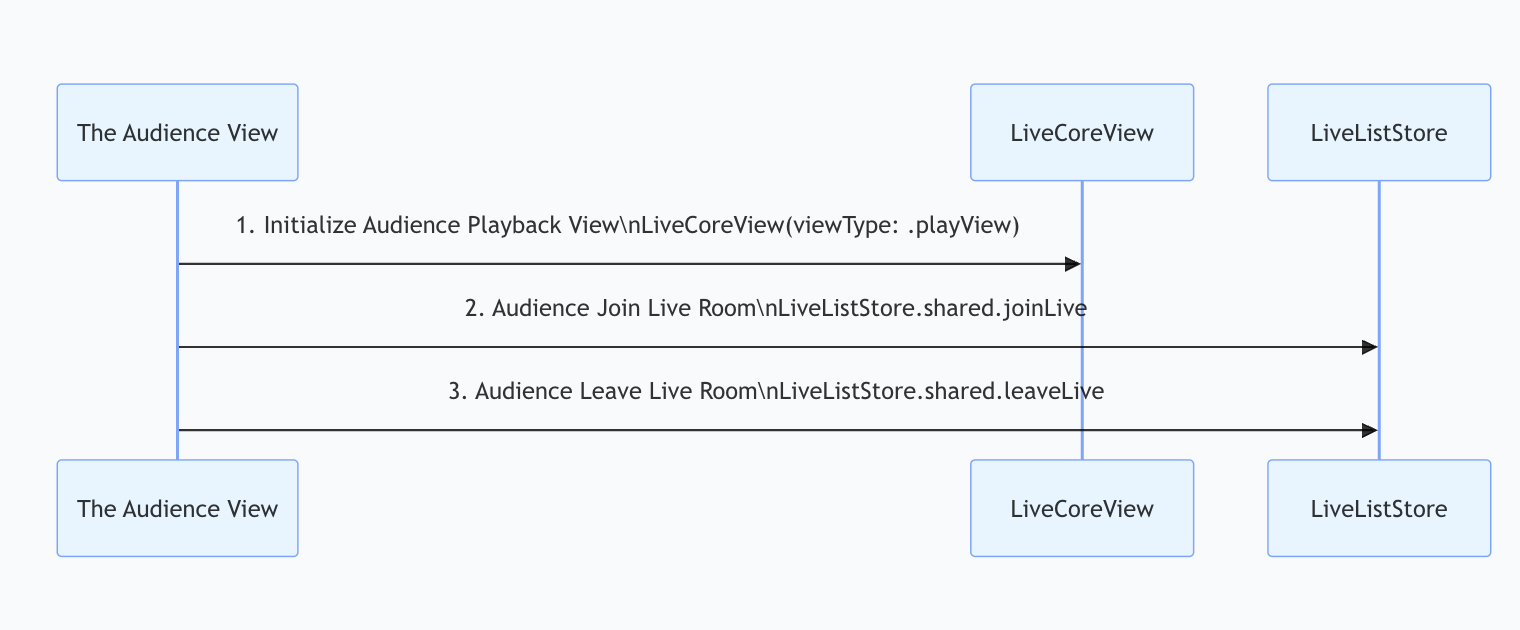
Follow these steps to enable audience live viewing.

1. Implement audience playback page
In your audience page, import the LiveCoreView component, set coreViewType to playView, and bind the current live ID to the component.
import { LiveCoreView } from 'react-native-tuikit-atomic-x/lib/module/components/LiveCoreView';

export default function YourAudienceScreen({ route, navigation }) {
const { liveID } = route.params || {};

return (
<View style={styles.container}>
<LiveCoreView liveId={liveID} coreViewType="playView" style={styles.playView} />
</View>
);
}
2. Join the live room
Call the joinLive method from LiveListState to join the live room. No extra steps are needed—LiveCoreView** will automatically play the room's video stream.** Example:
import { useEffect } from 'react';
import { useLiveListState } from 'react-native-tuikit-atomic-x/lib/module/atomic-x/state/LiveListState';

export default function YourAudienceScreen({ route, navigation }) {
const { liveID } = route.params || {};
const { joinLive } = useLiveListState();

useEffect(() => {
joinLive({
liveID: liveID,
onSuccess: () => { console.log('Joined live room successfully'); },
onError: (error) => { console.log('Failed to join live room', error); },
});
}, []);
}
3. Leave the live room
When the audience exits, call the leaveLive method from LiveListState to leave the live stream. The SDK will automatically stop playback and exit the room.
import { useLiveListState } from 'react-native-tuikit-atomic-x/lib/module/atomic-x/state/LiveListState';

const { leaveLive } = useLiveListState();

// Leave live room
const handleLeaveLive = () => {
leaveLive({
onSuccess: () => { console.log('Left live room successfully'); },
onError: (error) => { console.log('Failed to leave live room', error); },
});
};


Step 3: Listen for Live Events

After the audience enters the live room, you should handle certain “passive” events, such as the host ending the live stream or the audience being removed for violations. If you don't listen for these events, the audience UI may remain on a black screen, impacting user experience.
Subscribe to events using addLiveListListener from LiveListState:
import { useEffect } from 'react';
import { useLiveListState } from 'react-native-tuikit-atomic-x/lib/module/atomic-x/state/LiveListState';

export default function LiveAudienceScreen({ route, navigation }) {
const { addLiveListListener, removeLiveListListener } = useLiveListState();

useEffect(() => {
const onLiveEnded = (event) => {
console.log('Live ended', event);
// Handle logic after live ends, e.g., close current page
};
const onKickedOutOfLive = (event) => {
console.log('Kicked out of room', event.reason);
// Show a popup based on the reason for being removed from the room
};

addLiveListListener('onLiveEnded', onLiveEnded);
addLiveListListener('onKickedOutOfLive', onKickedOutOfLive);

return () => {
removeLiveListListener('onLiveEnded', onLiveEnded);
removeLiveListListener('onKickedOutOfLive', onKickedOutOfLive);
};
}, []);
}

Demo Effect

After integrating LiveCoreView, you'll have a clean video rendering view with full live streaming capabilities, but no interactive UI. To enhance your live streaming experience, see the next section Enrich Live Streaming Scenarios.


Enrich Live Streaming Scenarios

Once you’ve completed the basic live streaming setup, use the following feature guides to add interactive experiences to your live stream.
Live Feature
Feature Description
Feature States
Implementation Guide
Enable audience audio/video connection
Audience can apply to join the stream and interact with the host in real-time video.
Enable host cross-room connection
Hosts from different rooms can connect and interact.
Add live comments chat feature
Audience can send and receive real-time text messages in the live room.
Build a gift system
Audience can send virtual gifts to the host, increasing interaction and fun.
GiftState

API Documentation

State
Feature Description
API Documentation
LiveListState
Manage the full live video lifecycle: create/join/leave/destroy room, query room list, edit live info (name, announcement, etc.), listen for live status (e.g., kicked out, ended).
DeviceState
Audio/video device control: microphone (switch/volume), real-time device status monitoring.
CoGuestState
Audience connection management: apply/invite/accept/reject connection, member permission control (microphone), status synchronization.
CoHostState
Host cross-room connection: supports multiple layout templates (dynamic grid, etc.), initiate/accept/reject connection, co-host interaction management.
GiftState
Gift interaction: get gift list, send/receive gifts, listen for gift events (including sender and gift details).
BarrageState
Live comments feature: send text/custom comments, maintain comment list, real-time comment status monitoring.
LikeState
Like interaction: send likes, listen for like events, synchronize total like count.
LiveAudienceState
Audience management: get real-time audience list (ID/name/avatar), count audience number, listen for audience entry/exit events.
AudioEffectState
Audio effects: voice change (child/male), reverb (KTV, etc.), monitoring adjustment, real-time effect switching.
BaseBeautyState
Basic beauty enhancement: adjust smoothing/whitening/rosiness (0-100 levels), reset beauty status, synchronize effect parameters.

FAQs

Why is the screen black with no video after the host calls createLive or the audience calls joinLive?

Check liveID: Make sure the correct liveID is set for the LiveCoreView instance before calling broadcast or viewing methods.
Check device permissions: Ensure the app has system permissions for camera and microphone.
Check host side: Verify the host has called openLocalCamera({ isFront: true}) to enable the camera.
Check network: Confirm the device has a working network connection.

Why does the host see the local video preview after starting the broadcast, but the preview is black before broadcasting?

Check host side: Make sure the host streaming view LiveCoreView has coreViewType set to pushView.
Check audience side: Make sure the audience playback view LiveCoreView has coreViewType set to playView.

도움말 및 지원

문제 해결에 도움이 되었나요?

피드백