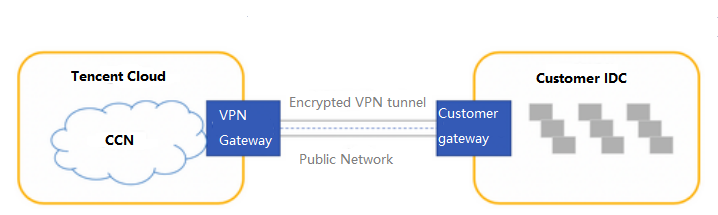
The VPN gateway for CCN can be associated with the Cloud Connect Network (CCN) to establish an encrypted communication between the IDC and CCN. This document introduces how to associate the VPN gateway for CCN with CCN.
Background
A VPN gateway for CCN can be associated with CCN and create multiple encrypted VPN tunnels. Each VPN tunnel can connect one local IDC.
The steps to associate the VPN gateway for CCN with CCN are as follows:
1. Create a VPN gateway for CCN: a VPN gateway is an egress gateway used by CCN along with the customer gateway to establish VPN connections.
3. Create a customer gateway: a customer gateway is a logical object used with a Tencent Cloud VPN gateway to record the fixed public IP address of the IPsec VPN gateway on the IDC side. A VPN gateway can establish encrypted VPN tunnels with multiple customer gateways.
4. Create a VPN tunnel: VPN tunnel supports IPsec encryption protocol, which ensures secure data transmission.
2. Choose VPN Connection > VPN Gateway in the left sidebar.
3. On the VPN Gateway page, specify Region in the topbar and click +New.
4. In the Create VPN Gateway pop-up window, specify the gateway name (for example, TomVPNGw), associated network, bandwidth cap, and billing method, and then click Create. After the VPN gateway is created, the system randomly assigns the gateway a public IP address such as 203.195.147.82.
Note:
To create a VPN gateway for CCN in the specified availability zone, please submit a ticket.
Parameter
Configuration
Gateway name
Enter the VPN gateway name (up to 60 characters)
Region
Display the region of the VPN gateway
AZ
Select the availability zone of the current gateway
Protocol Type
IPSec and SSL protocols are supported.
Bandwidth cap
Set a reasonable bandwidth cap for the VPN gateway according to the actual application scenarios.
Associated Network
Select CCN.
Tag
Tags mark VPN gateway resources so that these resources can be queried and managed efficiently. Tag is not a required configuration. You can decide whether to configure it according to your demand.
Billing Mode
Bill-by-traffic mode is supported. This billing mode is applicable to scenarios with significant bandwidth fluctuations.
Step 2: associate CCN instances
You can associate an existing CCN instance by the following steps:
1.1 Return to the VPN Gateway page, click the ID of an existing VPN gateway for CCN in the list to view its details.
1.2 On the Basic Information tab, click
next to Network, select a CCN instance you want to associate from the drop-down list, and then click Save.
You can associate a new CCN instance by the following steps:
2. Choose VPN Connection > VPN Tunnel in the left sidebar.
3. On the VPN Tunnel page, specify Region in the top bar and click +New.
4. Configure the basic information about the VPN tunnel as prompted.
Note:
IDC IP ranges in each rule cannot overlap.
Rules for tunnels in the same gateway cannot overlap.
Peer IP ranges in the SPD policy can be added to CCN.
5. Configure DPD and health check options.
DPD: By default, DPD is enabled. Retain the default settings. To modify the settings, check the parameters on the page.
Health check: By default, health check is disabled. Retain the default settings.
6. (Optional) Configure IKE parameters. Click Next if no advanced configuration is required.
7. (Optional) Configure IPsec parameters. Click Completed if no configuration is required.
8. Click Create. After the VPN tunnel is created, go back to the VPN tunnel list page. In the Actions column of the VPN tunnel, choose More > Download config file to download the configuration file.
Step 5: configure the VPN gateway route
After the VPN tunnel configuration is complete, configure the VPN gateway route to the customer gateway.
1. Choose VPN Connection > VPN Gateway in the left sidebar to go to the VPN Gateway page. Locate the VPN gateway that you created, and click the value in the ID/Name column to enter the gateway details page.
2. Click the Route Table tab and click Add a route.
3. Configure the policy of routing from the VPN gateway to the customer gateway.
Configuration Item
Description
Destination
Enter the IDC IP range configured in the customer gateway for the public access.
Next Hop Type
The default value is VPN Tunnel.
Next Hop
Select a VPN tunnel that has been created.
Weight
Enter an integer within 0-100. The smaller the value, the higher the priority.
4. Click OK.
Step 6: configure the IDC devices
After the VPN gateway and VPN tunnel are configured on Tencent Cloud, you must configure the VPN tunnel on the local gateway of the IDC. For more information, see Local Gateway Configurations.
Step 7: enable IDC IP ranges
Note:
This step is applicable only to VPN gateways v1.0 and v2.0.
If you use a VPN gateway v3.0 for CCN and have associated the gateway with a CCN instance, the routing policy in which the next hop is CCN will be automatically obtained and displayed in the route table. The routing policy configured on the VPN gateway is also automatically synchronized to CCN.
For VPN gateways v1.0 and v2.0, enable the IDC IP ranges as follows:
2. Select Cloud Connect Network in the left sidebar to go to the CCN page.
3. In the list, click the ID/Name of the CCN instance associated with the VPN gateway for CCN to view its details.
4. Click the Route table tab. If the table shows that the enabled IP range is in the Valid state and Next hop is a VPN gateway for CCN, the CCN instance is associated.


 Yes
Yes
 No
No
Was this page helpful?