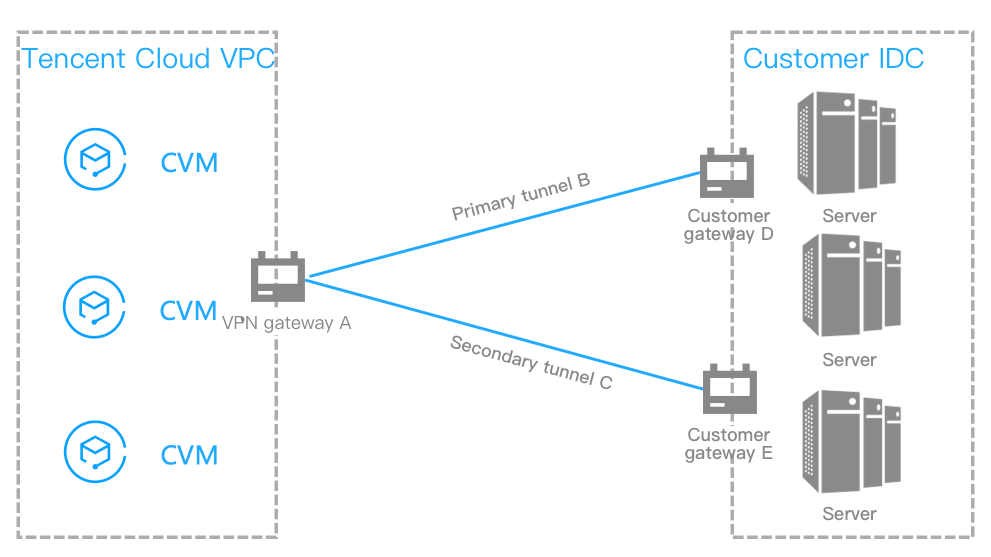
A Tencent Cloud VPN connection features high availability. If the customer IDC connects to Tencent Cloud via primary/secondary VPN tunnels, when the primary tunnel fails, the business will be automatically switched over to the secondary tunnel, thus ensuring business sustainability and improving reliability. This document describes how to connect an IDC to a single Tencent Cloud VPC and implement primary/secondary disaster recovery.
Disaster Recovery Solution
The customer IDC only needs to interconnect with a single Tencent Cloud VPC. In the IDC, you can deploy two IPsec VPN devices that respectively create IPsec VPN tunnels with Tencent Cloud VPN gateway for VPC. Then, configure two routes to the same destination in the VPN gateway route table, and set the priority to control the primary/secondary tunnels. In case of failure, the routes can be switched over automatically.
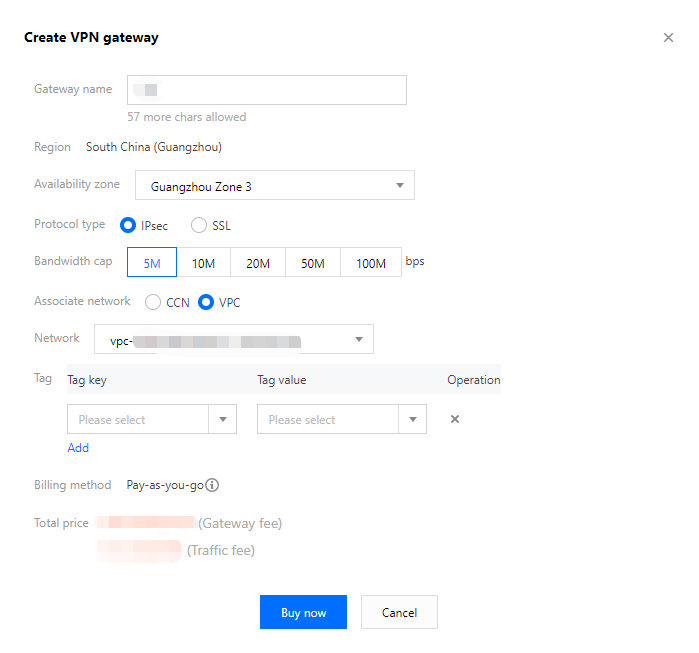
Bandwidth Cap: choose the maximum bandwidth that meets the application requirements.
Billing method: supports pay-as-you-go.
Leave the other parameters empty or keep their default settings.
5. After configuring gateway parameters, click Create to create a VPN gateway.
It takes about 1-2 minutes to complete creating a VPN gateway. Each running VPN gateway will be assigned with a public IP.
Step 2: create customer gateways
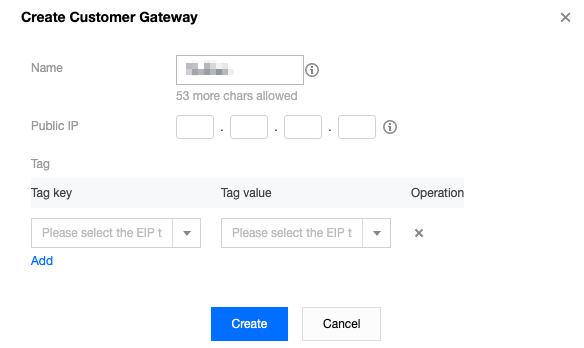
Creating a customer gateway D
1. Select VPN Connection > Customer Gateway on the left sidebar to access the Customer Gateway page.
2. Choose the region and click +New.
3. Enter the name and public IP of the customer gateway. Public IP refers to the static public IP of the VPN gateway device on the customer IDC side. You can optionally set tags.
Name: enter a customer gateway name.
Public IP: enter the public IP address of the VPN gateway on the IDC side.
4. Click Create.
Creating a customer gateway E
Repeat the step 1-4 of creating a customer gateway D.
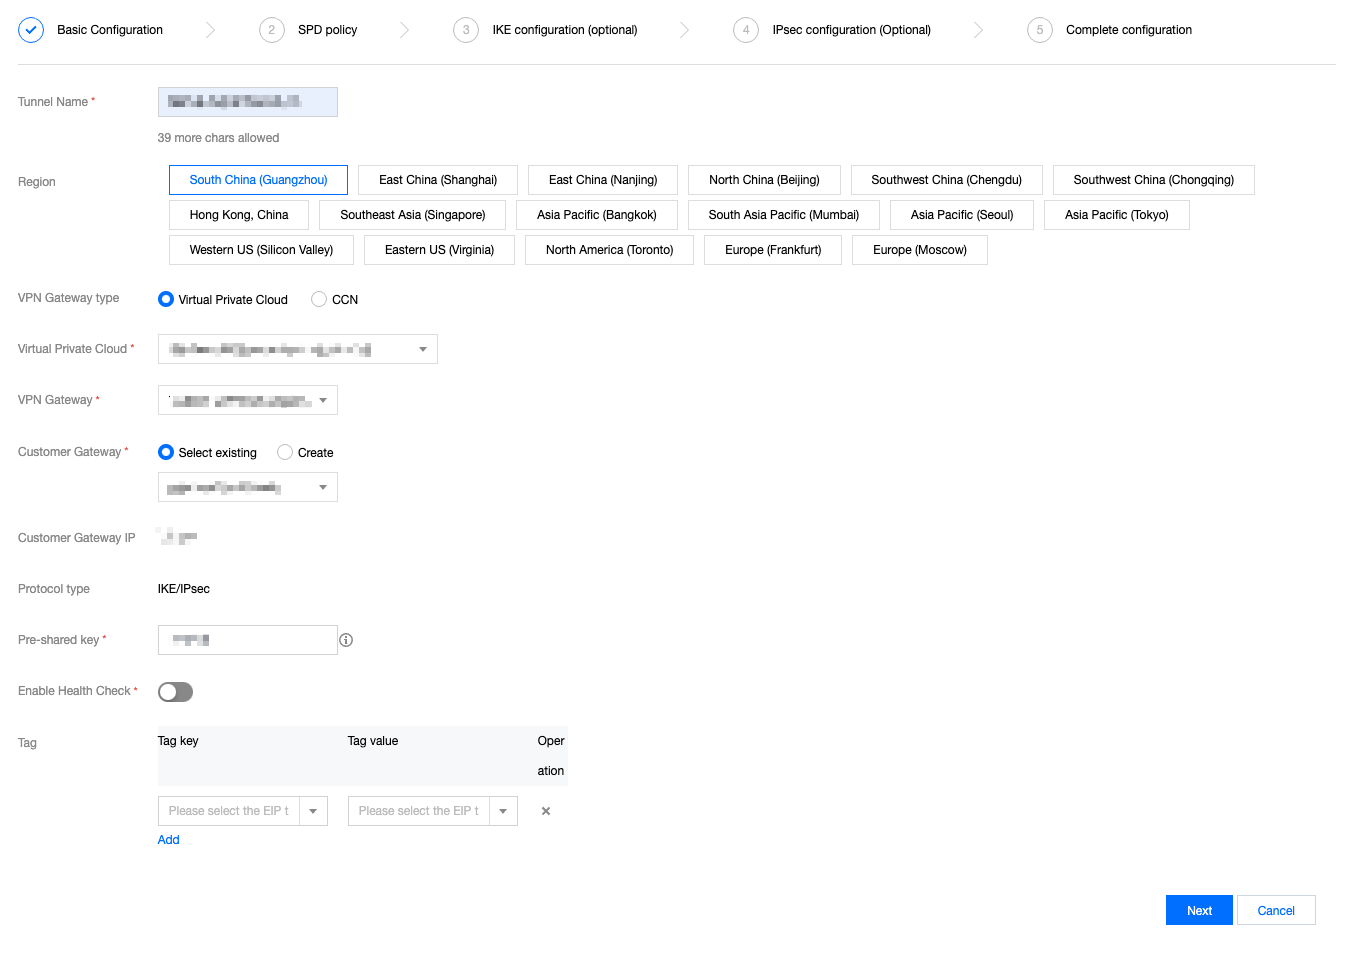
Step 3: create primary and secondary VPN tunnels
After creating the VPN gateway and customer gateways, create two VPN tunnels (primary and secondary) that respectively connect the VPN gateway to customer gateways.
Creating a primary tunnel B
1. Select VPN Connection > VPN Tunnel on the left sidebar to access the VPN Tunnel page.
2. Choose the region and click +New.
3. Complete the configurations of the VPN tunnel as instructed in Creating VPN Tunnel. The SPD policy specifies a customer IP range 0.0.0.0/0.
4. Click Create.
Creating a secondary tunnel C
Repeat the step 1-4 of creating a primary tunnel B. The SPD policy specifies a customer IP range 0.0.0.0/0.
Step 4: configure IDC devices
After the first 3 steps, the VPN gateway and VPN tunnel on the Tencent Cloud are configured. Then, you need to configure the VPN tunnel on the local gateway of the IDC. For detailed directions, see Local Gateway Configurations. The local gateway refers to the IPsec VPN device on the IDC side. The public IP of this device is recorded in the “customer gateway” created in step 2.
Note:
Configure both VPN gateways connected with the primary and secondary tunnels on the IDC side.
Step 5: configure the VPN gateway routes
After configuring the primary and secondary VPN tunnels, you need to configure the VPN gateway routes to VPN tunnels in the VPN console.
1. Select VPN Connection > VPN Gateway on the left sidebar to access the VPN Gateway page. Locate the VPN gateway A created in the step 1, and click the ID/Name to enter its details page.
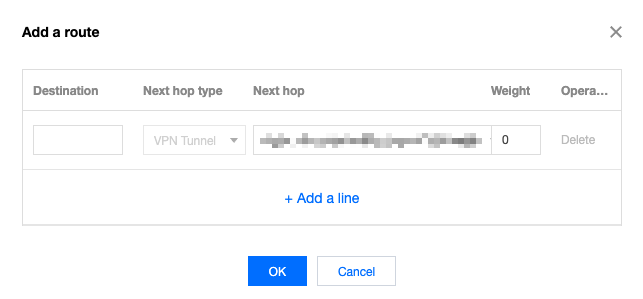
2. Select the Route Table tab and click Add a route.
3. Configure the routing policy of the VPN gateway A to the customer gateways D and E, which specifies the routing and forwarding rules of traffic in the VPN tunnels B and C.
Configuration Item
Description
Destination
Enter the IDC IP range that provides the public access.
Next hop type
It defaults to VPN Tunnel.
Next hop
Select a VPN tunnel that has been created.
Weight
Enter “0” for the tunnel B.
Enter “100” for the tunnel C.
The smaller the value, the higher the priority.
4. Click OK.
Step 6: configure health checks for tunnels
After configuring the VPN gateway routes, configure health checks for both the primary and secondary tunnels.
Note:
Your business may be interrupted for 1-2 seconds when the health check triggers the primary/secondary tunnel switchover.
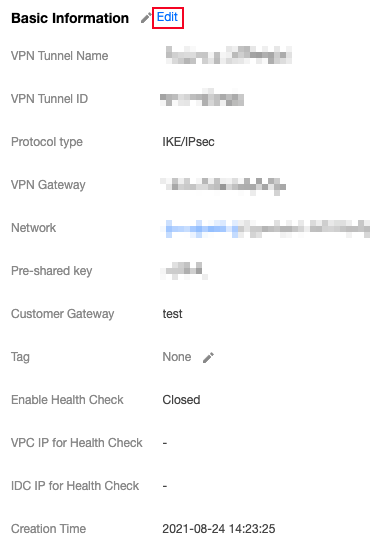
Configuring a health check for the primary tunnel B
1. Select VPN Connection > VPN Tunnel on the left sidebar to access the VPN Tunnel page. Locate the VPN tunnel B and click the ID/Name to enter its details page.
2. Click Edit on the Basic Information page.
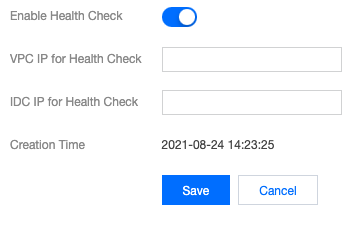
3. Enable the health check, enter VPC IP for Health Check and IDC IP for Health Check, and click Save.
Note:
VPC IP refers to the Tencent Cloud IP address that sends the access request to the IDC for a health check. This IP does not fall within a VPC CIDR block.
IDC IP refers to the IDC IP address that responds to the health check request of Tencent Cloud. Use an IP different from the VPC IP to avoid conflict.
If an IP address responds to the Tencent Cloud access request delivered via the tunnel, it means the tunnel is healthy.
Configuring a health check for the secondary tunnel C
Repeat the step 1-3 of configuring a health check for the primary tunnel B, with a different health check IP address.
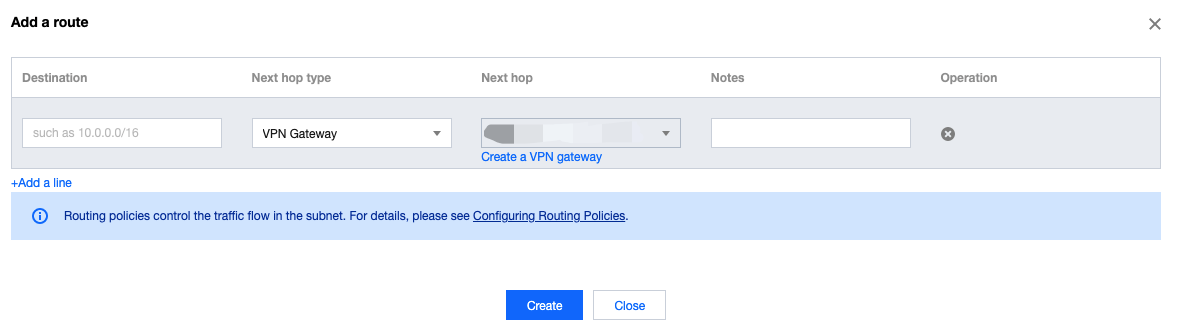
Step 7: configure the VPC routing policy
Now, you need to configure a VPC routing policy to direct the subnet traffic to the VPN gateway, thus enabling the subnet IP ranges to communicate with IDC IP ranges.
2. Click Subnet on the left sidebar, and choose the corresponding region and VPC. Click the associated route table of the subnet to go to the details page.
3. Click +New routing policies.
4. In the pop-up window, enter the destination IP range, select VPN Gateway for the Next hop type, search for the VPN gateway just created and select it for the Next hop, and click Create.
Step 8: activate a VPN tunnel
You can use the CVM in the VPC to ping an IP address in the customer IP range to activate the VPN tunnel. If the pinging succeeds, the VPC and IDC can communicate with each other.
When the VPN route table finds the route of the primary tunnel B is unreachable, the traffic will be automatically forwarded to the VPN tunnel C to ensure high business availability.


 Yes
Yes
 No
No
Was this page helpful?