This document describes how to build a Kubernetes cluster management environment by using the K3s application image. K3s is an open-source, extremely lightweight Kubernetes distribution. Currently, it is a Cloud Native Computing Foundation (CNCF) sandbox project. It has low requirements for server computing resources and can run in standalone mode. The K3s application image is preconfigured with the Kubernetes Dashboard visualization tool for easy Kubernetes cluster management in a browser.
Note:
The underlying layer of the sample K3s image in this document is based on CentOS 8.2 64-bit. Application images are subject to updates from time to time, and the actual image information on the purchase page shall prevail.
Directions
Using K3s image to create instance
1. Log in to the Lighthouse console and configure the following parameters:
Region and Availability zone: Select the region and AZ near your target users to reduce the network latency and improve their access speed.
Image: Select the K3s application image.
Instance bundle: Select an instance bundle according to the required instance configuration (including CPU, memory, system disk, bandwidth, and monthly traffic).
Instance name: Enter a custom instance name. If it is left empty, the selected image name will be used as the name by default. When multiple instances are created in a batch, their names will be consecutive with auto-incrementing suffixes. For example, if you enter "LH" as the name and create three instances, the three instances are named "LH1", "LH2", and "LH3".
Purchase period: Default to 1 month.
Quantity: Default to 1.
2. Click Buy now to submit your order and make the payment as prompted.
Configuring Lighthouse firewall
1. On the Instances page, select the target instance to enter its details page.
2. Select the Firewall tab, click Add rule, and open port 9090.
Note:
The default port for Kubernetes Dashboard is 9090.
Logging in to Kubernetes Dashboard
1. On the Instances page, select the target instance to enter its details page.
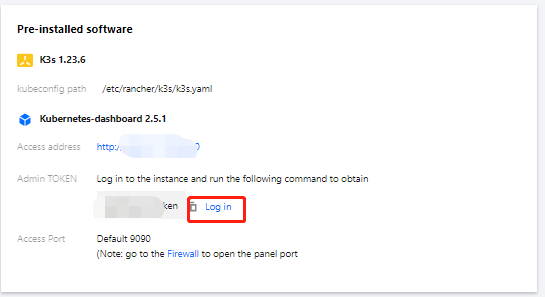
2. Select the Pre-installed application tab to enter the application details page, where you can view the configuration items of the application.
3.
In the Pre-installed software section
, click
to copy the admin token of Kubernetes Dashboard.
4. In the Pre-installed software section, click Log in.
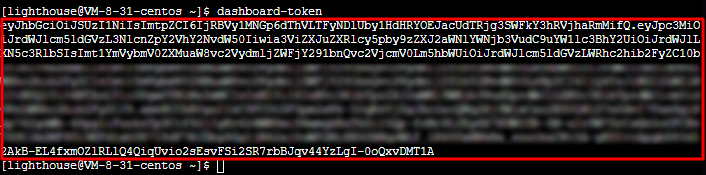
5. In the pop-up window, paste the command obtained in step 3 and press Enter.
6.
Record the returned token value.
7. In the Pre-installed software section, get the Access address and use it to enter Kubernetes Dashboard in a browser.
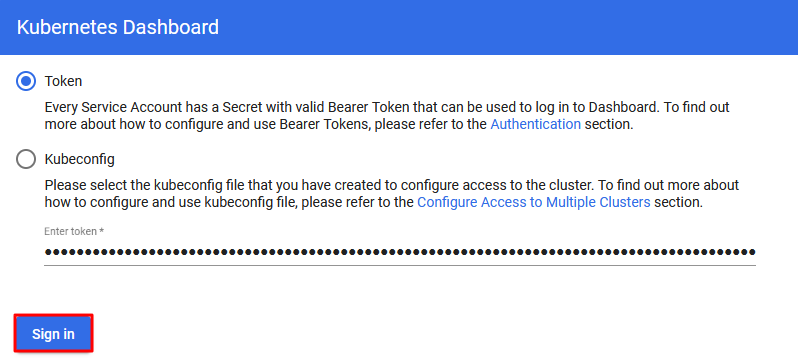
8. On the login page, enter the token obtained in step 6 and click Sign in.
Once you have successfully logged in, you can use Kubernetes Dashboard for cluster management.
Relevant Operations
Adding nodes
The instance created with the K3s application image works as the Master in the cluster. You can add nodes to the cluster as instructed below:
1. Enter the instance details page, select the Firewall tab, and open ports TCP:6443, UDP:8472, and TCP:10250 (for node monitoring) as instructed in Configuring Lighthouse firewall.
2. In the Pre-installed software section, click Log in.
3. In the pop-up window, run the following command to add the node IPs.
k3s-add-node {node-ip}
Note:
The Master is on CentOS 8.2. We recommend you create Lighthouse instances with the same OS in the same AZ as nodes in the cluster.
Nodes need to be connected to the Master over the private network.
Lighthouse instances in the same region under the same account are interconnected over the private network by default. For more information, see Region and Interconnection.
To allow the communication among nodes in the cluster, open port TCP:6443, UDP:8472, and TCP:10250 in the firewall rule as instructed in step1.
Please ensure firewall rule(TCP:6443) of master node has been allowed!
root@10.0.5.158's password:
4. Enter the root user password of the node to be added and press Enter. After the node is initiated, it will be added to the cluster.
Note:
If you haven't set or forgotten the root user password, see Resetting Password.
Modifying NodePort
The default NodePort range is 30000-32767. In some cases, due to network policy restrictions, you may need to modify this range in the following steps:
1. Enter the instance details page, select the Firewall tab, and open the modified NodePort (e.g., 30000–42767) as instructed in Configuring Lighthouse firewall.
2. In Remote login on the instance details page, click Log in.
3. Run the following command to edit the k3s.service configuration file.
sudovi /etc/systemd/system/k3s.service
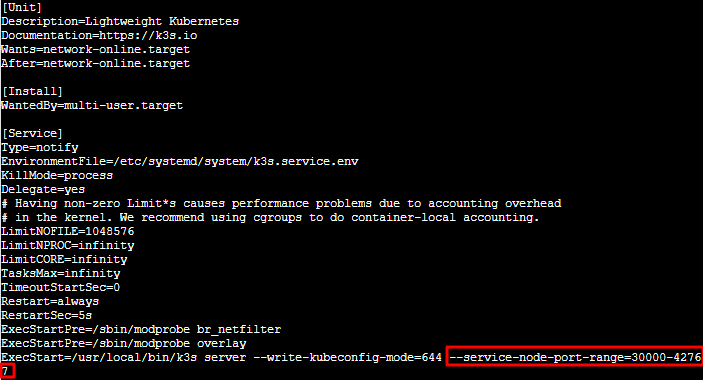
4. Press i to enter the edit mode, find ExecStart, and add the --service-node-port-range parameter to specify the NodePort; for example:
ExecStart=/usr/local/bin/k3s server --write-kubeconfig-mode=644 --service-node-port-range=30000-42767
The result should be as follows:
5. Press Esc and enter :wq to save the change and exit the edit mode.
6. Run the following command and enter the root user password to restart the K3s service and make the configuration take effect.


 Yes
Yes
 No
No
Was this page helpful?