kapt 'com.tencent.tcmpp.android:mini_annotation_processor:${version}' // For version information, see Android SDK updates
// Core library (required)
implementation 'com.tencent.tcmpp.android:mini_core:${version}' // For version information, see Android SDK updates
// Preset base library (optional)
implementation 'com.tencent.tcmpp.android:mini_baselib:${version}' // For version information, see Android SDK updates
// mini app end
}
Note:
Replace {version} in the configuration with the corresponding version of the dependencies. For version information, see Android SDK updates.
If developers have used the annotationProcessor annotation processor in their original projects, they need to change all annotationProcessor entries to kapt annotation processors.
Initialization
1. Create a superapp in the console
Initializing the mini program SDK requires obtaining from the mini program console the superapp's encryption key or configuration file.If you have not yet created a superapp in the console, follow the steps below to create one.
1.1 Log in to the mini program console and go to the superapp management page
1.2 Create a superapp
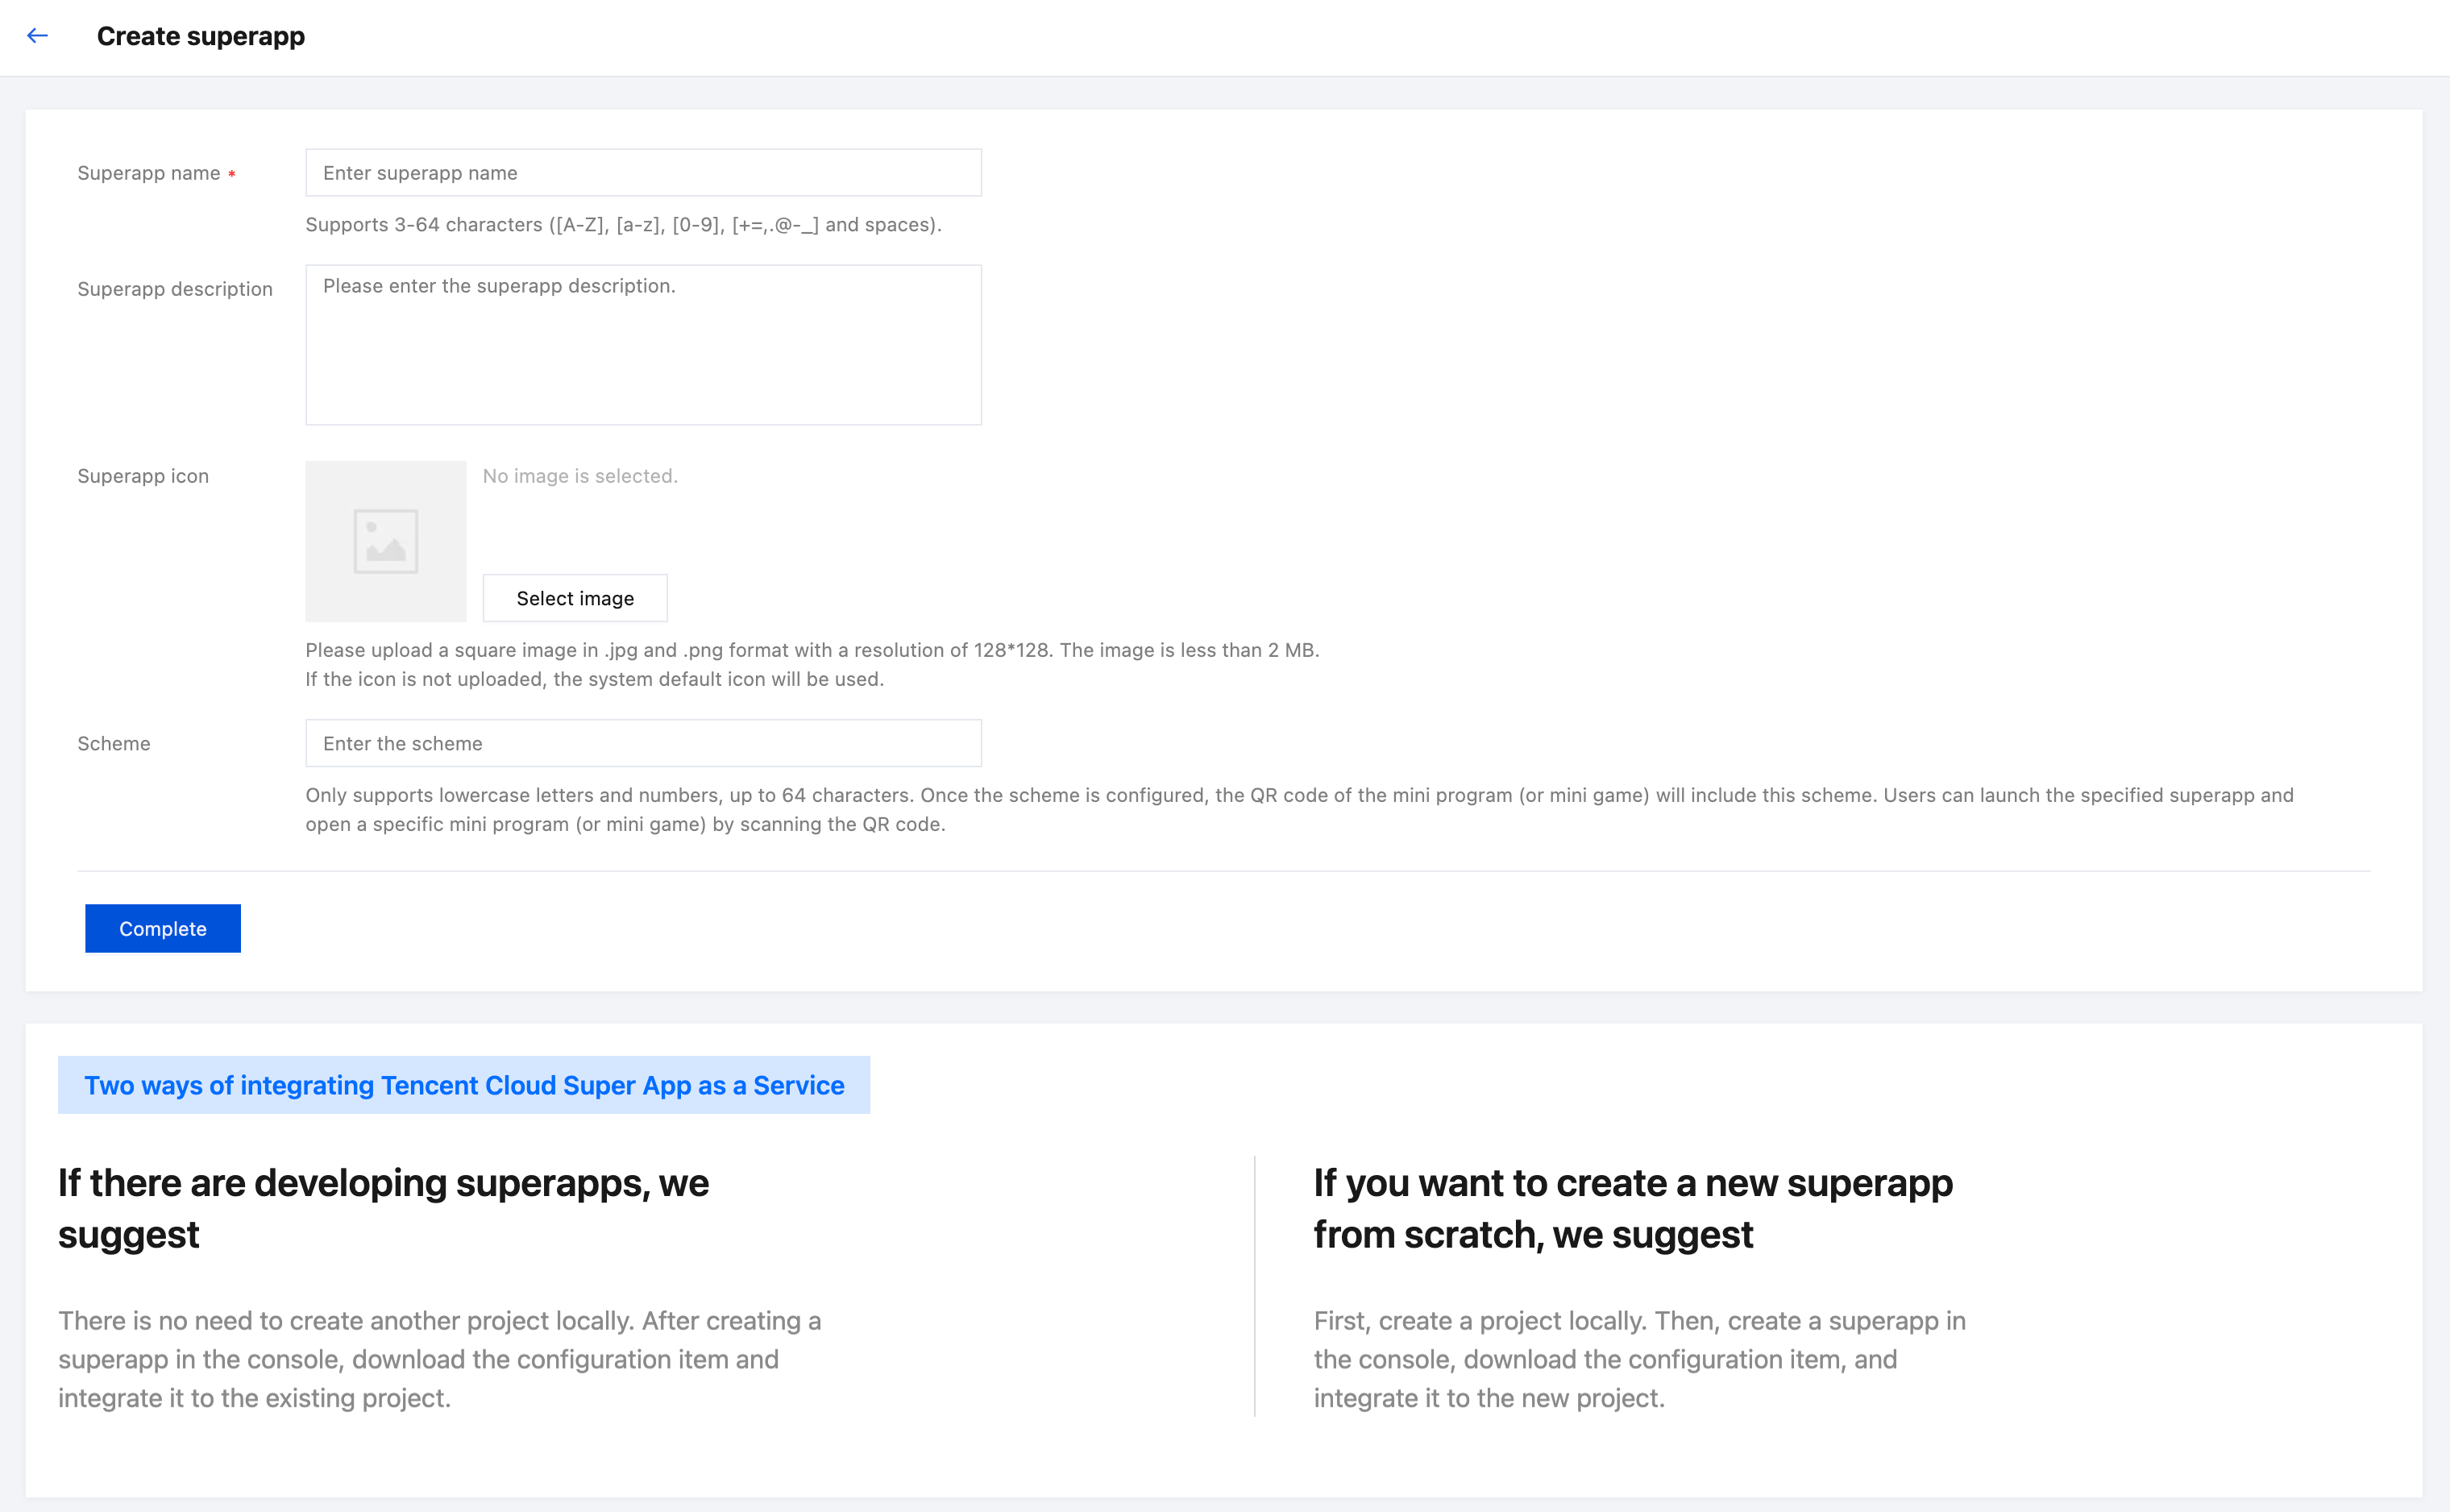
1.3. Fill in the superapp information
Required information:
Superapp name: Supports 3-64 characters including a-z, A-Z, 0-9, spaces and some special symbols ("+", "=", ",", ".", "@", "-", "_").
Optional information:
Superapp description: Brief introduction of the superapp, primarily for internal reference.
Superapp icon: Supports uploading square images in .jpg or .png format, with a resolution of 128 × 128 and a file size under 2 MB. If the icon is not uploaded, the system default icon will be used.
Scheme: Only supports lowercase letters and numbers, up to 64 characters. Once the scheme is configured, the QR code of the mini program (or mini game) will include this scheme. Using the phone system’s built-in scanning function, users can directly launch superapp and open the mini program (or mini game).
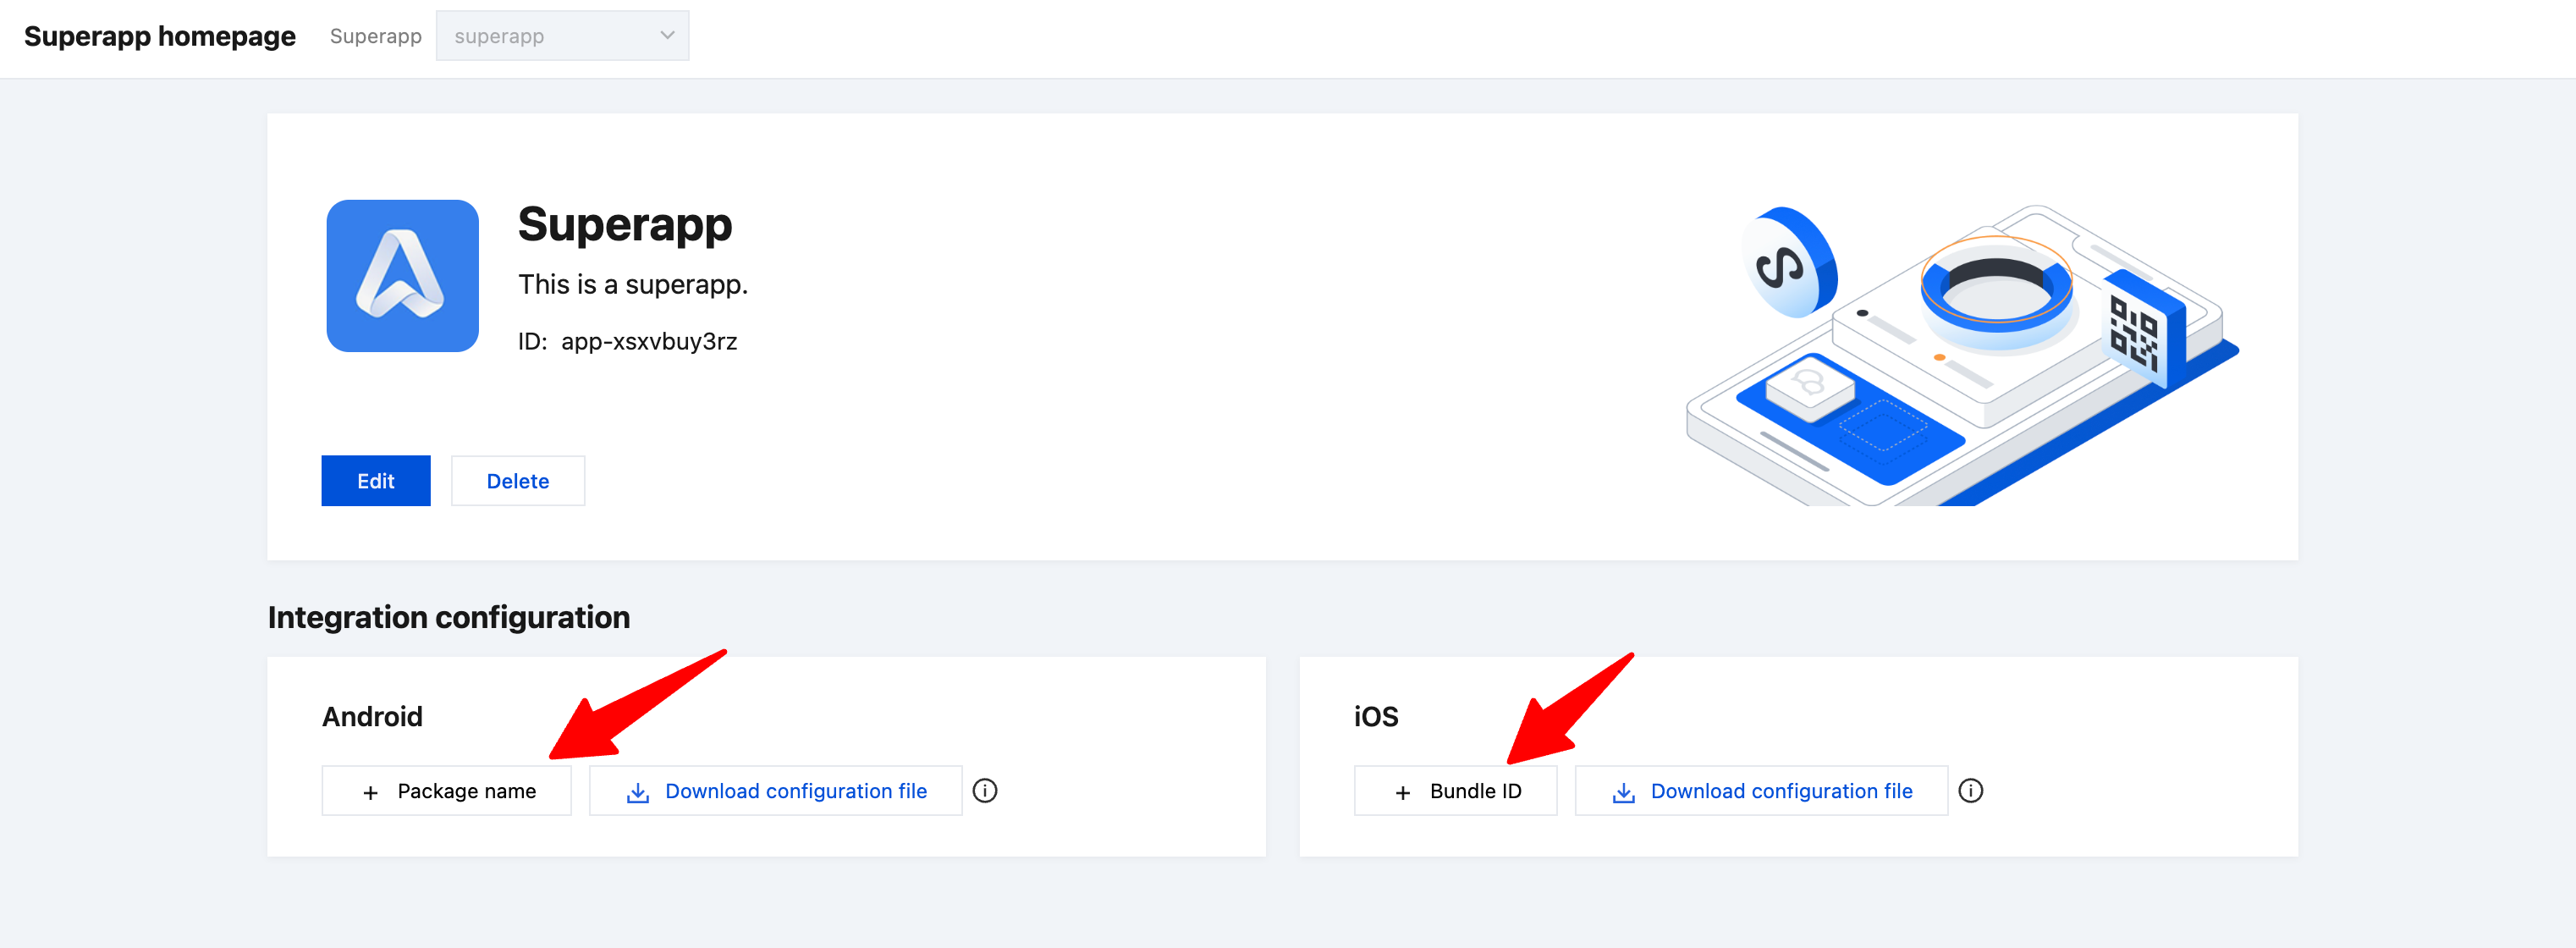
1.4 Enter the superapp package name
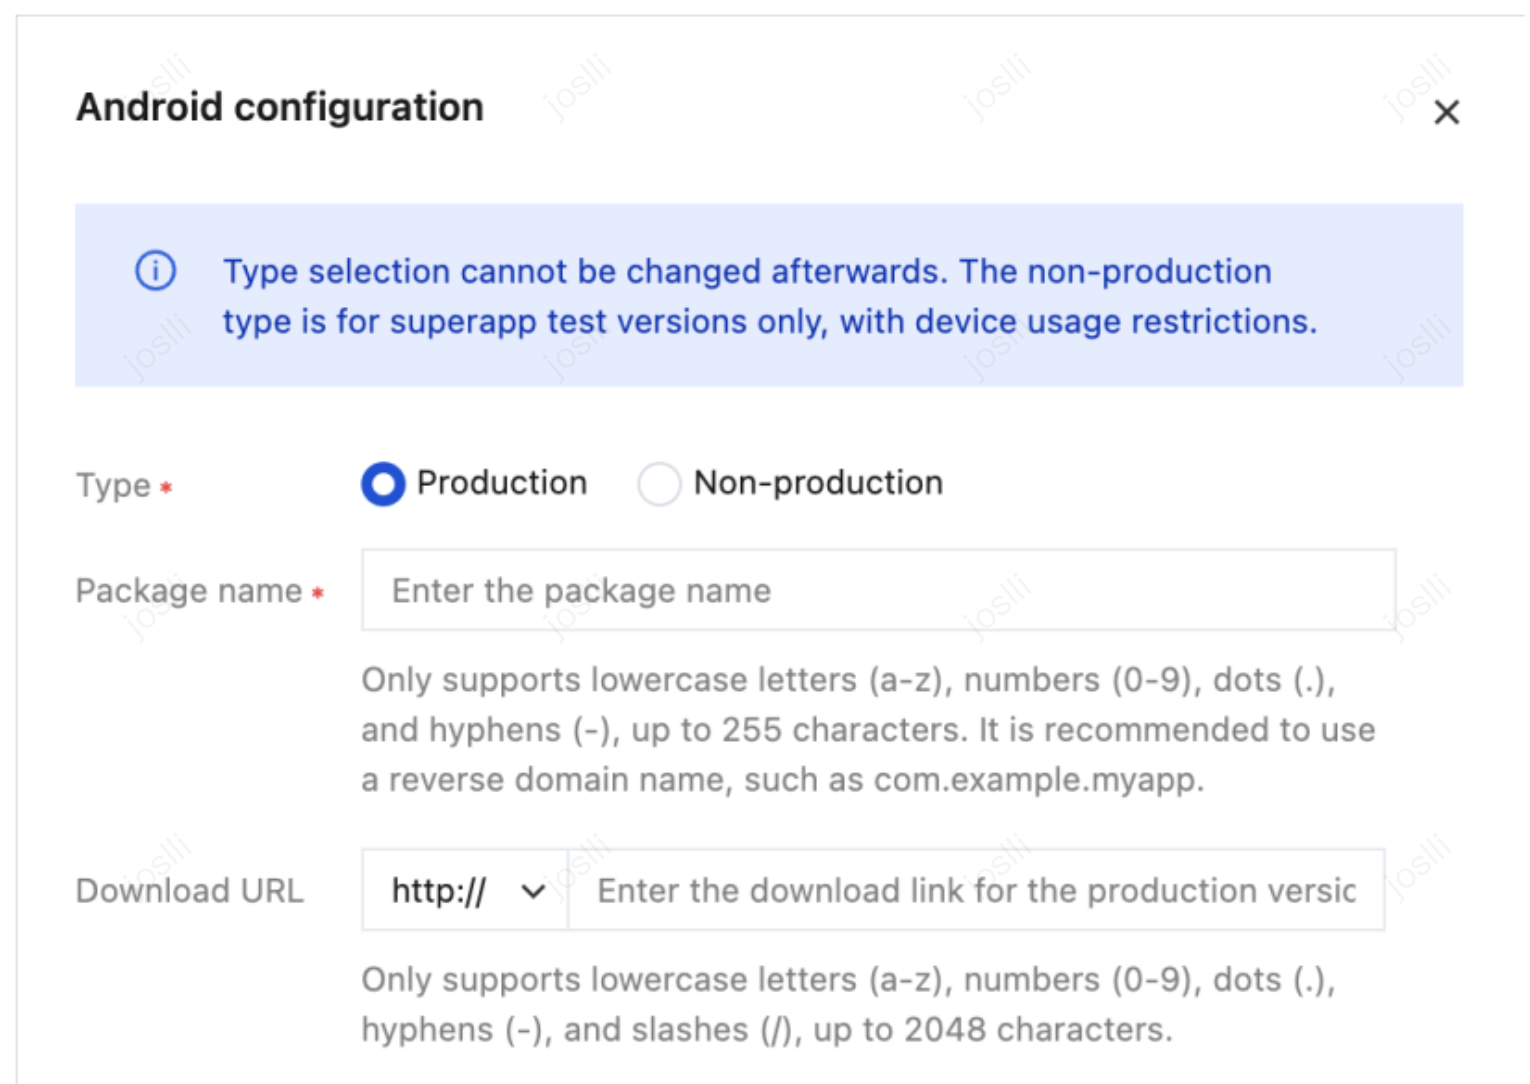
The following fields need to be filled in when adding the package name/bundle ID:
Type: Once selected, the type cannot be changed. Package names for non-production types are only used for superapp test versions and have a monthly device usage limit (up to 500 devices).
Package name/bundle ID: Only supports lowercase letters (a-z), numbers (0-9), dots (.), and hyphens (-), up to 255 characters. It is recommended to use reverse domain name notation, such as com.example.myapp.
Download URL: Only supports uppercase letters (A-Z), lowercase letters (a-z), numbers (0-9), dots (.), hyphens (-), and slashes (/), up to 2,048 characters.
2. Obtain superapp configuration and complete initialization
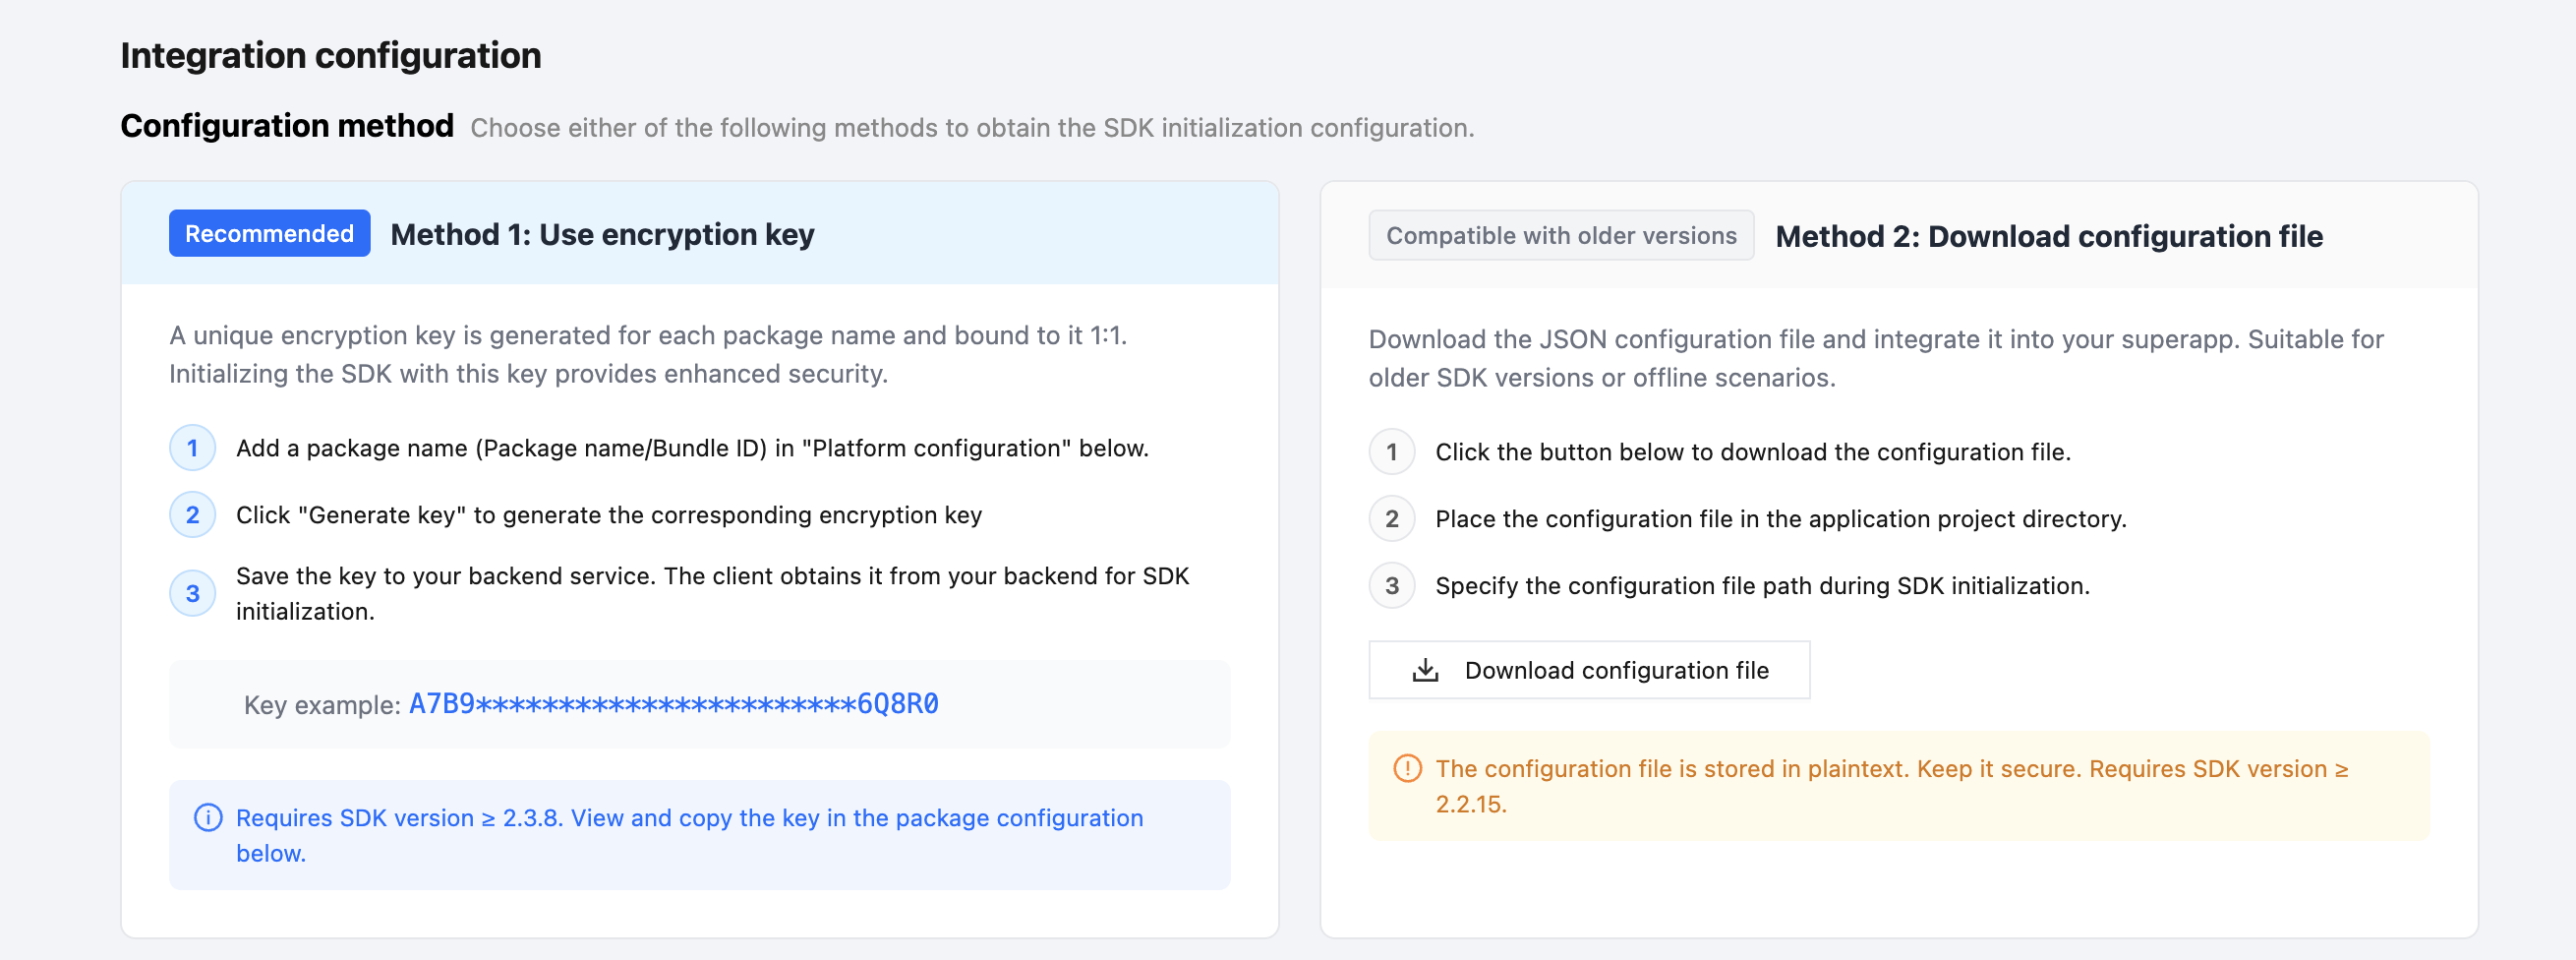
2.1 Configuration methods
After adding the "Package name/Bundle ID", the superapp needs to obtain the SDK initialization configuration from the console. Two methods are currently provided.Choose one.You can check the "Configuration method" section for descriptions:
Configuration method
Scenario
Security
SDK version requirement
Binding relationship
Method 1: Use encryption key
New SDK versions. Recommended for production environments.
High (Key distribution is controlled by the backend)
≥ 2.3.8
Bound 1:1 with the Package name/Bundle ID.
Method 2: Download configuration file
Old SDK versions or offline scenarios.
The config file is stored in plaintext and requires self-protection.
≥ 2.2.15
Bound to the superapp
Notes:
Choose only one method to initialize the SDK.Do not use both simultaneously.
We recommend Method 1: Use encryption key.It offers higher security and is bound 1:1 with the package name, facilitating permission control and auditing.
If your SDK version is earlier than 2.3.8, use Method 2: Download configuration file.
2.2 Method 1: Use encryption key
2.2.1 Generate an encryption key
1. Configure the production and non-production Package name/Bundle ID for the superapp as described above.A unique encryption key can be generated for each Package name/Bundle ID. The SDK uses this key for initialization. The key is bound 1:1 with the package name.Compared to plaintext config files, it offers higher security and is recommended for production environments.
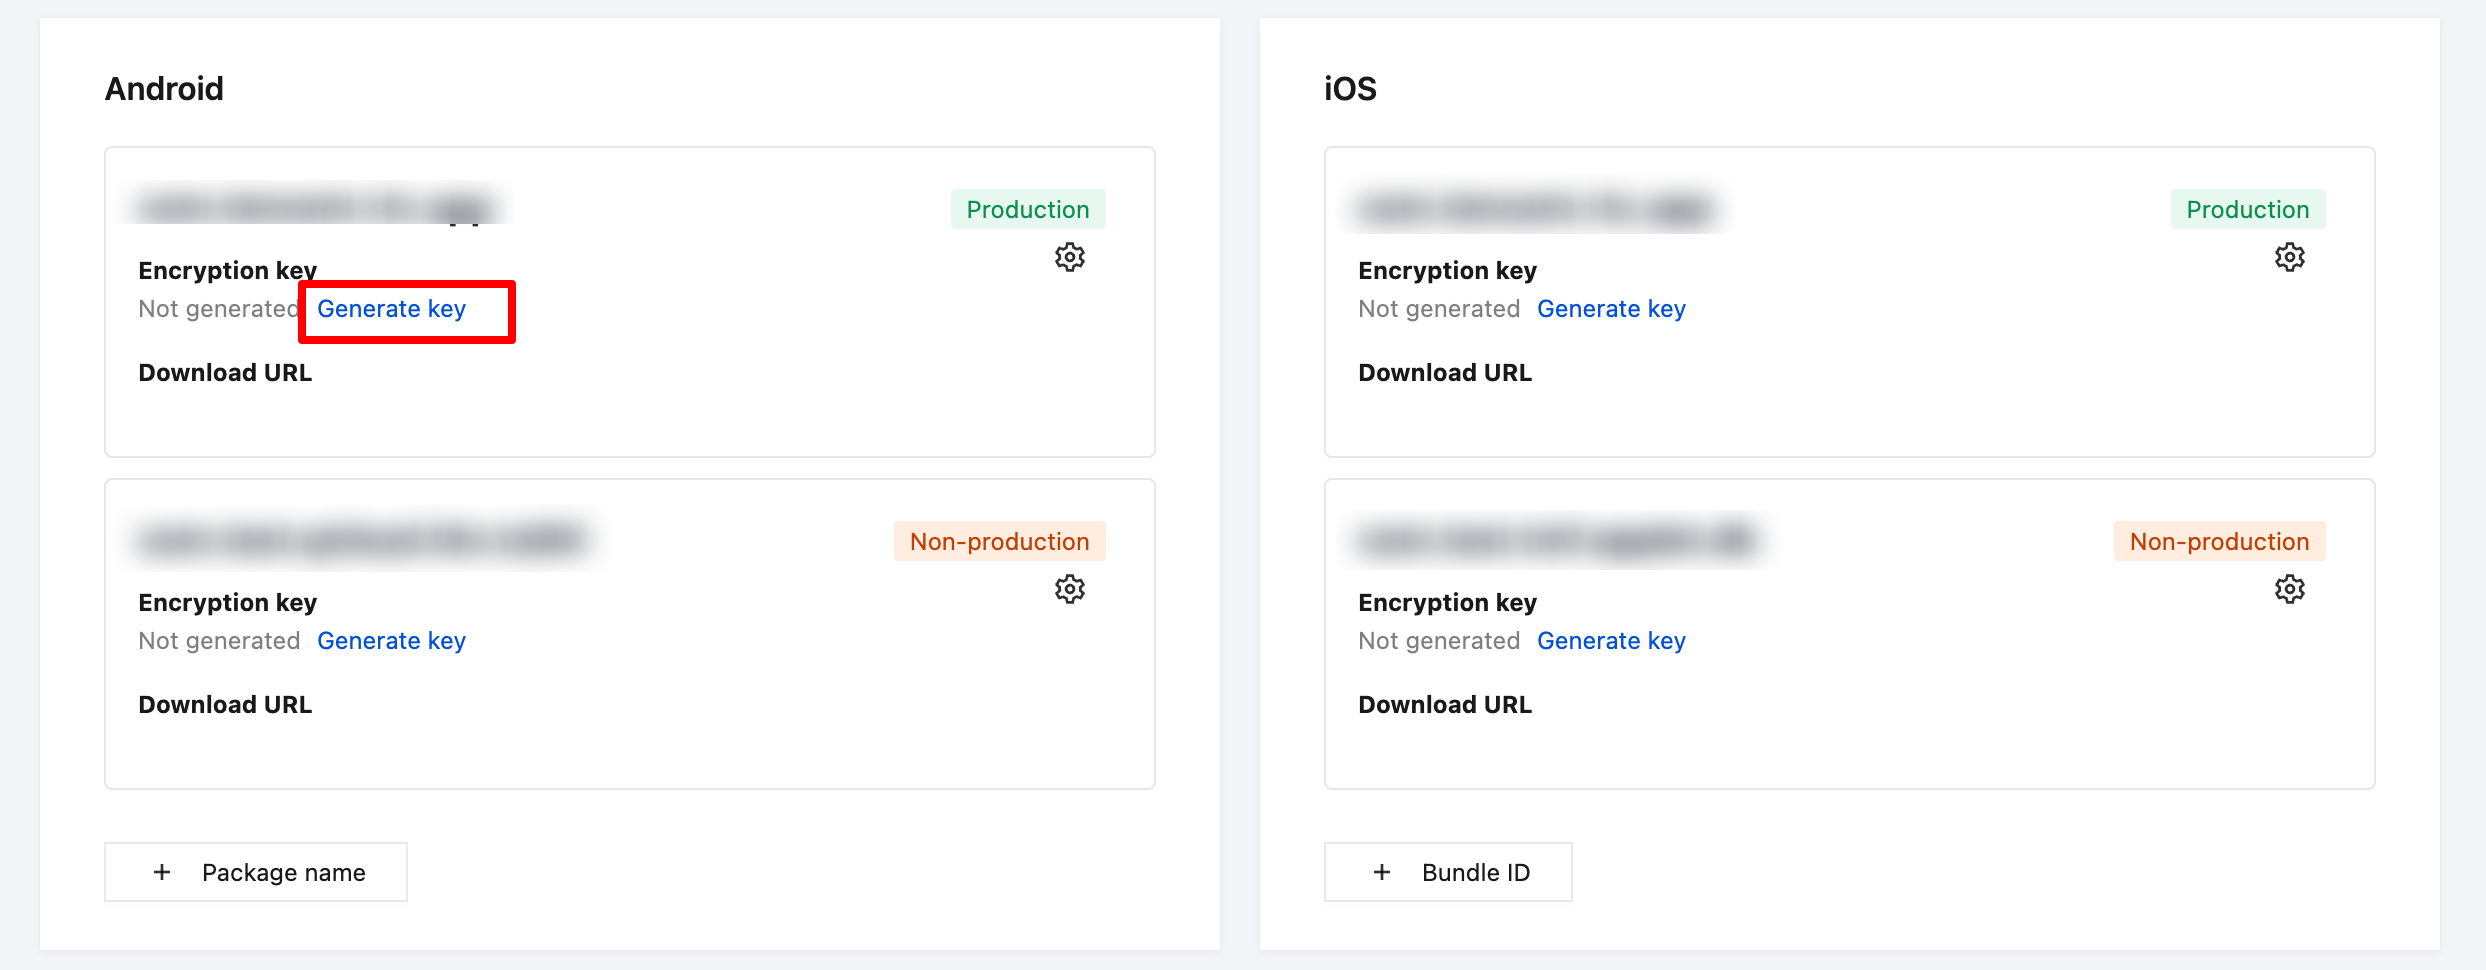
2. In the row of the corresponding package name, locate the "Encryption key" field:
If the status is "Not generated", click "Generate key".The system generates a unique key for the package name. Upon success, a masked string (e.g., A7B9***********************6Q8R0 is displayed, and a success message appears.
Each Package name/Bundle ID corresponds to only one encryption key. Clicking the button repeatedly will not generate new keys.
2.2.2 View and copy the key
1. After the key is generated, the "Encryption key" field displays a masked string and a "Get key" button.
2. Click "Get key". A dialog box appears, displaying the complete key details.
3. Click "Copy" in the dialog box to copy the key to the clipboard.A success message appears.
4. Save the copied key to your backend service, which will distribute it to the client. The client uses this key during SDK initialization to complete the integration.
Notes:
The encryption key is bound 1:1 with the Package name/Bundle ID. Different package names correspond to different keys and cannot be used interchangeably.
Do not hardcode the key in the client code or public repositories.We recommend keeping it in your backend and distributing it to the client on demand at runtime.
Only the superapp administrators/senior superapp developers have the permission to generate keys. Superapp developers can view and copy existing keys. Other roles have read-only access to check if a key has been generated.
If you suspect a key leak, contact the superapp administrator (e.g., to regenerate the key or change the package name) and update the key stored in your backend accordingly.
2.2.3 Use the encryption key to configure the initialization proxy
Inherit and implement the MiniConfigProxy class.
Add the following annotations for the implementation class of MiniConfigProxy:
.autoRequestPermission(true)// Specifies whether to automatically request corresponding system permissions from the user when the mini program uses an API that requires permissions.
.debug(true)// Log switch. Disabled by default.
.build();
return config;
}
}
2.3 Method 2: Use a config file
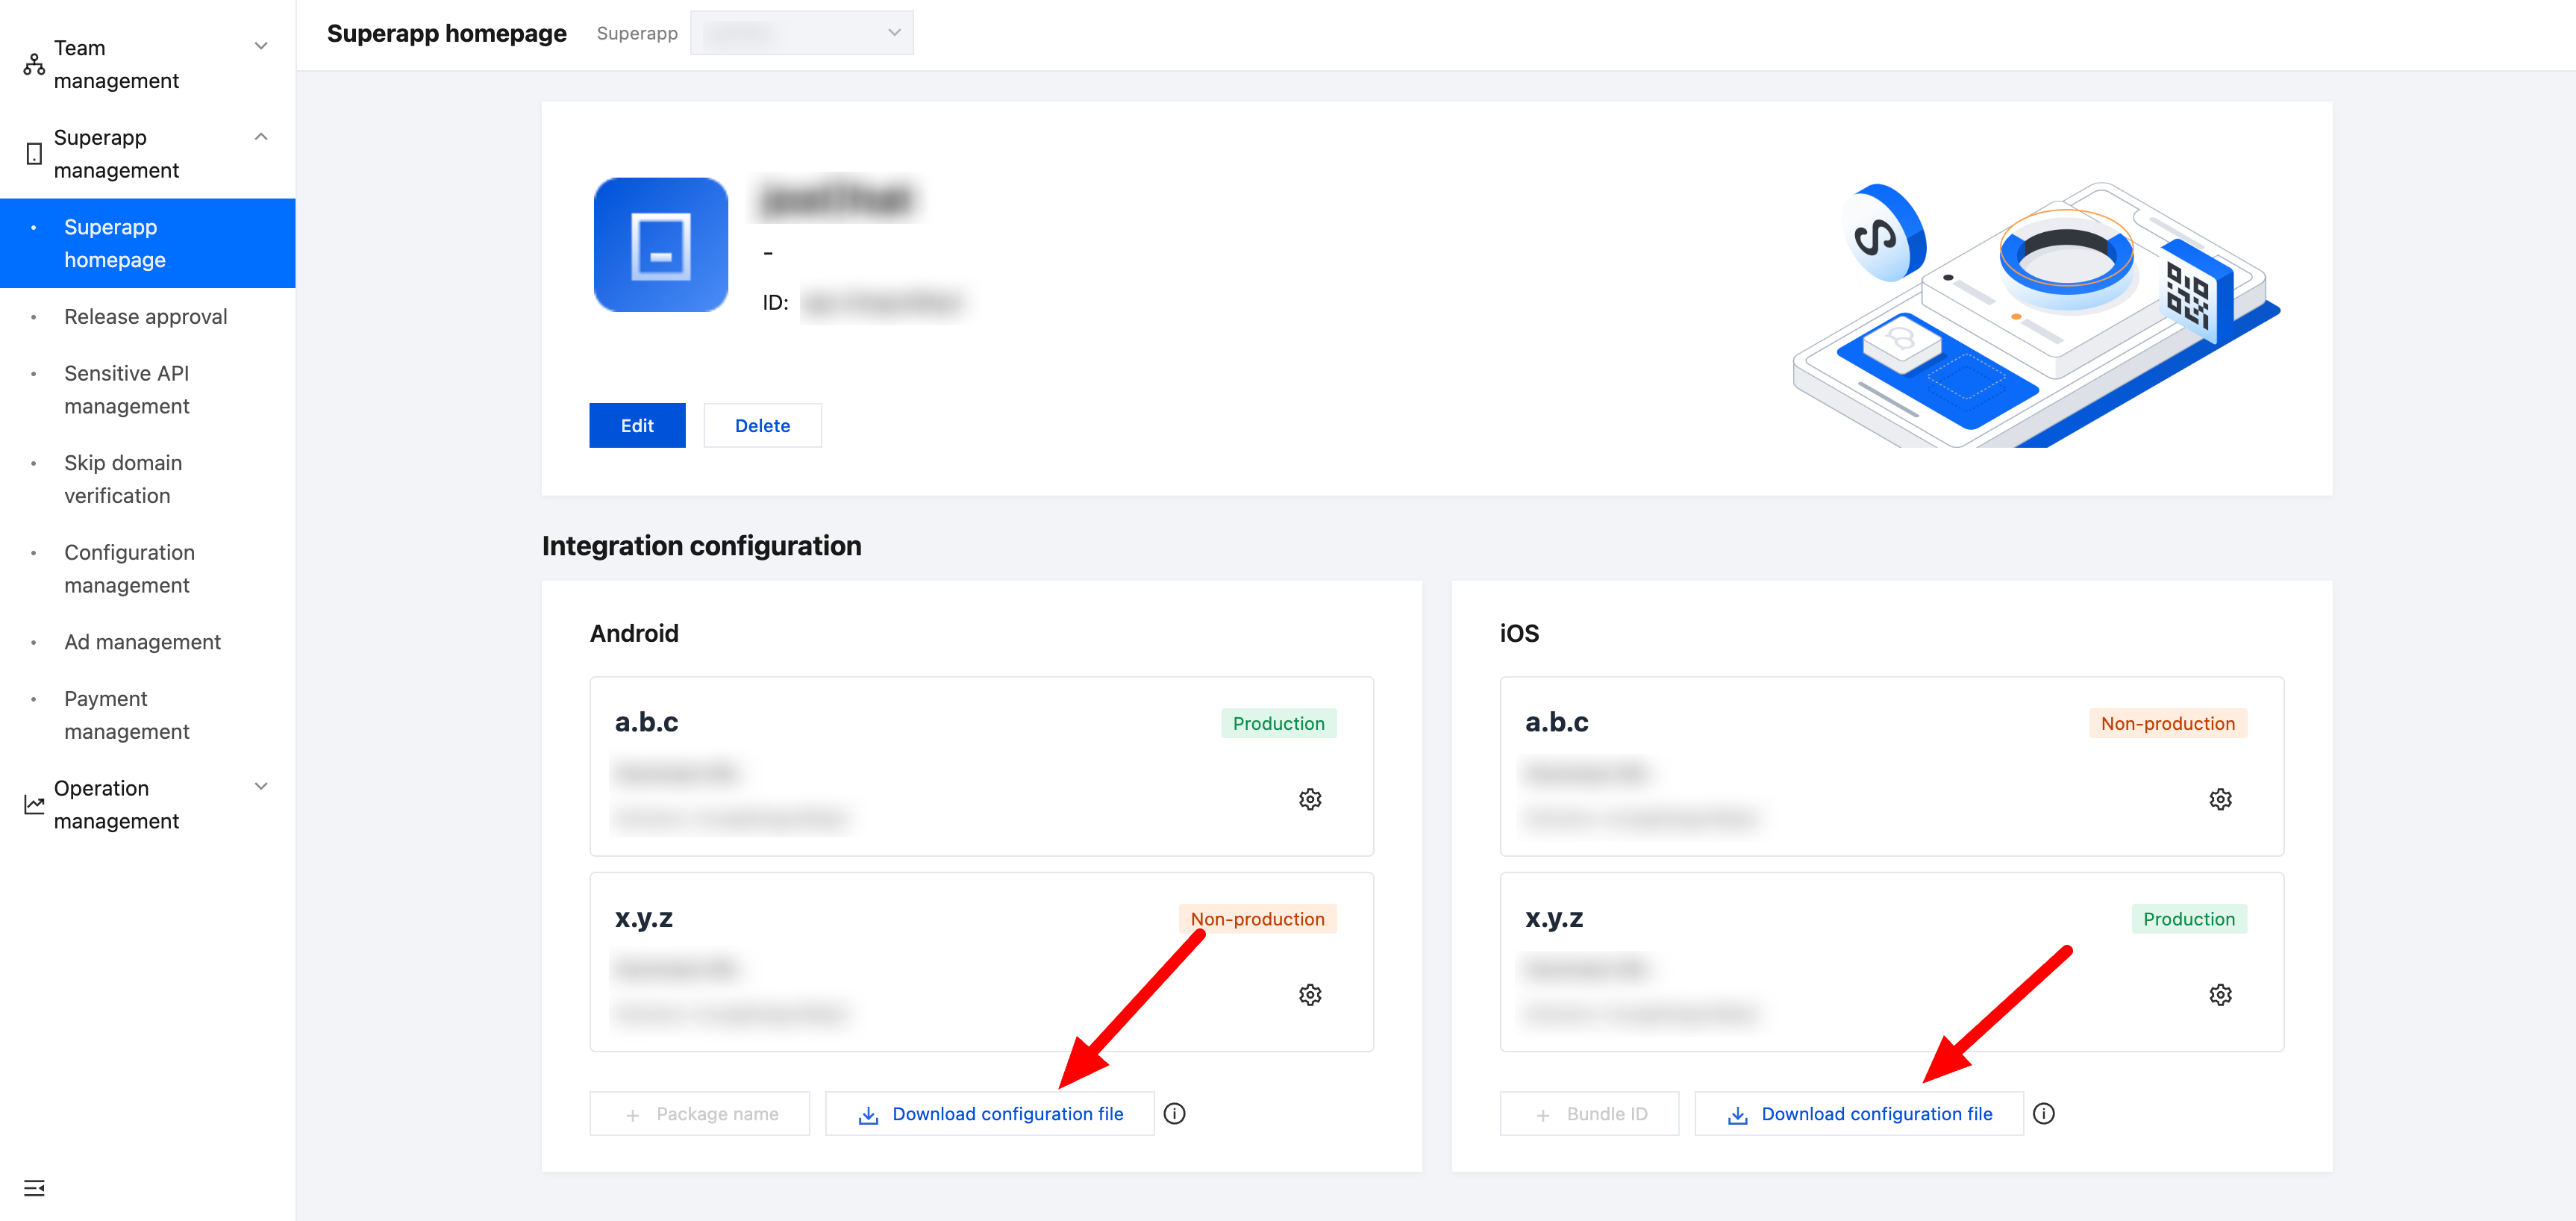
2.3.1 Download configuration file
Note:
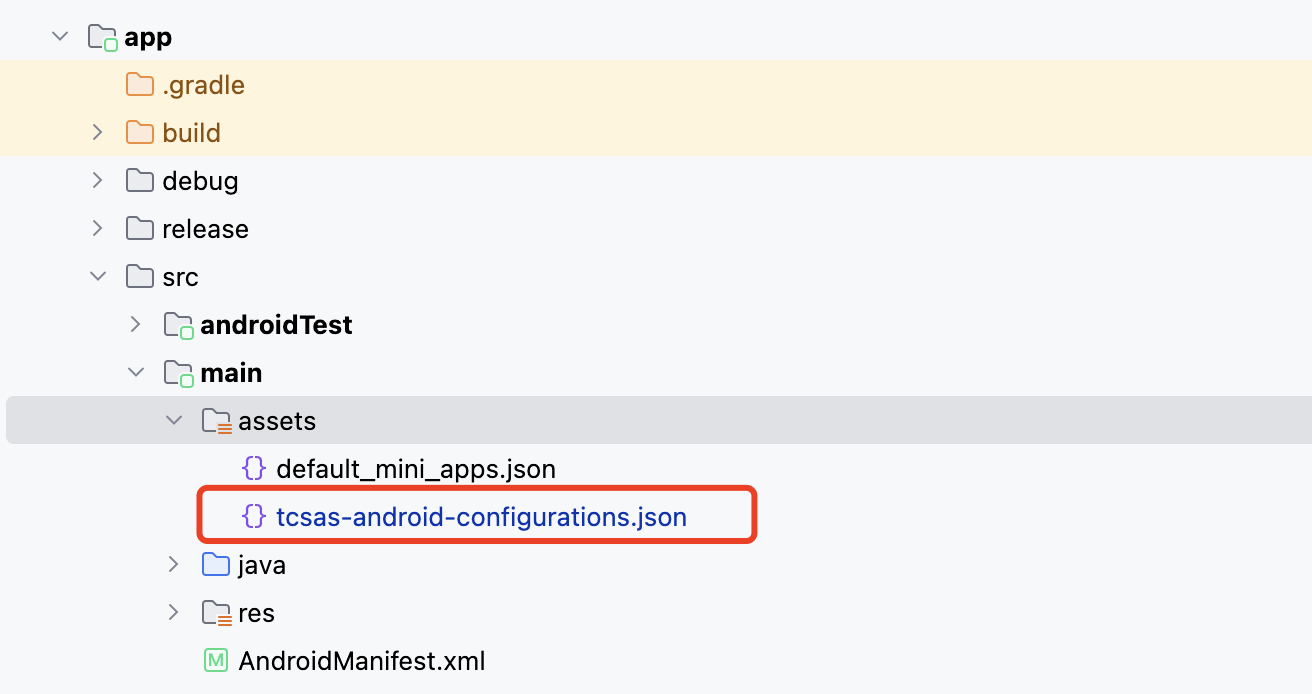
The default name of the downloaded configuration file is tcsas-android-configurations.json.
2.3.2. Add the configuration file to the project
After obtaining the configuration file, you need to copy the configuration file. to the assets directory of your project.
Note:
Ensure the superapp package name matches the one configured in the console. Otherwise, the mini program SDK will fail to validate the package name at runtime, leading to SDK errors.
2.3.3. Add mini program SDK initialization configuration in the source code
Inherit and implement the MiniConfigProxy class.
Add the following annotations for the implementation class of MiniConfigProxy:
.configAssetName("tcsas-android-configurations.json")// The name of the config file in the assets directory.
.autoRequestPermission(true)// Specifies whether to automatically request corresponding system permissions from the user when the mini program uses an API that requires permissions.
2. Since the SDK initially retrieves the superapp's Application instance from an internal ContentProvider, it is recommended to cache the Application instance in the Application.attachBaseContext method. This prevents the SDK from obtaining a null Application instance due to timing issues.
At this point, the integration of the mini program SDK is complete. The next step is to use the APIs provided by the mini program SDK to open and preview mini programs.
Open a mini program
To open a mini program, use the following code:
Note:
The appid is the mini program appid, which needs to be obtained from the mini program developer.
If your superapp supports multiple user logins and you need to prevent mini program sandbox data from being shared across different users, you should implement the IMiniAppProxy.getAccount() method to return a distinct user ID. This enables sandbox data to be isolated and stored per account.