Policy Examples
Download
Focus Mode
Font Size
Full Read/Write Policy for All ALB Instances
Scenarios
A sub-account is granted the full management permission on the Application Load Balancer (ALB) service, including all operations such as creation and management.
The policy name is QcloudALBFullAccess.
{"statement": [{"action": ["alb:*"],"effect": "allow","resource": "*"}],"version": "2.0"}
Operation Steps
1. Log in to the Cloud Access Management (CAM) console and choose Policies in the left sidebar.
2. On the policy management page, click Authorize User/User Group/Role in the Operation column of the QcloudALBFullAccess policy.
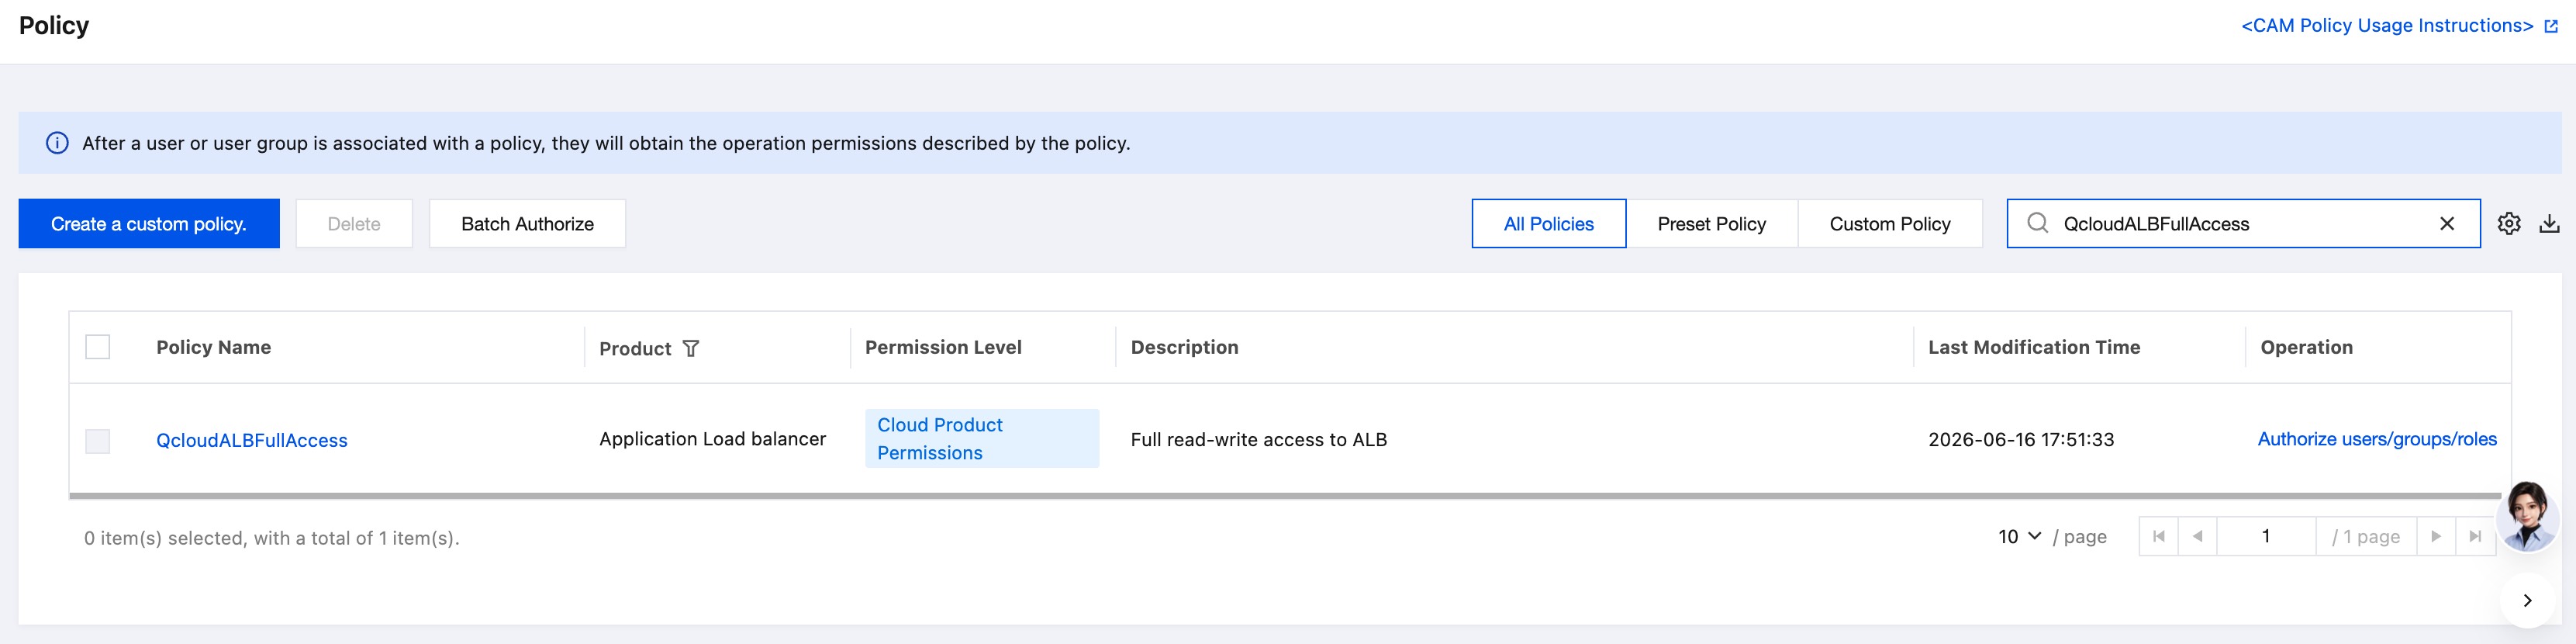
3. In the Authorize User/User Group/Role dialog box, select the account that requires the full read/write permission on ALB and click OK to grant sub-accounts the full read/write permission on ALB.
Read-Only Policy for All ALB Instances
Scenarios
A sub-account is granted the read-only access permission on the ALB service. After that, the sub-account can be used to view all ALB resources. However, it cannot be used to create, modify, or delete any ALB resources.
The policy name is QcloudALBReadOnlyAccess.
{"statement": [{"action": ["alb:*"],"condition": {"numeric_equal": {"qcs:read_only_action": 1}},"effect": "allow","resource": "*"}],"version": "2.0"}
Operation Steps
1. Log in to the CAM console and choose Policies in the left sidebar.
2. On the policy management page, click Authorize User/User Group/Role in the Operation column of the QcloudALBReadOnlyAccess policy.
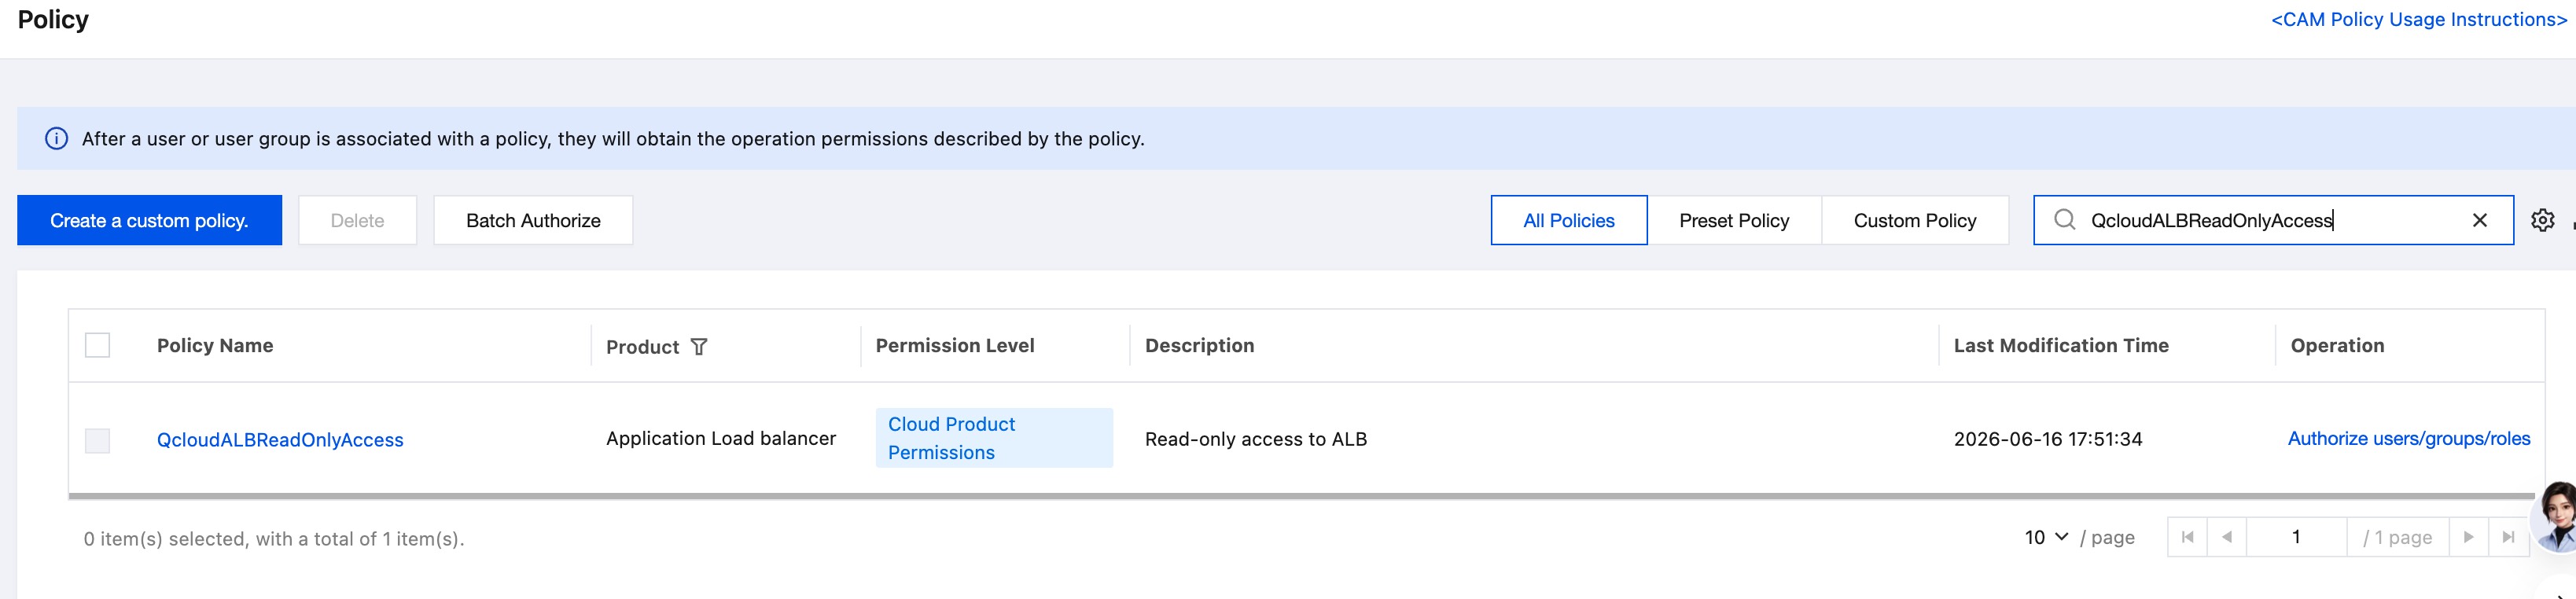
3. In the Authorize User/User Group/Role dialog box, select the account that requires the read-only access permission on ALB and click OK to grant sub-accounts the read-only access permission on ALB.
Full Read/Write Policy for ALB Instances Under a Specific Tag
A sub-account is granted the full management permission on ALB instances under a specific tag (The tag key is tagkey, and the tag value is tagvalue). The permission includes all operations such as instance and listener management.
ALB instances support tag configuration and tag-based authentication.
{"version":"2.0","statement":[{"effect":"allow","action":"*","resource":"*","condition":{"for_any_value:string_equal":{"qcs:tag":["tagkey&tagvalue"]}}}]}
Policies for VPC
If you want users to view Virtual Private Cloud (VPC) information in the ALB console, add the following permissions to your policy first and associate the policy with the users.
DescribeVpcPrivateIPResources: Views the details of VPC IP address resources.
DescribeOverseaAccelerator: Queries the acceleration domain names outside the Chinese mainland.
DescribeCustomerGateways: Queries customer gateways.
DescribeAddresses: Queries the list of elastic IPs (EIPs).
DescribeNetworkInterfaces: Queries the list of elastic network interfaces (ENIs).
DescribeCcnAttachedInstances: Queries the list of instances associated with Cloud Connect Network (CCN).
DescribeSecurityGroupLimits: Queries the security group quotas of a user.
DescribeBandwidthPackages: Queries bandwidth package resources.
DescribeServiceTemplates: Queries protocol port templates.
DescribeAddressTemplateGroups: Queries IP address template groups.
DescribeAddressTemplates: Queries IP address templates.
DescribeServiceTemplateGroups: Queries protocol port template groups.
The detailed steps are as follows:
1. Create a custom policy based on policy that allows viewing VPC IP resources and EIP list information in the ALB console.
You can configure the policy content by referring to the following policy syntax:
{"version": "2.0","statement": [{"action": ["vpc:DescribeVpcPrivateIPResources","vpc:DescribeAddresses"],"resource": "*","effect": "allow"}]}
2. Find the created policy and click Authorize User/Group/Role in the Operation column.
3. In the displayed Authorize User/User Group/Role dialog box, select the user/user group you want to authorize and click OK.
Policies for Tags
If you want users to view tag information in the ALB console, add the following permissions to your policy first and associate the policy with the users.
GetTags: Obtains the tag list.
GetTagKeys: Queries the tag key list.
GetTagValues: Queries the tag value list.
AddResourceTag: Associates tags with resources.
DescribeEffectivePolicy: Queries the effective policy of the target node.
UnTagResources: Removes tags from resources.
The detailed steps are as follows:
1. Create a custom policy based on the policy.
This policy grants users the permission to view information about tag keys and tag values in the ALB console. You can configure the policy content by referring to the following policy syntax:
{"version": "2.0","statement": [{"action": ["tag:GetTagKeys","tag:GetTagValues"],"resource": "*","effect": "allow"}]}
2. Find the created policy and click Authorize User/Group/Role in the Operation column.
3. In the displayed Authorize User/User Group/Role dialog box, select the user/user group you want to authorize and click OK.
Policies for CLS Logs
If you want users to view and use Cloud Log Service (CLS) log information in the ALB console, add the following permissions to your policy first and associate the policy with the users.
DescribeLogsets: Obtains the log set list.
DescribeTopics: Obtains the log topic list.
CreateTopic: Creates a log topic.
CreateLogset: Creates a log set.
SearchLog: Queries logs.
DescribeDashboards: Obtains the dashboard subscription list.
The detailed steps are as follows:
1. Create a custom policy based on the policy.
This policy grants users the permission to create log topics and view the log topic list in the ALB console. You can configure the policy content by referring to the following policy syntax:
{"version": "2.0","statement": [{"action": ["cls:CreateTopic","cls:DescribeTopics"],"resource": "*","effect": "allow"}]}
2. Find the created policy and click Authorize User/Group/Role in the Operation column.
3. In the displayed Authorize User/User Group/Role dialog box, select the user/user group you want to authorize and click OK.
Policies for TCOP
If you want users to view and use Tencent Cloud Observability Platform (TCOP) information in the ALB console, add the following permissions to your policy first and associate the policy with the users.
GetMonitorData: Pulls monitoring data.
DescribeCurrentTimestamp: Returns the current server timestamp.
DescribeStorageDuration: Pulls storage duration V3.
DescribeBaseMetricsForConsoleFrontEnd: Obtains basic metrics by calling the console frontend.
The detailed steps are as follows:
1. Create a custom policy based on the policy.
This policy grants users the permission to view monitoring data and obtain the current server timestamp in the ALB console. You can configure the policy content by referring to the following policy syntax:
{"version": "2.0","statement": [{"action": ["monitor:GetMonitorData","monitor:DescribeCurrentTimestamp"],"resource": "*","effect": "allow"}]}
2. Find the created policy and click Authorize User/Group/Role in the Operation column.
3. In the displayed Authorize User/User Group/Role dialog box, select the user/user group you want to authorize and click OK.
Policies for CVM
If you want users to view Cloud Virtual Machine (CVM) information in the ALB console, add the following permissions to your policy first and associate the policy with the users.
DescribeInstances: Views the instance list.
The detailed steps are as follows:
1. Create a custom policy based on the policy.
This policy grants users the permission to view the instance list in the ALB console. You can configure the policy content by referring to the following policy syntax:
{"version": "2.0","statement": [{"action": ["cvm:DescribeInstances"],"resource": "*","effect": "allow"}]}
2. Find the created policy and click Authorize User/Group/Role in the Operation column.
3. In the displayed Authorize User/User Group/Role dialog box, select the user/user group you want to authorize and click OK.
Help and Support
Was this page helpful?
You can also Contact sales or Submit a Ticket for help.
Help us improve! Rate your documentation experience in 5 mins.
Feedback