Getting Started
Download
Mode fokus
Ukuran font
This document describes how to quickly deploy GooseFS on a local device, perform debugging, and use COS as remote storage.
Prerequisites
Before using GooseFS, you need to:
1. Create a bucket in COS as remote storage. For detailed directions, please see Getting Started With the Console.
2. Install Java 8 or a later version.
3. Install SSH, ensure that you can connect to the LocalHost using SSH, and log in remotely.
4. Purchase a CVM instance as instructed in Getting Started and make sure that the disk has been mounted to the instance.
Downloading and Configuring GooseFS
1. Create and enter a local directory (you can also choose another directory as needed), and then download goosefs-1.4.2-bin.tar.gz。
$ cd /usr/local$ mkdir /service$ cd /service$ wget https://downloads.tencentgoosefs.cn/goosefs/1.4.2/release/goosefs-1.4.2-bin.tar.gz
2. Run the following command to decompress the installation package and enter the extracted directory:
$ tar -zxvf goosefs-1.4.2-bin.tar.gz$ cd goosefs-1.4.2
After the decompression, the home directory of GooseFS
goosefs-1.4.2 will be generated. This document uses ${GOOSEFS_HOME} as the absolute path of this home directory.3. Create the
conf/goosefs-site.properties configuration file in ${GOOSEFS_HOME}/conf. GooseFS provides configuration templates for AI and big data scenarios, and you can choose an appropriate one as needed. Then, enter the editing mode to modify the configuration:
(1) Use the AI template. For more information, see GooseFS Configuration Practice for a Production Environment in the AI Scenario.$ cp conf/goosefs-site.properties.ai_template conf/goosefs-site.properties$ vim conf/goosefs-site.properties
(2) Use the big data template. For more information, see GooseFS Configuration Practice for a Production Environment in the Big Data Scenario.
$ cp conf/goosefs-site.properties.bigdata_template conf/goosefs-site.properties$ vim conf/goosefs-site.properties
4. Modify the following configuration items in the configuration file
conf/goosefs-site.properties:# Common properties# Modify the master node's host informationgoosefs.master.hostname=localhostgoosefs.master.mount.table.root.ufs=${goosefs.work.dir}/underFSStorage# Security properties# Modify the permission configurationgoosefs.security.authorization.permission.enabled=truegoosefs.security.authentication.type=SIMPLE# Worker properties# Modify the worker node configuration to specify the local cache medium, cache path, and cache sizegoosefs.worker.ramdisk.size=1GBgoosefs.worker.tieredstore.levels=1goosefs.worker.tieredstore.level0.alias=SSDgoosefs.worker.tieredstore.level0.dirs.path=/datagoosefs.worker.tieredstore.level0.dirs.quota=80G# User properties# Specify the cache policies for file reads and writesgoosefs.user.file.readtype.default=CACHEgoosefs.user.file.writetype.default=MUST_CACHE
Note:
Before configuring the path parameter
goosefs.worker.tieredstore.level0.dirs.path, you need to create the path first.Running GooseFS
1. Before starting GooseFS, you need to enter the GooseFS directory and run the startup command:
$ cd /usr/local/service/goosefs-1.4.2$ ./bin/goosefs-start.sh all
After running this command, you can see the following page:
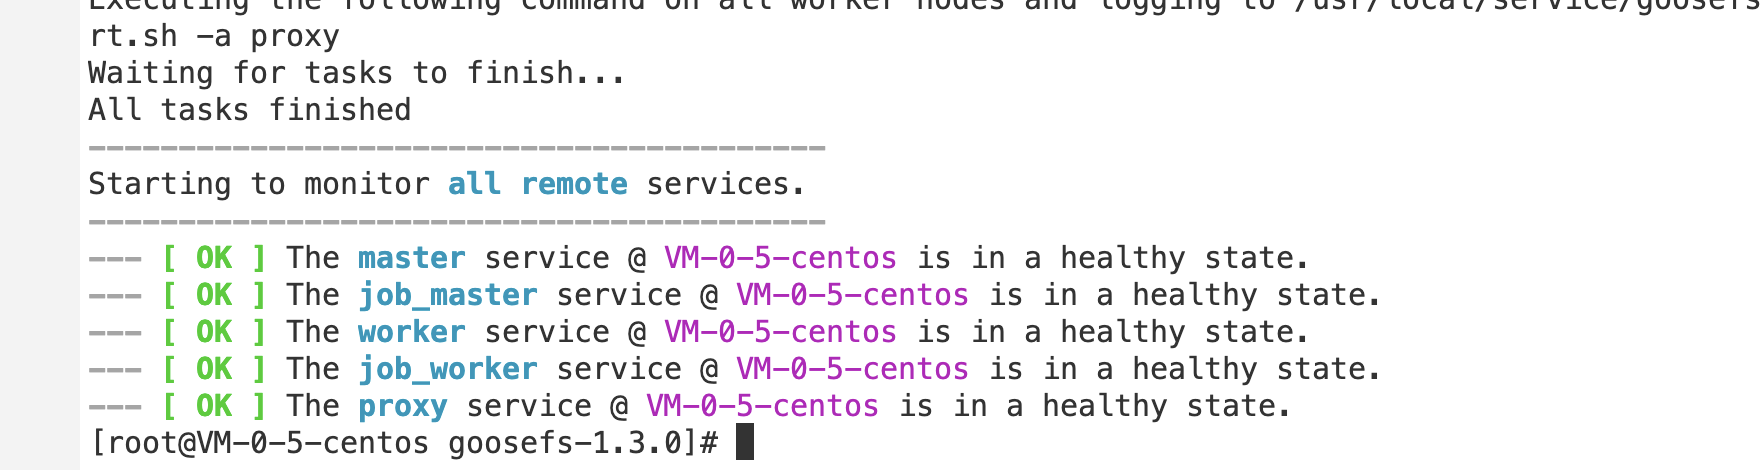
After the command above is executed, you can access
http://localhost:9201 and http://localhost:9204 to view the running status of the master and the worker, respectively.Mounting COS or Tencent Cloud HDFS to GooseFS
To mount COS or Tencent Cloud HDFS to the root directory of GooseFS, configure the required parameters of COSN/CHDFS (including but not limited to
fs.cosn.impl, fs.AbstractFileSystem.cosn.impl, fs.cosn.userinfo.secretId, and fs.cosn.userinfo.secretKey) in conf/core-site.xml, as shown below:<!-- COSN related configurations --><property><name>fs.cosn.impl</name><value>org.apache.hadoop.fs.CosFileSystem</value></property><property><name>fs.AbstractFileSystem.cosn.impl</name><value>com.qcloud.cos.goosefs.CosN</value></property><property><name>fs.cosn.userinfo.secretId</name><value></value></property><property><name>fs.cosn.userinfo.secretKey</name><value></value></property><property><name>fs.cosn.bucket.region</name><value></value></property><!-- CHDFS related configurations --><property><name>fs.AbstractFileSystem.ofs.impl</name><value>com.qcloud.chdfs.fs.CHDFSDelegateFSAdapter</value></property><property><name>fs.ofs.impl</name><value>com.qcloud.chdfs.fs.CHDFSHadoopFileSystemAdapter</value></property><property><name>fs.ofs.tmp.cache.dir</name><value>/data/chdfs_tmp_cache</value></property><!--appId--><property><name>fs.ofs.user.appid</name><value>1250000000</value></property>
Note:
For the complete configuration of COSN, please see Hadoop.
For the complete configuration of CHDFS, see Mounting CHDFS Instance.
The following describes how to create a namespace to mount COS or CHDFS.
1. Create a namespace and mount COS:
$ goosefs ns create myNamespace cosn://bucketName-1250000000/ \\--secret fs.cosn.userinfo.secretId=AKXXXXXXXXXXX \\--secret fs.cosn.userinfo.secretKey=XXXXXXXXXXXX \\--attribute fs.cosn.bucket.region=ap-xxx \\
Note:
When creating the namespace that mounts COSN, you must use the
–-secret parameter to specify the key, and use --attribute to specify all required parameters of Hadoop-COS (COSN). For the required parameters, please see Hadoop.When you create the namespace, if there is no read/write policy (rPolicy/wPolicy) specified, the read/write type set in the configuration file, or the default value (CACHE/CACHE_THROUGH) will be used.
Likewise, create a namespace to mount Tencent Cloud HDFS:
goosefs ns create MyNamespaceCHDFS ofs://xxxxx-xxxx.chdfs.ap-guangzhou.myqcloud.com/ \\--attribute fs.ofs.user.appid=1250000000--attribute fs.ofs.tmp.cache.dir=/tmp/chdfs
2. After the namespaces are created, run the
ls command to list all namespaces created in the cluster:$ goosefs ns lsnamespace mountPoint ufsPath creationTime wPolicy rPolicy TTL ttlActionmyNamespace /myNamespace cosn://bucketName-125xxxxxx/3TB 03-11-2021 11:43:06:239 CACHE_THROUGH CACHE -1 DELETEmyNamespaceCHDFS /myNamespaceCHDFS ofs://xxxxx-xxxx.chdfs.ap-guangzhou.myqcloud.com/3TB 03-11-2021 11:45:12:336 CACHE_THROUGH CACHE -1 DELETE
3. Run the following command to specify the namespace information:
$ goosefs ns stat myNamespaceNamespaceStatus{name=myNamespace, path=/myNamespace, ttlTime=-1, ttlAction=DELETE, ufsPath=cosn://bucketName-125xxxxxx/3TB, creationTimeMs=1615434186076, lastModificationTimeMs=1615436308143, lastAccessTimeMs=1615436308143, persistenceState=PERSISTED, mountPoint=true, mountId=4948824396519771065, acl=user::rwx,group::rwx,other::rwx, defaultAcl=, owner=user1, group=user1, mode=511, writePolicy=CACHE_THROUGH, readPolicy=CACHE}
Information recorded in the metadata is as follows:
No. | Parameter | Description |
1 | name | Name of the namespace |
2 | path | Path of the namespace in GooseFS |
3 | ttlTime | TTL period of files and directories in the namespace |
4 | ttlAction | TTL action to handle files and directories in the namespace. Valid values: FREE (default), DELETE |
5 | ufsPath | Mount path of the namespace in the UFS |
6 | creationTimeMs | Time when the namespace is created, in milliseconds |
7 | lastModificationTimeMs | Time when files or directories in the namespace is last modified, in milliseconds |
8 | persistenceState | Persistence state of the namespace |
9 | mountPoint | Whether the namespace is a mount point. The value is fixed to true. |
10 | mountId | Mount point ID of the namespace |
11 | acl | ACL of the namespace |
12 | defaultAcl | Default ACL of the namespace |
13 | owner | Owner of the namespace |
14 | group | Group where the namespace owner belongs |
15 | mode | POSIX permission of the namespace |
16 | writePolicy | Write policy for the namespace |
17 | readPolicy | Read policy for the namespace |
Loading Table Data to GooseFS
1. You can load Hive table data to GooseFS. Before the loading, attach the database to GooseFS using the following command:
$ goosefs table attachdb --db test_db hive thrift://172.16.16.22:7004 test_for_demo
Note:
Replace
thrift in the command with the actual Hive Metastore address.2. After the database is attached, run the
ls command to view information about the attached database and table:$ goosefs table ls test_db web_pageOWNER: hadoopDBNAME.TABLENAME: testdb.web_page (wp_web_page_sk bigint,wp_web_page_id string,wp_rec_start_date string,wp_rec_end_date string,wp_creation_date_sk bigint,wp_access_date_sk bigint,wp_autogen_flag string,wp_customer_sk bigint,wp_url string,wp_type string,wp_char_count int,wp_link_count int,wp_image_count int,wp_max_ad_count int,)PARTITIONED BY ()LOCATION (gfs://172.16.16.22:9200/myNamespace/3000/web_page)PARTITION LIST ({partitionName: web_pagelocation: gfs://172.16.16.22:9200/myNamespace/3000/web_page})
3. Run the
load command to load table data:$ goosefs table load test_db web_pageAsynchronous job submitted successfully, jobId: 1615966078836
The loading of table data is asynchronous. Therefore, a job ID will be returned. You can run the
goosefs job stat <Job Id> command to view the loading progress. When the status becomes "COMPLETED", the loading succeeds.Using GooseFS for Uploads/Downloads
1. GooseFS supports most file system−related commands. You can run the following command to view the supported commands:
$ goosefs fs
2. Run the
ls command to list files in GooseFS. The following example lists all files in the root directory:$ goosefs fs ls /
3. Run the
copyFromLocal command to copy a local file to GooseFS:$ goosefs fs copyFromLocal LICENSE /LICENSECopied LICENSE to /LICENSE$ goosefs fs ls /LICENSE-rw-r--r-- hadoop supergroup 20798 NOT_PERSISTED 03-26-2021 16:49:37:215 0% /LICENSE
4. Run the
cat command to view the file content:$ goosefs fs cat /LICENSEApache LicenseVersion 2.0, January 2004http://www.apache.org/licenses/TERMS AND CONDITIONS FOR USE, REPRODUCTION, AND DISTRIBUTION...
5. By default, GooseFS uses the local disk as the underlying file system. The default file system path is
./underFSStorage. You can run the persist command to store files to the local system persistently as follows:$ goosefs fs persist /LICENSEpersisted file /LICENSE with size 26847
Using GooseFS to Accelerate Uploads/Downloads
1. Check the file status to determine whether a file is cached. The file status
PERSISTED indicates that the file is in the memory, and NOT_PERSISTED indicates not.$ goosefs fs ls /data/cos/sample_tweets_150m.csv-r-x------ staff staff 157046046 NOT_PERSISTED 01-09-2018 16:35:01:002 0% /data/cos/sample_tweets_150m.csv
2. Count how many times “tencent” appeared in the file and calculate the time consumed:
$ time goosefs fs cat /data/s3/sample_tweets_150m.csv | grep-c tencent889real 0m22.857suser 0m7.557ssys 0m1.181s
3. Caching data in memory can effectively speed up queries. An example is as follows:
$ goosefs fs ls /data/cos/sample_tweets_150m.csv-r-x------ staff staff 157046046ED 01-09-2018 16:35:01:002 0% /data/cos/sample_tweets_150m.csv$ time goosefs fs cat /data/s3/sample_tweets_150m.csv | grep-c tencent889real 0m1.917suser 0m2.306ssys 0m0.243s
The data above shows that the system delay is reduced from 1.181s to 0.243s, achieving a 10-times improvement.
Shutting Down GooseFS
Run the following command to shut down GooseFS:
$ ./bin/goosefs-stop.sh local
Bantuan dan Dukungan
Apakah halaman ini membantu?
Anda juga dapat Menghubungi Penjualan atau Mengirimkan Tiket untuk meminta bantuan.
masukan