tencent cloud

HashiCorp Nomad on the Tencent Cloud

March 2021 | Last Update: March 2021

Overview

This guide provides step-by-step instructions for deploying HashiCorp Nomad on Tencent Cloud. It describes a global solution for deploying containers and legacy applications, detecting and utilizing resources, and federating clusters in multiple regions. This guide is based on the open-source version of Nomad.
HashiCorp Nomad is a simple and flexible workload orchestrator to deploy and manage containers and non-containerized applications across on-prem and clouds at scale. Nomad is ideal for the following use cases:
  • Simple container orchestration, to easily handle applications deployment and recover failed applications automatically.
  • Non-containerized application orchestration, to run non-containerized applications and high-performance batch workloads with zero downtime through a single workflow.
  • Automated service networking with Consul, to integrate Consul agents automatically and provide built-in service for discovery, registration, and monitoring with secure service-to-service communication.
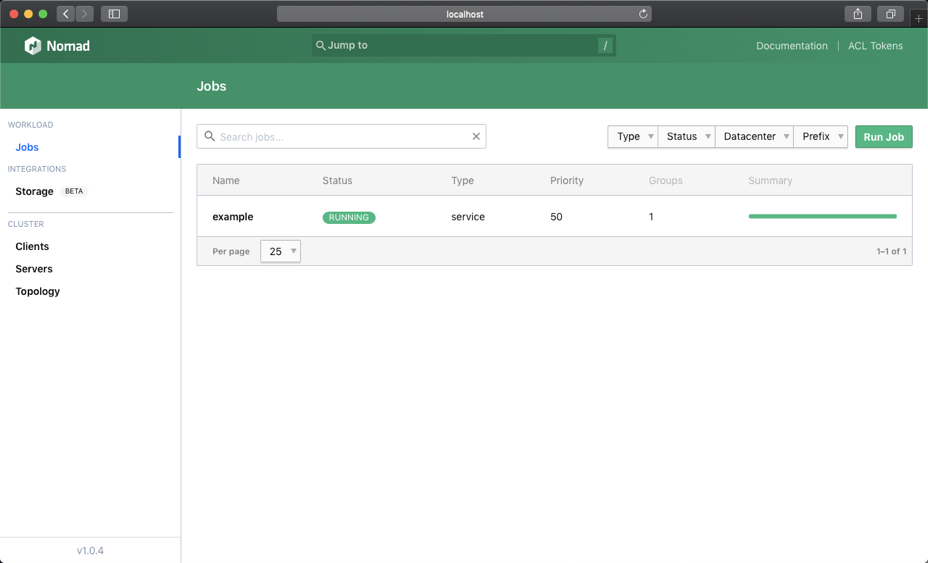
  • The key features of Nomad are:
  • Containers and Legacy Applications Deployment: Nomad can run containers, legacy, and batch applications together and achieve zero downtime deployments and utilization optimization on the same infrastructure without the needs of pluggable task drivers.
  • Simple & Reliable: Nomad runs as a single binary, combining resource management and scheduling into a single system. Nomad is easy to operate and manage on-prem or in the cloud without the need of external storage and coordination.
  • Device Plugins & GPU Support: Nomad can automatically detect and make device available to task and offers built-in support for GPU or other specialized workloads such as machine learning and AI.
  • Federation for Multi-Region: Nomad can use a single command to link clusters for multi-region, multi-cloud federation. Nomad runs as a single unified control plane to achieve applications deployment and replication of policies and namespaces in any cluster or region.
  • Proven Scalability: Nomad can easily scale up and down globally without complexity. Nomad has been proven the capability of having 10K+ clusters in real-world production environment.
  • HashiCorp Ecosystem: Nomad integrates with HashiCorp products seamlessly such as Terraform, Consul, and Vault.
Detailed instructions and screen illustrations are available on the HashiCorp Nomad website.

Costs and Licenses

You are responsible for the cost of the Tencent Cloud services used while running the reference deployment. You can customize the configuration parameters of the reference mentioned below, such as instance type, storage size, bandwidth, which will affect the cost of deployment. Adding additional Tencent Cloud services to your deployment will also affect the cost. Please refer to Tencent Cloud service pricing documentation for cost estimates.
This guide uses the open-source version of HashiCorp Nomad, which doesn’t require a license fee.

Prerequisites

Deployment Steps

Step 1. Prepare a Tencent Cloud Account
If you don’t already have a Tencent Cloud account, create one at our Sign Up page by following on-screen instructions.
Step 2. Create a CVM instance
After you log in your Tencent Cloud account, create a CVM instance on Cloud Virtual Machine page.
In the guide, we launched an instance using the configuration in Table 1. You can change the configuration based on your needs. Please note that you are responsible for the cost of using any Tencent Cloud CVM services. Changing the configuration will also influence the cost.
Step 3. Access Cloud Virtual Machine via SSH
To access the remote virtual environment and install Nomad, use an SSH agent to forward our private key on connection. Visit GitHub documentation for more information on SSH agents.
1. Add your SSH private key to the ssh-agent. If you created your key with a different name, or if you are adding an existing key that has a different name, put the name of your private key file instead of id_ed25519 in the command.
2. In the Tencent Cloud CVM console, find the public IP address of the CVM you created for Nomad.
In the example above, the public IP address is 170.106.101.25
3. Type the command ssh -A ubuntu@170.106.101.25 and remotely log in your instance. Replace the public IP address in the command with your own IP address. If it’s your first time remotely access this instance, type yes when prompted to continue connecting.
$ ssh -A ubuntu@170.106.101.25
Step 4. Install HashiCorp Nomad
Nomad can be installed as a pre-compiled binary or as a package for several operating systems. This guide installs Nomad as a pre-compiled binary manually. You can find other installation methods on Install Nomad.
1. Download the appropriate package for your system from HashiCorp Nomad website. The reference instance uses an Ubuntu 18.04.4 LTS 64bit system, so here we download Linux 64-bit version of Nomad.
$ wget https://releases.hashicorp.com/nomad/1.0.4/nomad_1.0.4_linux_amd64.zip
2. Unzip the file into any directory. The Nomad binary inside needs no additional files to run Nomad.
$ unzip nomad_1.0.4_linux_amd64.zip
3. To access Nomad the binary from the command-line, place it somewhere on your path. If you intend to permanently add a directory to your path, see solutions on Stack overflow.
$ sudo mv nomad /usr/bin/
To verify Nomad is properly installed, run nomad -v on your system. You will be able to see the version of HashiCorp Nomad illustrated in the figure above.
Step 5. Start Nomad and Run Your First Job
Nomad agent runs either in server or client mode. Agents in server mode oversee the cluster—managing all jobs and clients and running evaluations and creating task allocations. All other agents should be in client mode. A Nomad client is responsible for registering itself with the server and runs the tasks server appoints. Each node in the cluster must have a running agent in order to assign the work.
This guide starts the Nomad agent in development mode for simplicity. This mode is useful for testing and setting a single Nomad agent environment efficiently. It is not intended to be used in production as data loss is inevitable in a failure scenario.
1. Use the nomad agent -dev command to start a single Nomad agent in development mode. Add sudo if root level privilege is needed. Set the value of -bind flag to 0.0.0.0 and -log-level to INFO. The command starts the agent in both server and client mode. Wait until the agent has acquired leadership.
$ sudo nomad agent -dev -bind 0.0.0.0 -log-level INFO
2. To inspect registered nodes of the Nomad cluster, run the nomad node status command in another terminal session. You have created one local agent in the previous step, so you should only see one node in the ready state.
$ nomad node status
3. When using Nomad, you can run the nomad server members command to check the members of the gossip ring. In this case, since the agent is also in server mode, you should see one node alive from the output along with the address of the agent, health state, version information, datacenter, and region. Add -detailed flag so that it shows you additional metadata.
$ nomad server members
4. Now, use the nomad job init command to generate a sample job file. It contains a Redis task and uses the Docker driver to run a Redis container.
$ nomad job init
5. Command nomad job run is used both to create new jobs and update existing jobs. To register the example job, first verify Docker is installed on your Nomad client nodes or -dev agent node. Then, running the job with the nomad job run command. As this is a new job, Nomad creates an allocation and schedules it on your local agent.
$ nomad job run example.nomad
6. After the example file has been created, run nomad job status example to view your job status.
$ nomad job status example
7. To view an allocation, copy the allocations ID from the previous step, and change the ID in the nomad alloc status command.
$ nomad alloc status 0f778005
8. Each task’s log files can be viewed by using the nomad alloc logs command. Replace the allocation ID in the command and fetch the logs from the redis job. Put -stderr flag before the allocation ID if you want to see stderr log.
$ nomad alloc logs 0f778005
Step 6. Scale and Update a Job
Nomad can easily scale up and down globally without complexity. You may edit example.nomad file to update an application, scale with load, or modify the container. This step shows you how to update the count and scale up to 3 nodes.
1. Edit the example.nomad file you created in the previous steps and update the count to 3. You can find this parameter in cache section.
2. Use the nomad job plan command to inspect what would happen if you execute the plan. The output indicates two allocations need to be created and one in-place allocation needs to be updated. Updating in-place allocation causes no service interruption.
$ nomad job plan example.nomad
3. Run nomad job run -check-index 204 example.nomad to execute the plan. Grad the Job Modify Index from the output in the previous step and replace it with 204. Add -check-index flag to ensure the existing jobs haven’t changed status before you apply your execution.
$ nomad job run -check-index 204 example
4. Now, you can check how many instances are up and running by using the nomad job status command. The output should show there are three jobs in Allocations section.
$ nomad job status example
Step 7. Access the Nomad Web UI
1. Use command ssh -L 4646:170.106.101.25:4646 ubuntu@170.106.101.25 to open an SSH tunnel from your local workstation.
$ ssh -L 4646:170.106.101.25:4646 ubuntu@170.106.101.25
Step 8. Nomad Featured Tutorials
To integrate Nomad with your specific environment, please see more detailed deployment guide on Nomad Featured Tutorials from HashiCorp Nomad official website.

Additional Resources

Tencent Cloud ServicesHashiCorp Nomad
Contact Us

Contact our sales team or business advisors to help your business.

Technical Support

Open a ticket if you're looking for further assistance. Our Ticket is 7x24 avaliable.

7x24 Phone Support
Hong Kong, China
+852 800 906 020 (Toll Free)
United States
+1 844 606 0804 (Toll Free)
United Kingdom
+44 808 196 4551 (Toll Free)
Canada
+1 888 605 7930 (Toll Free)
Australia
+61 1300 986 386 (Toll Free)
Korea
+82 18773248 (Monday-Friday, local time 9:00-18:00)
Japan
+81 368979302(Monday-Friday, local time 9:00-18:00)
EdgeOne hotline
+852 300 80699
More local hotlines coming soon