Codex
Baixar
Modo Foco
Tamanho da Fonte
Codex is a next-generation AI-powered programming assistant developed by OpenAI. Built on the GPT architecture, it serves as a powerful code generation engine. Using deep learning technology, Codex can understand natural language and convert it into high-quality code, supporting multiple programming languages such as Python, JavaScript, and Java. This document describes how to configure and use the Tencent Cloud Large Language Model Token Plan Enterprise Edition in Codex.
Prerequisites
Before you start the configuration, ensure that you have completed the following preparations:
2. Obtain the model configuration: models available for the Pro Plan and models available for the Lite Plan.
Installing Codex
Because the Token Plan does not currently support the Responses protocol, please install the Codex version that supports Chat.
Version Requirements (Required Reading):
The Token Plan only supports the Chat/Completions API. However, the new version of Codex has switched to the Responses API and no longer supports the former. To use the Token Plan in Codex, install version 0.80.0 or an earlier version. For details, refer to the official Codex documentation.
Codex is installed via npm, which requires Node.js (version 18 or later recommended) to be installed first. If Node.js is not installed, visit the Node.js official website to download the LTS version.
Run the following command in the terminal to install Codex.
npm install -g @openai/codex@0.80.0
Run the following command in the terminal. If the version number is output, the installation is successful.
codex --version
Configuring Token Plan Enterprise Edition
Copy the following content in its entirety and paste it into the Codex configuration file
~/.codex/config.toml.1. Locate the Codex configuration file. The configuration file path is as follows. If the configuration file does not exist, create it.
macOS/Linux:
~/.codex/config.toml.Windows:
C:\\Users\\<username>\\.codex\\config.toml.2. Copy the following content and paste it into the config.toml configuration file. Select the corresponding configuration based on the plan you have purchased and the region where it is activated. Replace
$model_id with the required Model ID. For the complete model list, see models available for the Pro Plan and models available for the Lite Plan.model_provider = "Enterprise_Token_Plan"model = "$model_id"[model_providers.Enterprise_Token_Plan]name = "Enterprise Token Plan"base_url = "https://tokenhub.tencentcloudmaas.com/plan/v3"env_key = "Enterprise_Token_Plan_API_KEY"wire_api = "chat"
model_provider = "Enterprise_Token_Plan"model = "$model_id"[model_providers.Enterprise_Token_Plan]name = "Enterprise Token Plan"base_url = "https://tokenhub-intl.tencentcloudmaas.com/plan/v3"env_key = "Enterprise_Token_Plan_API_KEY"wire_api = "chat"
Configuring Environment Variables
Set the Enterprise_Token_Plan_API_KEY environment variable to your API Key in the command line.
Run the following command in the terminal to view the default Shell type.
echo $SHELL
Set the environment variable based on the Shell type. The command is as follows:
echo 'export Enterprise_Token_Plan_API_KEY="USER_API_KEY"' >> ~/.zshrc# Configure to take effect.source ~/.zshrc
echo 'export Enterprise_Token_Plan_API_KEY="USER_API_KEY"' >> ~/.bash_profile# Configure to take effect.source ~/.bash_profile
# Replace USER_API_KEY with your API Key.setx Enterprise_Token_Plan_API_KEY "USER_API_KEY"# Open a new CMD window to check whether it takes effect.echo %Enterprise_Token_Plan_API_KEY%
# Replace USER_API_KEY with your API Key.[Environment]::SetEnvironmentVariable("TP_ENT_API_KEY", "USER_API_KEY", [EnvironmentVariableTarget]::User)# Open a new window to verify whether it takes effect.echo $env:TP_ENT_API_KEY
Using Codex
1. Run the following command in the terminal and press Enter to start the Codex tool.
codex
2. Select Skip to skip.
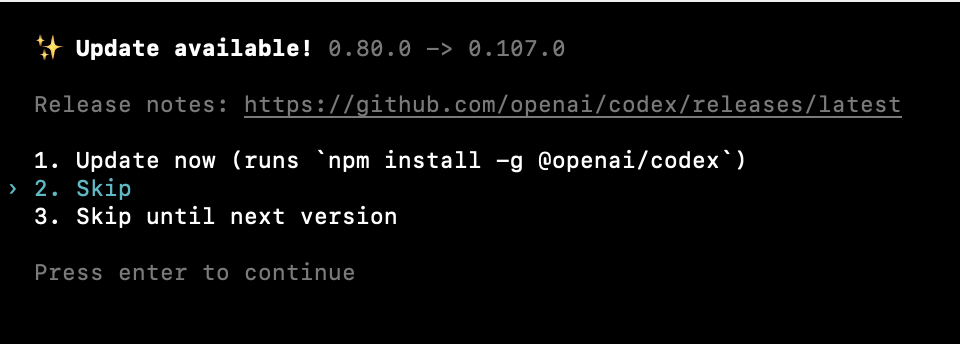
3. You can enter a question or command to start the conversation.
Ajuda e Suporte
Esta página foi útil?
Você também pode entrar em contato com a Equipe de vendas ou Enviar um tíquete em caso de ajuda.
comentários