iOS
下载
聚焦模式
字号
欢迎阅读 Tencent RTC Engine SDK 迁移指南。本文旨在协助开发者将基于 Twilio Video SDK 的实施方案高效迁移到 Tencent RTC Engine SDK。我们将通过详细的技术架构差异分析、迁移准备指引、核心功能迁移示例以及进阶功能对比,帮助您实现快速且无缝的迁移。如果您计划为新项目接入 Tencent RTC Engine SDK,我们建议您从 快速入门指南 开始学习;如果您想了解 Tencent RTC Engine 的更多信息,我们建议您访问 产品概述。
基本概念与技术架构差异
基本概念对比
本节对 Tencent RTC Engine 和 Twilio Video 服务过程中可能涉及到的一些基本概念进行了对比。要了解更多关于 Tencent RTC Engine 概念信息,请访问 基本概念。
概念 | Tencent RTC Engine | Twilio Video | 说明 |
房间 | Room | Room | 将 RTC 参与者联系在一起的会话空间。Tencent RTC 使用 roomId(数字) 或 strRoomId(字符串),Twilio 使用 roomName(字符串) |
用户 | User | Participant | 参与音视频通话的用户 |
主播 | Anchor | — | 拥有推流权限的用户类型,可向服务端推送和接收音视频流 |
观众 | Audience | — | 只能接收音视频流的用户类型 |
应用标识 | SDKAppID | Account SID | 应用唯一标识 |
鉴权凭证 | UserSig | Access Token | 客户端鉴权凭证 |
用户标识 | userId | Identity | 用户唯一标识 |
核心入口类 | TRTCCloud | Video (类) | SDK 核心入口类 |
技术架构差异
Twilio Video 架构
Twilio Video 采用 Track-based(基于轨道) 架构:
开发者需要显式创建
LocalAudioTrack、LocalVideoTrack通过
ConnectOptions.Builder 传入轨道列表来发布远端轨道通过
RemoteParticipant.Listener 的回调来订阅使用
VideoSink / VideoView 来渲染视频Tencent RTC Engine 架构
Tencent RTC Engine 采用 API-driven(API 驱动) 架构:
通过
TRTCCloud 单例直接调用 startLocalPreview()、startLocalAudio() 来采集发布远端流的订阅通过
TRTCCloudListener 的回调 + startRemoteView() 来完成使用
TXCloudVideoView 来渲染视频不需要显式创建和管理轨道对象
因此, Tencent RTC Engine 的 API 更加简洁,减少了对象管理的复杂性。
迁移准备
步骤1. 开通服务
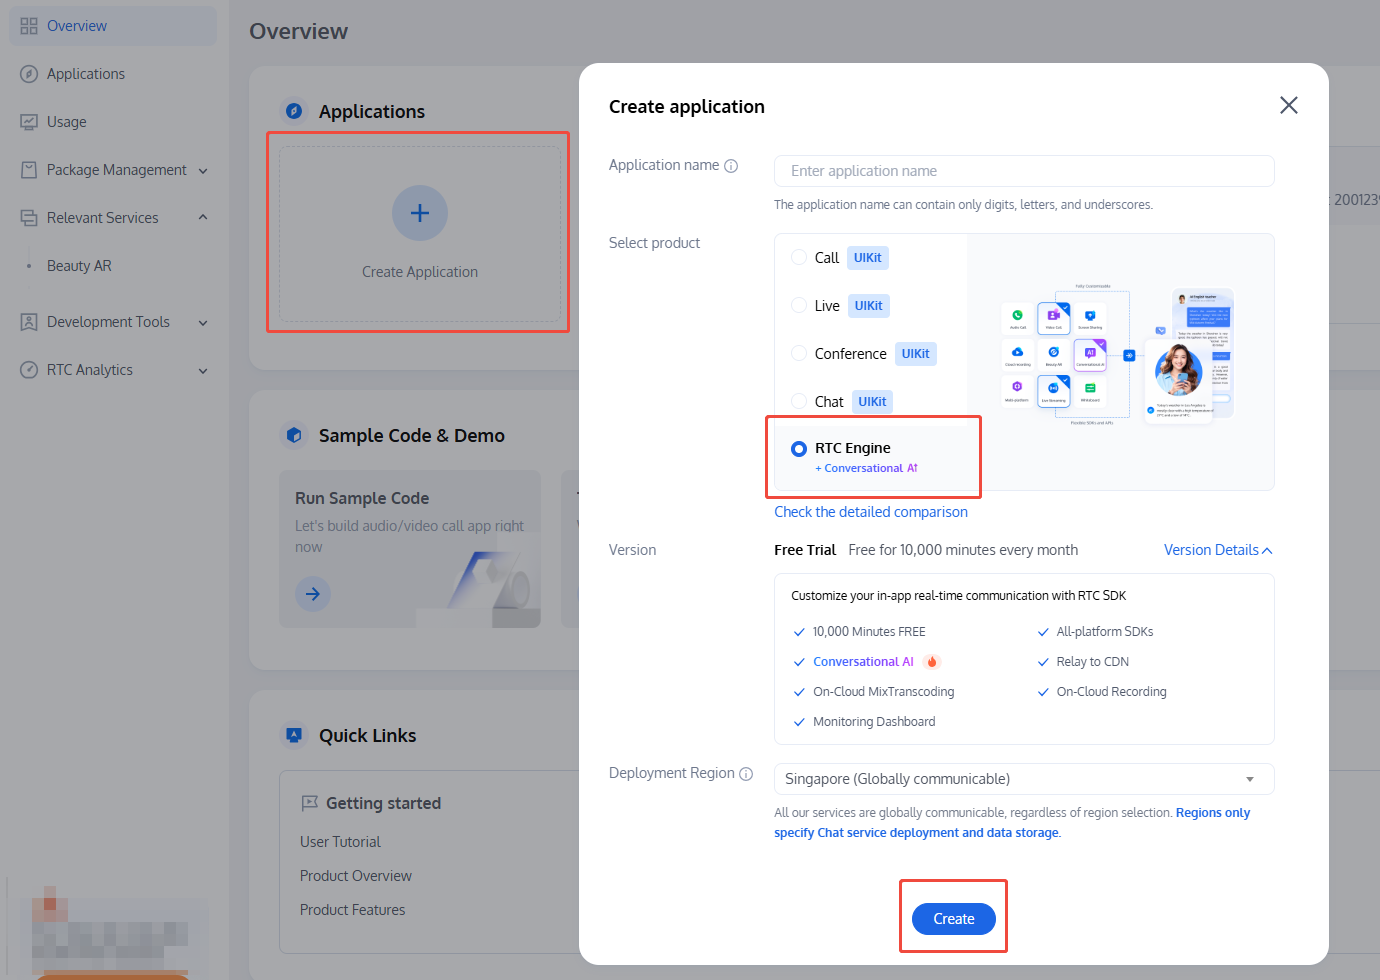
要访问 Tencent RTC Engine 服务,需要创建一个 Tencent RTC Engine 应用程序及其凭据。您可以按照以下步骤在 Tencent RTC 控制台中创建新的 Tencent RTC Engine 应用程序:
1. 注册或登录您的 Tencent RTC 账号,并登录到 Tencent RTC 控制台。
2. 点击 Create Application。
3. 在创建弹窗中,输入您的应用程序名称,选择 RTC Engine,点击 Create。
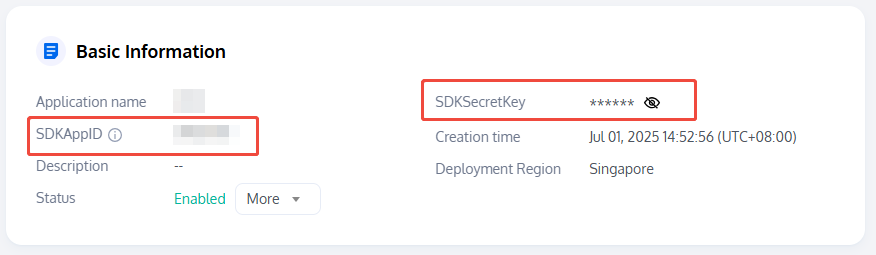
应用程序创建后,可在 Basic Information 获取以下凭证:
SDKAppID:自动生成的应用 ID,用于唯一标识您的 Tencent RTC 应用程序。
SDKSecretKey:用于生成安全签名 UserSig 的关键参数,用于保障 Tencent RTC 服务的安全访问。
说明:
关于鉴权对比:Twilio Video 使用 Access Token 进行身份验证,而 Tencent RTC 使用 UserSig。两者都是由服务端生成的时效性签名凭证,但生成方式不同。详见 UserSig 鉴权文档。
步骤2. 导入 SDK
原 Twilio Podfile(参考)
source 'https://github.com/CocoaPods/Specs'platform :ios, '12.2'target 'TARGET_NAME' dopod 'TwilioVideo', '~> 5'end
Tencent RTC Engine SDK (新依赖)
CocoaPods(推荐)
1. 如未安装 CocoaPods,请先安装:
sudo gem install cocoapods
2. 进入项目根目录,创建 Podfile:
pod init
3. 在 Podfile 中添加 TRTC SDK 依赖:
platform :ios, '9.0'target 'YourApp' dopod 'TXLiteAVSDK_TRTC', :podspec => 'https://liteav.sdk.qcloud.com/pod/liteavsdkspec/TXLiteAVSDK_TRTC.podspec'end
4. 安装 SDK:
pod install
5.
pod install 执行完成后,会生成新的 .xcworkspace 工程文件,双击打开.xcworkspace 文件进行后续工作。步骤3. 配置工程
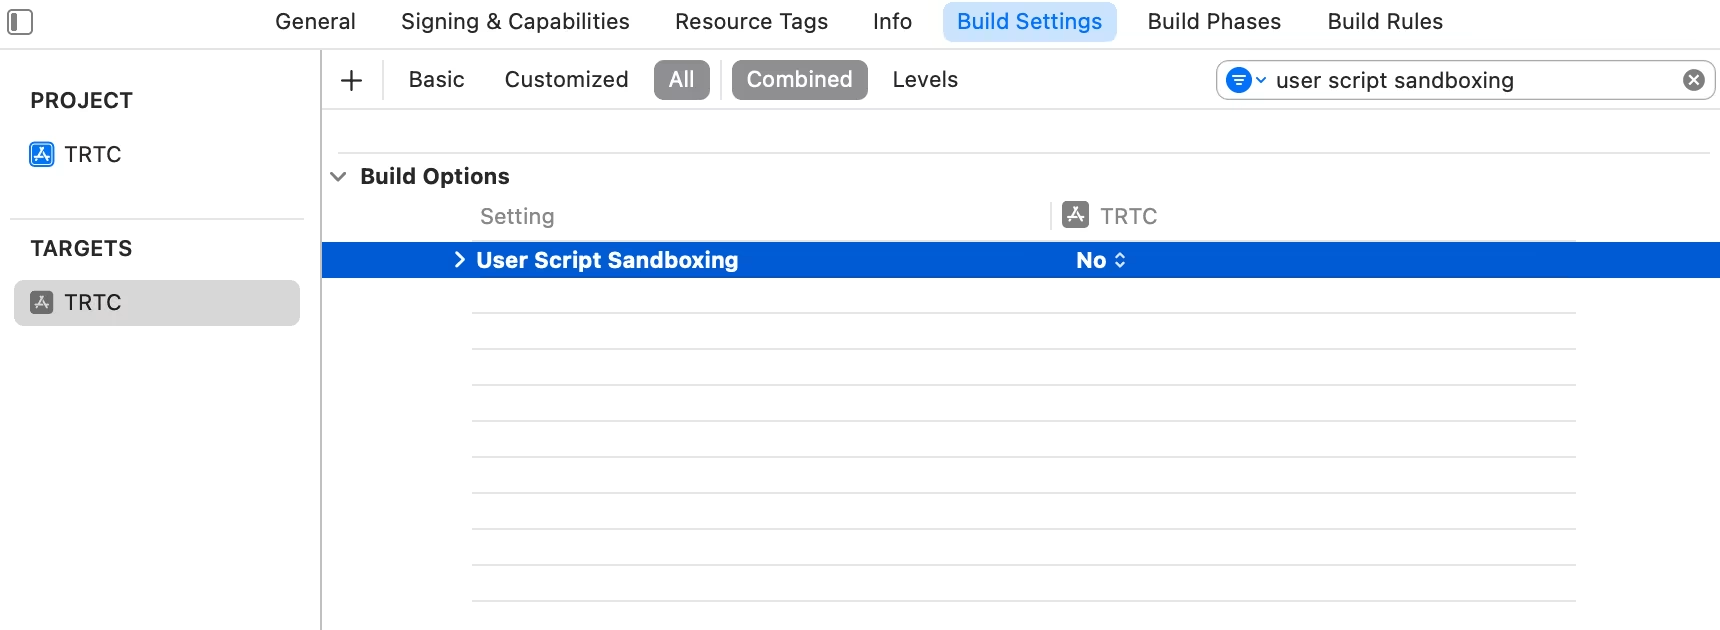
1. 打开 .xcworkspace 工程文件后,在 Xcode 的导航栏中点击左侧的 Project Navigator,点击您的项目名称并确保在编辑区域选择正确的 TARGETS。
2. 在 Build Settings 选项卡中搜索 User Script Sandboxing,将其值置为 No,以允许用户脚本访问更广泛的系统资源和文件。
3. 在
Info.plist 选项卡中添加 Privacy-Microphone Usage Description 和 Privacy-Camera Usage Description ,并填入 Microphone/Camera 使用的目标提示语,获取麦克风和摄像头的使用权限。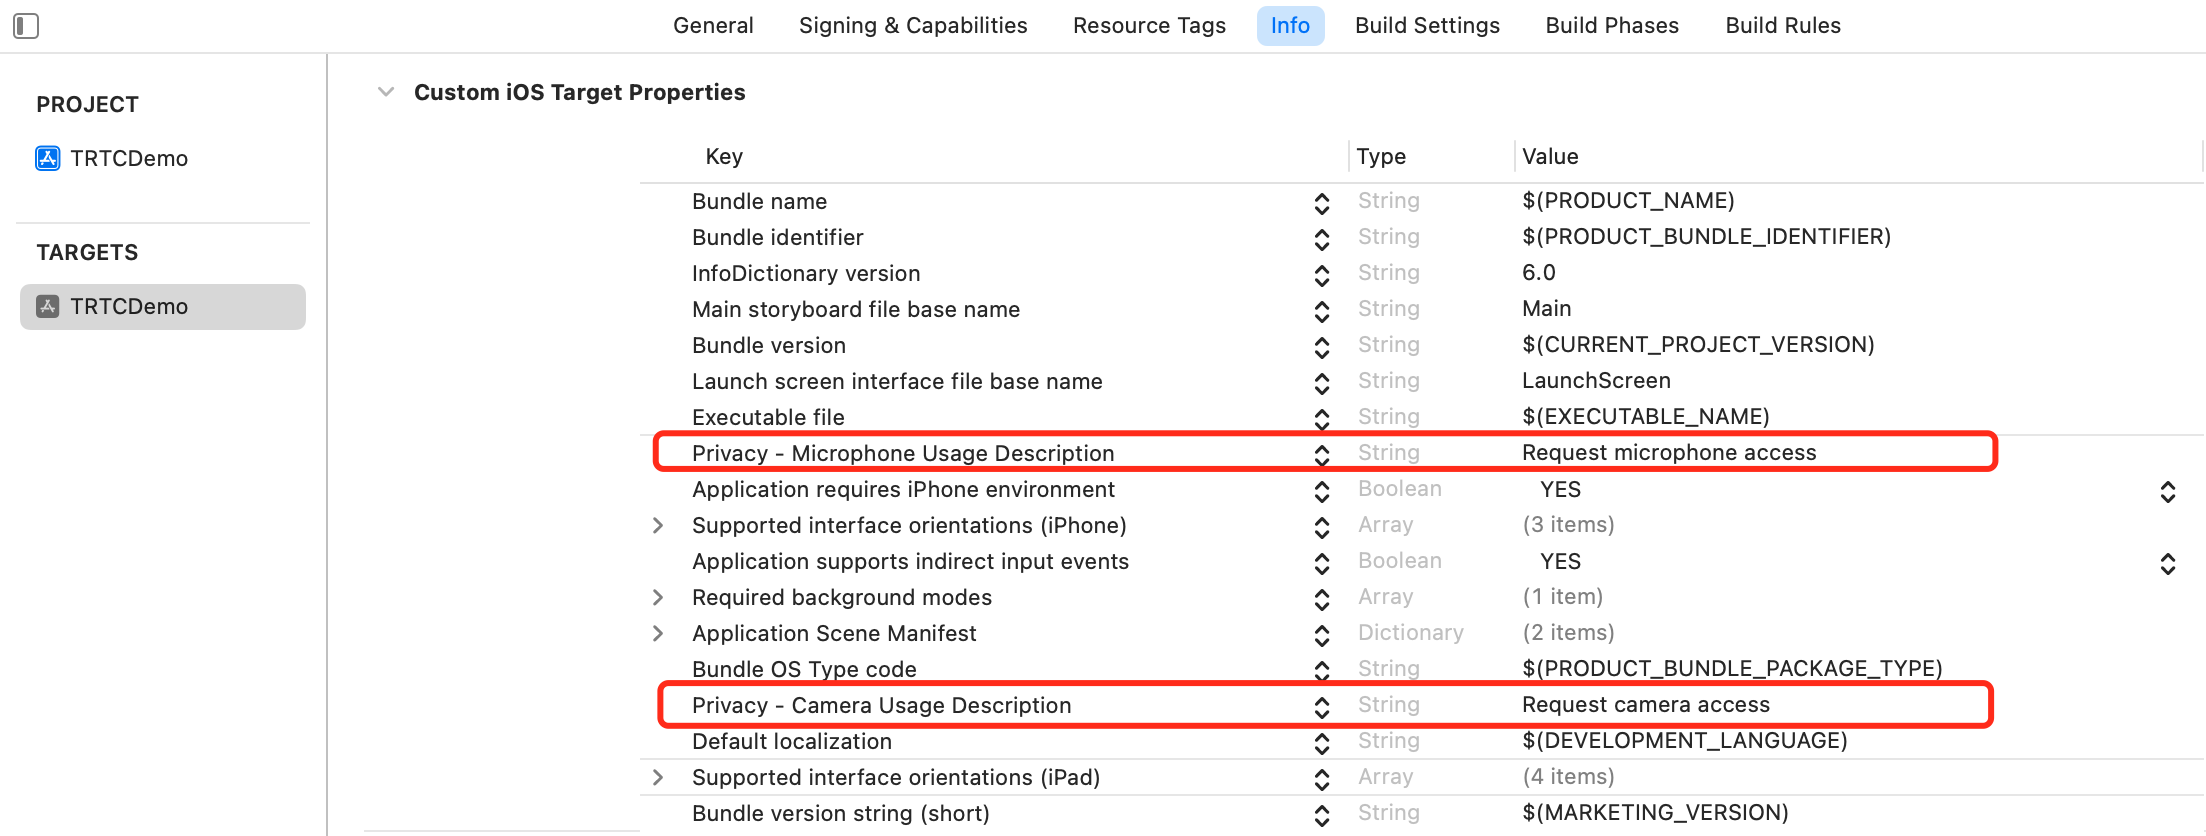
4. 在
Signing & Capabilities 选项卡中添加 Background Modes,并勾选 Audio,AirPlay and Picture in Picture,以允许应用在后台运行音频、AirPlay 和画中画功能。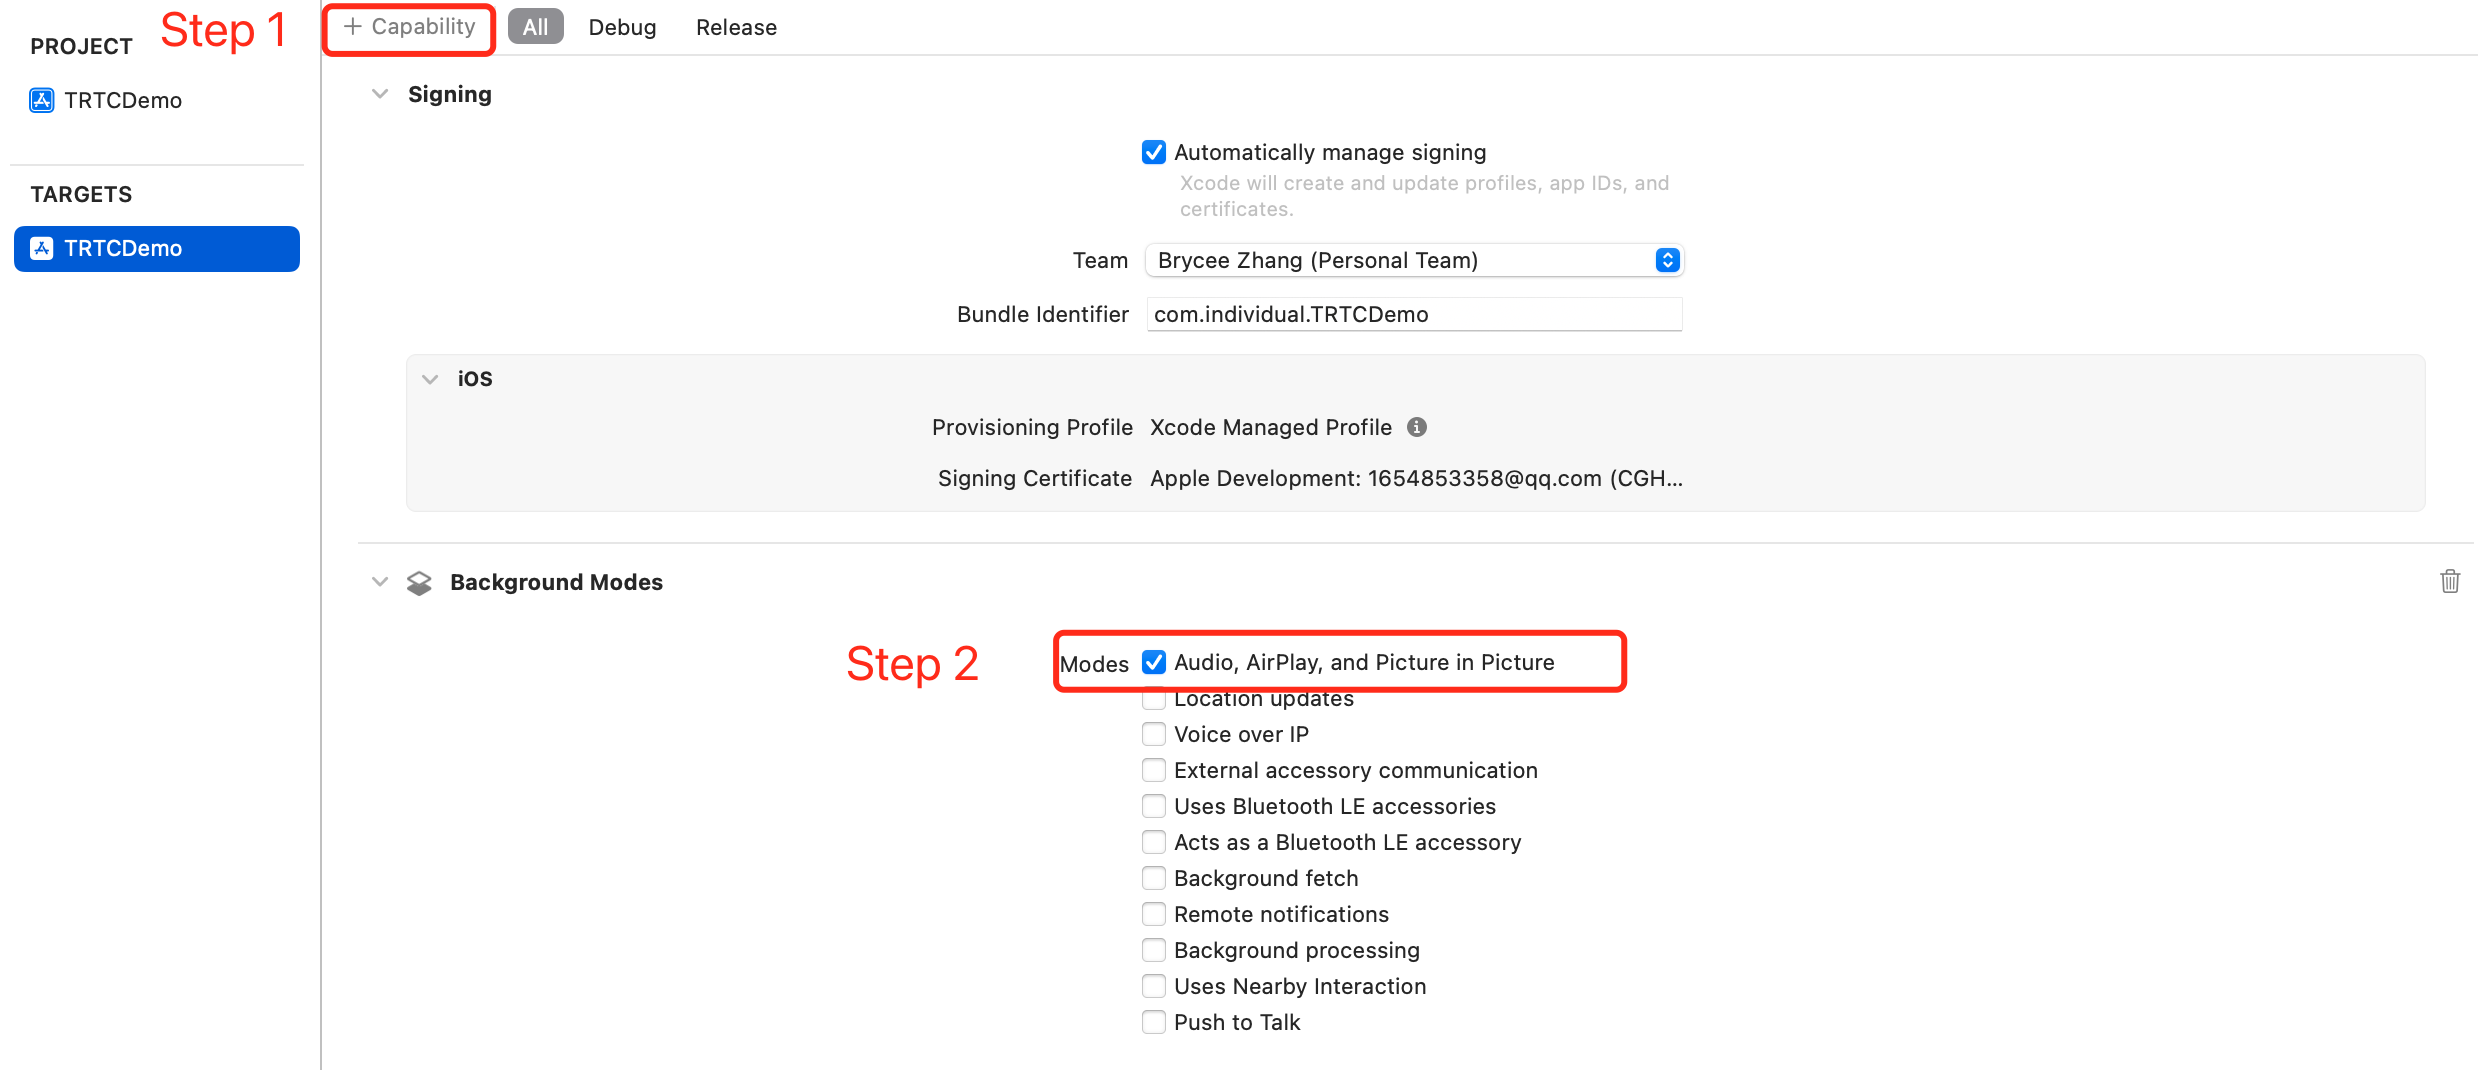
迁移指引
步骤4. 初始化 SDK 实例并设置事件监听
Twilio Video
import TwilioVideoclass TwilioVideoManager {var room: Room?var localVideoTrack: LocalVideoTrack?var localAudioTrack: LocalAudioTrack?init() {// Twilio SDK 不需要显式初始化}}
腾讯云 RTC
import TXLiteAVSDK_TRTCclass TRTCManager: NSObject {// 获取 TRTCCloud 单例let trtcCloud = TRTCCloud.sharedInstance()override init() {super.init()// 设置事件回调代理trtcCloud.delegate = self}}
#import <TXLiteAVSDK_TRTC/TRTCCloud.h>@interface TRTCManager : NSObject <TRTCCloudDelegate>@property (nonatomic, strong) TRTCCloud *trtcCloud;@end@implementation TRTCManager- (instancetype)init {self = [super init];if (self) {// 获取 TRTCCloud 单例_trtcCloud = [TRTCCloud sharedInstance];// 设置事件回调代理_trtcCloud.delegate = self;}return self;}@end
步骤5. 进入房间
Twilio Video
@IBAction func connectToRoom(sender: AnyObject) {let connectOptions = ConnectOptions(token: accessToken) { (builder) inbuilder.roomName = "my-room"}room = TwilioVideoSDK.connect(options: connectOptions, delegate: self)}
腾讯云 RTC
func enterRoom(sdkAppId: UInt32, roomId: UInt32, userId: String, userSig: String) {// 配置房间参数let params = TRTCParams()params.sdkAppId = sdkAppIdparams.roomId = roomIdparams.userId = userIdparams.userSig = userSigparams.role = .anchor // 主播角色可发布流// 进入房间,指定场景// .videoCall - 视频通话场景// .audioCall - 语音通话场景// .LIVE - 直播场景// .voiceChatRoom - 语音聊天室场景trtcCloud.enterRoom(params, appScene: .LIVE)}
- (void)enterRoomWithSdkAppId:(UInt32)sdkAppIdroomId:(UInt32)roomIduserId:(NSString *)userIduserSig:(NSString *)userSig {// 配置房间参数TRTCParams *params = [[TRTCParams alloc] init];params.sdkAppId = sdkAppId;params.roomId = roomId;params.userId = userId;params.userSig = userSig;params.role = TRTCRoleAnchor; // 主播角色可发布流// 进入房间,指定场景// TRTCAppSceneVideoCall - 视频通话场景// TRTCAppSceneAudioCall - 语音通话场景// TRTCAppSceneLIVE - 直播场景// TRTCAppSceneVoiceChatRoom - 语音聊天室场景[self.trtcCloud enterRoom:params appScene:TRTCAppSceneLIVE];}
步骤6. 实现事件回调方法
Twilio Video
extension TwilioVideoManager: RoomDelegate {// 成功连接房间func roomDidConnect(room: Room) {print("已连接到房间: \\(room.name)")}// 断开连接func roomDidDisconnect(room: Room, error: Error?) {print("已断开房间连接")}// 连接失败func roomDidFailToConnect(room: Room, error: Error) {print("连接失败: \\(error.localizedDescription)")}// 远端参与者加入func participantDidConnect(room: Room, participant: RemoteParticipant) {print("参与者加入: \\(participant.identity)")}// 远端参与者离开func participantDidDisconnect(room: Room, participant: RemoteParticipant) {print("参与者离开: \\(participant.identity)")}}
腾讯云 RTC
extension TRTCManager: TRTCCloudDelegate {// 进房结果回调// result > 0: 成功,耗时毫秒数// result < 0: 失败,错误码func onEnterRoom(_ result: Int) {if result > 0 {print("进房成功,耗时: \\(result)ms")} else {print("进房失败,错误码: \\(result)")}}// 退房回调// reason: 0 - 主动退出, 1 - 被踢出, 2 - 房间解散func onExitRoom(_ reason: Int) {print("退房,原因: \\(reason)")}// 错误回调func onError(_ errCode: TXLiteAVError, errMsg: String?, extInfo: [AnyHashable: Any]?) {print("错误: \\(errCode.rawValue) - \\(errMsg ?? "")")}// 远端用户进房func onRemoteUserEnterRoom(_ userId: String) {print("远端用户进入: \\(userId)")}// 远端用户退房func onRemoteUserLeaveRoom(_ userId: String, reason: Int) {print("远端用户离开: \\(userId), 原因: \\(reason)")}// 远端用户视频可用状态变化func onUserVideoAvailable(_ userId: String, available: Bool) {print("用户 \\(userId) 视频可用: \\(available)")}// 远端用户音频可用状态变化func onUserAudioAvailable(_ userId: String, available: Bool) {print("用户 \\(userId) 音频可用: \\(available)")}}
#pragma mark - TRTCCloudDelegate// 进房结果回调// result > 0: 成功,耗时毫秒数// result < 0: 失败,错误码- (void)onEnterRoom:(NSInteger)result {if (result > 0) {NSLog(@"进房成功,耗时: %ldms", (long)result);} else {NSLog(@"进房失败,错误码: %ld", (long)result);}}// 退房回调// reason: 0 - 主动退出, 1 - 被踢出, 2 - 房间解散- (void)onExitRoom:(NSInteger)reason {NSLog(@"退房,原因: %ld", (long)reason);}// 错误回调- (void)onError:(TXLiteAVError)errCode errMsg:(NSString *)errMsg extInfo:(NSDictionary *)extInfo {NSLog(@"错误: %d - %@", errCode, errMsg);}// 远端用户进房- (void)onRemoteUserEnterRoom:(NSString *)userId {NSLog(@"远端用户进入: %@", userId);}// 远端用户退房- (void)onRemoteUserLeaveRoom:(NSString *)userId reason:(NSInteger)reason {NSLog(@"远端用户离开: %@, 原因: %ld", userId, (long)reason);}// 远端用户视频可用状态变化- (void)onUserVideoAvailable:(NSString *)userId available:(BOOL)available {NSLog(@"用户 %@ 视频可用: %@", userId, available ? @"YES" : @"NO");}// 远端用户音频可用状态变化- (void)onUserAudioAvailable:(NSString *)userId available:(BOOL)available {NSLog(@"用户 %@ 音频可用: %@", userId, available ? @"YES" : @"NO");}
步骤7. 采集并发布本地流
Twilio Video
// MARK: - 本地视频func startPreview() {// 创建摄像头源camera = CameraSource(delegate: self)// 创建本地视频轨道localVideoTrack = LocalVideoTrack(source: camera!, enabled: true, name: "camera")// 添加渲染器显示预览localVideoTrack?.addRenderer(previewView)// 获取前置摄像头并开始采集if let frontCamera = CameraSource.captureDevice(position: .front) {camera?.startCapture(device: frontCamera)}}func stopLocalVideo() {localVideoTrack?.isEnabled = false}// MARK: - 本地音频func startLocalAudio() {localAudioTrack = LocalAudioTrack()}func stopLocalAudio() {localAudioTrack?.isEnabled = false}func muteAudio(_ mute: Bool) {localAudioTrack?.isEnabled = !mute}
腾讯云 RTC
// MARK: - 本地视频func startLocalVideo(view: UIView, frontCamera: Bool = true) {// 设置本地预览渲染参数(可选,SDK 有默认值)let renderParams = TRTCRenderParams()renderParams.fillMode = .fill // 填充模式:.fill(填充)或 .fit(适应)renderParams.mirrorType = .auto // 镜像模式:.auto(前置镜像)、.enable(始终镜像)、.disable(不镜像)trtcCloud.setLocalRenderParams(renderParams)// 开启本地视频预览// frontCamera: true = 前置摄像头, false = 后置摄像头trtcCloud.startLocalPreview(frontCamera, view: view)}func stopLocalVideo() {trtcCloud.stopLocalPreview()}func muteLocalVideo(_ mute: Bool) {trtcCloud.muteLocalVideo(.big, mute: mute)}func switchCamera(_ frontCamera: Bool) {trtcCloud.getDeviceManager().switchCamera(frontCamera)}// MARK: - 本地音频func startLocalAudio(quality: TRTCAudioQuality = .default) {// quality 选项:// .speech - 语音模式// .default - 默认模式// .music - 音乐模式trtcCloud.startLocalAudio(quality)}func stopLocalAudio() {trtcCloud.stopLocalAudio()}func muteLocalAudio(_ mute: Bool) {trtcCloud.muteLocalAudio(mute)}
#pragma mark - 本地视频- (void)startLocalVideoWithView:(UIView *)view frontCamera:(BOOL)frontCamera {// 设置本地预览渲染参数(可选,SDK 有默认值)TRTCRenderParams *renderParams = [[TRTCRenderParams alloc] init];renderParams.fillMode = TRTCVideoFillMode_Fill; // 填充模式:Fill(填充)或 Fit(适应)renderParams.mirrorType = TRTCVideoMirrorTypeAuto; // 镜像模式:Auto(前置镜像)、Enable(始终镜像)、Disable(不镜像)[self.trtcCloud setLocalRenderParams:renderParams];// 开启本地视频预览// frontCamera: YES = 前置摄像头, NO = 后置摄像头[self.trtcCloud startLocalPreview:frontCamera view:view];}- (void)stopLocalVideo {[self.trtcCloud stopLocalPreview];}- (void)muteLocalVideo:(BOOL)mute {[self.trtcCloud muteLocalVideo:TRTCVideoStreamTypeBig mute:mute];}- (void)switchCamera:(BOOL)frontCamera {[[self.trtcCloud getDeviceManager] switchCamera:frontCamera];}#pragma mark - 本地音频- (void)startLocalAudioWithQuality:(TRTCAudioQuality)quality {// quality 选项:// TRTCAudioQualitySpeech - 语音模式// TRTCAudioQualityDefault - 默认模式// TRTCAudioQualityMusic - 音乐模式[self.trtcCloud startLocalAudio:quality];}- (void)stopLocalAudio {[self.trtcCloud stopLocalAudio];}- (void)muteLocalAudio:(BOOL)mute {[self.trtcCloud muteLocalAudio:mute];}
步骤8. 订阅并播放远端流
Twilio Video
// MARK: - RemoteParticipantDelegateextension TwilioVideoManager: RemoteParticipantDelegate {// 轨道已订阅func didSubscribeToVideoTrack(videoTrack: RemoteVideoTrack,publication: RemoteVideoTrackPublication,participant: RemoteParticipant) {// 添加渲染器显示远端视频videoTrack.addRenderer(remoteVideoView)}// 轨道取消订阅func didUnsubscribeFromVideoTrack(videoTrack: RemoteVideoTrack,publication: RemoteVideoTrackPublication,participant: RemoteParticipant) {videoTrack.removeRenderer(remoteVideoView)}}
腾讯云 RTC
extension TRTCManager: TRTCCloudDelegate {// 远端用户视频可用状态变化func onUserVideoAvailable(_ userId: String, available: Bool) {if available {// 订阅远端用户视频流// streamType: .big (主流), .small (小流), .sub (屏幕分享)trtcCloud.startRemoteView(userId, streamType: .big, view: remoteVideoView)} else {// 视频不可用时停止订阅trtcCloud.stopRemoteView(userId, streamType: .big)}}// 远端用户音频可用状态变化func onUserAudioAvailable(_ userId: String, available: Bool) {if available {// 音频自动播放,通过静音控制trtcCloud.muteRemoteAudio(userId, mute: false)}}}// 手动控制方法func muteRemoteAudio(userId: String, mute: Bool) {trtcCloud.muteRemoteAudio(userId, mute: mute)}func muteAllRemoteAudio(_ mute: Bool) {trtcCloud.muteAllRemoteAudio(mute)}
#pragma mark - TRTCCloudDelegate// 远端用户视频可用状态变化- (void)onUserVideoAvailable:(NSString *)userId available:(BOOL)available {if (available) {// 订阅远端用户视频流// streamType: TRTCVideoStreamTypeBig (主流), TRTCVideoStreamTypeSmall (小流), TRTCVideoStreamTypeSub (屏幕分享)[self.trtcCloud startRemoteView:userId streamType:TRTCVideoStreamTypeBig view:self.remoteVideoView];} else {// 视频不可用时停止订阅[self.trtcCloud stopRemoteView:userId streamType:TRTCVideoStreamTypeBig];}}// 远端用户音频可用状态变化- (void)onUserAudioAvailable:(NSString *)userId available:(BOOL)available {if (available) {// 音频自动播放,通过静音控制[self.trtcCloud muteRemoteAudio:userId mute:NO];}}// 手动控制方法- (void)muteRemoteAudio:(NSString *)userId mute:(BOOL)mute {[self.trtcCloud muteRemoteAudio:userId mute:mute];}- (void)muteAllRemoteAudio:(BOOL)mute {[self.trtcCloud muteAllRemoteAudio:mute];}
步骤9. 离开房间
Twilio Video
func disconnect() {// 停止本地轨道localVideoTrack?.isEnabled = falselocalAudioTrack?.isEnabled = false// 断开房间连接room?.disconnect()}extension TwilioVideoManager: RoomDelegate {func roomDidDisconnect(room: Room, error: Error?) {// 清理资源localVideoTrack = nillocalAudioTrack = nilself.room = nilif let error = error {print("断开连接,错误: \\(error.localizedDescription)")}}}
腾讯云 RTC
func exitRoom() {// 先停止本地预览和音频trtcCloud.stopLocalPreview()trtcCloud.stopLocalAudio()// 退出房间trtcCloud.exitRoom()}extension TRTCManager: TRTCCloudDelegate {func onExitRoom(_ reason: Int) {// reason: 0 - 调用 exitRoom(), 1 - 被服务器踢出, 2 - 房间解散switch reason {case 0:print("正常退出房间")case 1:print("被服务器踢出")case 2:print("房间已解散")default:break}}}class TRTCManager: NSObject {deinit {// 使用完毕后销毁实例TRTCCloud.destroySharedInstance()}}
- (void)exitRoom {// 先停止本地预览和音频[self.trtcCloud stopLocalPreview];[self.trtcCloud stopLocalAudio];// 退出房间[self.trtcCloud exitRoom];}#pragma mark - TRTCCloudDelegate- (void)onExitRoom:(NSInteger)reason {// reason: 0 - 调用 exitRoom, 1 - 被服务器踢出, 2 - 房间解散switch (reason) {case 0:NSLog(@"正常退出房间");break;case 1:NSLog(@"被服务器踢出");break;case 2:NSLog(@"房间已解散");break;default:break;}}- (void)dealloc {// 使用完毕后销毁实例[TRTCCloud destroySharedInstance];}
进阶功能
屏幕分享
Twilio Video
// 使用 ReplayKitletscreenCapturer = ReplayKitVideoSource(isScreencast: true)let screenTrack = LocalVideoTrack(source: screenCapturer)// 开始广播RPScreenRecorder.shared().startCapture { sampleBuffer, bufferType, error in// 处理采样缓冲区}
腾讯云 RTC
// 配置屏幕分享编码参数let encParam = TRTCVideoEncParam()encParam.videoResolution = ._1280_720 // 推荐分辨率encParam.videoFps = 10 // 推荐帧率encParam.videoBitrate = 1600 // 推荐码率 (kbps)// 开始全系统屏幕共享(需要 Broadcast Extension 和 App Group)// streamType: .big 主路 或 .sub 辅路// encParam: 视频编码参数// appGroup: 主 App 与 Extension 进程间通信的 App Group IDtrtcCloud.startScreenCapture(byReplaykit: .sub,encParam: encParam,appGroup: "group.your.app.identifier")// 停止屏幕共享trtcCloud.stopScreenCapture()
// 配置屏幕分享编码参数TRTCVideoEncParam *encParam = [[TRTCVideoEncParam alloc] init];encParam.videoResolution = TRTCVideoResolution_1280_720; // 推荐分辨率encParam.videoFps = 10; // 推荐帧率encParam.videoBitrate = 1600; // 推荐码率 (kbps)// 开始全系统屏幕共享(需要 Broadcast Extension 和 App Group)- (void)startScreenCapture {TRTCVideoEncParam *videoEncConfig = [[TRTCVideoEncParam alloc] init];videoEncConfig.videoResolution = TRTCVideoResolution_1280_720;videoEncConfig.videoFps = 10;videoEncConfig.videoBitrate = 2000;// 需要用你先前创建的 App Group Identifier 替换 `APPGROUP`[[TRTCCloud sharedInstance] startScreenCaptureByReplaykit:videoEncConfigappGroup:APPGROUP];}// 停止屏幕共享- (void)stopScreenCapture {[[TRTCCloud sharedInstance] stopScreenCapture];}
音视频编码配置
Twilio Video
let connectOptions = ConnectOptions(token: token) { builder in// 视频编码器偏好builder.preferredVideoCodecs = [Vp8Codec(), H264Codec()]// 编码参数builder.encodingParameters = EncodingParameters(audioBitrate: 64,videoBitrate: 1500)}
腾讯云 RTC
// 视频编码参数let videoEncParam = TRTCVideoEncParam()videoEncParam.videoResolution = ._960_540 // 分辨率videoEncParam.videoFps = 15 // 帧率videoEncParam.videoBitrate = 1200 // 视频码率 (kbps)videoEncParam.resMode = .portrait // 方向模式trtcCloud.setVideoEncoderParam(videoEncParam)// 音频质量配置(在 startLocalAudio 时指定)// .speech - 语音模式// .default - 默认模式// .music - 音乐模式trtcCloud.startLocalAudio(.music)
// 视频编码参数TRTCVideoEncParam *videoEncParam = [[TRTCVideoEncParam alloc] init];videoEncParam.videoResolution = TRTCVideoResolution_960_540;videoEncParam.videoFps = 15;videoEncParam.videoBitrate = 1200;videoEncParam.resMode = TRTCVideoResolutionModePortrait;[self.trtcCloud setVideoEncoderParam:videoEncParam];// 音频质量配置(在 startLocalAudio 时指定)[self.trtcCloud startLocalAudio:TRTCAudioQualityMusic];
设备管理
Twilio Video
// 切换摄像头if let camera = camera {let newDevice = CameraSource.captureDevice(position: .back)camera.selectCaptureDevice(newDevice!) { _, _, error in// 处理结果}}// 切换静音localAudioTrack?.isEnabled = false// 切换到扬声器(使用 AVAudioSession)do {try AVAudioSession.sharedInstance().overrideOutputAudioPort(.speaker)} catch { }
腾讯云 RTC
// 获取设备管理器let deviceManager = trtcCloud.getDeviceManager()// 切换前后摄像头deviceManager.switchCamera(true) // true: 前置, false: 后置// 判断当前是否前置摄像头let isFront = deviceManager.isFrontCamera()// 设置摄像头缩放比例 (1.0 - 5.0)deviceManager.setCameraZoomRatio(2.0)// 设置摄像头对焦位置deviceManager.setCameraFocusPosition(CGPoint(x: 100, y: 100))// 闪光灯控制deviceManager.enableCameraTorch(true) // 开启// 设置自动对焦deviceManager.enableCameraAutoFocus(true)// 切换静音trtcCloud.muteLocalAudio(true)// 切换音频路由trtcCloud.setAudioRoute(.speakerphone) // 扬声器trtcCloud.setAudioRoute(.earpiece) // 听筒
// 获取设备管理器TXDeviceManager *deviceManager = [self.trtcCloud getDeviceManager];// 切换前后摄像头[deviceManager switchCamera:YES]; // YES: 前置, NO: 后置// 判断当前是否前置摄像头BOOL isFront = [deviceManager isFrontCamera];// 设置摄像头缩放比例 (1.0 - 5.0)[deviceManager setCameraZoomRatio:2.0];// 设置摄像头对焦位置[deviceManager setCameraFocusPosition:CGPointMake(100, 100)];// 闪光灯控制[deviceManager enableCameraTorch:YES]; // 开启// 设置自动对焦[deviceManager enableCameraAutoFocus:YES];// 切换静音[self.trtcCloud muteLocalAudio:YES];// 切换音频路由[self.trtcCloud setAudioRoute:TRTCAudioModeSpeakerphone]; // 扬声器[self.trtcCloud setAudioRoute:TRTCAudioModeEarpiece]; // 听筒
网络质量监控
Twilio Video
extension TwilioVideoManager: RoomDelegate {// 网络质量变化回调func networkQualityLevelDidChange(participant: Participant,networkQualityLevel: NetworkQualityLevel) {// NetworkQualityLevel: .zero (未知) ... .five (极好)print("参与者 \\(participant.identity) 网络质量: \\(networkQualityLevel.rawValue)")}}// 配置网络质量监控let connectOptions = ConnectOptions(token: token) { builder inbuilder.networkQualityEnabled = truebuilder.networkQualityConfiguration = NetworkQualityConfiguration(localVerbosity: .minimal,remoteVerbosity: .minimal)}
腾讯云 RTC
extension TRTCManager: TRTCCloudDelegate {// 网络质量回调(每2秒触发一次)func onNetworkQuality(_ localQuality: TRTCQualityInfo,remoteQuality: [TRTCQualityInfo]) {// quality: 0=未知, 1=极好, 2=好, 3=一般, 4=差, 5=很差, 6=不可用print("本地网络质量: \\(localQuality.quality.rawValue)")}// 统计信息回调func onStatistics(_ statistics: TRTCStatistics) {print("RTT: \\(statistics.rtt)ms")}}
// 监听 `onNetworkQuality` 回调以获得当前网络状况的改变- (void)onNetworkQuality:(TRTCQualityInfo *)localQuality remoteQuality:(NSArray<TRTCQualityInfo *> *)remoteQuality {// 获得本地的网络状况switch(localQuality.quality) {case TRTCQuality_Unknown:NSLog(@"SDK has not yet sensed the current network quality.");break;case TRTCQuality_Excellent:NSLog(@"The current network is very good.");break;case TRTCQuality_Good:NSLog(@"The current network is good.");break;case TRTCQuality_Poor:NSLog(@"The current network quality barely meets the demand.");break;case TRTCQuality_Bad:NSLog(@"The current network is poor, and there may be significant freezes and call delays.");break;case TRTCQuality_VeryBad:NSLog(@"The current network is very poor, the communication quality cannot be guaranteed");break;case TRTCQuality_Down:NSLog(@"The current network does not meet the minimum requirements.");break;default:break;}// 获得远端用户的网络质量for (TRTCQualityInfo *info in remoteQuality) {NSLog(@"remote user : = %@, quality = %@", info.userId, @(info.quality));}}
自定义视频采集
Twilio Video
class CustomVideoSource: NSObject, VideoSource {weak var sink: VideoSink?func sendFrame(_ pixelBuffer: CVPixelBuffer, timestamp: CMTime) {let frame = VideoFrame(timestamp: timestamp,buffer: pixelBuffer.videoFrameBuffer())sink?.onVideoFrame(frame)}}let customSource = CustomVideoSource()let videoTrack = LocalVideoTrack(source: customSource, enabled: true, name: "custom")
腾讯云 RTC
// 启用自定义视频采集trtcCloud.enableCustomVideoCapture(.big, enable: true)// 发送自定义视频帧 (CVPixelBuffer)func sendCustomVideoFrame(_ pixelBuffer: CVPixelBuffer) {let videoFrame = TRTCVideoFrame()videoFrame.pixelFormat = ._NV12videoFrame.bufferType = .pixelBuffervideoFrame.pixelBuffer = pixelBuffertrtcCloud.sendCustomVideoData(.big, frame: videoFrame)}// 发送自定义视频帧 (纹理)func sendCustomVideoTexture(_ textureId: GLuint, width: Int, height: Int) {let videoFrame = TRTCVideoFrame()videoFrame.pixelFormat = ._Texture_2DvideoFrame.bufferType = .texturevideoFrame.textureId = textureIdvideoFrame.width = UInt32(width)videoFrame.height = UInt32(height)trtcCloud.sendCustomVideoData(.big, frame: videoFrame)}// 停止自定义采集trtcCloud.enableCustomVideoCapture(.big, enable: false)
// 启用自定义视频采集[self.trtcCloud enableCustomVideoCapture:TRTCVideoStreamTypeBig enable:YES];// 发送自定义视频帧- (void)sendCustomVideoFrame:(CVPixelBufferRef)pixelBuffer timestamp:(uint64_t)timestamp {TRTCVideoFrame *videoFrame = [[TRTCVideoFrame alloc] init];videoFrame.pixelFormat = TRTCVideoPixelFormat_NV12;videoFrame.bufferType = TRTCVideoBufferType_PixelBuffer;videoFrame.pixelBuffer = pixelBuffer;videoFrame.timestamp = timestamp;[self.trtcCloud sendCustomVideoData:TRTCVideoStreamTypeBig frame:videoFrame];}// 停止自定义采集[self.trtcCloud enableCustomVideoCapture:TRTCVideoStreamTypeBig enable:NO];
数据通道/自定义消息
Twilio Video
let localDataTrack = LocalDataTrack(options: dataTrackOptions)localDataTrack?.send("Hello, World!")extension ViewController: RemoteDataTrackDelegate {func remoteDataTrackDidReceiveString(remoteDataTrack: RemoteDataTrack,message: String) {print("收到消息: \\(message)")}}
腾讯云 RTC
// 发送自定义消息(可靠传输,房间内所有人)// cmdID: 自定义消息 ID (1-10)// data: 消息内容,最大 1KB// reliable: true 可靠传输, false 不可靠传输// ordered: true 保序, false 不保序trtcCloud.sendCustomCmdMsg(1,data: "Hello, World!".data(using: .utf8)!,reliable: true,ordered: true)// 发送 SEI 消息(嵌入视频帧,适合时间戳同步)// repeatCount: 重复发送次数,-1 表示持续发送trtcCloud.sendSEIMsg("Timestamp: 12345".data(using: .utf8)!,repeatCount: 1)// 接收自定义消息extension TRTCManager: TRTCCloudDelegate {func onRecvCustomCmdMsgUserId(_ userId: String,cmdID: Int,seq: UInt32,message: Data) {let text = String(data: message, encoding: .utf8) ?? ""print("收到来自 \\(userId) 的消息 [cmdID=\\(cmdID)]: \\(text)")}// 消息丢失回调func onMissCustomCmdMsgUserId(_ userId: String,cmdID: Int,errCode: Int,missed: Int) {print("丢失来自 \\(userId) 的 \\(missed) 条消息")}// 接收 SEI 消息func onRecvSEIMsg(_ userId: String, message: Data) {let text = String(data: message, encoding: .utf8) ?? ""print("收到 SEI 消息: \\(text)")}}
- (void)sendHello {// 自定义消息的命令字。需要根据业务需求自定义一套规则。此处以 0x1 为例,表示发送文本广播消息NSInteger cmdID = 0x1;NSData *data = [@"Hello" dataUsingEncoding:NSUTF8StringEncoding];// reliable 和 ordered 目前需要保持一致。此处以有序发送为例[trtcCloud sendCustomCmdMsg:cmdID data:data reliable:YES ordered:YES];}// 发送 SEI 消息(嵌入视频帧,适合时间戳同步)// repeatCount: 重复发送次数,-1 表示持续发送[self.trtcCloud sendSEIMsg:[@"Timestamp: 12345" dataUsingEncoding:NSUTF8StringEncoding]repeatCount:1];#pragma mark - TRTCCloudDelegate// 接收自定义消息- (void)onRecvCustomCmdMsgUserId:(NSString *)userIdcmdID:(NSInteger)cmdIDseq:(UInt32)seqmessage:(NSData *)message {NSString *text = [[NSString alloc] initWithData:message encoding:NSUTF8StringEncoding];NSLog(@"收到来自 %@ 的消息 [cmdID=%ld]: %@", userId, (long)cmdID, text);}// 消息丢失回调- (void)onMissCustomCmdMsgUserId:(NSString *)userIdcmdID:(NSInteger)cmdIDerrCode:(NSInteger)errCodemissed:(NSInteger)missed {NSLog(@"丢失来自 %@ 的 %ld 条消息", userId, (long)missed);}// 接收 SEI 消息- (void)onRecvSEIMsg:(NSString *)userId message:(NSData *)message {NSString *text = [[NSString alloc] initWithData:message encoding:NSUTF8StringEncoding];NSLog(@"收到 SEI 消息: %@", text);}
常见问题
Q1: Twilio Video 的 Access Token 和 TRTC 的 UserSig 有什么区别?
两者都是用于客户端鉴权的时效性签名凭证,但生成方式不同:
Twilio Access Token:使用 Account SID、API Key SID 和 API Key Secret,通过 Twilio 的 SDK helper libraries 在服务端生成。
TRTC UserSig:使用 SDKAppID 和 SDKSecretKey,通过 HMAC SHA256 算法在服务端生成。
Q2: Twilio 的 Room Name(字符串)如何映射到 TRTC 的 Room ID?
TRTC 支持两种房间标识方式:
数字类型 Room ID (
roomId):范围为 1 - 4294967294 的整数,推荐使用。字符串类型 Room ID (
strRoomId):长度限制 64 字节,支持字母、数字和部分特殊字符。如果您的 Twilio 项目使用的是字符串形式的房间名称,可以直接使用
strRoomId 进行映射。注意:
同一个 TRTC 应用中,不可混用
roomId 和 strRoomId,两者互不互通。
Q3: TRTC 中远端音频为什么不需要手动订阅?
在 Twilio Video 中,远端音频需要通过
RemoteParticipant.Listener.onAudioTrackSubscribed 回调手动处理。而在 TRTC 中,远端音频在用户进入房间后会自动播放,无需任何额外操作。如需控制某个远端用户的音频播放,可以使用 muteRemoteAudio(userId, true/false) 进行静音/取消静音。
Q4: Twilio 的 P2P Room 和 Group Room 对应 TRTC 的哪些场景?
Twilio Room 类型 | TRTC 应用场景 | 适用场景 |
Peer-to-Peer Room | TRTCAppSceneVideoCall | 1v1 视频通话 |
Peer-to-Peer Room (纯语音) | TRTCAppSceneAudioCall | 1v1 语音通话 |
Group Room | TRTCAppSceneLIVE | 互动直播、多人视频会议 |
Group Room (纯语音) | TRTCAppSceneVoiceChatRoom | 语音聊天室 |
Q5: 在 TRTC 中如何处理重连?
TRTC SDK 内置了自动重连机制,无需开发者手动处理。当网络断开时,SDK 会自动尝试重连。您可以通过以下回调监听重连状态:
onConnectionLost():与服务器的连接断开onTryToReconnect():正在尝试重新连接onConnectionRecovery():连接已恢复上述回调与 Twilio 中的
onReconnecting 和 onReconnected 回调功能相对应。
文档反馈