This document describes how to get started with CSS. Before trying out CSS, you're advised to read the Pricing Overview of CSS to get familiar with its billable items and prices.
2. Go to the CSS service activation page, indicate your consent to the "Tencent Cloud Service Terms", and click Apply for Activation to activate the CSS service.
Step 1. Add domain names
To use CSS, you should have at least one push domain name and one playback domain name. You cannot use one domain name for both push and playback.
1. Prepare your own domain names. For domain names in Chinese mainland regions, ICP filing is required.
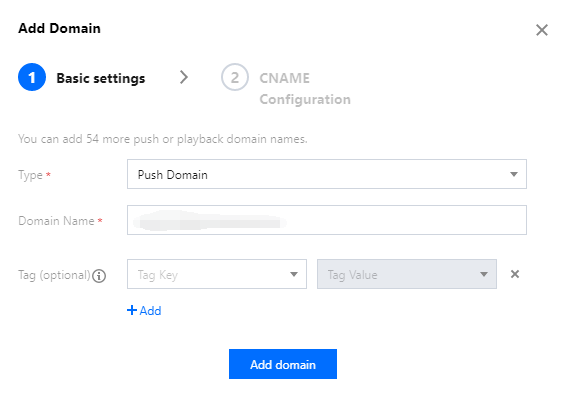
2. Log in to the CSS console, enter Domain Management, and click Add Domain.
2.1 Tags are used to categorize and manage resources from different dimensions. If the existing tags do not meet your requirements, you can also go to the Tag Console to manage tags uniformly.
2.2 Click Add domain.
Note
CSS provides a test domain name xxxx.livepush.myqcloud.com. You can use it to test live push, but you’re not advised to use it as the push domain name for business purposes.
After the domain name is added successfully, you can view its information in the domain name list in Domain Management. For how to manage it, see Domain Management.
For more information on live streaming domain names, please see Basic CSS Features.
3. Once your domain name is added, the system will assign it a CNAME domain name (suffixed with .txlivecdn.com or .tlivepush.com), which cannot be accessed before you complete the CNAME configuration at your DNS service provider. After the CNAME configuration takes effect, you can use CSS. The following example shows you how to add a CNAME record by assuming Tencent Cloud is your DNS service provider:
3.2 Find the target domain name and click Resolve.
3.3 On the domain name resolution page, click Add Record.
3.4 In the new line, enter the domain name prefix as the host record, select CNAME as the record type, and enter the CNAME domain name as the record value.
3.5 Click Save.
Note
After a CNAME record is successfully added, it takes some time for the CNAME configuration to take effect. If the configuration fails, you cannot use CSS.
After the CNAME configuration succeeds, you can see that the status symbol of the CNAME address in Domain Management in the CSS console has changed to
.
If the CNAME configuration failure persists, consult your DNS service provider.
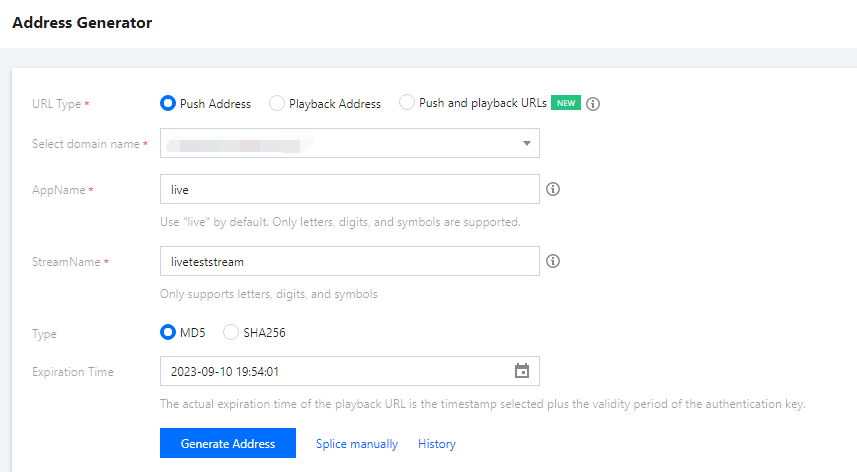
2. On the Address Generator page, configure as follows:
2.1 Select Push Domain for Domain Type.
2.2 Select a push domain name you added in Domain Management.
2.3 Enter an AppName. It is live by default.
2.4 Enter a custom StreamName, such as liveteststream.
2.5 You need to choose an encryption type based on your security requirements and performance considerations. The encryption type can be either MD5 or SHA256, with MD5 being the default option.
2.6 Select the URL expiration time, such as 2023-09-10 19:54:01.
3. Click Generate Address to generate a push address.
Note
In the push URL, live is the default AppName, txSecret is the signature for playing back the stream, and txTime is the URL expiration time.
Here is another way to generate a push URL: In Domain Management, find the push domain name you want use to generate a push URL, click Manage, select Push Configuration, enter an expiration time for the URL and a custom StreamName, and click Generate Push Address.
Before generating a push URL, you can create templates and bind them to your push domain. For the prices of CSS value-added services, see Pricing Overview.
Step 3. Push live stream
You can enter the generated push URL into the push software as appropriate for your use cases.
For push on PCs, you're advised to use OBS. For detailed directions, see Push via OBS.
For push on web, you're advised to use Web Push: select a push domain name, enter a custom StreamName, select a URL expiration time, turn the camera on, and click Start Push.
For push on mobile devices, download and install Tencent Video Cloud Demo, open it, select Mobile Live Video Broadcasting > Push (Camera), enter the push URL into the address box manually or by scanning the QR code, and then tap the start icon in the bottom-left corner to push the stream.
Note
You can integrate Tencent Cloud MLVB SDK into customized apps for live push.
Step 4. Get playback URL
1. After push succeeds, select Stream Management > Live Streams, view the status of the push URL, and click Test to play back the stream online.
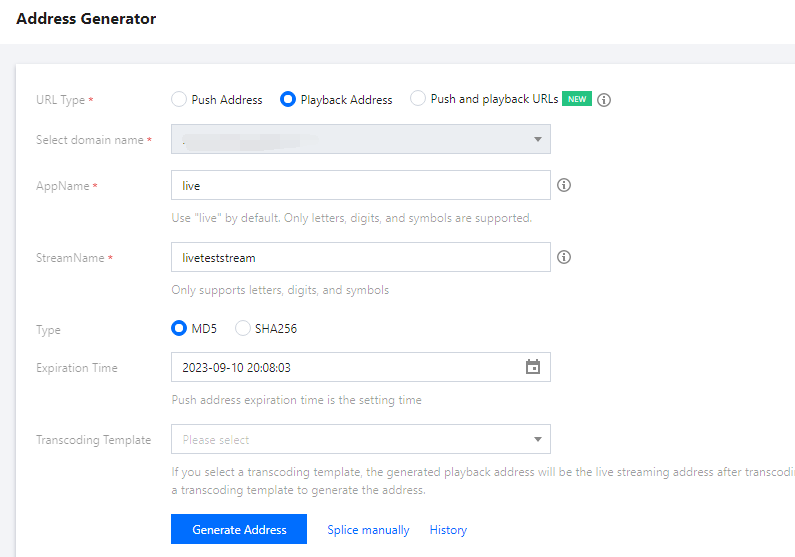
2. Select CSS Toolkit > Address Generator to get a playback address and configure as follows:
2.1 Select Playback Domain for Domain Type.
2.2 Select a playback domain name you added in Domain Management.
2.3 Enter an AppName. It is live by default.
2.4 Enter the StreamName in the push URL to play back the corresponding stream.
2.5 You need to choose an encryption type based on your security requirements and performance considerations. The encryption type can be either MD5 or SHA256, with MD5 being the default option.
2.6 Select the URL expiration time, such as 2023-09-10 20:08:03.
2.7 To generate a playback URL for a transcoded stream, please select a transcoding template which must be bound to the domain name in the playback URL. For directions on how to bind a transcoding template, please see Live Transcoding > Binding Domain Name.
2.8 Click Generate Address to generate a playback address.
3. You can use the following methods to test whether a live stream can be played back normally in different use cases:
For playback test on PCs, you're advised to use tools such as VLC. For more information, please see Live Playback.
For playback test on mobile devices, you're advised to download and install Tencent Video Cloud Toolkit App, select Mobile Live Video Broadcasting > LVB Playback, enter the playback URL into the address box manually or by scanning the QR code, and tap the play icon in the bottom-left corner.
Note
To push/play back a stream on an app, you can integrate the MLVB SDK into the app to supplement the CSS service. If you encounter any problem during the trial period, please see FAQs.
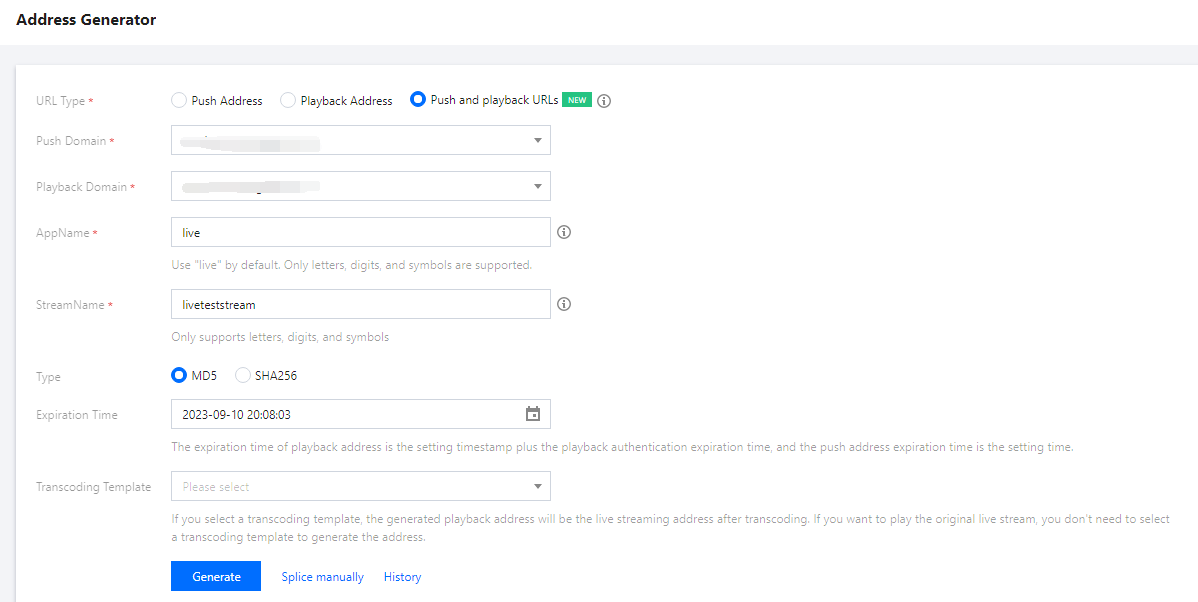
2. Select the address type as Push and playback URLs.
3. Select the Push Domain Name and Playback Domain Name that you have added to Domain Management.
4. Enter an AppName. It is live by default.
5. Enter a StreamName, such as liveteststream.
6. You need to choose an encryption type based on your security requirements and performance considerations. The encryption type can be either MD5 or SHA256, with MD5 being the default option.
7. Select the URL expiration time, such as 2023-09-10 20:08:03.
8. Select an existing transcoding template (optional).
9. Click Generate Address.
Operations
To enable live recording, please create a recording template and bind it to a domain name first. For more information, please see Creating Recording Template.
To enable live transcoding, please create a transcoding template and bind it to a domain name first. For more information, please see Creating Transcoding Template.
To enable live watermarking, please create a watermark template and bind it to a domain name first. For more information, please see Creating Recording Template.
To enable live screencapture and porn detection, please create a screencapture and porn detection template and bind it to a domain name first. For more information, please see Creating Screencapture and Porn Detection Template.
To enable live streaming callbacks, you can create a callback template and associate it with the domain for configuration. For related documentation, please refer to Creating a Callback Template.
To enable live streaming standby content, you can create a standby content template and associate it with the domain for configuration. For related documentation, please refer to Creating a Standby Content Template.
To enable live stream mixing, please call the stream mixing API CreateCommonMixStream.


 Yes
Yes
 No
No
Was this page helpful?