- Release Notes and Announcements
- Release Notes
- TRTC Live (TUILiveKit) Product Launch Announcement
- TRTC Conference Official Editions Launched
- The commercial version of Conference is coming soon
- Terms and Conditions Applicable to $9.9 Starter Package
- Rules for the "First Subscription $100 Discount" Promotion
- Announcement on the Start of Beta Testing for Multi-person Audio and Video Conference
- TRTC Call Official Editions Launched
- License Required for Video Playback in New Version of LiteAV SDK
- TRTC to Offer Monthly Packages
- Product Introduction
- Purchase Guide
- Billing Overview
- RTC-Engine Packages
- TRTC Call Monthly Packages
- TRTC Conference Monthly Packages
- TRTC Live Monthly Packages
- Pay-As-You-Go
- Billing Explanation for Subscription Package Duration
- Billing of On-Cloud Recording
- Billing of MixTranscoding and Relay to CDN
- Free Minutes
- FAQs
- Billing of Monitoring Dashboard
- Billing of Recording Delivery
- Overdue and Suspension Policy
- Refund Policies
- User Tutorial
- Free Demo
- Video Calling (Including UI)
- Overview (TUICallKit)
- Activate the Service(TUICallKit)
- Run Demo(TUICallKit)
- Integration (TUICallKit)
- UI Customization (TUICallKit)
- Offline Call Push (TUICallKit)
- AI Noise Reduction (TUICallKit)
- Virtual Background (TUICallKit)
- On-Cloud Recording (TUICallKit)
- Additional Features(TUICallKit)
- Server APIs (TUICallKit)
- Client APIs (TUICallKit)
- ErrorCode
- Release Notes (TUICallKit)
- FAQs(TUICallKit)
- Multi-Participant Conference (with UI)
- Overview (TUIRoomKit)
- Activate the Service (TUIRoomKit)
- Run Demo(TUIRoomKit)
- Integration (TUIRoomKit)
- UI Customization (TUIRoomKit)
- Virtual Background (TUIRoomKit)
- Conference Control (TUIRoomKit)
- Cloud Recording (TUIRoomKit)
- AI Noise Reduction (TUIRoomKit)
- API Documentation(TUIRoomKit)
- In-Conference Chat (TUIRoomKit)
- Robot Streaming (TUIRoomKit)
- Enhanced Features (TUIRoomKit)
- FAQs (TUIRoomKit)
- Error Code (TUIRoomKit)
- SDK Update Log (TUIRoomKit)
- Live Streaming (Including UI)
- Voice Chat Room (with UI)
- Overview (TUILiveKit)
- Activating the Service (TUILiveKit)
- Integration (TUILiveKit)
- Interactive Bullet Comments (TUILiveKit)
- Interactive Gifts (TUILiveKit)
- Client APIs (TUICallKit)
- Error Codes (TUILiveKit)
- Release Notes(TUILiveKit)
- FAQs(TUILiveKit)
- Integrating TUIVoiceRoom (Android)
- Integrating TUIVoiceRoom (iOS)
- TUIVoiceRoom APIs
- Integration (No UI)
- SDK Download
- API Examples
- Integration Guide
- Client APIs
- Advanced Features
- Relay to CDN
- Enabling Advanced Permission Control
- RTMP Streaming with TRTC
- Utilizing Beautification Effects
- Testing Hardware Devices
- Testing Network Quality
- On-Cloud Recording
- Custom Capturing and Rendering
- Custom Audio Capturing and Playback
- Sending and Receiving Messages
- Event Callbacks
- Access Management
- How to push stream to TRTC room with OBS WHIP
- Server APIs
- Console Guide
- Solution
- FAQs
- Legacy Documentation
- Protocols and Policies
- TRTC Policy
- Glossary
This article will guide you on how to quickly run through the Audio and Video Call Demo. By following this document, you can have the Demo up and running in 10 minutes, and ultimately experience an Audio and Video Call feature with a complete UI interface.
Caller | Callee |
 |  |
Environment preparations
Flutter
Flutter 3.0 or later.
Android
Android Studio 3.5 or above.
Android devices on Android 4.1 or later.
iOS
Xcode 13.0 or above.
Please ensure your project is set up with a valid developer signature.
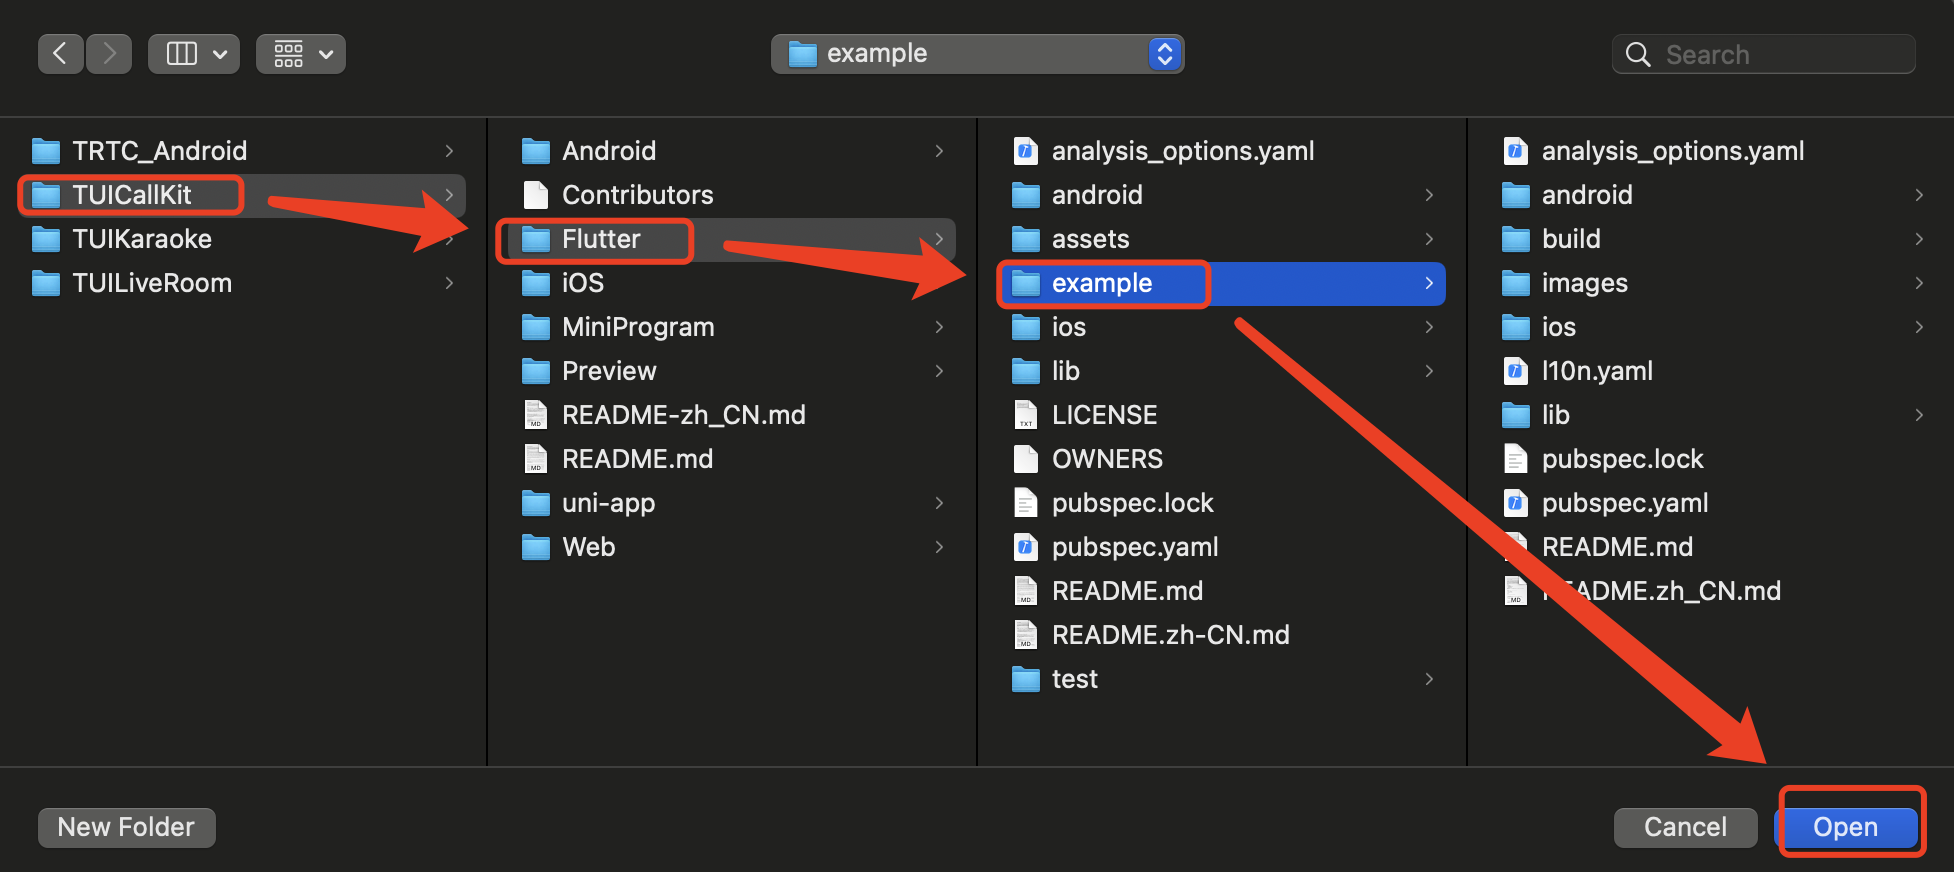
Step 1: Download the Demo
1. Download the TUICallKit Demo source code from GitHub, or directly run the following command in the command line:
2. Open the TUICallKit Flutter example in Android Studio or VSCode. The following process will take Android Studio as an example:
Step 2: Configure the Demo
1. Activate the audio and video services, to obtain the SDKAppID and SDKSecretKey.
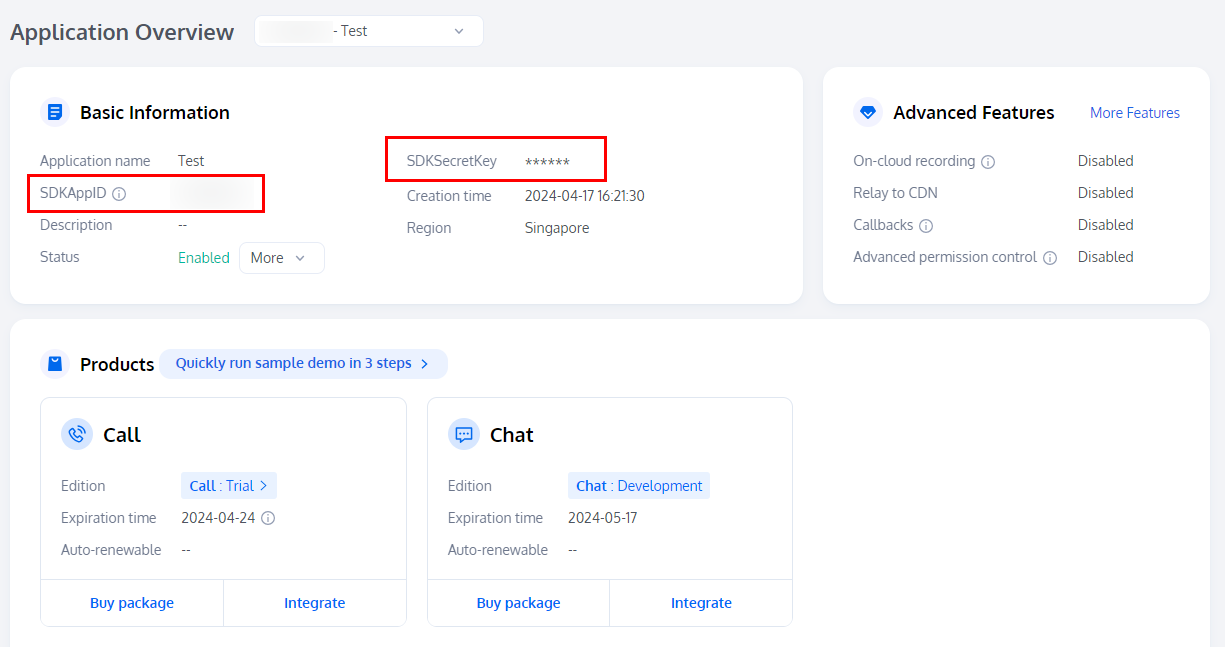
2. Open the
Flutter/example/lib/debug/generate_test_user_sig.dart file and fill in the SDKAppID and SDKSecretKey obtained when Activating the Service:
Step 3: Running the Demo
1. In the top right corner of Android Studio, select the device you want to run the Demo on as shown below:

2. After selecting, click Run to execute the TUICallKit Android Demo on the target device.
Make the first call
Note:
To experience the complete audio and video calling process, please log into the Demo on two devices as two different users, with one acting as the caller and the other as the callee.
1. Log in & Signup
Please enter the ID at the
User ID. If your current User ID has not been used before, you will be taken to the Signup screen, where you can set your own avatar and nickname.
Note:
Try to avoid setting your User ID to simple strings like "1", "123", "111", as TRTC does not support the same User ID being logged into from multiple devices. Such User IDs like "1", "123", "111" are easily occupied by your colleagues during collaborative development, leading to login failures. Therefore, we recommend setting highly recognizable User IDs while debugging.
2. Make a phone call
2.1 The caller should click 1V1 Call on the interface, enter the callee's User ID in the pop-up interface, and select the desired call type.
2.2 Click Initiate Call.


 Yes
Yes
 No
No
Was this page helpful?