Publishing and Calling Model Service
Demo 1. Deploy a model trained on the platform as an online service
This demo uses the handwritten digit recognition model trained with the MNIST dataset and PyTorch framework in the task-based modeling module as an example to describe how to deploy a model trained on the platform as an online service and perform call verification.
Preparations
Model file
Log in to the TI Platform console, select Training > Task-based Modeling on the left sidebar, and confirm that the handwritten digit recognition model has been completely trained.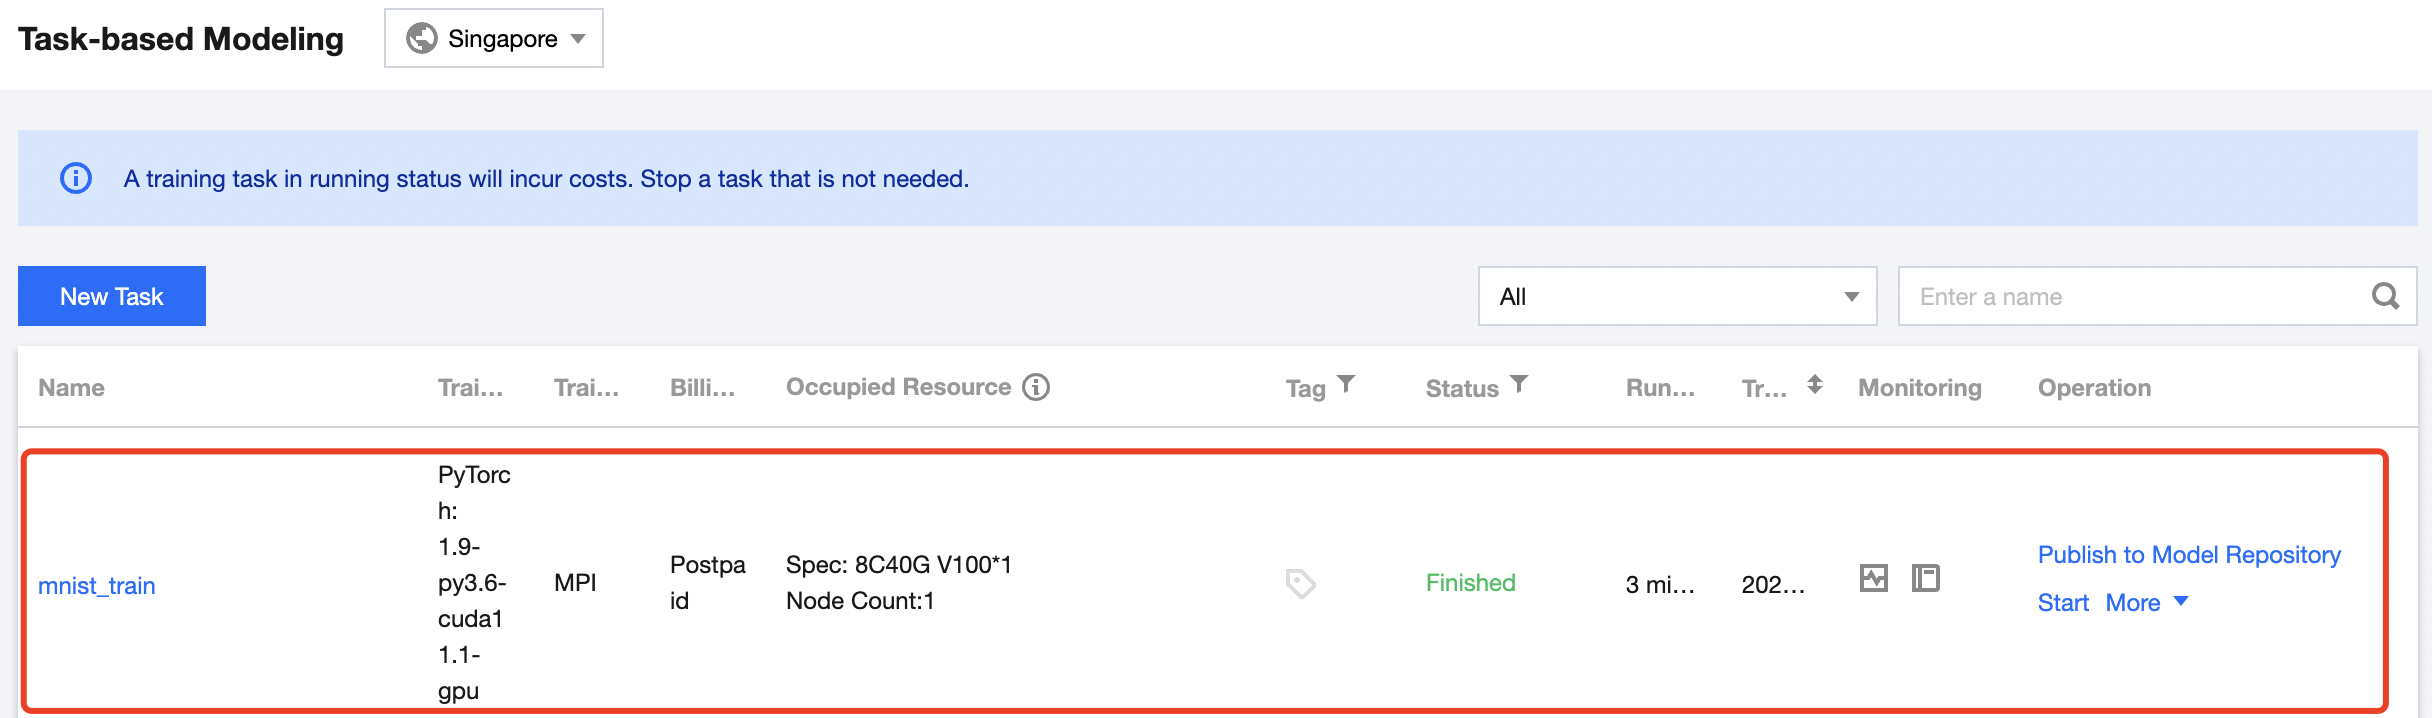
Inference script and configuration file
The inference script and configuration file of the handwritten digit recognition model have been prepared, which can be downloaded here.Test data
The following test data has been prepared and can be directly used for call testing after the service is published.
(1) Image of 2: https://qcloudimg.tencent-cloud.cn/raw/81ebbd130357ec4b1bbbecf73d1330f5.jpeg
(2) Image of 5: https://qcloudimg.tencent-cloud.cn/raw/43b8f14ba3515c34b5c572f0c6bc225e.jpeg
(3) Image of 9: https://qcloudimg.tencent-cloud.cn/raw/3768c5d8a47b5da666c82a286e00759b.jpeg
Step 1. Import the model repository
(1) Go to the TI Platform console and select Models > Model Repository on the left sidebar to enter the model list page.
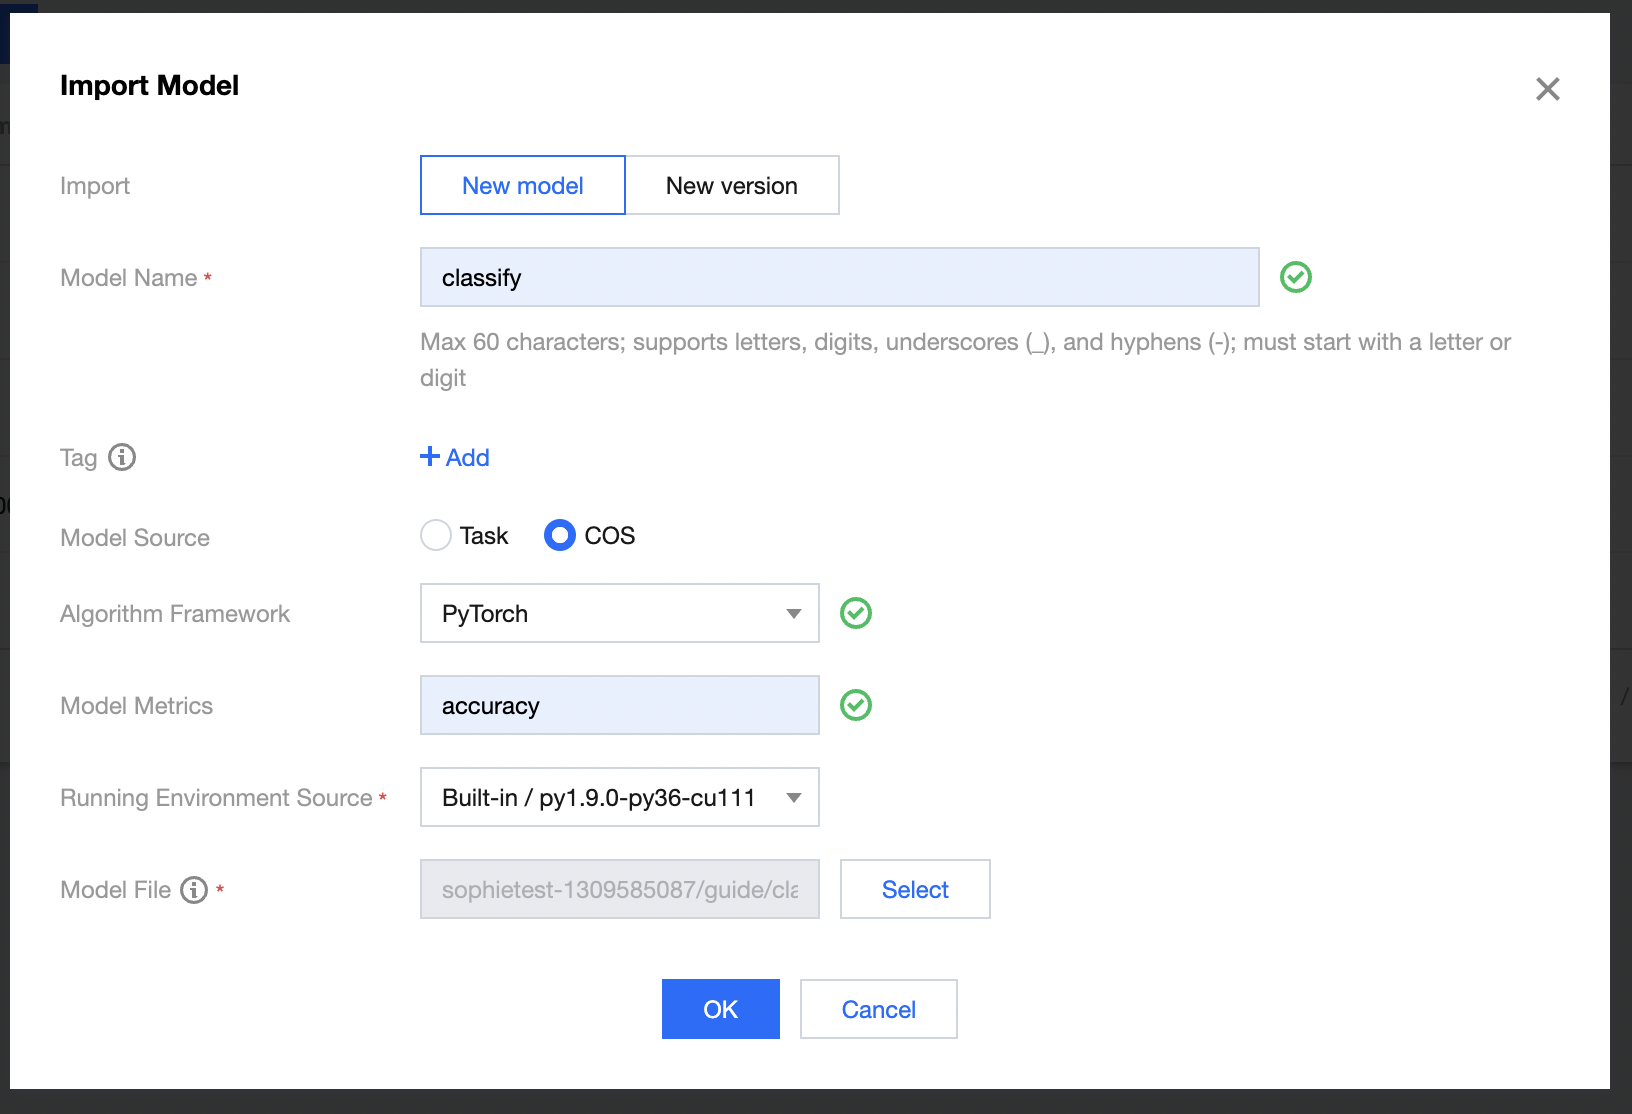
(2) Click Import Model and set the following parameters in the Import Model pop-up:
- Import: select New model
- Model Name: customize the model name, such as
mnist_train - Tag: add optional tags as needed
- Model Source: select Task
- Task: select mnist_train
- Model Metrics: enter a metric as needed, such as
accuracy - Running Environment Source: we recommend you use a built-in GPU running environment, such as
py1.9.0-py36-cu111 - Move Model By: select a method as needed, such as Copy
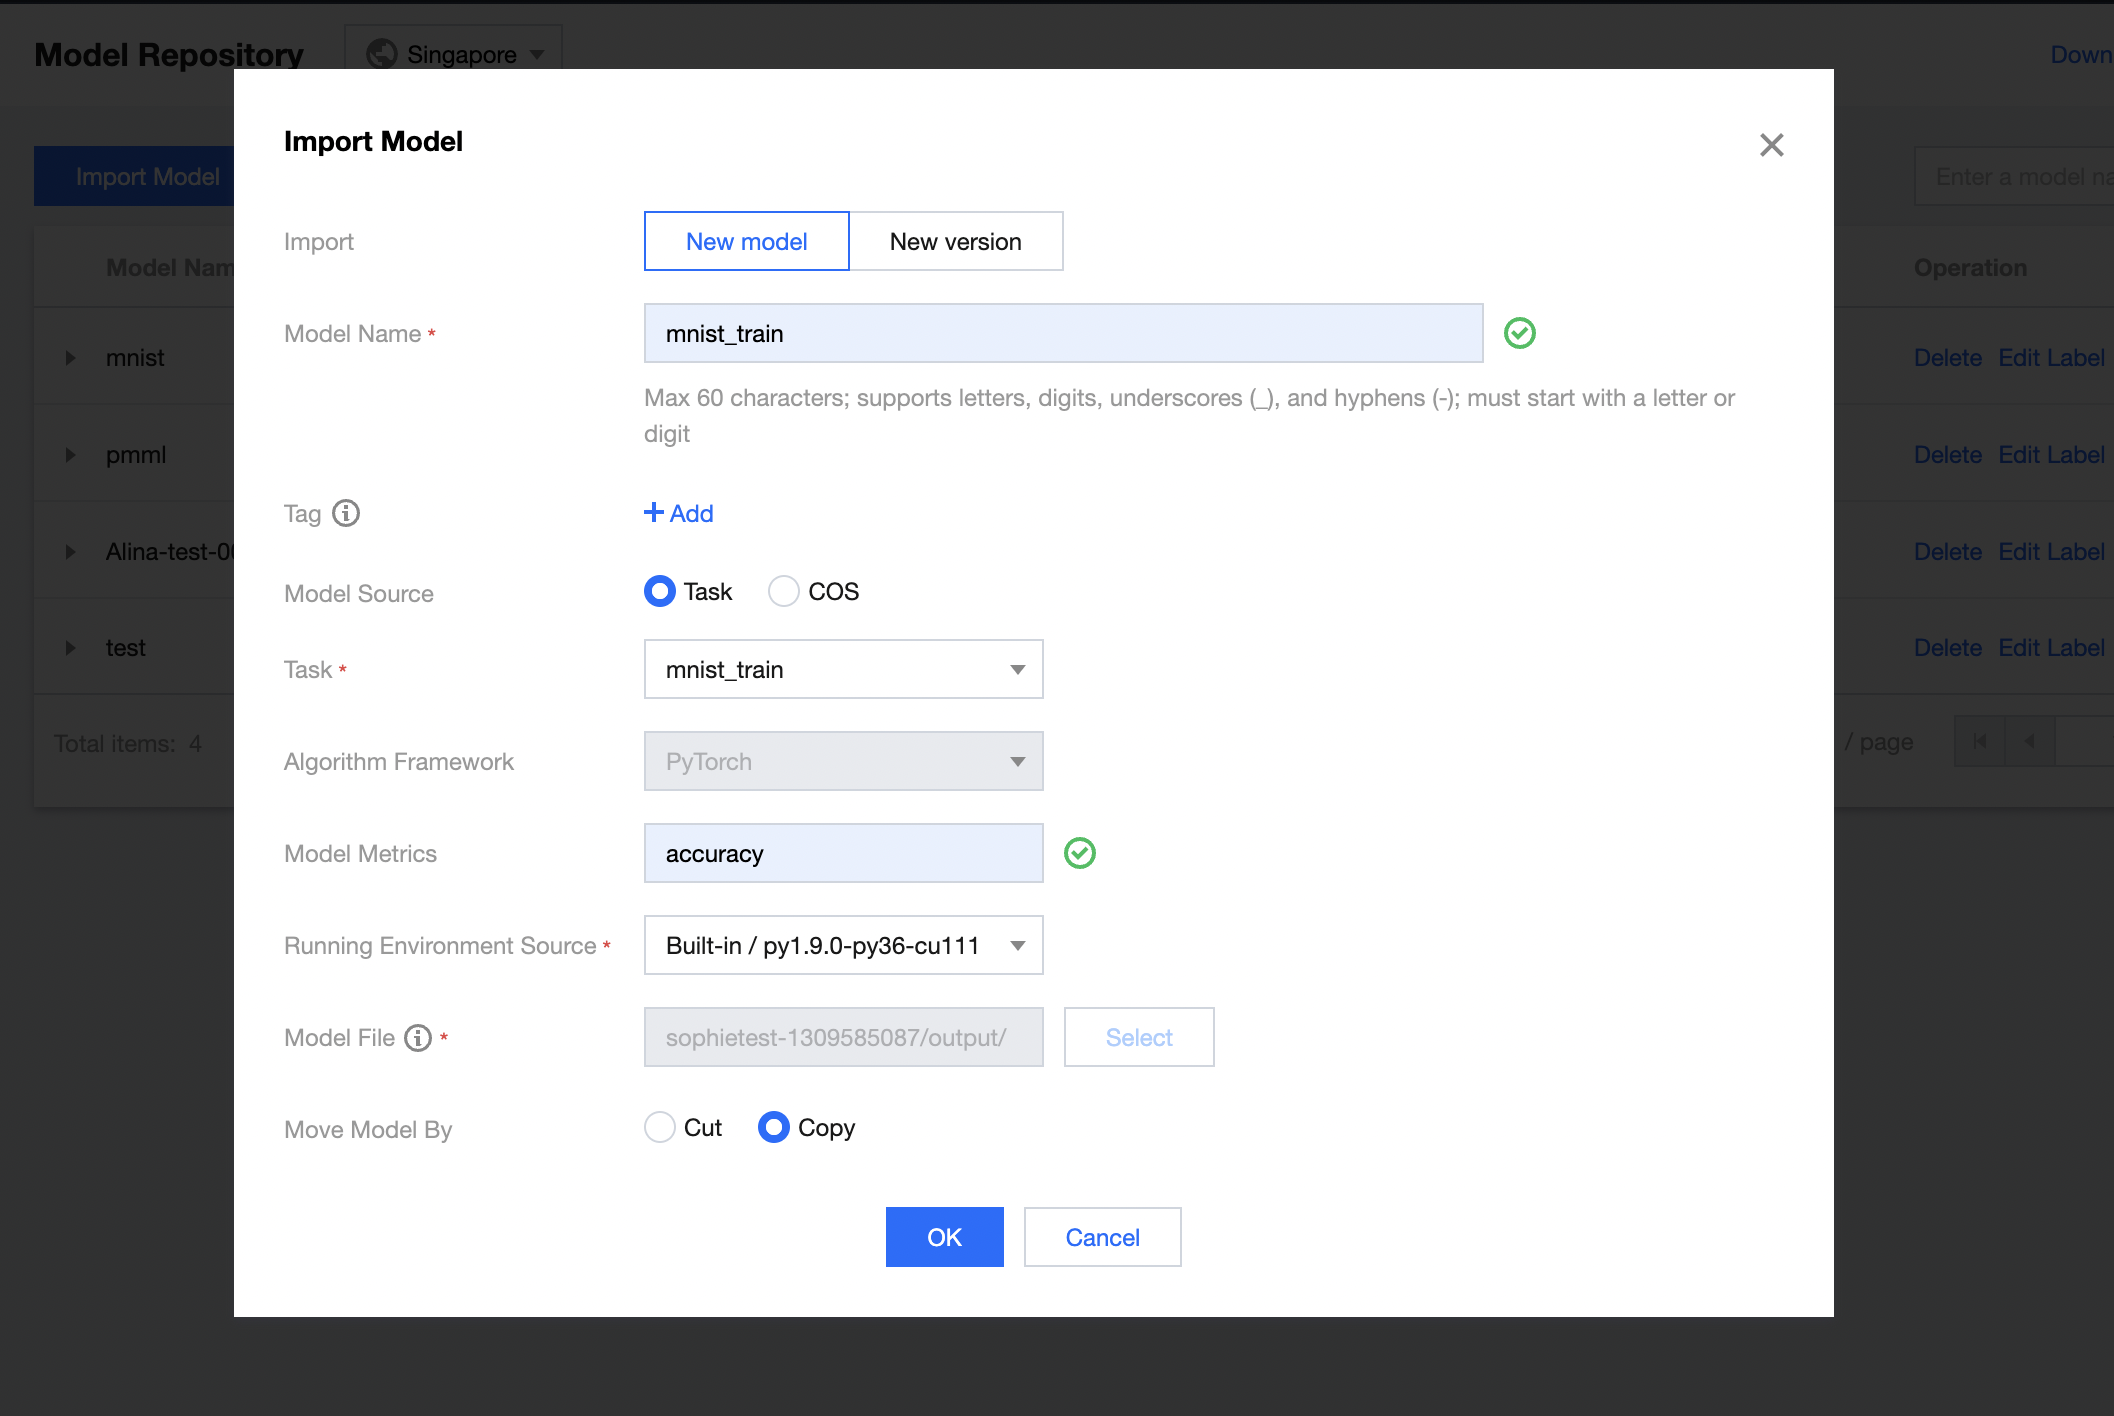
(3) Click OK.
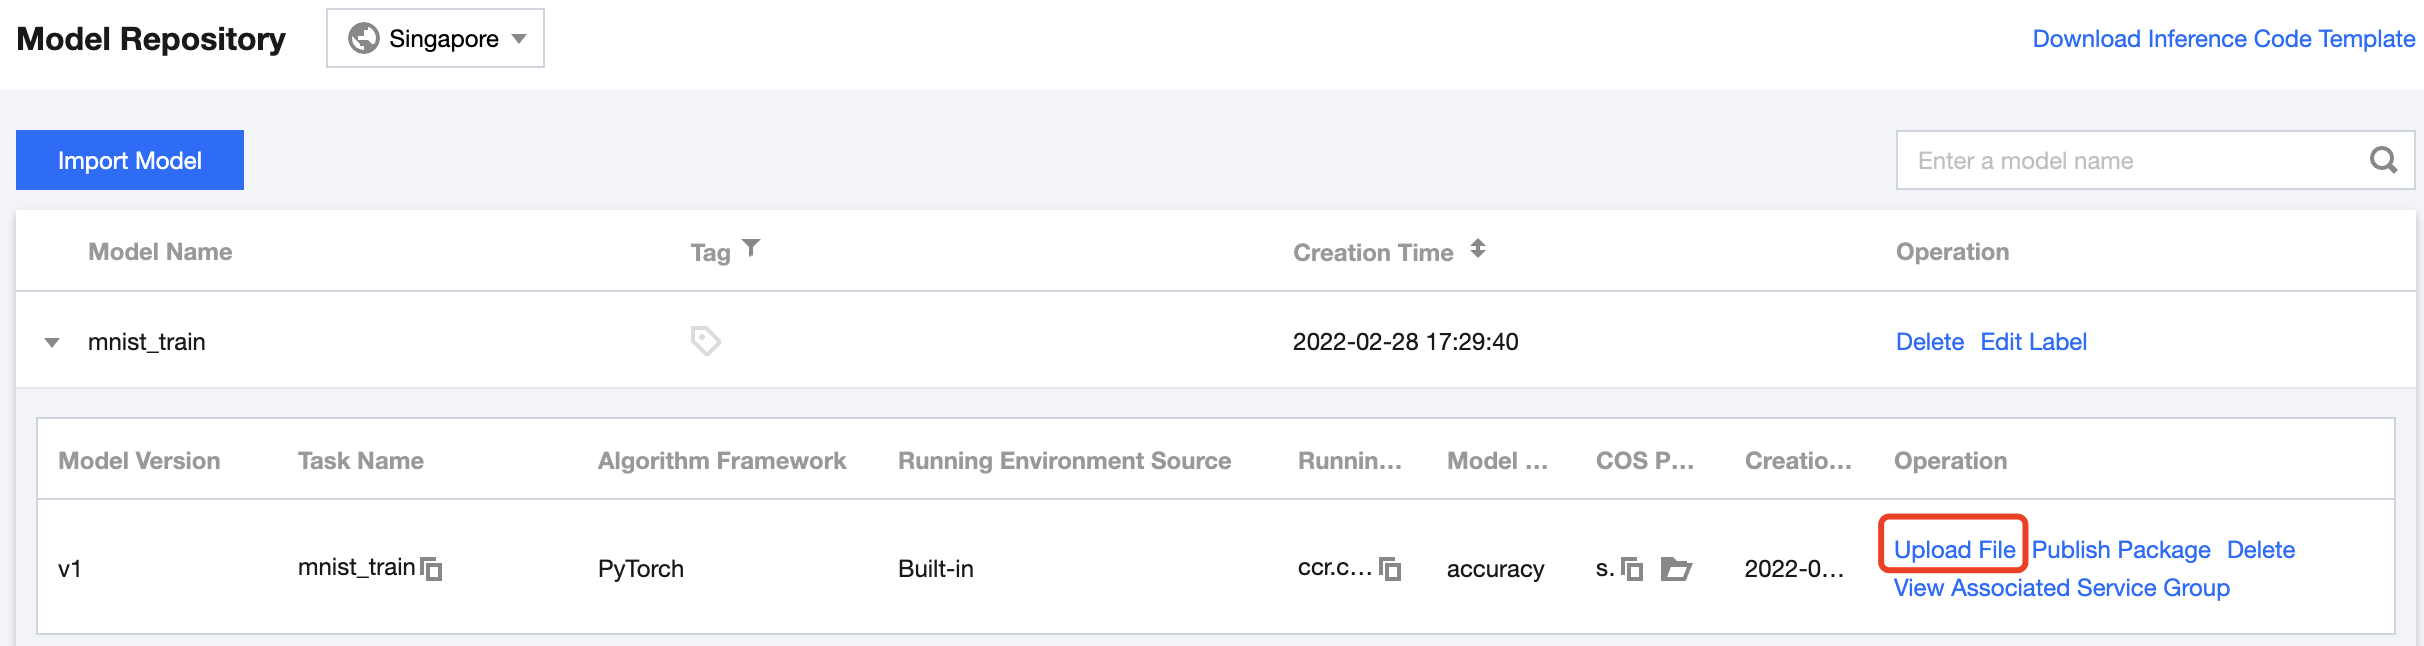
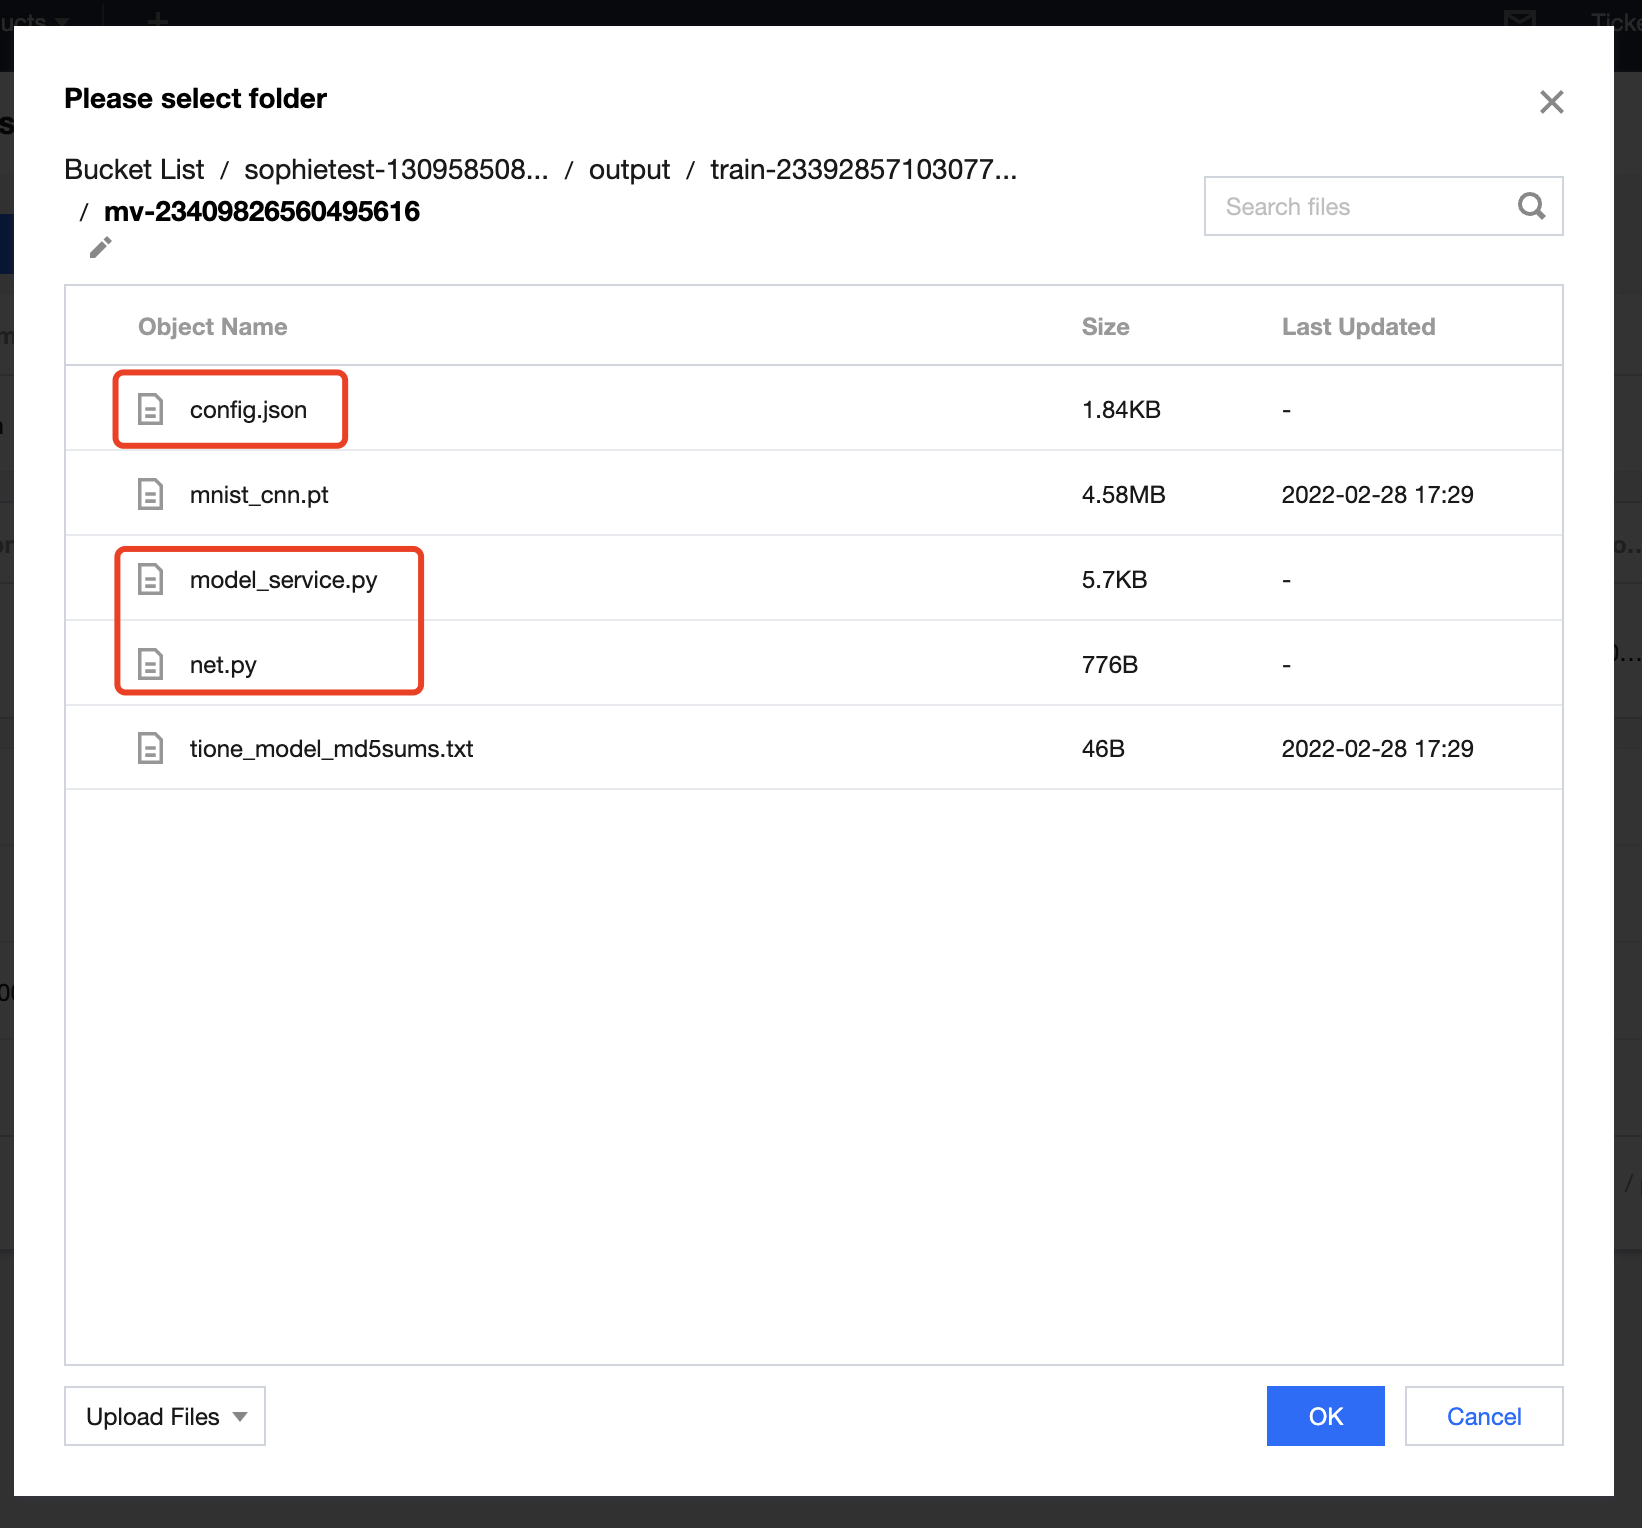
(4) Upload the inference script and configuration file.
Find the uploaded model version and click Upload File. In the COS pop-up window, click Upload File in the bottom-left corner, upload the 3 files generated after decompressing the mnist-pytorch-infer package successively, and click OK.
Step 2. Start an online service
(1) Go to the TI Platform console and select Model Services > Online Services on the left sidebar to enter the service list page.
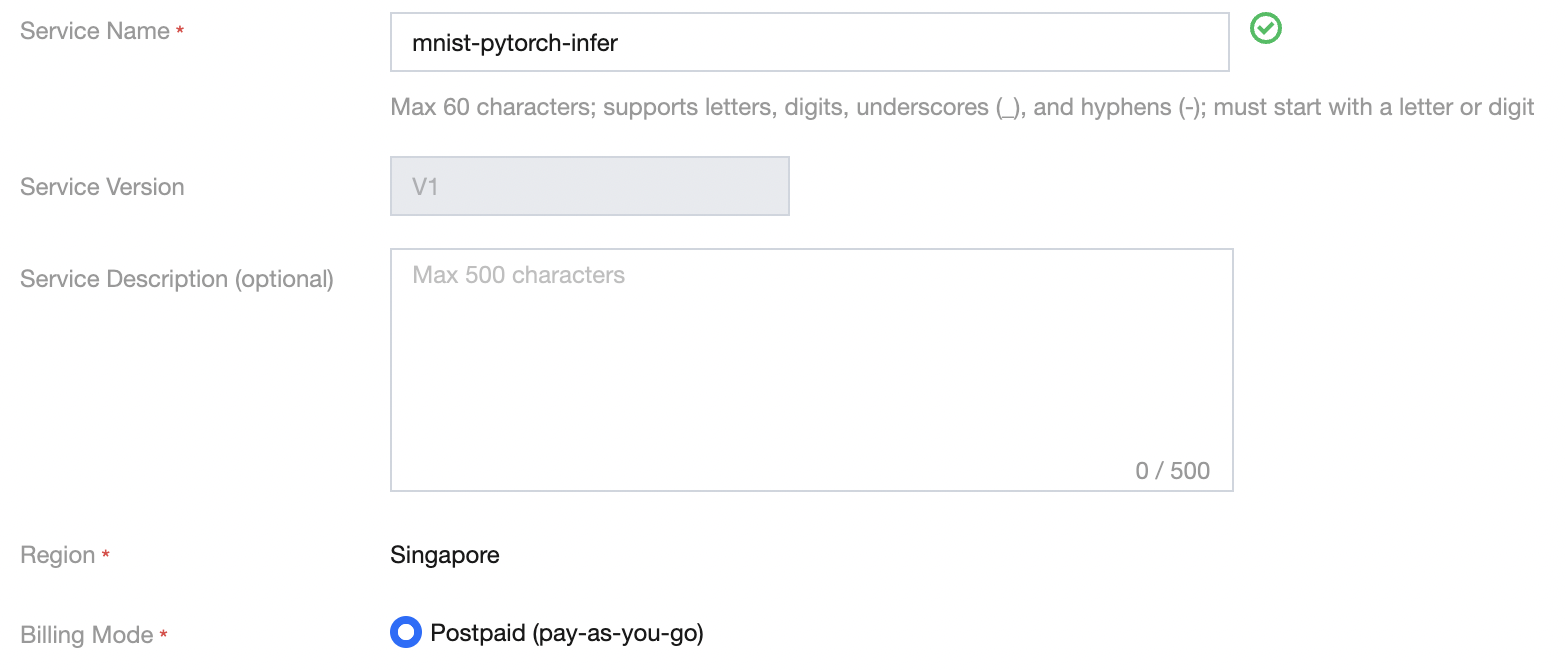
(2) Click New Service and enter the basic service information in the pop-up window as instructed below:
- Service Name: customize the service name, such as
mnist-pytorch-infer - Service Description: enter the optional service description as needed
- Billing Mode: if you have not used the resource group management module, we recommend you select Postpaid
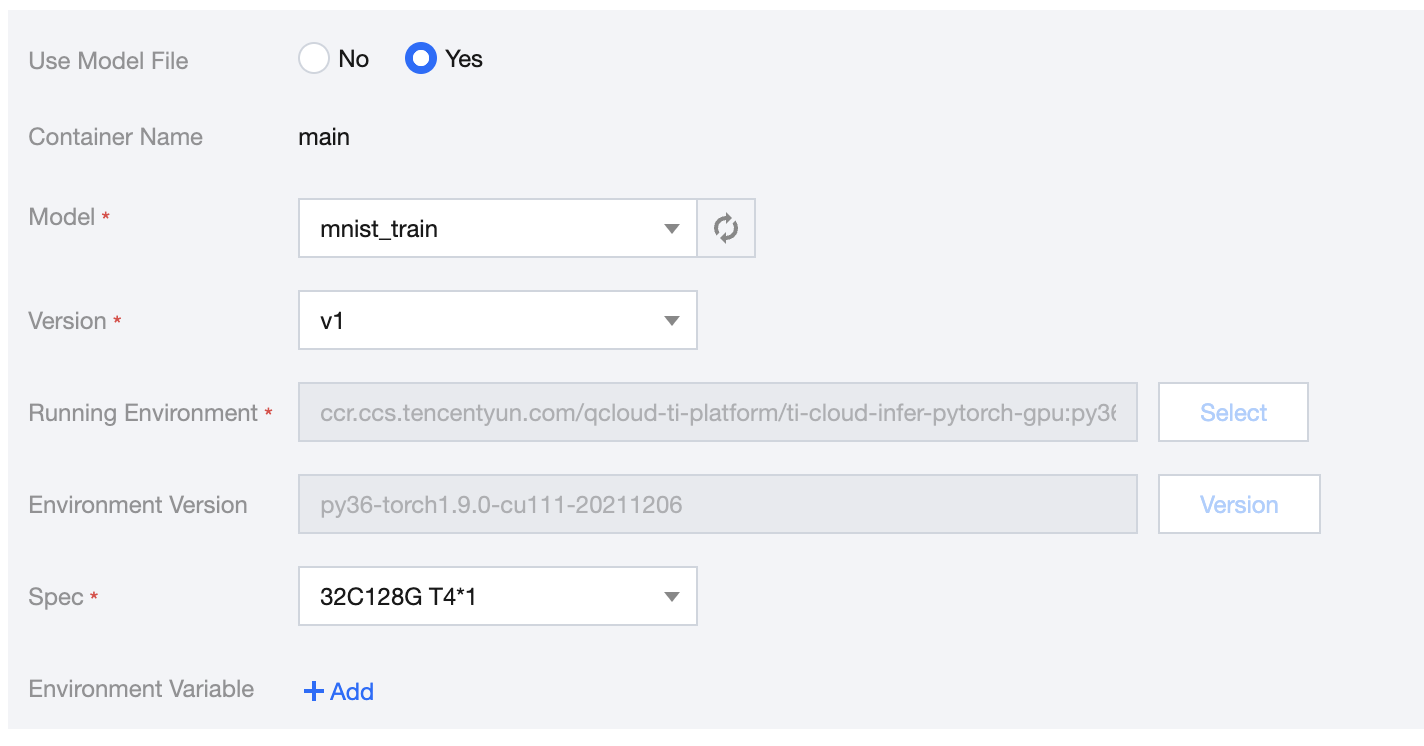
(3) Set the instance container information as instructed below:
- Use Model File: select Yes
- Model: select the model file
mnist_trainimported in the previous step - Version: select v1
- Spec: select a spec as needed, such as
32C128G T4*1
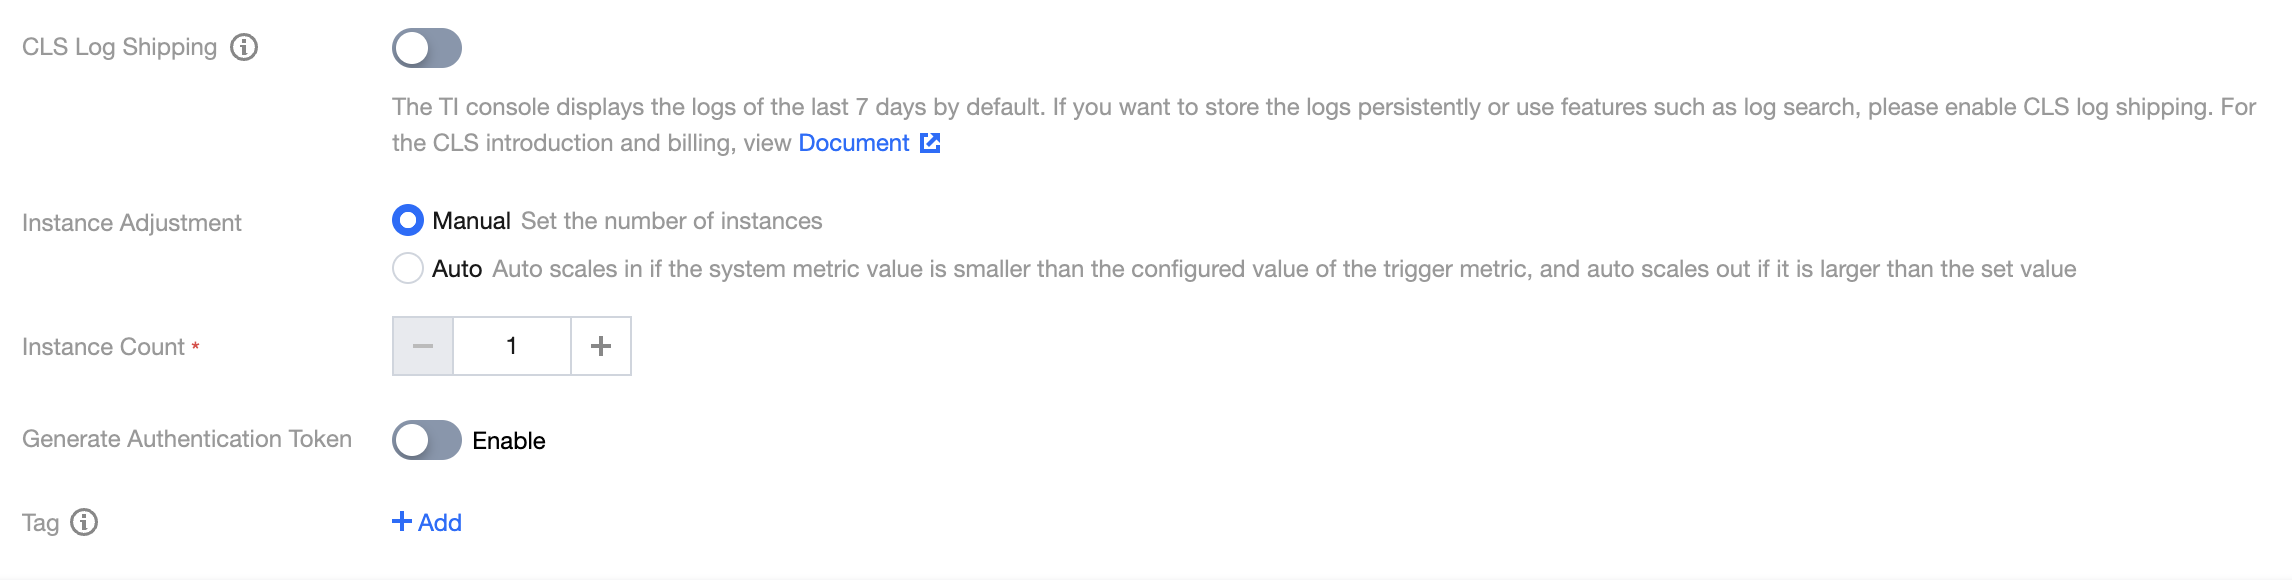
(4) Complete the advanced settings of the service as instructed below:
- CLS Log Shipping: enable it as needed, which is disabled by default
- Instance Adjustment: select an option as needed, which is Manual by default
- Instance Count: configure a quantity as needed, which is 1 by default
- Generate Authentication Token: enable it as needed, which is disabled by default
- Tag: add optional tags as needed
(5) Click Start Service. If you have selected the postpaid mode, a fee freezing confirmation will be displayed.
The postpaid mode requires freezing the fees for two hours in advance. If your account balance is sufficient, click OK.
In the service list, the newly created service will be in Creating status. A gateway will be created, and compute resources will be scheduled in the service deployment process, which will take some time. After the service is deployed successfully, its status will change to Running.
Step 3. Test the service call
(1) Confirm that the service published in the previous step has been deployed and is in Running status.
(2) Click Call to enter the service call page.
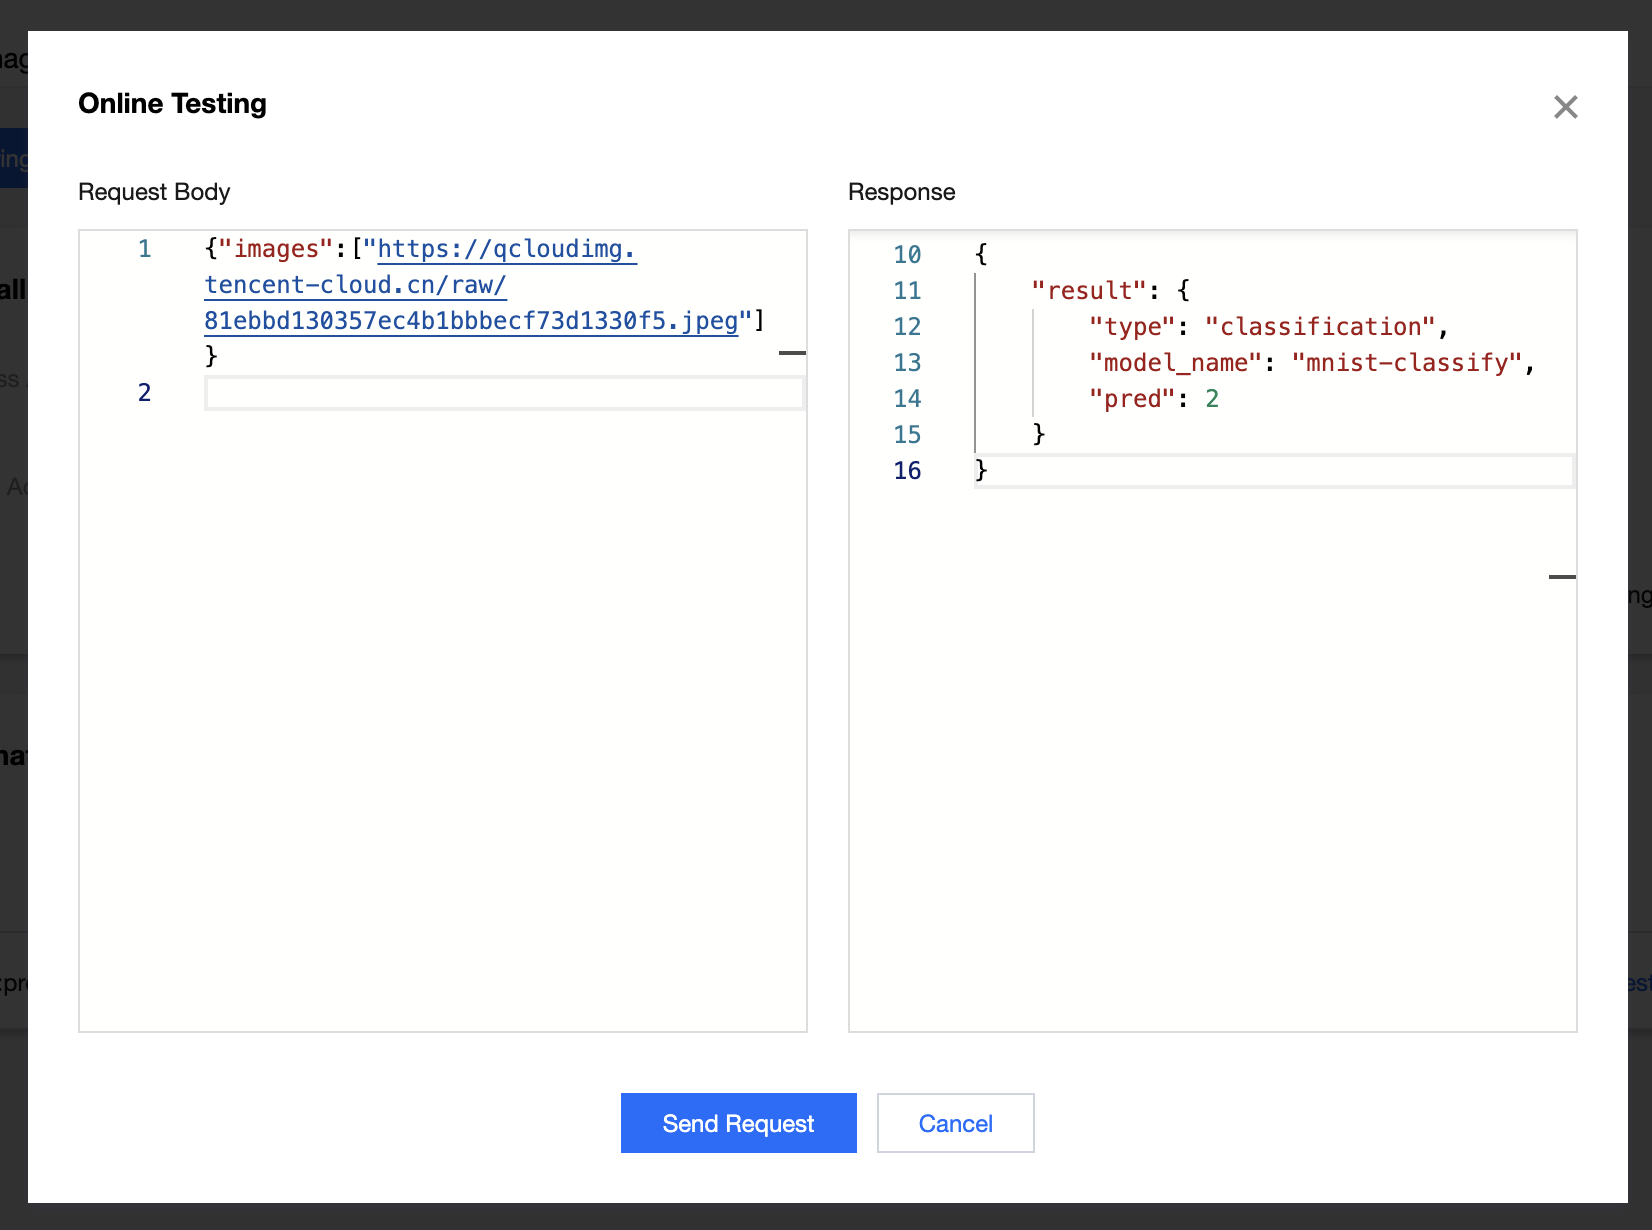
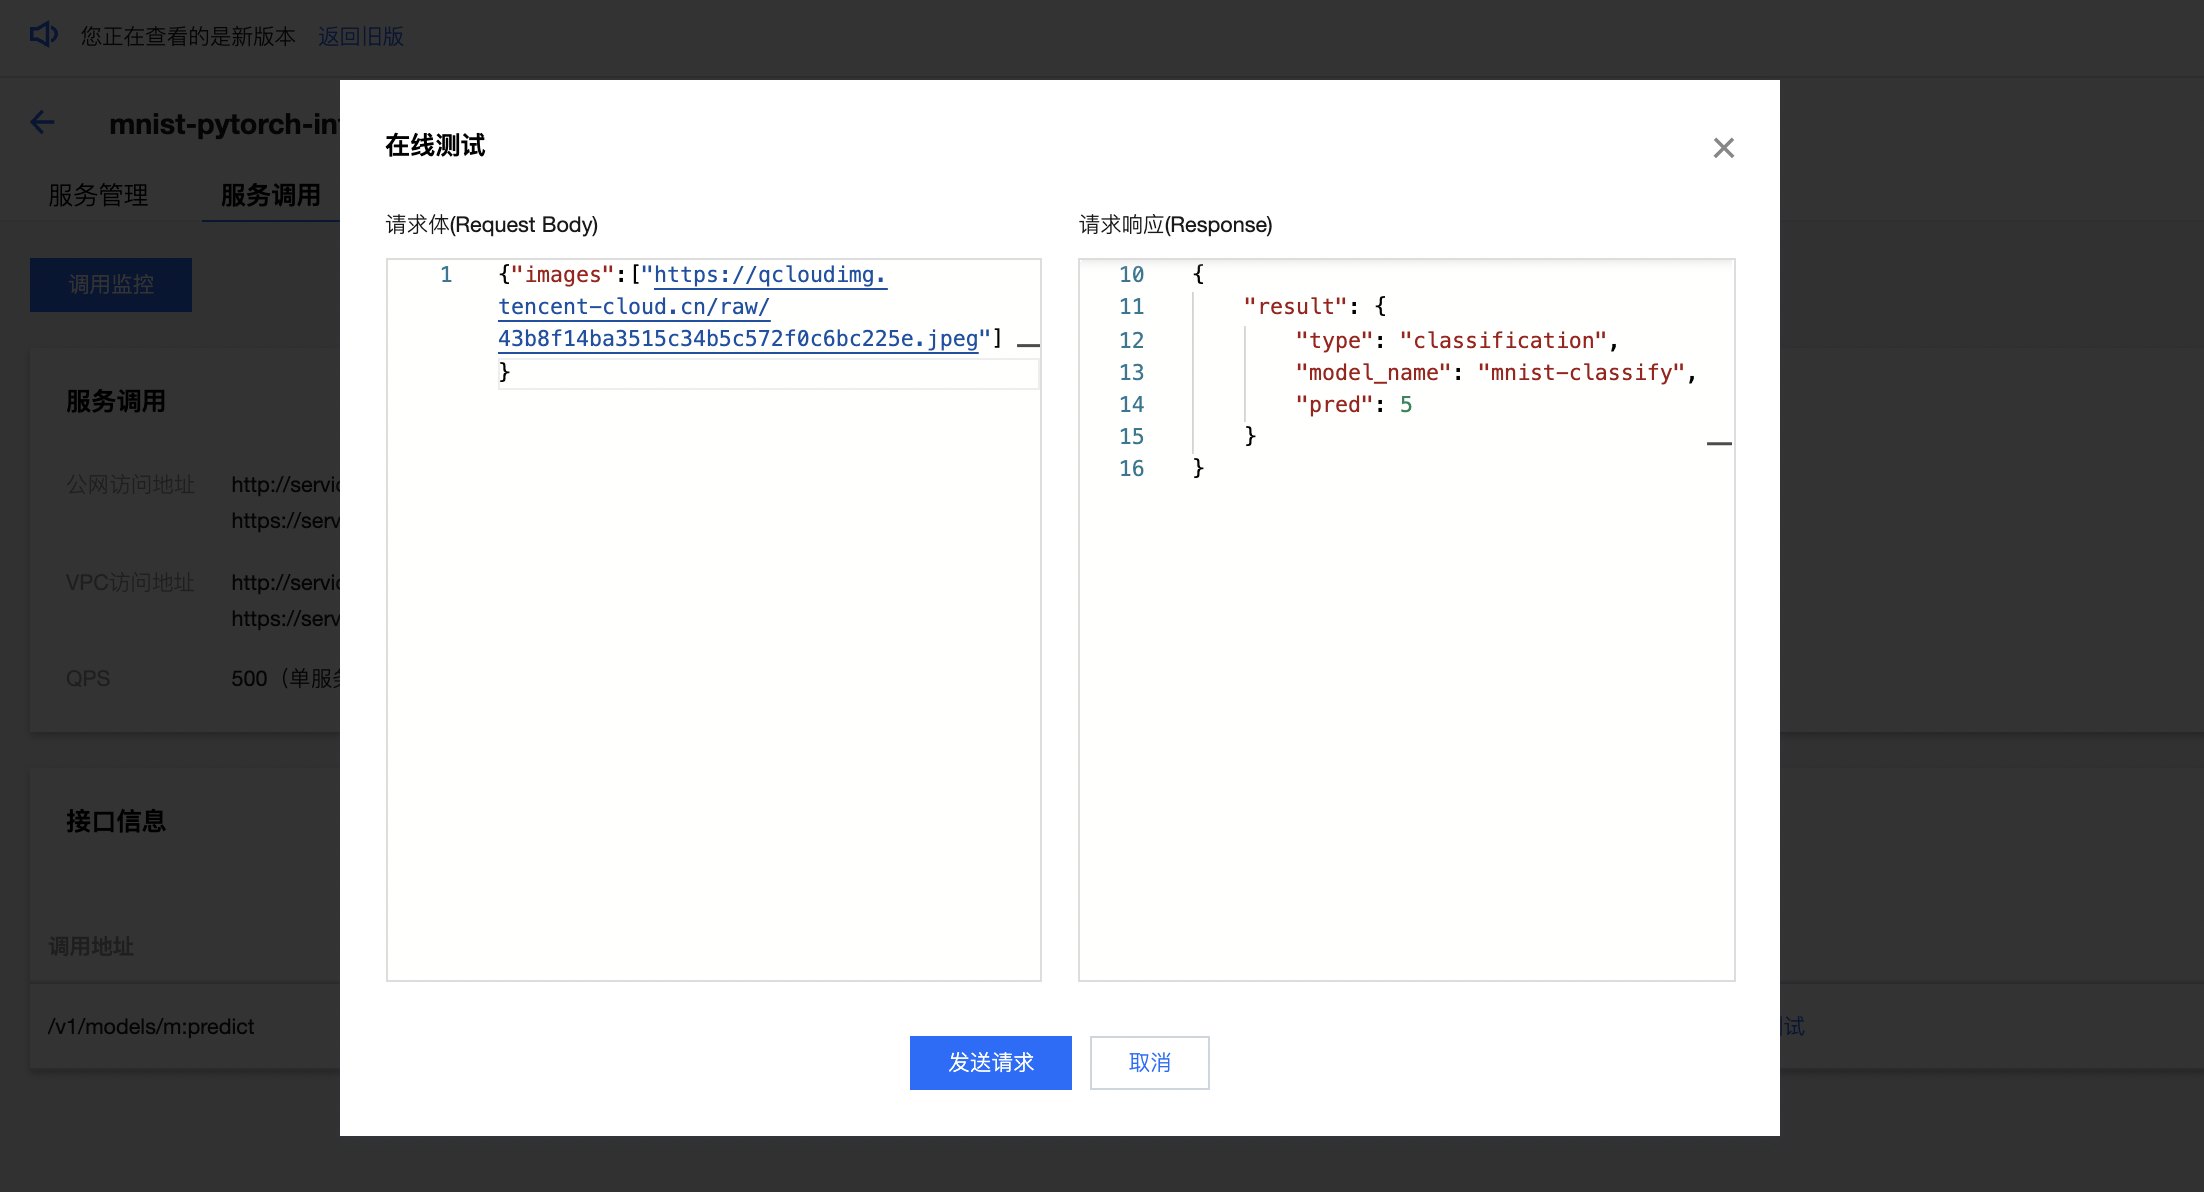
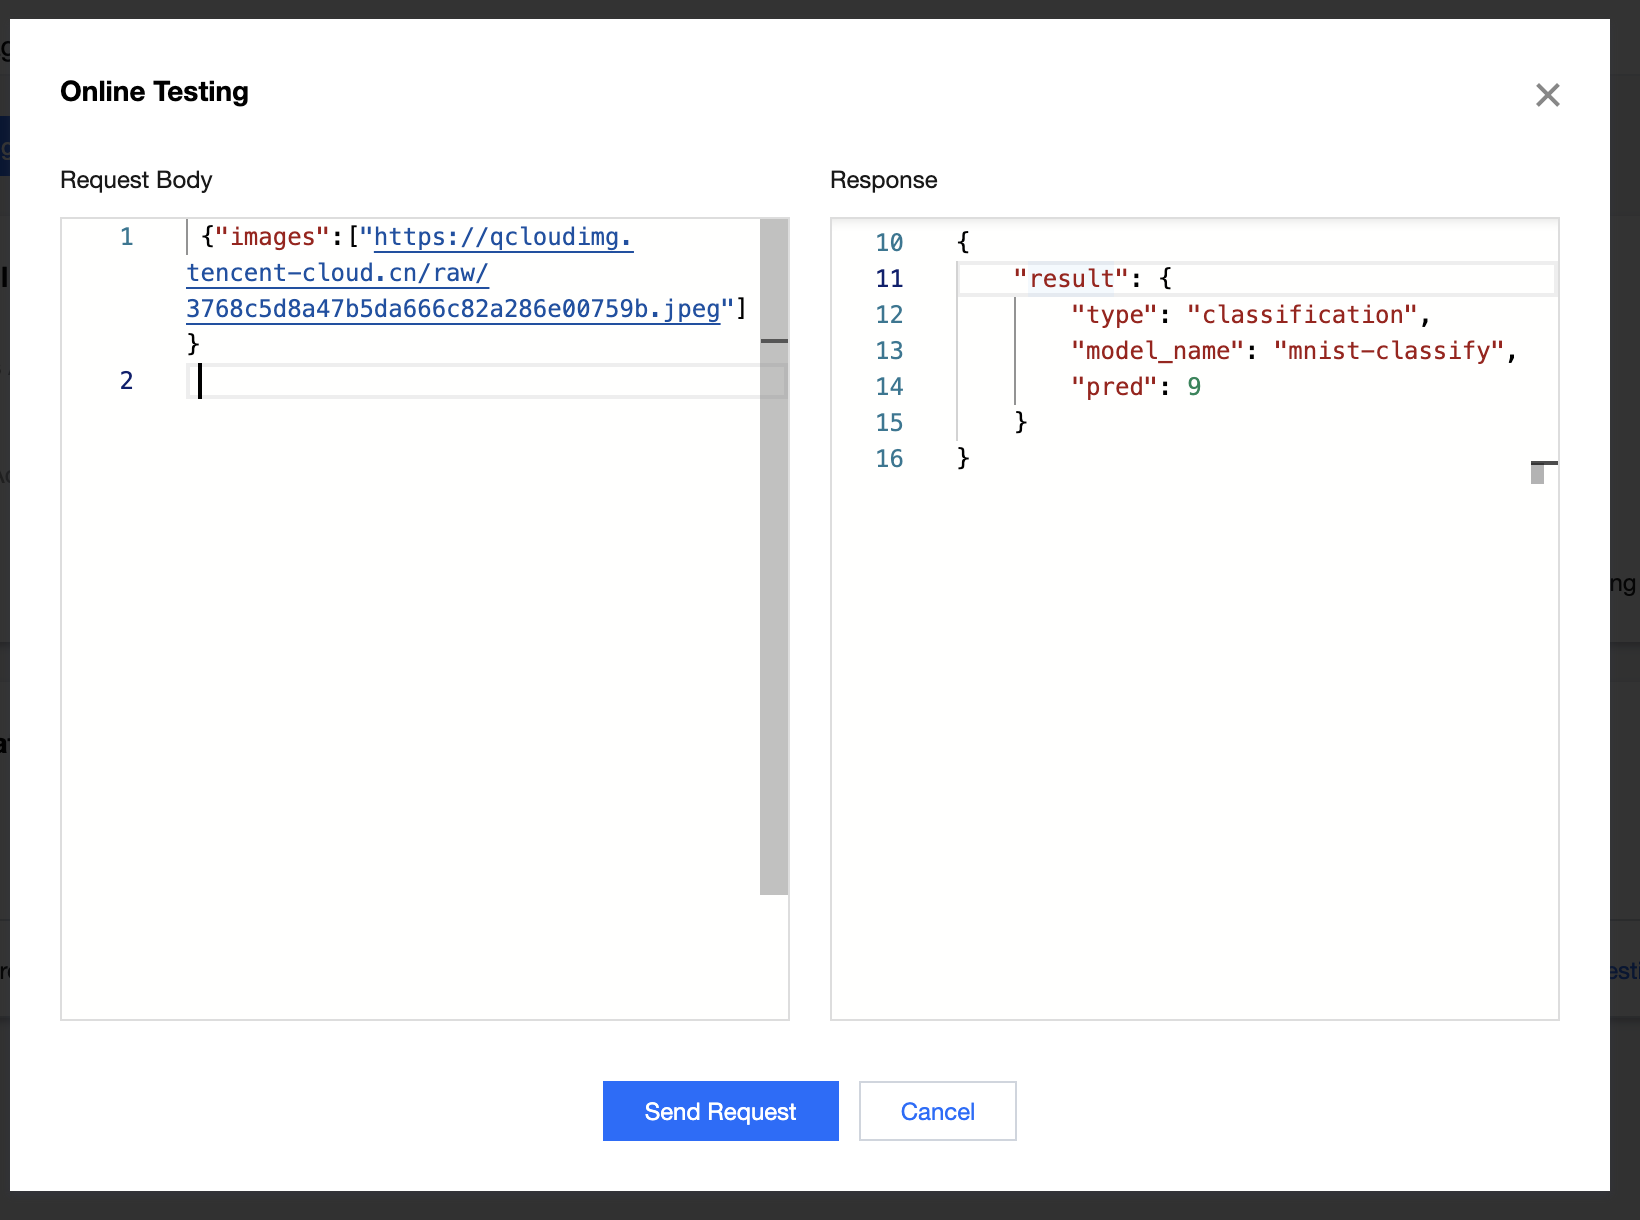
(3) View the API information and click Online Testing in the API list to open the service call testing page.
(4) Enter the request information in JSON format in the request body module, click Send Request, and you can view the prediction result in the response module.
- Sample 1. When the path
{"images":["https://qcloudimg.tencent-cloud.cn/raw/81ebbd130357ec4b1bbbecf73d1330f5.jpeg"]}of the image of 2 is entered in the request body, the prediction result will be 2.
- Sample 2. When the path
{"images":["https://qcloudimg.tencent-cloud.cn/raw/43b8f14ba3515c34b5c572f0c6bc225e.jpeg"]}of the image of 5 is entered in the request body, the prediction result will be 5.
- Sample 3. When the path
{"images":["https://qcloudimg.tencent-cloud.cn/raw/3768c5d8a47b5da666c82a286e00759b.jpeg"]}of the image of 9 is entered in the request body, the prediction result will be 9.
Demo 2. Import a third-party model into the platform and deploy it as an online service
This demo uses the PyTorch image classification model in the platform's preset model package as an example to describe how to deploy a third-party model as an online service. After deploying the model, you will be able to call the service through the online testing feature to recognize the type of the input image.
Preparations
Model package
(1) Log in to the TI Platform console and select Models > Model Repository on the left sidebar to enter the model list page.
(2) Click Download Inference Code Template in the top-right corner to get the preset model package provided by the platform.
(3) Decompress the model package and find the pytorch>classify folder.
Test data
The following test data has been prepared and can be directly used for call testing after the service is published.
(1) Image of cat
https://qcloudimg.tencent-cloud.cn/raw/bcbdae25439713ecb4dbb154d43a9ef8.jpeg
(2) Image of butterfly
https://qcloudimg.tencent-cloud.cn/raw/40a99b15e76d6957644f160b9149522a.jpeg
(3) Image of dog
https://qcloudimg.tencent-cloud.cn/raw/aab789b6e047fa804bbf803de16f49a0.jpeg
Step 1. Import the model repository
(1) Go to the TI Platform console and select Models > Model Repository on the left sidebar to enter the model list page.
(2) Click Import Model and set the following parameters in the Import Model pop-up:
- Import: select New model
- Model Name: customize the model name, such as
classify - Tag: add optional tags as needed
- Model Source: select COS
- Algorithm Framework: select PyTorch
- Model Metrics: enter a metric as needed, such as
accuracy - Running Environment Source: we recommend you use a built-in GPU running environment, such as
py1.9.0-py36-cu111 - Model File: click Select. In the COS pop-up window, select the target bucket, click Upload Folder in the bottom-left corner, upload the pytorch>classify folder in the model package, and select the folder path

(3) Click OK.
Step 2. Start an online service
(1) Go to the TI Platform console and select Model Services > Online Services on the left sidebar to enter the service list page.
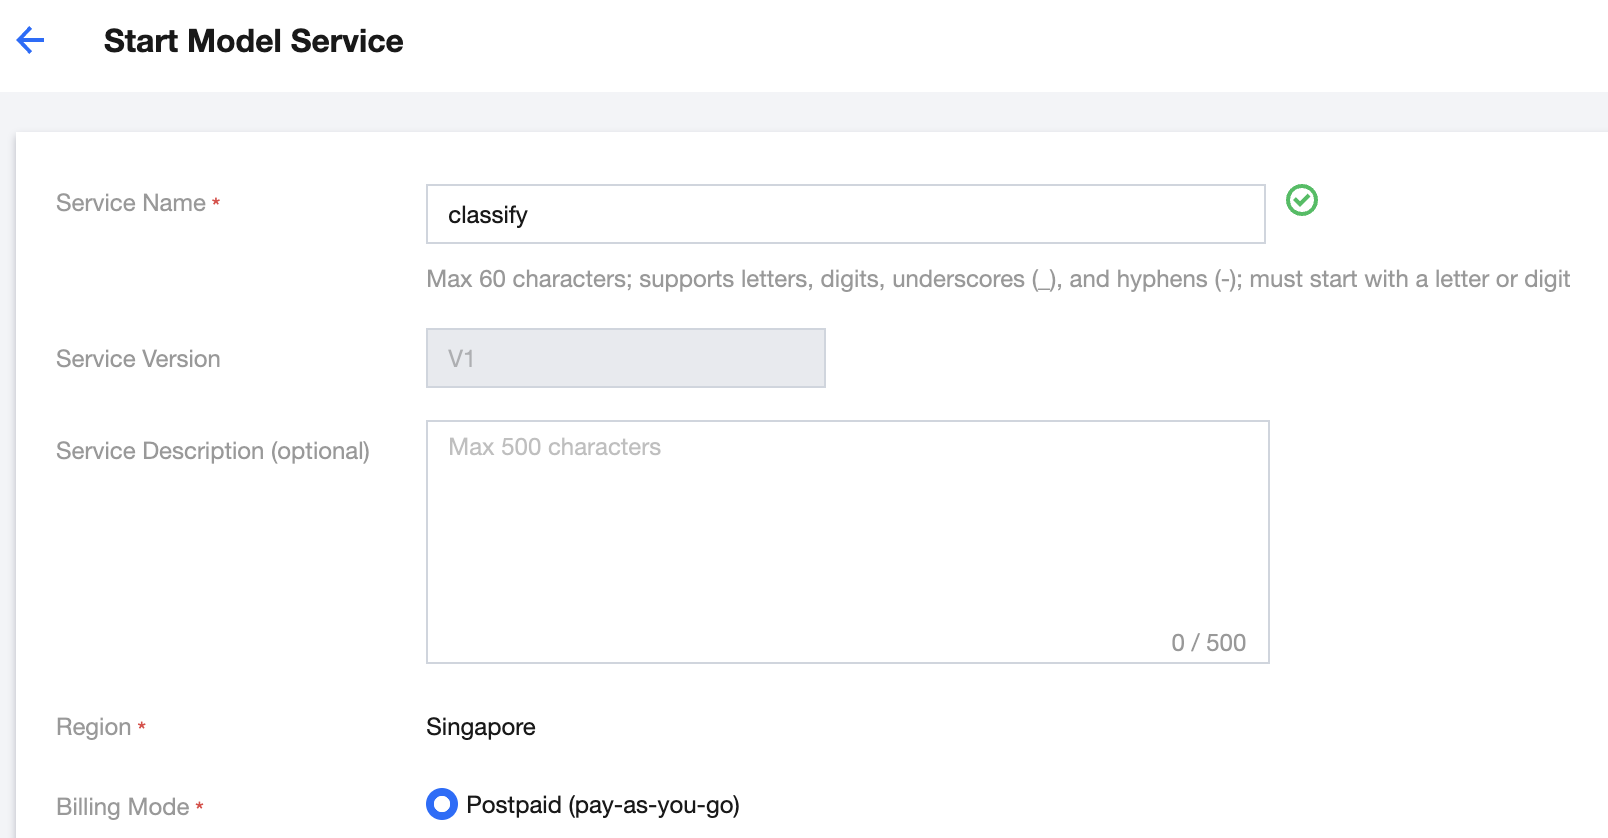
(2) Click New Service and enter the basic service information in the pop-up window as instructed below:
- Service Name: customize the service name, such as
classify - Service Description: enter the optional service description as needed
- Billing Mode: if you have not used the resource group management module, we recommend you select Postpaid
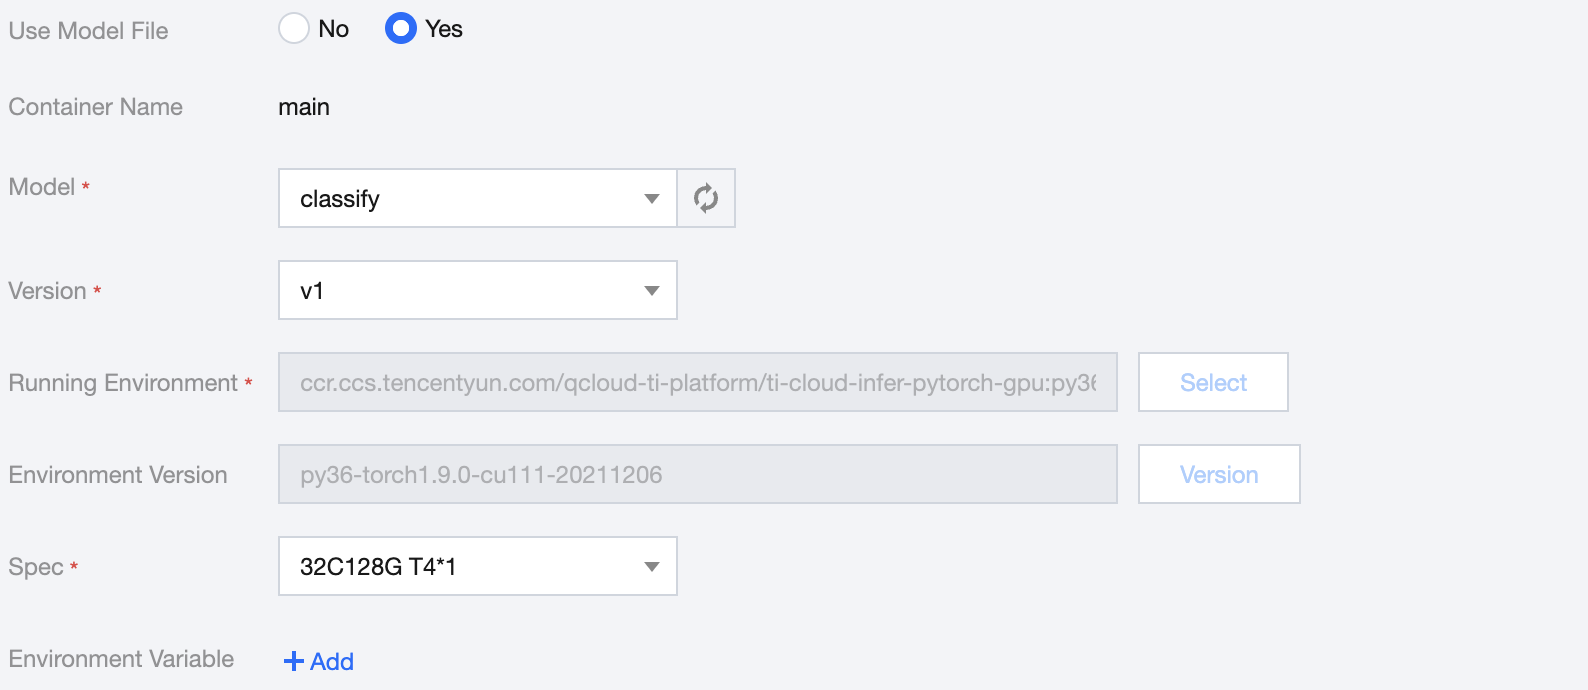
(3) Set the instance container information as instructed below:
- Use Model File: select Yes
- Model: select the model file
classifyimported in the previous step - Version: select v1
- Spec: select a spec as needed, such as
32C128G T4*1
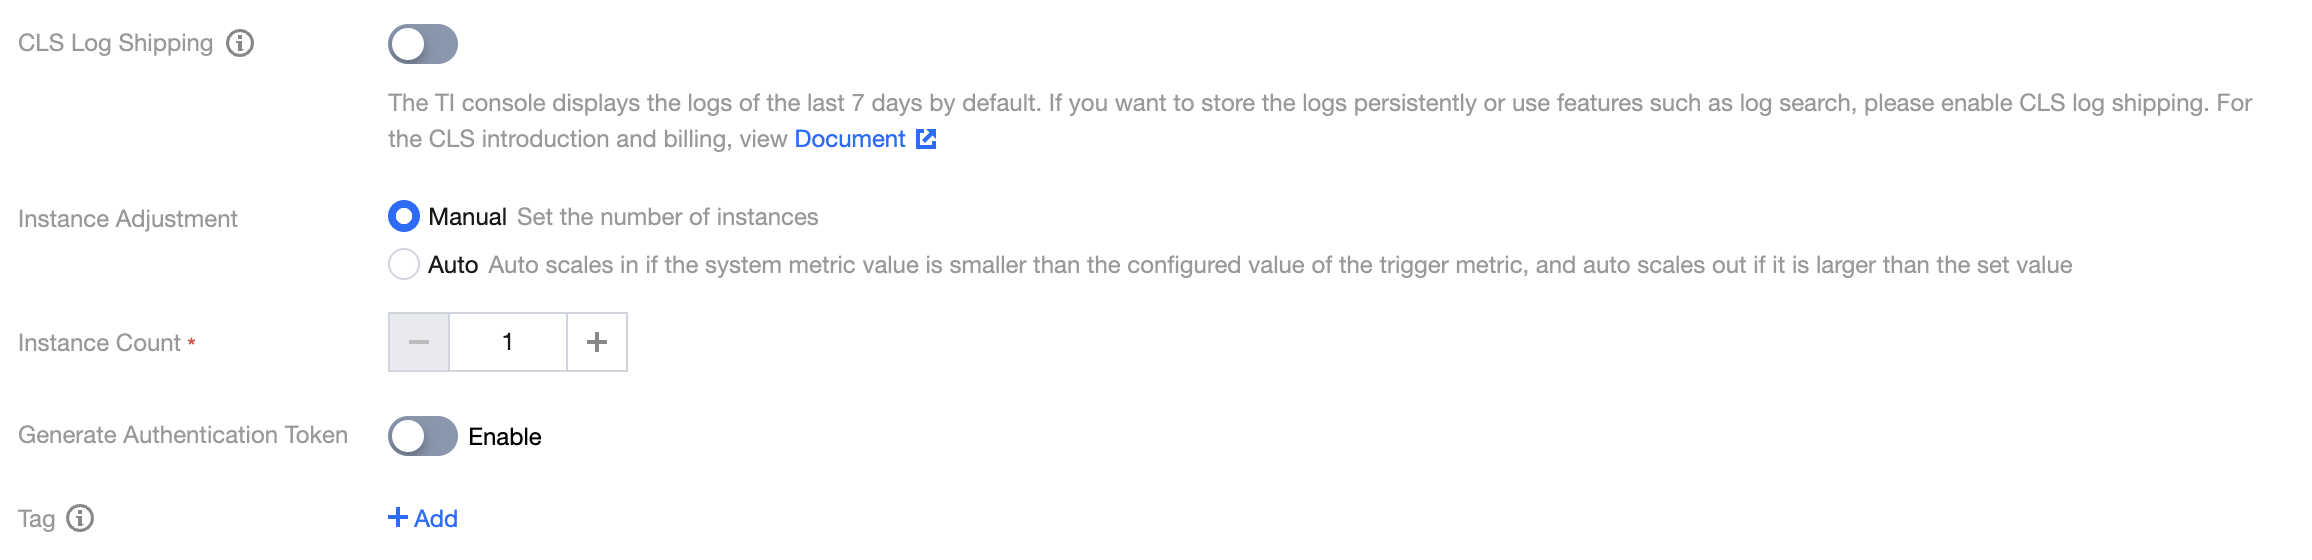
(4) Complete the advanced configuration of the service as instructed below:
- CLS Log Shipping: enable it as needed, which is disabled by default
- Instance Adjustment: select an option as needed, which is Manual by default
- Instance Count: configure a quantity as needed, which is 1 by default
- Generate Authentication Token: enable it as needed, which is disabled by default
- Tag: add optional tags as needed
(5) Click Start Service. If you have selected the postpaid mode, a fee freezing confirmation will be displayed.
The postpaid mode requires freezing the fees for two hours in advance. If your account balance is sufficient, click OK.
In the service list, the newly created service will be in Creating status. A gateway will be created, and computing resources will be scheduled in the service deployment process, which will take some time. After the service is deployed successfully, its status will change to Running.
Step 3. Test the service call
(1) Confirm that the service published in the previous step has been deployed and is in Running status.
(2) Click Call to enter the service call page.
(3) View the API information and click Online Testing in the API list to open the service call testing page.
(4) Enter the request information in JSON format in the request body module, click Send Request, and you can view the prediction result in the response module.
Sample 1. When the path
{"image": "https://qcloudimg.tencent-cloud.cn/raw/bcbdae25439713ecb4dbb154d43a9ef8.jpeg"}of the image of cat is entered in the request body, the highest level of confidence will be ofcatin the returned result.Sample 2. When the path
{"image": "https://qcloudimg.tencent-cloud.cn/raw/40a99b15e76d6957644f160b9149522a.jpeg"}of the image of butterfly is entered in the request body, the highest level of confidence will be ofbutterflyin the returned result.Sample 3. When the path
{"image": "https://qcloudimg.tencent-cloud.cn/raw/aab789b6e047fa804bbf803de16f49a0.jpeg"}of the image of dog is entered in the request body, the highest level of confidence will be ofdogin the returned result.

 Yes
Yes
 No
No
Was this page helpful?