COS Authorization and Identity Verification Process
Download
Mode fokus
Ukuran font
Terakhir diperbarui: 2024-03-25 15:39:58
COS resources (buckets and objects) are configured with the Private Read/Write permission by default. Even if anonymous users obtain object URLs, they cannot access your resource content through the URLs due to lack of signature information.
Main Steps
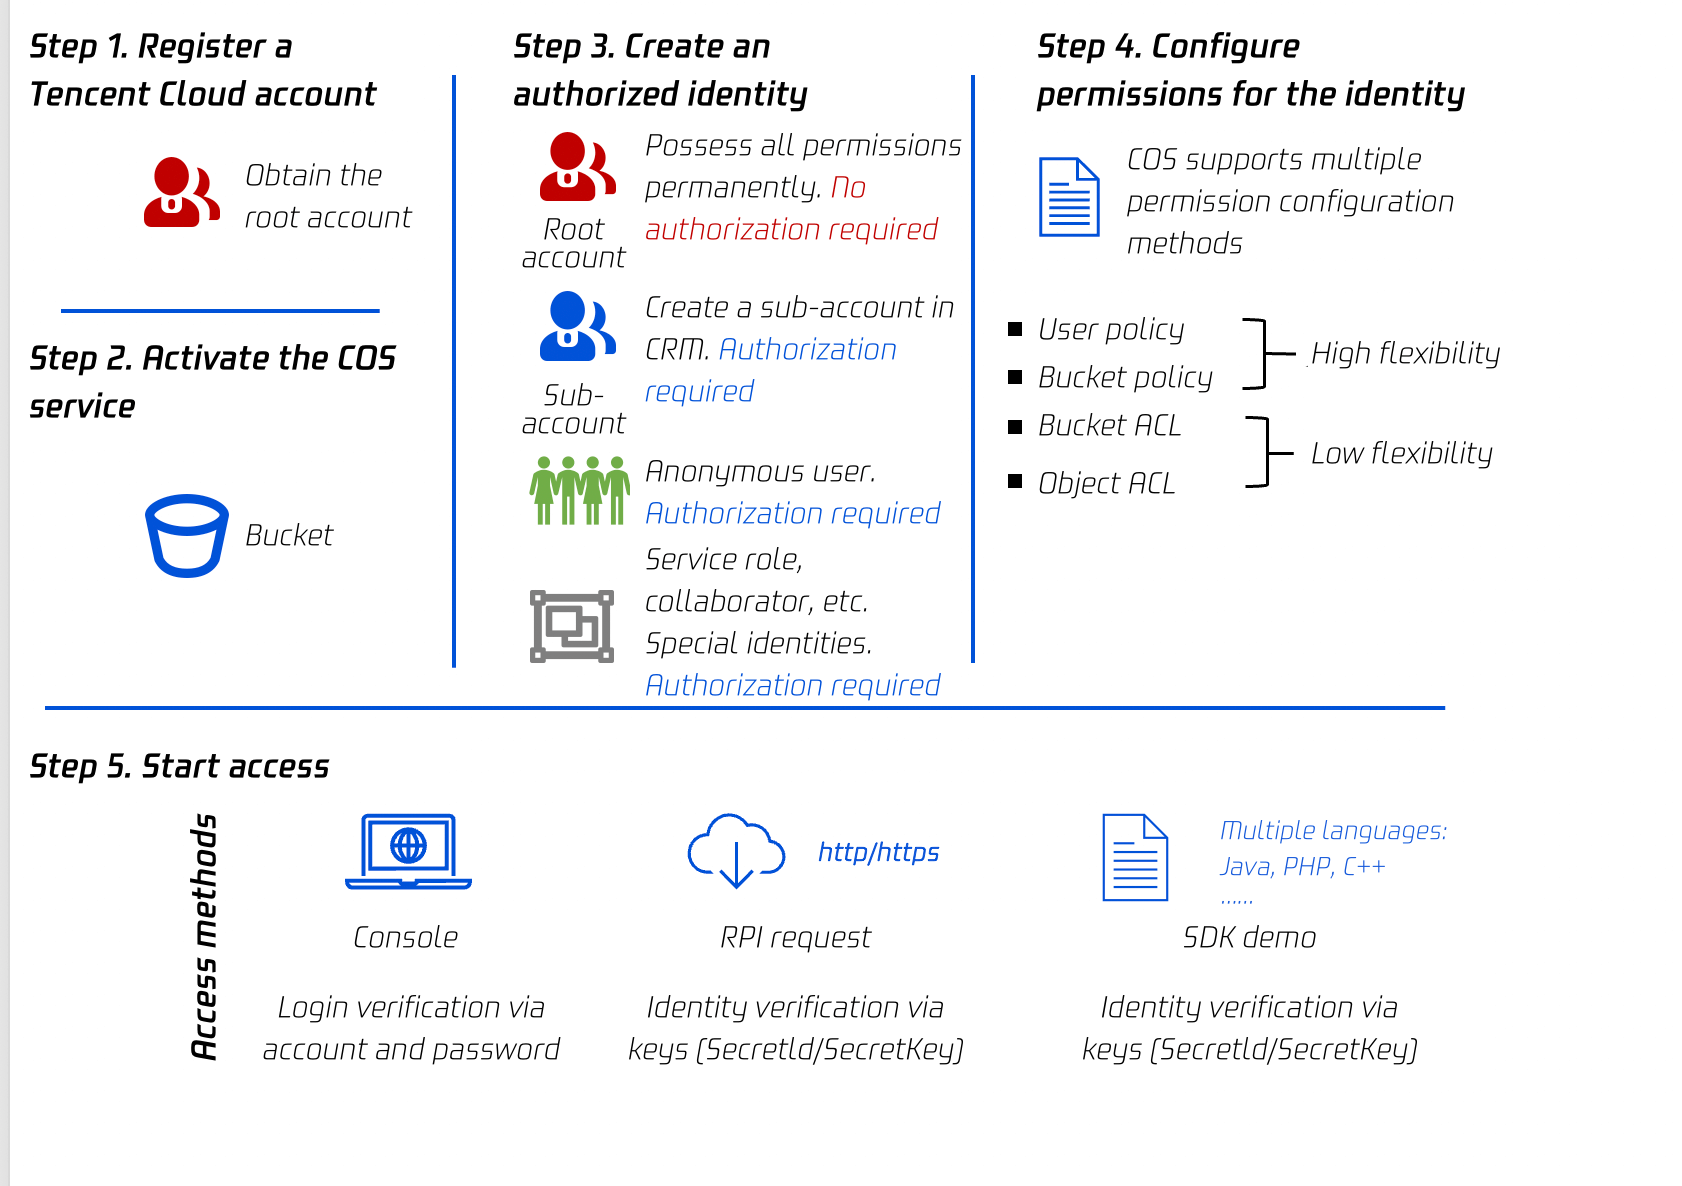
COS's authorization and identity verification process consists of five steps, as shown in the figure below.
Step 1. Register a Tencent Cloud account
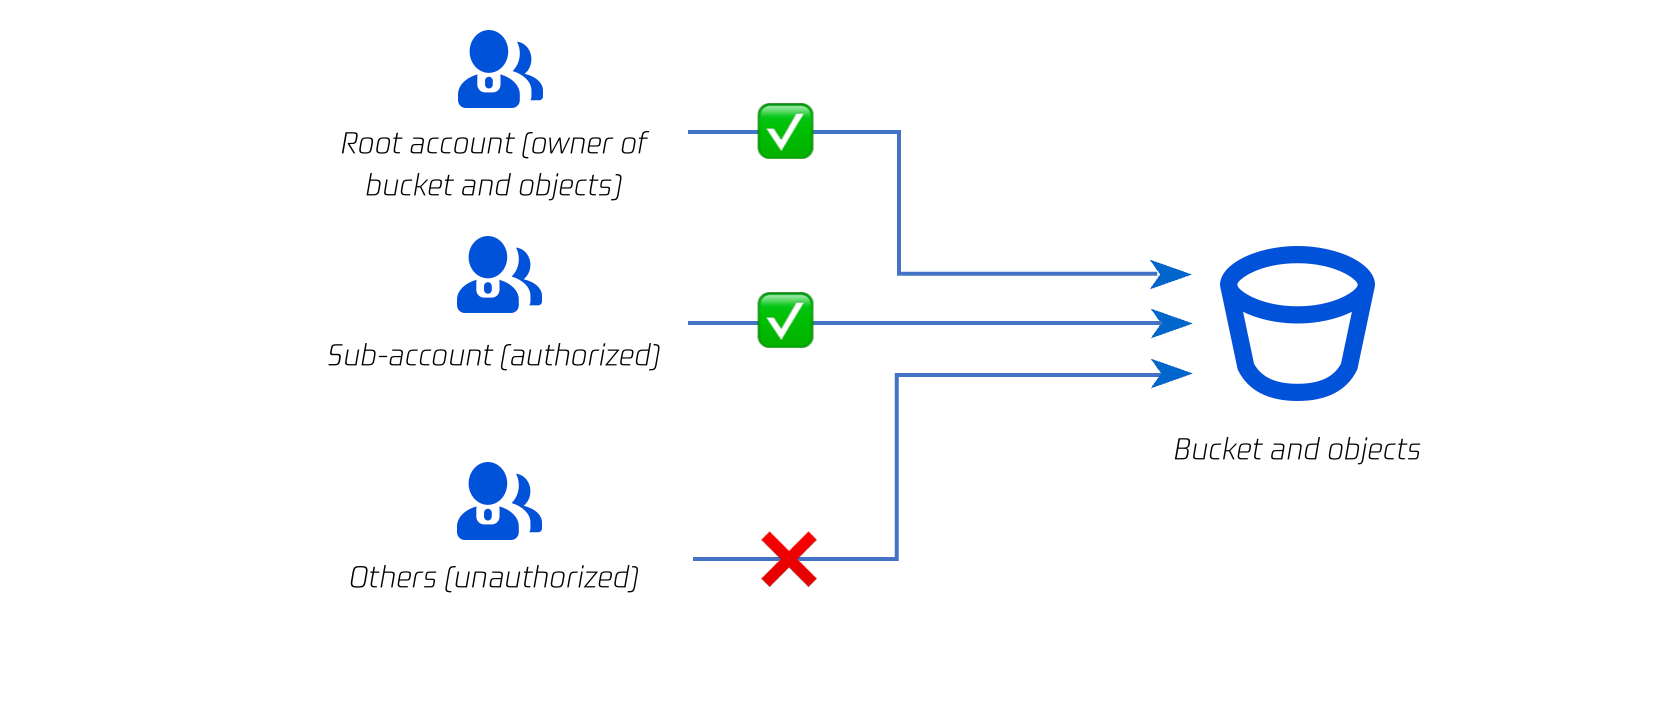
After registration, your account serves as your root account, which has the highest permissions.
Step 2. Activate the COS service
After you activate the COS service, all buckets you create belong to your root account. The root account has the highest permissions of all resources and can be used to create and authorize sub-accounts.
Step 3. Create an authorized identity
Note:
Unless you set the bucket or object permission to Public Read, identity verification is required for any access to COS.
With a root account, you can create multiple identities and grant different permissions to different resources.
If you need to authorize specific users, such as coworkers and users in specific departments, you can create sub-accounts for these users in the Cloud Access Management (CAM) console, and then use various authorization methods, such as bucket policies, user policies (CAM policies), bucket ACLs, and object ACLs, to grant specific access permissions to specified resources to the sub-accounts.
If you need to authorize anonymous users, such as allowing others to download objects through URLs without identity verification, you need to change the resource permission from the default Private Read to Public Read.
If you need to enable other Tencent Cloud services (such as CDN) to use COS buckets, you need to follow the same authorization process. With your authorization, these services will legally access COS through service roles. You can view the created service roles in the CAM console.
For authorization across Tencent Cloud accounts, if you need to authorize only one COS bucket, you can directly authorize another root account via a bucket policy or ACL. If you need to authorize multiple COS buckets or Tencent Cloud resources, you can create collaborator identities in the CAM console for a wider range of authorization.
You can access COS through the console, API requests, and SDKs. For security reasons, buckets are configured with the Private Read permission by default and require identity verification for any access mode. For the console access mode, you can log in using your account and password. For both the API request and SDK access modes, you need to use keys (SecretId/SecretKey) for identity verification.
COS Identity Verification Modes
COS buckets are private by default. Identity verification is required regardless of whether you access COS using keys (permanent or temporary keys) or pre-signed URLs. In special scenarios, you can set your bucket permission to Public Read so that any user can use object URLs to download objects directly without identity verification, which is risky.
1. Access via permanent key
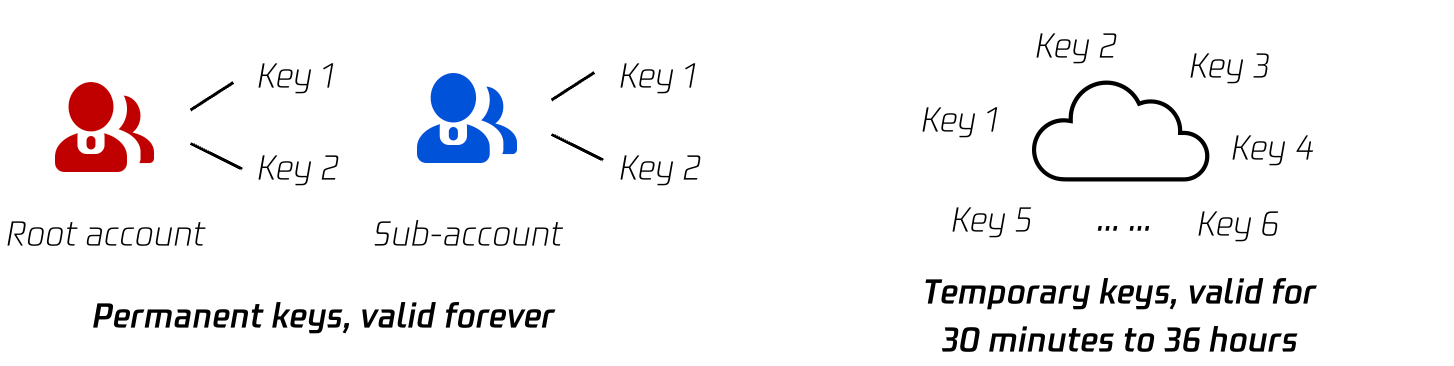
A key (SecretId and SecretKey) is the security credential used for identity verification when a user accesses a Tencent Cloud API and can be viewed on the Manage API Key page in the CAM console. Multiple keys can be created under each root account or sub-account.
A permanent key consists of a SecretId and a SecretKey. Two pairs of permanent keys can be generated for each root account or sub-account. Permanent keys represent the permanent identities of accounts. They are valid forever if not deleted. For more information, see Accessing COS Using a Temporary Key.
2. Access via temporary key
A temporary key consists of a SecretId, SecretKey, and token. Multiple temporary keys can be generated for each root account or sub-account. Compared with permanent keys, temporary keys have shorter validity periods (1,800 seconds by default). The validity period of a temporary key can be up to 7,200 seconds for a root account and up to 129,600 seconds for a sub-account. For more information, see Getting Temporary Credentials for a Federated User.
Temporary keys are applicable to temporary authorization scenarios such as frontend direct upload. Compared with permanent keys, distributing temporary keys to untrusted users is more secure. For more information, see Accessing COS Using a Temporary Key.
If you want any third party to be able to download an object from your bucket, but you don't want them to use CAM accounts or temporary keys, signatures can be provided by pre-signed URLs for temporary download operations. Anyone who receives a valid pre-signed URL can download an object.
Obtaining a temporary download link (validity period: 1-2 hours) from the COS console or COSBrowser
You can obtain the temporary download link of an object from the COS console or COSBrowser and enter the link in the browser to download the object. For more information, see Obtaining a Temporary Link Quickly.
Generating a pre-signed URL via SDK
You can use an SDK to obtain pre-signed URLs with custom validity periods in batches. For more information, see Obtaining Pre-Signed URLs in Batches via SDK.
Generating a pre-signed URL via signature generation tool
If you are not familiar with programming, you can use a signature generation tool to obtain pre-signed URLs with custom validity periods. For more information, see the signature generation tool documentation.
Manually constructing a pre-signed URL
A pre-signed URL is in fact an object URL concatenated with a signature. Therefore, you can use an SDK or signature generation tool to generate a signature and concatenate the object URL and the signature to form a pre-signed URL. However, this method is generally not recommended because of the complexity of the signature generation algorithm.
Uploading an object
If you want any third party to be able to upload an object to your bucket, but you don't want them to use CAM accounts or temporary keys, signatures can be provided by pre-signed URLs for temporary upload operations. Anyone who receives a valid pre-signed URL can upload an object.
Method 1. Generating a pre-signed URL via SDK
SDKs in various programming languages provide pre-signed URL generation methods. For more information about the methods, see Upload via Pre-Signed URL. Select a method according to the programming language that you are familiar with.
Method 2. Manually constructing a pre-signed URL
A pre-signed URL is in fact an object URL concatenated with a signature. Therefore, you can use an SDK or signature generation tool to generate a signature and concatenate the object URL and the signature to form a pre-signed URL for object upload. However, this method is generally not recommended because of the complexity of the signature generation algorithm.
4. Anonymous access
COS buckets are private by default. Identity verification is required no matter whether you access COS using keys (permanent or temporary keys) or pre-signed URLs.
In special scenarios, you can set your bucket or object permission to Public Read so that any user can use object URLs to download objects directly without identity verification.
Note:
Setting your resource permission to Public Read is risky because, once the resource link is leaked, any user can access your resource, which may cause hotlinking by malicious users.
Setting the permission of a bucket to Public Read
You can set your bucket permission to Public Read in the COS console so that each object in the bucket can be downloaded directly via object URL. For the permission setting method, see Setting Access Permission.
Setting the permission of an object to Public Read
You can set the permission of an object to Public Read in the COS console so that only this object in your bucket can be downloaded directly via object URL, and other objects are not affected. For the permission setting method, see Setting Object Access Permission.
Setting the permission of a folder to Public Read
You can set the permission of a folder to Public Read in the COS console so that all objects in the folder can be downloaded directly via object URL, and objects outside of the folder are not affected. For the permission setting method, see Setting Folder Permissions.