DLC を Power BI に接続
Download
フォーカスモード
フォントサイズ
説明:
事前準備
操作を実行する前に、以下の条件を満たしていることを確認してください:
Tencent Cloudアカウントを所有し、DLCの使用が許可されていること。
DLC標準Sparkエンジンを所有し、このエンジンはパブリックアクセスを許可する必要があります。
Cloud Access Management (CAM)でロールが作成されています。
Databricks Spark ODBC Driverがインストールされています。
Power BI Serviceに接続するためにOn-premises data gatewayがインストールされました。
操作手順
Tencent Cloudアクセス管理(CAM)でロールを作成
1. Tencent Cloud管理者アカウントでアクセス管理(CAM)にログインします。左サイドバーで「身分プロバイダ」をクリックし、「ロールSSO」を選択して、「新しいプロバイダ」ボタンをクリックします。OIDCタイプを選択し、身分プロバイダ名を入力します。Microsoft Entraから身分プロバイダURL、クライアントID、署名公開鍵を取得できます。詳細はOIDC身分プロバイダの作成を参照してください。
2. このドキュメントを参考にしてロールを作成することができます。Power BIのOpenID Connectメタデータドキュメントから、oidc:aud(発行者アドレス)とoidc:sub(クライアントid)という2つのパラメータの値を見つけることができます。
「Power BI Desktop」設定
DLC ODBC コネクタをインストールする
1. DlcODBC.mezファイルをローカルコンピュータの「ファイル\\Power BI Desktop\\Custom Connectors」パスに保存します。このパスが存在しない場合は、対応するフォルダを作成してください。

2. Power BI Desktop を実行し、[ファイル] > [オプションと設定] > [オプション] > [セキュリティ] を選択します。
3. Data Extensionsの下で、(推奨されません)検証や警告なしで任意の拡張機能を読み込むことを許可するを選択します。
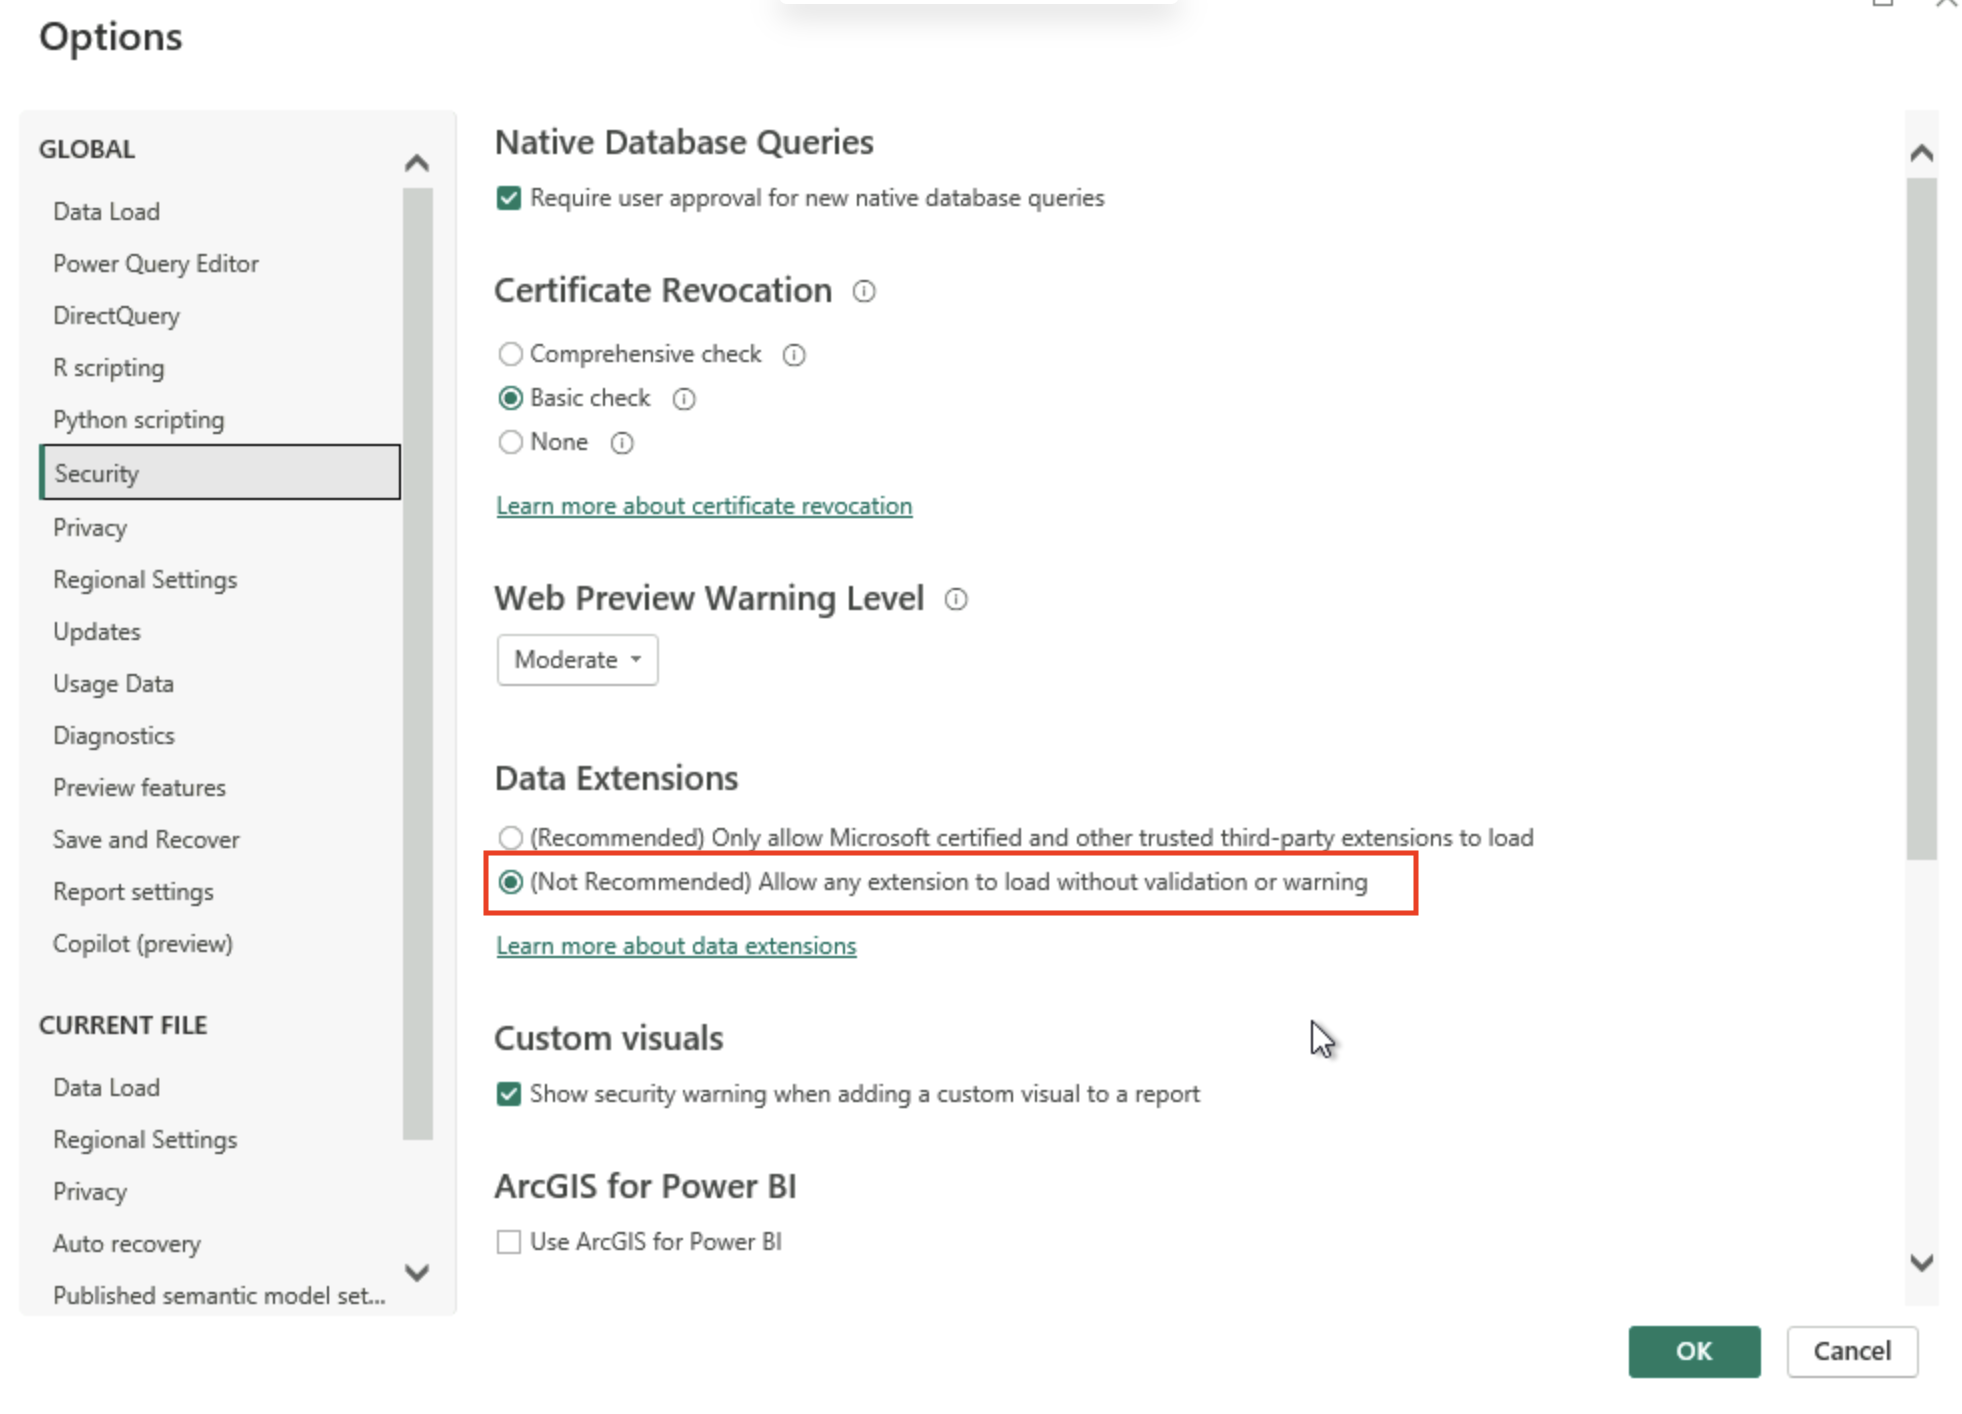
4. 「OK」をクリックして、Power BI Desktopを再起動します。
ODBC設定
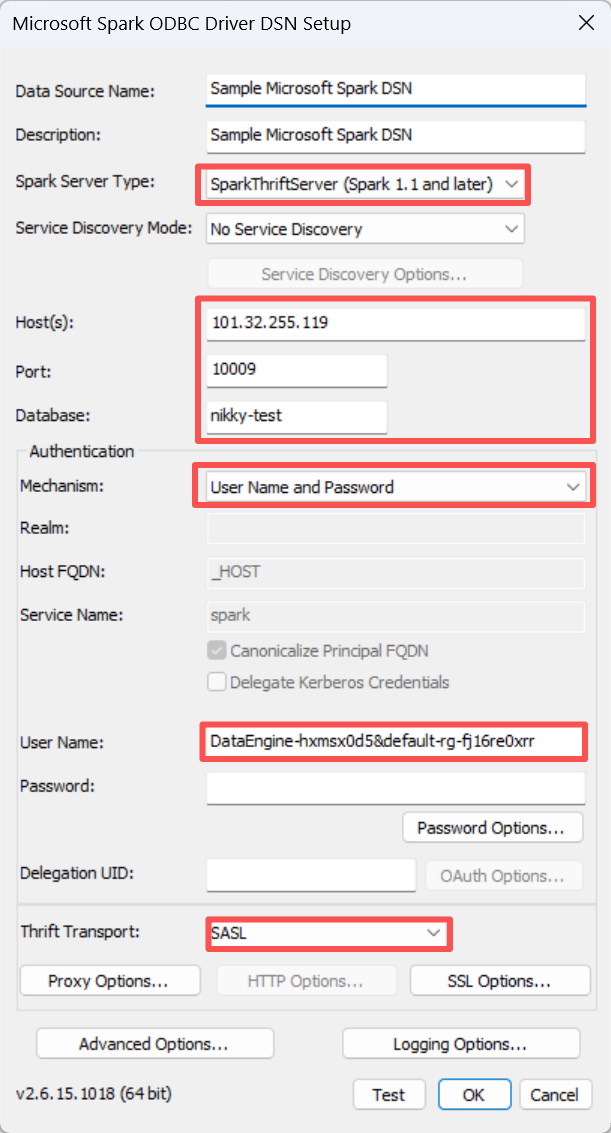
1. ODBCドライバを開きます。System DSN > Sample Microsoft Spark DSN > 構成を選択します。次に、Spark Server TypeとしてSparkThriftServer(Spark 1.1以降)を選択します。Host、Port、Databaseを入力します。Authenticationの下で、MechanismとしてUser Name and Passwordを選択します。ユーザー名(形式は「エンジンID&リソースグループ」)を入力します。Thrift TransportとしてSASLを選択します。
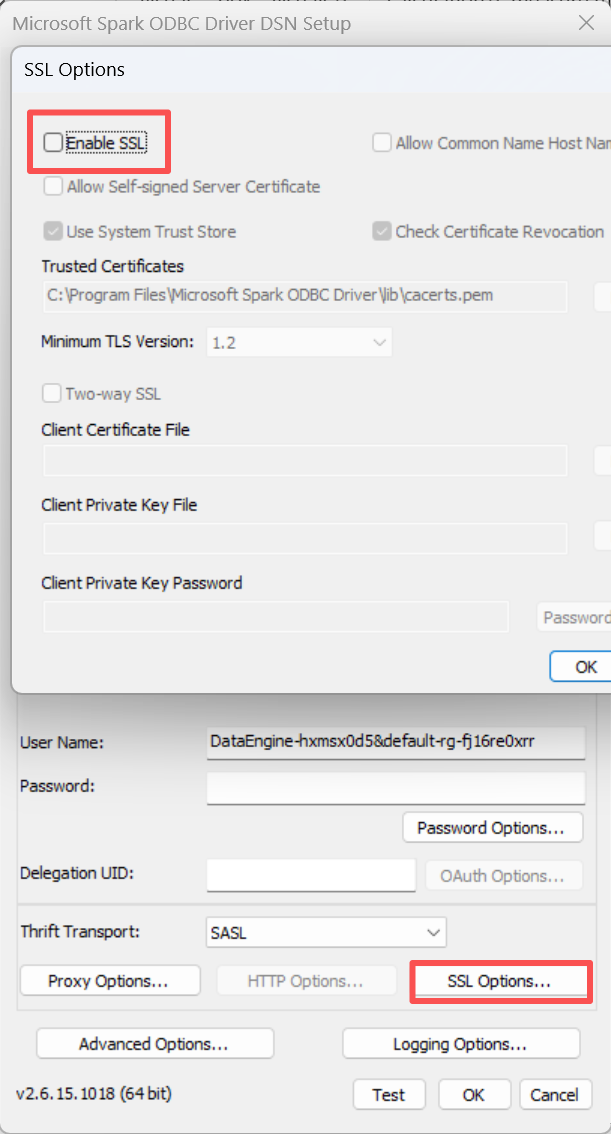
2. SSLを無効化します。SSLオプション > 「Enable SSL」のチェックを外す > OK。
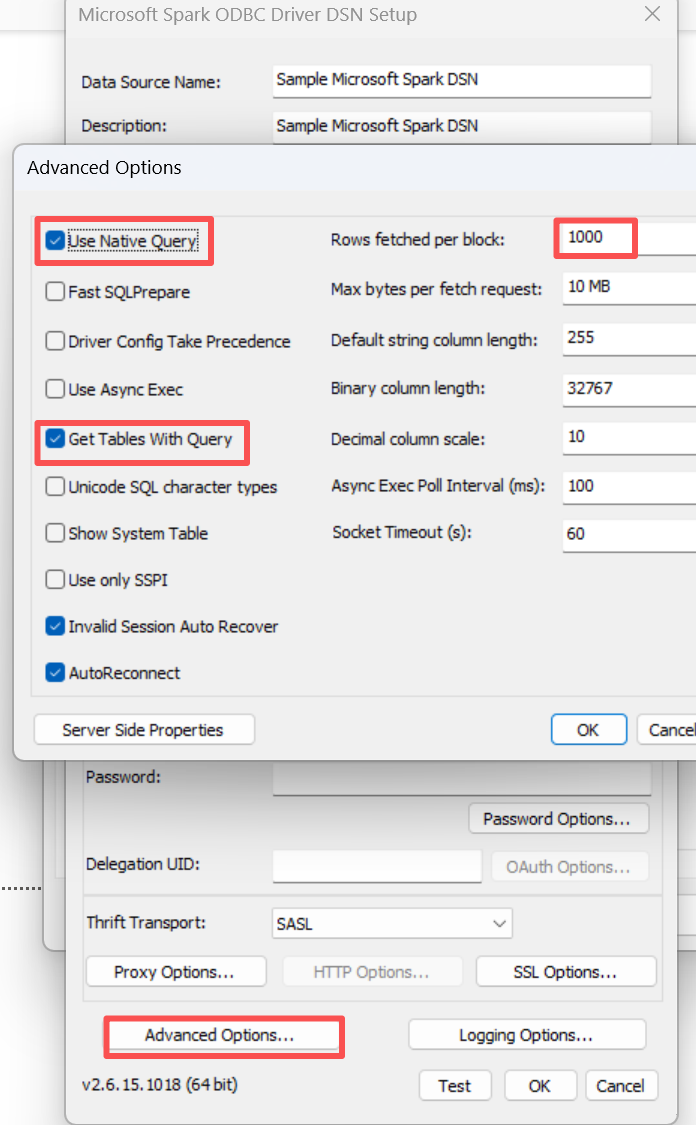
3. 詳細オプションを調整し、「Advanced Options」をクリックします。「Use Native Query」にチェックを入れてネイティブクエリを有効にし、「Get Tables With Query」にチェックを入れてテーブルメタデータ抽出を有効にします。「Rows fetched per block」は1000に設定することをお勧めします。
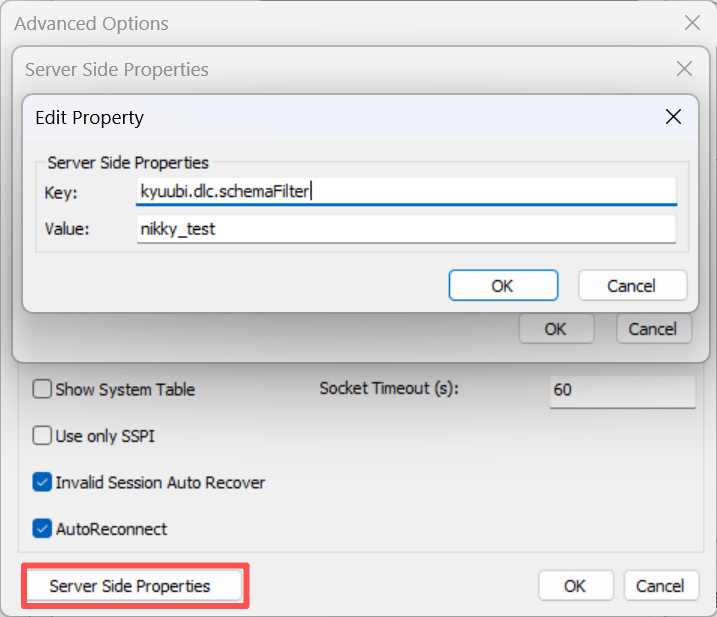
4. ロードするメタデータを削減するため、サーバーサイドプロパティ「kyuubi.dlc.schemaFilter」の追加を推奨します。「Server side Properties」>「add」> keyに「kyuubi.dlc.schemaFilter」、valueにデータベース名を入力し、OKをクリックして保存してください。
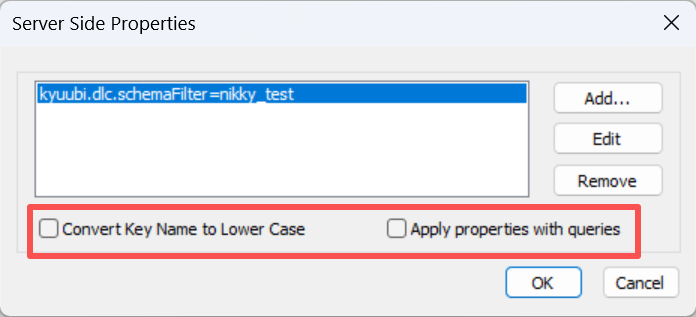
5. そして、「Convert key name to lower case」と「Apply properties with queries」のチェックを外します。
6. 「OK」をクリックして保存します。
データを取得する
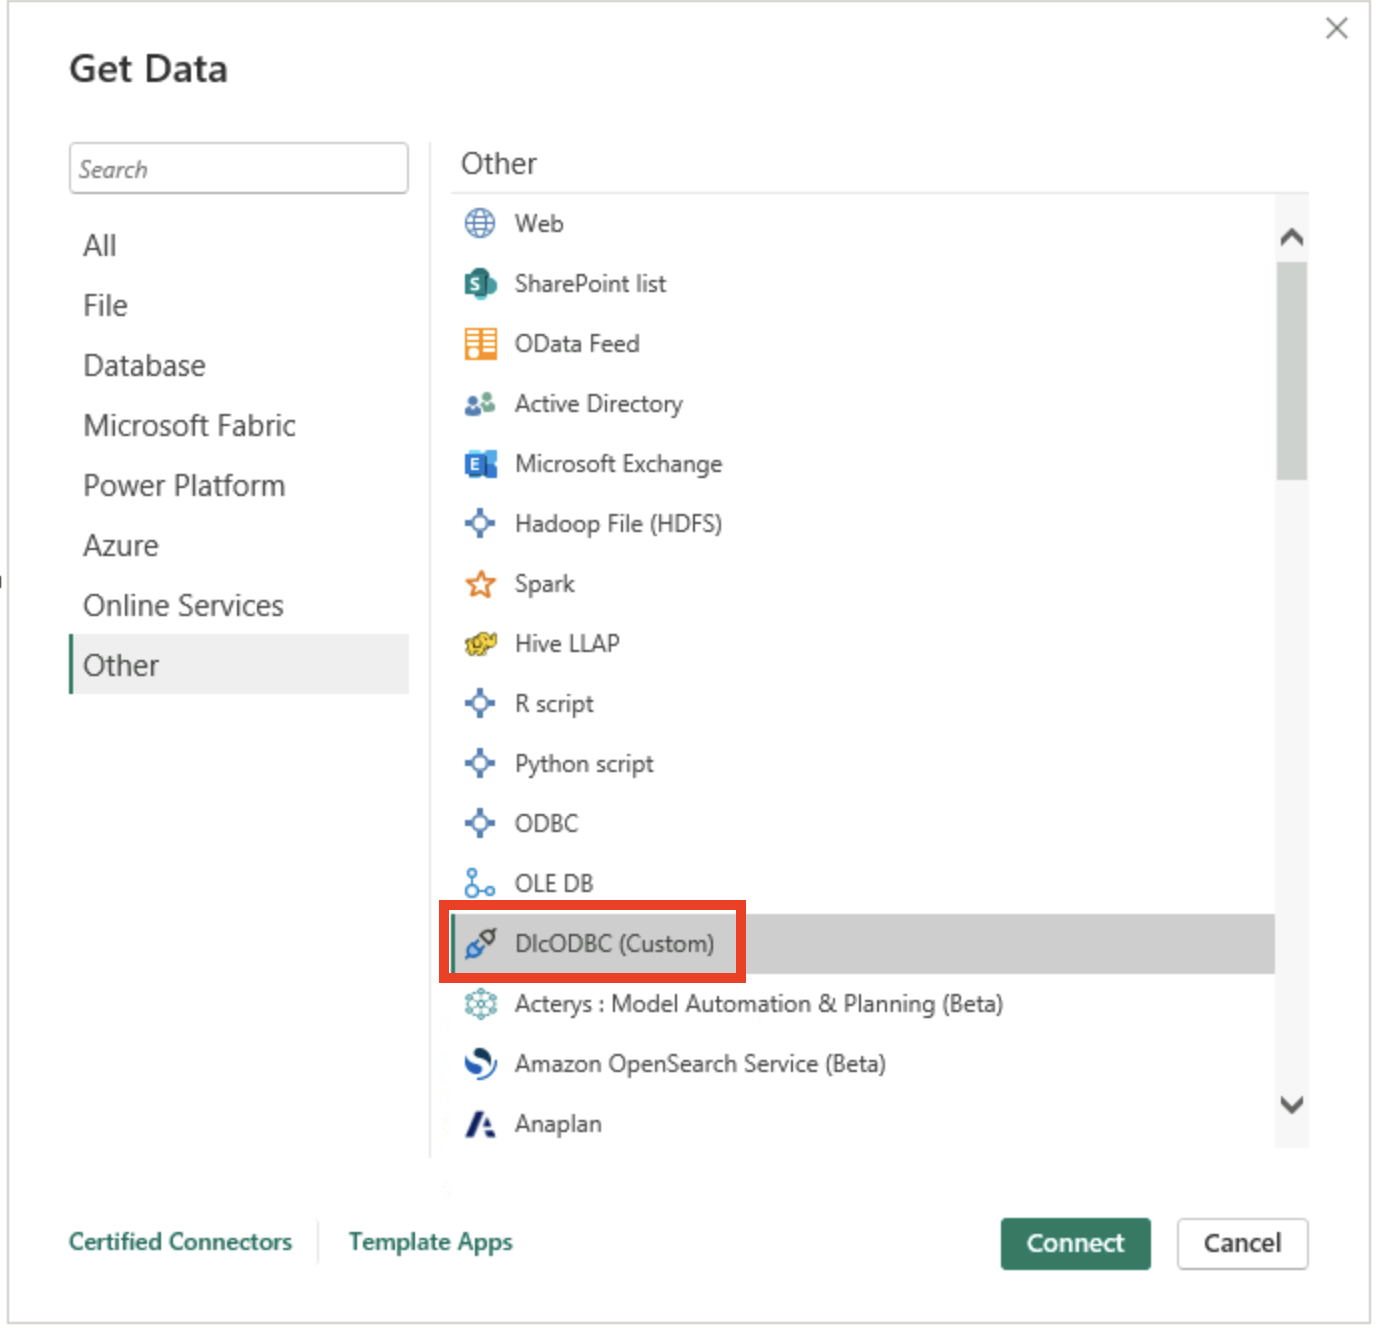
1. Power BI Desktopを開き、「データの取得」をクリックします。「その他」>「DlcODBC(カスタム)」>「接続」を選択します。
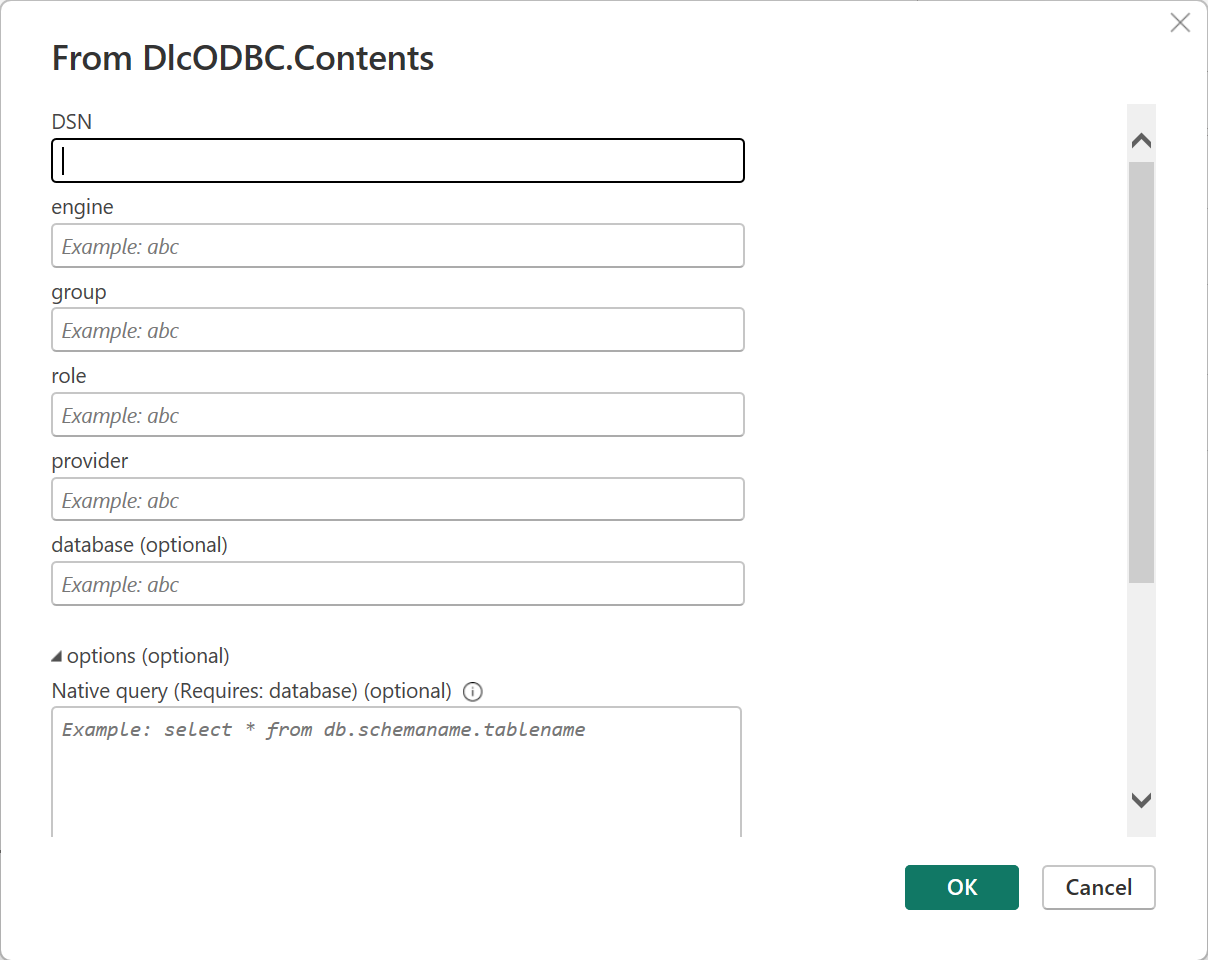
2. DSN名(Sample Microsoft Spark DSN)、エンジン名、リソースグループ、Tencent CloudロールID、Tencent CloudロールIDプロバイダーIDを入力し、データベースにSPARK > データ転送モードを選択して、OKをクリックします。
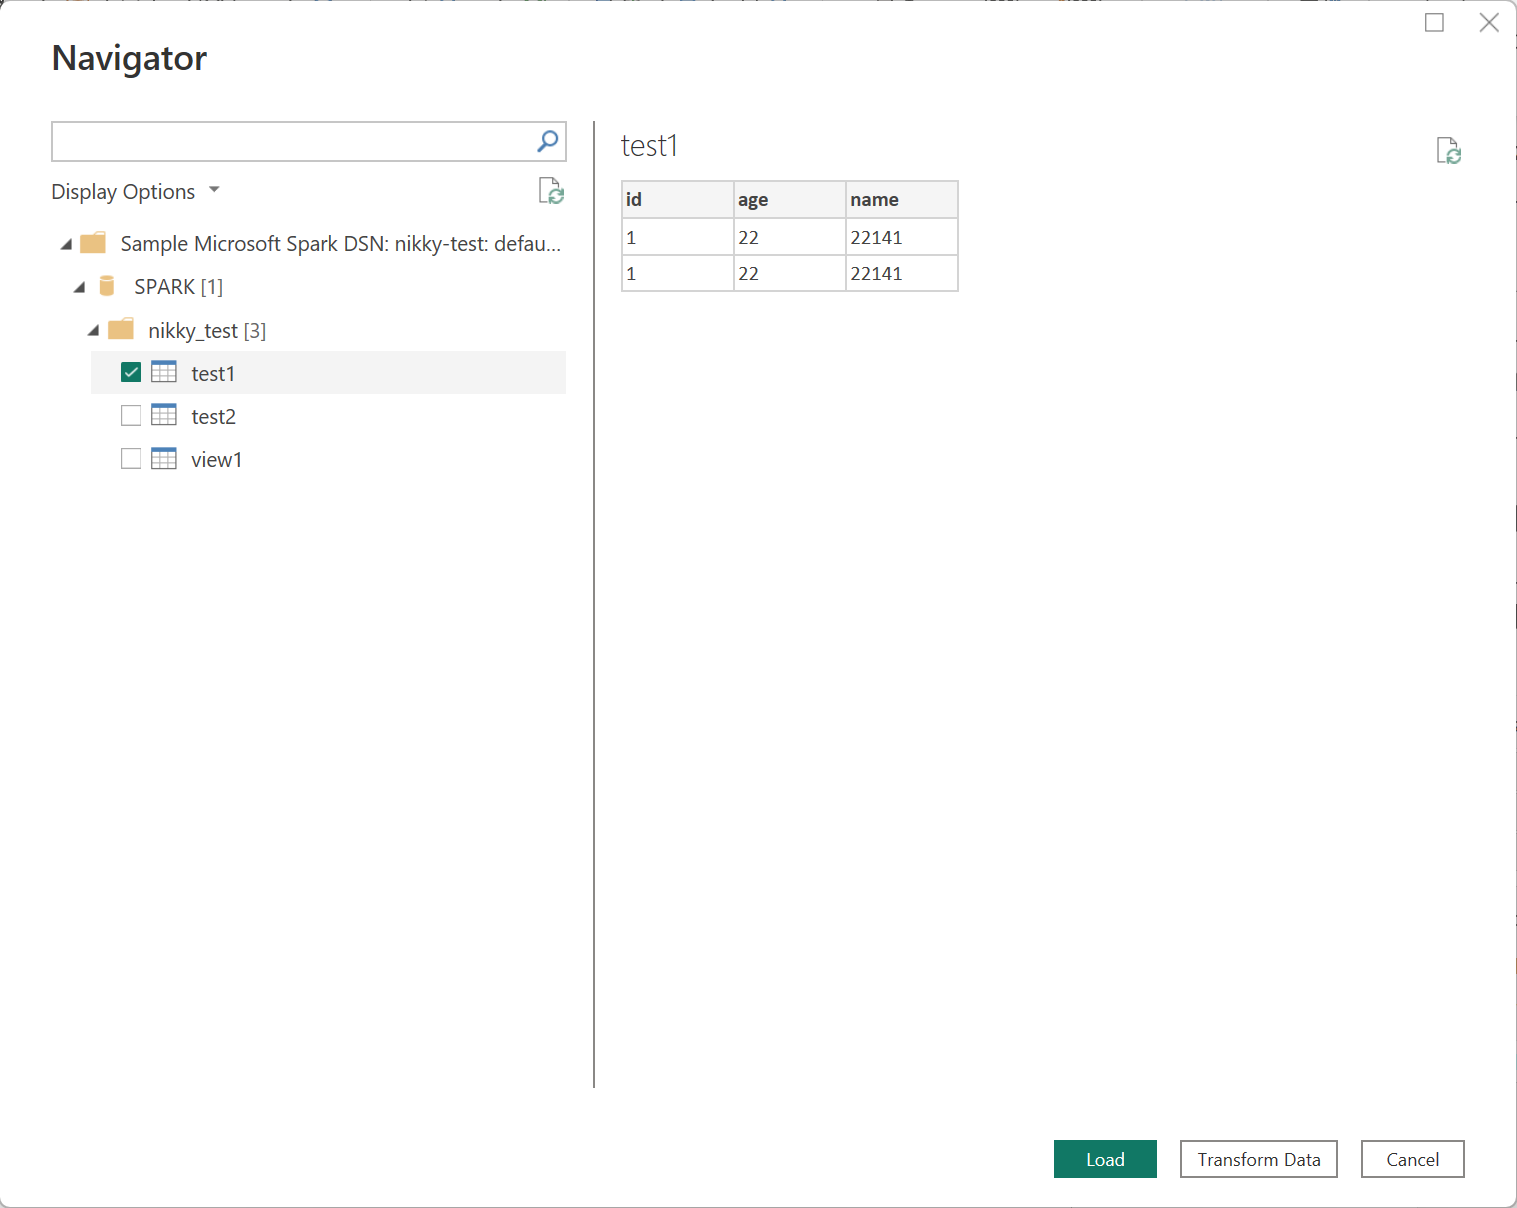
3. データテーブル/ビューを選択し、Loadをクリックします。
レポートを公開する
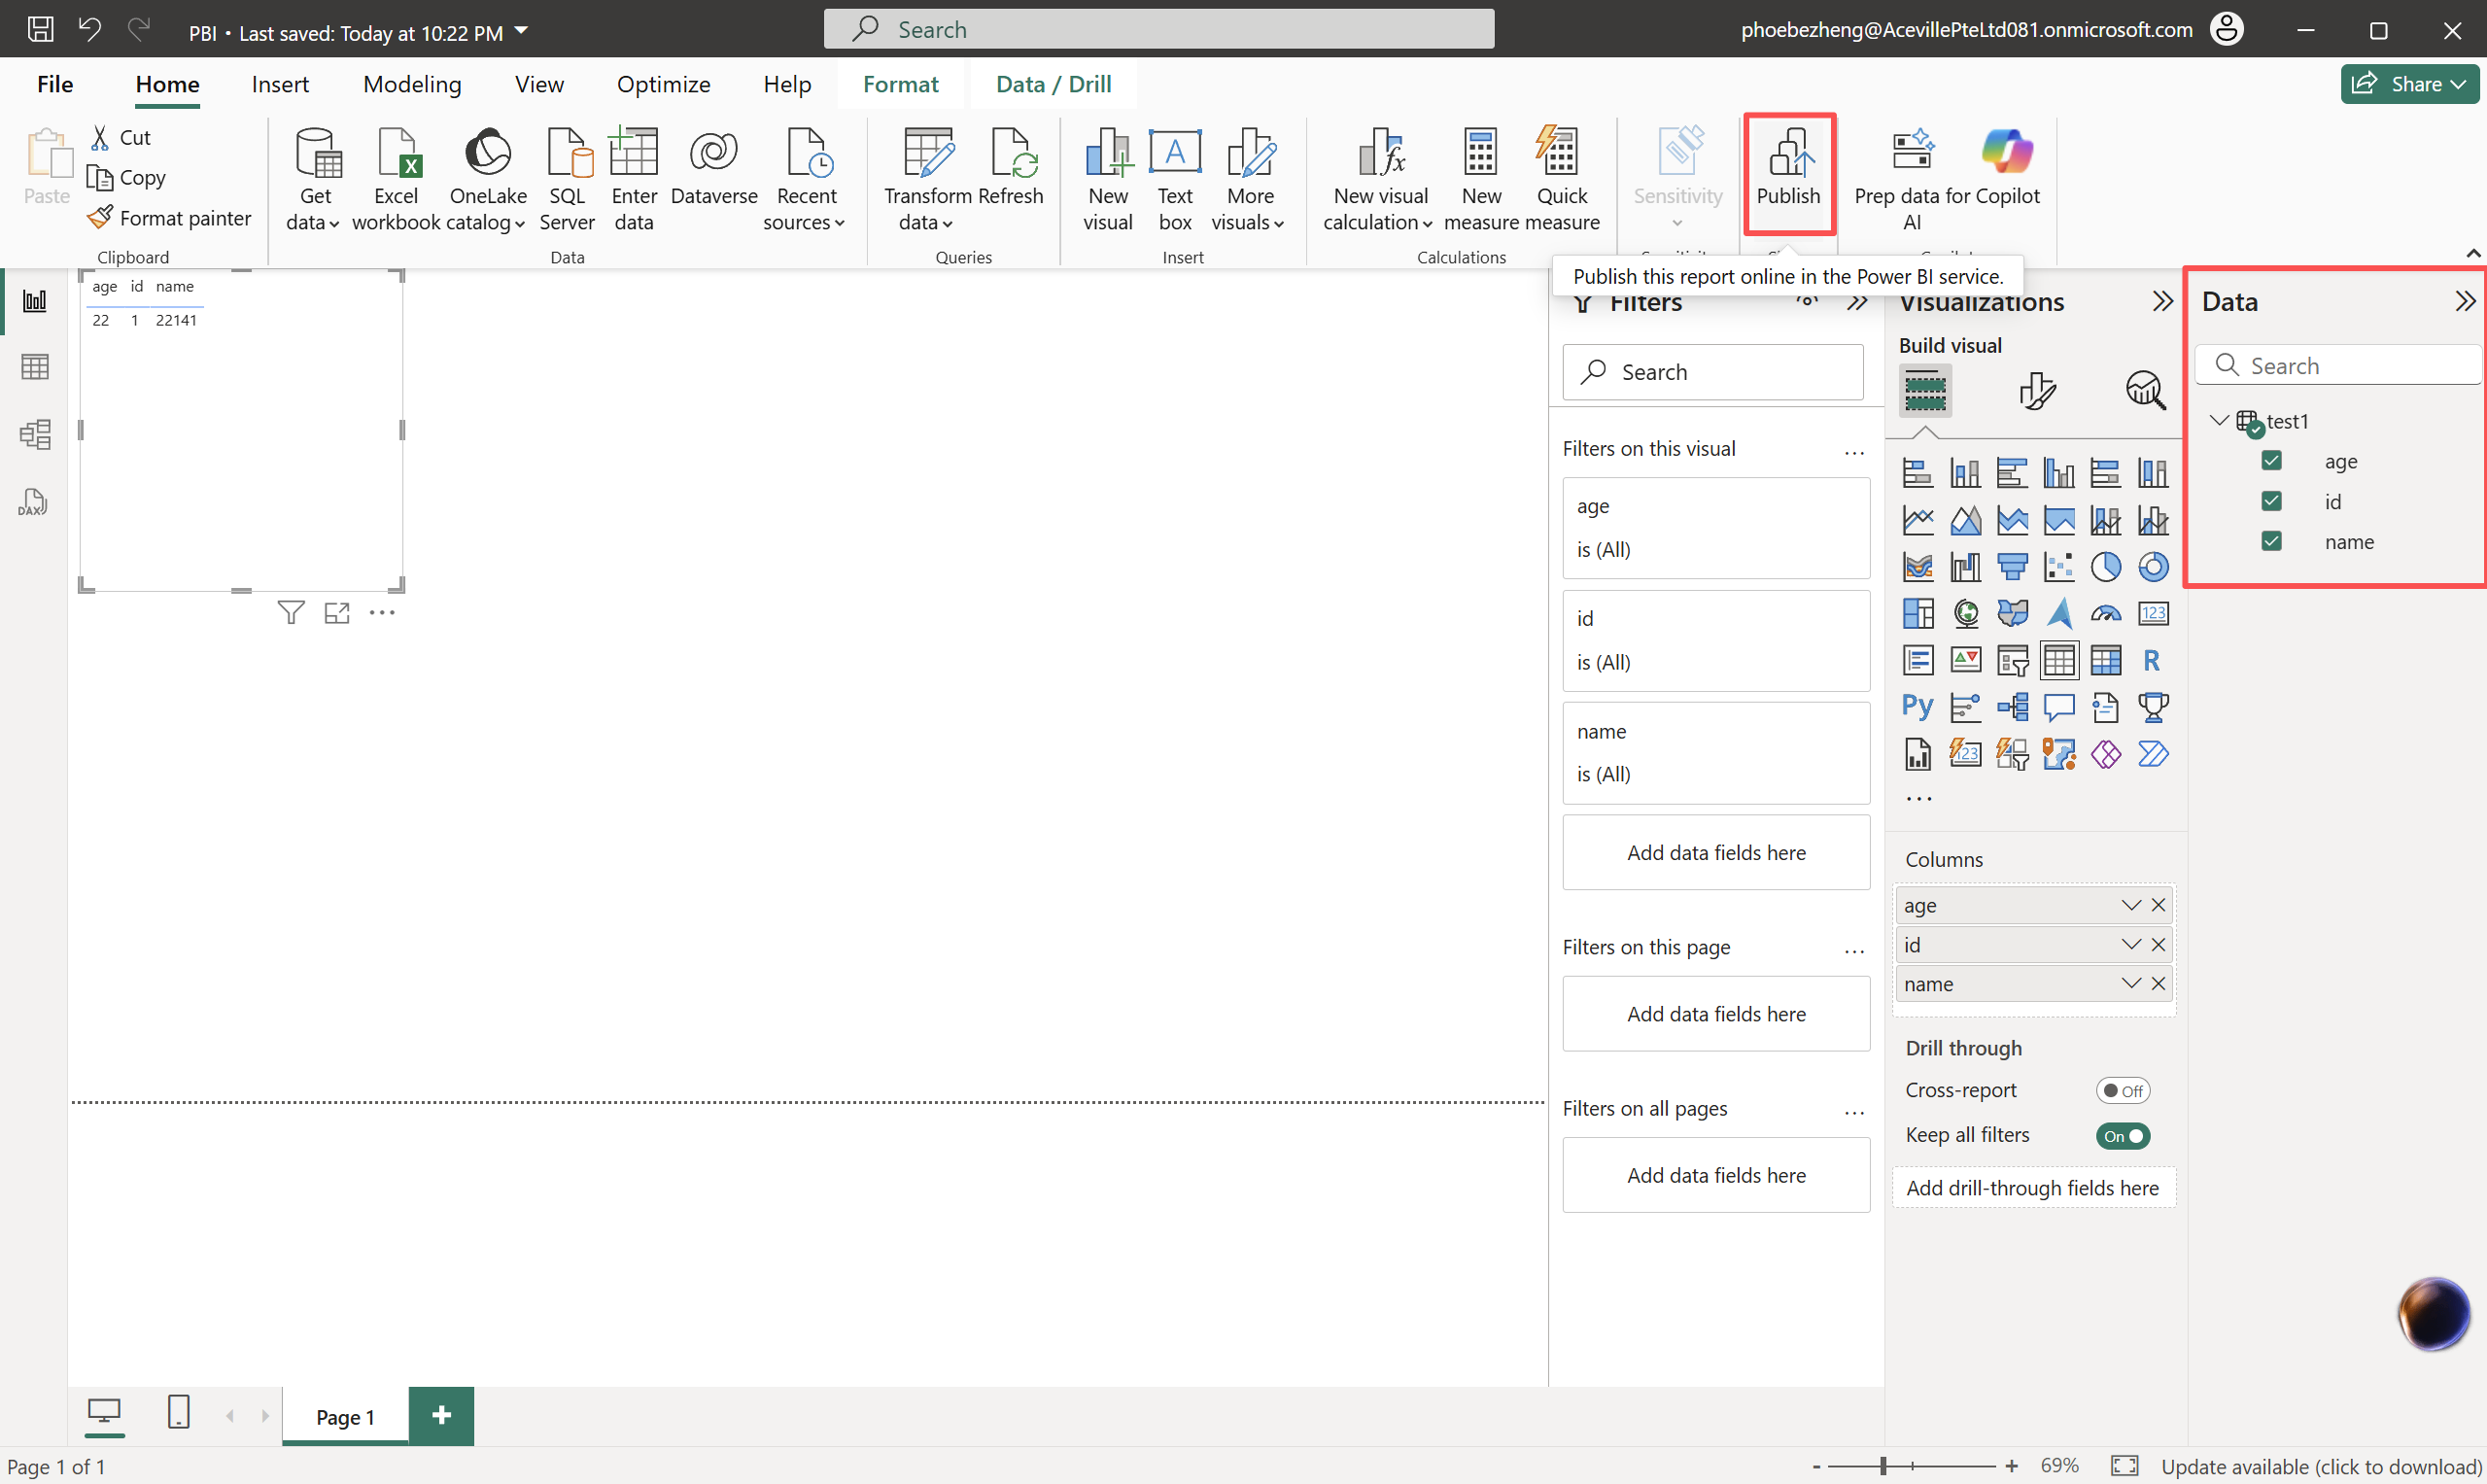
1. データを選択した後、レポートを公開し、Power BI Serviceにアップロードします。
「Power BI」ゲートウェイ設定
DLC ODBC コネクタをインストールする
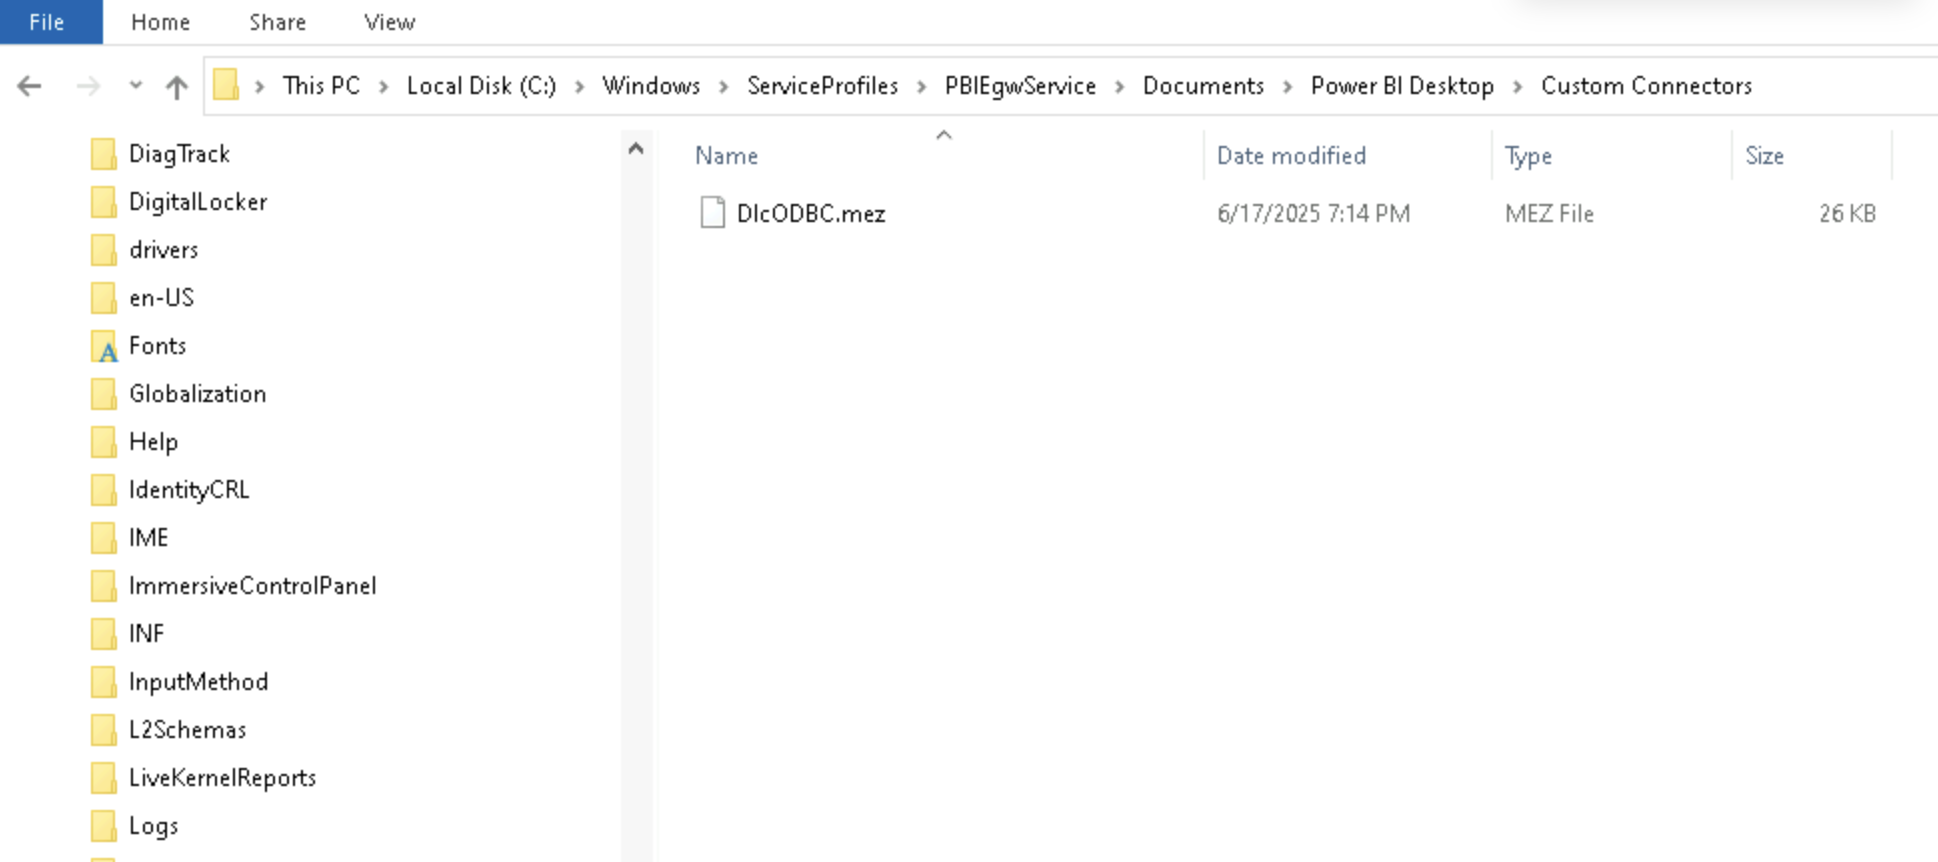
1. DlcODBC.mezファイルをローカルコンピュータの「C:\\\\Windows\\ServiceProfiles\\PBIEgwService\\Documents\\Power BI Desktop\\Custom Connectors」パスに保存します。このパスが存在しない場合は、まず対応するフォルダを作成してください。
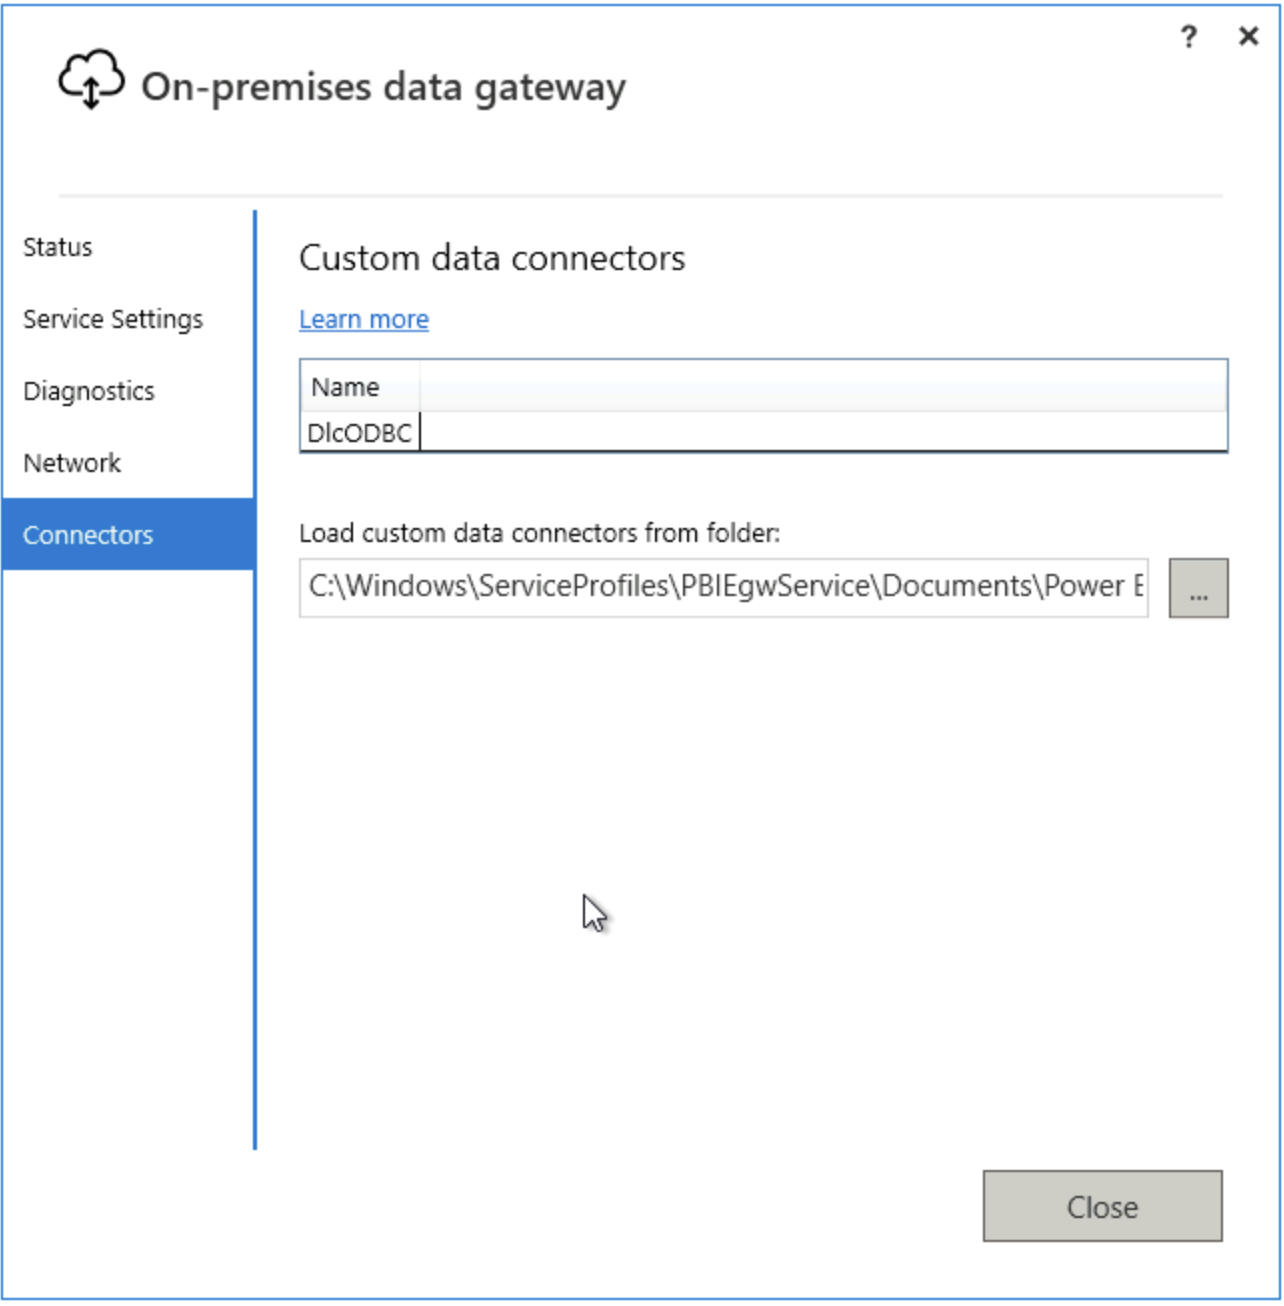
2. オンプレミスデータゲートウェイを開き、コネクタをクリックして、名前を設定し、ステップ1のファイルパスをデータロードパスとして選択し、ゲートウェイを再起動します。
「Power BI Service」設定
ゲートウェイ設定を調整
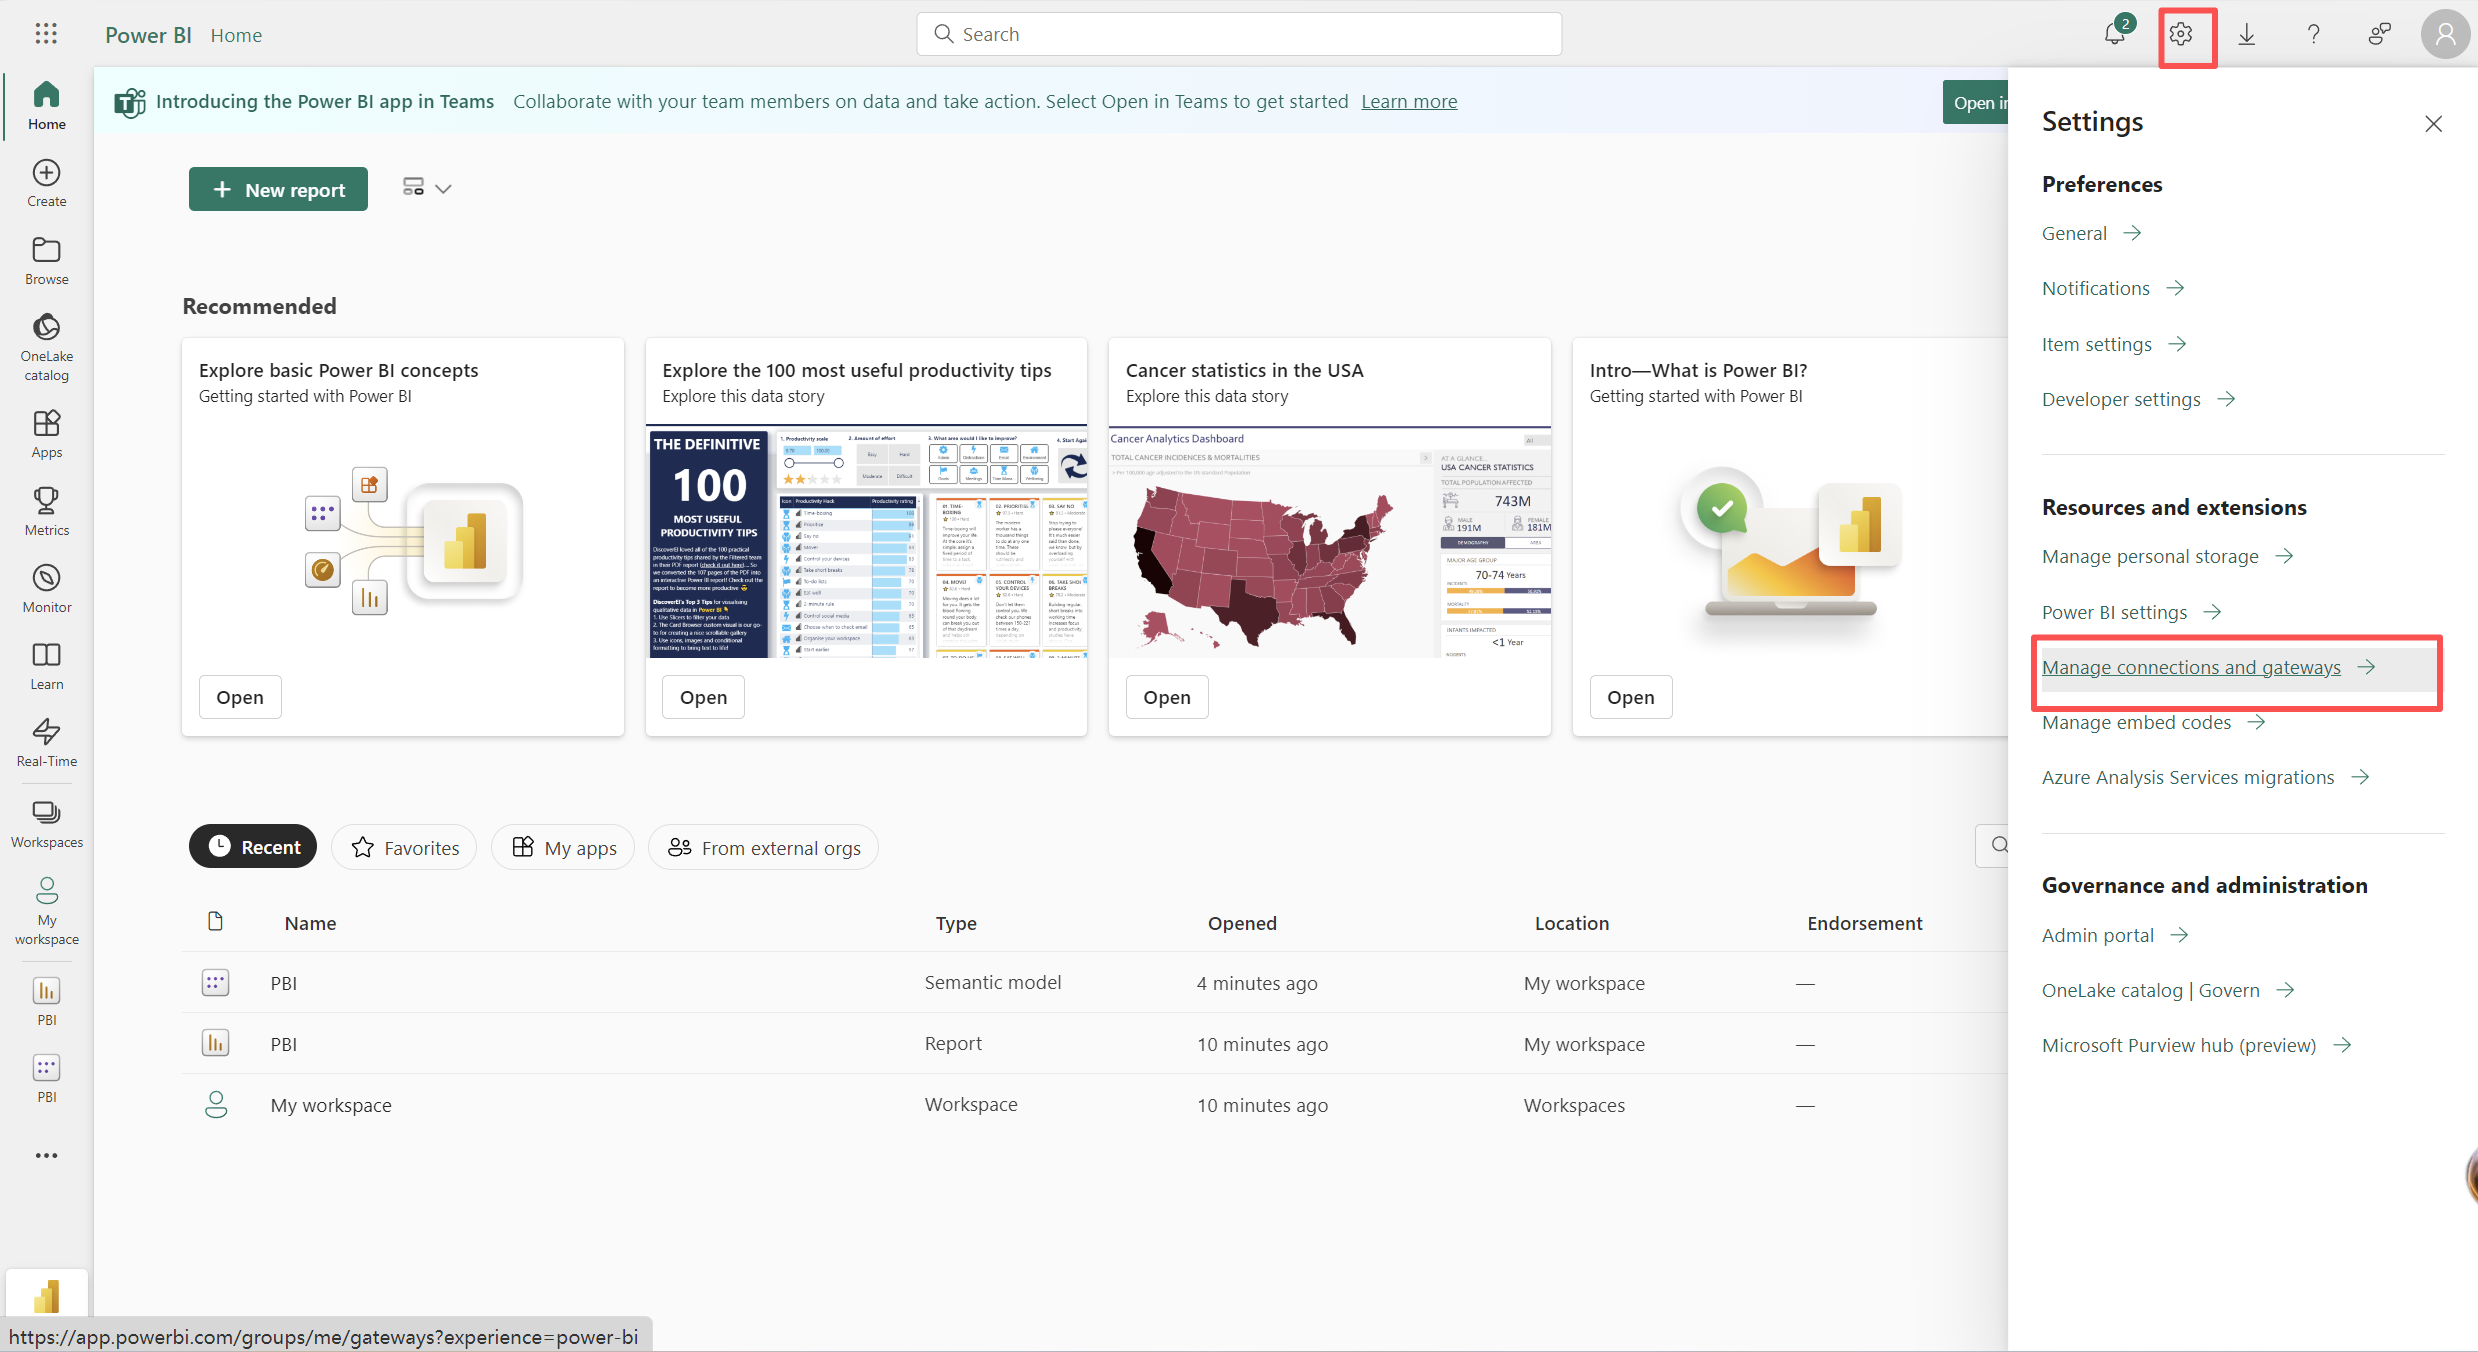
1. ページの右上隅にある設定をクリックし、「コネクタとゲートウェイの管理」を選択します。

2. ページを「On-premises data gateways」に切り替え、ターゲットゲートウェイの「···」にカーソルを合わせ、設定をクリックします。
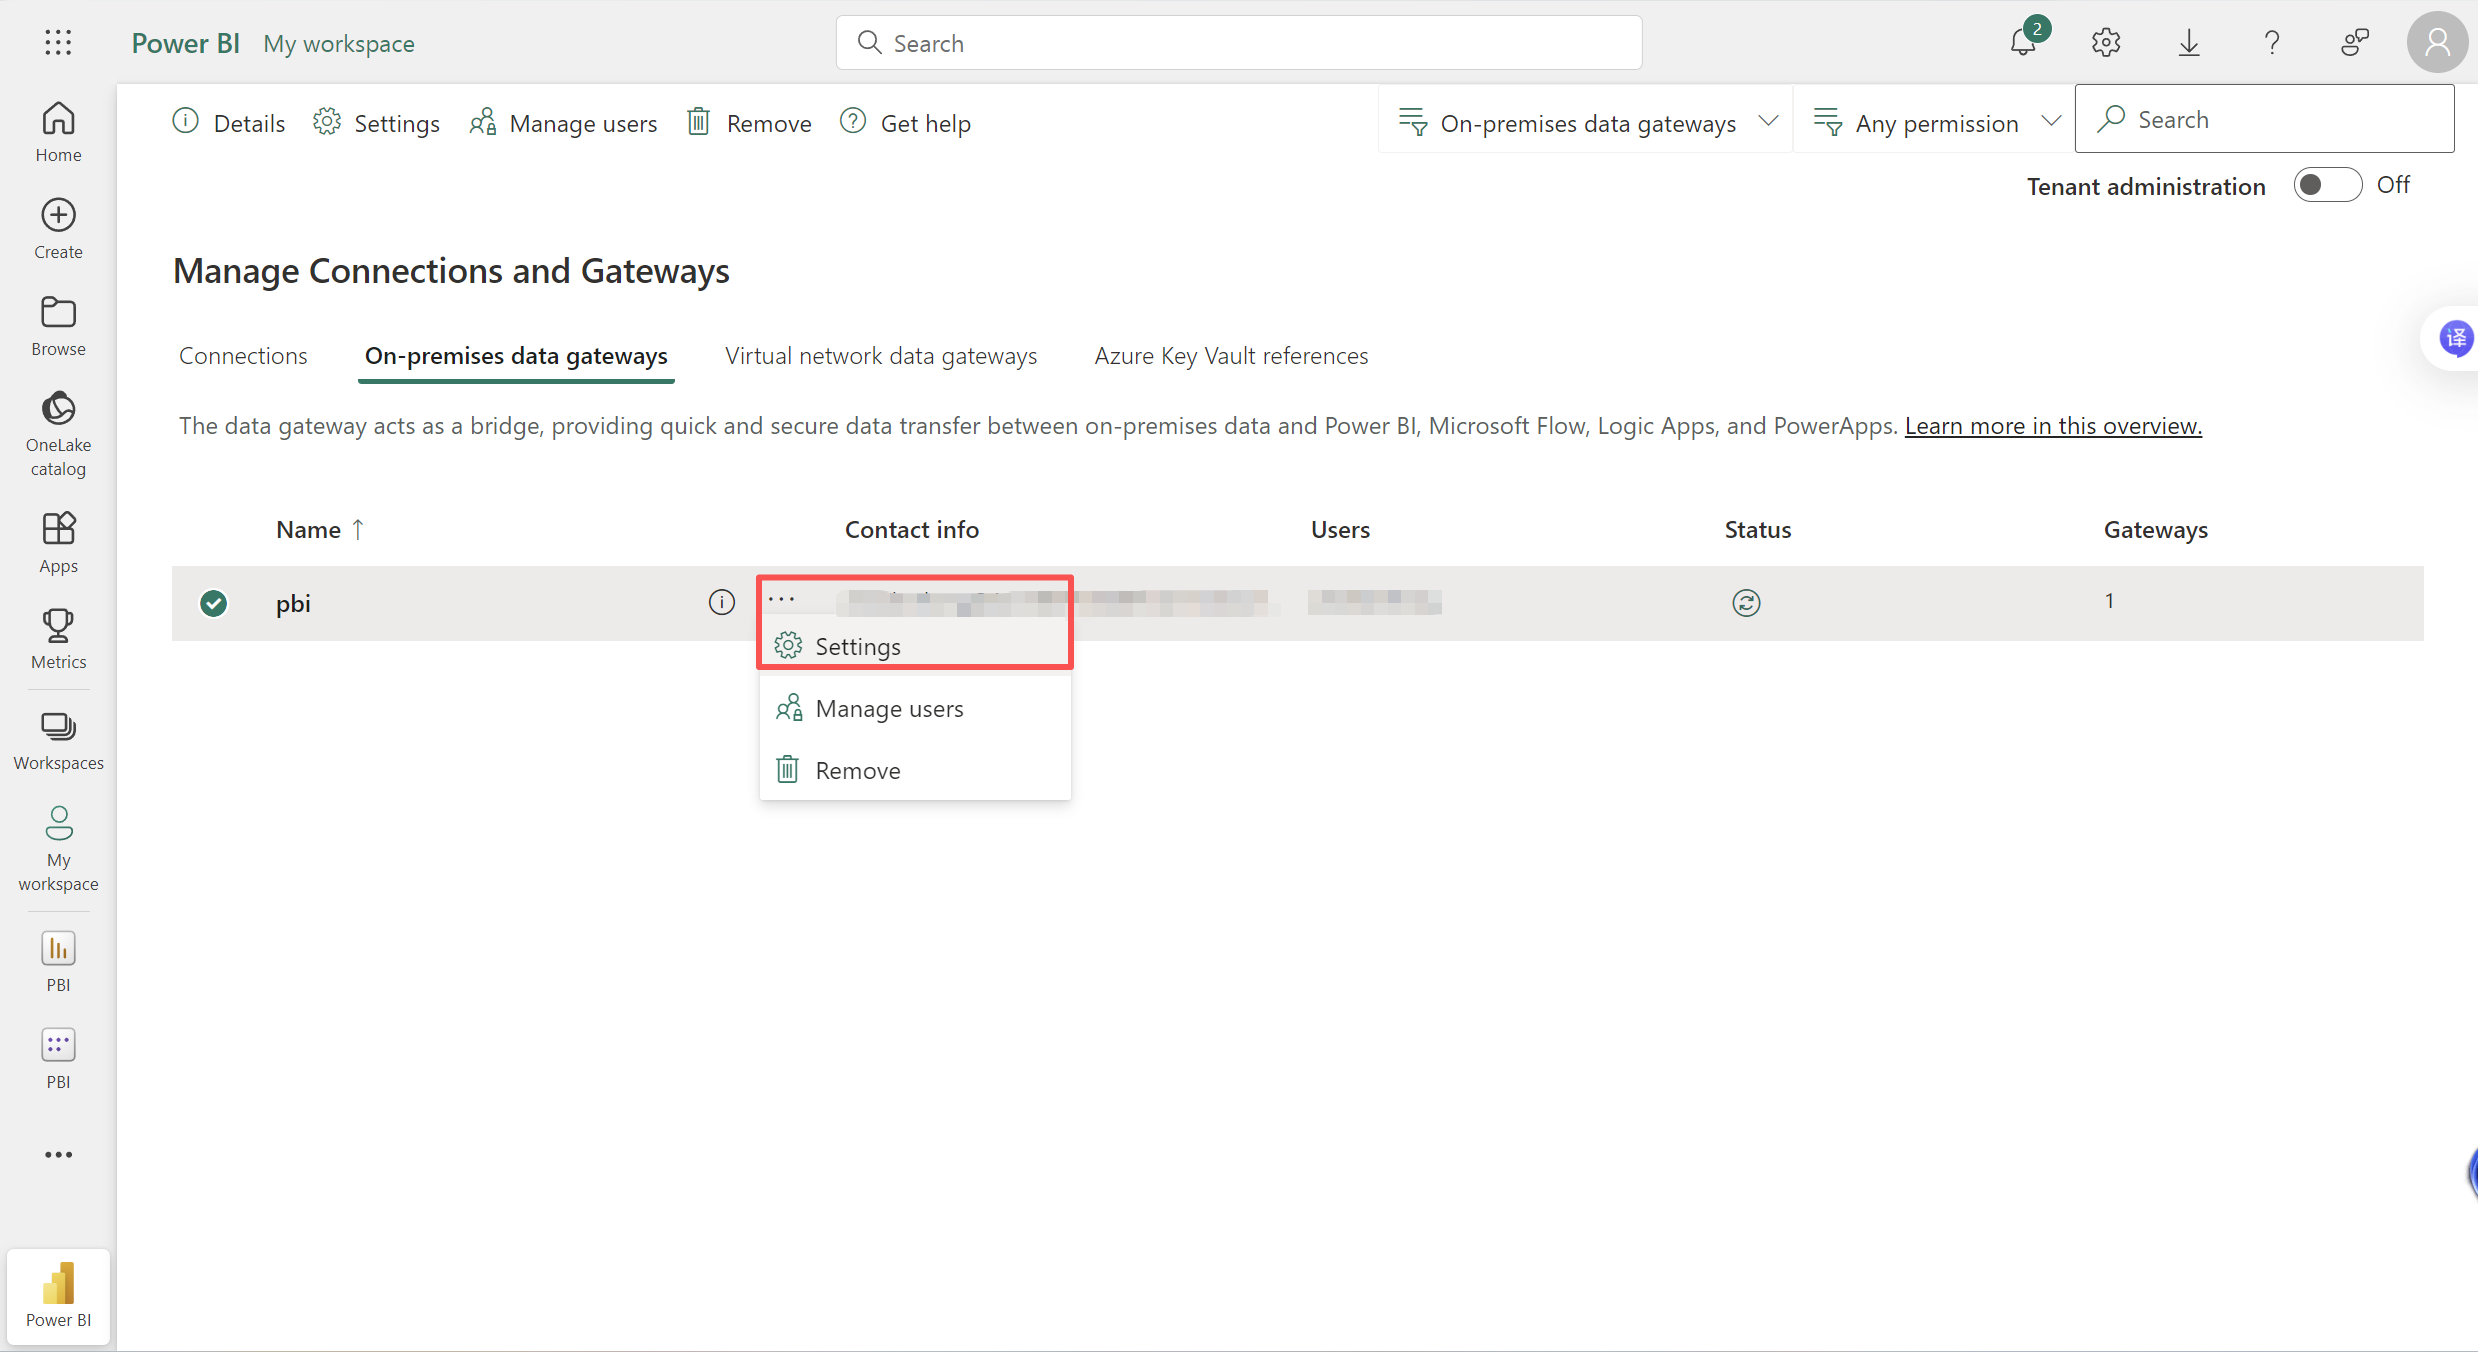
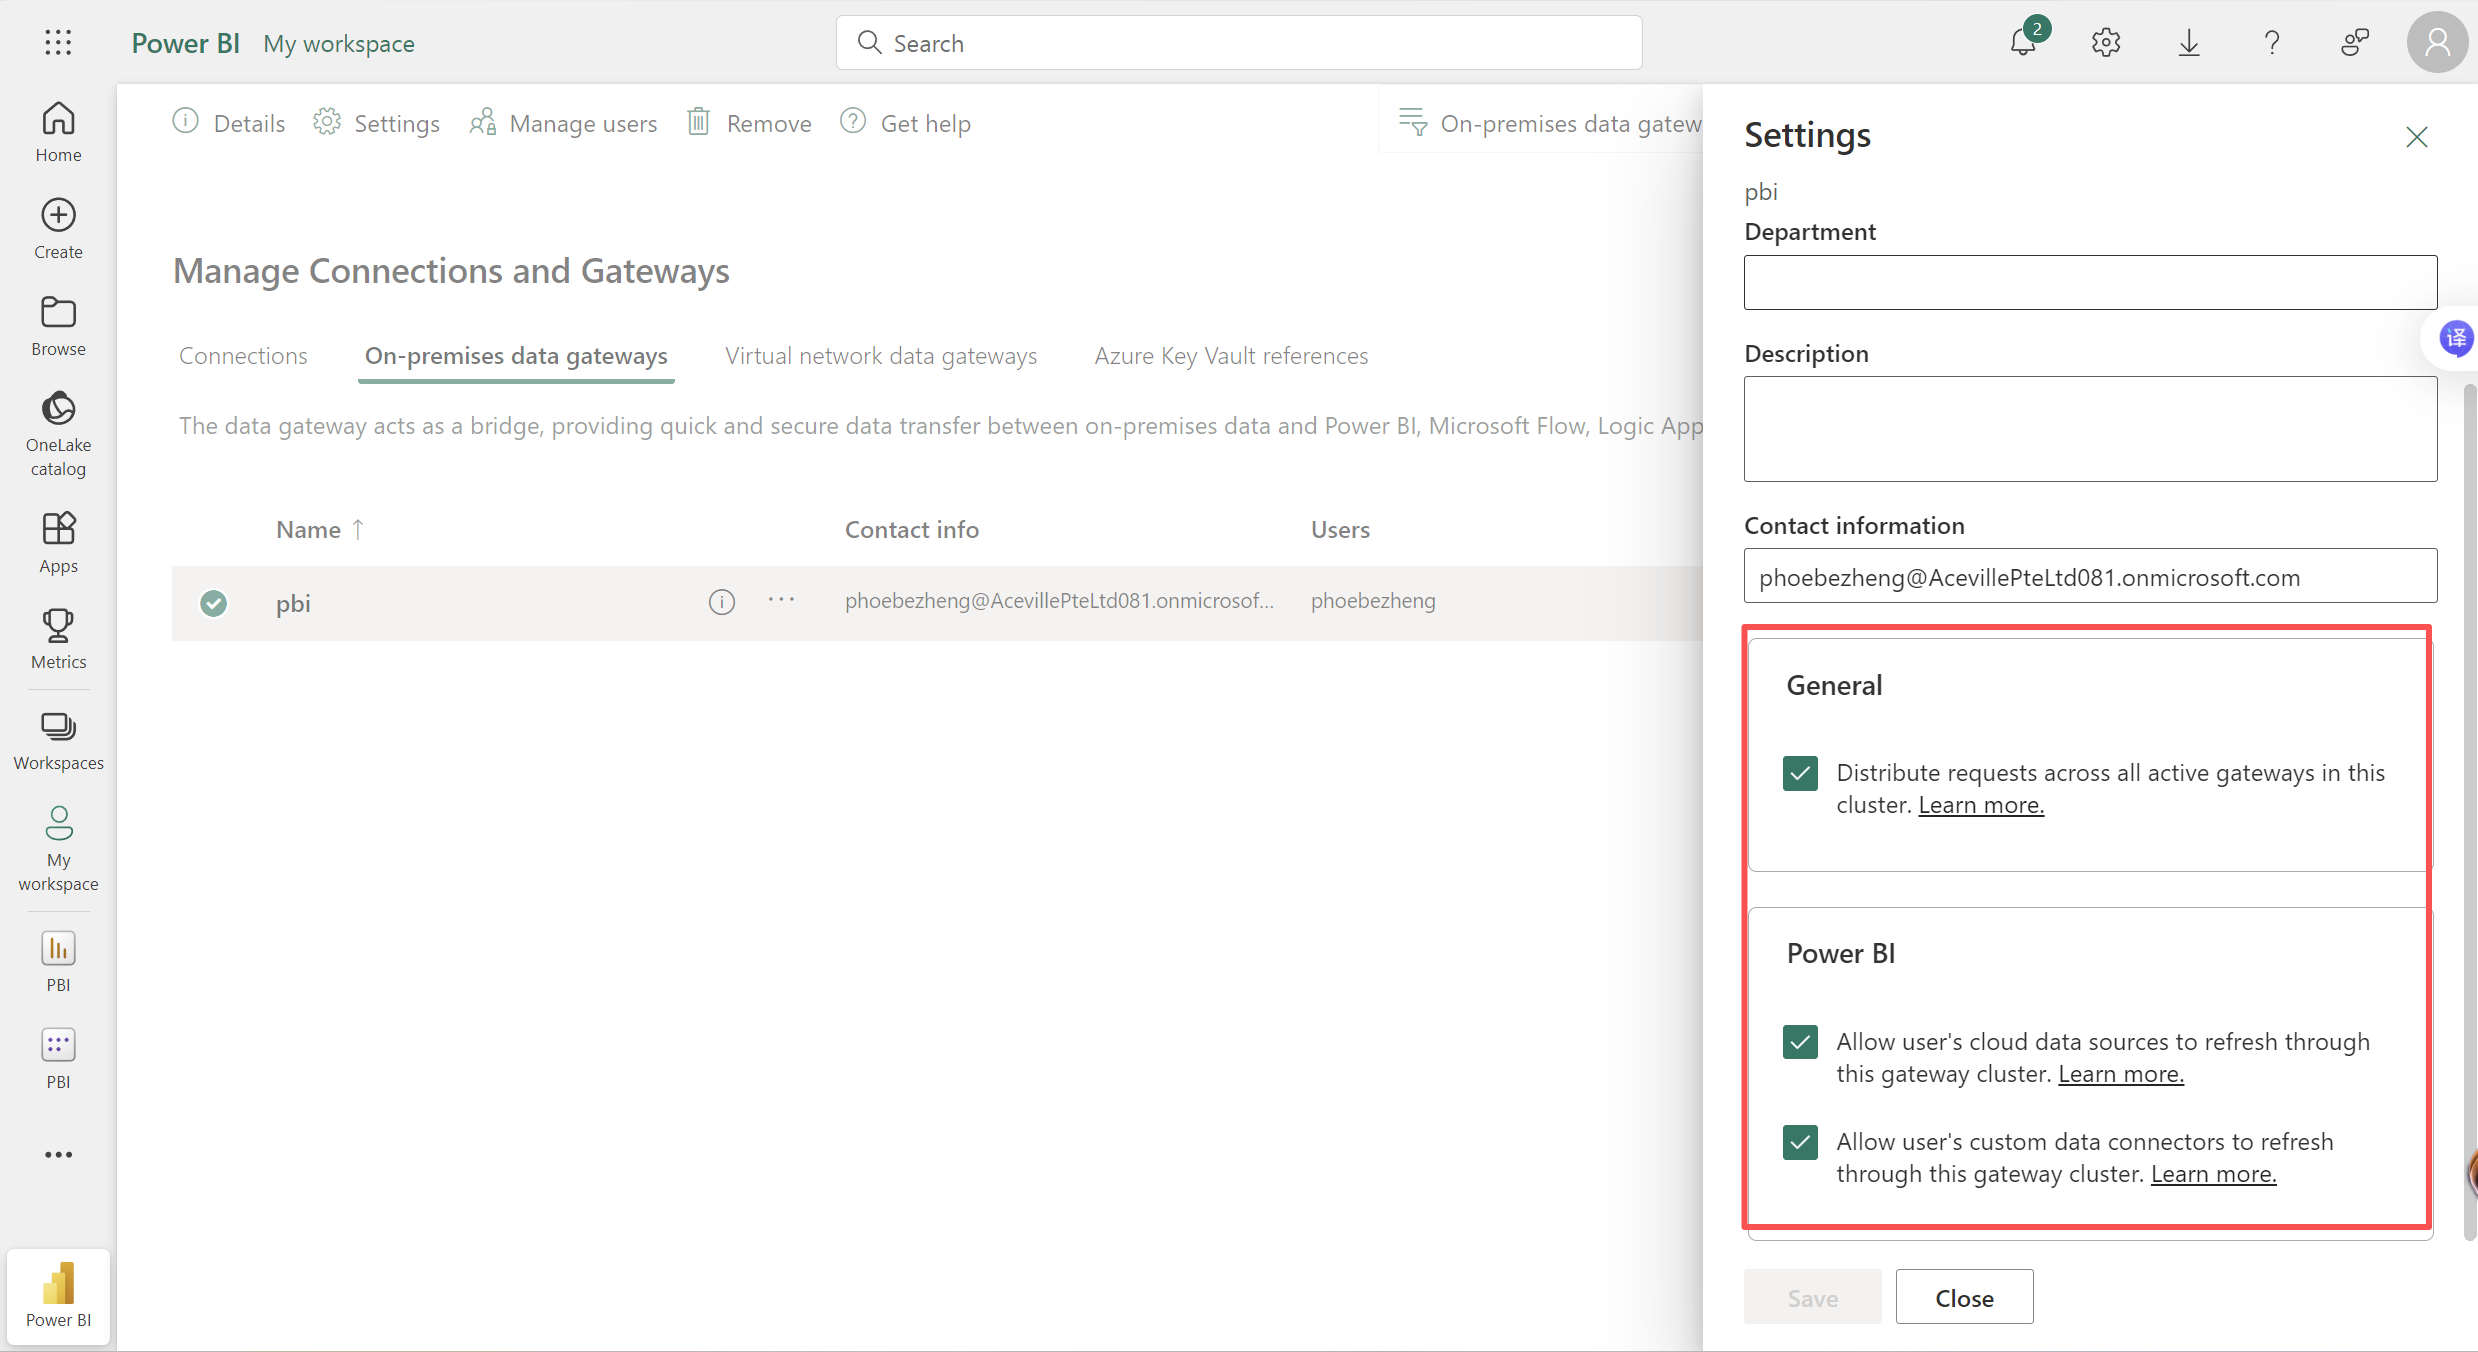
3. 右側のドロワーに表示される3つのオプションをチェックすると、ユーザーのクラウドデータソースとユーザーのデータコネクタがこのゲートウェイを介して更新できるようになり、リクエストをクラスタ内のすべてのアクティブなゲートウェイに分散することが許可されます。
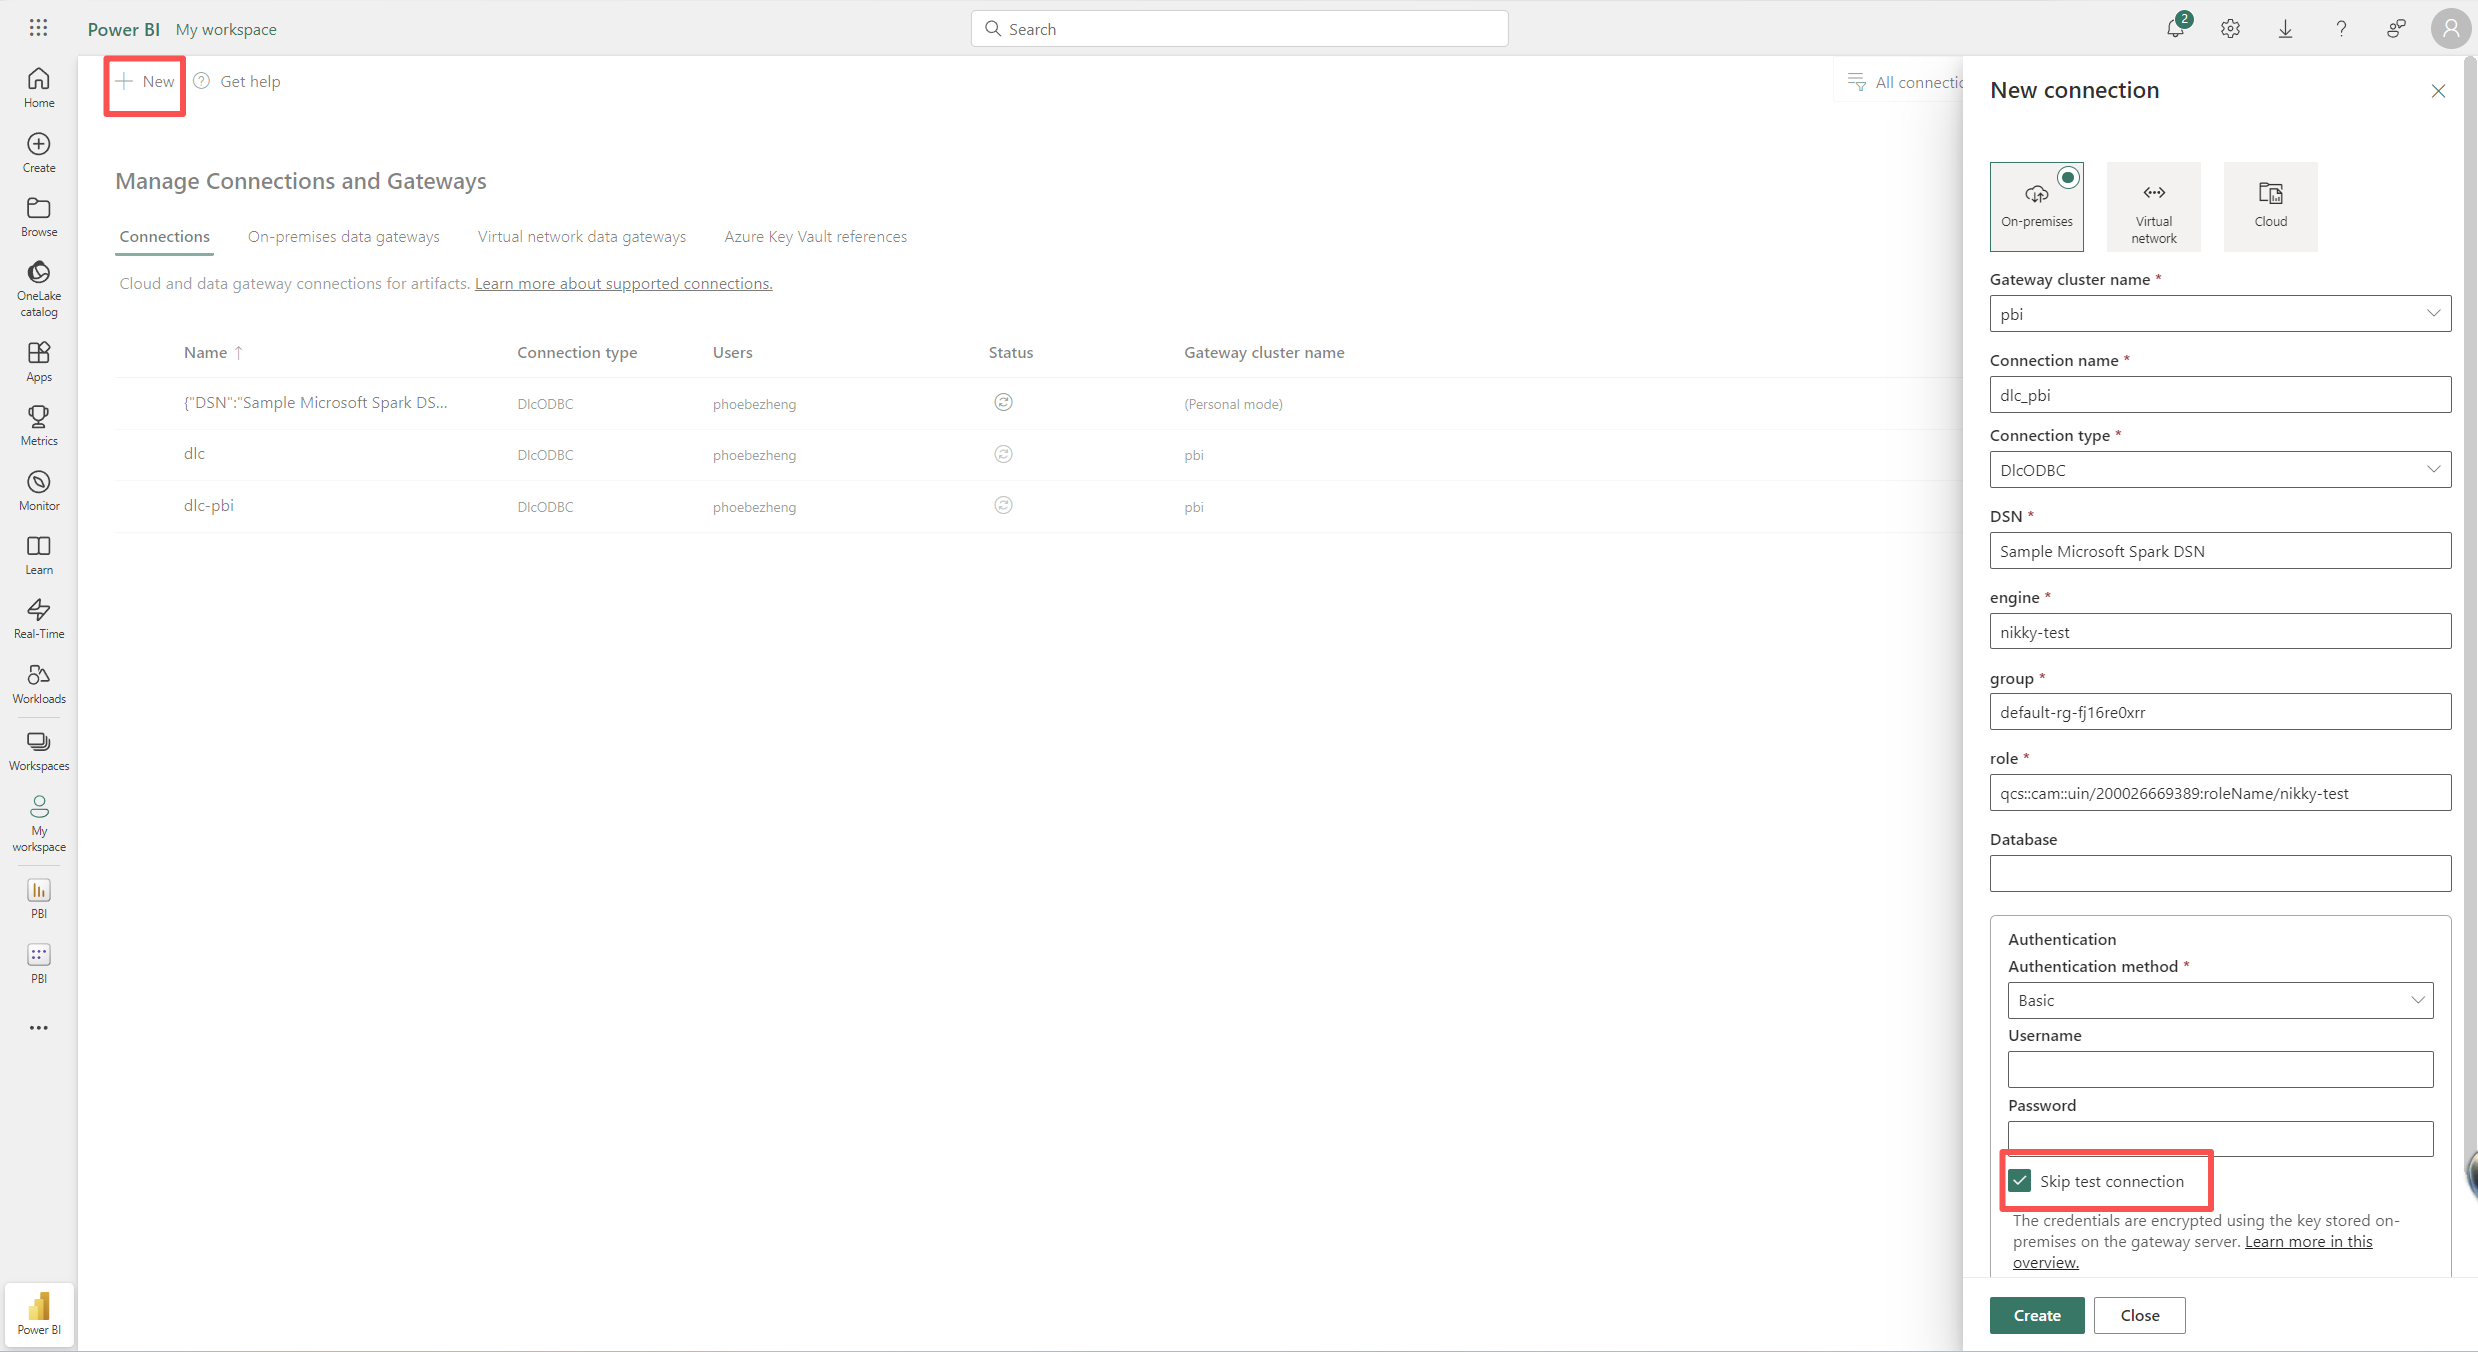
オンプレミス接続を作成
1. ページの右上隅にある設定をクリックし、「コネクタとゲートウェイの管理」を選択します。
2. 接続ページの左上隅で、「作成」をクリックし、ターゲットゲートウェイ名を選択し、接続名を入力します。接続タイプとしてDlcODBCを選択し、DSN名、エンジン名、リソースグループ、およびTencent CloudロールIDを入力します。認証方法として「Basic」を選択し、接続テストをスキップして「作成」をクリックします。
レポートを更新する
1. ターゲットレポートのモデルファイルを見つけ、ファイルの設定を選択し、「ゲートウェイとクラウド接続設定」で「On-premisesゲートウェイ接続を許可」を選択し、データソースにマッピングされたon-premises接続を選択します。
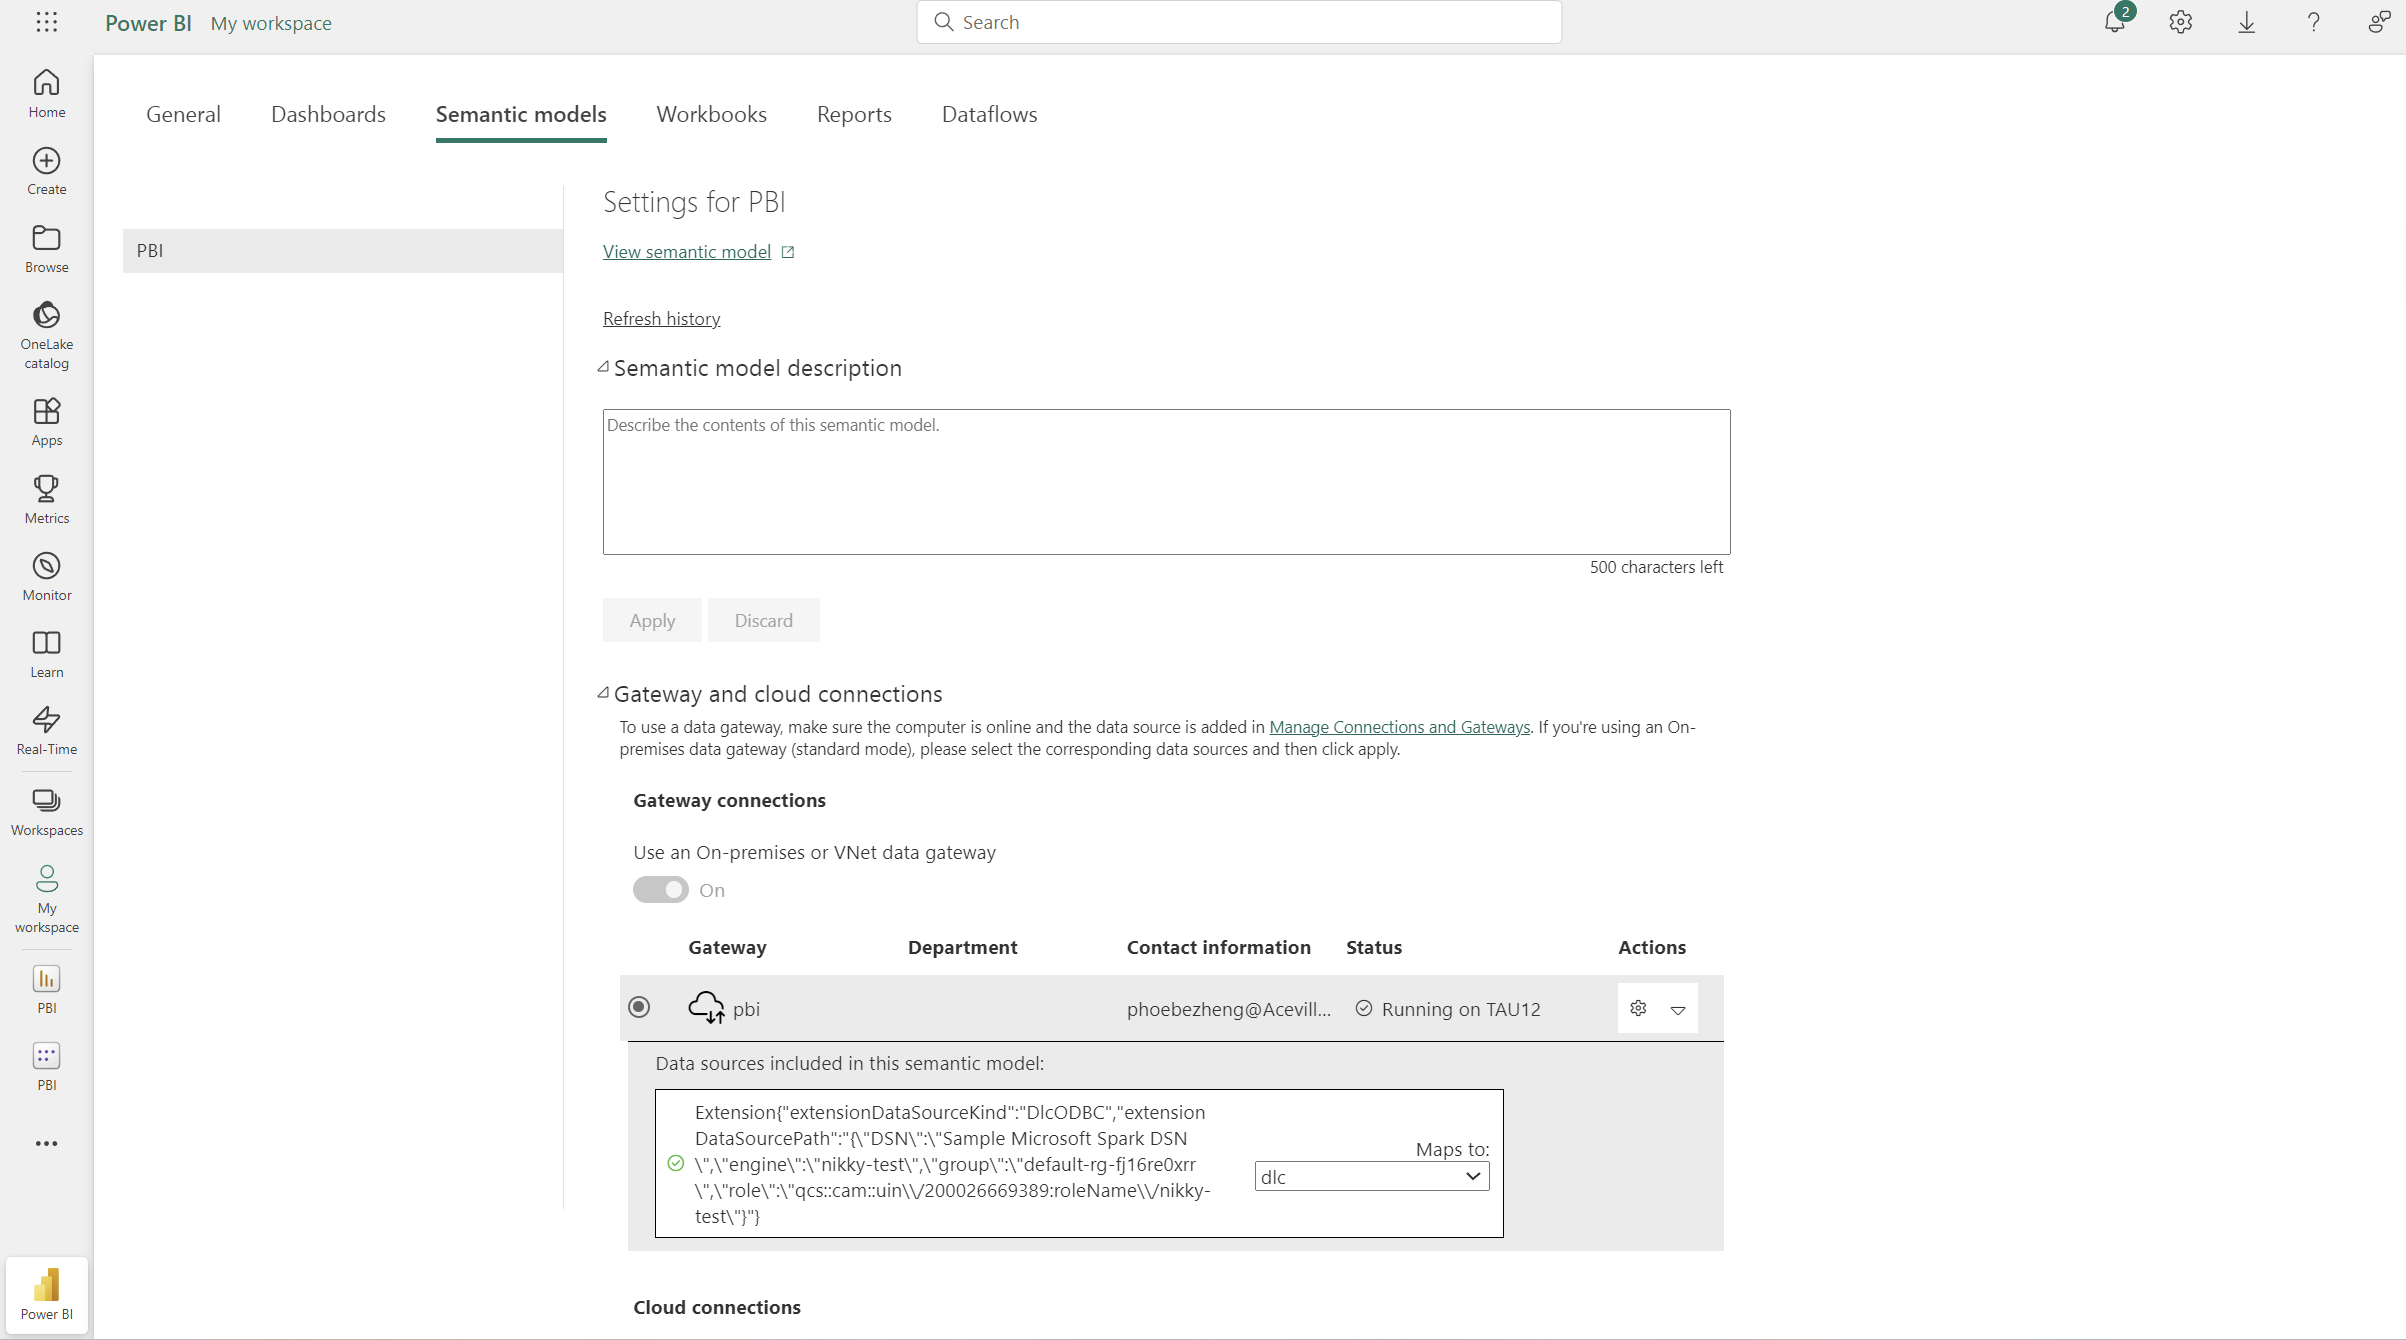
2. レポートを更新する。
フィードバック