快速接入(Web)
本文档将帮助您使用
AtomicXCore SDK 的核心组件 LiveView,快速构建一个包含主播开播和观众观看功能的基础直播 Web 应用。核心功能
LiveView 是一个专为直播场景设计的核心视频区域组件,是您构建直播场景的核心,它封装了所有复杂的底层直播技术(例如推拉流、连麦、音视频渲染)。您可以将 LiveView 作为直播画面的“画布”,专注于上层 UI 与交互的开发。通过下方的视图层级示意图,您可以直观了解 LiveView 在直播界面中的位置和作用: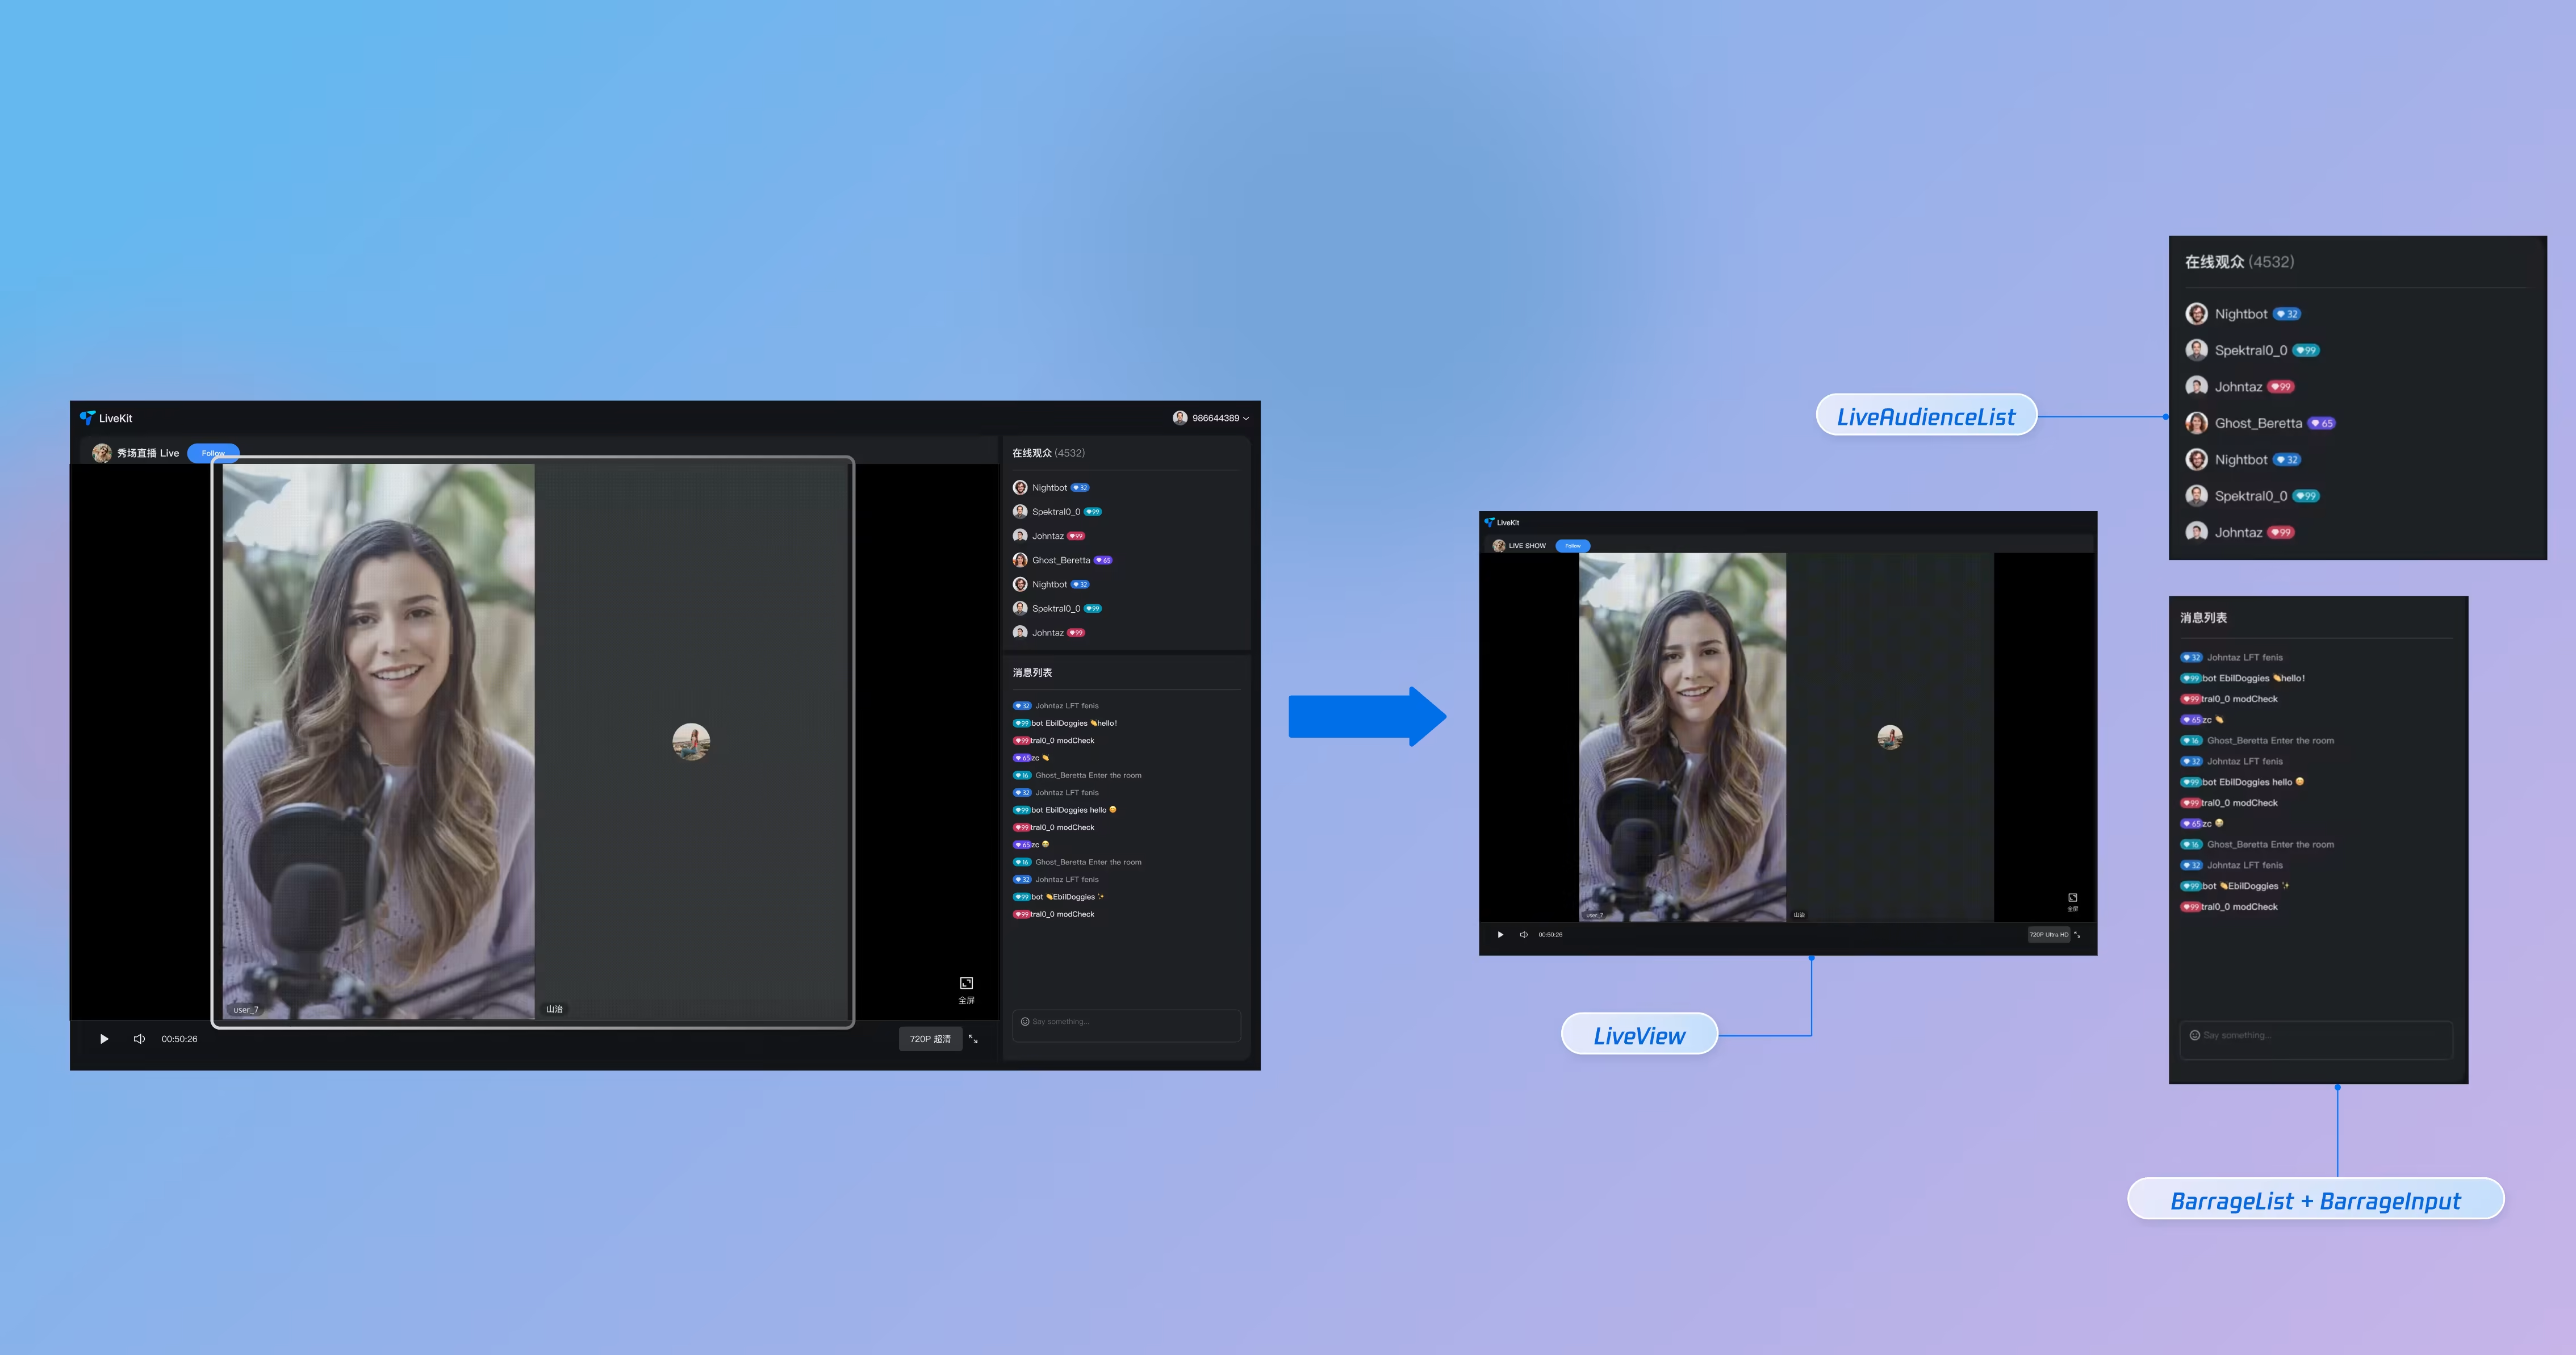
示例项目
准备工作
步骤1:开通服务
说明:
AtomicXCore SDK适用于 Vue3 项目。在使用前,请确保您的开发环境已适配 Vue3。步骤2:在当前项目中导入 AtomicXCore
1. 安装组件:请在您的项目中安装
tuikit-atomicx-vue3 依赖包,执行如下指令即可。npm install tuikit-atomicx-vue3 --save
pnpm add tuikit-atomicx-vue3
yarn add tuikit-atomicx-vue3
2. 配置浏览器权限:确保您的 Web 应用已获得摄像头和麦克风的浏览器使用权限。现代浏览器通常会在首次访问时自动弹出权限请求。
步骤3:实现登录逻辑
在您的项目中调用
useLoginState() 中的login 方法完成登录,这是使用 AtomicXCore 所有功能的关键前提。重要:
推荐在您项目自身的用户账户登录成功后,再调用
useLoginState 中的 login 方法,以确保登录业务逻辑的清晰和一致。import { useLoginState } from 'tuikit-atomicx-vue3';const { login } = useLoginState();async function initLogin() {try {await login({sdkAppId: 0, // 替换为您的 sdkAppIduserId: "", // 替换为您的 userIduserSig: "" // 替换为您的 userSig});} catch (error) {console.error("login failed:", error);}}initLogin(); // 在组件挂载时或适当时机调用 initLogin
登录接口参数说明:
参数 | 类型 | 说明 |
sdkAppId | int | |
userId | string | 当前用户的唯一 ID,仅包含英文字母、数字、连字符和下划线。为避免多端登录冲突,请勿使用 1、123 等简单 ID。 |
userSig | string | 用于 TRTC 鉴权的票据。请注意: 开发环境:您可以采用本地 GenerateTestUserSig.genTestSig 函数生成 UserSig 或者通过 UserSig 辅助工具 生成临时的 UserSig。生产环境:为了防止密钥泄露,请务必采用服务端生成 UserSig 的方式。详细信息请参见 服务端生成 UserSig。 |
搭建基础直播间
步骤1:实现主播视频开播
主播开播流程如下,您只需执行以下几步操作,即可快速搭建主播视频直播。
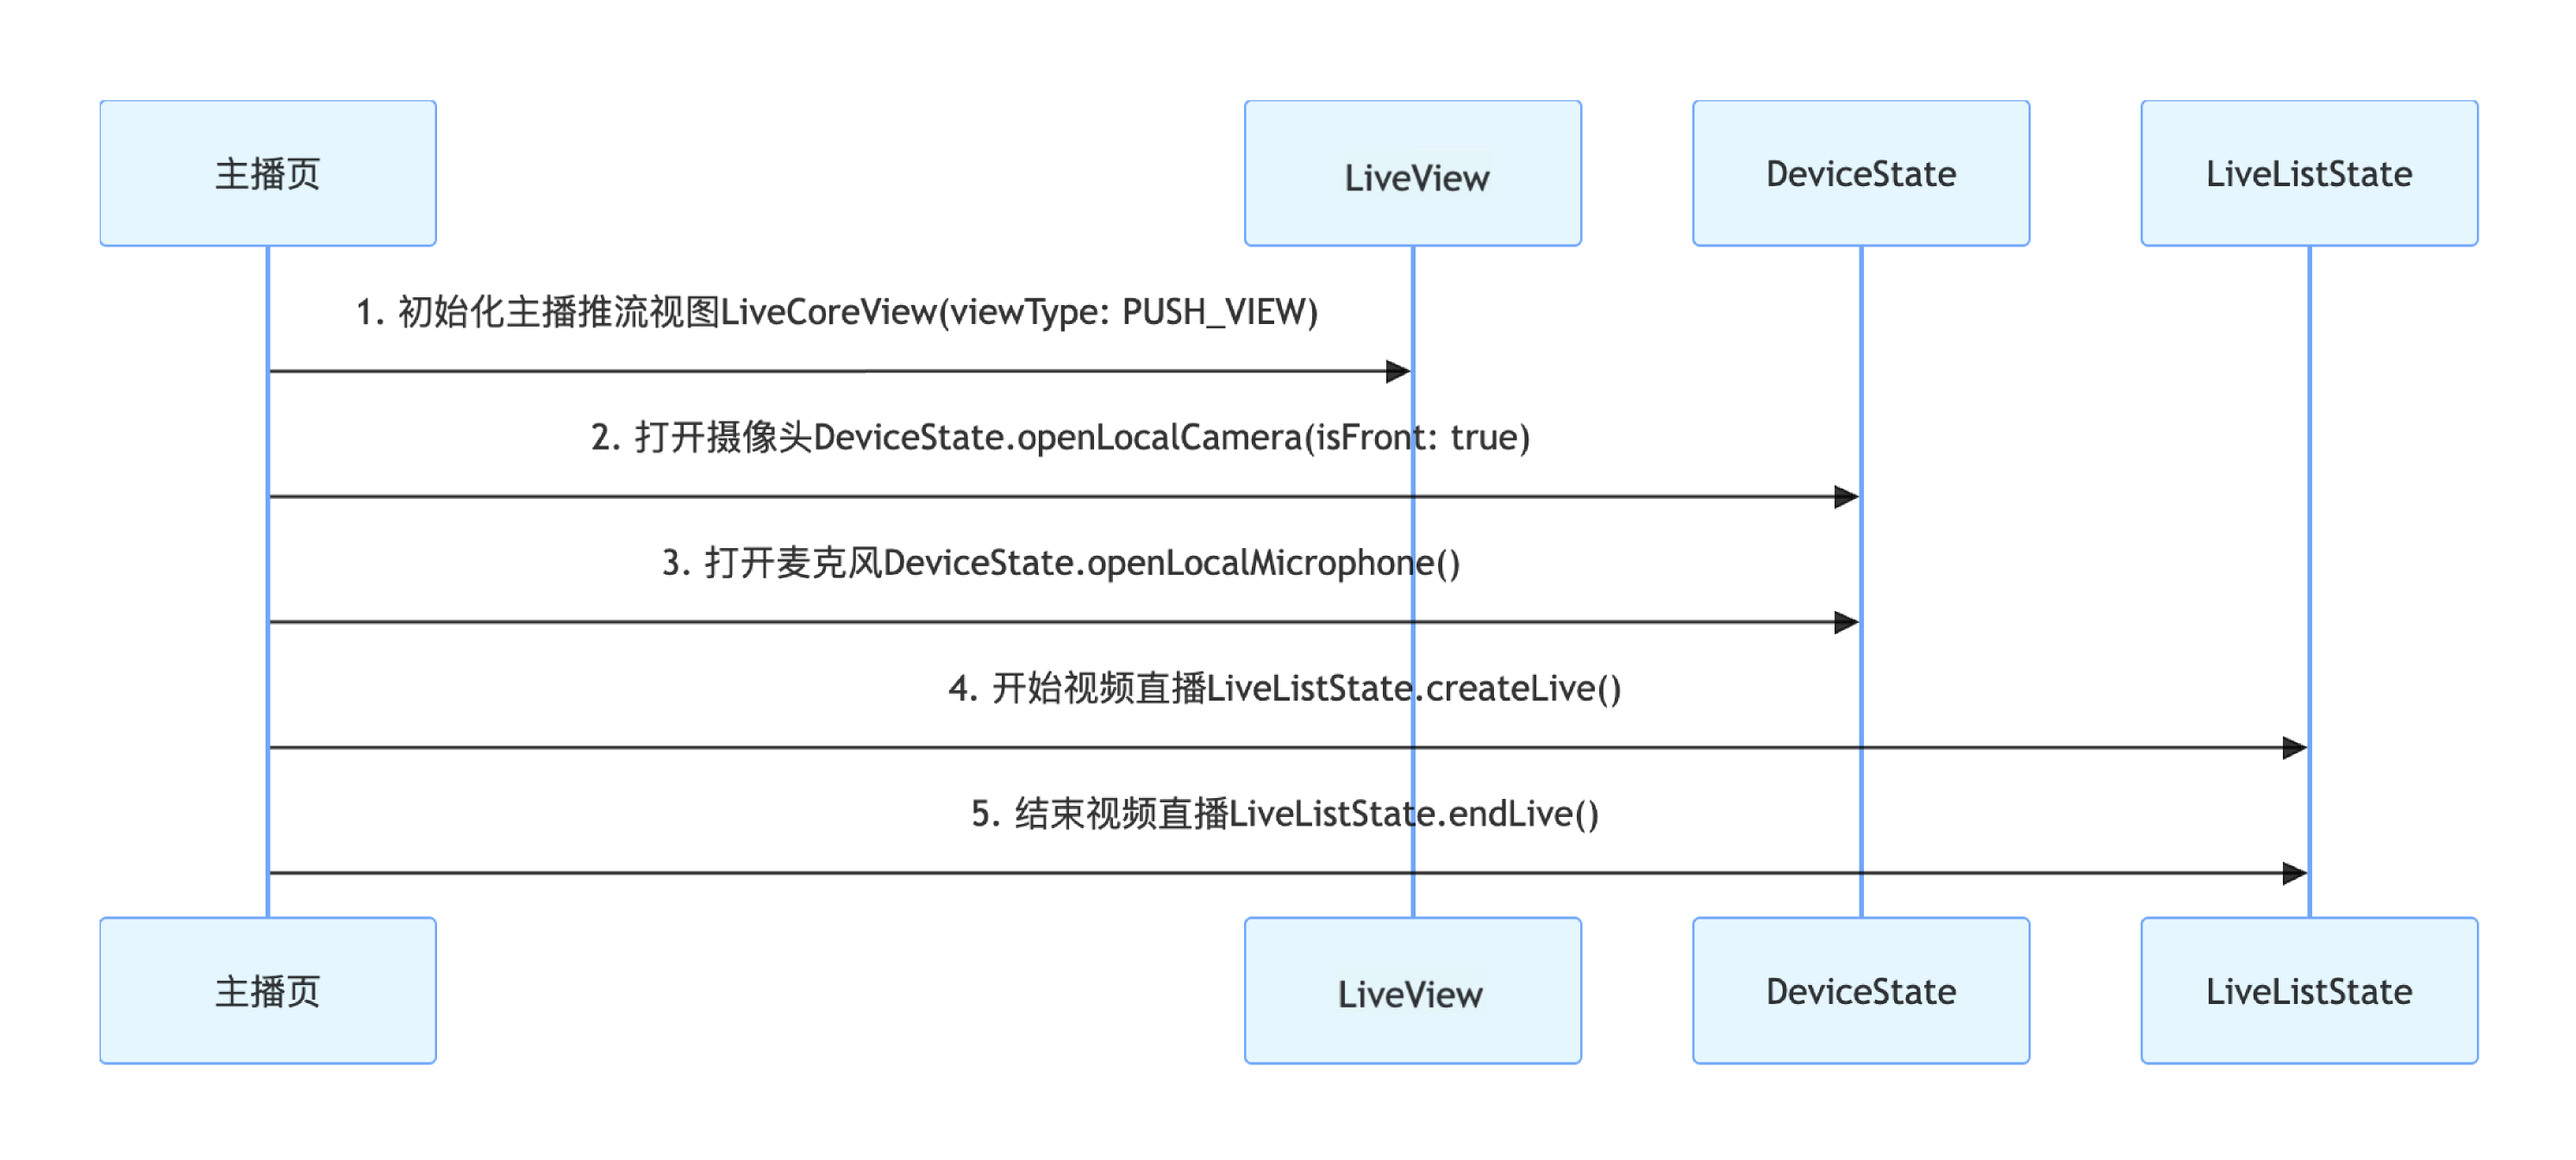
1. 初始化主播推流的视图
在您的主播
Vue 组件中,导入并使用 StreamMixer 组件(推流视图)。<template><StreamMixer /></template><script setup lang="ts">import { StreamMixer } from 'tuikit-atomicx-vue3';</script>
2. 打开摄像头和麦克风
通过调用
useDeviceState 的 openLocalCamera、openLocalMicrophone 接口打开摄像头和麦克风,您无需做额外操作,StreamMixer 会自动预览当前摄像头的视频流,示例代码如下:import { onMounted } from 'vue';import { useDeviceState } from 'tuikit-atomicx-vue3';const { openLocalCamera, openLocalMicrophone } = useDeviceState();onMounted(() => {openLocalMicrophone();openLocalCamera();})
3. 开始直播
通过调用
useLiveListState 的 createLive 接口开始视频直播,完整示例代码如下:import { useLiveListState } from 'tuikit-atomicx-vue3';const { createLive } = useLiveListState();// 定义直播间 ID,实际业务中通常由后端生成或路由参数传递const liveId = ref('test_live_room_001');async function startLive() {try {await createLive({liveId: liveId.value, // 设置直播的房间 idliveName: 'test 直播', // 设置直播的房间名称});} catch (error) {console.error('创建直播失败:', error);}}
LiveInfo参数说明:参数名 | 类型 | 属性 | 描述 |
liveId | string | 必填 | 直播间的唯一标识符 |
liveName | string | 必填 | 直播间的标题 |
notice | string | 选填 | 直播间的公告信息 |
isMessageDisableForAllUser | Bool | 选填 | 是否禁言( true:是,false:否) |
isPublicVisible | Bool | 选填 | 是否公开可见( true:是,false:否) |
isSeatEnabled | Bool | 选填 | 是否启用麦位功能( true:是,false:否) |
keepOwnerOnSeat | Bool | 选填 | 是否保持房主在麦位上 |
maxSeatCount | number | 选填 | 最大麦位数量 |
seatMode | string | 选填 | 上麦模式( 'FREE':自由上麦,'APPLY':申请上麦) |
seatLayoutTemplateId | number | 选填 | 麦位布局模板 ID |
coverUrl | string | 选填 | 直播间的封面图片地址 |
backgroundUrl | string | 选填 | 直播间的背景图片地址 |
categoryList | [number] | 选填 | 直播间的分类标签列表 |
activityStatus | number | 选填 | 直播活动状态 |
isGiftEnabled | Bool | 选填 | 是否启用礼物功能( true:是,false:否) |
isLikeEnabled | Bool | 选填 | 是否支持点赞( true:是,false:否) |
4. 结束直播
直播结束后,主播可以调用
useLiveListState 的 endLive 接口结束直播。SDK 会处理停止推流和销毁房间的逻辑。import { useLiveListState } from 'tuikit-atomicx-vue3';const { endLive } = useLiveListState();// 结束直播async function stopLive() {try {await endLive();} catch (error) {console.error('结束直播失败:', error);}}
步骤2:实现观众进入直播间
观众观看流程如下,通过简单几步操作,即可实现观众观看直播。
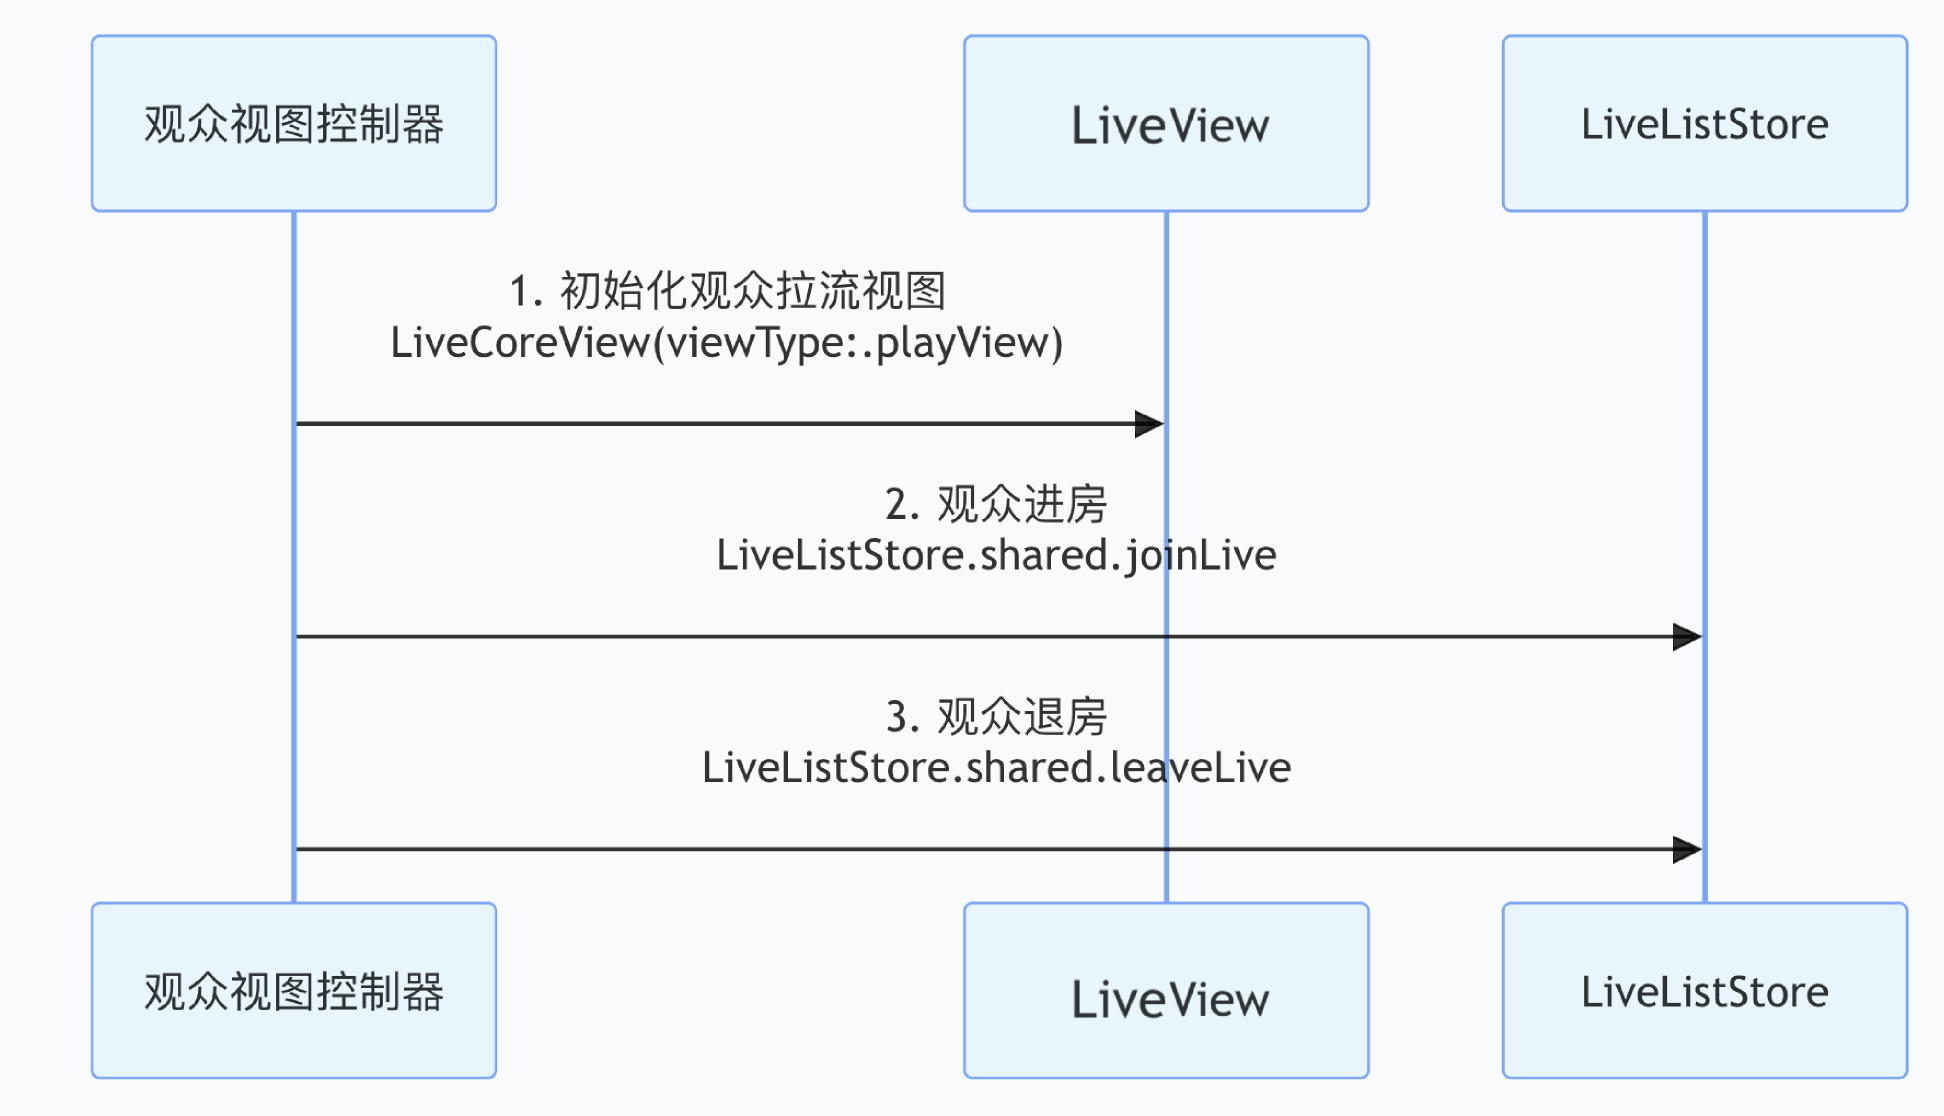
1. 添加观众拉流页面
在您的观众
Vue 组件中,导入并使用 LiveView 组件(拉流视图)。<template><LiveView /></template><script setup lang="ts">import { LiveView } from 'tuikit-atomicx-vue3';</script>
2. 进入直播间观看
通过调用
useLiveListState 的 joinLive 接口进入直播间,您无需做额外操作,LiveView 会自动播放当前房间的视频流,完整示例代码如下:import { useLiveListState } from 'tuikit-atomicx-vue3';const { joinLive } = useLiveListState();// 定义要进入的直播间 IDconst liveId = ref('test_live_room_001');// 进入直播间async function joinLiveRoom() {try {await joinLive({ liveId: liveId.value }); // 与主播开播同样的 liveId} catch (error) {console.error('进入直播间失败:', error);}}
3. 退出直播
观众退出直播间时,需要调用
useLiveListState 的 leaveLive 接口退出直播。SDK 会自动停止拉流并退出房间。import { useLiveListState } from 'tuikit-atomicx-vue3';const { leaveLive } = useLiveListState();// 退出直播async function exitLive() {try {await leaveLive();// 您可以在这里进行页面的跳转} catch (error) {console.error('离开直播间失败:', error);}}
步骤3:监听直播事件
在观众进入直播间后,您还需要处理一些房间内的“被动”事件。例如,主播主动结束了直播,或者观众因为违规等原因被踢出房间。如果不监听这些事件,观众端 UI 可能会停留在黑屏页面,影响用户体验。您可以通过订阅
useLiveListState 提供的 subscribeEvent 来实现事件监听。import { useLiveListState, LiveListEvent } from "tuikit-atomicx-vue3";import { onMounted, onUnmounted } from 'vue';const { subscribeEvent, unsubscribeEvent } = useLiveListState()const handleKickedOutOfLive = () => {console.log('You have been kicked out from live room');};const handleLiveEnded = () => {console.log('Live has ended');};onMounted(async () => {subscribeEvent(LiveListEvent.onLiveEnded, handleLiveEnded);subscribeEvent(LiveListEvent.onKickedOutOfLive, handleKickedOutOfLive);});onUnmounted(async () => {unsubscribeEvent(LiveListEvent.onLiveEnded, handleLiveEnded);unsubscribeEvent(LiveListEvent.onKickedOutOfLive, handleKickedOutOfLive);});
运行效果
集成
LiveView 后,您将得到一个纯净的视频渲染视图,它已具备完整的直播业务能力,但没有任何交互 UI。您可以参考下一章节丰富直播场景来完善直播场景。丰富直播场景
当您完成了基础的直播功能后,您可以参考以下功能指南来为直播添加丰富的互动玩法。
直播功能 | 功能介绍 | 功能 State | 实现指南 |
实现观众音视频连线 | 观众申请上麦,与主播进行实时视频互动。 | 实现观众连线 | |
实现主播跨房连线 PK | 两个不同房间的主播进行连线,实现互动或 PK。 | 实现主播连线 PK | |
添加弹幕聊天功能 | 观众可以在直播间发送和接收实时文字消息。 | 实现弹幕功能 |
API 文档
State | 功能描述 | API 文档 |
LiveListState | 直播间全生命周期管理:创建 / 进入 / 离开 / 销毁房间,查询房间列表,修改直播信息(名称、公告等),监听直播状态(如被踢出、结束)。 | |
DeviceState | 音视频设备控制:麦克风(开关 / 音量)、摄像头(开关 / 切换 / 画质)、屏幕共享,设备状态实时监听。 | |
CoGuestState | 观众连麦管理:连麦申请 / 邀请 / 同意 / 拒绝,连麦成员权限控制(麦克风 / 摄像头),状态同步。 | |
CoHostState | 主播跨房连线:支持多布局模板(动态网格等),发起 / 接受 / 拒绝连线,连麦主播互动管理。 | |
BarrageState | 弹幕功能:发送文本 / 自定义弹幕,维护弹幕列表,实时监听弹幕状态。 | |
LiveAudienceState | 观众管理:获取实时观众列表(ID / 名称 / 头像),统计观众数量,监听观众进出事件。 |
常见问题
主播调用 createLive 或 观众调用 joinLive 后为什么画面是黑的,没有视频画面?
检查登录状态:请确保在调用开播或观看接口前,已经成功调用
login 方法完成登录。检查浏览器权限:请确保浏览器已获得摄像头和麦克风的使用权限,现代浏览器通常会在首次访问时弹出权限请求。
检查主播端:主播端是否正常调用
openLocalCamera() 打开了摄像头。检查网络:请检查设备网络连接是否正常,确保能够访问 TRTC 服务。
检查 HTTPS:在生产环境中,请确保您的
Web 应用运行在 HTTPS 协议下,因为浏览器要求在安全上下文中才能访问摄像头和麦克风。主播端打开摄像头后,开播后可以看到本地视频预览画面,开播前视频预览是黑屏?
检查主播端:请检查主播推流视图是否正确使用了
StreamMixer 组件。检查观众端:请检查观众拉流视图是否正确使用了
LiveView 组件。检查组件导入:确保正确从
tuikit-atomicx-vue3 导入了相应的组件。Web 端特有问题
浏览器兼容性:请确保使用支持 WebRTC 的现代浏览器,推荐使用
Chrome 70+、Firefox 65+、Safari 12+ 或 Edge 79+。本地开发环境:在本地开发时,可以使用
localhost 或 127.0.0.1,但在生产环境中必须使用 HTTPS。防火墙和代理:如果在企业网络环境中,请确保防火墙允许
WebRTC 相关的端口和协议。文档反馈