Quick Start (Web React Desktop Browser)
Download
聚焦模式
字号
Overview
In live streaming operations, operations management is a critical part of ensuring stable platform operation and improving user experience. The Live Streaming Management System provides one-stop live streaming operations capabilities, covering core features such as live monitoring, room management, gift configuration, and content moderation, helping you quickly build a professional live streaming operations system and achieve efficient live room operations and content governance.
You can choose one of the following two integration methods based on your business needs:
Integration Method | Applicable Scenarios | Integration Notes |
Quick deployment without extensive customization | Deploy the Live Streaming Management System to your environment and use it directly, or embed it into your existing operations system via iframe. | |
Unified brand styling or custom features and pages required | Build on the open-source codebase to customize pages, menus, and features, then integrate into your existing business system. |
Note:
The Live Streaming Management System does not provide hosted backend services. You must deploy your own server to generate login credentials and interact with Tencent Cloud services. The repository includes a sample server implementation that you can deploy directly or integrate into your existing backend infrastructure.
Quick Experience
Before experiencing, you need to Activate Services, and ensure the environment setup and service activation requirements are met.
Fill in the SDKAppId and SDKSecretKey obtained after activation into the demo login form.
Note:
The quick experience only demonstrates basic features. For full functionality, please read this document and set up locally for testing, or deploy for production use.
Features
Feature Module | Description | UI Preview |
Live Monitoring | Supports multi-screen concurrent monitoring and quick live room search by Room ID. The system displays violation labels for non-compliant live rooms(contact us to enable). Operators can force-stop streaming with one click or send violation alerts to hosts, keeping track of live status in real time and responding to risks promptly. | 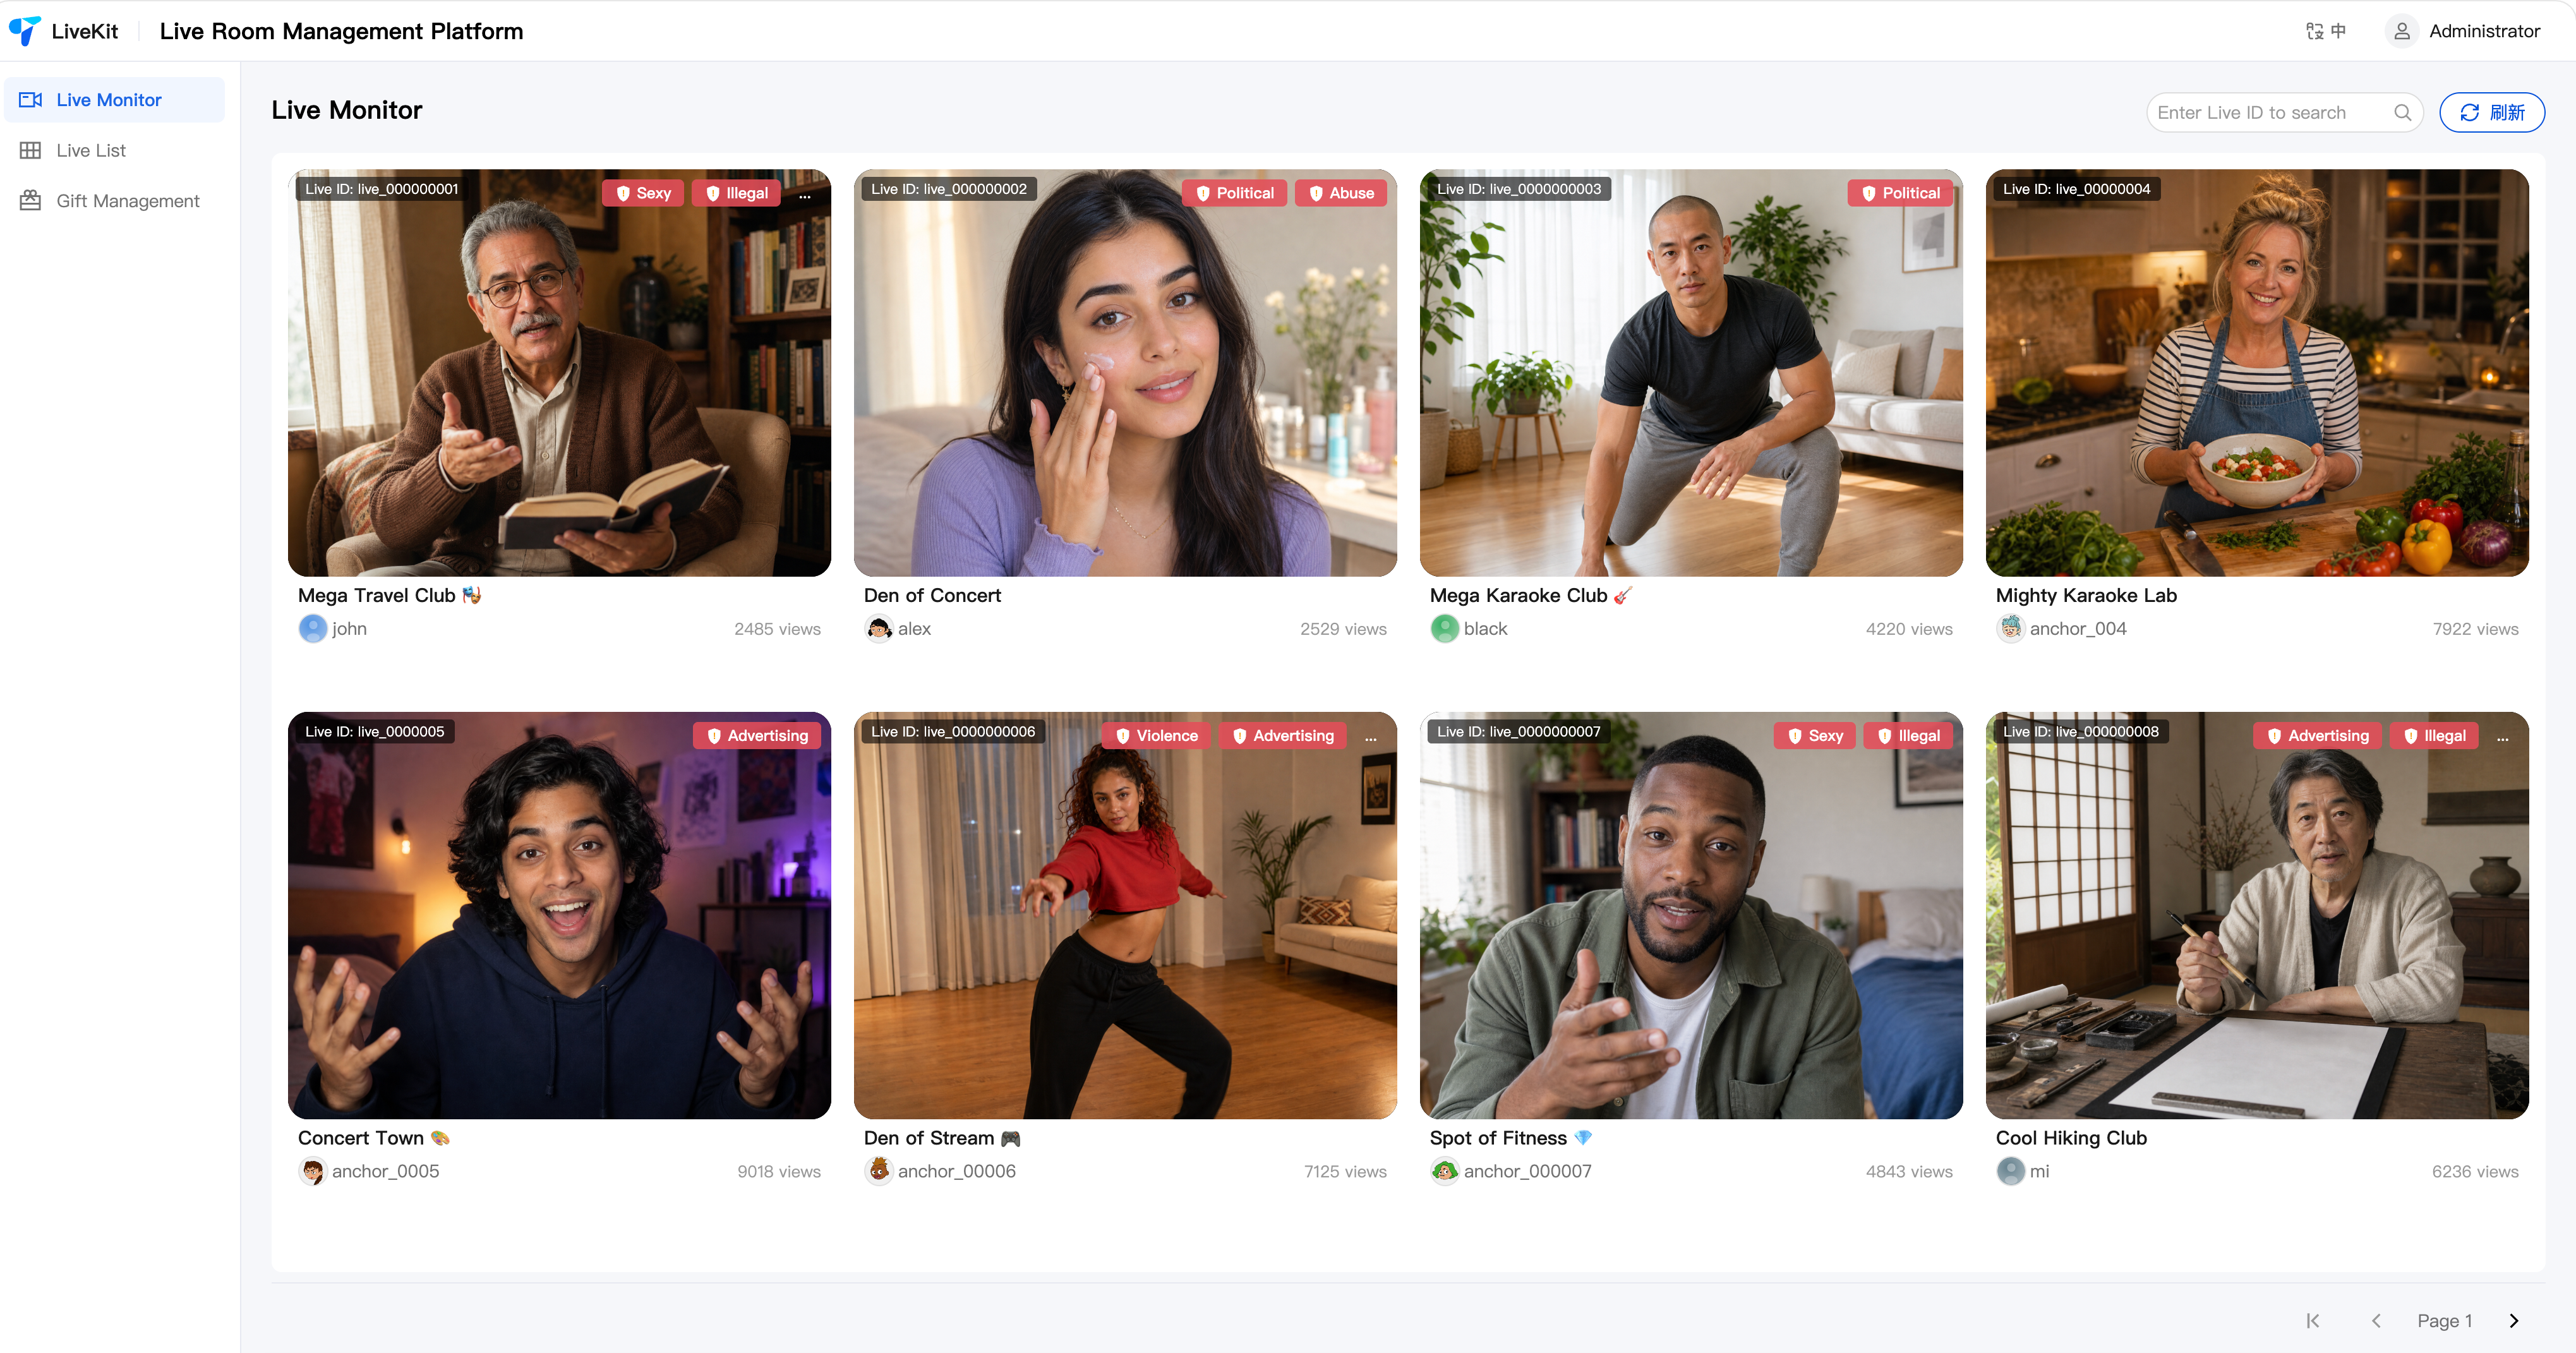 |
Room Details | Supports entering the live room details page to view real-time chat messages, online audience, and core operational data. Provides management capabilities such as mute all and ban members, helping operators respond to and handle live room issues quickly. Admins can send admin messages in the chat (entering this page joins the live room with admin identity). If Text Moderation is integrated, you can view the live room's text moderation records and use review management features such as batch approval and correction whitelist(contact us to enable). | 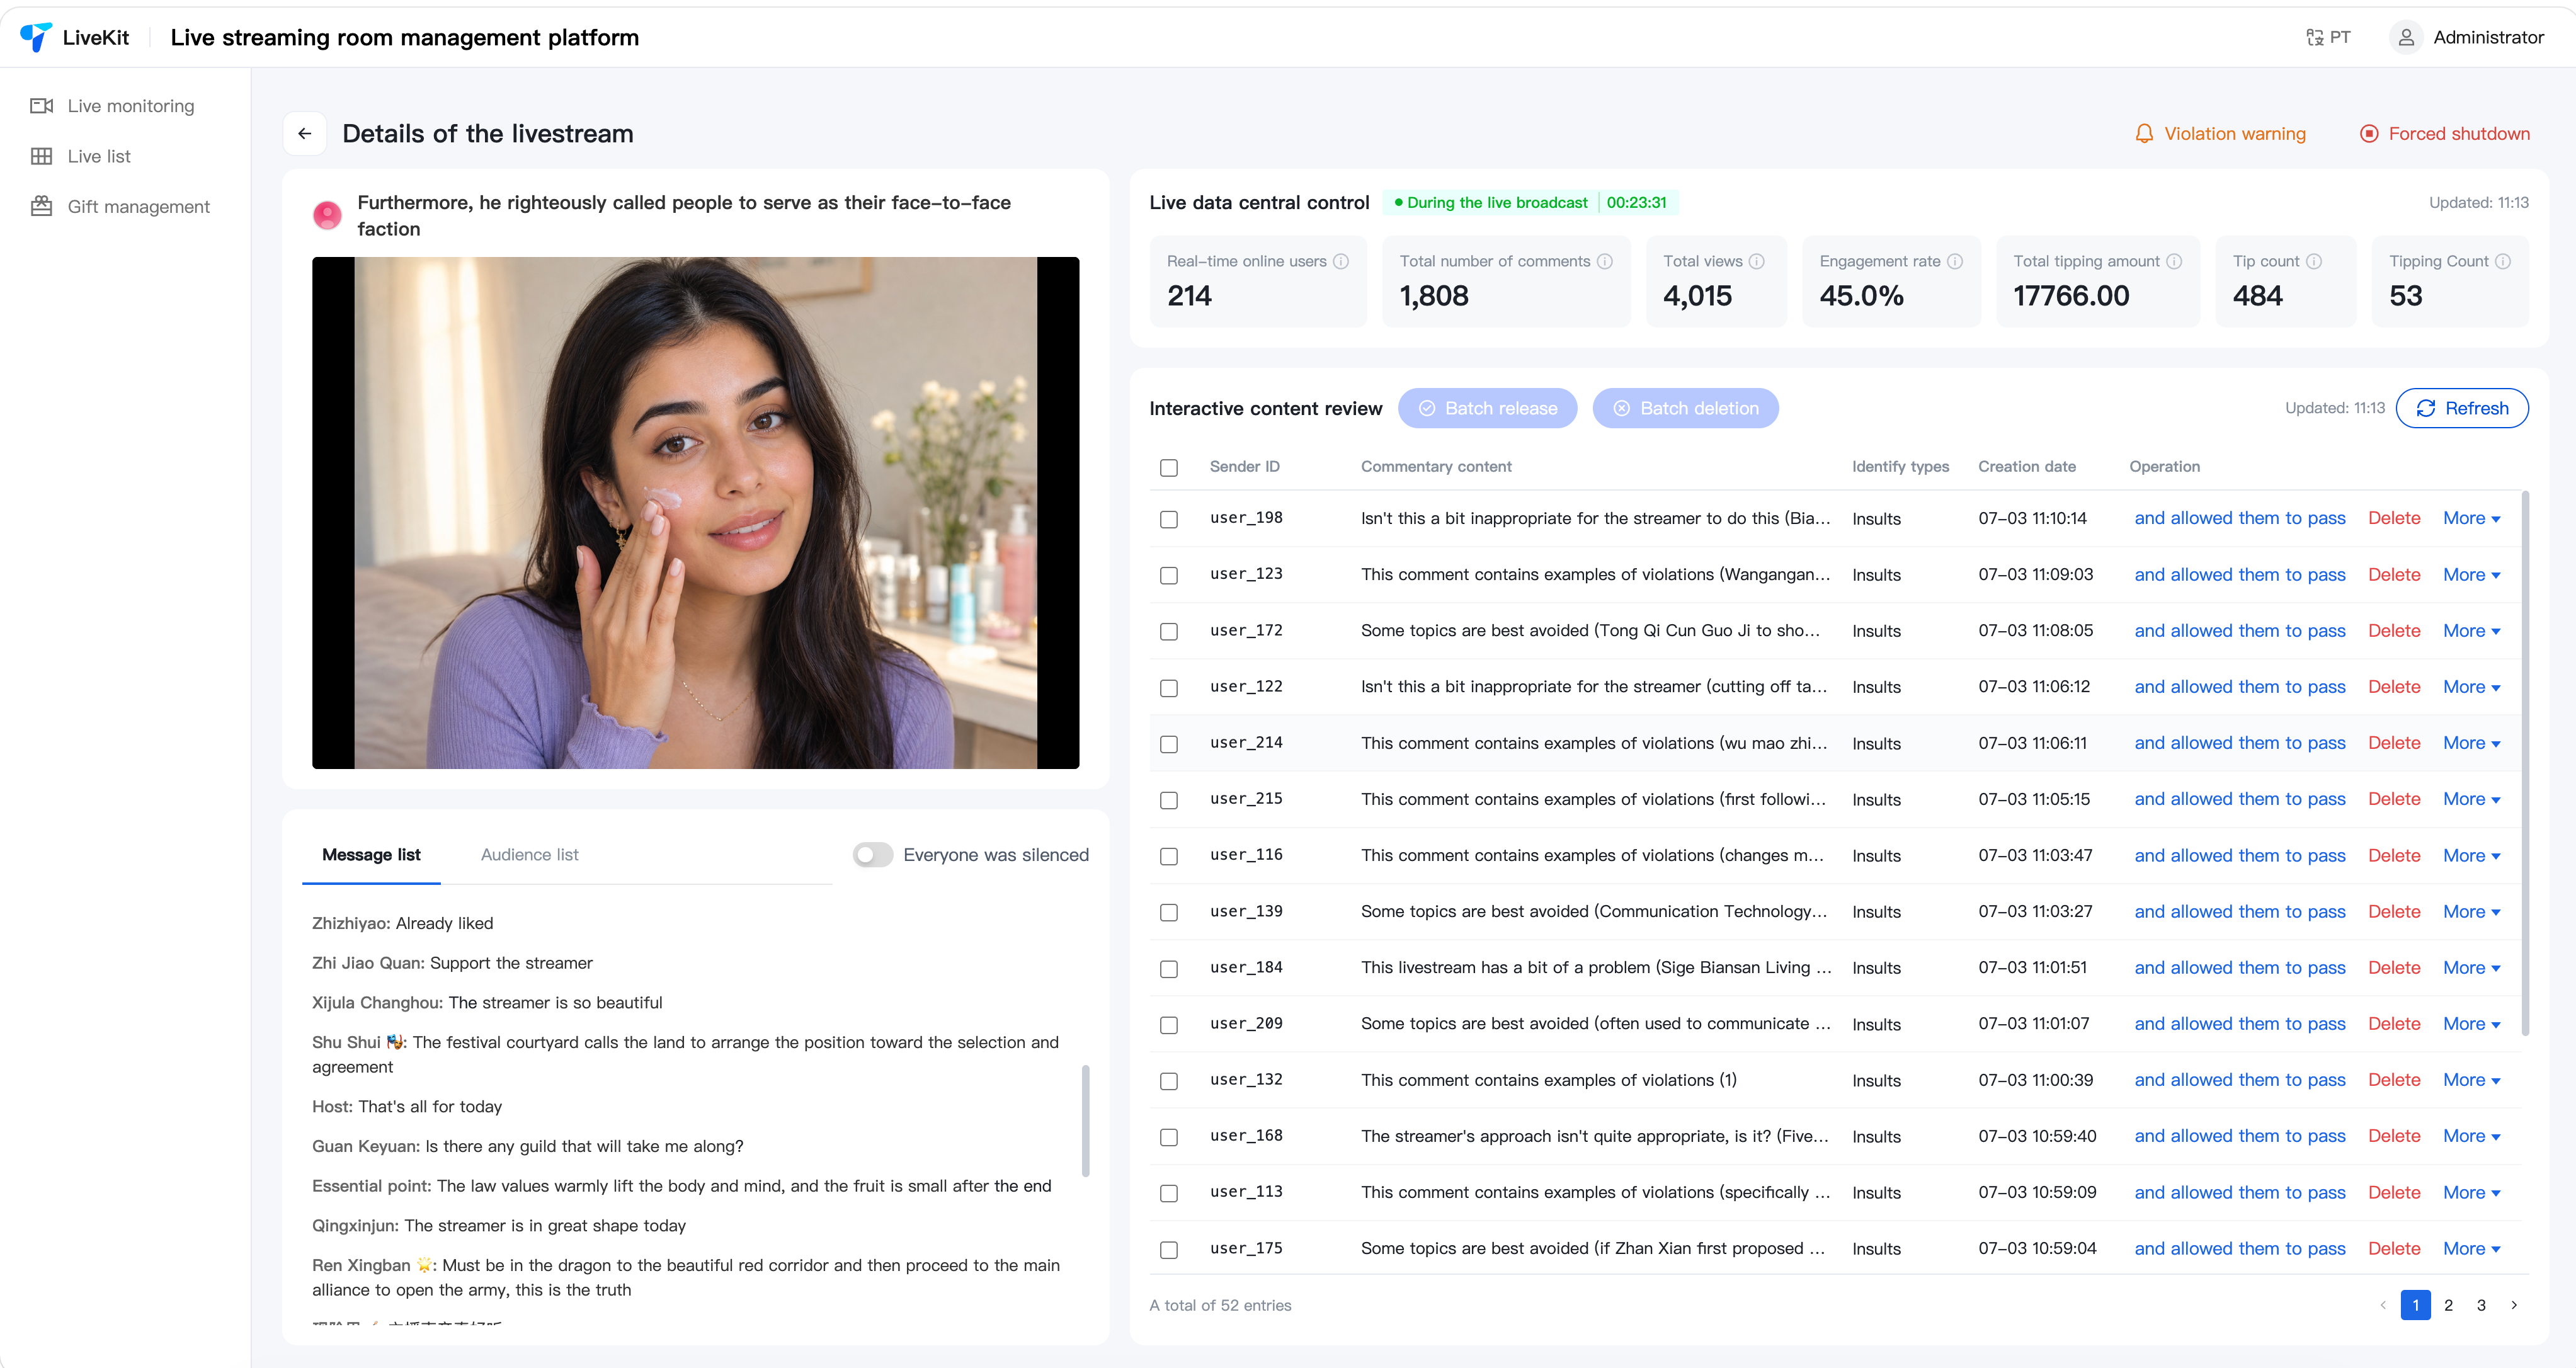 |
Room List | Pre-create live rooms in the backend with designated host IDs, allowing hosts to enter assigned rooms directly when starting streams. Generates OBS streaming URLs enabling hosts to go live with one click via OBS | 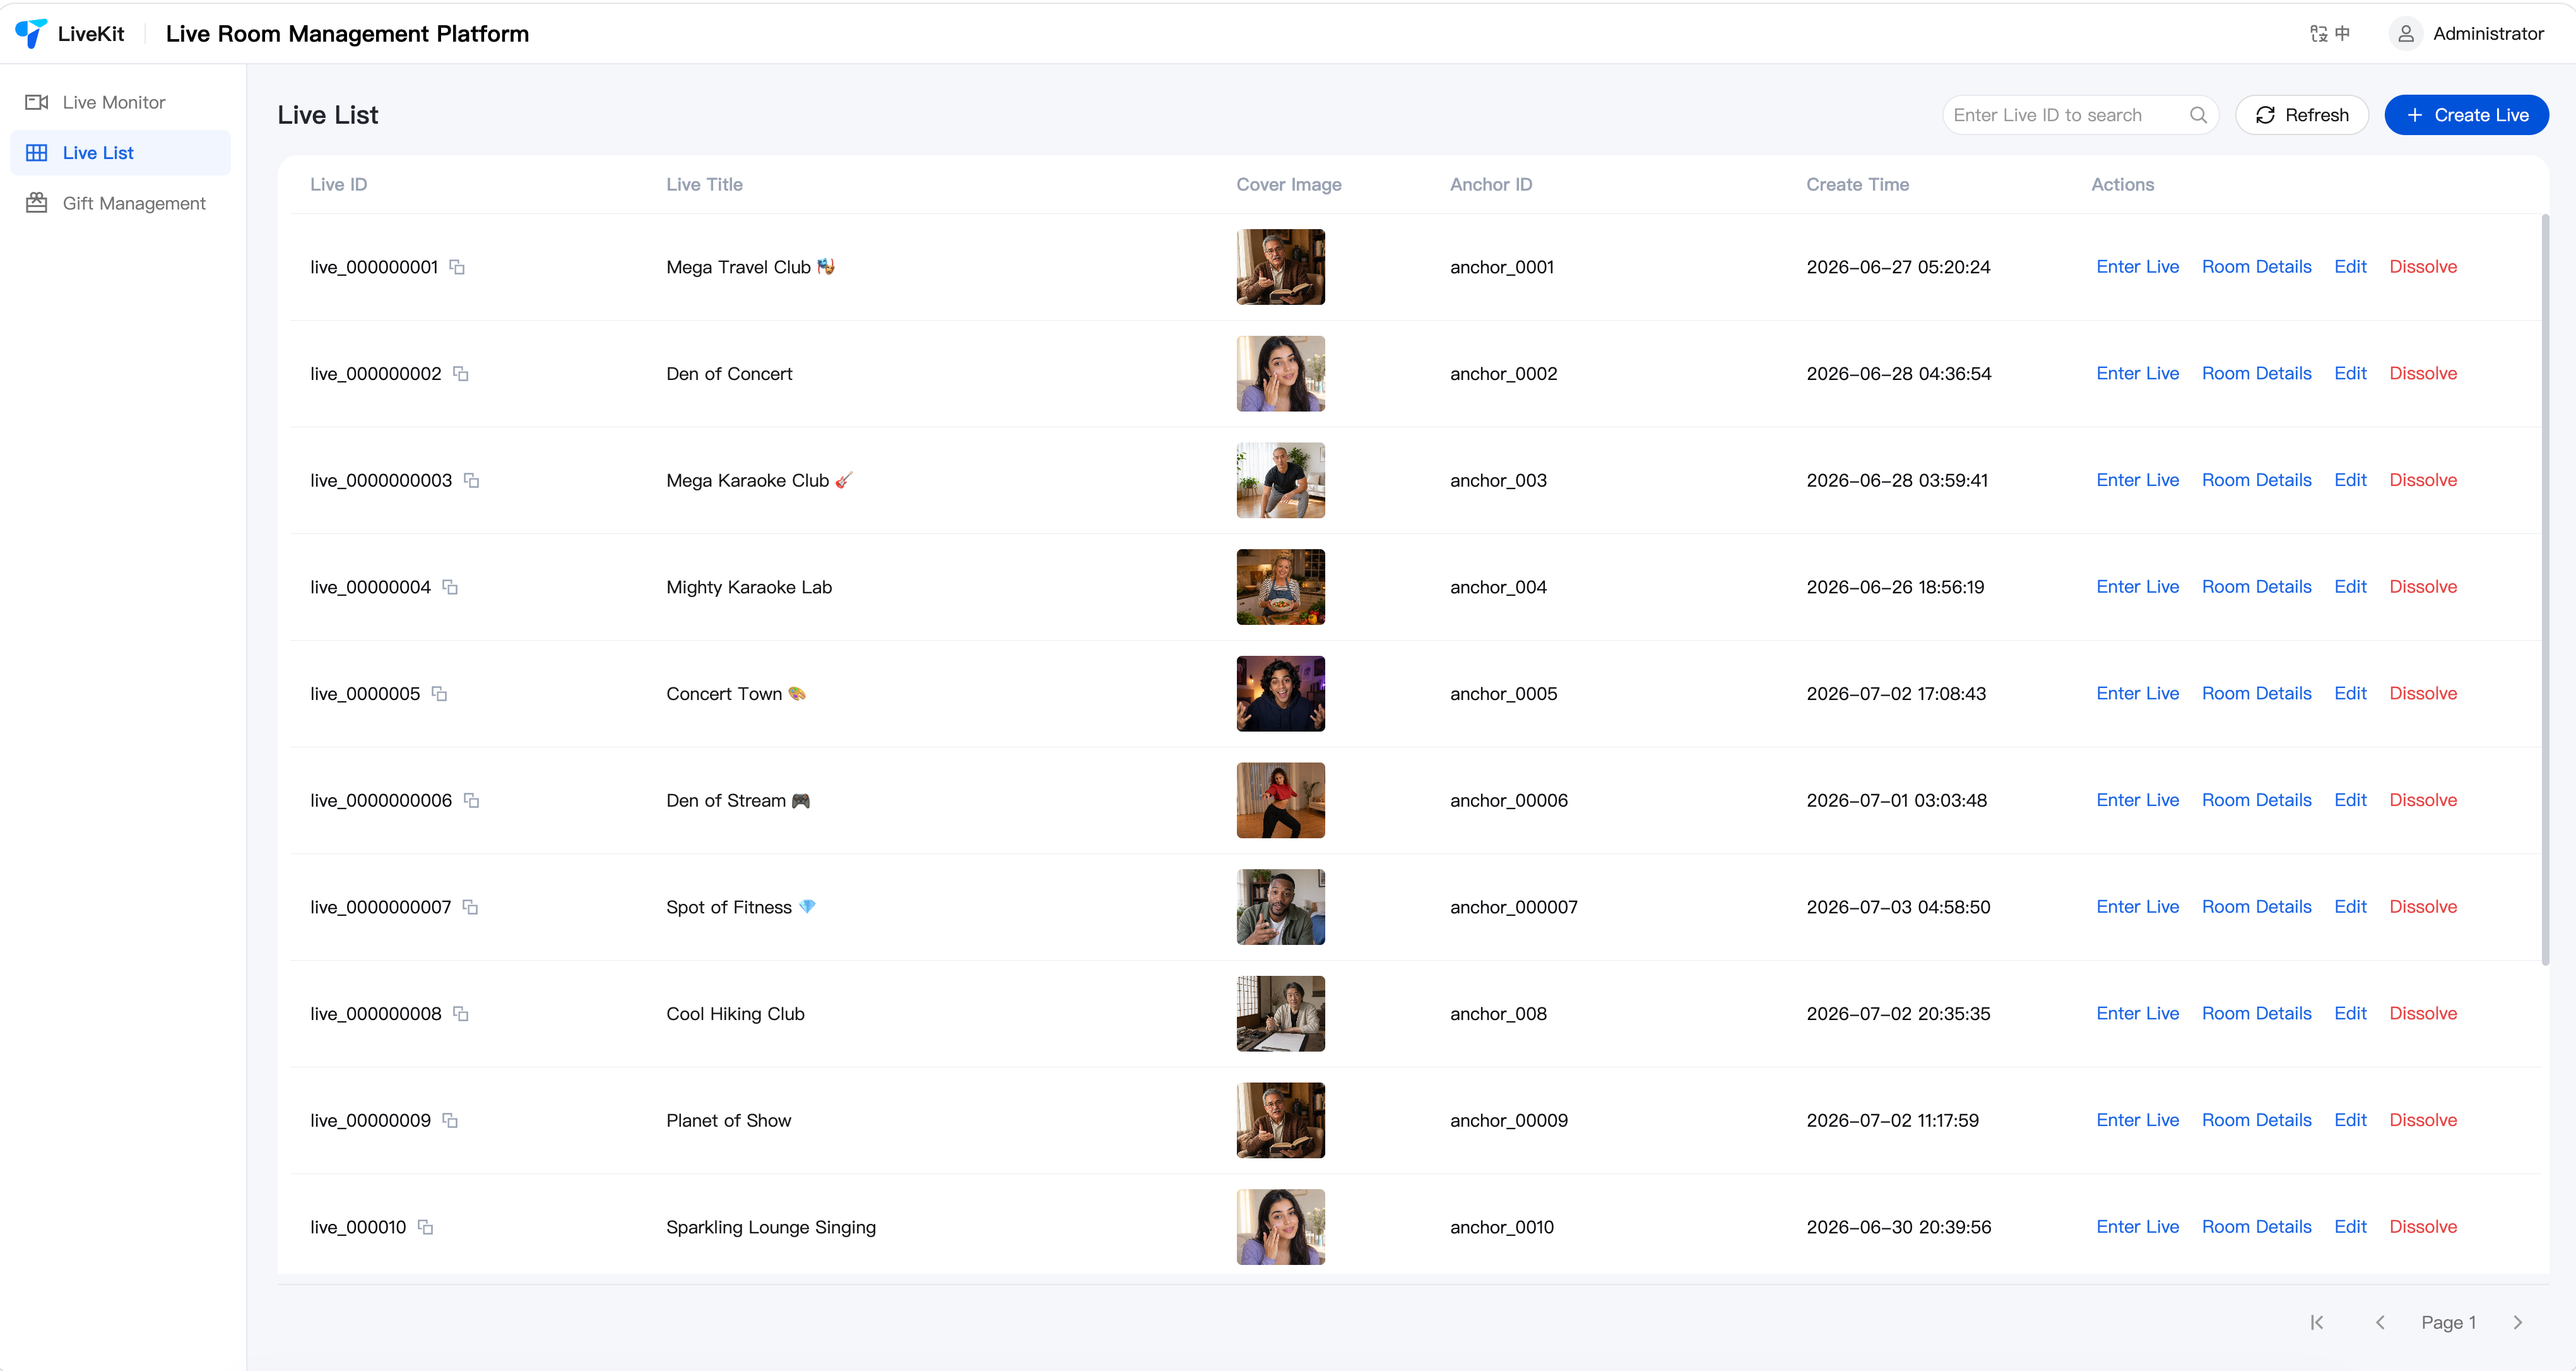 |
Gift Configuration | Supports adding, editing, and deleting gifts and gift categories, with multi-language configuration. | 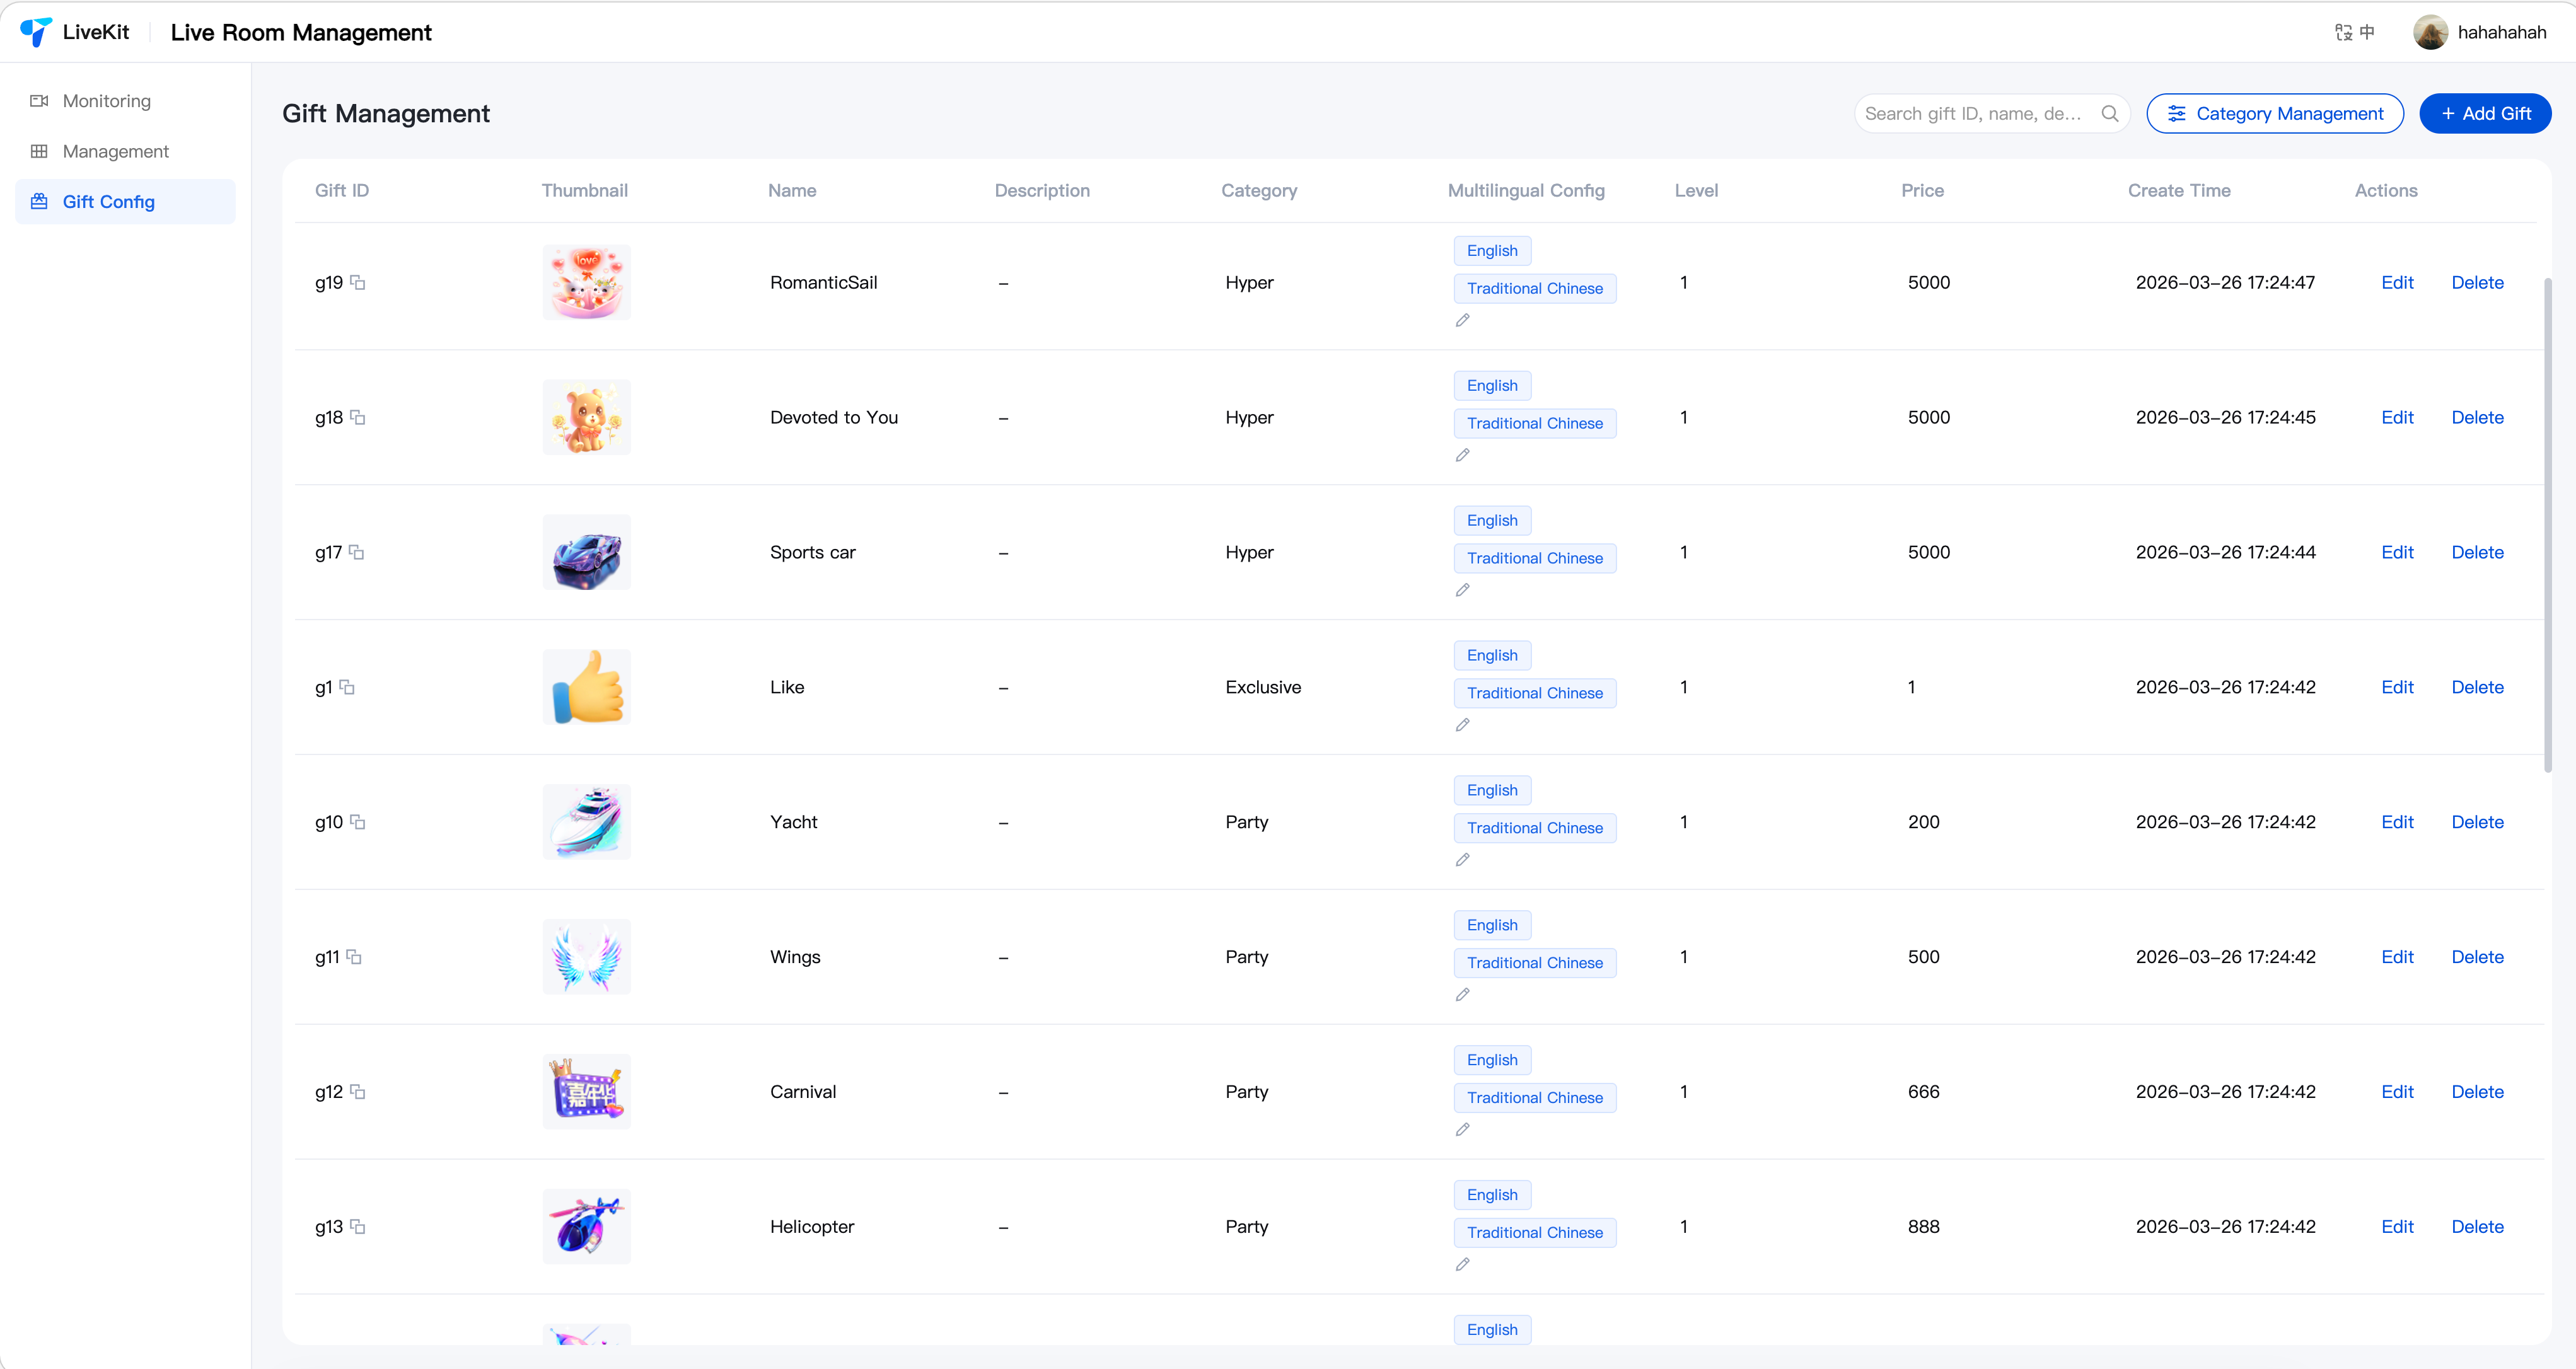 |
System Architecture
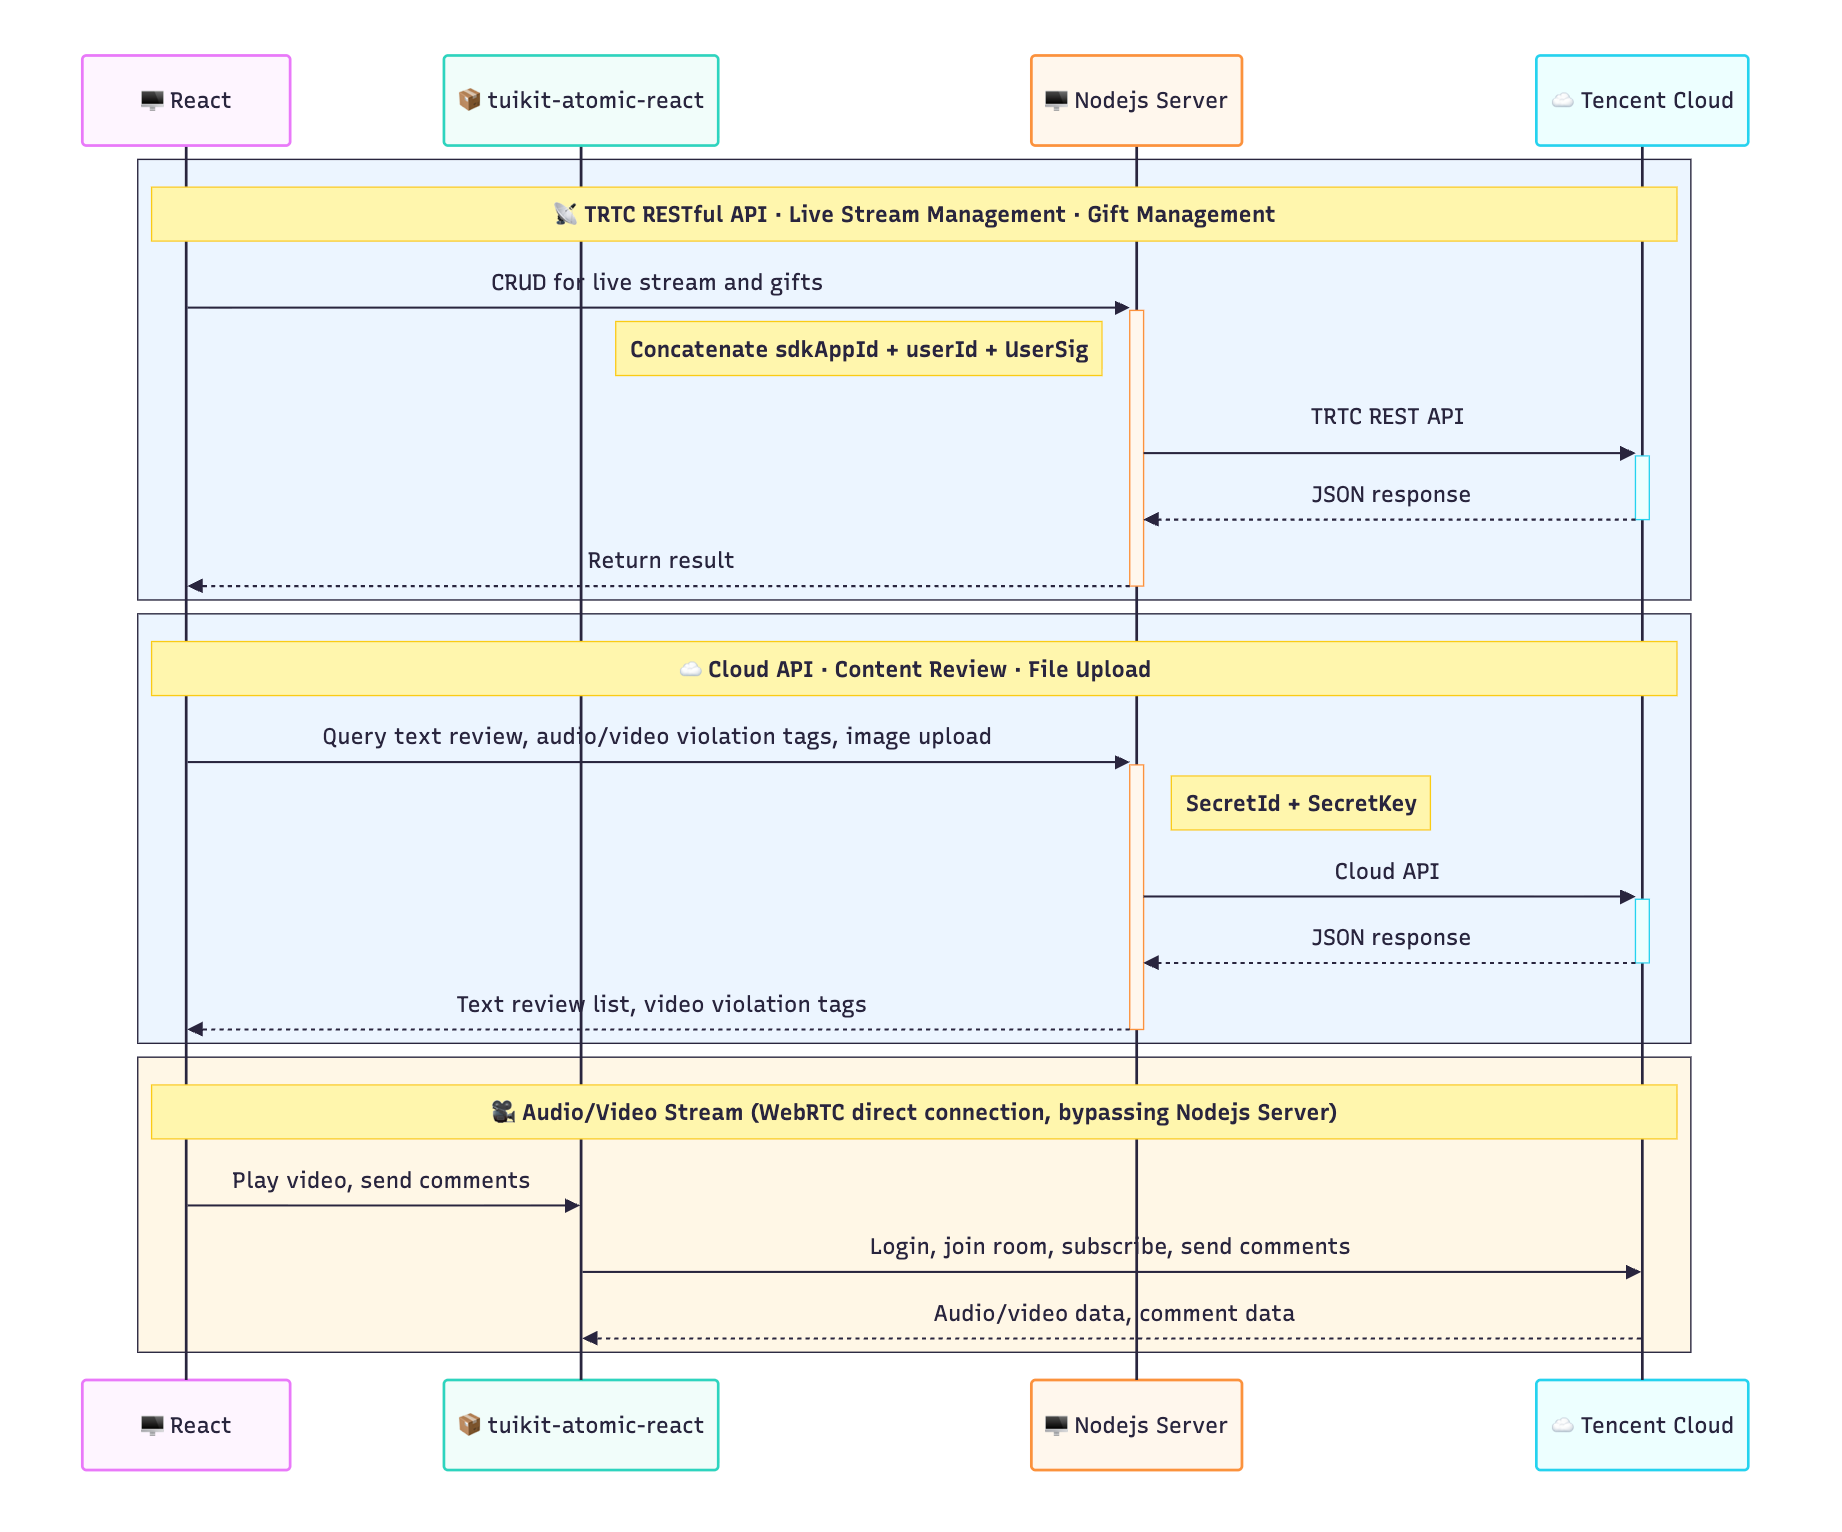
Quick Start
Step 1: Environment Setup and Service Activation
Before getting started, please refer to Getting Start(Web React)to complete the required environment setup and activate the corresponding services.
Step 2: Download the Project
Clone from the GitHub Release page, or use git clone:
git clone https://github.com/Tencent-RTC/TUILiveKit_Managercd TUILiveKit_Managerpnpm install
Step 3: Configure the Server
1. Edit
packages/server/config/.env:SDK_APP_ID=1400000001 # Replace with your SDKAppIDSECRET_KEY=xxxxxxx # Replace with your SecretKeyUSER_ID=administrator # Replace with your admin userID
Note:
For how to get SDK_APP_ID and SECRET_KEY, see Activate Services.
For how to get USER_ID, see Account Management.
2. Start the server:
pnpm run start:server
Note:
The default port is 9000. You can modify it by setting PORT in .env, and you need to allow firewall access to this port.
Step 4: Configure the Frontend
Edit
packages/react/.env:VITE_API_BASE_URL=http://localhost:9000/api
Note:
The port in VITE_API_BASE_URL must match the port the server was started with in the previous step.
Step 5: Start the Frontend
pnpm run dev:react
Advanced Configuration (Optional)
Configure Image Upload
The system's gift thumbnails, gift materials, and room cover features rely on image upload and require storage configuration. If not configured, the frontend will automatically fall back to manual URL input mode, which does not affect other features.
Add storage configuration to
packages/server/config/.env. The system supports three options:Option 1: Tencent Cloud COS Object Storage (Default)
Note:
STORAGE_PROVIDER=cosCOS_SECRET_ID=your_secret_id # Tencent Cloud API SecretIdCOS_SECRET_KEY=your_secret_key # Tencent Cloud API SecretKeyCOS_BUCKET=your-bucket-1250000000 # COS bucket nameCOS_REGION=ap-guangzhou # Bucket regionCOS_CDN_DOMAIN=web.sdk.qcloud.com # (Optional) CDN acceleration domain; if not set, the default COS domain is usedCOS_PATH_PREFIX=uploads # (Optional) Storage path prefix; files will be stored under this directory
Option 2: Custom HTTP Upload Endpoint
Suitable for scenarios with an existing image upload service. The system forwards files to your upload endpoint via
multipart/form-data.STORAGE_PROVIDER=customCUSTOM_UPLOAD_URL=https://your-api.com/upload # Upload endpoint (required)CUSTOM_ACCESS_DOMAIN=https://cdn.your-api.com # (Optional) File access domain prefixCUSTOM_UPLOAD_FIELD=file # (Optional) Upload file field name, default: fileCUSTOM_RESPONSE_URL_FIELD=data.url # (Optional) JSON path for the URL field in the response, default: data.urlCUSTOM_AUTH_HEADER=Authorization: Bearer token # (Optional) Custom auth request headerCUSTOM_PATH_PREFIX=uploads # (Optional) Storage path prefix
Note:
The custom upload endpoint should return JSON format, e.g.:
{ "code": 0, "data": { "url": "https://cdn.example.com/xxx.png" } }.Option 3: Extend Other Storage Services
To integrate AWS S3, Aliyun OSS, etc., extend as follows:
1. Create
YourProvider.js in packages/server/src/services/storage/, extending the StorageProvider base class.2. Register it in
PROVIDER_MAP in packages/server/src/services/storage/index.js.3. Set
STORAGE_PROVIDER=your_key in .env with the corresponding configuration items.Content Moderation Capabilities
Content moderation requires Tencent Cloud API capabilities, so you need to activate the corresponding features and configure the relevant keys to use them.
Edit
packages/server/config/.env:# Tencent Cloud API keys (required for content moderation, violation labels, etc.)TENCENT_CLOUD_SECRET_ID=xxxx # Replace with your Tencent Cloud SecretIdTENCENT_CLOUD_SECRET_KEY=xxxx # Replace with your Tencent Cloud SecretKey
Note:
TENCENT_CLOUD_SECRET_ID and TENCENT_CLOUD_SECRET_KEY are used to call the Tencent Cloud IM moderation API (text moderation, correction whitelist) and the TRTC moderation label query API (violation label display). For how to obtain them, see Tencent Cloud API Key Management.
Audio/Video Violation Label Display
Live Room Comment Content Moderation (Automated Moderation)
Live Room Comment Full Moderation (Manual Moderation)
Secondary Development
The entry project (
packages/react) is fully open source; you are free to adjust the page structure, navigation menus, brand identity, and page styles. Business capabilities can be flexibly extended in the following ways:Brand and Appearance Customization: Customize the page title, logo, brand info, etc. via
live-manager.ts.Component Customization: Render custom content by setting component properties and slots.
Server-side Extension: Extend backend capabilities such as storage and authentication via the Provider mechanism in
packages/server.Note:
Brand and Menu Configuration
The
packages/react/src/live-manager.ts file in the project is the unified configuration file. Modify this file to customize the brand, menus, slots, and all other content:import type { ComponentType, LazyExoticComponent } from 'react';import { configureLiveManager } from 'tuikit-live-manager-sdk-react';export default configureLiveManager<ComponentType | LazyExoticComponent<any>>({brand: {appName: 'My Live Management System',pageTitle: 'Live Management Console',logoUrl: '/assets/my-logo.png',primaryColor: '#0052D9',},menus: {hidden: [],rename: { 'live-list': 'Live Room Management' },order: ['live-list', 'live-monitor', 'gift-config'],extraMenus: [],},components: {},features: { enableGift: true },runtime: {apiBaseUrl: 'http://localhost:9000/api',language: 'zh-CN',},});
Note:
The project reads environment variables from the
.env file by default. The example above uses hardcoded values. In practice, we recommend reading from import.meta.env.VITE_* environment variables.Component Slots
Preset page components provide slots at key positions. You can inject custom React components via
configureLiveManager to extend page functionality:Layout Slots
Slot Name | Insert Position | Received Props |
headerRight | Header right area | - |
sidebarBottom | Sidebar bottom area | - |
export default configureLiveManager<ComponentType | LazyExoticComponent<any>>({components: {layout: { headerRight: MyHeaderWidget },},});
LiveMonitor - Live Monitoring Page
Slot Name | Insert Position | Received Props |
userActionExtraItems | Action area of each live room card | { live: MonitorLiveInfo } |
Example: Add a custom button to monitoring cards
// live-manager.tsimport MyMonitorButton from './components/MyMonitorButton.tsx';export default configureLiveManager({components: {liveMonitor: {userActionExtraItems: MyMonitorButton,},},});
// MyMonitorButton.tsximport type { MonitorLiveInfo } from 'tuikit-live-manager-sdk-react';interface Props { live: MonitorLiveInfo }function MyMonitorButton({ live }: Props) {return (<t-button variant="text" size="small">Custom Action — {live.liveName}</t-button>);}
LiveList - Live Room List Page
Slot Name | Insert Position | Received Props |
beforeToolbar | Before the list page toolbar | { lives: MonitorLiveInfo[]; loading: boolean } |
afterToolbar | After the list page toolbar | { lives: MonitorLiveInfo[]; loading: boolean } |
tableExtraColumns | Table extra columns | { live: MonitorLiveInfo } |
rowActions | Row action button area | { live: MonitorLiveInfo } |
liveFormExtraFields | Create/edit live room form extra fields | { mode: 'create' | 'edit'; formData: Record<string, unknown> } |
Example: Add custom columns to the table
// live-manager.tsimport CustomColumn from './components/CustomColumn.tsx';export default configureLiveManager({components: {liveList: {tableExtraColumns: CustomColumn,},},});
// CustomColumn.tsximport type { MonitorLiveInfo } from 'tuikit-live-manager-sdk-react';import { Tag as TTag } from 'tdesign-react';interface Props {live: MonitorLiveInfo;}function CustomColumn({ live }: Props) {return (<TTag theme={live.isMuted ? 'warning' : 'success'} variant="light">{live.isMuted ? 'Muted' : 'Normal'}</TTag>);}export default CustomColumn;
LiveControl - Live Room Details Page
Slot Name | Insert Position | Received Props |
beforeLiveInfo | Before the live room info area | { liveInfo: MonitorLiveInfo | null } |
customControlPanel | Control panel below statistics cards | { liveInfo: MonitorLiveInfo | null; stats: LiveStats } |
Example: Add a custom statistics panel
// live-manager.tsimport CustomPanel from './components/CustomPanel.tsx';export default configureLiveManager({components: {liveControl: {customControlPanel: CustomPanel,},},});
// CustomPanel.tsximport { useMemo } from 'react';import type { MonitorLiveInfo, LiveStats } from 'tuikit-live-manager-sdk-react';interface Props {liveInfo: MonitorLiveInfo | null;stats: LiveStats;}function CustomPanel({ liveInfo, stats }: Props) {const revenueRate = useMemo(() => {if (!stats || stats.viewCount === 0) return '0';return ((Number(stats.giftUserCount ?? 0) / stats.viewCount) * 100).toFixed(2);}, [stats]);return (<t-card title="Custom Statistics" class="custom-panel"><p>Gift Conversion Rate: {revenueRate}%</p><p>Total Likes: {stats.likeCount.toLocaleString()}</p><p>Total Comments: {stats.commentCount.toLocaleString()}</p></t-card>);}
GiftConfig - Gift Configuration Page
Slot Name | Insert Position | Received Props |
giftTableExtraColumns | Gift table extra columns | { gift: GiftItem } |
giftRowActions | Gift row action button area | { gift: GiftItem } |
giftFormExtraFields | Create/edit gift form extra fields | { mode: 'create' | 'edit'; formData: Record<string, unknown> } |
Example: Display category tags in the gift table
// live-manager.tsimport GiftCategoryTag from './components/GiftCategoryTag.tsx';export default configureLiveManager<ComponentType | LazyExoticComponent<any>>({components: {giftConfig: {giftTableExtraColumns: GiftCategoryTag,},},});
// GiftCategoryTag.tsximport type { GiftItem } from 'tuikit-live-manager-sdk-react';import { Space as TSpace, Tag as TTag } from 'tdesign-react';interface Props {gift: GiftItem;}function GiftCategoryTag({ gift }: Props) {const categories = gift.categories ?? [];return (<TSpace size="small">{categories.map(cat => (<TTag key={cat} size="small" variant="light">{cat}</TTag>))}</TSpace>);}export default GiftCategoryTag;
Production Deployment
Note:
If you already have your own server, choose Option 1: Self-hosted Deployment for more flexibility and integration with your existing system.
If you want a quick trial or demo, choose Option 2: Cloud Functions + COS/EdgeOne Pages for faster setup without purchasing and configuring servers.
Option 1: Self-hosted Deployment
Server: After modifying the configuration, deploy
packages/server to your server, run pnpm install in that directory, then run node src/index.js to start the server.Frontend: After modifying
VITE_API_BASE_URL, run pnpm run build:react at the root and deploy the build output to a static resource server such as Nginx. You can also place the build output in the server's public directory to share the port with the server. In this case, set VITE_API_BASE_URL=/api so the frontend uses relative paths for API requests.Option 2: Cloud Functions + COS / EdgeOne Pages
Server: Run
npm run deploy:server at the root, then upload packages/server/dist/scf-deploy.zip to Tencent Cloud Functions (Web Functions, Node.js 20.19).Frontend: Create
.env.production with the Cloud Function request URL, then run pnpm run build:react at the root and upload the build output to COS or EdgeOne.VITE_API_BASE_URL=https://your-scf-url.com/api
Note:
Replace your-scf-url.com with your actual domain and port.
Related Documentation
文档反馈