This document describes how to create an image for the Windows Server 2012 operating system. You can also refer to this document for other versions of Windows Server.
Directions
Preparations
Check the following before you start:
Note:
If you need to create and export a data disk image, skip this step.
Checking the partitioning and starting mode of the OS
1. On the desktop, click
to open the Windows PowerShell window.
2. In the Windows PowerShell window, enter diskmgmt.msc and click Enter to open the Disk Management window.
3. Right-click the disk to be checked, click Properties, and select the Volume tab to check the disk partitioning mode.
4. Check whether the disk partition is a GPT partition.
If yes, as GPT partitions are not available for service migration, please submit a ticket.
If no, proceed to the next step.
5. Start CMD as the admin user and run the following command to check whether the operating system starts in EFI mode:
bcdedit /enum {current}
A result similar to the following will be returned:
If the path parameter contains "efi", the current operating system is started in EFI mode. In this case, please submit a ticket.
If path does not contain "efi", proceed to the next step.
Uninstalling software
Uninstall the conflicting drivers and software (including VMware tools, Xen tools, Virtualbox GuestAdditions, and other software that comes with underlying drivers).
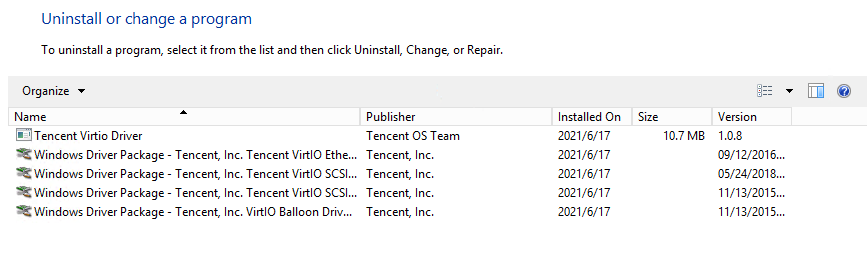
Choose Control panel > Programs and Features, and enter "Virtio" in the search box.
If the result shown in the figure below is returned, the Virtio driver is installed.
If the Virtio driver is not installed, please download an edition based on your needs and install it.
Note:
Tencent Cloud does not support importing Windows Server 2003.
If you are using Windows Server 2008R2/2012R2/2016/2019/2022, please install Tencent Cloud customized VirtIO driver.
If you are using another version of Windows operating system, please try Tencent Cloud customized VirtIO driver first. If the running is not stable, install the community edition instead.
After the migration to the cloud, hardware changes include but are not limited to:
The graphics card changes to Cirrus VGA.
The disk is changed to Virtio Disk.
The ENI is changed to Virtio Nic, and Local Area Connection is used by default.
Exporting an image
You can use various tools to export an image according to your requirements.
Using a platform tool to export an image
Using disk2vhd to export an image
For more information on how to use the image export tools of virtualization platforms, such as VMWare vCenter Convert and Citrix XenConvert, see the document for the respective platform.
Note:
Tencent Cloud Service Migration supports images in qcow2, vhd, raw, and vmdk formats.
If you need to export the system on a physical machine or if you do not want to use a platform tool to export an image, use disk2vhd instead.
Disk2vhd can be started only after the Volume Shadow Copy Service (VSS) is installed in the Windows system. For more information about the VSS features, see Volume Shadow Copy Service.
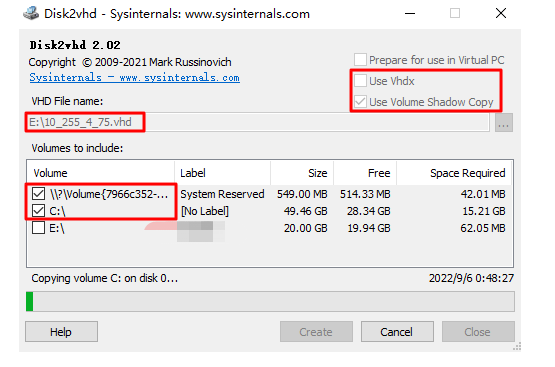
3. Configure the parameters as below, and click Create to export the image.
Use Vhdx: Do not select it because the system currently does not support VHDX images.
Use volume Shadow Copy: It is recommended that you select it for higher data integrity.
VHD File name: The location where the .vhd file is stored. Please select a non-system disk.
Volume to include: The entire system disk is required to be exported when you export the image. Please choose all partitions of your system disk, otherwise an error will occur when you import the image.
System disk partitions usually include C:\\ partition, boot partition and recovery partition. All partitions need to be chosen.
Configuration samples
Run Disk2vhd in E drive, choose all partitions of the system disk (boot partition and C:\\ partition). Select “Use volume Shadow Copy”, and deselect “Use Vhdx”. The .vhd file will be stored on E drive after the image is exported.
Converting the image format (optional)
Use qemu-img to convert the original image into a supported format. For more information, see Converting Image Format.
Checking the image
Note:
The image file system that you create may be corrupted because you created the image without stopping the service or due to other reasons. Therefore, we recommend that you check the image after creating it.
If the image format is supported by the current platform, you can directly open the image to check the file system. For example, the Windows platform supports images in the vhd format; the Linux platform allows you to use qemu-nbd to open images in the qcow2 format; and the Xen platform allows you to directly open files in the vhd format.
This document takes checking the VHD images through Attach VHD in Disk Management on Windows as an example.
1. On the desktop, right click
, and select Computer Management in the pop-up menu.
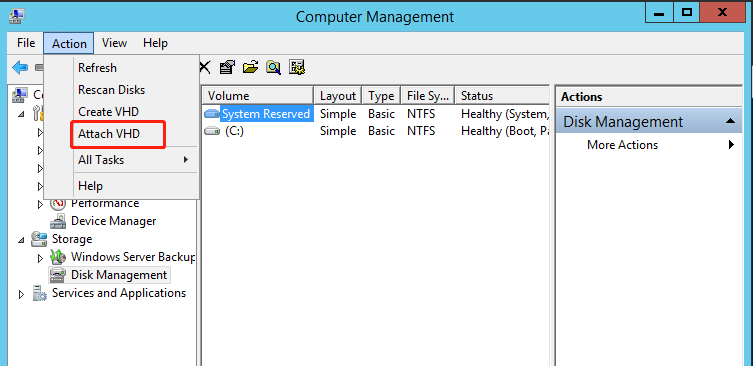
2. Select Storage > Disk Management to enter the disk management page.
3. Select Action > Attach VHD as shown in the figure below.
If the result similar to the following figure appears, the image has been created.


 Yes
Yes
 No
No
Was this page helpful?