The default port of the CVM is susceptible to scanning and attack by malicious software. Therefore, you need to change the default remote port of the CVM to a less common port to prevent the inability to remotely access the CVM due to such attacks. This ensures the security of the CVM.
Modifications to the port will be valid only if they are made in the security group rules and the CVM simultaneously. You can modify the default remote port of the CVM as described below. The modification method varies based on the operating system of the CVM.
3. In the “Windows PowerShell” window, enter regedit and press Enter to open the “Registry Editor” window.
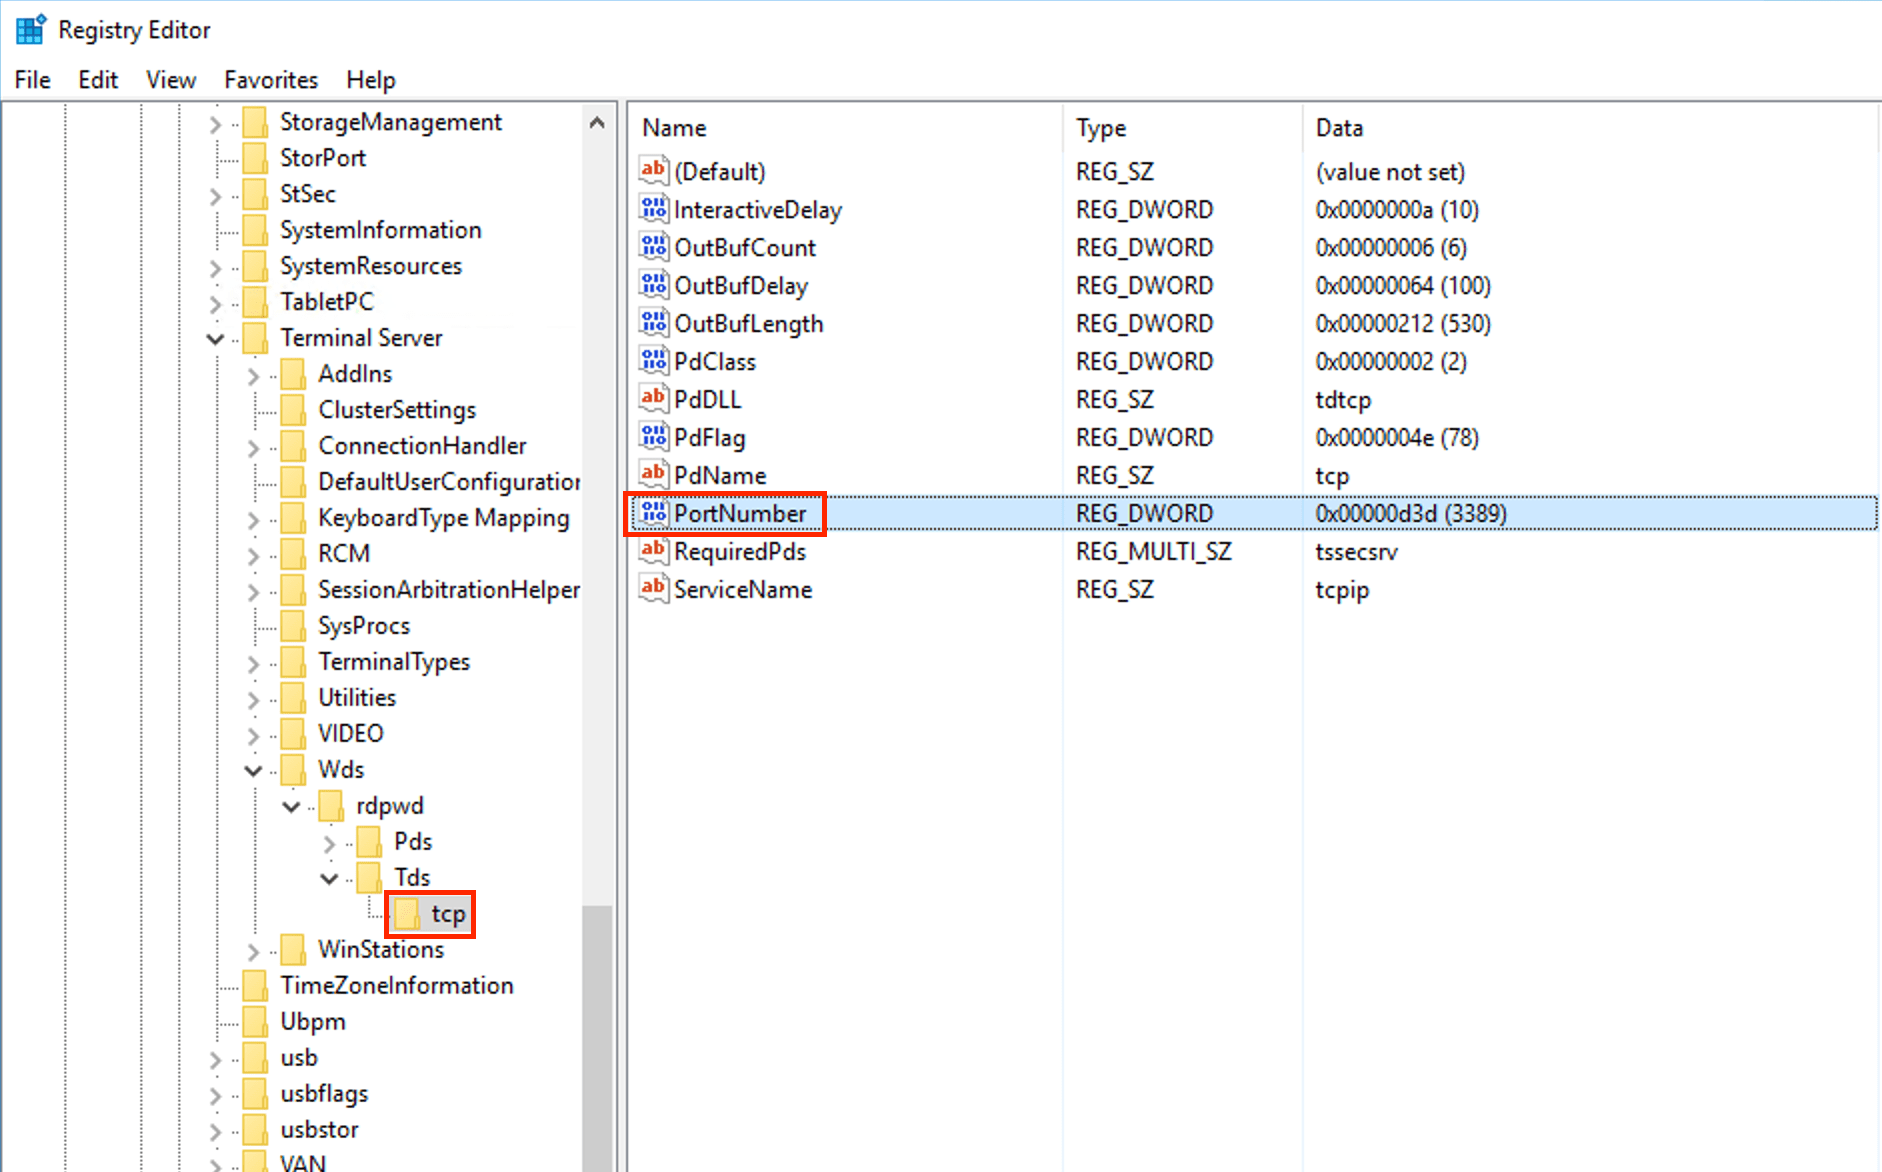
4. In the left-side registry navigation pane, expand the following hierarchies in sequence: HKEY_LOCAL_MACHINE > SYSTEM > CurrentControlSet > Control > Terminal Server > Wds > rdpwd > Tds > tcp.
5.
Find PortNumber in tcp
. Then, change the value of PortNumber from 3389 to an unoccupied port number within the range of 0 to 65535, as shown in the following figure.
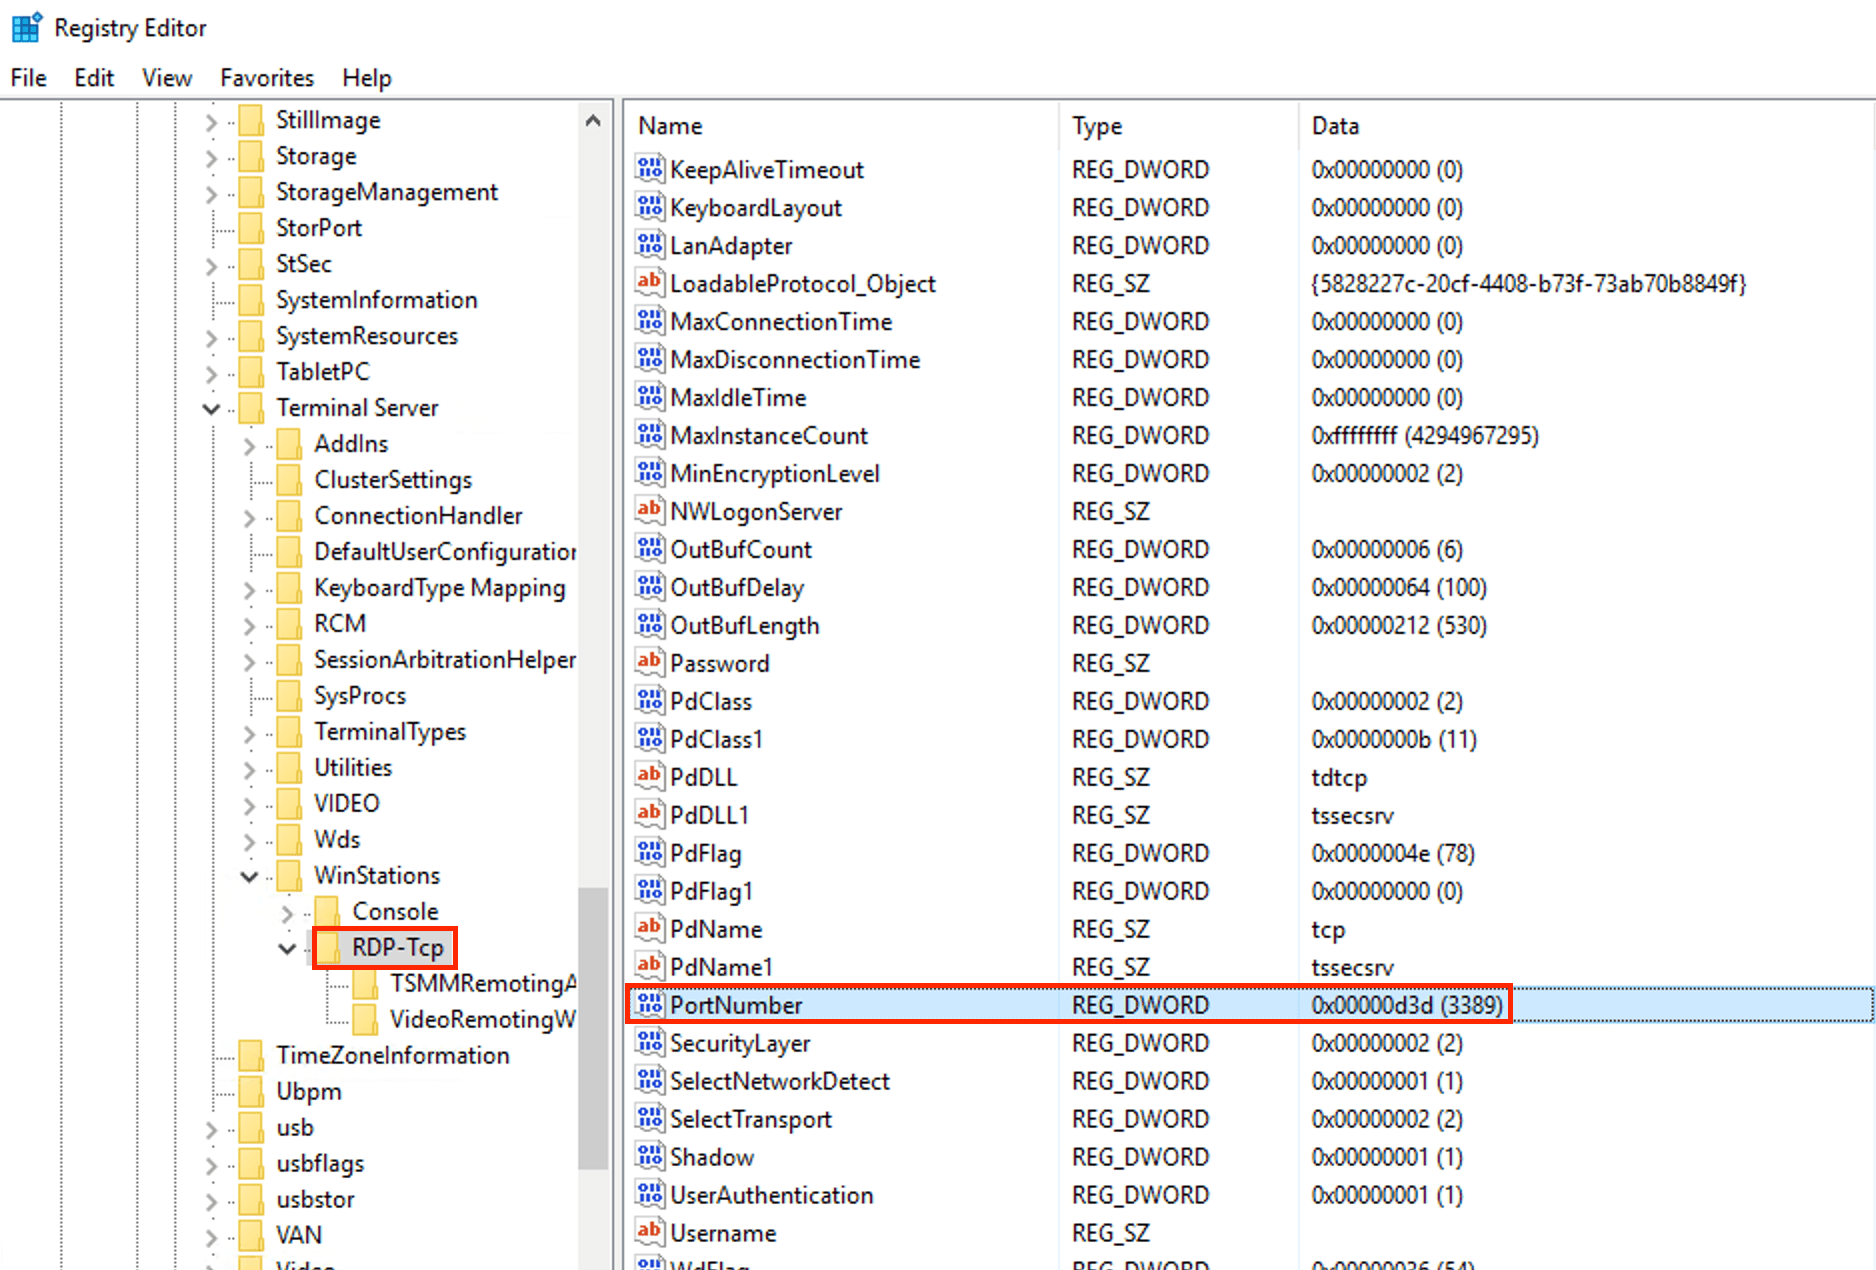
6. In the left-side registry navigation pane, expand the following hierarchies in sequence: HKEY_LOCAL_MACHINE > SYSTEM > CurrentControlSet > Control > Terminal Server > WinStations > RDP-Tcp.
7. Find and change PortNumber in RDP-Tcp to be the same as that in tcp.
8. (Optional) If a firewall is enabled for your CVM, be sure to add the new port to the allowlist of the firewall and set to allow connection.
8.1 In the “Windows PowerShell” window, enter wf.msc and press Enter to open the “Windows Firewall with Advanced Security” window.
8.2 In the “Windows Firewall with Advanced Security” window, select Inbound Rules and click New rule, as shown in the following figure.
8.3 On the “Rule Type” page in the “New Inbound Rule Wizard” window, select Port and click Next.
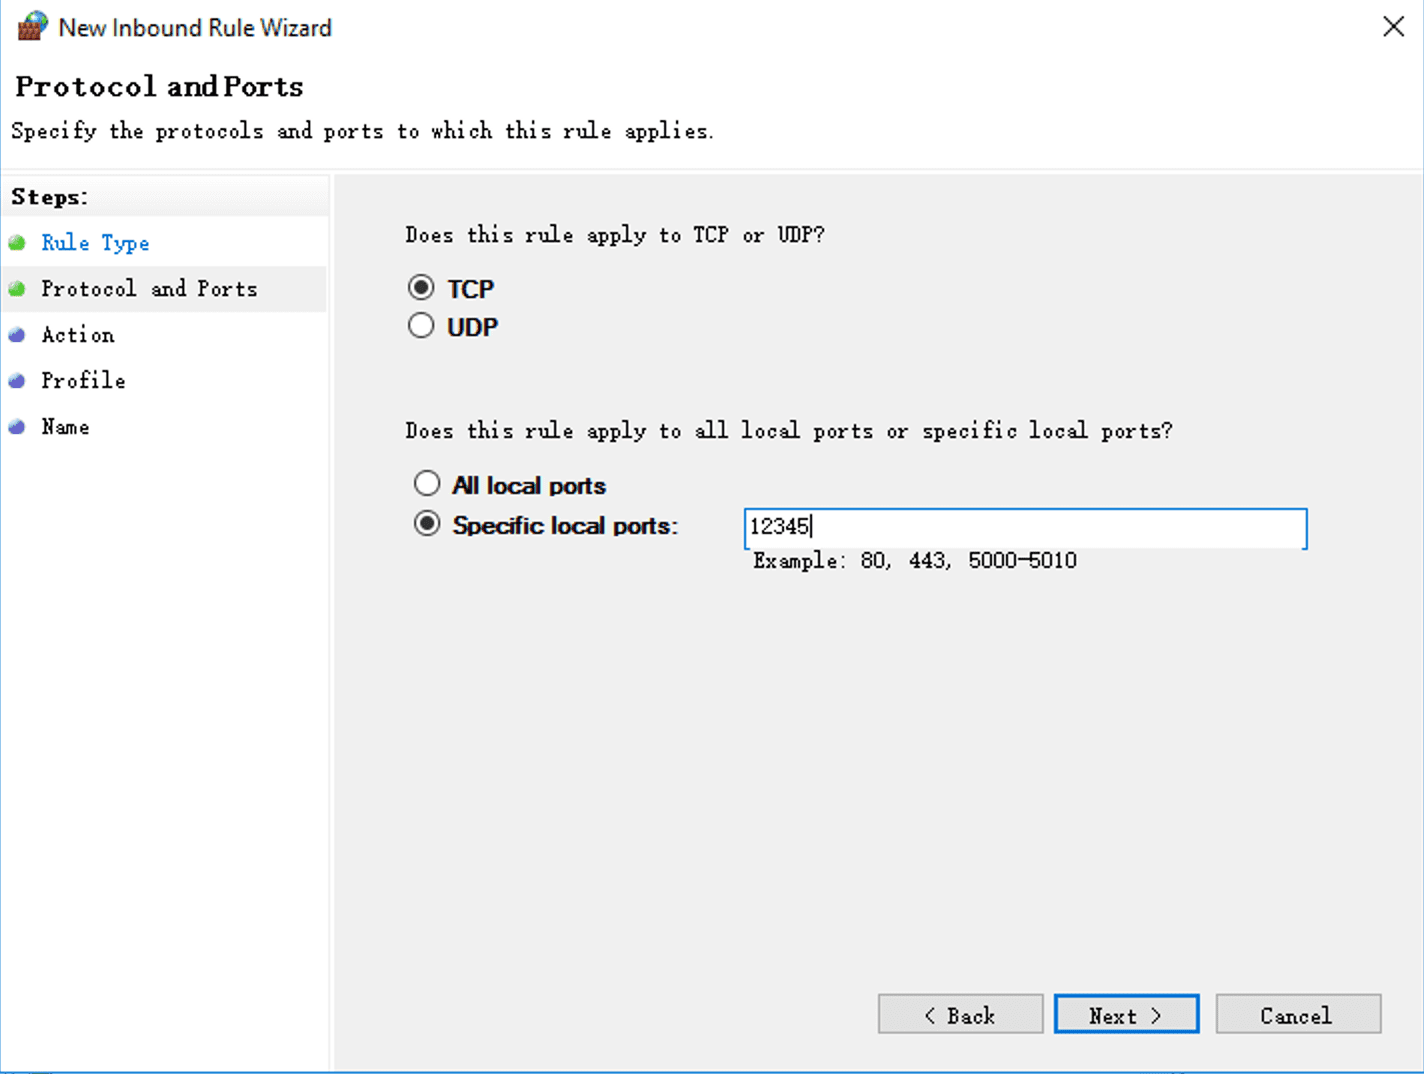
8.4 On the “Protocol and Ports” page in the New Inbound Rule Wizard window, select TCP and enter the port number set in Step 5 in Specific Port. Then, click Next, as shown in the following figure.
8.5 On the Action page in the “New Inbound Rule Wizard” window, select Allow connections and click Next.
8.6 On the “Profile” page in the “New Inbound Rule Wizard” window, apply the default profile and click Next.
8.7 On the “Name” page in the “New Inbound Rule Wizard” window, enter the rule name and click Finish.
8.8 In the “Windows PowerShell” window, enter services.msc and press Enter to go to the “Services” window.
8.9 Find and right-click Remote Desktop Services in the “Services” window. Then, select Restart to restart the remote login service.
8.10 Refer to Modifying Security Group Rules to modify the security group rule with the protocol port “TCP:3389” by changing the port number to that set in Step 5.
Modifying the default remote port of a Linux CVM
Note:
Before you modify the default remote port, we recommend that you add the SSH port number and test whether the port is successfully connected to the CVM. Then, delete the default port 22. Ensure that the default port 22 cannot be connected to the CVM when the new port fails to connect to the CVM.
The following operations use CentOS 7.3 as an example. The specific operations vary slightly according to the version and language of the operating system.
2. Run the following command to modify the configuration file:
vim /etc/ssh/sshd_config
3.
Press i to switch to the editing
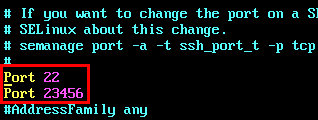
mode and add a new port. Add Port x (where x is the port number of the new port) in a new row below #Port 22, and delete # to comment off Port 22, as shown in the following figure.
For example, add Port 23456 in the row.
4. Press Esc, enter :wq, and save the change.
5. Run the following command so that the new configuration takes effect:
systemctl restart sshd.service
6. (Optional)Configure the firewall.
By default, the iptables service is used as the firewall for Linux CVMs with CentOS earlier than CentOS 7. Configure the firewall as follows if iptables rules have been configured for the CVM.
6.1.1 Run the following command to configure the firewall:
iptables -A INPUT -p tcp --dport <New port number> -j ACCEPT
For example, if the new port number is 23456, run the following command:
iptables -A INPUT -p tcp --dport 23456 -j ACCEPT
6.1.2 Run the following command to restart the firewall:
service iptables restart
The Firewalld service is used as the firewall for Linux CVMs with CentOS 7 or later. Configure the firewall as follows if the Firewalld service has been enabled on the CVM.
Run the following command to allow access by the port number added in Step 3:
firewall-cmd --add-port=<New port number>/tcp --permanent
For example, if the new port number is 23456, run the following command:
firewall-cmd --add-port=23456/tcp --permanent
If success is returned, the port was successfully configured.
7. Refer to Modifying Security Group Rules to modify the security group rule with the protocol port “TCP:22” by changing the port number to that set in Step 3.
Verification
Windows CVMs
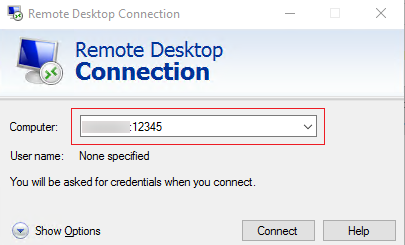
1. Assume that the Windows operating system is installed on the local computer. Open the “Remote Desktop Connection” dialog box.
2. Enter the Internet IP of Windows server: port number after modification after Computer and click Connect, as shown in the following figure.
3. Enter the admin account and password as prompted and click OK.
If the operating system interface of the Windows CVM appears, the connection is established.
Note:
If you log in to the Windows CVM by using an RDP file, modify the full address:s parameter in the RDP file.
Linux CVMs
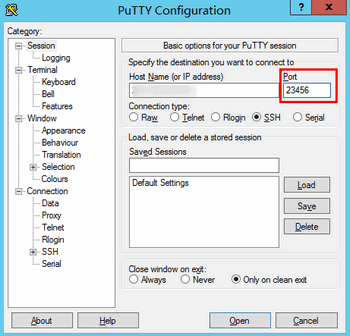
1. Assume that PuTTY is used for remote login. Start the PuTTY client.
2. In the “PuTTY Configuration” window, enter the public IP address of the Linux CVM, set Port to the new port number, and click Open, as shown in the following figure.
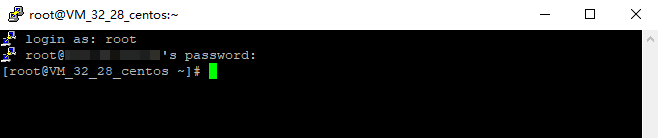
3. Enter the username and password of the Linux CVM as prompted and press Enter.
If the following output appears, the connection is established.
4. After using the new port to successfully establish a connection to the Linux CVM, run the following command:
vim /etc/ssh/sshd_config
5. Press i to switch to the editing mode, and add # in front of Port 22 to comment off the port.
6. Press Esc, enter :wq, and save the change.
7. Run the following command so that the new configuration takes effect. Ensure that you use the new port for the next remote login to the Linux CVM.


 Yes
Yes
 No
No
Was this page helpful?