Web
Download
フォーカスモード
フォントサイズ
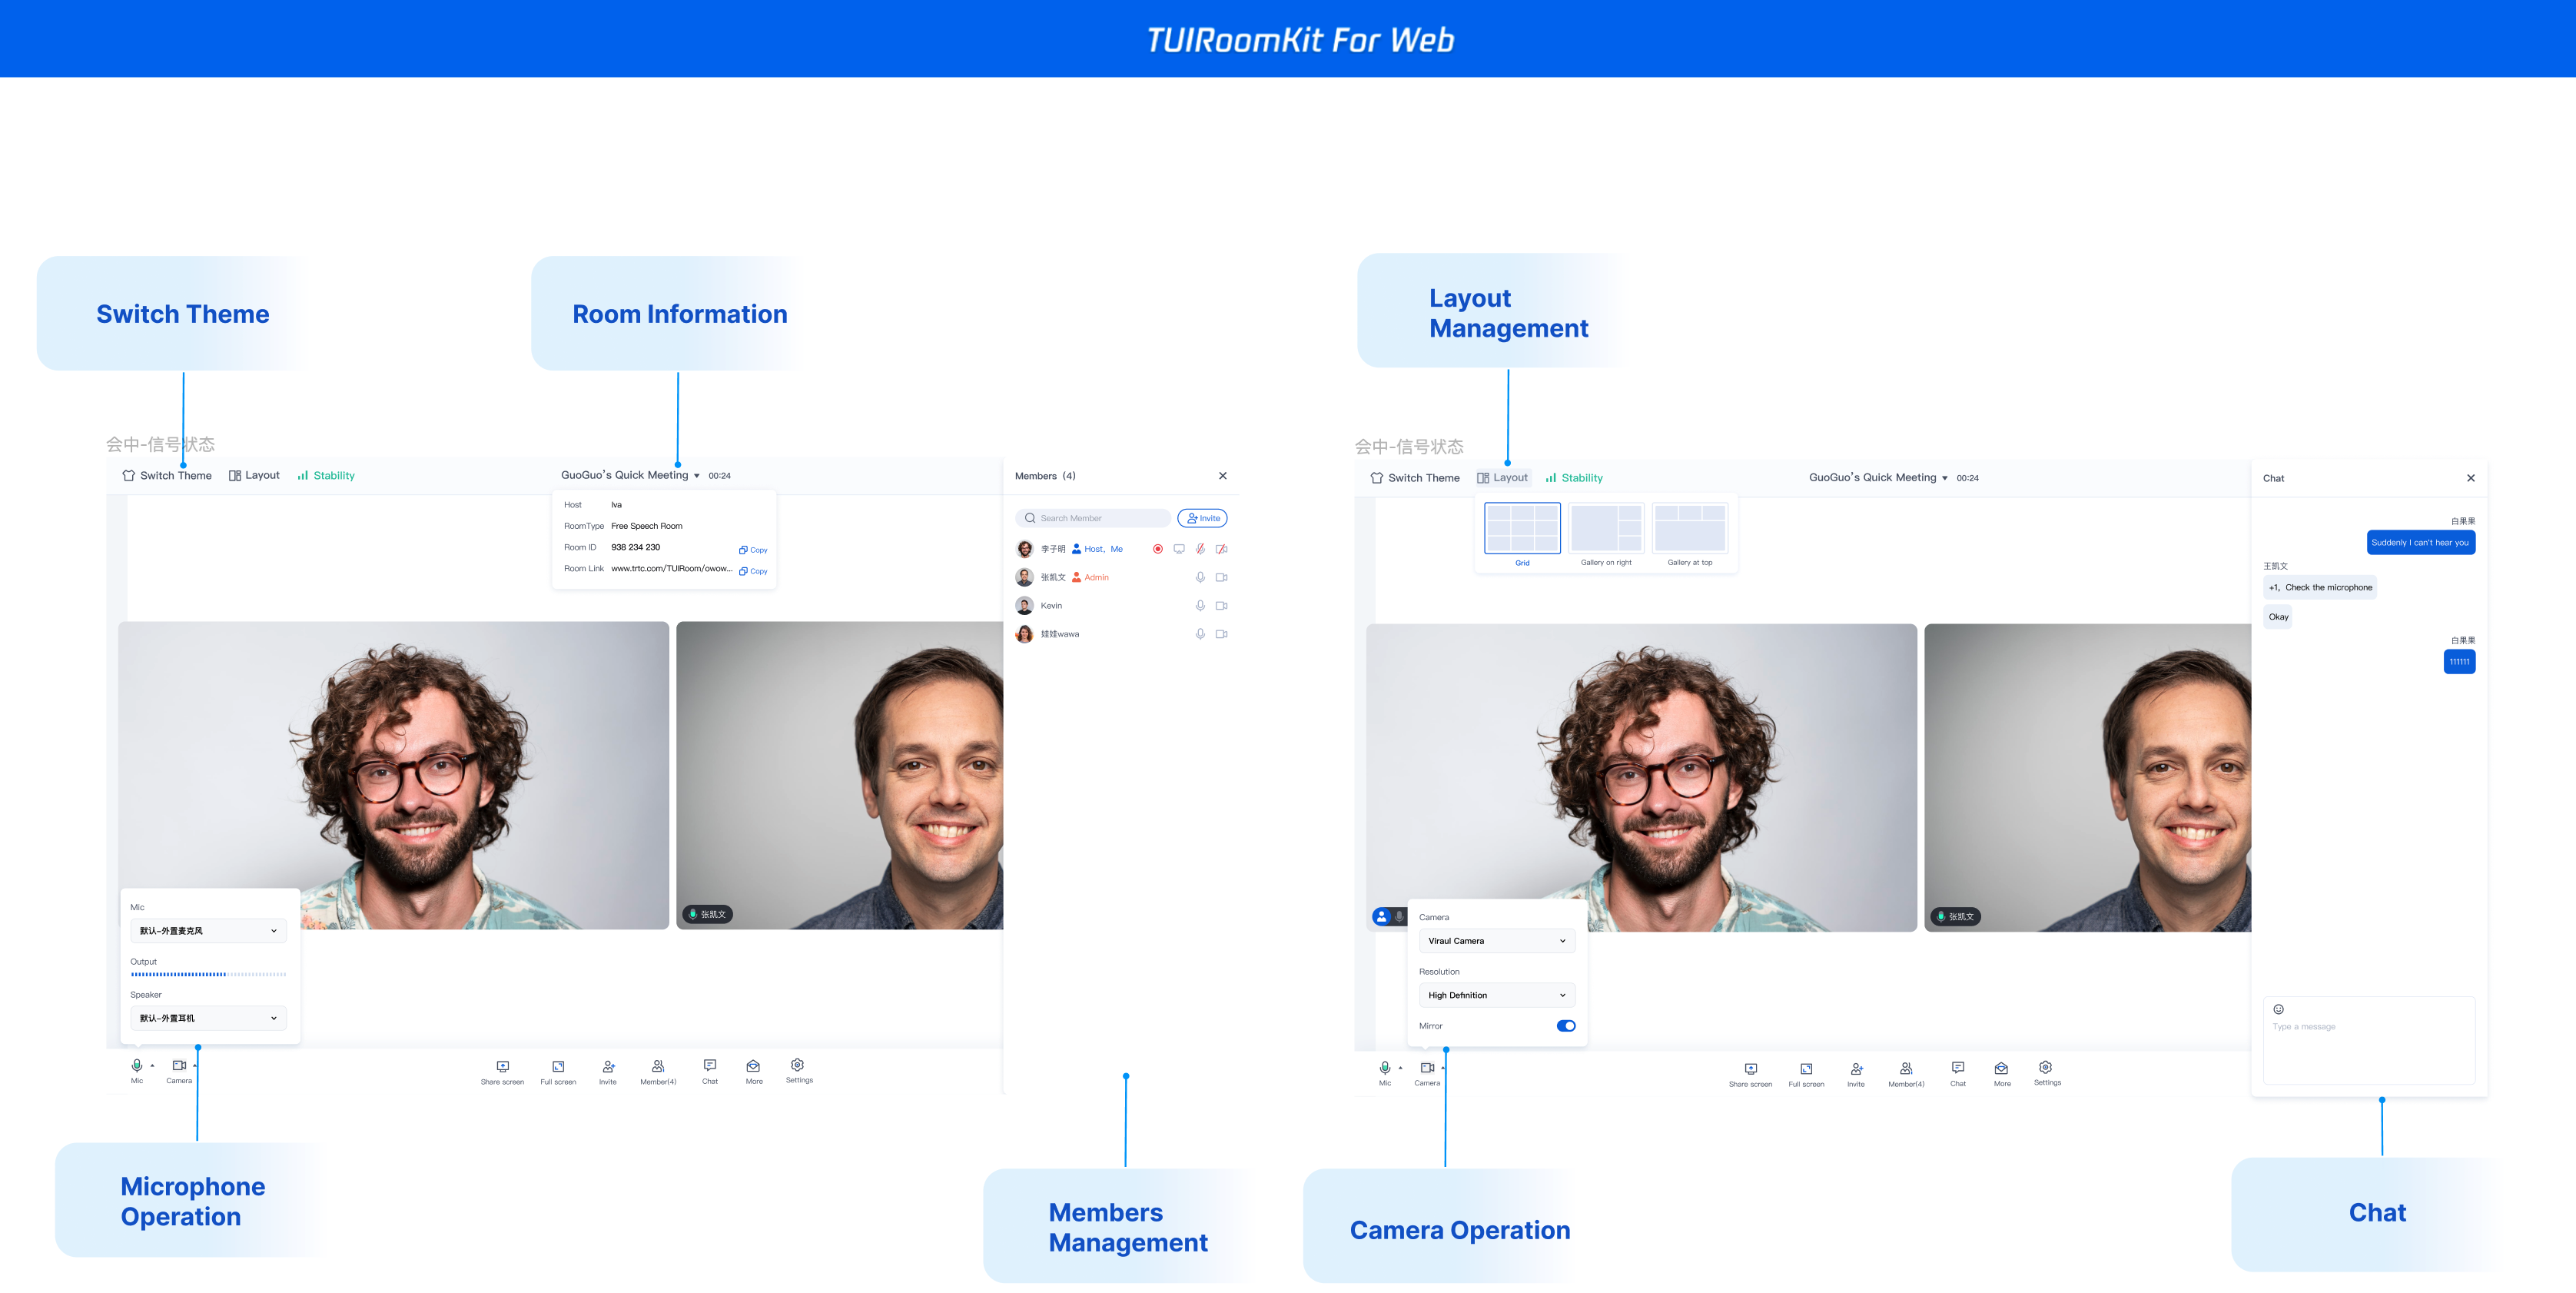
TUIRoomKit は Tencent Cloud が発表したマルチプレイヤーオーディオ・ビデオ UI のコンポーネントです。このコンポーネントは、ルーム管理、オーディオ・ビデオコントロール、画面共有、メンバー管理、マイク管理、ライブチャット、カスタムレイアウト切り替えなどの豊富な機能インタラクションを提供し、中国語と英語の切り替え、ワンクリックスキンチェンジなどの機能をサポートしています。
この文章では、TUIRoomKit(Web&H5)の導入ガイドラインを紹介し、企業ミーティング、オンライン教育、医療問診、オンライン巡視、遠隔損失判定などを迅速に立ち上げるビジネスシーンを支援します。
TUIRoomKit Demo 体験
TUIRoomKit オンライン体験リンク をクリックして TUIRoomKit のその他の機能を体験してください。Github をクリックして TUIRoomKit コードをダウンロードし、コードリポジトリの README.md ドキュメンテーションを参照して、TUIRoomKit Webのサンプルプロジェクトのクイックスタートを実行してください。
環境の準備
Node.js バージョン:Node.js ≥ 16.19.1(公式 LTS バージョンを使用し、npm バージョンは node バージョンと一致することを推奨する)。
Modern browser, supporting WebRTC APIs.
TUIRoomKit コンポーネントの統合
既存のプロジェクトで統合する必要がある場合は、以下の手順に従って導入してください。
ステップ 1:インストール依存
npm install @tencentcloud/roomkit-web-vue3 pinia --save
# vue バージョン が 2.7.16 以上である必要があることに注意してください。インストールに失敗した場合は、お使いの vue バージョンがサポートするかどうかを確認してくださいnpm install @tencentcloud/roomkit-web-vue2.7 pinia
Pinia はルームデータ管理を行うため、プロジェクトのエントリーファイルに Pinia を登録する必要があります。プロジェクトのエントリーファイルは
src/main.ts ファイルです。説明:
TUIRoomKit npm パッケージは、ミーティング前のプレビューコンポーネント、ミーティング中のコンポーネント、ミーティングの開始、ミーティング参加、画面微調整の方法を提供します。詳細については、 TUIRoomKit APIを参照してください。これらの API がビジネスニーズを満たしていない場合は、TUIRoomKit ソースコードエクスポート ソリューションを参照して TUIRoomKit ソースコード を導入することができます。
ステップ 2:プロジェクト設定
pinia の登録:TUIRoom はルームデータ管理のために Pinia を使用しており、プロジェクトエントリーファイルに Pinia を登録する必要があります。プロジェクトのエントリーファイルは
src/main.ts ファイルです。// src/main.ts ファイルimport { createPinia } from 'pinia';const app = createApp(App);// pinia の登録app.use(createPinia());app.mount('#app')
// src/main.ts ファイルimport { createPinia, PiniaVuePlugin } from 'pinia';Vue.use(PiniaVuePlugin);const pinia = createPinia();new Vue({pinia,render: h => h(App),}).$mount('#app');
ステップ 3:TUIRoomKit コンポーネントの引用
説明:
ConferenceMainView コンポーネントを導入し、コンポーネントはデフォルトで 常駐モード(コンポーネントは常に表示される。コンポーネントの表示と非表示に関する内部制御はなく、ビジネス側が制御しなければ、コンポーネントは常に表示される)になります。
<template><ConferenceMainView></ConferenceMainView></template><script setup>import { ConferenceMainView } from '@tencentcloud/roomkit-web-vue3';</script>
<template><ConferenceMainView></ConferenceMainView></template><script>import { ConferenceMainView } from '@tencentcloud/roomkit-web-vue2.7';export default {components: {ConferenceMainView,},};</script>
ステップ 4:TUIRoomKit コンポーネントのログイン
import { conference } from '@tencentcloud/roomkit-web-vue3';await conference.login({sdkAppId: 0, // Replace with your sdkAppIduserId: '', // Replace with your userIduserSig: '', // Replace with your userSig});
パラメータ説明 ここでは
login 関数に必要な幾つかの重要なパラメータについて詳しく説明します。sdkAppId: サービスのアクティブ化 の最後のステップで取得されます。
userId:現在のユーザーの ID 、文字列タイプ。英字(a-z と A-Z)、数字(0-9)、ハイフン(-)、アンダースコア(_)のみを含めることができます。
userSig: サービスのアクティブ化 で取得した
SDKSecretKey``SDKAppID、UserIDなどの情報を暗号化することにより、UserSigを得ることができます。それは認証用のチケットであり、現在ユーザーがTRTCのサービスを使用できるかどうかを、Tencent Cloud が識別するために使用されます。コンソールの 補助ツール を使用して一時的に使用可能なものを生成することができますUserSig。詳細情報については、 UserSig の計算方法と使用方法を参照してください。
ご注意:
このステップは、開発者から最も多くのフィードバックを受けるステップでもあります。よくある質問は以下の通りです。
sdkAppId 設定が間違っています。国内サイトの SDKAppID は通常、140 から始まる 10 桁の整数です。
UserSig が 暗号化キー(SecretKey) として誤って設定されています。UserSig は、SecretKey を直接 UserSig として設定するのではなく、SDKAppID、UserID、有効期限などの情報を SecretKey で暗号化して取得されるものです。
UserId が「1」、「123」、「111」などの簡単な文字列に設定されています。 TRTC は、同じ UserID での複数端末ログインをサポートしていないため、複数人の開発者が共同開発を行う場合、「1」、「123」、「111」などの UserID が同僚に使用されることで、ログインに失敗する可能性があります。そのため、デバッグの際には認識しやすい UserID を設定することをお勧めします。
Github におけるサンプルコードでは、現在のアクセスプロセスのクイックスタートを実行するために、genTestUserSig 関数を使用してローカルで UserSig を計算しています。しかし、この方法では SecretKey がコードに公開されるため、SecretKey のアップグレードや保護には不利です。そのため、UserSig の計算ロジックはサーバ側で保持し、TUIRoomKit コンポーネントを使用するたびに、リアルタイムに計算され たUserSig をサーバーに要求することを強くお勧めします。
ステップ 5:新しいミーティングの開始
ミーティングホストは、 start インターフェースを呼び出して新しいミーティングを開始することができます。その他の参加者は、 ステップ 6 の説明を参照し、join インターフェースを呼び出してそのミーティングに参加することができます。
// パッケージ名に注意してください。vue2 バージョンを使用している場合は、パッケージ名を @tencentcloud/roomkit-web-vue2.7に変更してくださいimport { conference } from '@tencentcloud/roomkit-web-vue3';const startConference = async () => {await conference.login({sdkAppId: 0, // Replace with your sdkAppIduserId: '', // Replace with your userIduserSig: '', // Replace with your userSig});await conference.start('123456', {roomName: 'TestRoom',isSeatEnabled: false,isOpenCamera: false,isOpenMicrophone: false,});}startConference()
ステップ 6:既存のミーティングへの参加
// パッケージ名に注意してください。vue2 バージョンを使用している場合は、パッケージ名を @tencentcloud/roomkit-web-vue2.7に変更してくださいimport { conference } from '@tencentcloud/roomkit-web-vue3';const joinConference = async () => {await conference.login({sdkAppId: 0, // Replace with your sdkAppIduserId: '', // Replace with your userIduserSig: '', // Replace with your userSig});await conference.join('123456', {isOpenCamera: false,isOpenMicrophone: false,});}joinConference()
開発環境の実行
1. 開発環境コマンドを実行します。(ここでは vue3 + vite のデフォルトプロジェクトを例にする。dev コマンドはプロジェクトによって異なる可能性があるので、自分のプロジェクトに合わせて調整してください)
npm run dev
2. コンソールのプロンプトに従って、ブラウザでページを開きます。
:http://localhost:3000/。3. TUIRoomKit コンポーネントの機能を体験します。
本番環境の配置
1. dist ファイルをパッケージ化します。
npm run build
2. dist ファイルをサーバーに配置します。
ご注意:
本番環境では HTTPS ドメイン名を使用する必要があります。
その他のドキュメンテーション
よくある質問
コミュニケーションとフィードバック
導入や利用に関してご質問やご意見がございましたら、info_rtc@tencent.com までお問い合わせください。
フィードバック