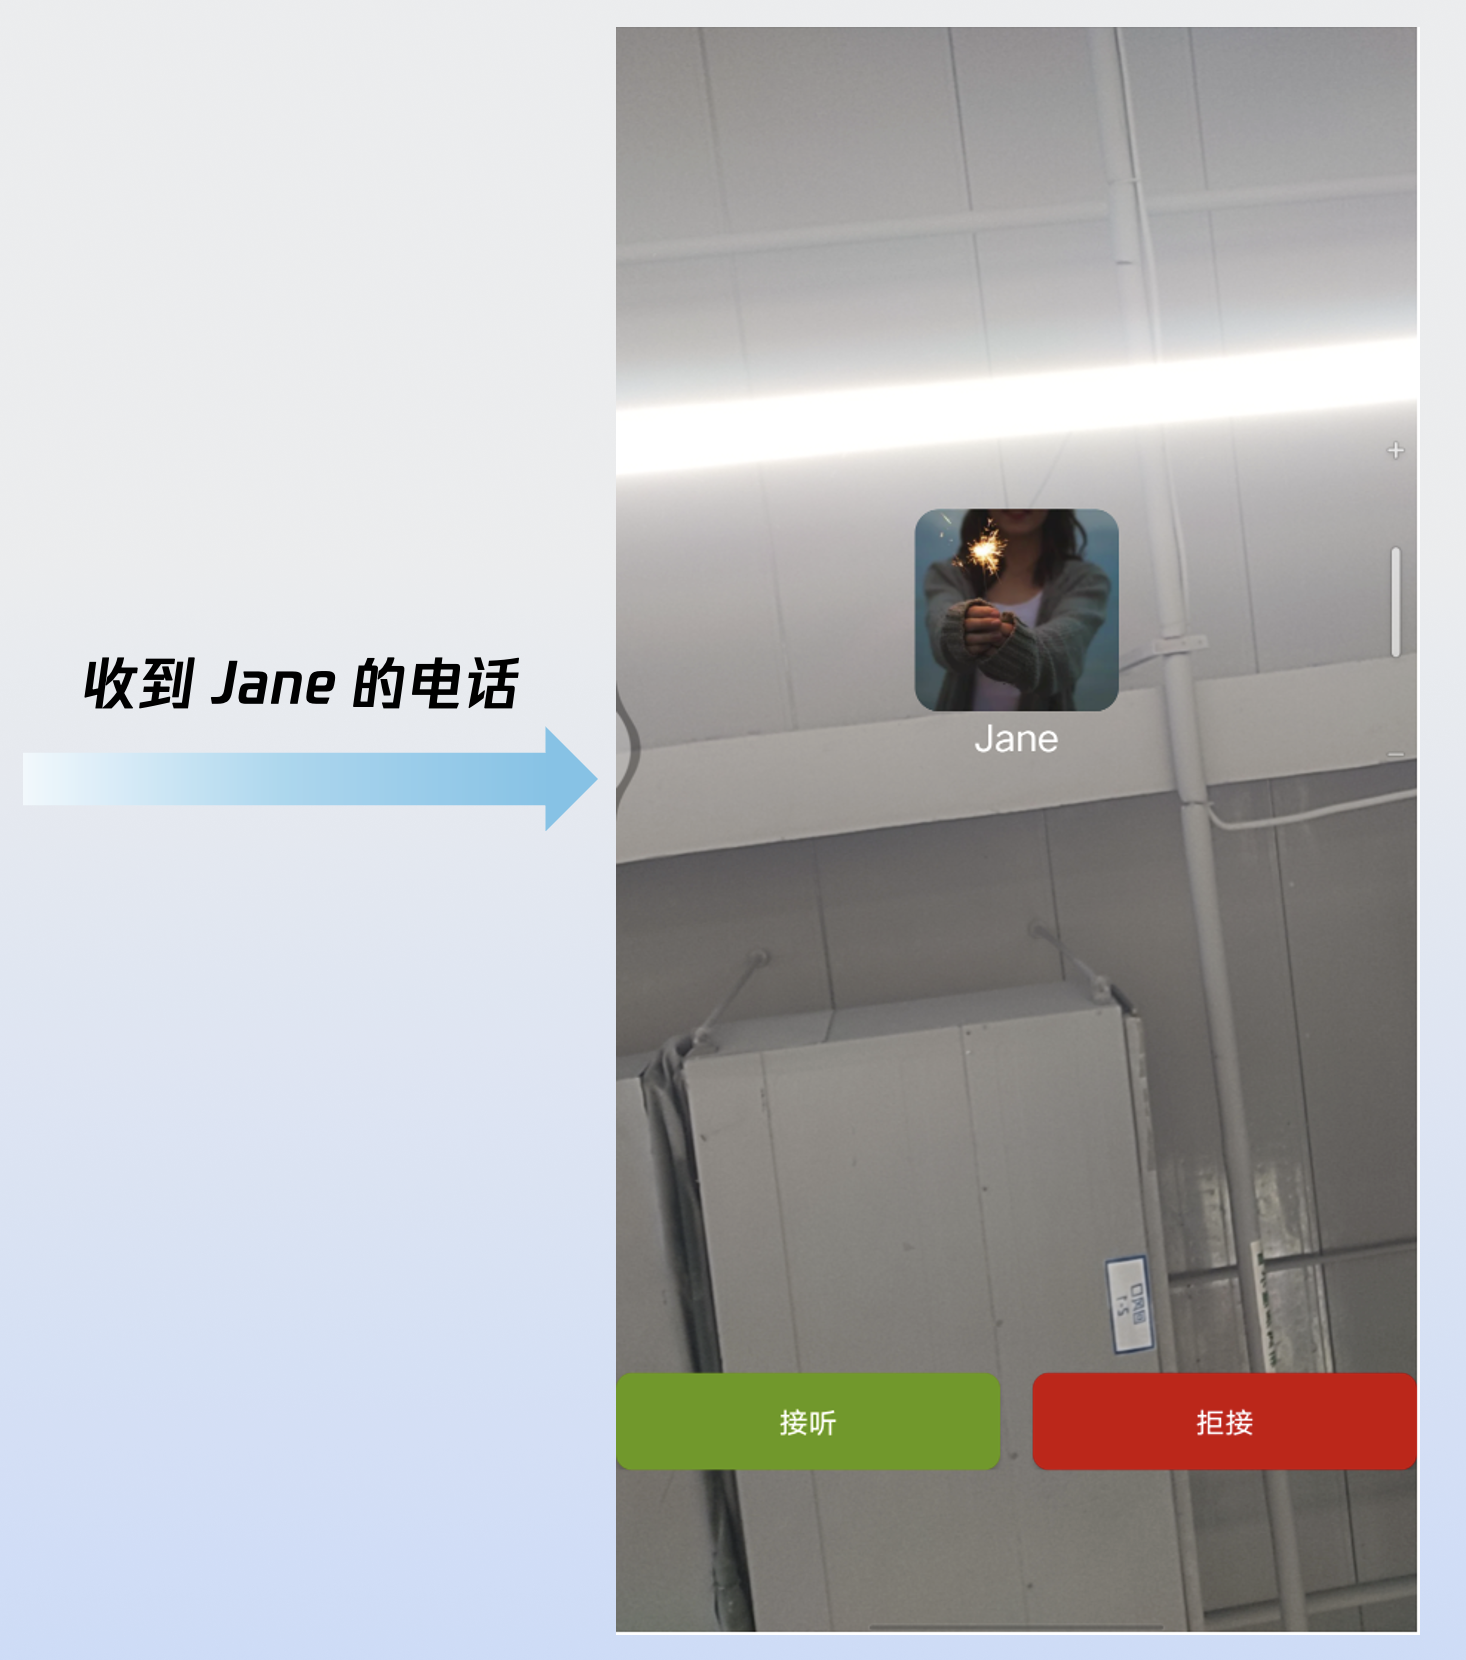
接听第一通电话
下载
聚焦模式
字号
本文档将帮助您使用 AtomicXCore SDK 的 DeviceStore、CallStore 以及核心组件 CallCoreView,快速完成接听电话功能。
核心功能
AtomicXCore 中用于搭建多人音视频通话场景所需要使用到的核心模块包含以下三个:
模块 | 功能描述 |
通话视图核心 Widget。自动监听 CallStore 数据并完成画面渲染,同时支持 1v1 和多人通话布局自动切换。 | |
通话生命周期管理:拨打电话、接通电话、拒接电话、挂断电话。实时获取参与通话人员音视频状态,通话计时、通话记录等数据。 | |
音视频设备控制:麦克风(开关 / 音量)、摄像头(开关 / 切换 / 画质)、屏幕共享,设备状态实时监听。 |
准备工作
步骤1:开通服务
步骤2:集成 SDK
flutter pubaddatomic_x_core
步骤3:初始化与登录流程
Android 配置
1. 由于 SDK 内部使用了 Java 反射机制(或特性),需要将部分 SDK 类加入不混淆处理的名单。
请在工程的
android/app/目录下找到build.gradle.kts(或build.gradle )文件并配置并开启混淆规则:android {buildTypes {release {isMinifyEnabled = trueproguardFiles(getDefaultProguardFile("proguard-android.txt"),"proguard-rules.pro")}}}
android {buildTypes {release {minifyEnabled trueproguardFiles getDefaultProguardFile('proguard-android.txt'), 'proguard-rules.pro'}}}
在工程的
android/app 目录下创建 proguard-rules.pro 文件,并在其中添加如下代码:-keep class com.tencent.** { *; }
2. (可选)如果您需要在应用外使用 CallKit 的悬浮窗能力,需要开启系统画中画特性。
请在 App 主工程的
AndroidManifest.xml 里设置 MainActivity 的 android:supportsPictureInPicture 为 true:<manifest xmlns:android="http://schemas.android.com/apk/res/android"><application><activityandroid:name=".MainActivity"android:supportsPictureInPicture="true"</activity></application></manifest>
iOS 配置
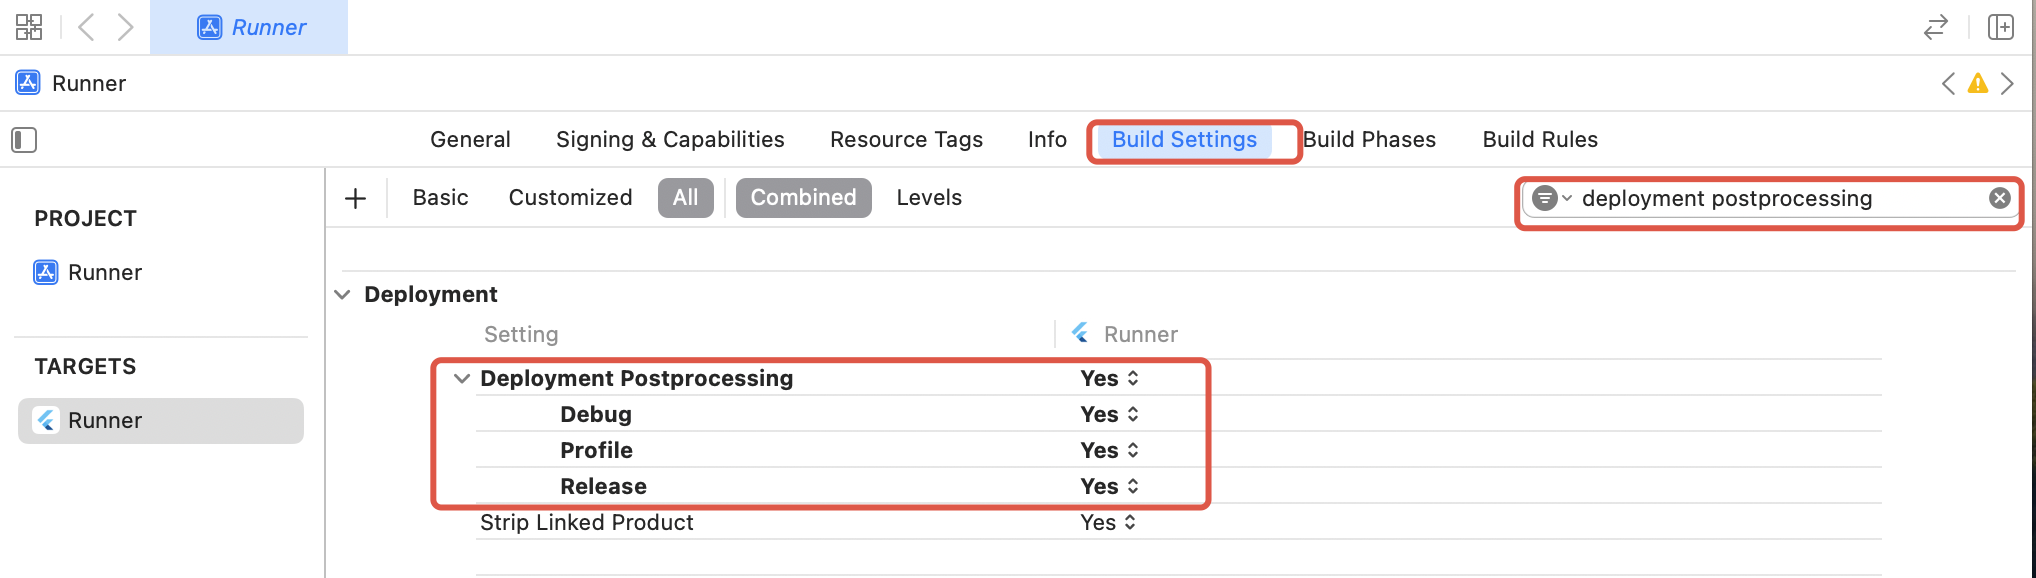
由于 tencent_rtc_sdk 通过 Flutter FFI 调用接口,iOS Release 构建时 Xcode 的符号裁剪优化可能误移除 TRTC 的 C 符号,引发
`symbol not found` 错误。解决方案如下:1. 在项目的 Build Settings 中找到 Deployment Postprocessing,将其设置为 Yes 。

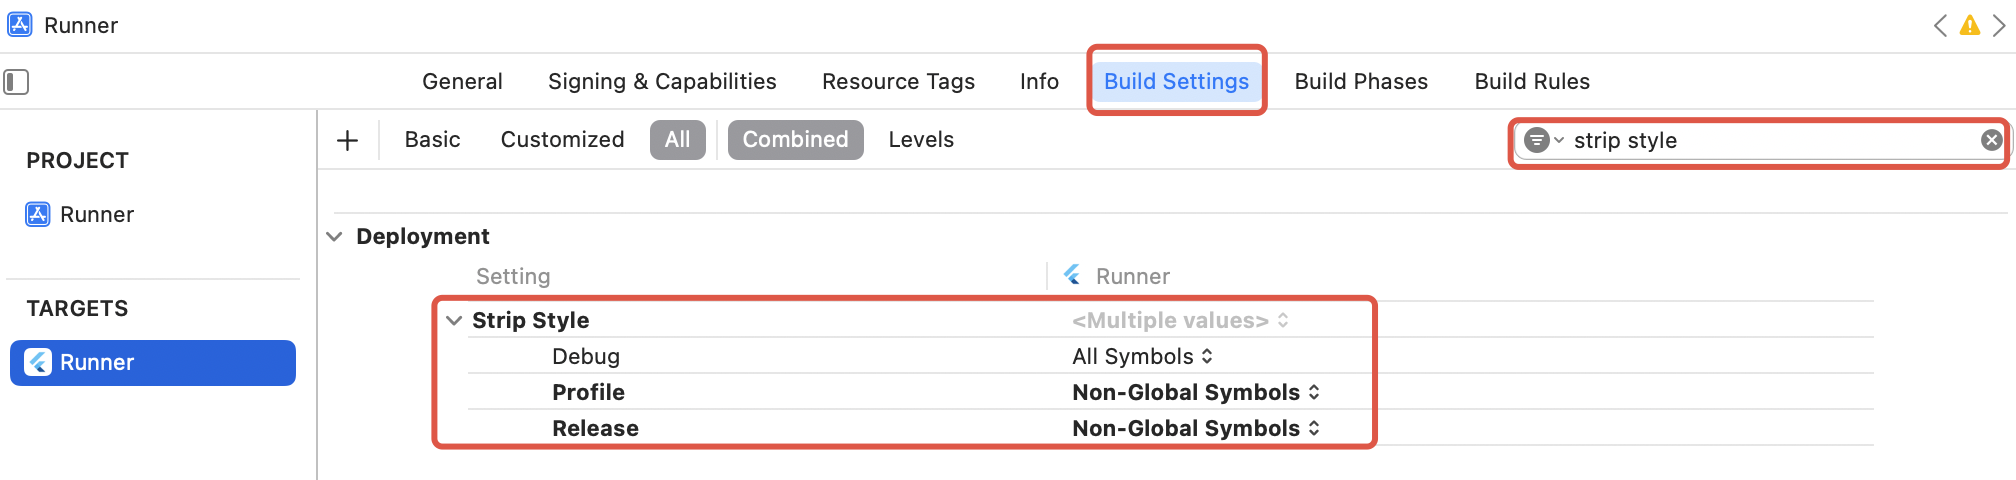
2. 在项目的 Build Settings 中找到 Strip Style,将其中 Release 的值设置为 Non-Global Symbols 。
Flutter 初始化与登录流程
启动通话服务需依次完成 CallStore 初始化与用户登录。CallStore 通过监听登录成功事件自动同步用户信息,从而进入就绪状态。流程图与示例代码如下:
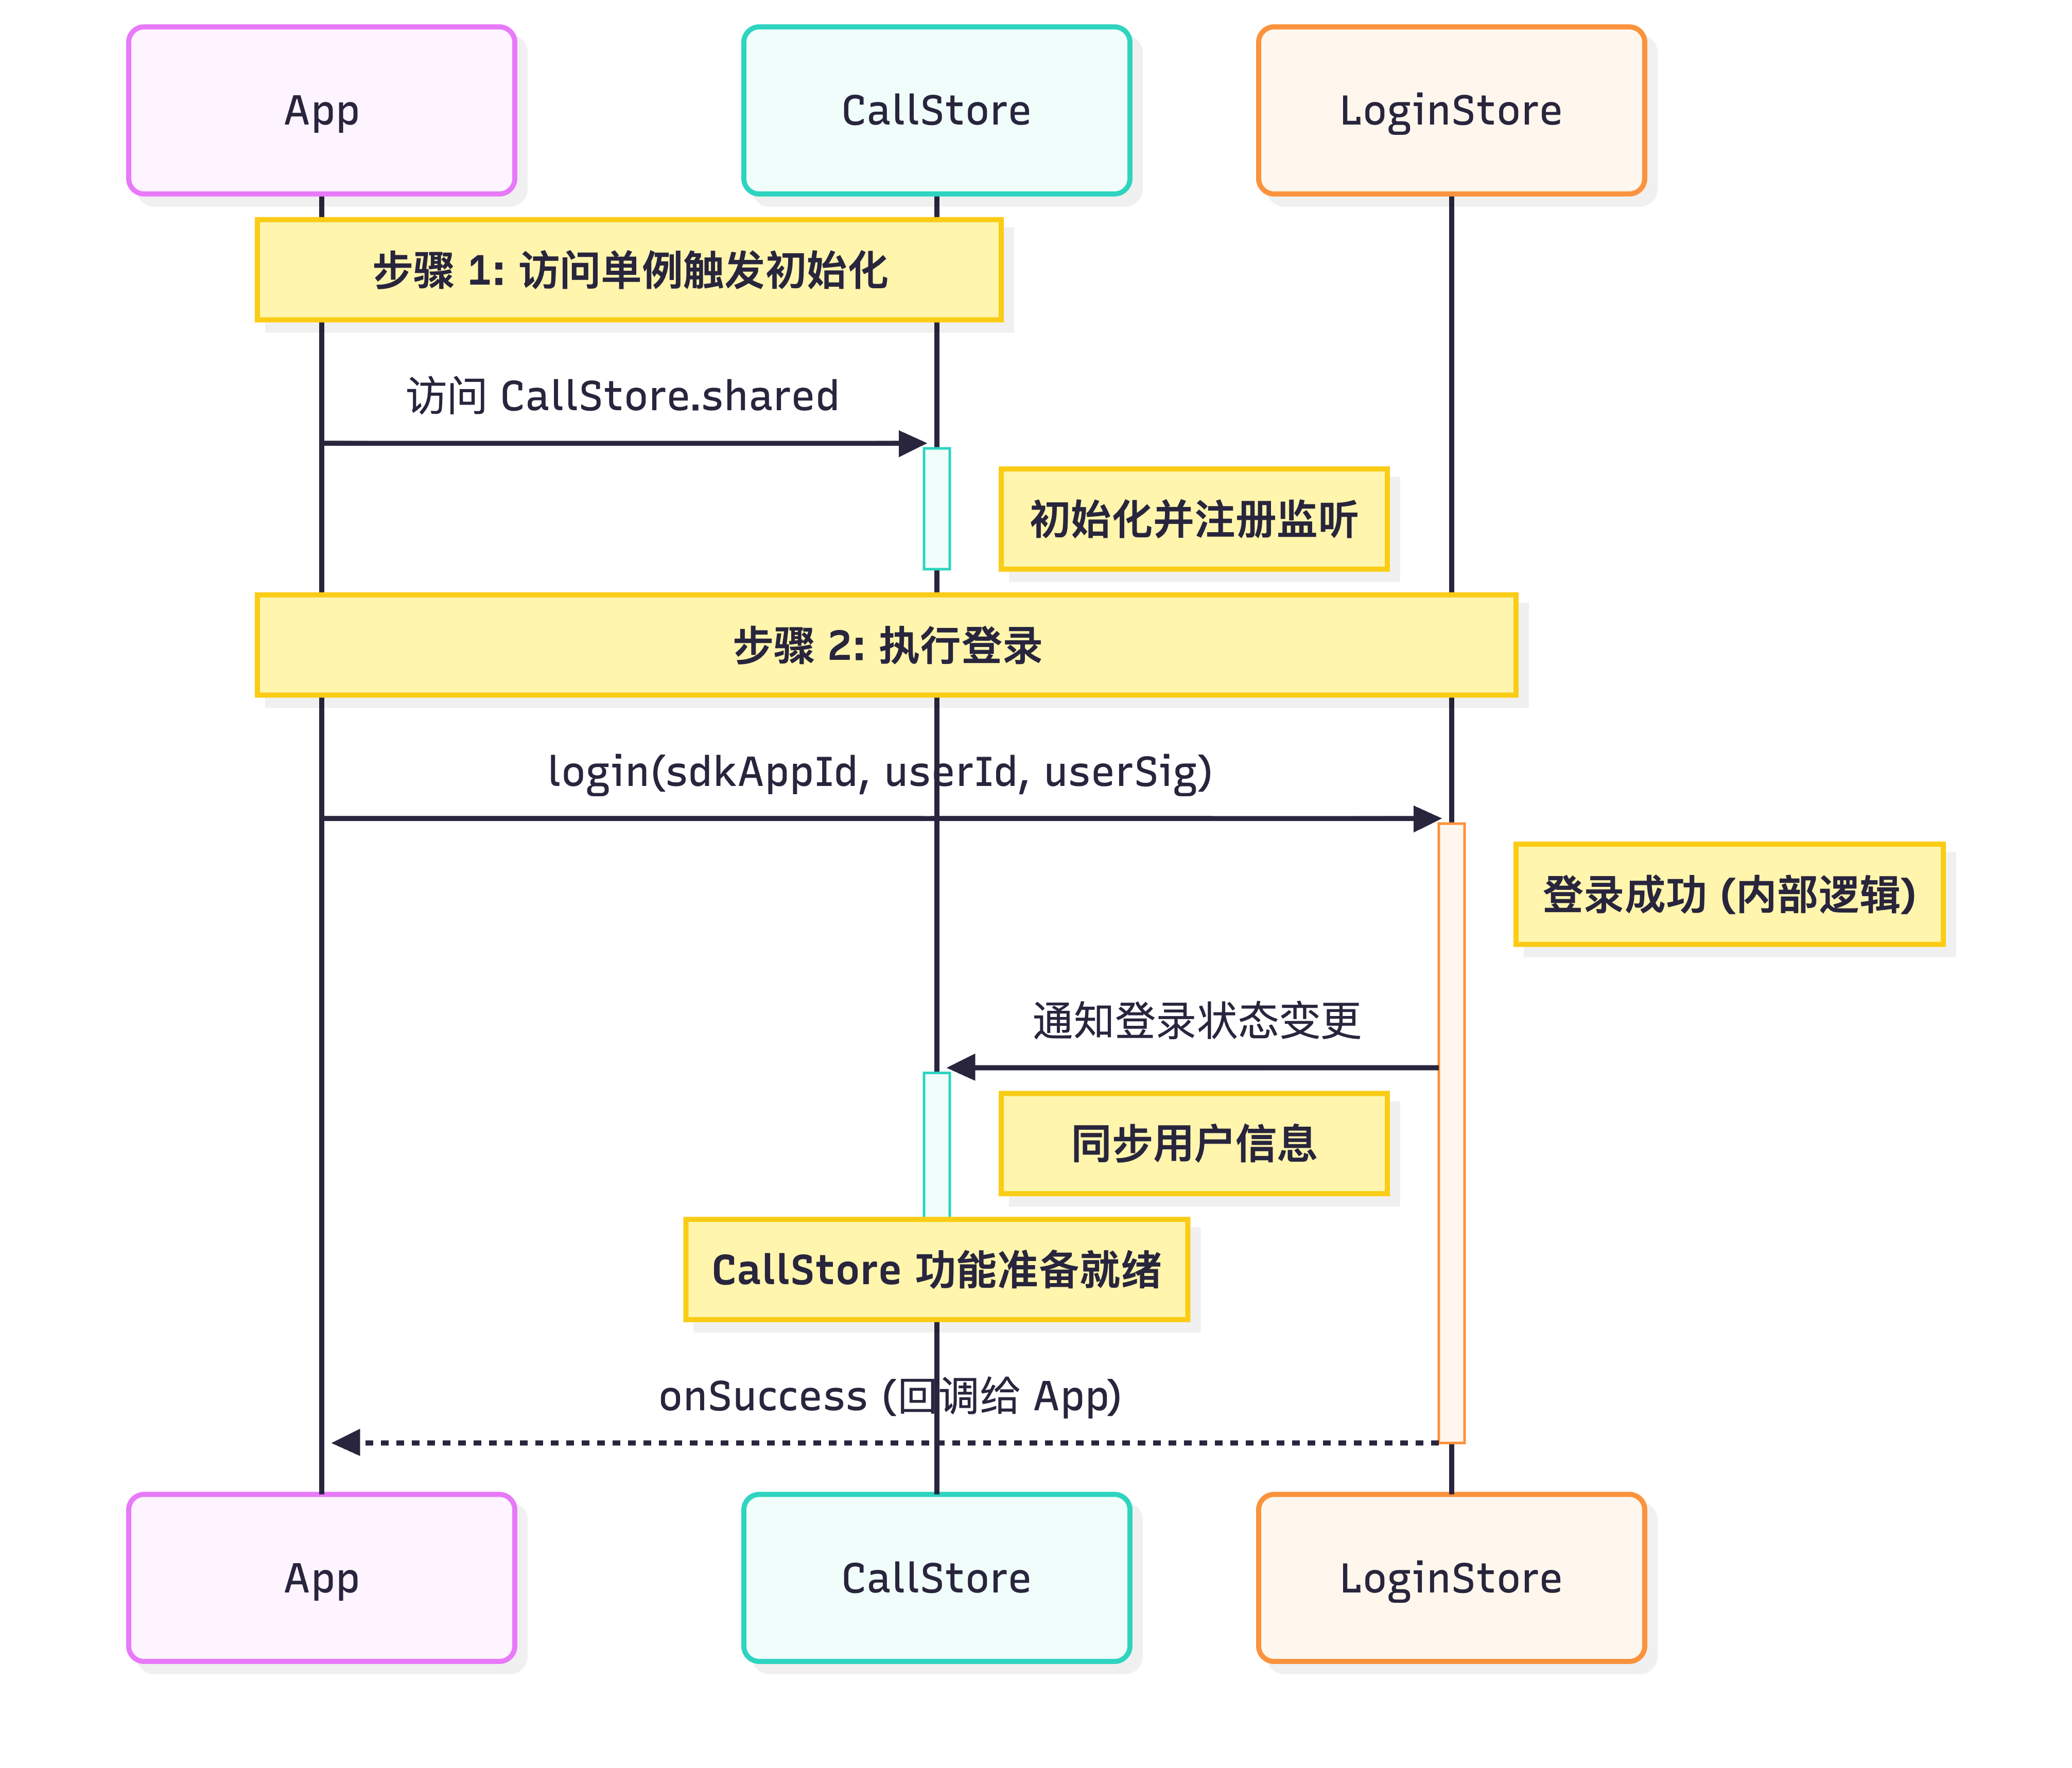
import 'package:atomic_x_core/atomicxcore.dart';import 'package:rtc_room_engine/api/call/tui_call_engine.dart';Future<void> _login() async {int sdkAppId = 1400000001; // 替换为您的 SDKAppIDString userId = 'test_001'; // 替换为您的 UserIDString userSig = 'xxxxxxxxxxx'; // 替换为您的 UserSigCallStore.shared;final result = await LoginStore.shared.login(sdkAppId, userId, userSig);TUICallEngine.instance.init(sdkAppId, userId, userSig);if (result.isSuccess) {// 登录成功debugPrint('login success');} else {// 登录失败debugPrint('login failed, code: ${result.code}, message: ${result.message}');}}
参数 | 类型 | 说明 |
userId | String | 当前用户的唯一 ID,仅包含英文字母、数字、连字符和下划线。为避免多端登录冲突,请勿使用 1、123 等简单 ID。 |
sdkAppId | int | |
userSig | String | 用于腾讯云鉴权的票据。请注意: 开发环境:您可以采用本地 GenerateTestUserSig.genTestUserSig 函数生成 userSig 或者 通过 UserSig 辅助工具 生成临时的 UserSig。 生产环境:为了防止密钥泄露,请务必采用服务端生成 UserSig 的方式。详细信息请参考 服务端生成 UserSig。 |
实现接听通话
接听通话前,请确保已完成登录,这是服务可用的必要前提。接下来,我们将通过 6 个步骤带您实现‘接听一通电话’的功能。
步骤1:创建通话页面
您需要创建一个通话页面,当收到来电时唤起通话页面,实现方式如下:
1. 创建通话页面:您可以新建一个 StatefulWidget 作为通话宿主页面,用于响应来电时的跳转逻辑。
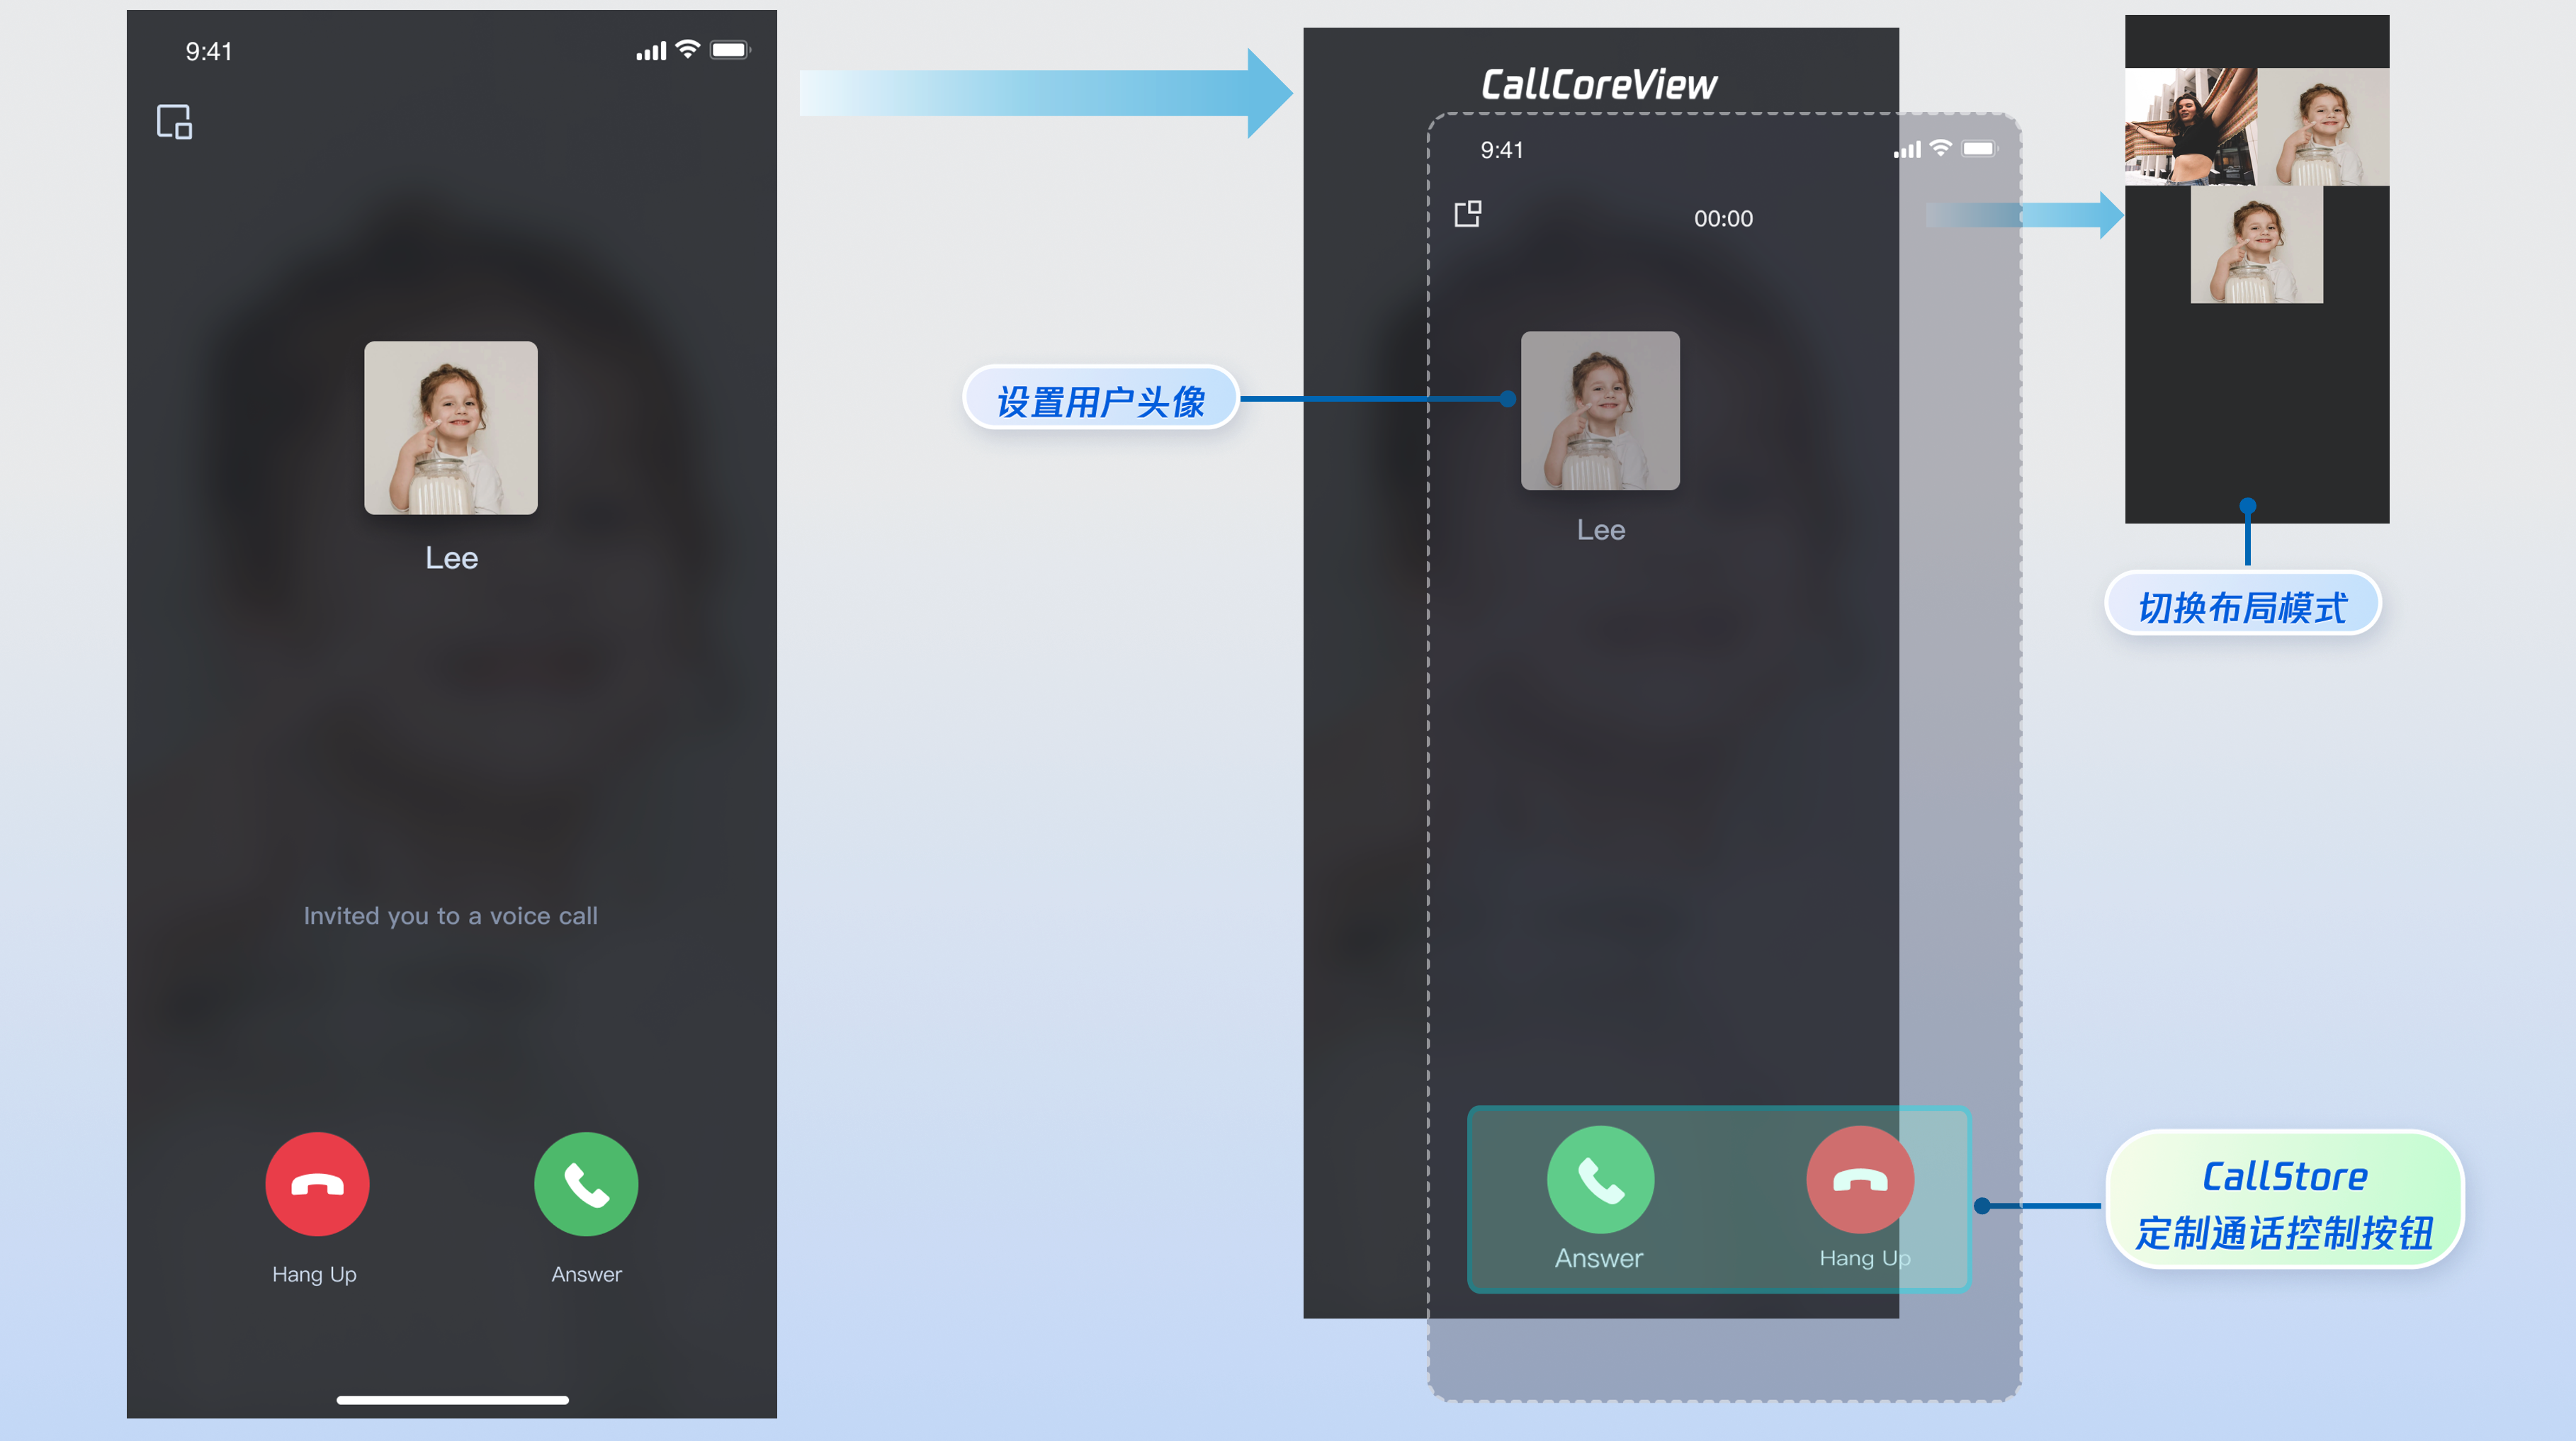
2. 通话页面使用 CallCoreView Widget:通话视图核心组件,需要传入 controller 参数,自动监听 CallStore 数据并完成画面渲染,支持 1v1 和多人通话布局自动切换。
import 'package:flutter/material.dart';import 'package:atomic_x_core/atomicxcore.dart';// 1. 创建通话页面 Widgetclass CallPage extends StatefulWidget {const CallPage({super.key});@overrideState<CallPage> createState() => _CallPageState();}class _CallPageState extends State<CallPage> {late CallCoreController controller;@overridevoid initState() {super.initState();controller = CallCoreController.create();}@overrideWidget build(BuildContext context) {// 2. 通话页面使用 CallCoreView Widgetreturn CallCoreView(controller: controller);}}
CallCoreView Widget 功能说明:
功能 | 说明 | 参考文档 |
设置布局模式 | 支持自由切换布局模式。若未设置,将根据通话人数自动适配布局。 | |
设置头像 | 支持通过传入头像资源路径,为特定用户自定义头像。 | |
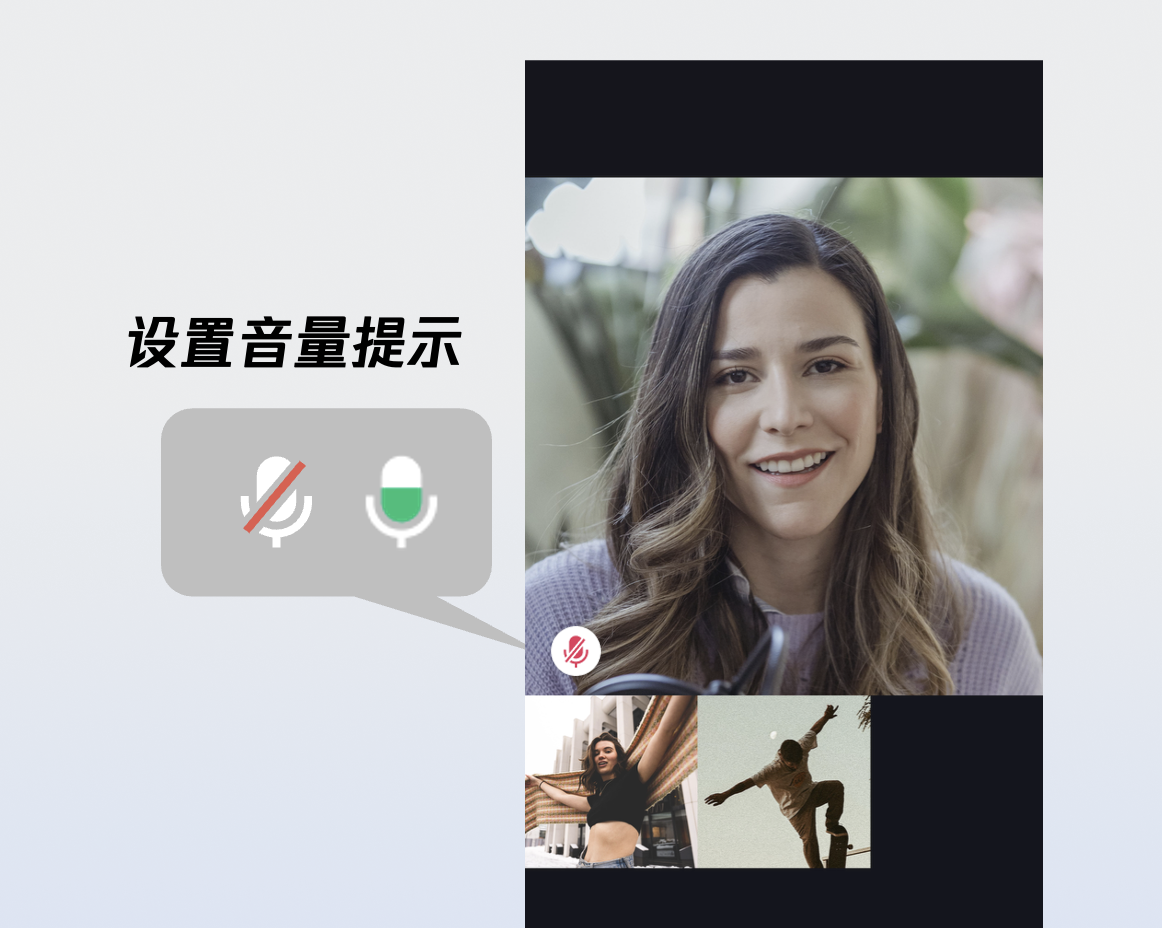
设置音量提示图标 | 支持根据不同音量等级,配置个性化的音量指示图标。 | |
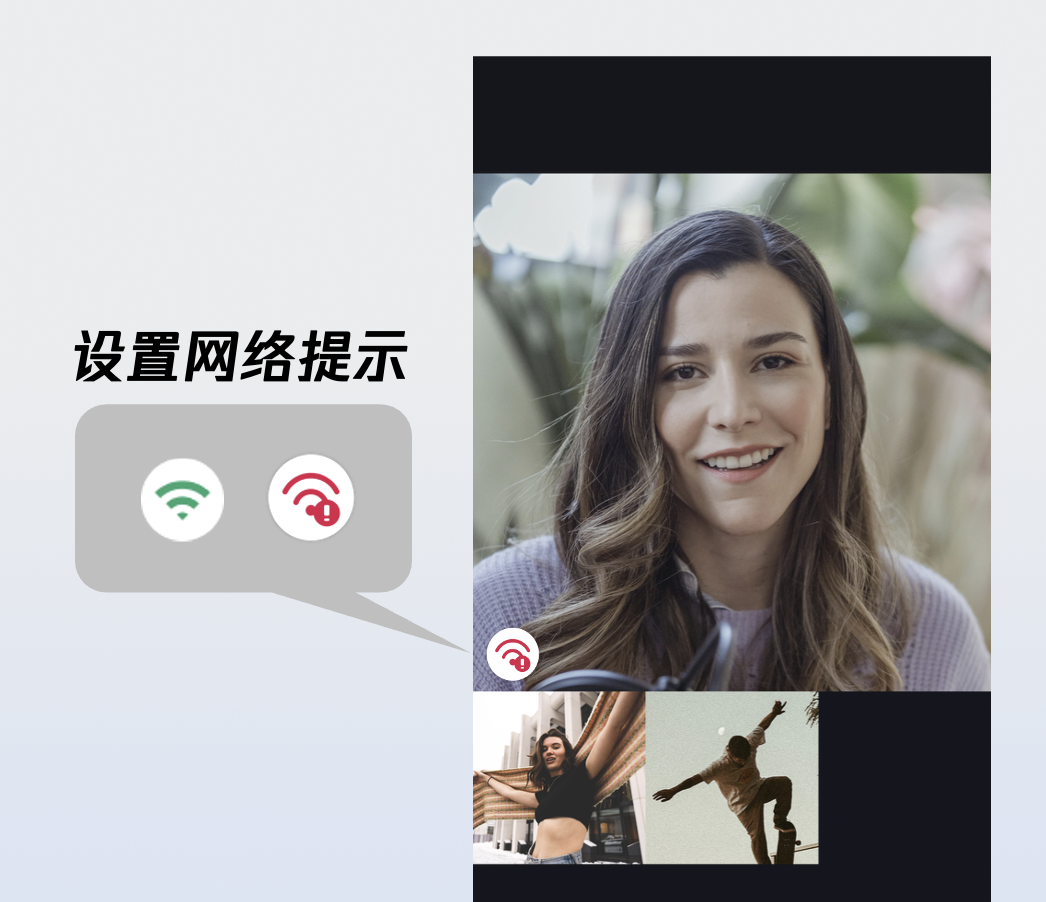
设置网络提示图标 | 支持根据实时网络质量,配置对应的网络状态提示图标。 | |
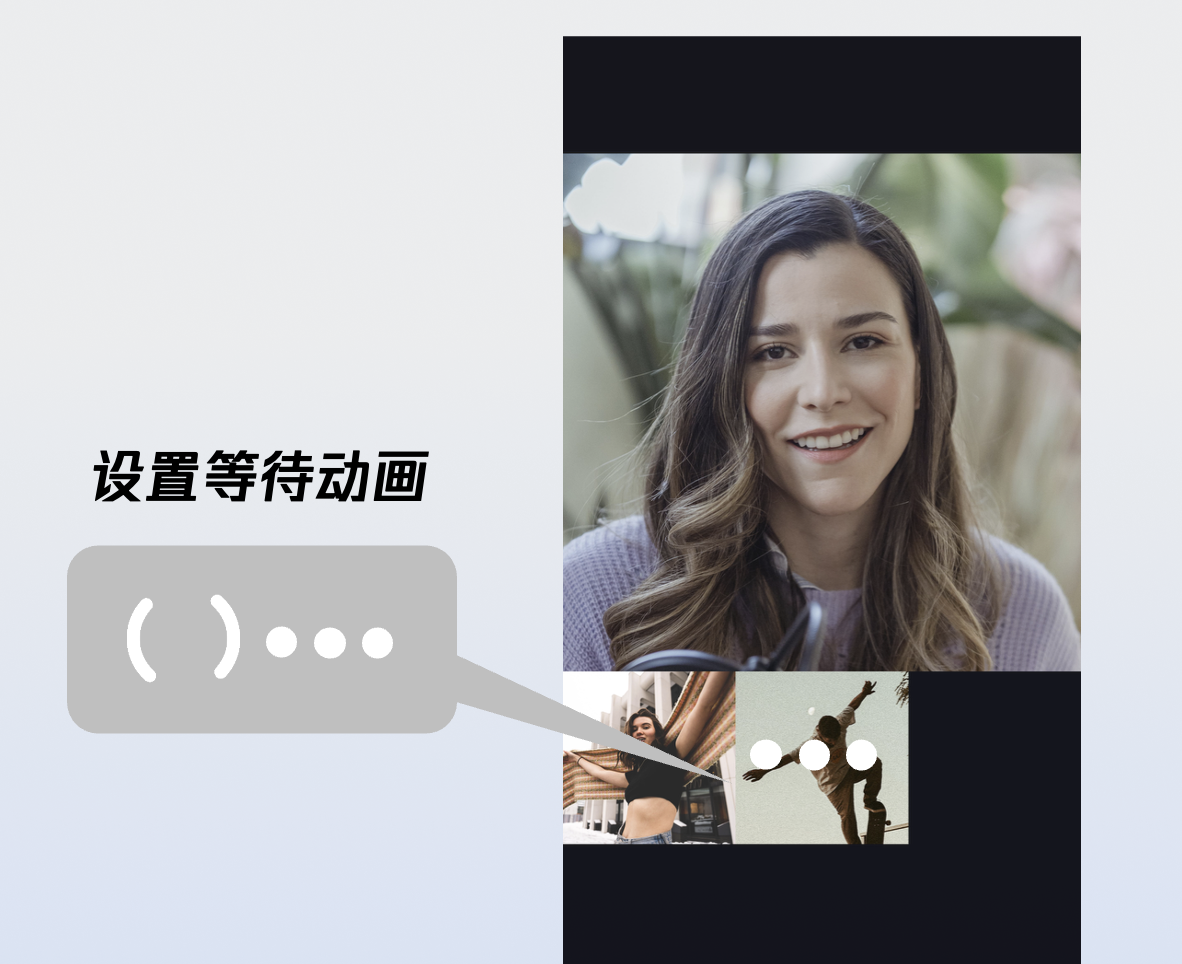
设置等待接听用户的动画 | 在多人通话场景下,支持传入 GIF 路径,为待接听状态的用户展示动画。 |
步骤2:添加接听和拒接按钮
DeviceStore 功能说明:麦克风(开关 / 音量)、摄像头(开关 / 切换 / 画质)、屏幕共享,设备状态实时监听。建议将对应方法绑定至按钮点击事件,并通过监听设备状态变更来实时刷新按钮的 UI 状态。
CallStore 功能说明:接听、挂断、拒接等核心通话控制能力。建议将对应方法绑定至按钮点击事件,并监听通话状态的变化,以确保按钮显示与当前通话阶段保持同步。
图标资源下载:按钮图标可以直接从 GitHub 下载。这些图标由我们的设计师专为 TUICallKit 打造,无版权风险,可放心使用。


以下是添加"接听"和"拒接"按钮的实现方式:
import 'package:flutter/material.dart';import 'package:atomic_x_core/atomicxcore.dart';// 接听和拒接按钮 Widgetclass AcceptRejectButtons extends StatelessWidget {const AcceptRejectButtons({super.key});@overrideWidget build(BuildContext context) {return Row(children: [// 接听按钮_buildAcceptButton(),// 拒接按钮_buildRejectButton(),],);}// 接听按钮Widget _buildAcceptButton() {return GestureDetector(onTap: () {// 调用 accept 接口接听通话CallStore.shared.accept();},child: Container(width: 60,height: 60,decoration: const BoxDecoration(color: Colors.green,shape: BoxShape.circle,),child: const Icon(Icons.call,color: Colors.white,size: 30,),),);}// 拒接按钮Widget _buildRejectButton() {return GestureDetector(onTap: () {// 调用 reject 接口拒接通话CallStore.shared.reject();},child: Container(width: 60,height: 60,decoration: const BoxDecoration(color: Colors.red,shape: BoxShape.circle,),child: const Icon(Icons.call_end,color: Colors.white,size: 30,),),);}}
1.2 拨打方取消通话或您拒接时销毁界面:无论拨打方取消呼叫,还是接收方拒接,均会触发 onCallEnded(通话结束)事件。建议监听此事件,以便在通话终止时及时关闭(销毁)通话界面。
import 'package:atomic_x_core/atomicxcore.dart';import 'package:flutter/cupertino.dart';void addListener(BuildContext context) {CallEventListener listener = CallEventListener(onCallEnded: (callId, mediaType, reason, userId) {Navigator.of(context).pop();});CallStore.shared.addListener(listener);}
onCallEnded 事件参数详细说明:
参数 | 类型 | 说明 |
callId | String | 此次通话的唯一标识。 |
mediaType | 通话媒体类型,用于指定发起音频通话还是视频通话。 CallMediaType.video : 视频通话。CallMediaType.audio : 语音通话。 | |
reason | 通话结束的原因。 unknown : 未知原因,无法确定结束原因。hangup : 正常挂断,用户主动挂断通话。reject : 拒绝接听,被叫方拒绝来电。noResponse : 无响应,被叫方未在超时时间内接听。offline : 对方离线,被叫方不在线。lineBusy : 对方忙线,被叫方正在通话中。canceled : 通话取消,主叫方在对方接听前取消。otherDeviceAccepted : 其他设备已接听,通话已在另一登录设备上接听。otherDeviceReject : 其他设备已拒绝,通话已在另一登录设备上拒绝。endByServer : 服务器结束,通话被服务器终止。 | |
userId | String | 触发结束的用户 ID 。 |
步骤3:申请麦克风/摄像头权限
建议在发起通话前,先行检测音视频权限。若权限缺失,请引导用户动态申请。实现方法如下:
1. Android 权限声明:
在
AndroidManifest.xml 文件中声明应用需要的摄像头和麦克风权限。<manifest xmlns:android="http://schemas.android.com/apk/res/android"><!-- 麦克风权限 --><uses-permission android:name="android.permission.RECORD_AUDIO" /><!-- 摄像头权限 --><uses-permission android:name="android.permission.CAMERA" /></manifest>
2. iOS 权限声明:
在您的 iOS 工程的
Info.plist 文件中,在顶级 <dict> 元素下添加以下两项。<key>NSCameraUsageDescription</key><string>CallingApp需要访问您的相机权限,开启后录制的视频才会有画面</string><key>NSMicrophoneUsageDescription</key><string>CallingApp需要访问您的麦克风权限,开启后录制的视频才会有声音</string>
3. 动态申请权限:我们推荐使用 permission_handler 插件来动态申请音视频权限。首先使用以下命令添加 permission_handler 插件,然后申请权限:
flutter pub add permission_handler
import 'package:permission_handler/permission_handler.dart';// 申请音视频权限Future<bool> requestCallPermissions() async {// 请求麦克风和摄像头权限Map<Permission, PermissionStatus> statuses = await [Permission.microphone,Permission.camera,].request();// 检查权限状态bool micGranted = statuses[Permission.microphone]?.isGranted ?? false;bool cameraGranted = statuses[Permission.camera]?.isGranted ?? false;if (micGranted && cameraGranted) {// 权限申请成功return true;} else {// 部分权限被拒绝,可引导用户开启权限return false;}}
步骤4: 来电播放提示
您可以监听当前用户的通话状态,在收到来电时播放铃声或振动,接听、挂断后停止播放来电提示,实现方法如下:
1. 数据层订阅:订阅
CallStore.shared.state.selfInfo , 建立当前登录用户信息的响应式监听。2. 播放或停止来电提示:若当前用户的通话状态 (
selfInfo.status) 为等待接听状态(CallParticipantStatus.waiting)播放铃声或振动,若当前用户的通话状态 (selfInfo.status) 为已接听状态(CallParticipantStatus.accept)停止铃声或振动。CallStore.shared.state.selfInfo.addListener(() {CallParticipantInfo info = CallStore.shared.state.selfInfo.value;if (info.status == CallParticipantStatus.accept || info.status == CallParticipantStatus.none) {// 停止播放铃音return;}if (info.status == CallParticipantStatus.waiting) {// 播放铃音}});
步骤5:来电打开媒体设备
1. 监听来电事件:订阅
onCallReceived 事件。2. 根据来电媒体类型打开设备:若为语音通话仅开启麦克风,若为视频通话开启麦克风和摄像头。
import 'package:atomic_x_core/atomicxcore.dart';CallEventListener? callListener;void initCallListener() {// 1.监听来电事件callListener = CallEventListener(onCallReceived: (callId, mediaType, userData) {// 2.根据来电媒体类型打开设备openDeviceForMediaType(mediaType);},);if (callListener != null) {CallStore.shared.addListener(callListener!);}}void openDeviceForMediaType(CallMediaType? mediaType) {if (mediaType == null) return;DeviceStore.shared.openLocalMicrophone();if (mediaType == CallMediaType.video) {final isFrontCamera = DeviceStore.shared.state.isFrontCamera.value;DeviceStore.shared.openLocalCamera(isFrontCamera);}}
onCallReceived 事件详细说明:
参数 | 类型 | 说明 |
callId | String | 此次通话的唯一标识。 |
mediaType | 通话媒体类型,用于指定发起音频通话还是视频通话。 CallMediaType.video : 视频通话。CallMediaType.audio : 语音通话。 |
openLocalCamera 接口参数详细说明:
参数名 | 类型 | 必填 | 说明 |
isFront | bool | 是 | 是否开启前置摄像头。 true : 开启前置摄像头。false :开启后置摄像头。 |
completion | 否 | 操作完成回调,用于返回开启摄像头的结果。若开启失败则会返回错误码和错误信息。 |
openLocalMicrophone 接口参数详细说明:
参数名 | 类型 | 必填 | 说明 |
completion | 否 | 操作完成回调,用于返回开启麦克风的结果。若开启失败则会返回错误码和错误信息。 |
步骤6:来电唤起通话界面
import 'package:atomic_x_core/atomicxcore.dart';import 'package:flutter/material.dart';CallEventListener? callListener;void addListener(BuildContext context) {callListener = CallEventListener(onCallReceived: (callId, mediaType, userData) {// 唤起通话页面(使用 Navigator 跳转)Navigator.push(context,MaterialPageRoute(builder: (context) => const CallPage()),);},);if (callListener != null) {CallStore.shared.addListener(callListener!);}}
运行效果
当您完成以上 6 步后,"接听一通电话"运行效果如下:
接入离线推送
定制页面
CallCoreView 提供了完善的 UI 定制能力,支持头像及音量提示等图标的自由替换。为助力快速集成,您可以直接从 GitHub 下载。这些图标由我们的设计师专为 TUICallKit 打造,无版权风险,可放心使用。
自定义音量提示的图标
volumeIcons 示例代码:
Widget _buildCallCoreView() {Map<VolumeLevel, Image> volumeIcons = {VolumeLevel.mute : Image.asset(''), // 每个音量等级对应的图片};return CallCoreView(controller: CallCoreController.create(),volumeIcons: volumeIcons,);}
volumeIcons 参数详细说明:
参数 | 类型 | 是否必填 | 说明 |
volumeIcons | 否 | 音量等级与图标资源的映射表。 key ( VolumeLevel ) 表示音量等级: VolumeLevel.mute :表示麦克风关闭,静音状态。VolumeLevel.low :表示音量范围 (0-25]VolumeLevel.medium : 表示音量范围 (25-50]VolumeLevel.high : 表示音量范围在 (50-75]VolumeLevel.peak : 表示音量范围在 (75-100]。Value ( Image ) 表示对应音量等级的图标资源。 |
音量提示图标:


自定义网络提示的图标
networkQualityIcons 示例代码:
Widget _buildCallCoreView() {Map<NetworkQuality, Image> networkQualityIcons = {NetworkQuality.bad : Image.asset(''), // 每个网络质量等级对应的图片};return CallCoreView(controller: CallCoreController.create(),networkQualityIcons: networkQualityIcons,);}
networkQualityIcons 参数详细说明:
参数 | 类型 | 是否必填 | 说明 |
networkQualityIcons | 否 | 网络质量与图标资源的映射表。 Key ( NetworkQuality ) : 表示网络质量等级。 NetworkQuality.unknown :未知网络状态。NetworkQuality.excellent:网络状态极佳。NetworkQuality.good : 网络状态较好。NetworkQuality.poor : 网络状态较差。NetworkQuality.bad : 网络状态差。NetworkQuality.veryBad :网络状态极差。NetworkQuality.down :网络断开。Value ( Image ) : 对应网络状态的图标资源。 |
网络较差的提示图标:
图标 | 说明 | 下载地址 |
 | 网络较差的提示图标。 您可以将该图标等级设置为 NetworkQuality.bad、NetworkQuality.veryBad 或 NetworkQuality.down ,当网络较差时显示该图标。 |
自定义默认头像
您可以调用 CallCoreView 的 defaultAvatar 参数设置用户默认头像。建议您监听响应式数据 allParticipants(所有参与通话的成员):当获取到用户头像时设置并展示;若用户未设置头像或加载失败,则显示默认头像(占位图)。
defaultAvatar 示例代码:
Widget _buildCallCoreView() {Image defaultAvatarImage = Image.asset(''); // 默认用户头像图片return CallCoreView(controller: CallCoreController.create(),defaultAvatar: defaultAvatarImage,);}
defaultAvatar 接口参数详细说明:
参数 | 类型 | 是否必填 | 说明 |
defaultAvatar | Image | 否 | 用户默认头像。 |
默认头像资源:
图标 | 说明 | 下载地址 |
 | 默认头像 当用户头像加载失败或无头像时,您可以给该用户设置此默认头像。 |
自定义 loading 动画
loadingAnimation 示例代码:
Widget _buildCallCoreView() {Image loading = Image.asset(''); // 默认加载动画资源return CallCoreView(controller: CallCoreController.create(),loadingAnimation: loading,);}
loadingAnimation 接口参数详细说明:
参数 | 类型 | 是否必填 | 说明 |
loadingAnimation | Image | 否 | GIF 格式图像资源。 |
等待接听的动画:
图标 | 说明 | 下载地址 |
 | 用户等待接听动画。 群组通话时设置的动画。设置后,当用户的状态为等待接听时,显示该动画。 |
添加通话计时提示
1. 数据层订阅:订阅
CallStore.shared.state.activeCall , 建立当前活跃通话的响应式监听。2. 绑定通话计时数据:将
activeCall.duration 字段绑定至 UI 控件。该字段为响应式数据,会自动驱动 UI 实时刷新,无需手动维护定时器。import 'package:atomic_x_core/atomicxcore.dart';import 'package:flutter/material.dart';class TimerWidget extends StatelessWidget {final double? fontSize;final FontWeight? fontWeight;const TimerWidget({super.key,this.fontSize,this.fontWeight,});@overrideWidget build(BuildContext context) {return ValueListenableBuilder(valueListenable: CallStore.shared.state.selfInfo,builder: (context, info, child) {if (info.status == CallParticipantStatus.accept) {return ValueListenableBuilder(valueListenable: CallStore.shared.state.activeCall,builder: (context, activeCall, child) {return Text(formatDuration(activeCall.duration.toInt()),style: TextStyle(fontSize: fontSize,fontWeight: fontWeight,),);},);} else {return Container();}});}String formatDuration(int timeCount) {int hour = timeCount ~/ 3600;int minute = (timeCount % 3600) ~/ 60;String minuteShow = minute <= 9 ? "0$minute" : "$minute";int second = timeCount % 60;String secondShow = second <= 9 ? "0$second" : "$second";if (hour > 0) {String hourShow = hour <= 9 ? "0$hour" : "$hour";return '$hourShow:$minuteShow:$secondShow';} else {return '$minuteShow:$secondShow';}}}
说明:
更多功能
设置头像和昵称
setSelfInfo 示例代码:
UserProfile profile = UserProfile(userID: "", // 您的 UserIdavatarURL: "", // 头像的 URLnickname: "", // 需要设置的昵称);CompletionHandler result = await LoginStore.shared.setSelfInfo(userInfo: profile);if (result.errorCode == 0) {print("setSelfInfo success");} else {print("setSelfInfo failed");}
setSelfInfo 接口参数详细说明:
参数 | 类型 | 是否必填 | 说明 |
userProfile | 是 | 用户信息结构体。 userID (String):用户的 ID 。avatarURL (String) : 用户头像的 URL。nickname (String) :用户的昵称。 | |
completion | CompletionHandler | 否 | 操作完成回调,用于返回接通电话的结果。 |
切换布局模式
您可以通过 setLayoutTemplate 接口灵活切换布局模式。若未主动配置,CallCoreView 将根据通话人数自动适配:1v1 场景下默认采用
Float 模式,多人通话场景下则自动切换为 Grid 模式。不同布局模式的说明如下:Float 模式 | Grid 模式 | PIP 模式 |
 |  |  |
布局逻辑:呼叫等待时全屏显示己方画面。接通后全屏显示对方画面,己方画面以悬浮小窗展示。 交互特性:支持小窗拖拽移动,点击小窗可实现大小画面互换。 | 布局逻辑:所有成员画面呈网格状平铺排列成宫格模式布局,适用 2 人以上通话,支持点击放大画面功能。 交互特性:支持点击特定成员画面放大查看。 | 布局逻辑:1v1 场景固定显示对方画面,多人场景:采用当前发言者(Active Speaker) 策略,自动识别并全屏展示正在说话的用户。 交互特性:等待时显示自己的画面,接通后还会显示通话计时。 |
setLayoutTemplate 示例代码:
CallCoreController controller = CallCoreController.create();CallLayoutTemplate template = CallLayoutTemplate.float;controller.setLayoutTemplate(template);
setLayoutTemplate 接口参数详细说明:
参数 | 类型 | 是否必填 | 说明 |
template | 是 | CallCoreView 的布局模式。 CallLayoutTemplate.float :布局逻辑:呼叫等待时全屏显示己方画面;接通后全屏显示对方画面,己方画面以悬浮小窗展示。 交互特性:支持小窗拖拽移动,点击小窗可实现大小画面互换。 CallLayoutTemplate.grid :布局逻辑:所有成员画面呈网格状平铺排列成宫格模式布局,适用 2 人以上通话,支持点击放大画面功能。 交互特性:支持点击特定成员画面放大查看。 CallLayoutTemplate.pip : 布局逻辑:1v1 场景固定显示对方画面,多人场景:采用当前发言者(Active Speaker) 策略,自动识别并全屏展示正在说话的用户。 交互特性:等待时显示自己的画面,接通后还会显示通话计时。 |
设置通话的默认超时时间
void startCall(List<String> userIdList, CallMediaType mediaType) {CallParams params = CallParams(timeout: 30, // 设置通话等待超时时间);CallStore.shared.calls(userIdList, mediaType, params);}
calls 接口参数详细说明:
参数 | 类型 | 是否必填 | 说明 |
userIdList | List<String> | 是 | 目标用户的 userId 列表。 |
mediaType | 是 | 通话媒体类型,用于指定发起音频通话还是视频通话。 CallMediaType.video : 视频通话。CallMediaType.audio : 语音通话。 | |
params | 否 | 通话扩展参数,如:房间号、通话邀请超时时间等。 roomId (String) : 房间 ID,可选参数,未指定时由服务端自动分配。timeout (Int) : 呼叫超时时间(秒)。userData (String) : 用户自定义数据。chatGroupId (String) : Chat 群组 ID,用于群组通话场景。isEphemeralCall (Boolean) : 是否为加密通话(不产生通话记录)。 |
实现应用内悬浮窗
在通话界面因页面导航(如用户返回、跳转至其他页面)而被覆盖时,在应用内生成一个可拖拽的悬浮窗。该悬浮窗需持续展示关键通话状态(如通话时长、对方信息),并提供一键返回完整通话界面的入口,从而提升多任务场景下的通话体验。
_buildPipWindowWidget() {final pipWidth = MediaQuery.of(context).size.width;final pipHeight = MediaQuery.of(context).size.height;final scale = pipWidth / originWidth;CallCoreController controller = CallCoreController.create();controller.setLayoutTemplate(CallLayoutTemplate.pip);return Scaffold(body: SizedBox(width: pipWidth,height: pipHeight,child: Container(width: pipWidth,height: pipHeight,decoration: const BoxDecoration(color: Colors.transparent),child: MediaQuery(data: MediaQuery.of(context).copyWith(size: Size(originWidth ?? pipWidth, originHeight ?? pipHeight)),child: ClipRect(child: Transform.scale(scale: scale,alignment: Alignment.center,child: OverflowBox(maxWidth: originWidth,maxHeight: originHeight,alignment: Alignment.center,child: CallCoreView(controller: controller,),),),),),),),);}
实现 Android 应用外画中画
画中画功能需 Android 8.0 (API 26) 及以上版本支持。
1. MainActivity 配置
监听 MainActivity 的生命周期,当 enablePictureInPicture 为 true 时,当应用退到后台时自动拉起画中画。
import android.app.PictureInPictureParamsimport android.content.pm.PackageManagerimport android.os.Buildimport android.util.Logimport android.util.Rationalimport io.flutter.embedding.android.FlutterActivityimport io.flutter.embedding.engine.FlutterEngineimport io.flutter.plugin.common.MethodChannelclass MainActivity : FlutterActivity() {companion object {private const val TAG = "MainActivity"private const val CHANNEL = "atomic_x/pip"}private var enablePictureInPicture = falseoverride fun configureFlutterEngine(flutterEngine: FlutterEngine) {super.configureFlutterEngine(flutterEngine)MethodChannel(flutterEngine.dartExecutor.binaryMessenger, CHANNEL).setMethodCallHandler { call, result ->when (call.method) {"enablePictureInPicture" -> {val enable = call.argument<Boolean>("enable") ?: falseval success = enablePIP(enable)result.success(success)}"enterPictureInPicture" -> {val success = enterPIP()result.success(success)}else -> result.notImplemented()}}}override fun onUserLeaveHint() {super.onUserLeaveHint()// 用户按 Home 键时自动进入画中画if (enablePictureInPicture) {enterPIP()}}private fun enablePIP(enable: Boolean): Boolean {Log.i(TAG, "enablePictureInPicture: $enable")if (Build.VERSION.SDK_INT >= Build.VERSION_CODES.O &&packageManager.hasSystemFeature(PackageManager.FEATURE_PICTURE_IN_PICTURE)) {enablePictureInPicture = enablereturn true}return false}private fun enterPIP(): Boolean {if (!enablePictureInPicture) return falseif (Build.VERSION.SDK_INT >= Build.VERSION_CODES.O) {try {val aspectRatio = Rational(9, 16)val params = PictureInPictureParams.Builder().setAspectRatio(aspectRatio).build()return enterPictureInPictureMode(params)} catch (e: Exception) {Log.e(TAG, "enterPIP failed: ${e.message}")}}return false}}
2. AndroidManifest 配置
在项目的 AndroidManifest.xml 文件中为 MainActivity 添加画中画能力配置:
android:supportsPictureInPicture="true"<activityandroid:name=".MainActivity"android:exported="true"android:launchMode="singleTop"android:taskAffinity=""android:theme="@style/LaunchTheme"android:configChanges="orientation|keyboardHidden|keyboard|screenSize|smallestScreenSize|locale|layoutDirection|fontScale|screenLayout|density|uiMode"android:hardwareAccelerated="true"android:windowSoftInputMode="adjustResize"android:supportsPictureInPicture="true"><meta-dataandroid:name="io.flutter.embedding.android.NormalTheme"android:resource="@style/NormalTheme"/><intent-filter><action android:name="android.intent.action.MAIN"/><category android:name="android.intent.category.LAUNCHER"/></intent-filter></activity>
3. Dart 层配置
import 'package:flutter/services.dart';class PipManager {static const MethodChannel _channel = MethodChannel('atomic_x/pip');/// 启用/禁用画中画功能static Future<bool> enablePictureInPicture(bool enable) async {try {final result = await _channel.invokeMethod<bool>('enablePictureInPicture', {'enable': enable});return result ?? false;} catch (e) {return false;}}/// 立即进入画中画模式static Future<bool> enterPictureInPicture() async {try {final result = await _channel.invokeMethod<bool>('enterPictureInPicture');return result ?? false;} catch (e) {return false;}}}
在您的通话开始前,选择合适的时机启用画中画;在通话结束后,关闭画中画。
实现 iOS 应用外画中画
iOS 端支持通过底层 TRTC 引擎实现应用外画中画功能。当应用进入后台时,通话画面可以以系统画中画形式悬浮在其他应用之上,用户可以边使用其他应用边进行视频通话。实现方式如下:
说明:
需要在 Xcode 的
Signing & Capabilities 中添加 Background Modes 能力,并勾选 Audio, AirPlay, and Picture in Picture。需要 iOS 15.0 及以上版本支持。
1. 开启画中画
import 'package:tencent_rtc_sdk/trtc_cloud.dart';TRTCCloud.sharedInstance().then((trtcCloud) {trtcCloud.callExperimentalAPI('''{"api": "configPictureInPicture","params": {"enable": true,"cameraBackgroundCapture": true,"canvas": {"width": 720,"height": 1280,"backgroundColor": "#111111"},"regions": [{"userId": "remoteUserId","userName": "","width": 1.0,"height": 1.0,"x": 0.0,"y": 0.0,"fillMode": 0,"streamType": "high","backgroundColor": "#111111","backgroundImage": "file:///path/to/avatar.png"},{"userId": "localUserId","userName": "","width": 0.333,"height": 0.333,"x": 0.65,"y": 0.05,"fillMode": 0,"streamType": "high","backgroundColor": "#111111"}]}}''');});
2. 关闭画中画
import 'package:tencent_rtc_sdk/trtc_cloud.dart';TRTCCloud.sharedInstance().then((trtcCloud) {trtcCloud.callExperimentalAPI('''{"api": "configPictureInPicture","params": {"enable": false}}''');});
开启后台采集音频/视频
为了确保应用在进入后台时仍能正常采集音频和视频(例如用户锁屏或切换到其他应用),您需要分别在 Android 、iOS 进行如下配置:
Android 端配置
1. 配置权限与服务(AndroidManifest.xml): 从 Android 9.0 (API 28) 开始需要声明前台服务权限;Android 14 (API 34) 强制要求声明具体的服务类型(麦克风和摄像头)。
<manifest xmlns:android="http://schemas.android.com/apk/res/android"><uses-permission android:name="android.permission.FOREGROUND_SERVICE" /><uses-permission android:name="android.permission.FOREGROUND_SERVICE_CAMERA" /><uses-permission android:name="android.permission.FOREGROUND_SERVICE_MICROPHONE" /><application><serviceandroid:name=".CallForegroundService"android:enabled="true"android:exported="false"android:foregroundServiceType="camera|microphone" /></application></manifest>
2. 创建前台服务类(CallForegroundService):
import android.app.Notificationimport android.app.NotificationChannelimport android.app.NotificationManagerimport android.app.Serviceimport android.content.Contextimport android.content.Intentimport android.os.Buildimport android.os.IBinderimport androidx.core.app.NotificationCompatclass CallForegroundService : Service() {companion object {private const val NOTIFICATION_ID = 1001private const val CHANNEL_ID = "call_foreground_channel"fun start(context: Context) {val intent = Intent(context, CallForegroundService::class.java)if (Build.VERSION.SDK_INT >= Build.VERSION_CODES.O) {context.startForegroundService(intent)} else {context.startService(intent)}}fun stop(context: Context) {val intent = Intent(context, CallForegroundService::class.java)context.stopService(intent)}}override fun onCreate() {super.onCreate()createNotificationChannel()// 启动前台通知,确保后台采集权限startForeground(NOTIFICATION_ID, createNotification())}override fun onBind(intent: Intent?): IBinder? = nullprivate fun createNotification(): Notification {return NotificationCompat.Builder(this, CHANNEL_ID).setContentTitle("正在通话中").setContentText("应用正在后台运行以保持通话").setSmallIcon(android.R.drawable.ic_menu_call) // 请替换为您的应用图标.setPriority(NotificationCompat.PRIORITY_HIGH).build()}private fun createNotificationChannel() {if (Build.VERSION.SDK_INT >= Build.VERSION_CODES.O) {val channel = NotificationChannel(CHANNEL_ID,"通话保活服务",NotificationManager.IMPORTANCE_HIGH)val manager = getSystemService(NotificationManager::class.java)manager.createNotificationChannel(channel)}}}
iOS 端配置
配置步骤:在 Xcode 中打开您的项目,按照以下步骤操作:
1. 选择项目的
Target → Signing & Capabilities。2. 点击
+ Capability 。3. 搜索并添加
Background Modes。4. 勾选以下三个选项:
Audio, AirPlay, and Picture in Picture(保持音频采集和画中画功能)。Voice over IP(支持 VoIP 通话)。Remote notifications(可选,用于接收离线推送)。配置完成后,您的
Info.plist 文件会自动添加以下内容:<key>UIBackgroundModes</key><array><string>audio</string><string>voip</string><string>remote-notification</string></array>
配置音频会话(AVAudioSession)
为了确保通话音频在后台正常工作,您需要在通话开始前配置音频会话。建议在通话界面的
viewDidLoad 或发起通话前设置:import AVFoundation/*** 设置音频会话,支持后台音频采集** 建议在以下场景调用:* 1. 通话界面的 viewDidLoad 中* 2. 发起通话 (calls) 之前* 3. 接听通话 (accept) 之前*/private func start() {let audioSession = AVAudioSession.sharedInstance()do {// 设置音频会话类别为播放和录音// .allowBluetooth: 支持蓝牙耳机// .allowBluetoothA2DP: 支持高质量蓝牙音频(A2DP 协议)try audioSession.setCategory(.playAndRecord, options: [.allowBluetooth, .allowBluetoothA2DP])// 激活音频会话try audioSession.setActive(true)} catch {// 音频会话配置失败}}
注意:
您需要在应用中合适的时机,使用 MethodChannel 调用 start() 方法以开启后台保活能力。
常见问题
iOS release 包运行时 [symbol not found]?
由于 tencent_rtc_sdk 通过 Flutter FFI 调用接口,iOS Release 构建时 Xcode 的符号裁剪优化可能误移除 TRTC 的 C 符号,引发
`symbol not found` 错误。解决方案如下:1. 在项目的 Build Settings中找到 Deployment Postprocessing,将其设置为 Yes 。
2. 在项目的 Build Settings中找到 Strip Style,将其中 Release 的值设置为 Non-Global Symbols 。
在通话邀请超时时间内,被邀请者如果离线再上线,能否收到来电事件?
单人通话时,如果在超时时间内上线,会触发来电邀请;群组通话,如果在超时时间内上线,会拉起未处理的20条群消息,如果存在通话邀请,则触发来电邀请事件。
联系我们
文档反馈