tencent cloud

Tencent Real-Time Communication

문서Tencent Real-Time Communication

Integration Overview (iOS)

다운로드
포커스 모드
폰트 크기
마지막 업데이트 시간: 2026-06-15 15:14:29
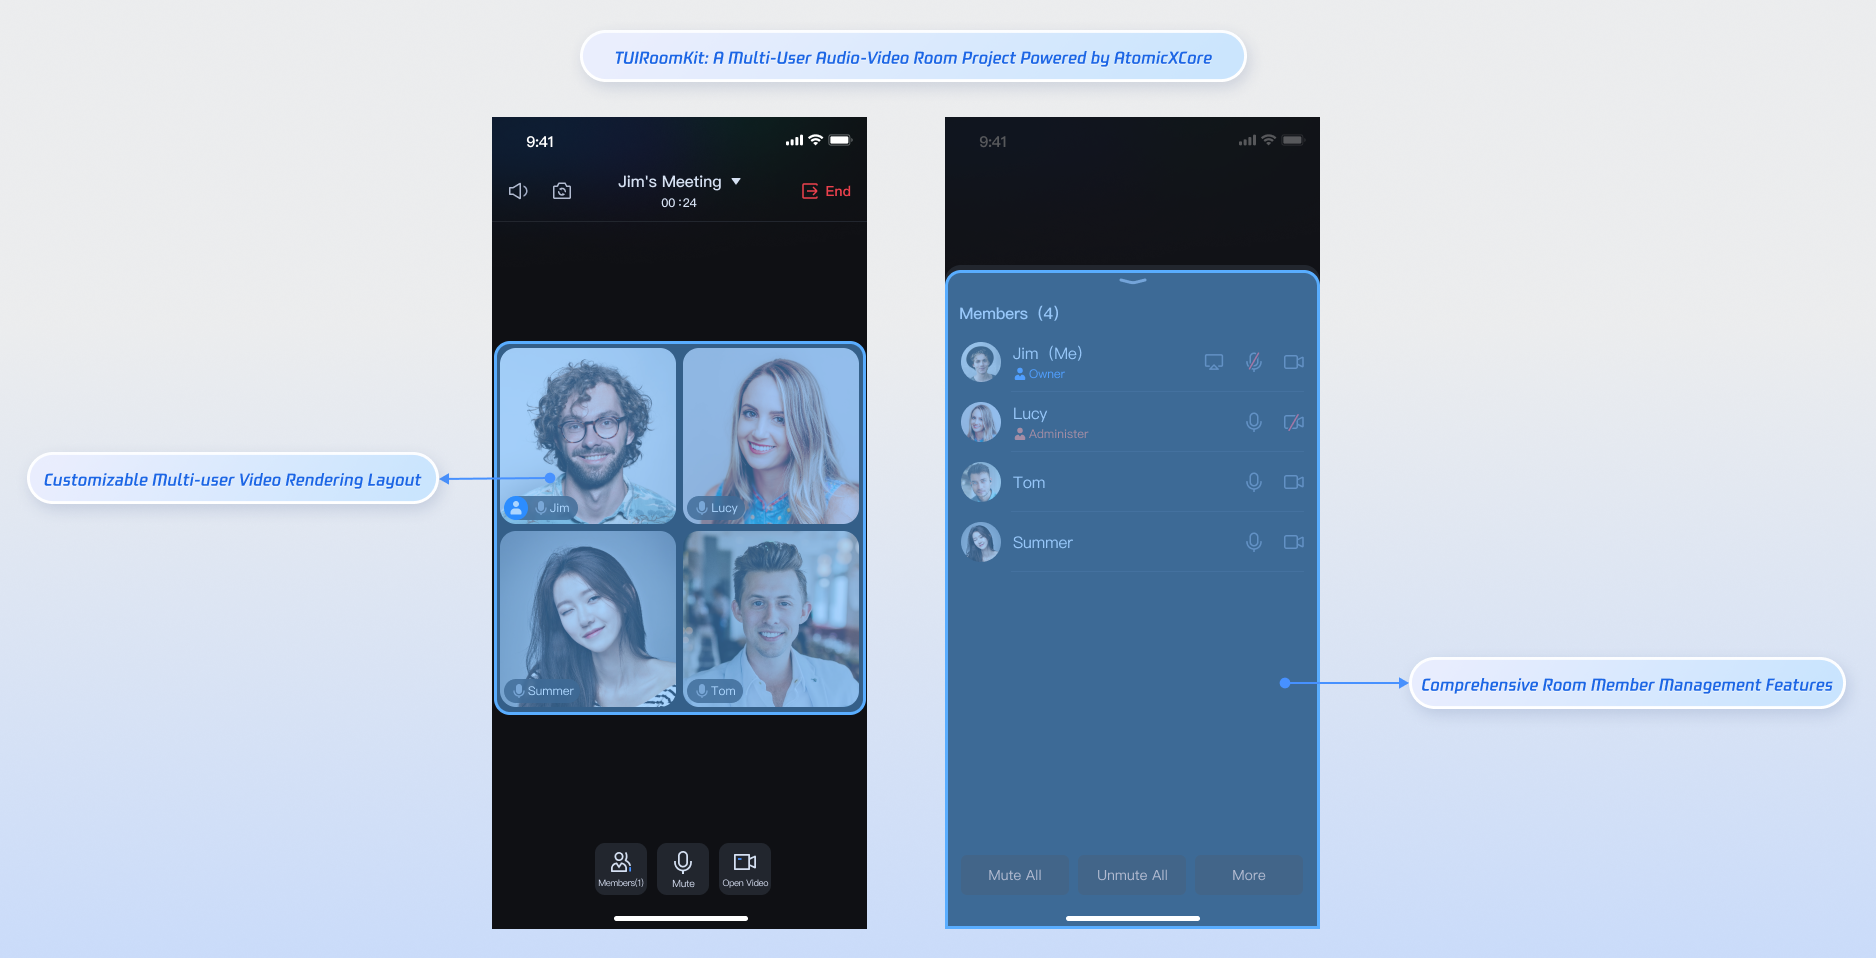
This document provides an integration guide for the core features of AtomicXCore, enabling developers to quickly build multi-party audio/video conference rooms. The SDK follows a pure API architecture, giving you full control over UI customization while letting you focus on business logic and user experience.


Key Features

AtomicXCore offers three essential modules for developing multi-party audio/video conference rooms:
RoomStore: Centralized room management, including scheduling, creating, joining rooms, and in-room calling.
RoomParticipantStore: Participant management within a room, covering admin settings, host transfer, removing participants, device control, and more.
RoomParticipantView: Video view for displaying participant streams within the room.

Prerequisites

Step 1: Activate the Service

See Activate the Service to obtain either the trial or paid version of the SDK.

Step 2: Environment Requirements

Xcode: Requires Xcode 15 or later.
iOS System: Supports devices running iOS 13.0 or above.
CocoaPods Environment: CocoaPods must be installed. If not, follow the CocoaPods Official Installation Guide or use the steps below:
Install CocoaPods via gem: Run sudo gem install cocoapods in your terminal.
Tip:
During sudo gem install cocoapods, you may be prompted for your computer password. Enter your administrator password as instructed.

Step 3: Integrate the AtomicXCore SDK

1. Add Pod Dependency:
If you already have a Podfile
If you do not have a Podfile
Add the pod 'AtomicXCore' dependency to your project's Podfile:
target 'YourProjectTarget' do
# Other existing Pod dependencies...
# Add pod 'AtomicXCore' dependency
pod 'AtomicXCore'
end
Navigate to your .xcodeproj directory using cd in the terminal, then run pod init to create a Podfile. Afterward, add the pod 'AtomicXCore' dependency:
# If your project directory is /Users/yourusername/Projects/YourProject

# 1. cd to your .xcodeproj project directory
cd /Users/yourusername/Projects/YourProject

# 2. Run pod init. After execution, a Podfile will be generated in your project directory.
pod init

# 3. Add pod 'AtomicXCore' dependency to the generated Podfile
target 'YourProjectTarget' do
# Add pod 'AtomicXCore' dependency
pod 'AtomicXCore'
end
2. Install Components:
In your terminal, cd to the directory containing your Podfile, then run:
pod install
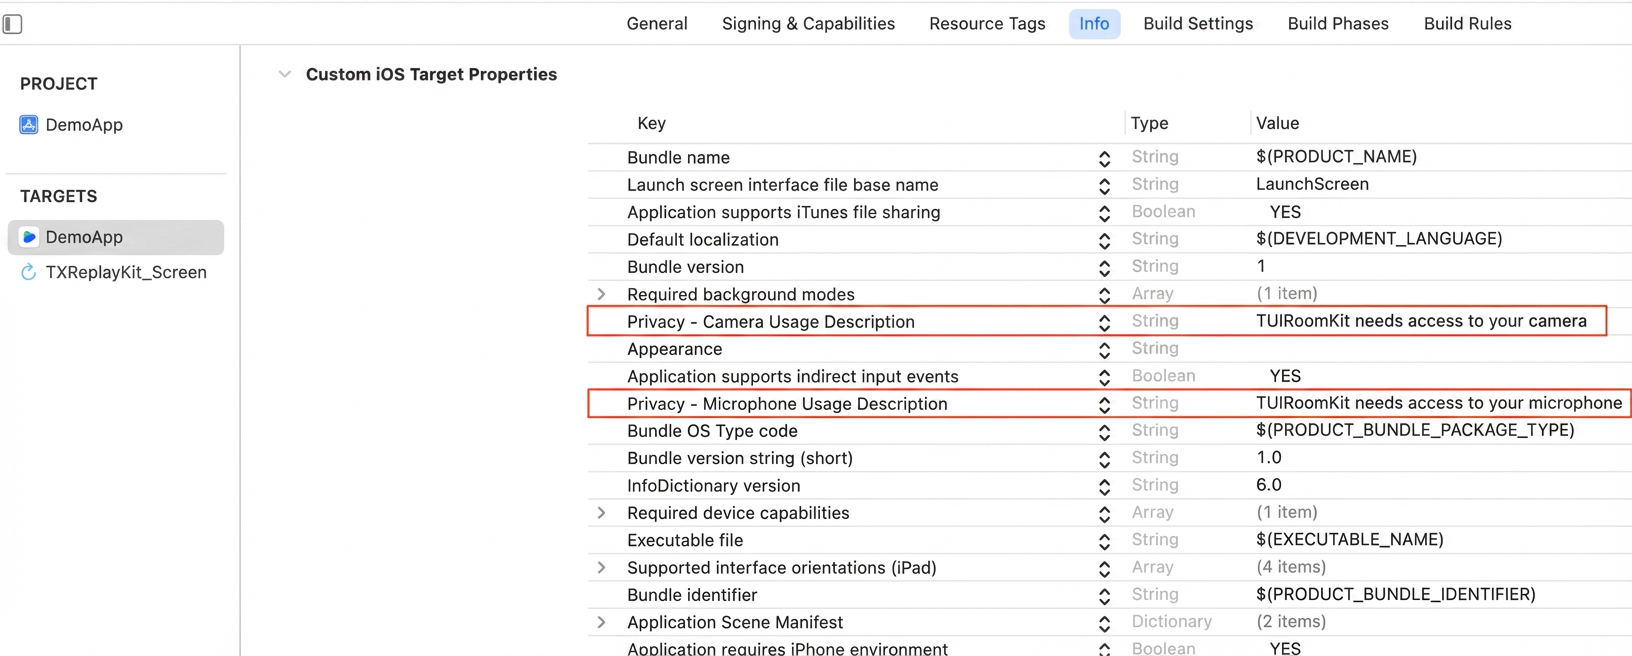
3. Configure App Permissions: Add camera and microphone usage descriptions to your app's Info.plist file.
<key>NSCameraUsageDescription</key>
<string>TUIRoomKit needs access to your camera</string>
<key>NSMicrophoneUsageDescription</key>
<string>TUIRoomKit needs access to your microphone</string>


Step 4: Implement Login Logic

Call LoginStore.shared.login in your project to complete login. This step is required before using any feature of AtomicXCore.
Important:
For best results, call LoginStore.shared.login only after your own user account login is successful. This ensures clarity and consistency in your login flow.
import AtomicXCore

func login() {
LoginStore.shared.login(sdkAppID: 1400000001, // Replace with your project's sdkAppID
userID: "test_001", // Replace with your project's userID
userSig: "xxxxxxxxxxx") { result in // Replace with your project's userSig
switch result {
case .success(let info):
debugPrint("login success")
case .failure(let error):
debugPrint("login failed code:\\(error.code), message:\\(error.message)")
}
}
}
Login API Parameter Description:
Parameter
Type
Description
sdkAppID
Int32
userID
String
Unique user identifier. Use only English letters, numbers, hyphens, and underscores. Avoid using simple IDs like 1 or 123 to prevent multi-device login conflicts.
userSig
String
Authentication ticket for Tencent Cloud.
For development: Use GenerateTestUserSig.genTestSig or the UserSig Assistant Tool for a temporary UserSig.
For production: Always generate UserSig server-side to prevent secret key leaks. See Calculating UserSig on the Server.
For more details, see How to Calculate and Use UserSig.

Build a Basic Multi-Party Room

Step 1: Host Creates and Joins a Room

Follow these steps to quickly set up a multi-party room.


Tip:
For reference, see the host room creation and join logic in the TUIRoomKit open source project, specifically RoomMainViewController.swift and RoomMainView.swift.

1. Create and Join Room

Implementation:
1.1 Configure Room Initialization Parameters: Initialize CreateRoomOptions to set the room name and password.
1.2 Set Room Permissions: Configure permissions for all members, such as muting everyone or disabling all cameras.
1.3 Create and Join Room: Call the createAndJoinRoom API from RoomStore to execute the operation.
Sample Code:
import UIKit
import AtomicXCore

// RoomMainViewController represents the main view controller of the room
class RoomMainViewController: UIViewController {
// Initialize the view controller and automatically create and join the room
public init(roomID: String, roomType: RoomType) {
super.init(nibName: nil, bundle: nil)
createAndJoinRoom(roomID: roomID, roomType: roomType)
}
required init?(coder: NSCoder) {
fatalError("init(coder:) has not been implemented")
}
// Call this method to create and join the room
private func createAndJoinRoom(roomID: String, roomType: RoomType) {
// 1. Configure room initialization parameters
// CreateRoomOptions defines the basic attributes and initial permission controls of the room
var options = CreateRoomOptions()
options.roomName = "My Discussion" // Set the room display name
options.password = "" // Set the room entry password (leave blank if not required)
// 2. Set room permissions: control all-member permissions at creation (typically for formal meetings)
options.isAllCameraDisabled = false // Enable/disable cameras for all members
options.isAllMessageDisabled = false // Enable/disable chat for all members
options.isAllMicrophoneDisabled = false // Enable/disable microphones for all members
options.isAllScreenShareDisabled = false // Enable/disable screen sharing for all members
// 3. Create and join room
// If the room does not exist, it will be created first, then joined automatically
RoomStore.shared.createAndJoinRoom(roomID: roomID, roomType: roomType, options: options) { [weak self] result in
guard let self = self else { return }
switch result {
case .success():
print("Room created and joined successfully")
case .failure(let error):
print("Failed to create and join room [Error code: \\(error.code)]: \\(error.message)")
}
}
}
}
createAndJoinRoom API Parameter Details
Parameter Name
Type
Required
Description
roomID
String
Yes
Unique room identifier (string).
Limit: 0-48 bytes.
Use only numbers, English letters (case-sensitive), underscores (_), and hyphens (-). Avoid spaces and Chinese characters.
roomType
RoomType
Yes
Room type:
standard: Standard room, all members can freely interact via audio/video.
webinar: Large seminar room, distinguishes between guest and audience roles; audience cannot go on stage by default.
options
CreateRoomOptions
Yes
Room creation configuration object.
For usage details, see CreateRoomOptions struct documentation.
completion
CompletionClosure
No
Completion callback. Returns the result of creating and joining the room. If creation fails, returns error code and message.
CreateRoomOptions Struct
Parameter Name
Type
Required
Description
roomName
String
No
Room name (optional, defaults to empty string).
Limit: 0-60 bytes.
Supports English, Chinese, numbers, special characters.
password
String
No
Room password. Empty string "" means no password.
Limit: 0-32 bytes.
Recommend using 4-8 digits for easy mobile input. If set, other users must enter the password to join. Avoid storing plaintext sensitive information.
isAllMicrophoneDisabled
Bool
No
Disable microphones for all members. When enabled, only host/admin can unmute; regular participants are muted by default.
true: Disabled.
false: Not disabled (default).
isAllCameraDisabled
Bool
No
Disable cameras for all members. When enabled, only host/admin can enable cameras; regular participants are disabled by default.
true: Disabled.
false: Not disabled (default).
isAllScreenShareDisabled
Bool
No
Disable screen sharing for all members. When enabled, only host/admin can share screen.
true: Disabled.
false: Not disabled (default).
isAllMessageDisabled
Bool
No
Disable chat messages for all members (mute). When enabled, regular participants cannot send text messages in the room.
true: Disabled.
false: Not disabled (default).

2. Enable Camera and Microphone

After entering the room, call the openLocalCamera and openLocalMicrophone APIs from the DeviceStore singleton to enable local devices.
import UIKit
import AtomicXCore

// RoomMainViewController represents the main view controller of the room
class RoomMainViewController: UIViewController {
private let roomID: String
public init(roomID: String) {
self.roomID = roomID
super.init(nibName: nil, bundle: nil)
openDevices()
}
required init?(coder: NSCoder) {
fatalError("init(coder:) has not been implemented")
}
// Enable devices
private func openDevices() {
// 1. Enable front camera
DeviceStore.shared.openLocalCamera(isFront: true, completion: nil)
// 2. Enable microphone
DeviceStore.shared.openLocalMicrophone(completion: nil)
}
}
openLocalCamera API Parameter Details
Parameter Name
Type
Required
Description
isFront
Bool
Yes
Enable the front camera.
true: Front camera .
false: Rear camera.
completion
CompletionClosure
No
Completion callback. Returns the result of enabling the camera. If enabling fails, returns error code and message.
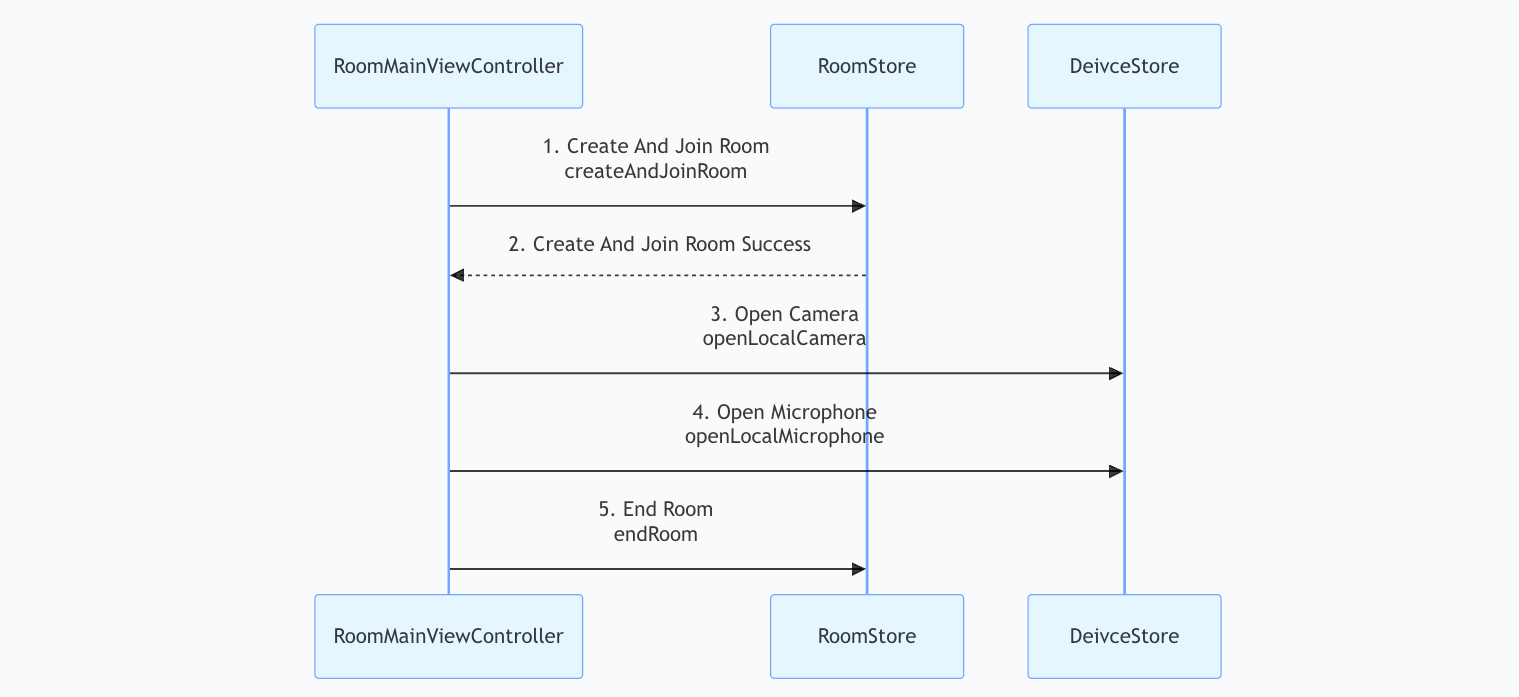
3. End a Room

To end a room, call the endRoom API from RoomStore. All participants will receive a room ended event.
import UIKit
import AtomicXCore

// RoomMainViewController represents the main view controller of the room
class RoomMainViewController: UIViewController {
private let roomID: String

public init(roomID: String) {
self.roomID = roomID
super.init(nibName: nil, bundle: nil)
endRoom()
}
required init?(coder: NSCoder) {
fatalError("init(coder:) has not been implemented")
}
// End the room
private func endRoom() {
// endRoom API permanently ends the current room.
// Note: Typically, only the host (owner) can perform this operation. After execution, all members are removed from the room and audio/video capture is forcibly stopped.
RoomStore.shared.endRoom { [weak self] result in
guard let self = self else { return }
switch result {
case .success():
print("Room ended successfully")
case .failure(let error):
print("Failed to end room [Error code: \\(error.code)]: \\(error.message)")
}
}
}
}

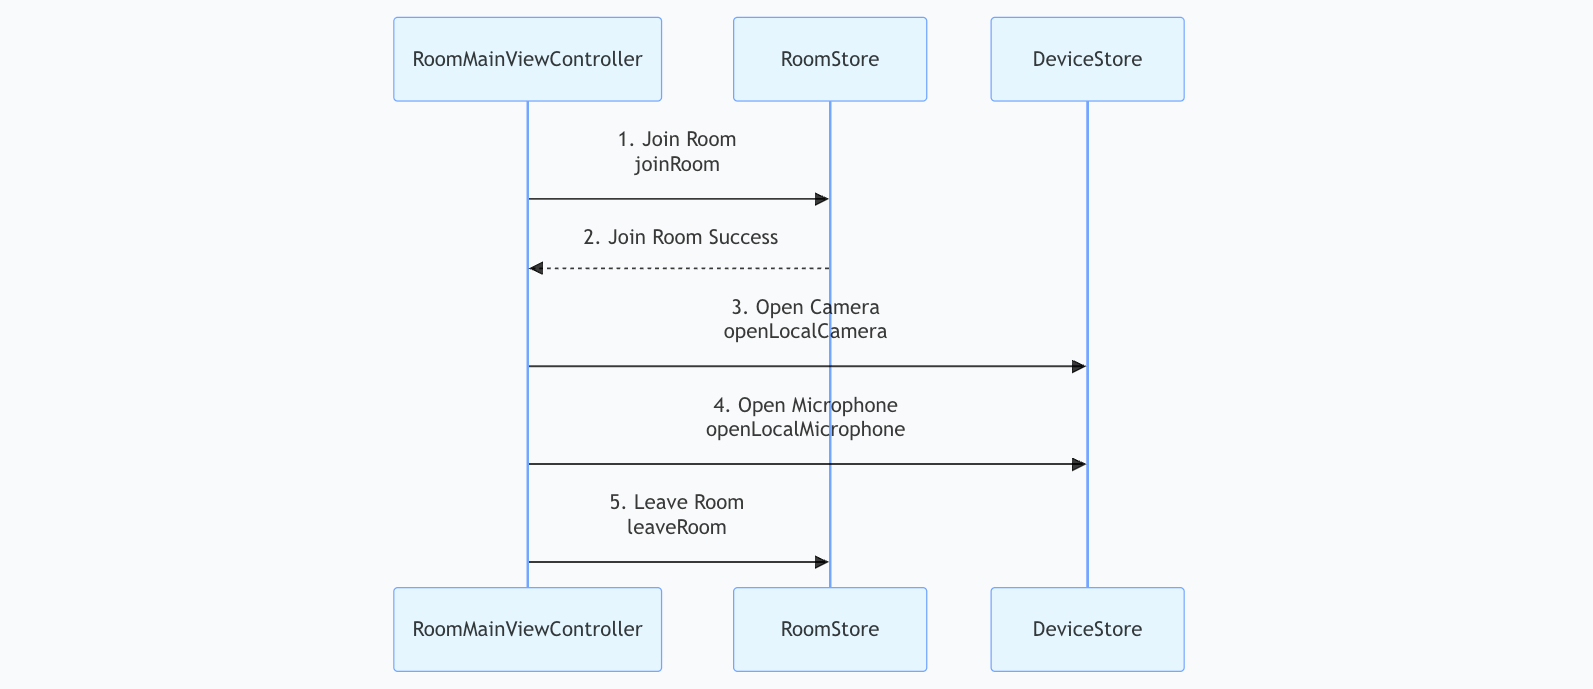
Step 2: Participant Joins a Room

Participants can join a room in just a few steps to interact with others in real-time audio/video.


1. Join a Room

To join a room, call the joinRoom API from RoomStore. Other participants will receive a participant joined event notification.
import UIKit
import AtomicXCore

// RoomMainViewController represents the main view controller of the room
class RoomMainViewController: UIViewController {
public init(roomID: String, roomType: RoomType) {
super.init(nibName: nil, bundle: nil)
joinRoom(roomID: roomID, roomType: roomType)
}
required init?(coder: NSCoder) {
fatalError("init(coder:) has not been implemented")
}
// Join an existing room
private func joinRoom(roomID: String, roomType: RoomType) {
// 1. Prepare join parameters
// joinRoom is used for joining a known and ongoing room
let targetRoomID = roomID // Target room ID
let roomPassword = "" // Room password, pass empty string or nil if not set
// 2. Call RoomStore joinRoom API
// This operation verifies if the room exists, if the user is banned, and if the password is correct
RoomStore.shared.joinRoom(roomID: targetRoomID, roomType: roomType, password: roomPassword) { [weak self] result in
guard let self = self else { return }
switch result {
case .success():
print("Joined room successfully")
case .failure(let error):
print("Failed to join room [Error code: \\(error.code)]: \\(error.message)")
}
}
}
}
joinRoom API Parameter Details
Parameter Name
Type
Required
Description
roomID
String
Yes
Unique room identifier (string).
Limit: 0-48 bytes.
Use only numbers, English letters (case-sensitive), underscores (_), and hyphens (-). Avoid spaces and Chinese characters.
roomType
RoomType
Yes
Room type:
standard: Standard room, all members can freely interact via audio/video.
webinar: Large seminar room, distinguishes between guest and audience roles; audience cannot go on stage by default.
password
String
Yes
Room password. Empty string "" means no password.
Limit: 0-32 bytes.
Recommend using 4-8 digits for easy mobile input. If set, other users must enter the password to join. Avoid storing plaintext sensitive information.
completion
CompletionClosure
No
Completion callback. Returns the result of joining the room. If joining fails, returns error code and message.

2. Enable Camera and Microphone

For code samples, see Enable Camera and Microphone.

3. Leave a Room

To leave a room, call the leaveRoom API from RoomStore. Other participants will receive a participant left event notification.
import UIKit
import AtomicXCore

// RoomMainViewController represents the main view controller of the room
class RoomMainViewController: UIViewController {
private let roomID: String
public init(roomID: String) {
self.roomID = roomID
super.init(nibName: nil, bundle: nil)
leaveRoom()
}
required init?(coder: NSCoder) {
fatalError("init(coder:) has not been implemented")
}
// Leave the current room
private func leaveRoom() {
// 1. Business logic
// leaveRoom API is used for regular members or host to leave the room.
// Unlike endRoom, when the host calls leaveRoom, only they leave; the room remains.
// 2. Call RoomStore leaveRoom API
// This operation stops audio/video streaming and notifies the server to remove the current user from the room
RoomStore.shared.leaveRoom { [weak self] result in
guard let self = self else { return }
switch result {
case .success():
print("Left room successfully")
case .failure(let error):
print("Failed to leave room [Error code: \\(error.code)]: \\(error.message)")
}
}
}
}

Step 3: Bind Video View

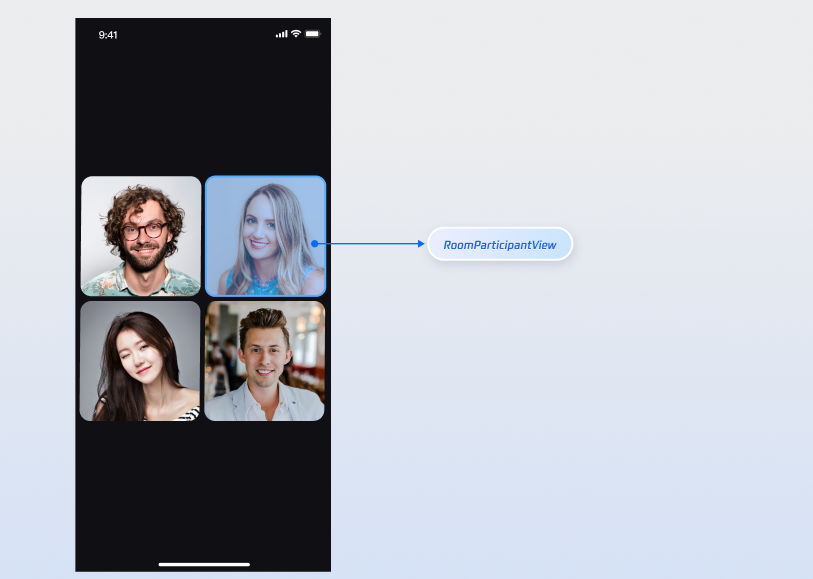
The RoomParticipantView component in AtomicXCore SDK provides a complete solution for video rendering. It supports real-time display of both local camera feeds and remote participant streams, and is easy to integrate.


Tip:
RoomParticipantView is the core view component for rendering participant video streams in the room. For more flexible video layout options, see TUIRoomKit open source project, specifically RoomView.swift.

Implementation:

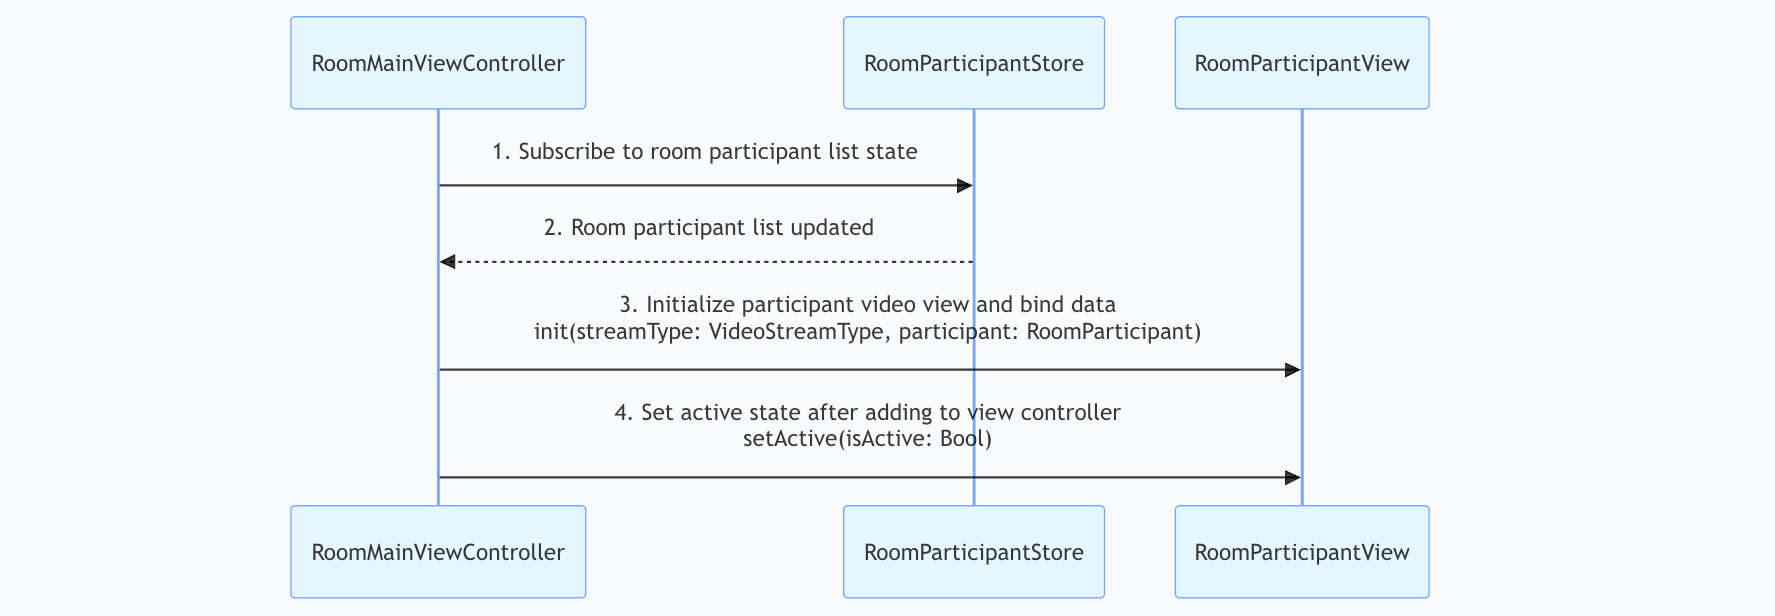
1. Subscribe to Data Layer: Listen to RoomParticipantStore.state.participantList for participant state changes.
2. Automatic State Sync: When the participant list updates, the system automatically syncs the participantList state.
3. Initialize View: Create RoomParticipantView instances based on participant data and bind video rendering logic.
4. Integrate UI: Complete view hierarchy integration, layout configuration, and activate rendering.

Sample Code:

import UIKit
import Combine
import AtomicXCore

// RoomMainViewController represents the main view controller of the room
class RoomMainViewController: UIViewController {
private var participantStore: RoomParticipantStore
private var cancellableSet = Set<AnyCancellable>()
private var views = [RoomParticipantView]()
init(roomID: String) {
// RoomParticipantStore is bound to the room and must be created via RoomParticipantStore.create(roomID: String) factory method for a specific room
participantStore = RoomParticipantStore.create(roomID: roomID)
super.init(nibName: nil, bundle: nil)
// 1. Subscribe to Data Layer
subscribeParticipantState()
participantStore.getParticipantList(cursor: "", completion: nil)
}
required init?(coder: NSCoder) { fatalError() }
private func subscribeParticipantState() {
participantStore.state.subscribe(StatePublisherSelector(keyPath: \\.participantList))
.receive(on: DispatchQueue.main)
.sink { [weak self] participantList in
guard let self = self else { return }
// 2. Automatic State Sync
updateParticipantView(participantList)
}
.store(in: &cancellableSet)
}
private func updateParticipantView(_ list: [RoomParticipant]) {
views.forEach { view in
view.setActive(isActive: false)
view.removeFromSuperview()
}
views = Array(list.prefix(9)).enumerated().map { index, participant in
// 3. Initialize View
let participantView = RoomParticipantView(streamType: .camera, participant: participant)
participantView.frame = CGRect(x: CGFloat(index % 3) * 125 + 10, y: CGFloat(index / 3) * 165 + 100, width: 120, height: 160)
// 4. Integrate UI
view.addSubview(participantView)
participantView.setActive(isActive: true)
return participantView
}
}
}
RoomParticipantView Constructor Parameter Details:
Parameter Name
Type
Required
Description
streamType
VideoStreamType
Yes
Type of video stream to render.
camera: Camera stream.
screen: Screen sharing stream.
participant
RoomParticipant
Yes
Real-time participant object in the room, including identity, business state, and audio/video device permissions.
For usage details, see RoomParticipant struct documentation.

RoomParticipant Struct Parameter Details:

Parameter Name
Type
Required
Description
userID
String
Yes
Unique identifier for the user.
userName
String
No
User nickname.
avatarURL
String
No
URL address of the user's avatar.
nameCard
String
No
User's name card or remark in the room.
Limit: 0-32 bytes.
Supports English, Chinese, numbers, special characters.
role
ParticipantRole
No
Participant role in the room.
owner: Host.
admin: Admin.
generalUser: Regular user (default).
roomStatus
RoomParticipantStatus
No
Participant status in the room.
scheduled: Scheduled (default).
inCalling: Calling.
callTimeout: Call timeout.
callRejected: Call rejected.
inRoom: In the room.
microphoneStatus
DeviceStatus
No
Microphone device status.
off: Off (default).
on: On.
cameraStatus
DeviceStatus
No
Camera device status.
off: Off (default).
on: On.
screenShareStatus
DeviceStatus
No
Screen sharing status.
off: Off (default).
on: On.
isMessageDisabled
Bool
No
Whether the participant is muted. If true, cannot send chat messages.
true: Disabled.
false: Not disabled (default).
metaData
[String: String]
No
Business custom extension data, synchronized with participant state.
Limit: 0-60 bytes. Supports only JSON string.

Step 4: Listen to Room Events

After entering the room, subscribe to passive room events by accessing RoomStore's roomEventPublisher for RoomEvent.
import UIKit
import Combine
import AtomicXCore

// RoomMainViewController represents the main view controller of the room
class RoomMainViewController: UIViewController {
private let roomID: String
// Stores Combine subscriptions to prevent listener invalidation due to object destruction
private var cancellableSet = Set<AnyCancellable>()
public init(roomID: String) {
self.roomID = roomID
super.init(nibName: nil, bundle: nil)
// Start event listening during initialization
subscribeRoomEvents()
}
required init?(coder: NSCoder) {
fatalError("init(coder:) has not been implemented")
}
// Subscribe to passive room events
private func subscribeRoomEvents() {
// 1. Access RoomStore's roomEventPublisher
// This Publisher pushes events throughout the room lifecycle, such as calling, dissolution, scheduled reminders, etc.
RoomStore.shared.roomEventPublisher
.receive(on: RunLoop.main) // Ensure UI logic is handled on the main thread
.sink { [weak self] event in
guard let self = self else { return }
// 2. Execute business logic based on event type
switch event {
case .onRoomEnded(let roomInfo):
print("The current room has ended")
// ... Handle other RoomEvent events ...
default: break
}
}
.store(in: &cancellableSet) // 3. Store subscription relationship
}
}

Demo Effect

After completing the above setup, you will have a multi-party video rendering room without UI interaction.
Demo Effect


Enhance Multi-Party Room Features

To support additional requirements, AtomicXCore SDK provides the following features to enrich conference room scenarios.
Multi-Party Room Feature
Feature Introduction
Implementation Guide
Update Room Information
The host can update parts of the room information, such as room name and password.
In-Meeting Calling
The host or admin can call users who have not entered the room to join.
Room Scheduling
Rooms can be scheduled in advance, supporting start time, end time, and adding participants.
Member Management
The host can manage other participants in the room, such as setting admins, removing participants, and controlling individual participant audio/video status.

API Documentation

Store/Component
Feature Description
API Documentation
RoomStore
Complete room lifecycle management: create and join / join / leave / end room / update and get room info / schedule room / call external members / listen to passive room events (such as room dissolution, room info update, etc.).
RoomParticipantStore
Participant management within the room: set admin / transfer host / get participant list / remove from room / participant device control (invite to enable camera, microphone, etc.) / request to enable device (e.g., request to enable camera, microphone, etc.).
RoomParticipantView
Single participant video display view: bind and update participant info / update video stream type / set active state, etc.

FAQs

RoomParticipantView is bound to another participant's info and the correct video stream type, but the video is still not visible?

Check setActive: Make sure the current RoomParticipantView is visible on screen and that RoomParticipantView's setActive: true is called correctly.
Check RoomParticipant: Confirm that the cameraStatus of the RoomParticipant set in RoomParticipantView is on.
Check Network: Verify that the device's network connection is normal.

Rsync fails to copy third-party library resources due to insufficient permissions

For example, when integrating the SnapKit framework with Xcode, you may encounter the following build error:
rsync(xxxx):1:1: SnapKit.framework/SnapKit_Privacy.bundle/: mkpathat: Operation not permitted

Cause

Xcode's user script sandbox mechanism restricts the rsync script's write permissions to the SnapKit.framework resource files during the build process, causing the SnapKit_Privacy.bundle in the framework to fail to copy.

Solution Steps

1. After disabling user script sandboxing, open your Xcode project, go to Build Settings, search for User Script Sandboxing (or ENABLE_USER_SCRIPT_SANDBOXING), and change its value from YES to NO.
2. Clean and rebuild the project by selecting Product → Clean Build Folder to clear the project cache, then recompile and run.

Contact Us

If you have any questions or suggestions during integration or usage, please contact info_rtc@tencent.com to submit feedback.

도움말 및 지원

문제 해결에 도움이 되었나요?

피드백