Host Live Streaming (React Native)
Download
フォーカスモード
フォントサイズ
This guide helps you quickly integrate the host start streaming page and enable host live streaming features. With this integration, hosts can access camera preview, beauty filters, audio effects, camera switching, audience guest connections, co-hosting, live room info display, audience list, gift animations, and live comments.
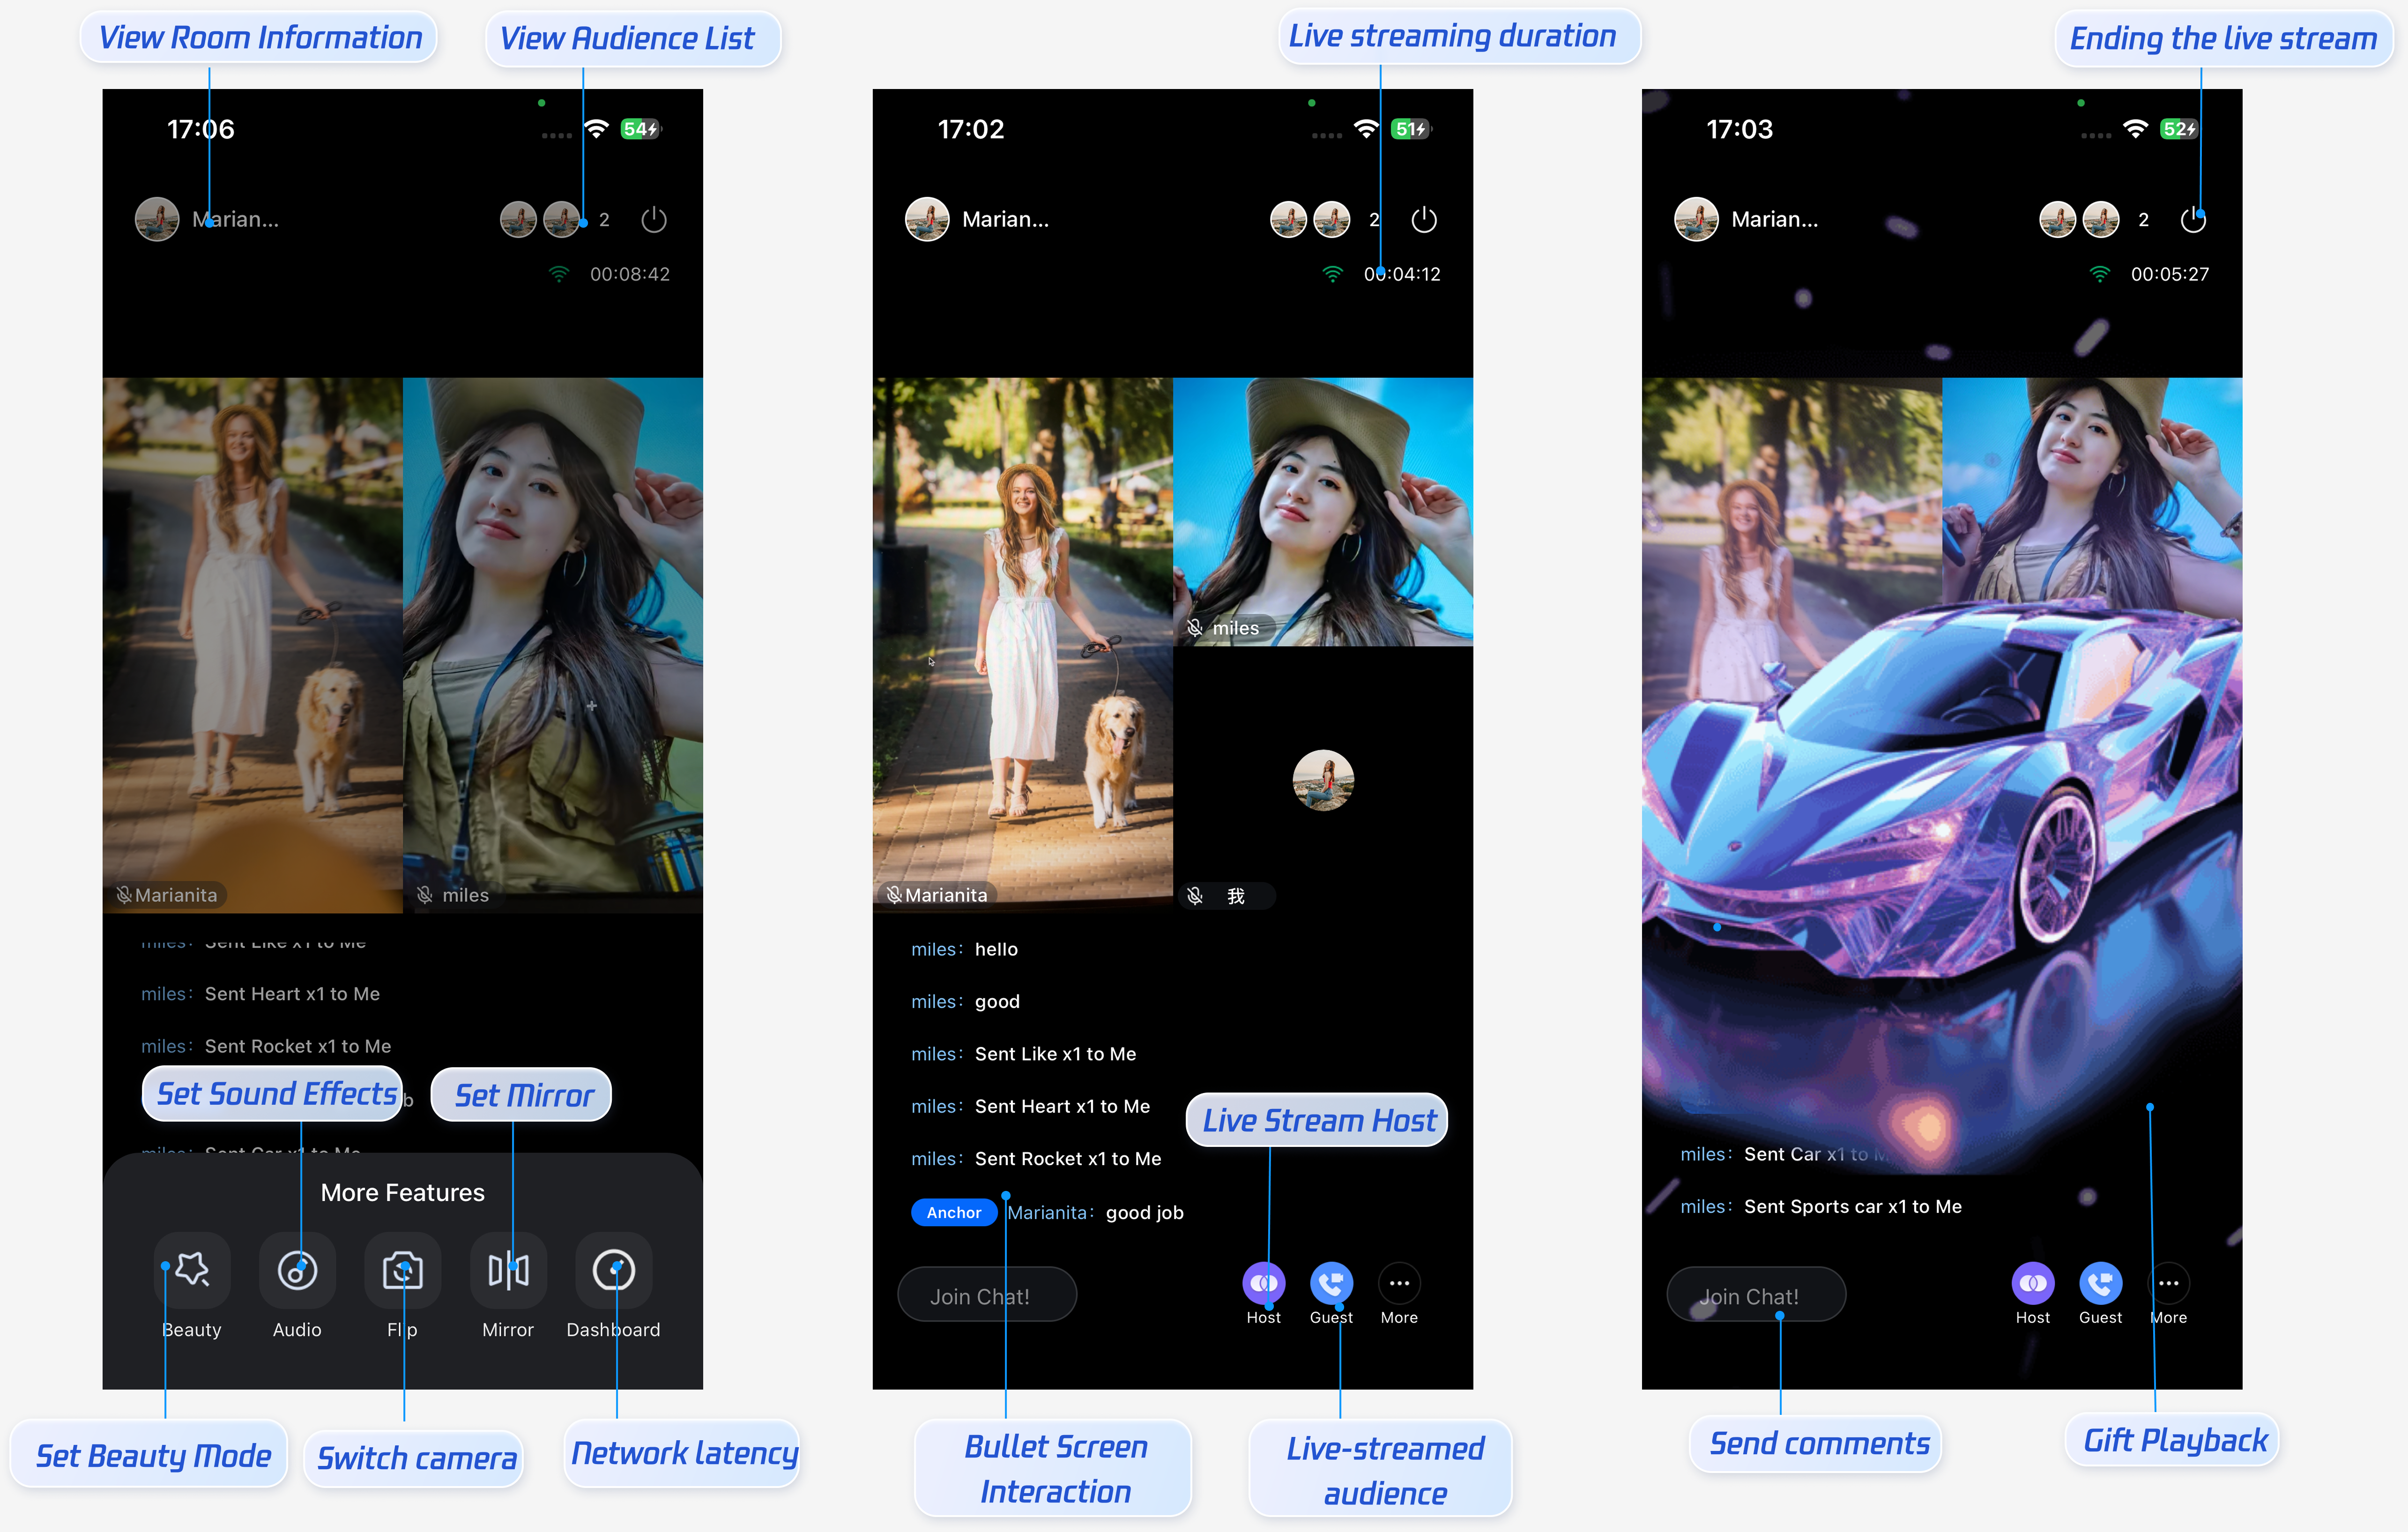
Feature Preview
The host start streaming page includes built-in behaviors and default styles. If these defaults don’t fully meet your requirements, you can customize the UI to fit your needs. The diagram below highlights the main features available on the host start streaming page.
Quick Integration
Step 1: Activate the Service
Refer to the Activate the Service document to enable the trial version or activate the Pro Edition package.
Step 2: Integrate the Code
Ensure your project includes
react-native-safe-area-context. If not, install it with:yarn add react-native-safe-area-context
Step 3: Add the Host Page
The
react-native-tuikit-live package provides a complete UI and business logic for host-side live streaming. To integrate the host page:1. Set up the entry point in your app to launch the
AnchorPage component.2. Implement navigation logic for switching between pages.
Here is a simple navigation example.
AnchorPage component will automatically create a live streaming room, you only need to input the following callback parameters:onBack: Triggered when returning to the previous page.onEndLive: Triggered when the live stream ends.Note: This example demonstrates simple page switching using
useState. For production apps, it is recommended to use navigation libraries like React Navigation for page management. To understand how to integrate navigation libraries, refer to React Navigation official documentation./**Simple navigation example - use useState to manage page transitions*/import React, { useState } from 'react';import { AnchorPage } from 'react-native-tuikit-live';import { View, Button, StyleSheet } from 'react-native';import { SafeAreaProvider } from 'react-native-safe-area-context';type PageType = 'home' | 'anchor' | 'liveEnd';function MyApp() {const [currentPage, setCurrentPage] = useState<PageType>('home');const [endedLiveID, setEndedLiveID] = useState<string>('');// start live streamingconst handleStartLive = () => {setCurrentPage('anchor');};// Return from anchor pageconst handleBackFromAnchor = () => {setCurrentPage('home');};// live streaming endconst handleEndLive = (liveID?: string) => {setEndedLiveID(liveID || '');setCurrentPage('liveEnd');};return (<SafeAreaProvider>{currentPage === 'home' && (<View style={styles.container}><Button title="Start live streaming" onPress={handleStartLive} /></View>)}{currentPage === 'anchor' && (<AnchorPageonBack={handleBackFromAnchor}onEndLive={handleEndLive}/>)}{currentPage === 'liveEnd' && (<View style={styles.container}><Button title="Back to homepage" onPress={() => setCurrentPage('home')} /></View>)}</SafeAreaProvider>);}const styles = StyleSheet.create({container: {flex: 1,justifyContent: 'center',alignItems: 'center',},});export default MyApp;
After integration, invoke code to pull up the AnchorPage.
Customize UI Layout
TUILiveKit allows you to customize both the start streaming and live streaming pages to fit your business requirements.
Customize Icons
All icons used by TUILiveKit are located in the
tuikit-atomic-x/src/static/images directory. The table below lists some examples. You can replace these icons as needed.Icon Path | Description |
/static/images/link-host.png | “Co-host” icon in the bottom action bar |
/static/images/link-guest.png | “Guest” icon in the bottom action bar |
/static/images/live-more.png | “More” icon in the bottom action bar |
/static/images/live-end.png | “End Live” icon in the top action bar |
After updating icons, rebuild and run your app to apply the changes.
Customize Texts
TUILiveKit manages all UI text in a centralized file. To change any text, simply edit the relevant json files in the
tuikit-atomic-x/src/locales/ directory.
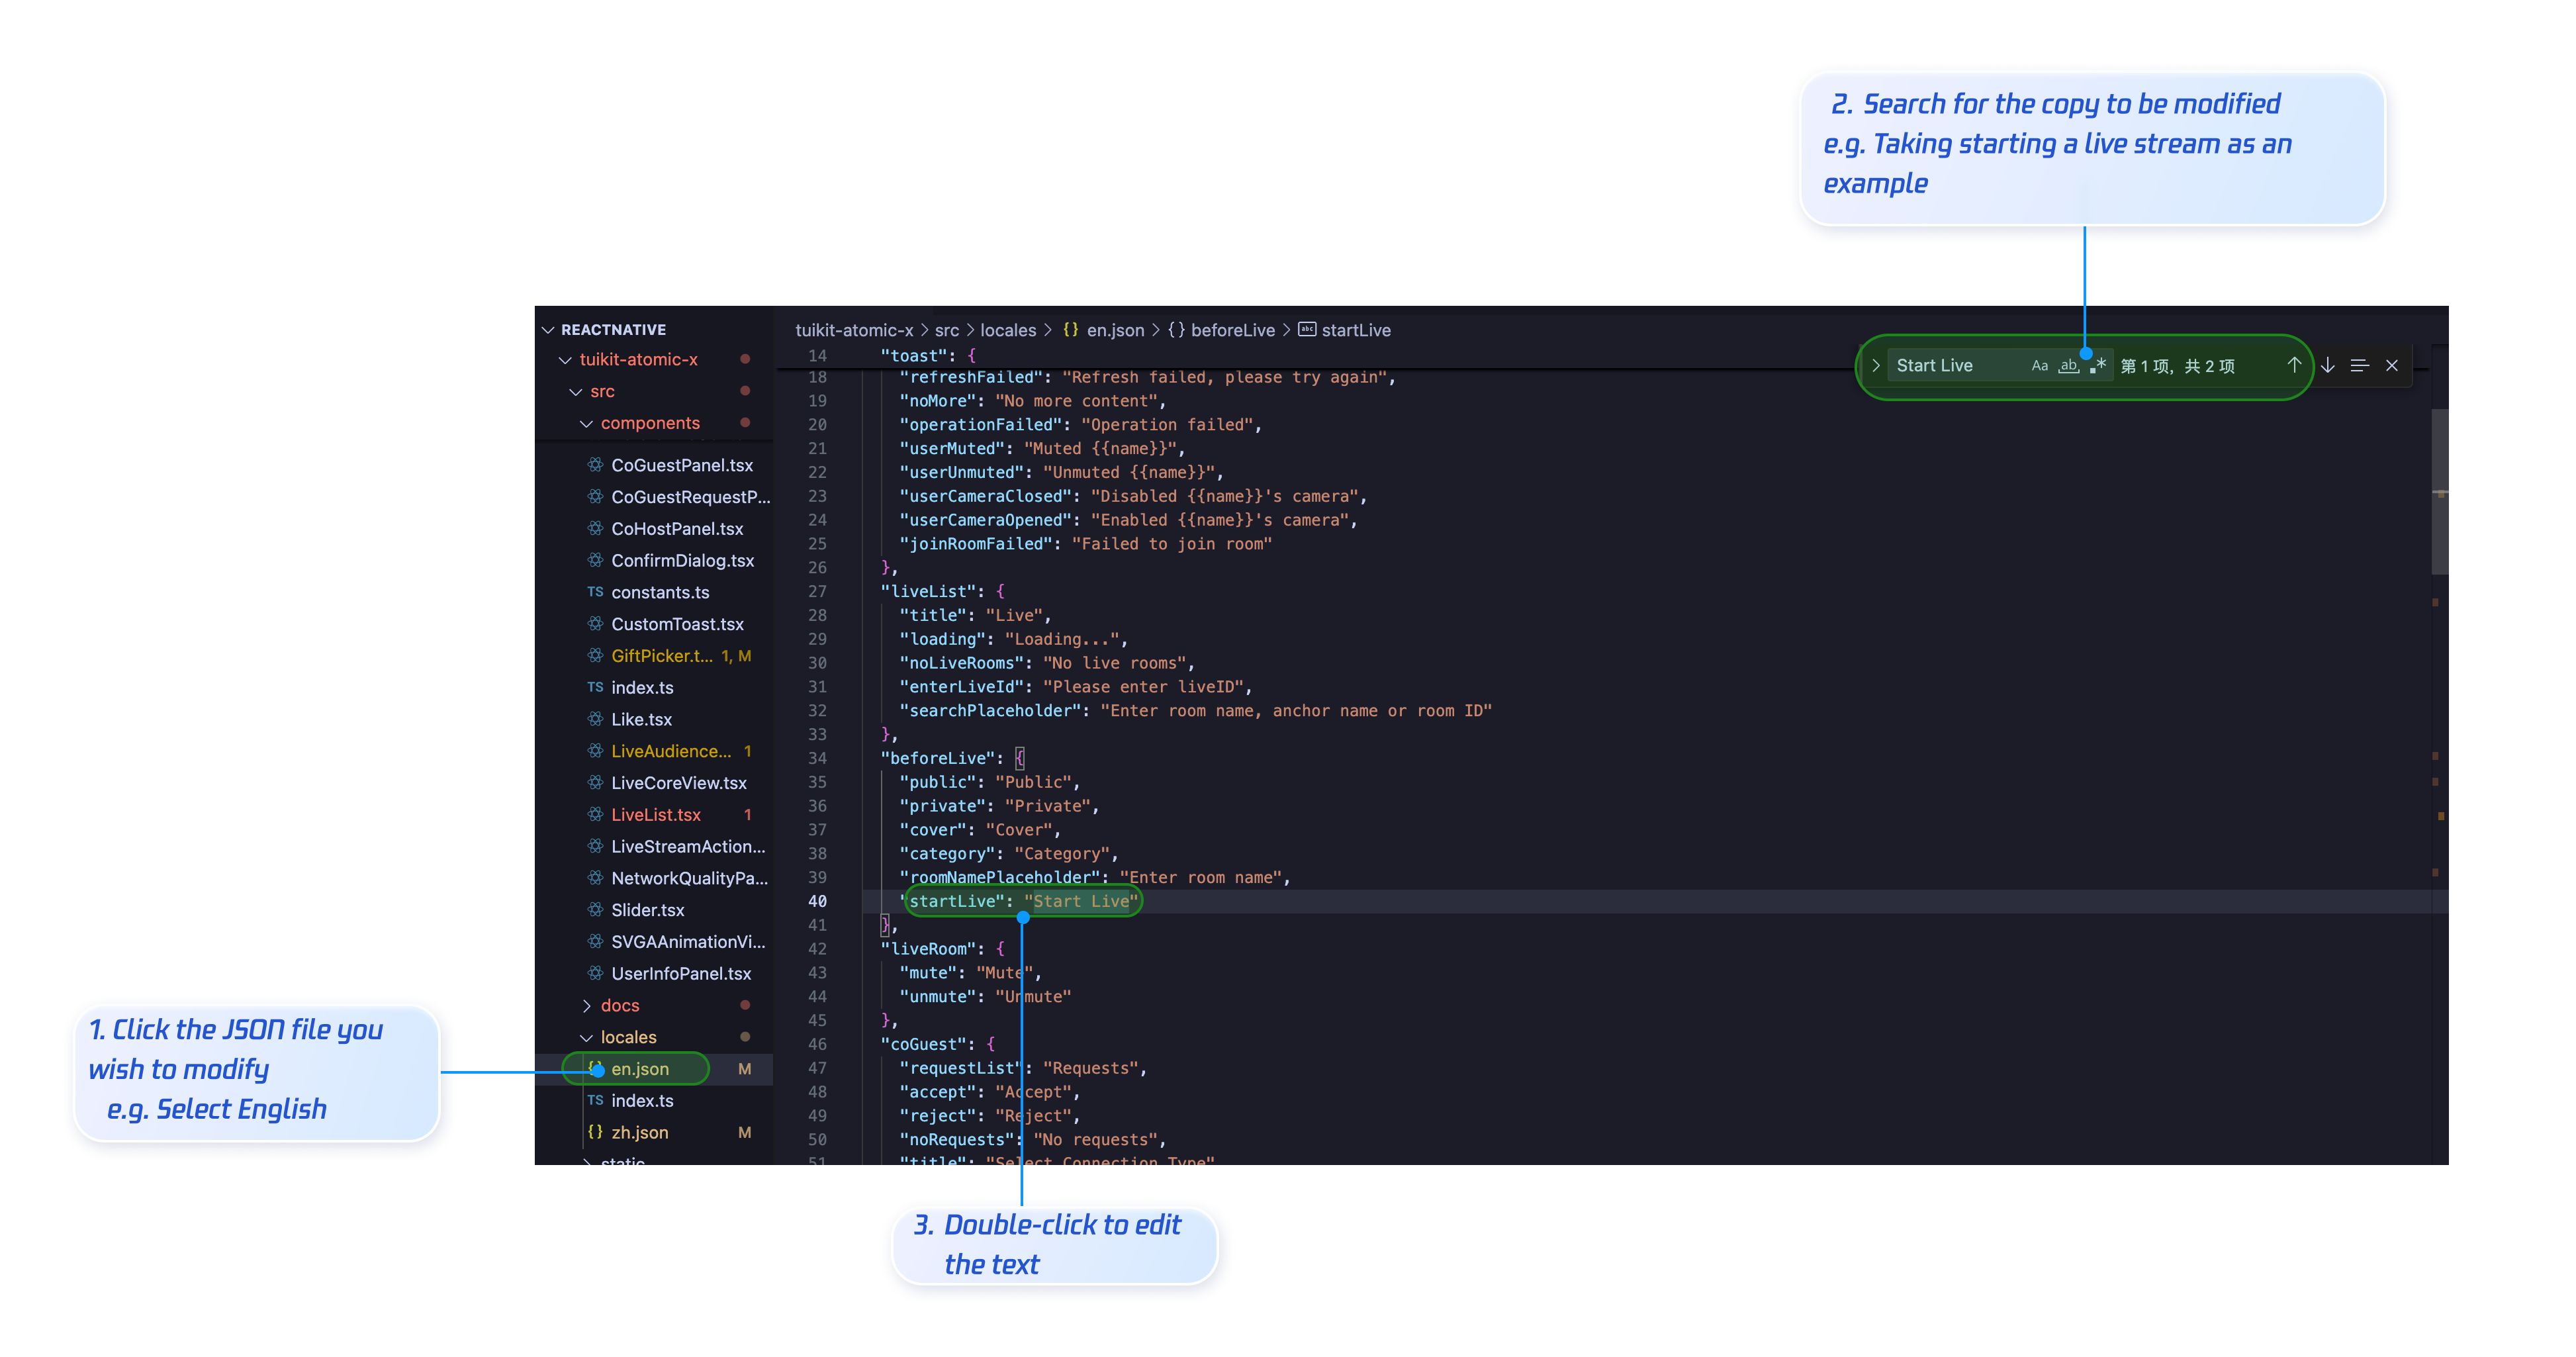
zh.json: Chinese text
en.json: English text
After editing, rebuild and run your app to see the updated UI text.
Add a Button
To add a “Product” button to the bottom action bar, edit
live/src/pages/Anchor/index.tsx directly.// Other code<View>.......{/* Bottom operation bar */}<TouchableOpacitystyle={styles.actionButtonItem}onPress={() => showCoGuestPanel('requests')}activeOpacity={0.7}>{/* Replace the image address with your resources */}<Imagesource={require('/static/images/link-guest.png')}style={styles.actionButtonIcon}resizeMode="contain"/><Text style={styles.actionButtonText}>{product}</Text></TouchableOpacity></View>
Resulting UI:

Hide a Button
To hide a button, comment out or remove the relevant code in the source file. For example, to hide the “Co-host” button in the bottom action bar:
{/* <TouchableOpacitystyle={styles.actionButtonItem}onPress={showCoHostPanel}activeOpacity={0.7}><Imagesource={require('react-native-tuikit-atomic-x/src/static/images/link-host.png')}style={styles.actionButtonIcon}resizeMode="contain"/><Text style={styles.actionButtonText}>{t('anchor.linkHost')}</Text></TouchableOpacity> */}
Next Steps
You’ve now integrated the host start streaming feature. Next, you can add audience viewing, Live Stream List, and other capabilities. See the table below for details:
Feature | Description | Integration Guide |
Audience Viewing | Lets audience join the host’s live room and watch the stream, including guest connections, live room info, online audience, and live comments display | |
Live Stream List | Shows the Live Stream List interface and features, including live stream list and room info display |
FAQs
Why does the video screen suddenly go black after the host has been live for a while?
Check if the same userID is logged in on another device. Make sure the account used for both the audience and host is not being used elsewhere. If the account is logged in on another device, it may cause the live stream or viewing screen to go black.
フィードバック