- 动态与公告
- 产品简介
- 购买指南
- 快速入门
- EMR on CVM 操作指南
- EMR 容器版
- EMR 开发指南
- Hadoop开发指南
- Spark 开发指南
- HBASE开发指南
- Phoenix on Hbase 开发指南
- Hive 开发指南
- Presto开发指南
- Sqoop 开发指南
- Hue 开发指南
- Oozie 开发指南
- Flume 开发指南
- Kerberos 开发指南
- Knox 开发指南
- Alluxio 开发指南
- Kylin 开发指南
- Livy 开发指南
- Kyuubi 开发指南
- Zeppelin 开发指南
- Hudi 开发指南
- Superset 开发指南
- Impala 开发指南
- ClickHouse 开发指南
- Druid 开发指南
- Tensorflow 开发指南
- Jupyter 开发指南
- Kudu 开发指南
- Ranger 开发指南
- Doris 开发指南
- Kafka 开发指南
- Iceberg 开发指南
- StarRocks 开发指南
- Flink 开发指南
- RSS 开发指南
- 最佳实践
- API 文档
- 常见问题
- Service Level Agreement
- 联系我们
早期 EMR 产品版本未提供 Tez-UI 集成必要的 Timelineserver 软件包和 Tomcat 软件包,需要根据本文进行操作。
注意:由于 Tez 的 UI 启用需要运行 Timelineserver,Timelineserver 运行时有较高资源占用,需要评估对业务的影响,谨慎启用。
本文主要介绍 Knox 集成 tez 的具体操作步骤,主要有安装 tomcat 和 tez-ui、新建 role、配置 timelineserver、配置 tez和启动服务。其中,172.**.**.9 为主节点内网 IP,159.**.**.70 为主节点外网 IP,tez 版本为0.9.2版本。
安装 Tomcat 和 tez-ui
cd  /usr/local/service
wget https://jaydihu-package-1258469122.cos.ap-guangzhou.myqcloud.com/apache-tomcat-9.0.46.tar.gz
tar -zxvf apache-tomcat-9.0.46.tar.gz
mv /usr/local/service/apache-tomcat-9.0.46 /usr/local/service/tomcat
修改 tomcat 端口号:
vim /usr/local/service/tomcat/conf/server.xml
第一处:由8005修改为2020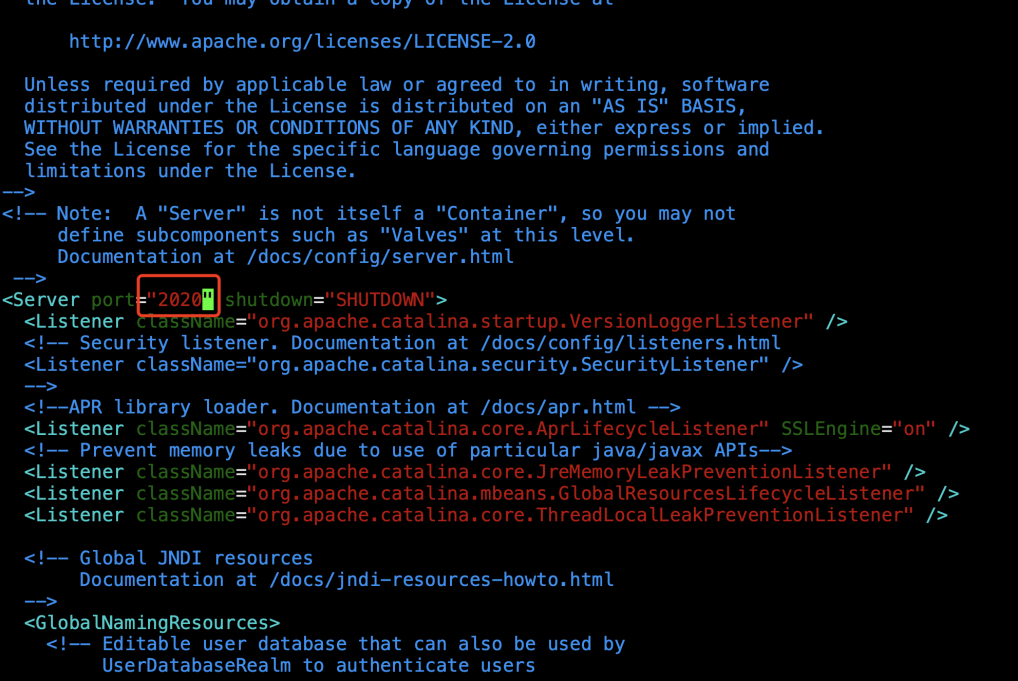
第二处:端口由8080改为2000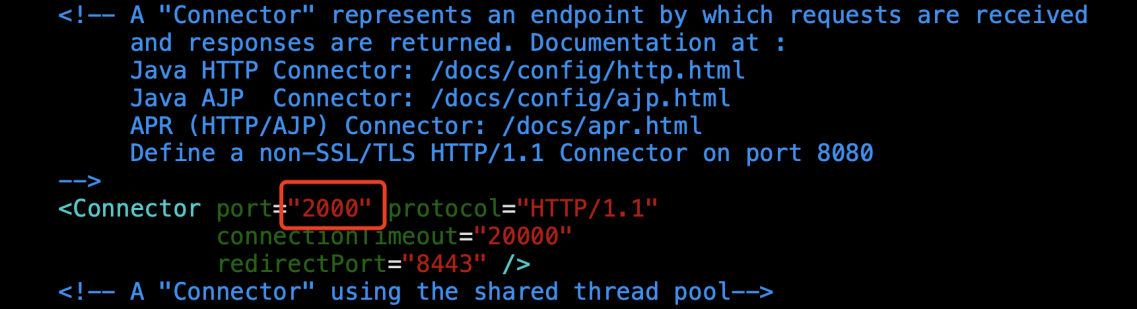
mkdir -p /usr/local/service/tomcat/webapps/tez-ui
cp /usr/local/service/tez/tez-ui-0.9.2.war /usr/local/service/tomcat/webapps/tez-ui/
cd /usr/local/service/tomcat/webapps/tez-ui
unzip tez-ui-0.9.2.war
vim ./config/configs.env
将 localhost 修改为当前服务器的内网 IP。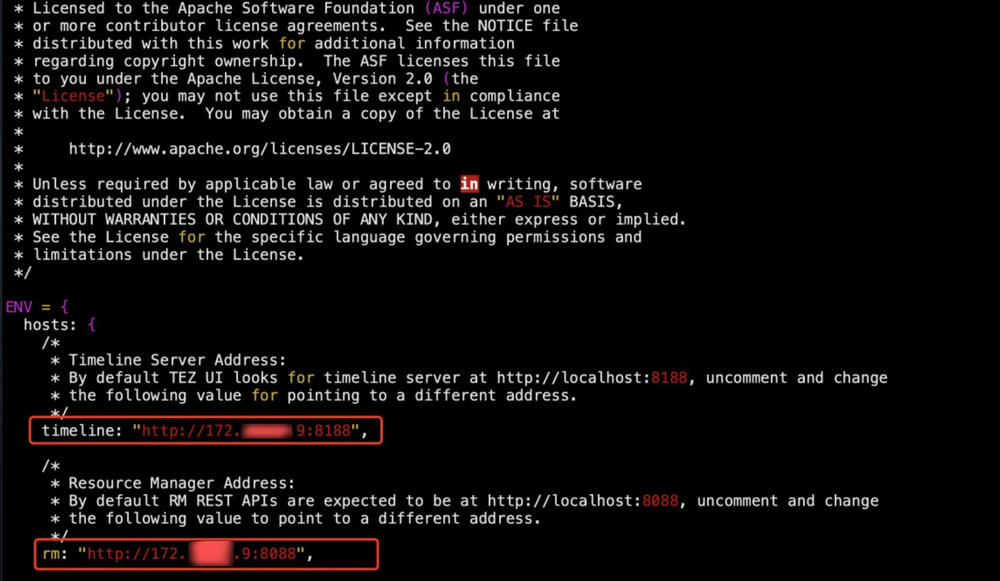
新建 role
vim /usr/local/service/knox/conf/topologies/emr.xml
修改 emr.xml 配置文件
第一处:添加内容如下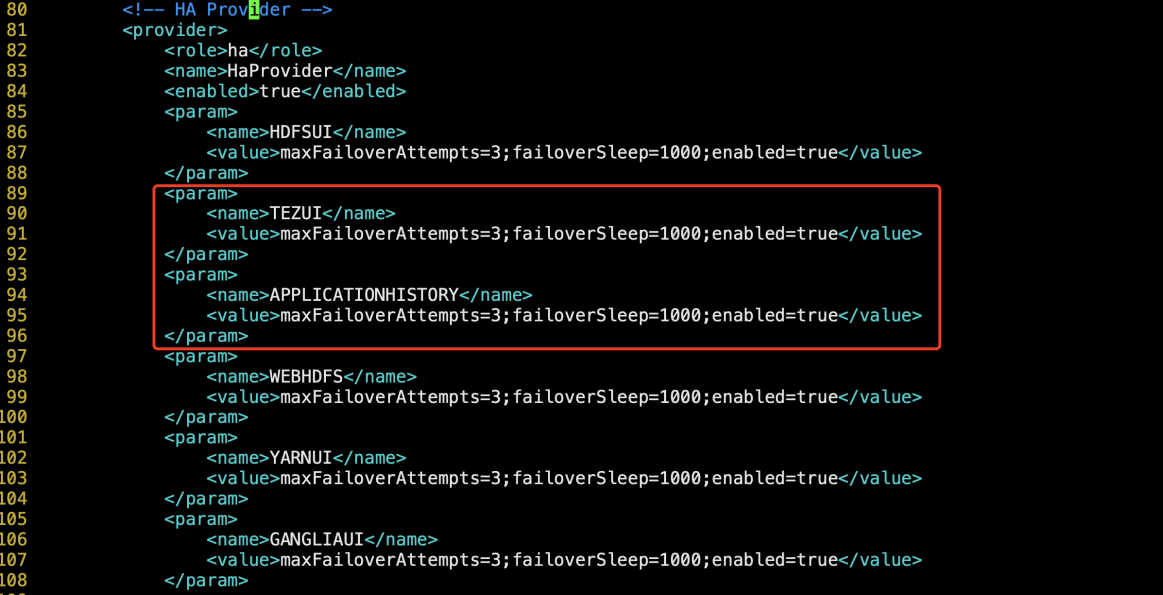
<param>
   <name>TEZUI</name>
<value>maxFailoverAttempts=3;failoverSleep=1000;enabled=true</value>
</param>
<param>
    <name>APPLICATIONHISTORY</name>
<value>maxFailoverAttempts=3;failoverSleep=1000;enabled=true</value>
</param>
第二处:修改内容如下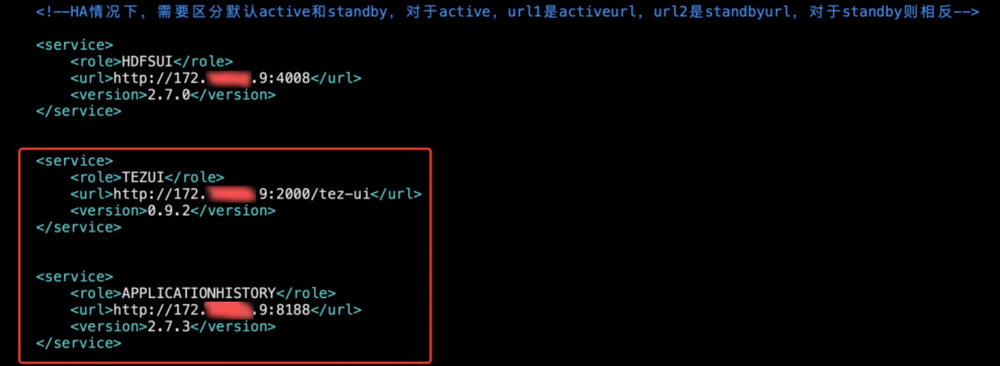
<service>
    <role>TEZUI</role>
    <url>http://172.**.**.9:2000/tez-ui</url>
    <version>0.9.2</version>
</service>
<service>
    <role>APPLICATIONHISTORY</role>
    <url>http://172.**.**.9:8188</url>
    <version>2.7.3</version>
</service>
yarn 的 timelineserver 配置
在配置管理中修改 yarn-site.xml 配置文件,保存配置修改,重启配置发生变化组件。
| 参数 | 值 |
|---|---|
| yarn.timeline-service.enabled | true |
| yarn.timeline-service.hostname | 172.**.**.9(需替换为自己的 IP) |
| yarn.timeline-service.http-cross-origin.enabled | true |
| yarn.resourcemanager.system-metrics-publisher.enabled | true |
| yarn.timeline-service.address | 172.**.**.9:10201(需替换为自己的 IP) |
| yarn.timeline-service.webapp.address | 172.**.**.9:8188 (需替换为自己的 IP) |
| yarn.timeline-service.webapp.https.address | 172.**.**.9:2191 (需替换为自己的 IP) |
| yarn.timeline-service.generic-application-history.enabled | true |
| yarn.timeline-service.handler-thread-count | 24 |
tez 配置修改
在配置管理中的 tez-site.xml 配置文件中新增配置项,保存配置修改,重启配置发生变化组件。
| 参数 | 值 |
|---|---|
| tez.tez-ui.history-url.base | http://172.**.**.9:2000/tez-ui/(需替换为自己的 IP) |
| tez.history.logging.service.class | org.apache.tez.dag.history.logging.ats.ATSHistoryLoggingService |
服务启动
启动 timelineserver。
/usr/local/service/hadoop/sbin/yarn-daemon.sh start timelineserver启动 tomcat。
/usr/local/service/tomcat/bin/startup.sh重启 tez 服务。
su hadoop
rm -rf  /usr/local/service/knox/data/deployments/*
/usr/local/service/knox/bin/ldap.sh stop
/usr/local/service/knox/bin/ldap.sh start
/usr/local/service/knox/bin/gateway.sh stop
/usr/local/service/knox/bin/gateway.sh start
tezui 访问地址。
说明:账号密码与服务器登录账号密码相同。
https://{集群公网ip}:30002/gateway/emr/tez/
服务停止
如果运行一段时间后,发现 timelineserver 对业务影响较大,可参照如下操作停止相关服务。
- 停止 tomcat。
/usr/local/service/tomcat/bin/shutdown.sh
- 停止 timelineserver。
/usr/local/service/hadoop/sbin/yarn-daemon.sh stop timelineserver

 是
是
 否
否
本页内容是否解决了您的问题?