For files already in a bucket, you can create a job for media processing. Currently, the following jobs are supported: audio/video transcoding, top speed codec transcoding, broadcast media format transcoding, video montage, voice/sound separation, text to speech, audio/video splicing, video frame capturing, video to animated image conversion, intelligent thumbnail, video enhancement, super resolution, audio/video segmentation, SDR to HDR, image processing, digital watermark extraction, which can be created by template. You can use the preset templates provided by CI or customize templates. For more information, see Template.
Note:
Currently, jobs can process 3GP, ASF, AVI, DV, FLV, F4V, M3U8, M4V, MKV, MOV, MP4, MPG, MPEG, MTS, OGG, RM, RMVB, SWF, VOB, WMV, WEBM, MP3, AAC, FLAC, AMR, AWB, M4A, WMA, and WAV files. When initiating a media processing request, you must enter the complete file name and extension; otherwise, the format cannot be recognized and processed.
Currently, the job feature can only manipulate existing files. To manipulate files during upload, use the workflow feature.
After a job is created, feature fees will be charged. For billing details, see Media Processing Fees.
To use the media processing service, make sure that resources are available. Do not enable input image protection (as described in Configuring Buckets), hotlink protection (as described in Managing Domain Names), and other access control features.
Viewing Jobs
On the job page, you can view all jobs in different types for the specified time period, click Status to filter and view jobs in different statuses, search for jobs by job ID in the search box, and click View on the right of a job to view its following information:
Job information: Job ID, job status, queue ID, template ID, job creation time, and job end time.
Input information: Source video bucket, region, and storage path.
Destination information: Destination media address, bucket, region, and storage path.
Note:
A job has six statuses: succeeded, failed, executing, pending, paused, and canceled.
You can query the records of jobs for the past month only.
Creating an Audio/Video Transcoding Job
The audio/video transcoding feature converts an audio/video file bitstream. It changes parameters of the source bitstream, such as codec, resolution, and bitrate, to adapt to different devices and network conditions.
2. Click Bucket Management on the left sidebar to enter the bucket list.
3. Click the name of the desired bucket.
4. Click Data Processing Workflow > Job on the left sidebar, and select the Media Processing tab at the top.
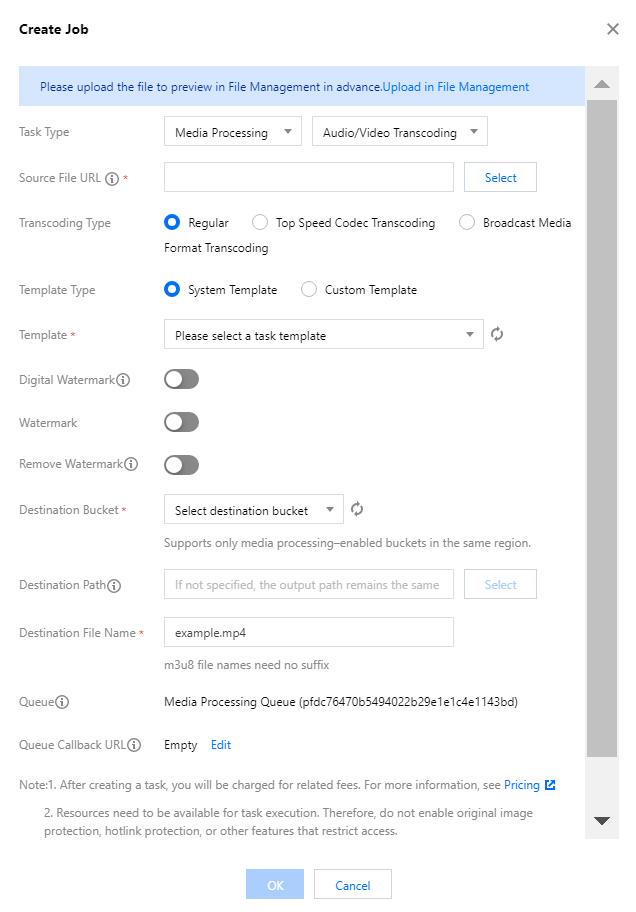
5. Select Media Processing > Transcoding > Audio/Video Transcoding as the job type, click Create Job, and configure as follows:
Source File URL: Enter the path of the source file, which must begin with but cannot end with /. Different folders are separated with /.
Transcoding Type: Select Regular.
Template Type: Select System Template or Custom Template.
Template: Select a specified template.
Digital Watermark: You can add a blind watermark to the video during transcoding for copyright protection.
Watermark: Add an image or text watermark to the video during transcoding.
Remove Watermark: Select the image watermark and remove it.
Accelerated Transcoding: If you toggle on this option, the job is added to the accelerated transcoding queue and the transcoding speed can reach more than 5 times of the regular transcoding speed.
Destination Bucket: Select a bucket for which the media processing feature has been enabled in the current region.
Destination File Name: Name of the destination file.
Destination Path: Path of the destination file.
Queue: Currently, only the default queue queue-1 is supported. For more information, see Queue.
Creating a TSC Transcoding Job
The top speed codec technology improves the subjective image quality of a video at the minimum bitrate. Compared with standard transcoding, it makes videos smaller and clearer and delivers a better visual experience with low network resource usage.
2. Click Bucket Management on the left sidebar to enter the bucket list.
3. Click the name of the desired bucket.
4. Click Data Processing Workflow > Job on the left sidebar, and select the Media Processing tab at the top.
5. Select Transcoding > Audio/Video Transcoding as the job type, click Create Job, select Top Speed Codec Transcoding as the transcoding type, and configure as follows:
Source File URL: Enter the path of the source file, which cannot begin or end with /.
Transcoding Type: Select Top Speed Codec Transcoding.
Template: Select a custom template. If there are none, create one first.
Digital Watermark: You can add a blind watermark to the video during transcoding for copyright protection.
Watermark: Add an image or text watermark to the video during transcoding.
Destination Bucket: Select a bucket for which the media processing feature has been enabled in the current region.
Destination Path: Path of the transcoded video.
Destination File Name: Name of the destination file.
Queue: Currently, only the default queue queue-1 is supported.
Creating a Broadcast Media Format Transcoding Job
This feature processes special formats such as XAVC and Apple ProRes.
2. Click Bucket Management on the left sidebar to enter the bucket list.
3. Click the name of the desired bucket.
4. Click Data Processing Workflow > Job on the left sidebar, and select the Media Processing tab at the top.
5. Select Transcoding > Audio/Video Transcoding as the job type, click Create Job, select Broadcast Media Format Transcoding as the transcoding type, and configure as follows:
Source File URL: Enter the path of the source file, which cannot begin or end with /.
Transcoding Type: Select Broadcast Media Format Transcoding.
Template: Select a custom template. If there are none, create one first.
Digital Watermark: You can add a blind watermark to the video during transcoding for copyright protection.
Watermark: Add an image or text watermark to the video during transcoding.
Destination Bucket: Select a bucket for which the media processing feature has been enabled in the current region.
Destination Path: Path of the transcoded video.
Destination File Name: Name of the destination file.
Queue: Currently, only the default queue queue-1 is supported.
Creating an Video Montage Job
The video montage feature accurately extracts highlight segments from a video and outputs them as a new file for use in different scenarios, such as replay and preview.
2. Click Bucket Management on the left sidebar to enter the bucket list.
3. Click the name of the desired bucket.
4. Click Data Processing Workflow > Job on the left sidebar, and select the Media Processing tab at the top.
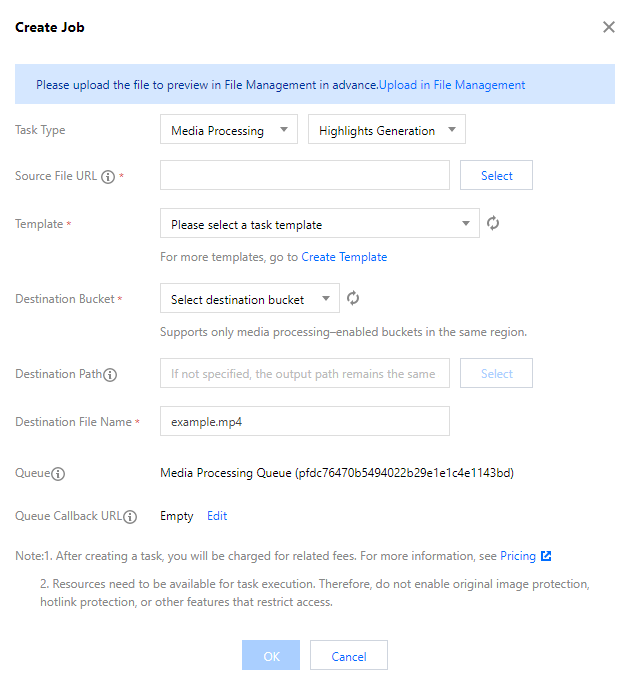
5. Select Smart Editing > Video Montage as the job type, click Create Job, and configure as follows:
Input Bucket Name: It is the current bucket by default.
Source File URL: Enter the path of the source file, which cannot begin or end with /.
Template: Select a custom template. If there are none, create one first.
Destination Bucket: Select a bucket for which the media processing feature has been enabled in the current region.
Destination Path: Path of the destination file.
Destination File Name: Name of the destination file.
Queue: Currently, only the default queue queue-1 is supported.
Creating a Voice/Sound Separation Job
The voice/sound separation feature separates the voice from the background sound in a video material to generate a new independent audio file. Then, you can apply artistic processing of other styles to the material without accompaniment and noise.
2. Click Bucket Management on the left sidebar to enter the bucket list.
3. Click the name of the desired bucket.
4. Click Data Processing Workflow > Job on the left sidebar, and select the Media Processing tab at the top.
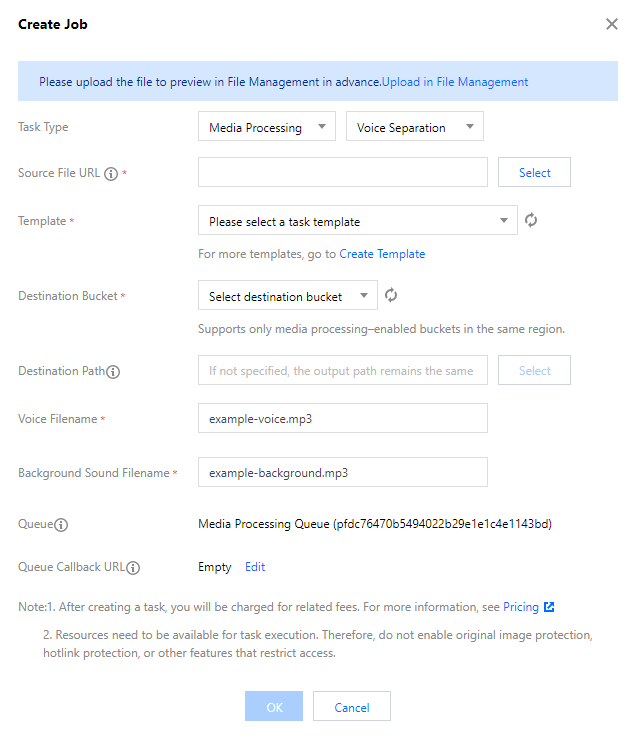
5. Select Smart Editing > Text to Speech as the job type, click Create Job, and configure as follows:
Source File URL: Enter the path of the source file, which cannot begin or end with /.
Template: Select a custom template. If there are none, create one first.
Destination Bucket: Select a bucket for which the media processing feature has been enabled in the current region.
Destination Path: Path of the destination file.
Voice Filename: Name of the destination voice file.
Queue: Currently, only the default queue queue-1 is supported.
Creating a Video Enhancement Job
Video enhancement is a video image quality improvement feature provided by CI. You can use it to enhance and beautify image colors and improve the image details.
Directions
1. Log in to the CI console and click Bucket Management to enter the bucket management page.
2. On the Bucket Management page, click the name of the desired bucket.
3. Click Data Processing Workflow > Job on the left sidebar, and select the Media Processing tab at the top.
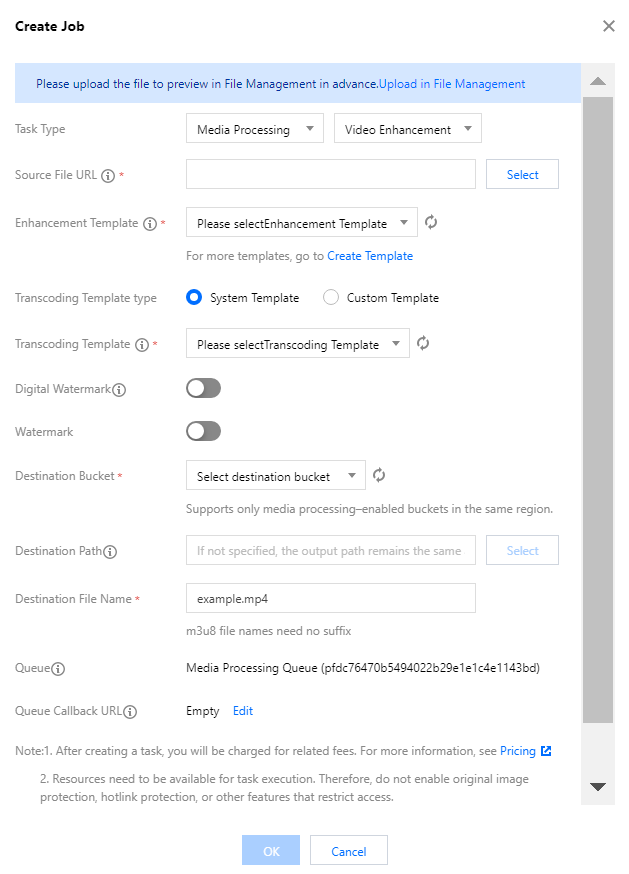
4. Select Image Quality Optimization > Video Enhancement as the job type, click Create Job, and configure as follows:
Note:
The input video must be shorter than 30 minutes.
Source File URL: Enter the path of the source file, which cannot begin or end with /.
Enhancement Template: Select a video enhancement template as needed.
Transcoding Template Type: Select System Template or Custom Template.
Transcoding Template: You can select a transcoding template and specify parameters such as resolution, bitrate, and format of the destination file.
Digital Watermark: You can add a blind watermark to the video during video enhancement for copyright protection.
Watermark: Add an image or text watermark to the video during video enhancement.
Destination Bucket: Select a bucket for which the media processing feature has been enabled in the current region.
Destination Path: Storage path of the destination file.
Destination File Name: Name of the destination file.
Queue: Currently, only the default queue queue-1 is supported. For more information, see Queue.
Creating a Super Resolution Job
The super resolution feature reconstructs the details and local features of a video by recognizing its content and contour so as to generate a high-resolution video image through a series of low-resolution video images. It can be used in combination with video enhancement to remaster old videos.
2. Click Bucket Management on the left sidebar to enter the bucket list.
3. Click the name of the desired bucket.
4. Click Data Processing Workflow > Job on the left sidebar, and select the Media Processing tab at the top.
5. Select Image Quality Optimization > Super Resolution as the job type, click Create Job, and configure as follows:
Source File URL: Enter the path of the source file, which cannot begin or end with /.
Super Resolution Template: Select the destination resolution template as needed.
Transcoding Template Type: Select System Template or Custom Template.
Transcoding Template: You can select a transcoding template and specify parameters such as resolution, bitrate, and format of the destination file.
Digital Watermark: You can add a blind watermark to the video during super resolution for copyright protection.
Watermark: Add an image or text watermark to the video during super resolution.
Destination Bucket: Select a bucket for which the media processing feature has been enabled in the current region.
Destination Path: Storage path of the destination file.
Destination File Name: Name of the destination file.
Queue: Currently, only the default queue queue-1 is supported. For more information, see Queue.
Creating an SDR-to-HDR Job
SDR to HDR is a video dynamic range conversion feature provided by CI. You can use it to convert a standard dynamic range (SDR) video to a high dynamic range (HDR) video.
Directions
1. Log in to the CI console and click Bucket Management to enter the bucket management page.
2. On the Bucket Management page, click the name of the desired bucket.
3. Click Data Processing Workflow > Job on the left sidebar, and select the Media Processing tab at the top.
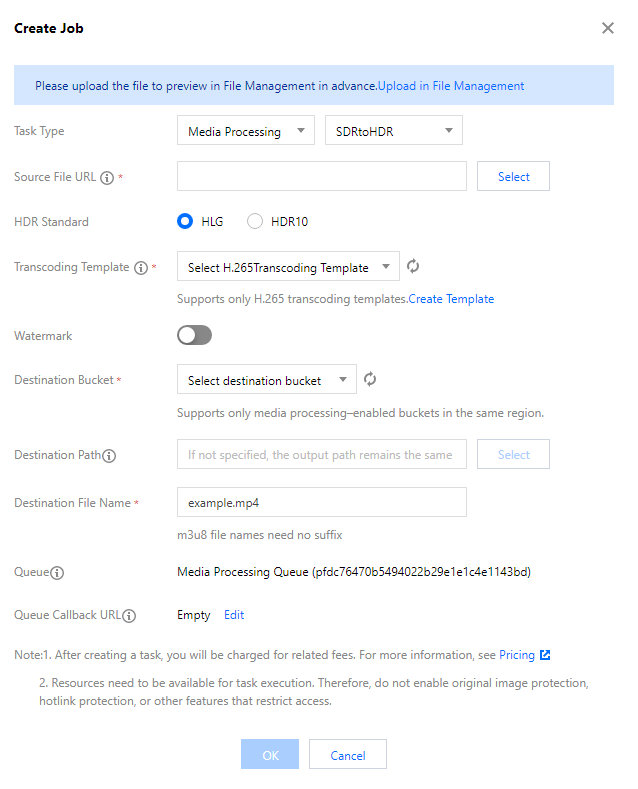
4. Select Image Quality Optimization > SDR to HDR as the job type, click Create Job, and configure as follows:
Note:
The input video must be shorter than 30 minutes.
Source File URL: Enter the path of the source file, which cannot begin or end with /.
HDR Standard: Select HLG or HDR10.
Transcoding Template: Select an H.265 transcoding template. If there are no templates, create an audio/video transcoding template and select H.265 as the encoding format. For more information on how to create a template and configure parameters, see Custom Template.
Watermark: Add an image or text watermark as needed.
Destination Bucket: Select a bucket for which the media processing feature has been enabled in the current region.
Destination Path: Storage path of the destination file after the SDR to HDR conversion is completed.
Destination File Name: Name of the destination file.
Queue: Currently, only the default queue queue-1 is supported. For more information, see Queue.
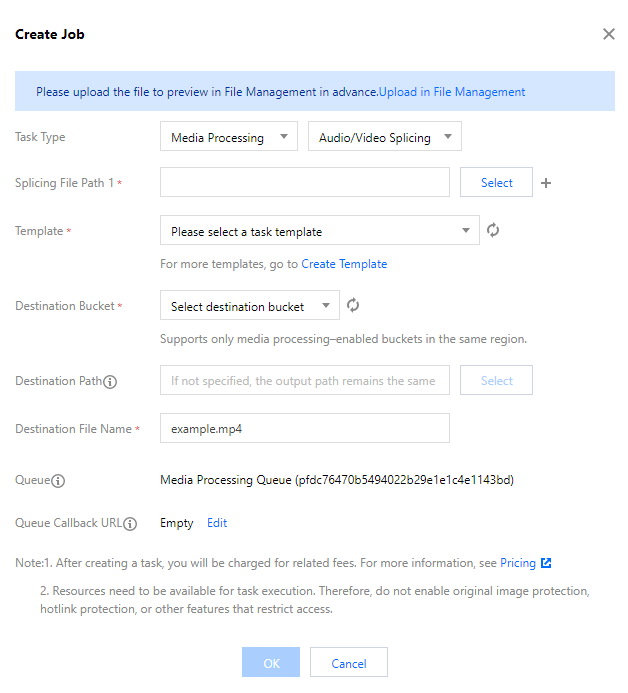
Creating an Audio/Video Splicing Job
The video/audio splicing feature adds the specified video/audio segment at the beginning or end of a video/audio file to generate a new one.
2. Click Bucket Management on the left sidebar to enter the bucket list.
3. Click the name of the desired bucket.
4. Click Data Processing Workflow > Job on the left sidebar, and select the Media Processing tab at the top.
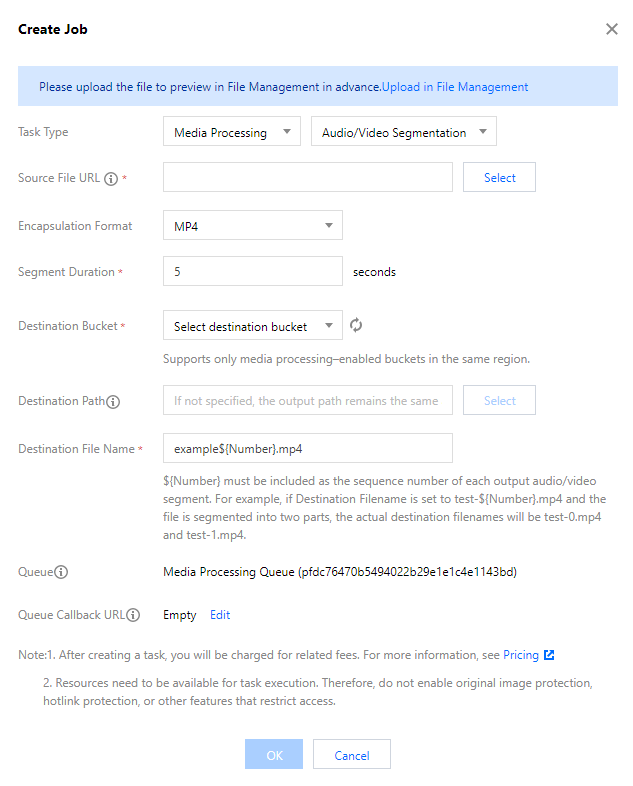
5. Select Transcoding > Audio/Video Segmentation as the job type, click Create Job, and configure as follows:
Source File URL: Enter the path of the source file, which must begin with but cannot end with /. Different folders are separated with /.
Segment Duration: Specify the duration of the output segment.
Container Format: Select the container format for the output audio/video.
Destination Bucket: Select a bucket for which the media processing feature has been enabled in the current region.
Destination Path: Storage path of the destination file.
Destination File Name: Name of the destination file.
Queue: Currently, only the default queue queue-1 is supported. For more information, see Queue.
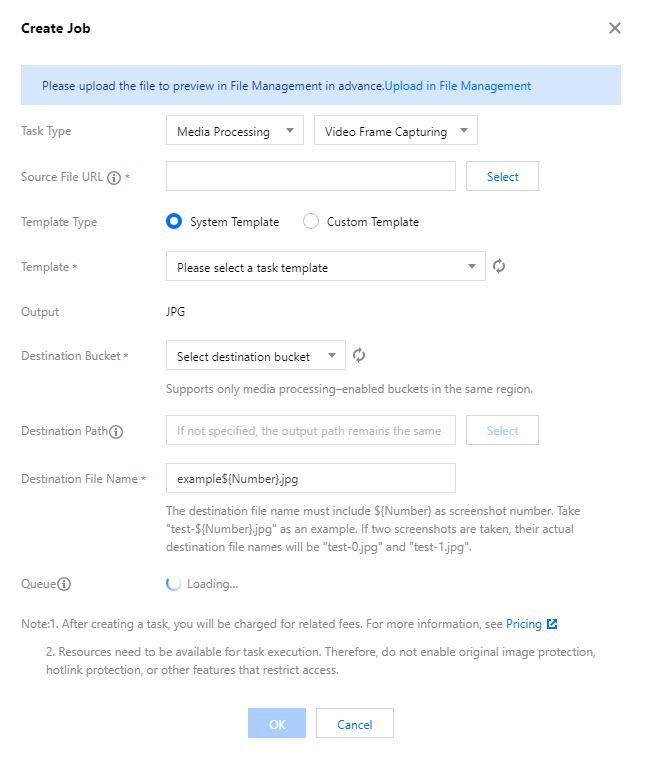
Creating a Video Frame Capturing Job
Video frame capturing is a screencapturing feature provided by CI to capture the frames of a video at specified time points. After the job is enabled in the console, the output screenshots are in JPG format by default. If you enable captured frame compression, screenshots can be output in HEIF or TPG format.
Note:
A video frame capturing job can be created by template. You can customize the frame capturing start time, frame capturing interval, captured frames, destination image size, and destination format (captured frame compression needs to be enabled for this option) in a custom video frame capturing template.
2. Click Bucket Management on the left sidebar to enter the bucket list.
3. Click the name of the desired bucket.
4. Click Data Processing Workflow > Job on the left sidebar, and select the Media Processing tab at the top.
5. Select Transcoding > Video Frame Capturing as the job type, click Create Job, and configure as follows:
Source File URL: Enter the path of the source file, which must begin with but cannot end with /. Different folders are separated with /.
Template Type: Select System Template or Custom Template. For more information, see Template.
Template: Select the specified template.
Output: If the video frame capturing job is enabled in the console, screenshots in JPG format will be output by default. If captured frame compression is used, screenshots in HEIF or TPG format can be output. If you use the video frame capturing API, you can choose to output JPG or PNG screenshots. For more information, see GenerateSnapshot in the API documentation.
Destination Bucket: Select a bucket for which the media processing feature has been enabled in the current region.
Destination Path: Storage path of the video screenshots.
Destination File Name: Name of the output file. Note that as more than one files are output by video frame capturing, the destination file name must contain the ${Number} parameter as the sequence number of the screenshot. For example, if the destination file path is set to test-${Number}.jpg and the job captures two screenshots, the actual names of the destination files will be test-0.jpg and test-1.jpg.
Queue: Currently, only the default queue queue-1 is supported. For more information, see Queue.
Creating a Video-to-Animated Image Conversion Job
You can use the video to animated image conversion feature to convert a video to animated images.
Note:
A video-to-animated image conversion job can be created by template. You can customize the transcoding start time, transcoding duration, frame extraction method, destination animated image frame rate, destination animated image size, and destination format in a custom video-to-animated image conversion template.
2. Click Bucket Management on the left sidebar to enter the bucket list.
3. Click the name of the desired bucket.
4. Click Data Processing Workflow > Job on the left sidebar, and select the Media Processing tab at the top.
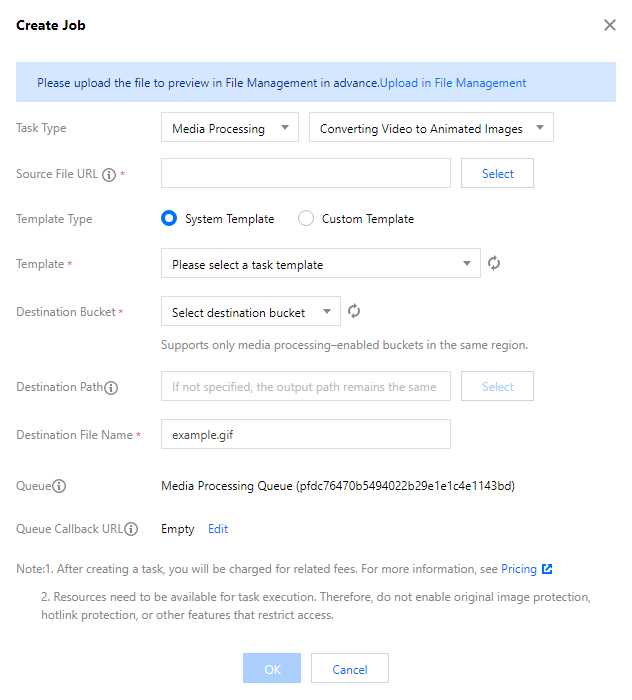
5. Select Transcoding > Video-to-Animated Image Conversion as the job type, click Create Job, and configure as follows:
Source File URL: Enter the path of the source file, which must begin with but cannot end with /. Different folders are separated with /.
Template Type: Select System Template or Custom Template. For more information, see Template.
Template: Select the specified template.
Destination Bucket: Select a bucket for which the media processing feature has been enabled in the current region.
Destination Path: Storage path of the animated images.
Destination File Name: Name of the destination file.
Queue: Currently, only the default queue queue-1 is supported. For more information, see Queue.
Creating an Intelligent Thumbnail Job
The intelligent thumbnail feature intelligently analyzes the quality, brilliance, and content relevance of video frames by understanding the video content with Tencent Cloud's advanced AI technologies. Then, it extracts optimal frames to generate thumbnails to make the content more engaging. |
Note:
The intelligent thumbnail feature is a paid service and billed by the video duration. For billing details, see Billing Overview.
Three optimal keyframes will be output through intelligent analysis of each video file.
CI also provides an API for creating jobs, which can be configured based on parameters. For more information, see Submitting Audio/Video Transcoding Job in the API documentation.
2. Click Bucket Management on the left sidebar to enter the bucket list.
3. Click the name of the desired bucket.
4. Click Data Processing Workflow > Job on the left sidebar, and select the Media Processing tab at the top.
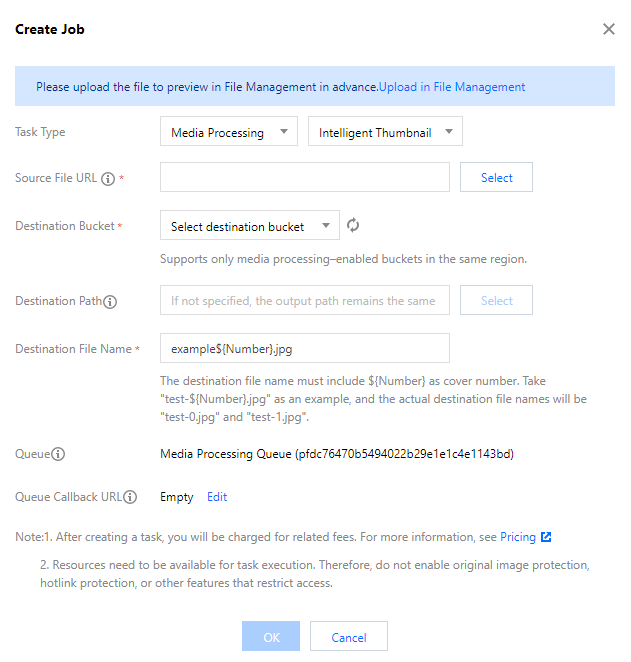
5. Select Smart Editing > Intelligent Thumbnail as the job type, click Create Job, and configure as follows:
Source File URL: Enter the path of the source file, which must begin with but cannot end with /. Different folders are separated with /.
Destination Bucket: Select a bucket for which the media processing feature has been enabled in the current region.
Destination Path: Storage path of the smart thumbnails.
Destination File Name: Name of the destination file. Note that as more than one files are output by video frame capturing, the destination file name must contain the ${Number} parameter as the sequence number of the screenshot. For example, if the destination file path is set to test-${Number}.jpg and the job captures two screenshots, the actual names of the destination files will be test-0.jpg and test-1.jpg.
Queue: Currently, only the default queue queue-1 is supported. For more information, see Queue.
Creating a Digital Watermark Adding Job
This feature can embed an invisible watermark into a video for copyright protection.
2. Click Bucket Management on the left sidebar to enter the bucket list.
3. Click the name of the desired bucket.
4. Click Data Processing Workflow > Job on the left sidebar, and select the Media Processing tab at the top.
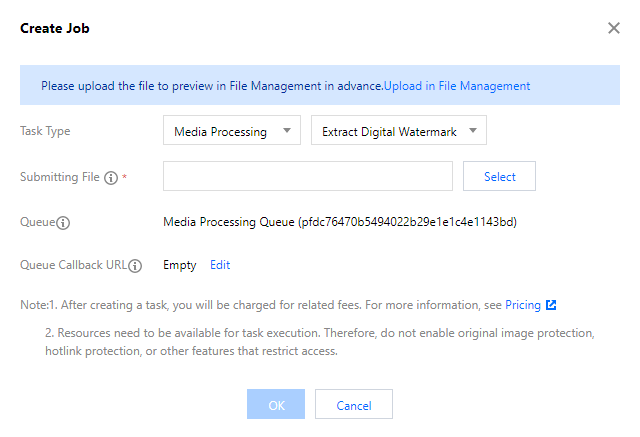
5. Select Copyright Protection > Digital Watermark Extraction as the job type, click Create Job, and configure as follows:
Source File: Enter the path of the source file, which must begin with but cannot end with /. Different folders are separated with /.
Queue: Currently, only the default queue queue-1 is supported. For more information, see Queue.
Creating an Image Processing Job
Image processing supports flexible image editing, such as rotation, cropping, transcoding, and scaling. It provides multiple image downsizing solutions like Guetzli compression, TPG transcoding, and HEIF transcoding, as well as diversified copyright protection solutions like image/text/blind watermarking. This meets your image processing needs in different business scenarios.

 Yes
Yes
 No
No
Was this page helpful?