The Skills Hub supports two methods for creating custom Skills. You can choose the appropriate method based on your role and scenario.
Creation Method
Applicable User Group
Description
Import Skills Package
Developer
Assemble Skill files locally according to specifications, compress them into a ZIP file, and upload it to the platform.
Create via conversation
Business users and non-technical users
Describe capability requirements in natural language within the Smart Desk, and the AI automatically generates the Skill file package and completes its publication.
Regardless of the method used, a newly created Skill undergoes platform security review. Once the review passes, it becomes available for viewing and use in the Custom Skills list on the Skills Hub.
Method 1: Importing a Skills Package
Upload a compliant Skills package (in ZIP format) to the platform. After it passes the security review, you can view and use it in the Custom Skills list on the Skills Hub.
Skills Package Format Requirements
Imported Skills packages must meet the following specifications:
Requirement Item
Description
File Formats
Only .zip format is supported.
File Size
Maximum 10 MB.
Directory Structure
The SKILL.md file must be included in the root directory of the ZIP package.
SKILL.md Specification
Must contain metadata in YAML format, including at least the Skill name and feature description fields.
Note:
If a Skills package is non-compliant, the import will fail and display a corresponding error message.
Steps
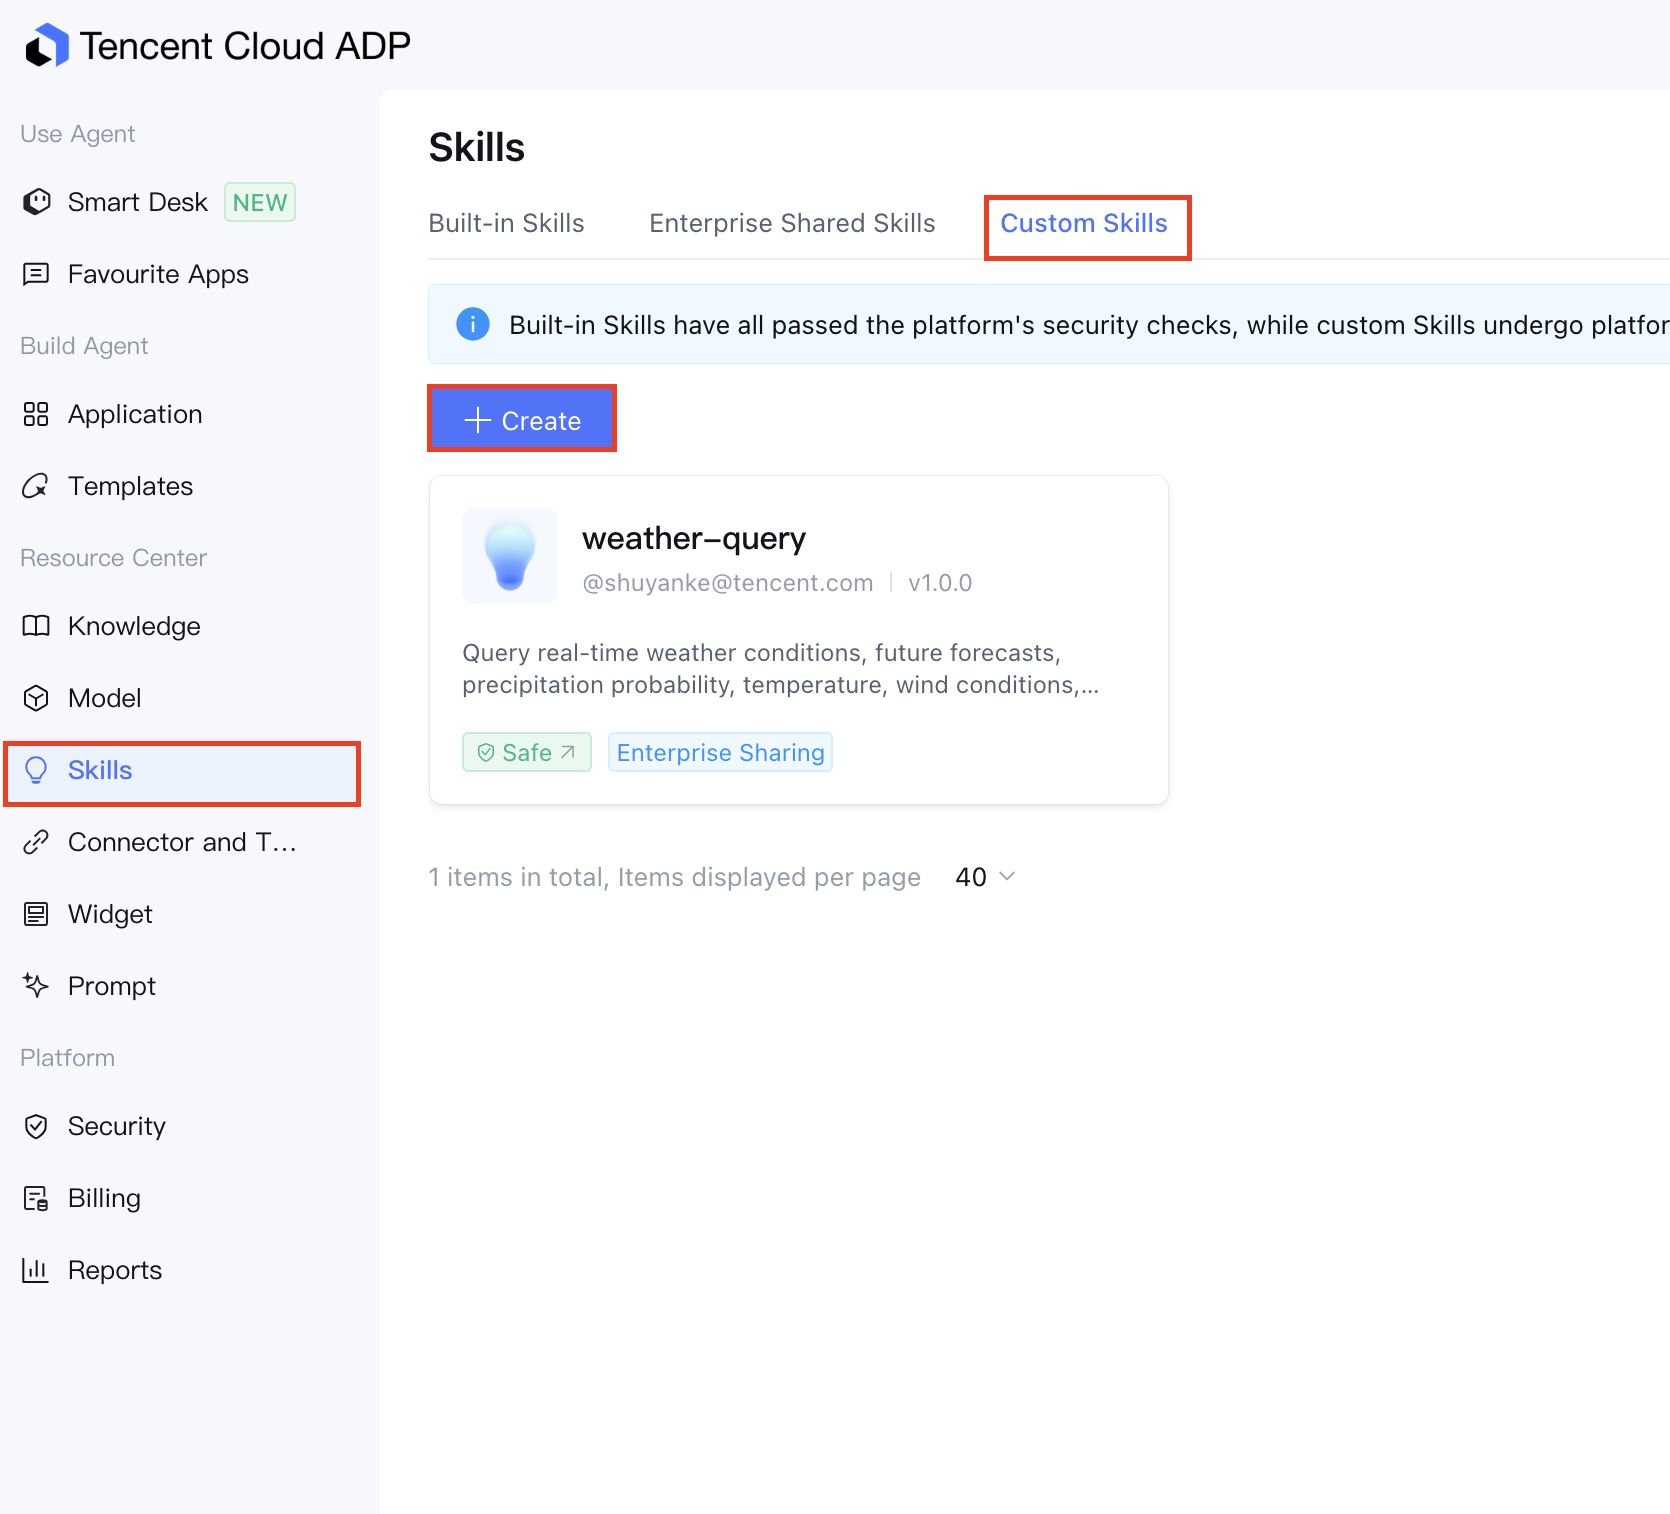
Step 1: Go to the Skills Square
1. Log in to the Tencent Cloud Agent Development Platform console.
2. In the left sidebar, click Resource Center > Skills to go to the Skills Hub.
3. Select the Custom Skills tab.
Step 2: Enter the Import Information
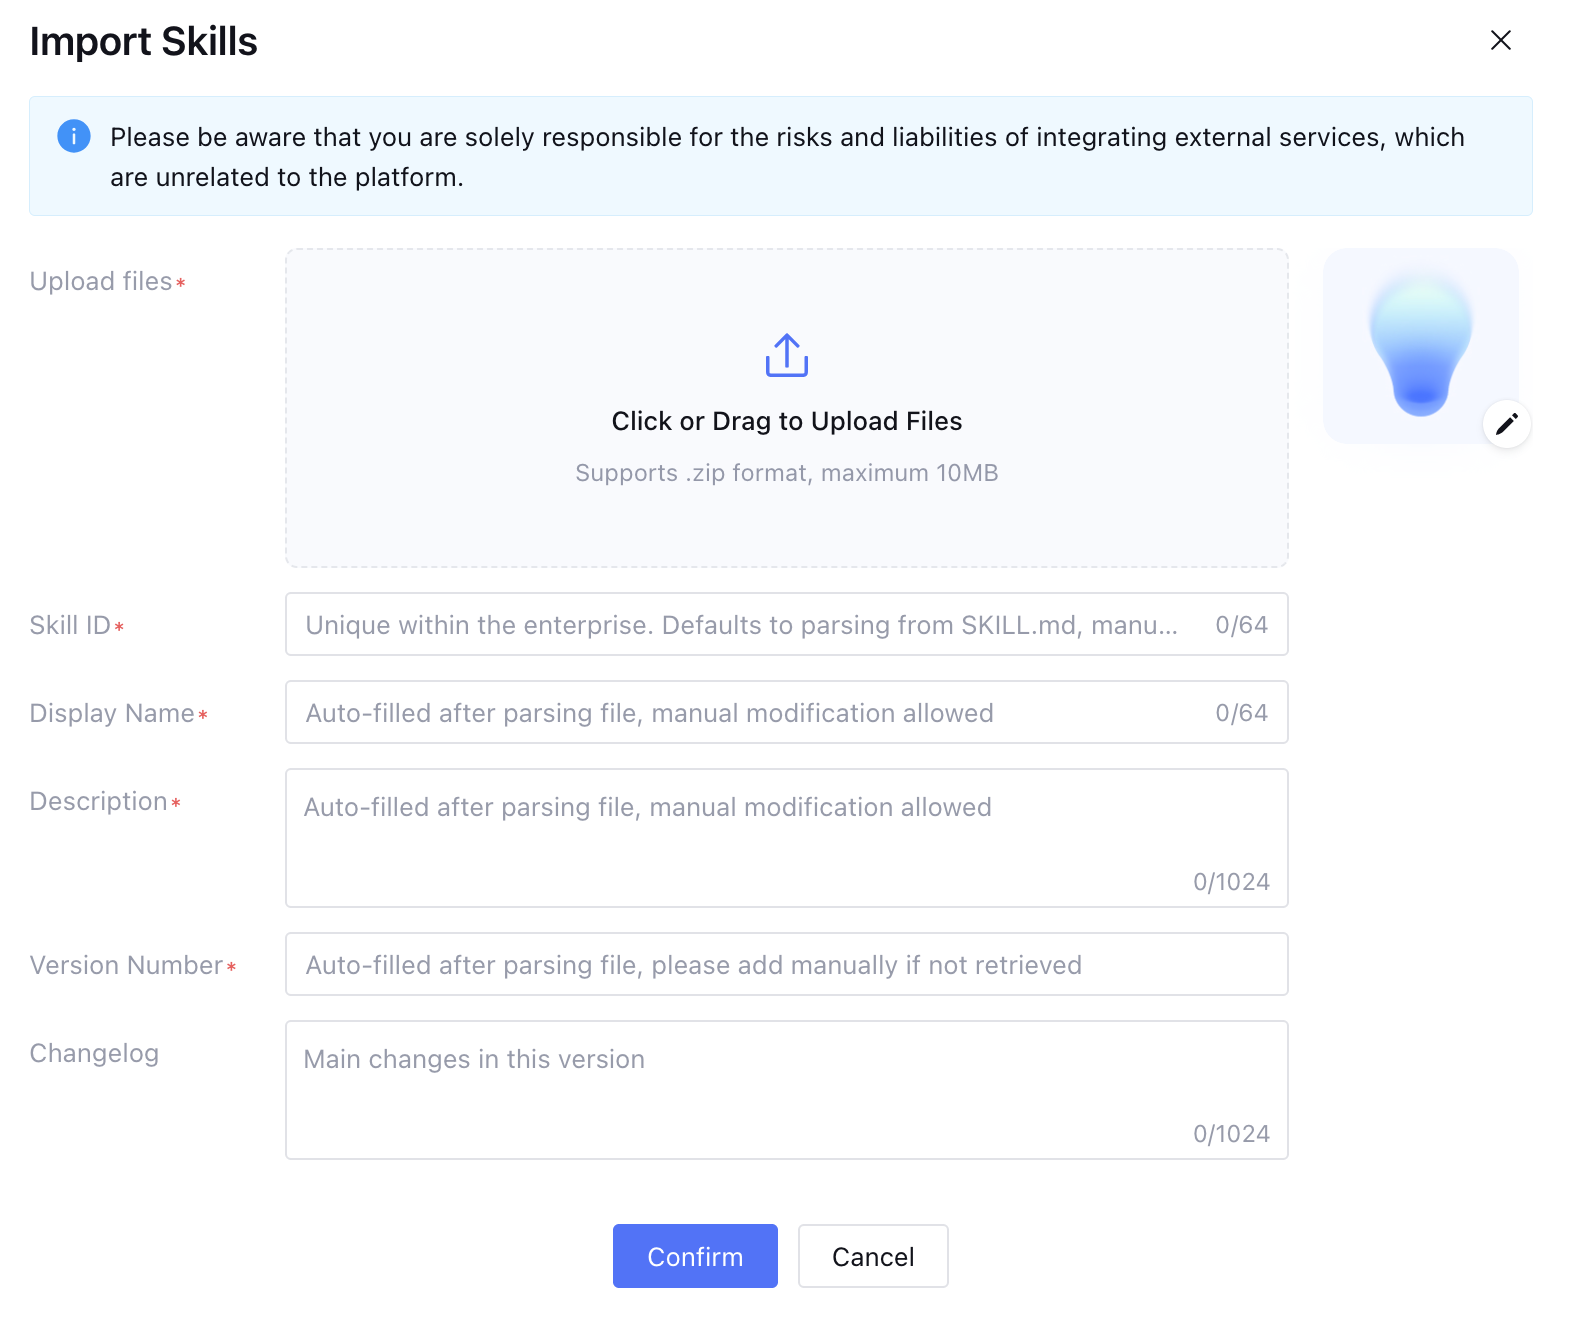
1. Click Create. The Import Skills dialog box pops up.
2. In the Click or Drag to upload Files area, click or drag a compliant .zip file to the upload area (supports .zip format, maximum 10 MB).
3. After the upload is complete, the platform automatically parses the ZIP package and pre-fills the following fields. You can modify them as needed:
Field
Required
Description
Skill ID
Yes
Unique within the enterprise, with a maximum of 64 characters. Parsed from SKILL.md by default. Manually fill in if not parsed.
Display Name
Yes
The name displayed for the Skill in the square and in conversations, with a maximum of 64 characters. Parsed from SKILL.md by default. Manual modification is allowed.
Overview
Yes
A brief description of the Skill's features, with a maximum of 1024 characters. Parsed from SKILL.md by default. Manual modification is allowed.
Version Number
Yes
The version number of the Skill (it is recommended to follow semantic versioning, such as 1.0.0). Parsed from SKILL.md by default. Manually add it if not parsed.
Change Description
No
The main changes in this version, with a maximum of 1024 characters.
4. (Optional) Click the edit icon in the lower-right corner of the default Skill icon on the right. You can then upload a custom icon to replace the default one.
5. After confirming all information is correct, click Confirm to submit the import. To cancel, click Cancel to close the dialog box.
Note:
The Skill ID is the unique identifier within the enterprise. It cannot be modified after submission, so configure it carefully.
The version number must be unique under the same Skill ID. When you continue iteration via the Update option on the Skill details page, the new version number must be higher than the current latest version.
Step 3: Wait for Security Review
After the upload is complete, the platform automatically performs a security review on the Skills package. The review process includes:
1. Format Validation: Checks whether the ZIP package structure is compliant and whether the root directory contains SKILL.md.
2. YAML Validation: Parses the metadata in SKILL.md and verifies whether the required fields are complete.
3. Security Scanning: Performs security detection on the code and scripts in the Skills package to identify potential risks.
After the review passes, the Skill appears in the Custom Skills list and is ready for use.
Note:
The security review requires the Skill to be installed and run in a sandbox, so you need to wait for about 5 minutes.
Method 2: Creating via Conversation
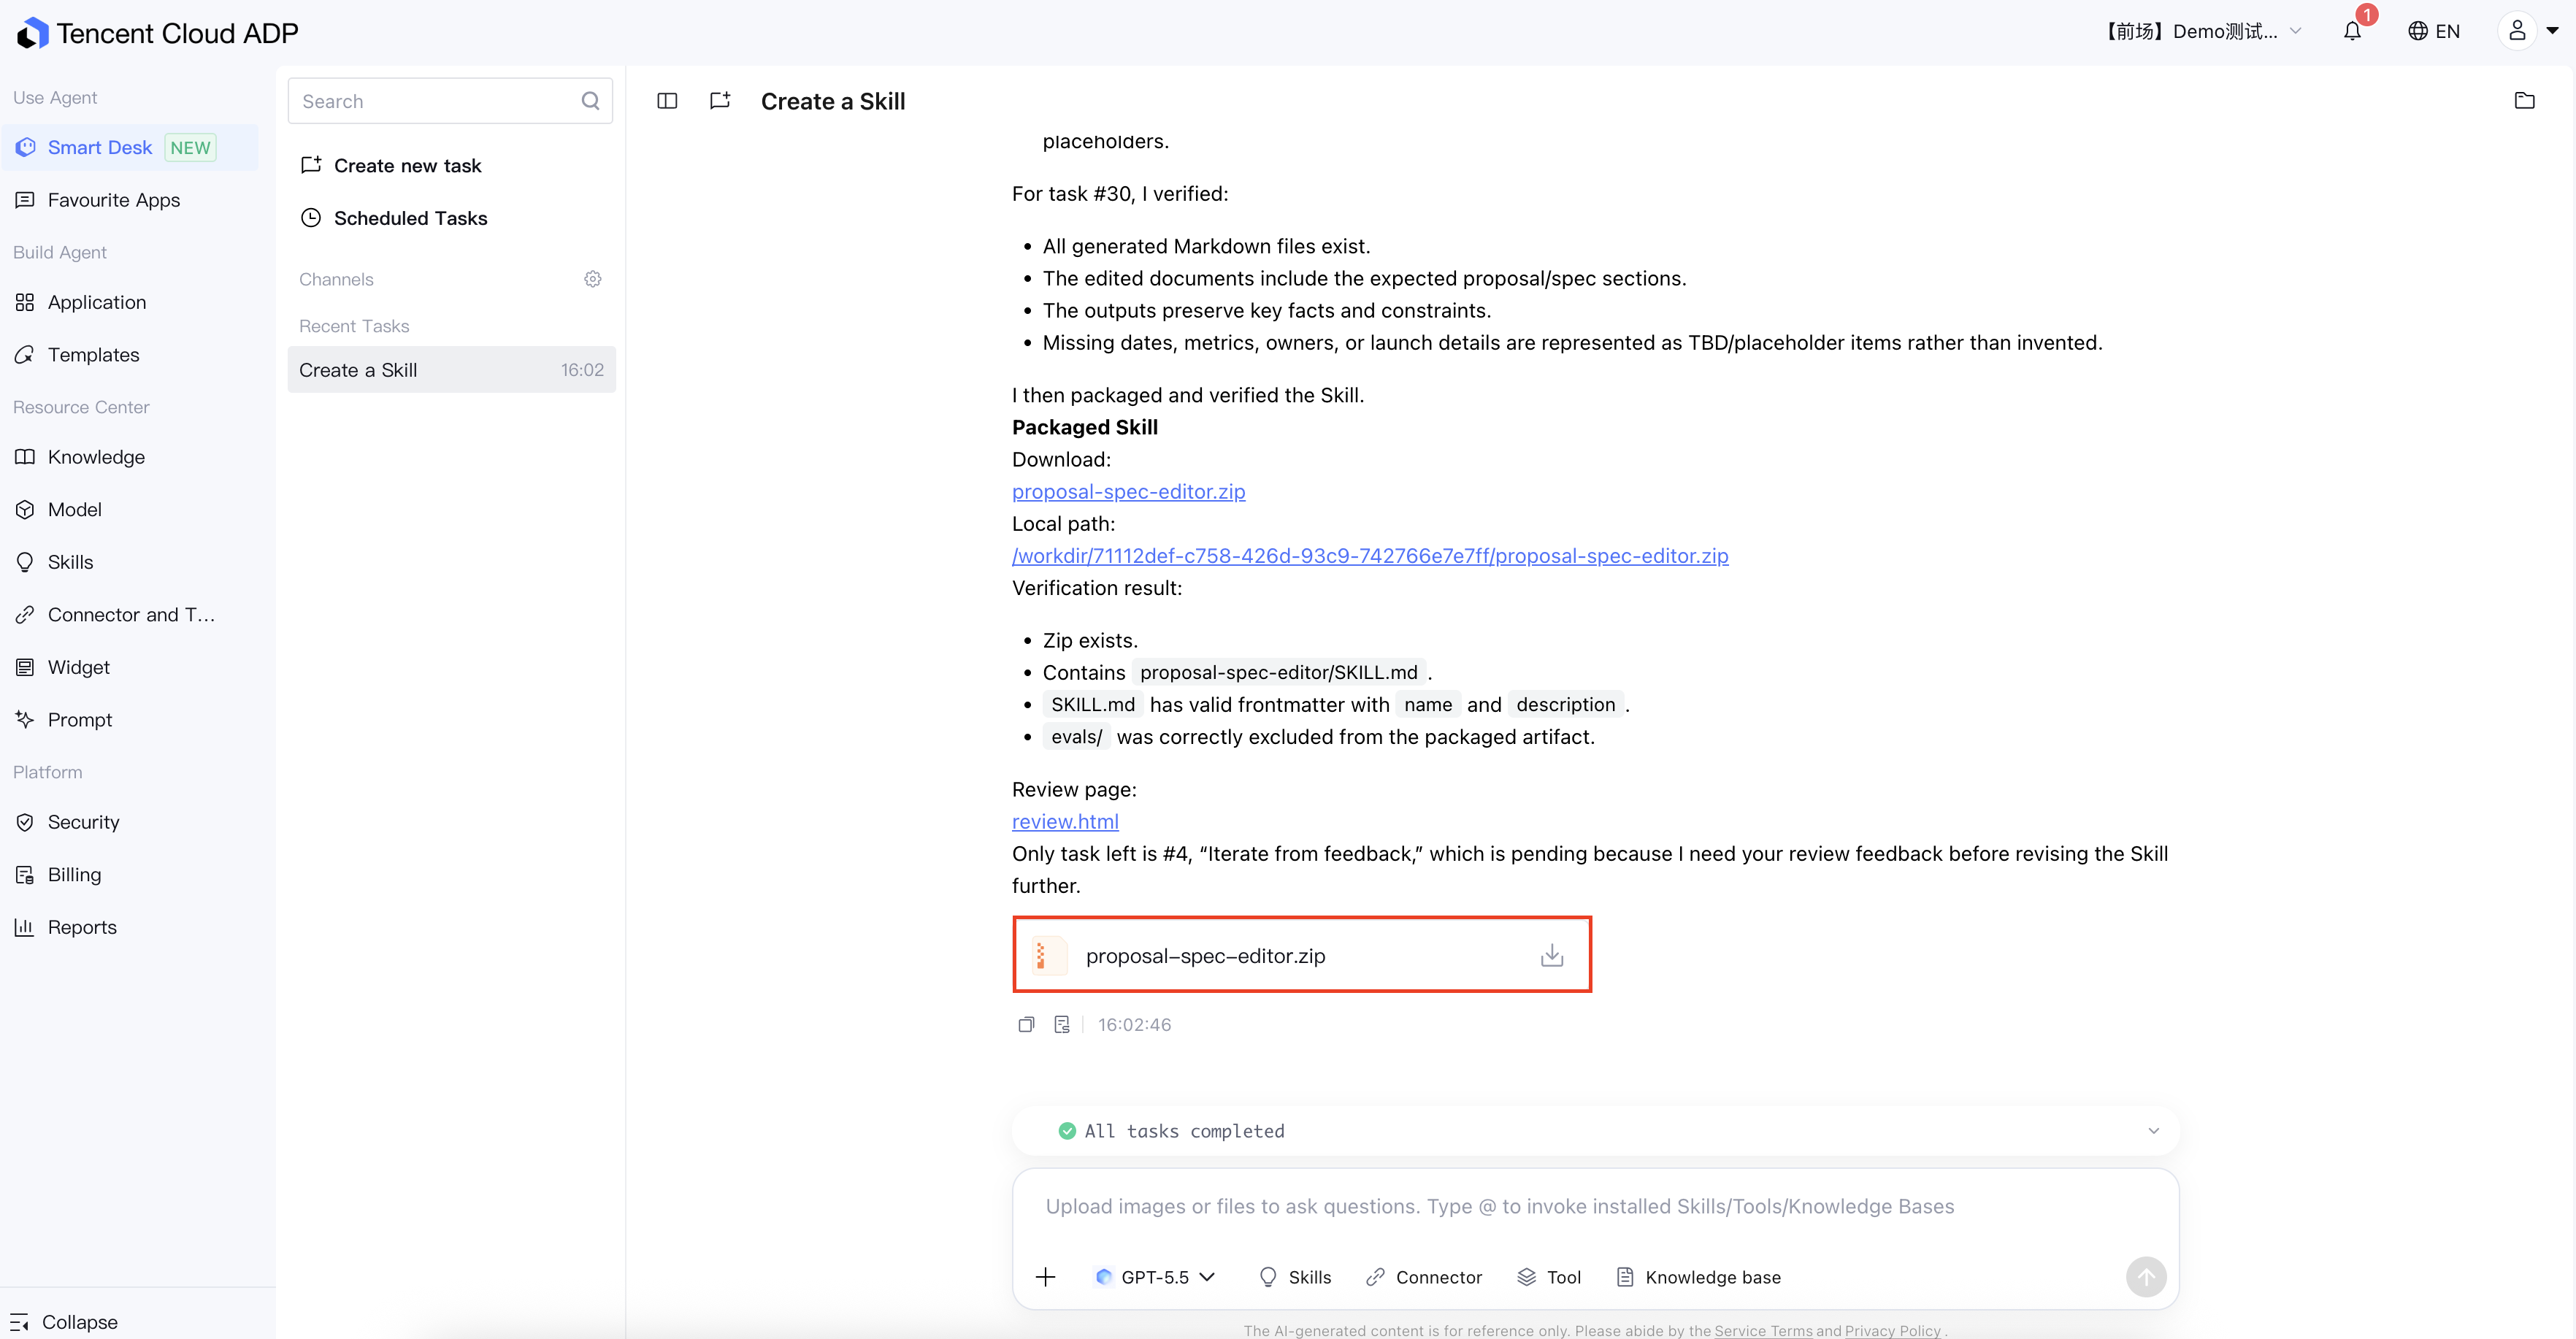
Business users unfamiliar with the Skill file structure can describe their capability requirements through natural language conversation in the Smart Desk. The intelligent development assistant then automatically handles requirement clarification, Skill package generation, and security review, ultimately publishing it to Custom Skills.
Steps
Step 1: Express the Skill Creation Intent in the Smart Desk
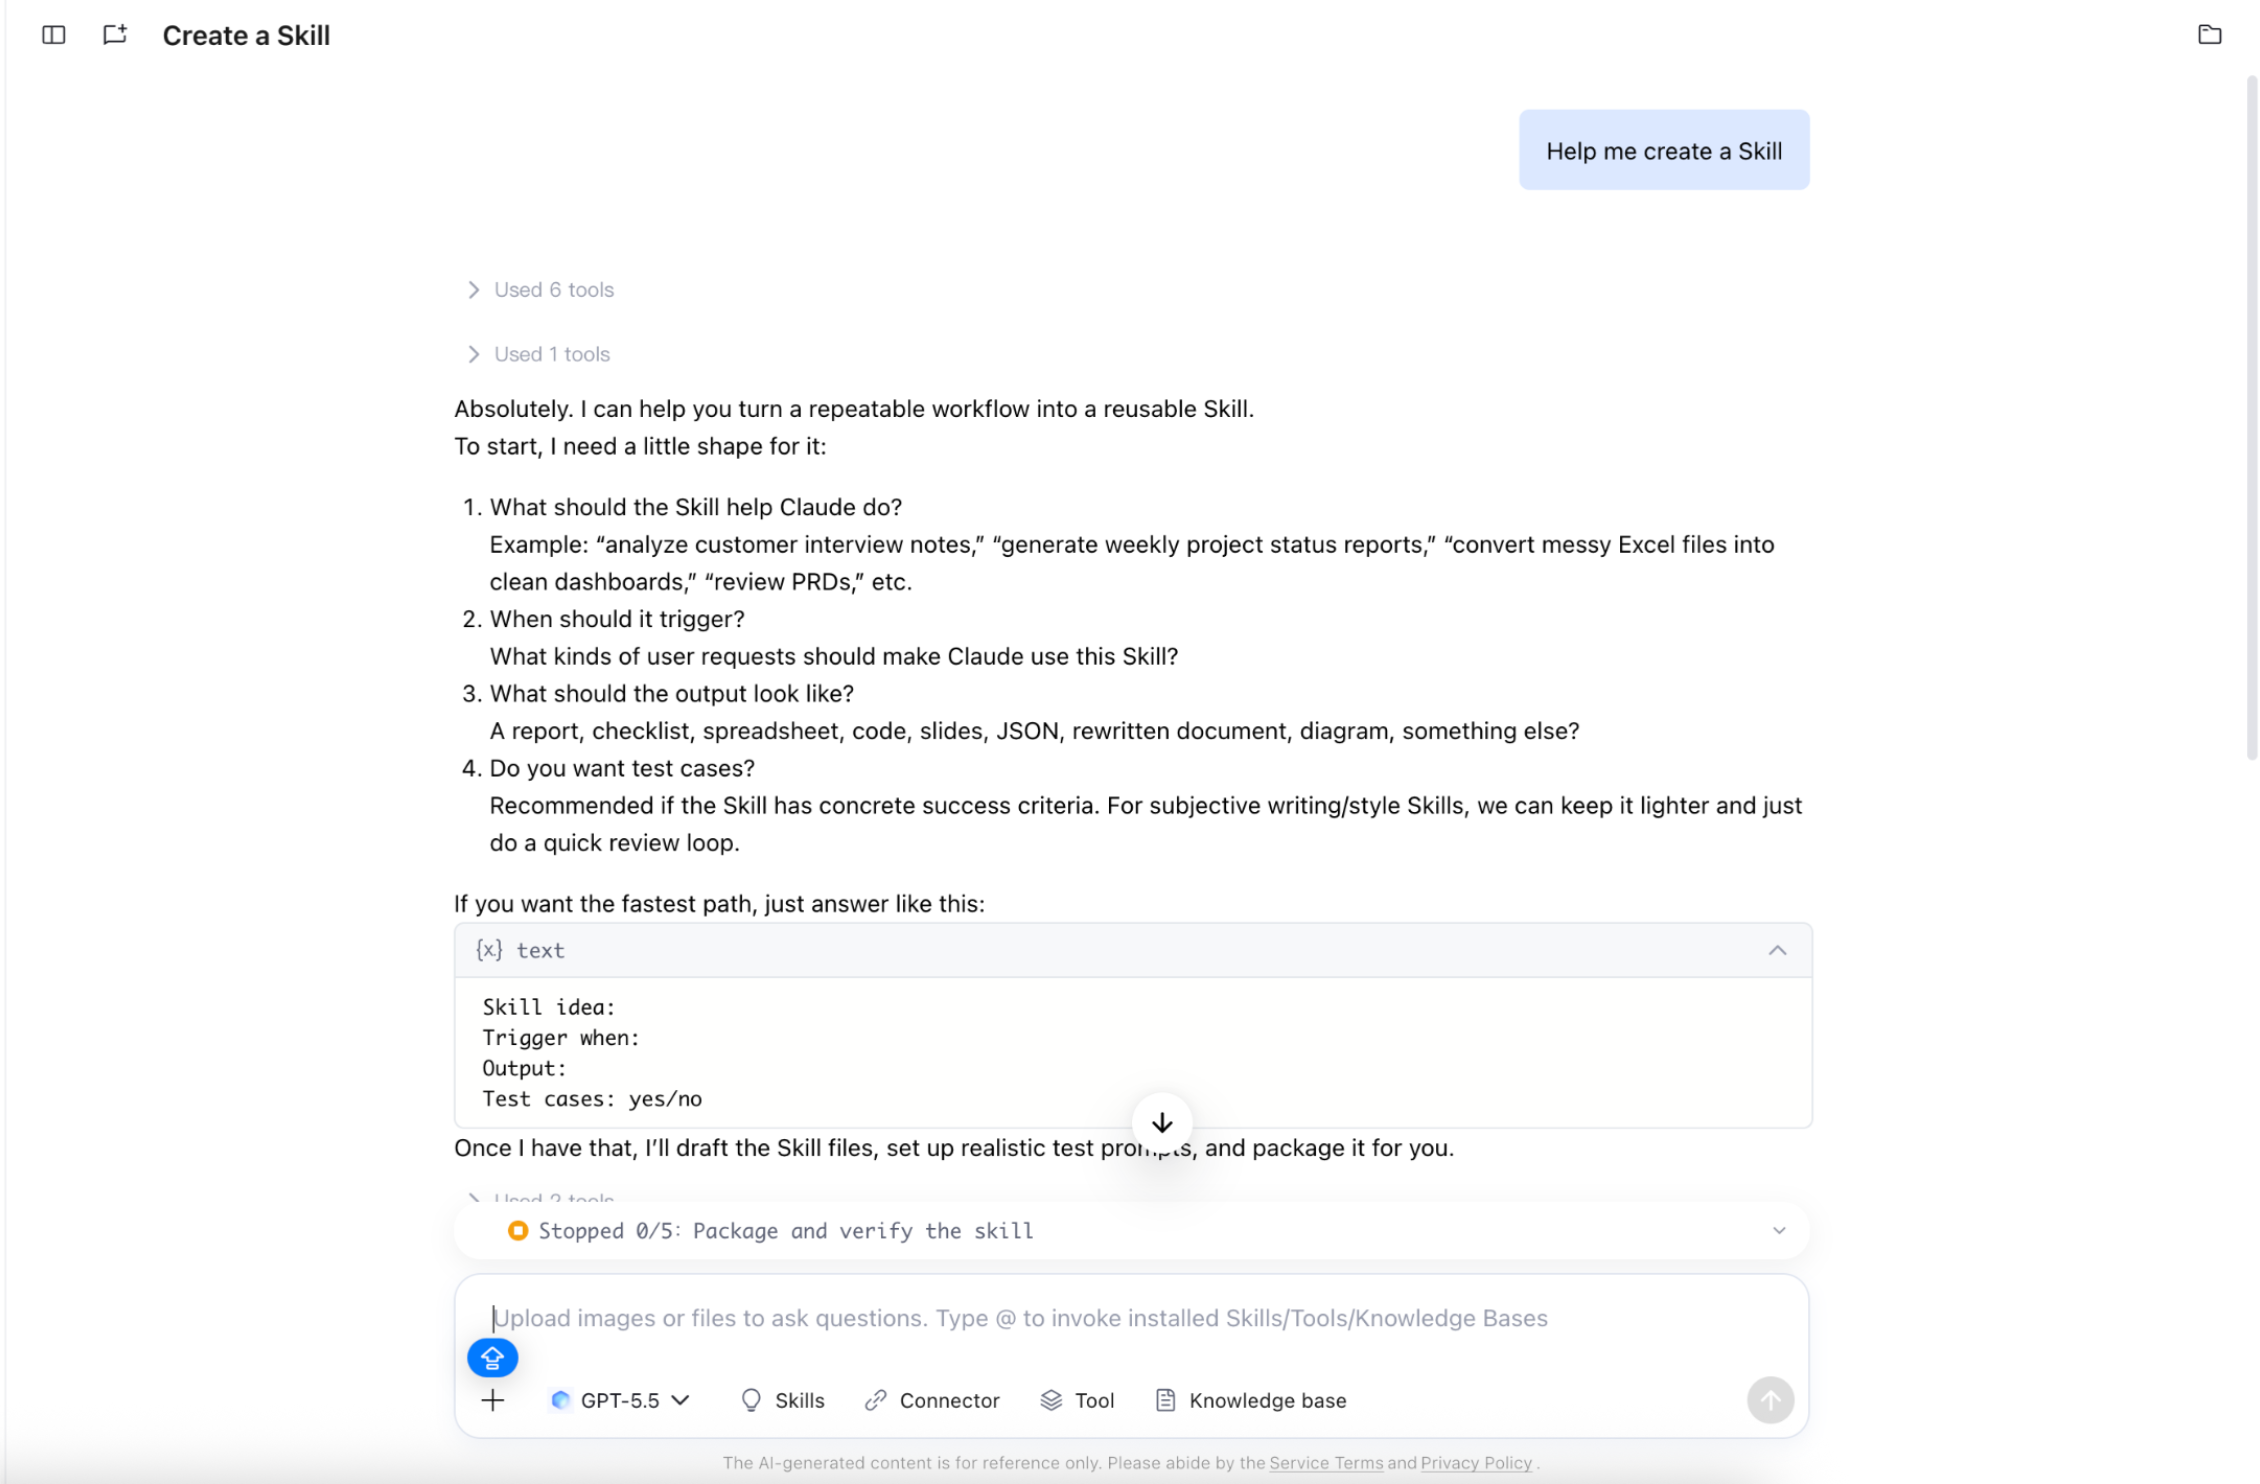
1. In the left sidebar, click Smart Desk to go to the conversation page.
2. In the dialog box, enter your request related to Skill creation, for example: "Help me create a Skill" or "I want to build a skill that can check the weather".
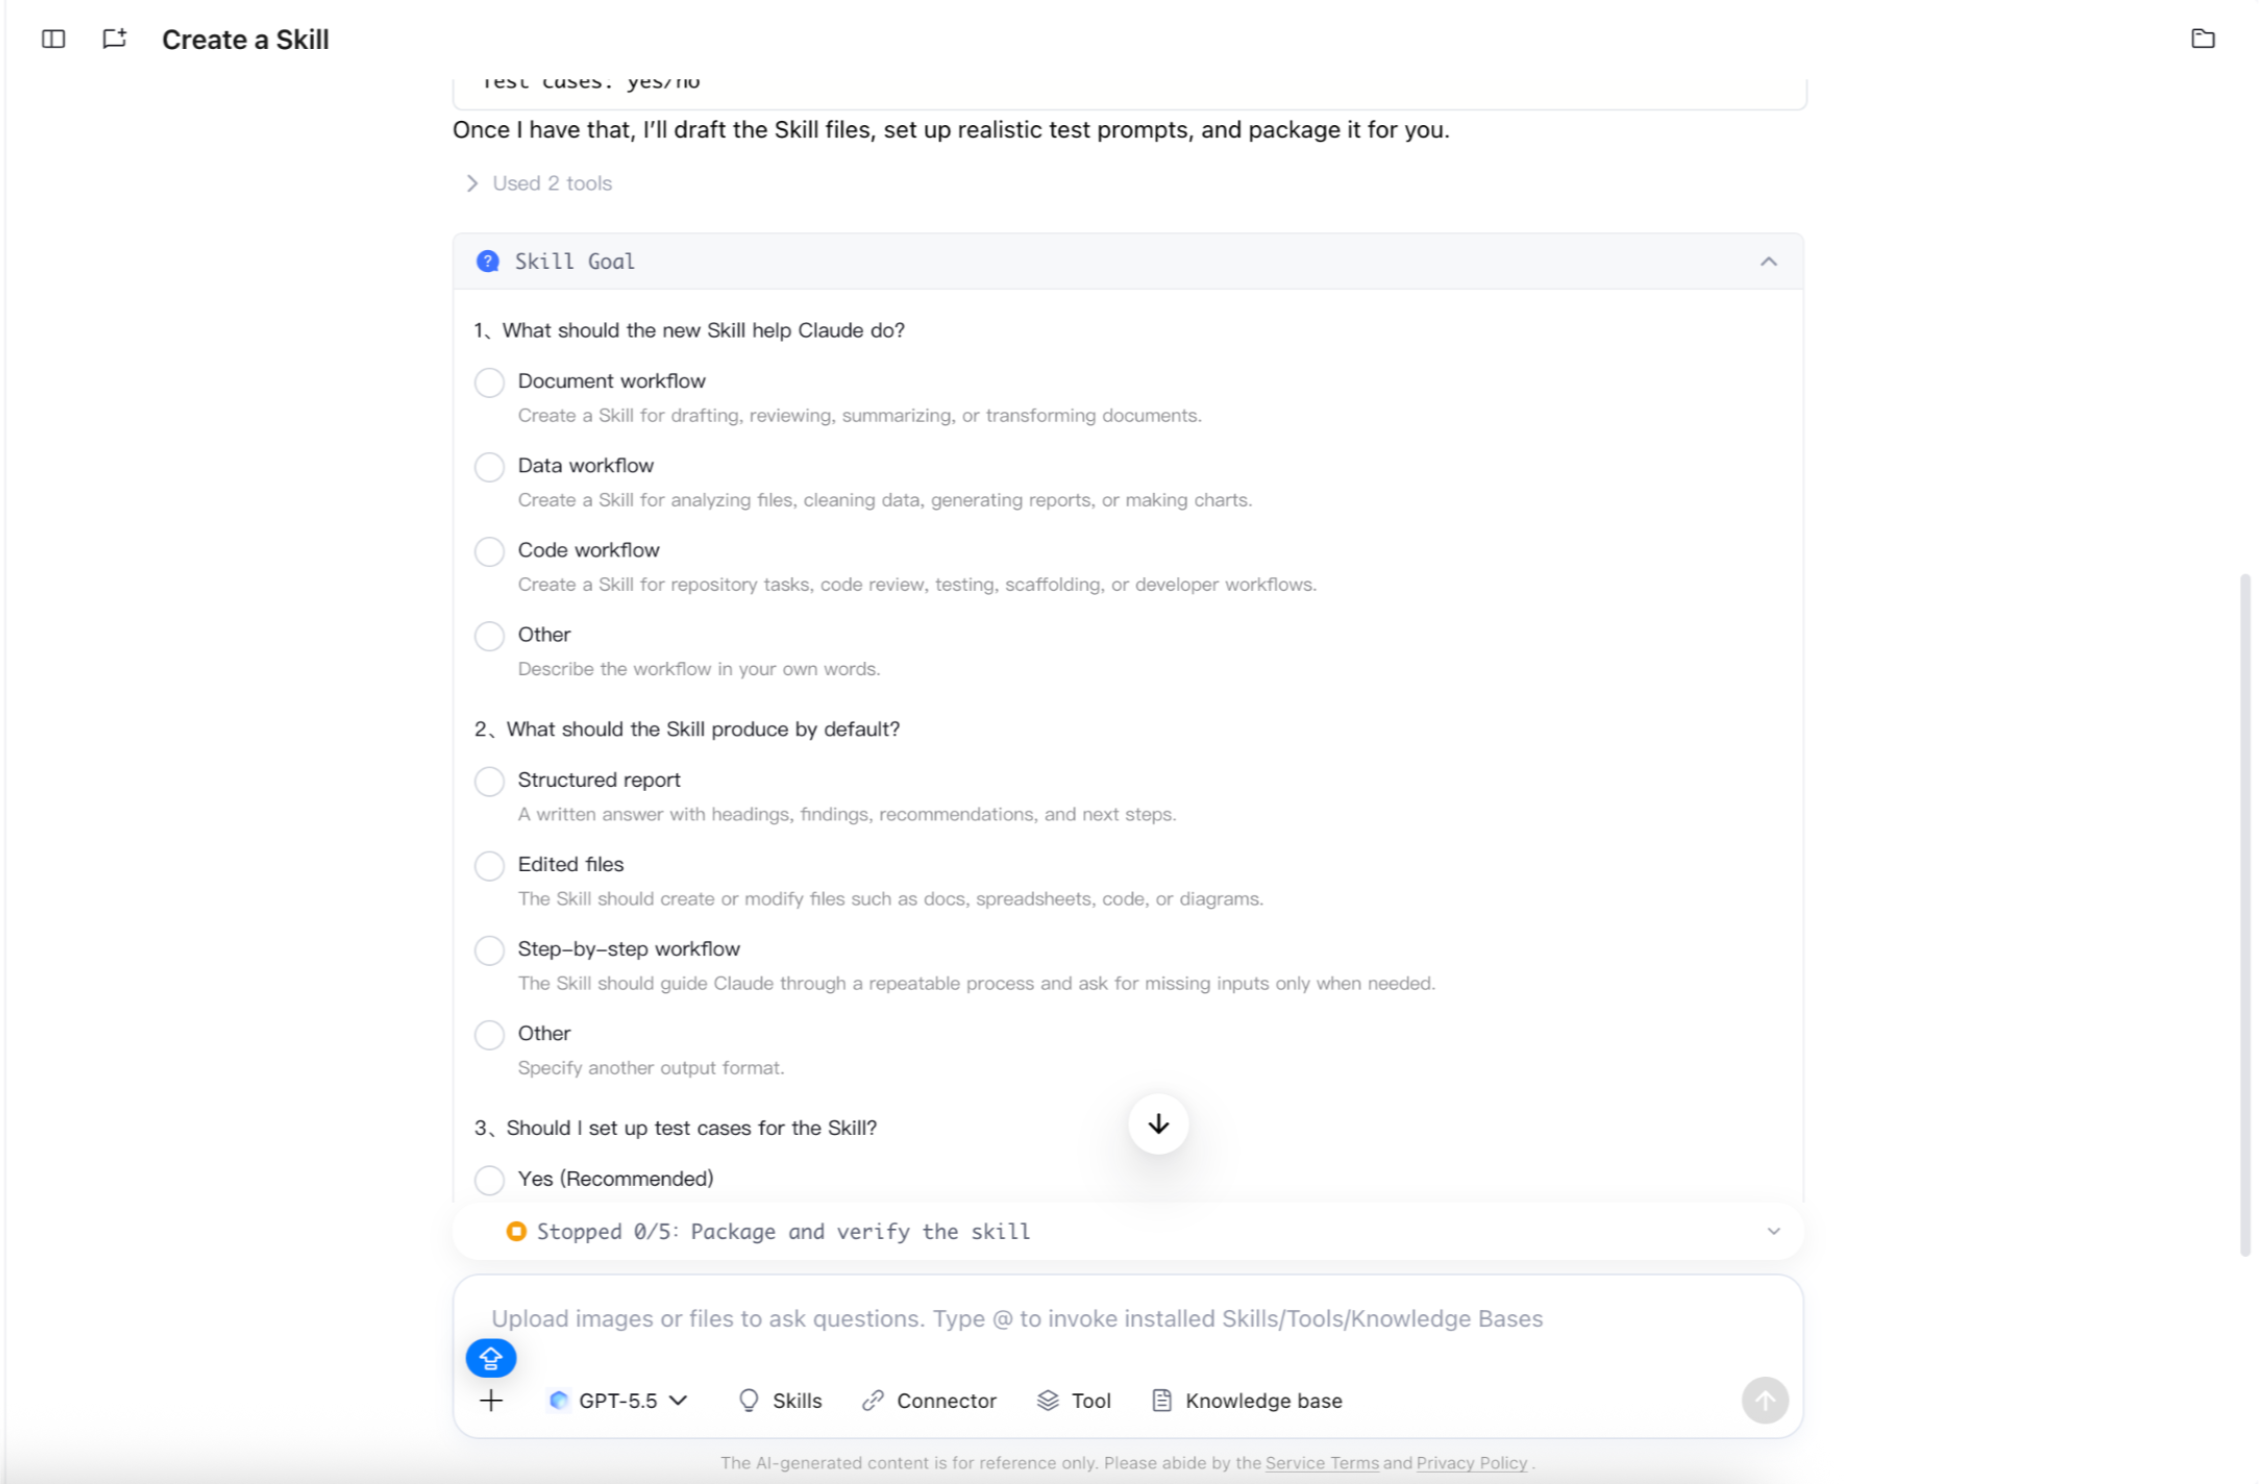
3. After the intelligent development assistant detects the intent to create a Skill, the conversation flow is automatically switched to Skill creation mode.
The intelligent development assistant clarifies the following dimensions through 1 to 3 rounds of dialogue. You can reply to each item individually, or directly reply with "Use defaults" to let the AI infer automatically.
Step 3: Obtain the AI-Generated Skills Package
After requirement clarification is completed, the intelligent development assistant outputs the generated Skills package (ZIP format) in the dialog bubble, which contains the complete file structure (SKILL.md, scripts, dependency declarations, and so on).
Follow-up Action
Description
Download ZIP package.
Click the download icon on the right side of the Skills package card in the chat bubble to save the ZIP package locally. You can review and adjust it locally, then manually import it to the Skills Square by following the steps in "Method 1".
Instruct the AI Development Assistant to Install to Skills Square.
In the conversation, send an instruction similar to "Install this skill to the Skills Square" to the AI Development Assistant. The AI Development Assistant will automatically invoke the ADP skill management tool, first complete a security check, and then list this Skill to the Custom Skills of the current space.
Note:
When a Skill is automatically published by the Smart Desk, the platform also first performs a security review (format validation + security scanning). The Skill appears in the Custom Skills list only after the review passed.
If you are not satisfied with the generated result, you can continue to add modification requests in the conversation. The intelligent development assistant will then regenerate the Skills package.
Managing Custom Skills
In the Custom Skills list, you can perform the following operations on the created Skills:
Operation
Description
View details
Click the Skill card to view its basic information and usage.
Search
Quickly search by Skill name using the search box.
Favorite
Select the Favorite filter to quickly view your favorited Skills.
Submit for enterprise sharing
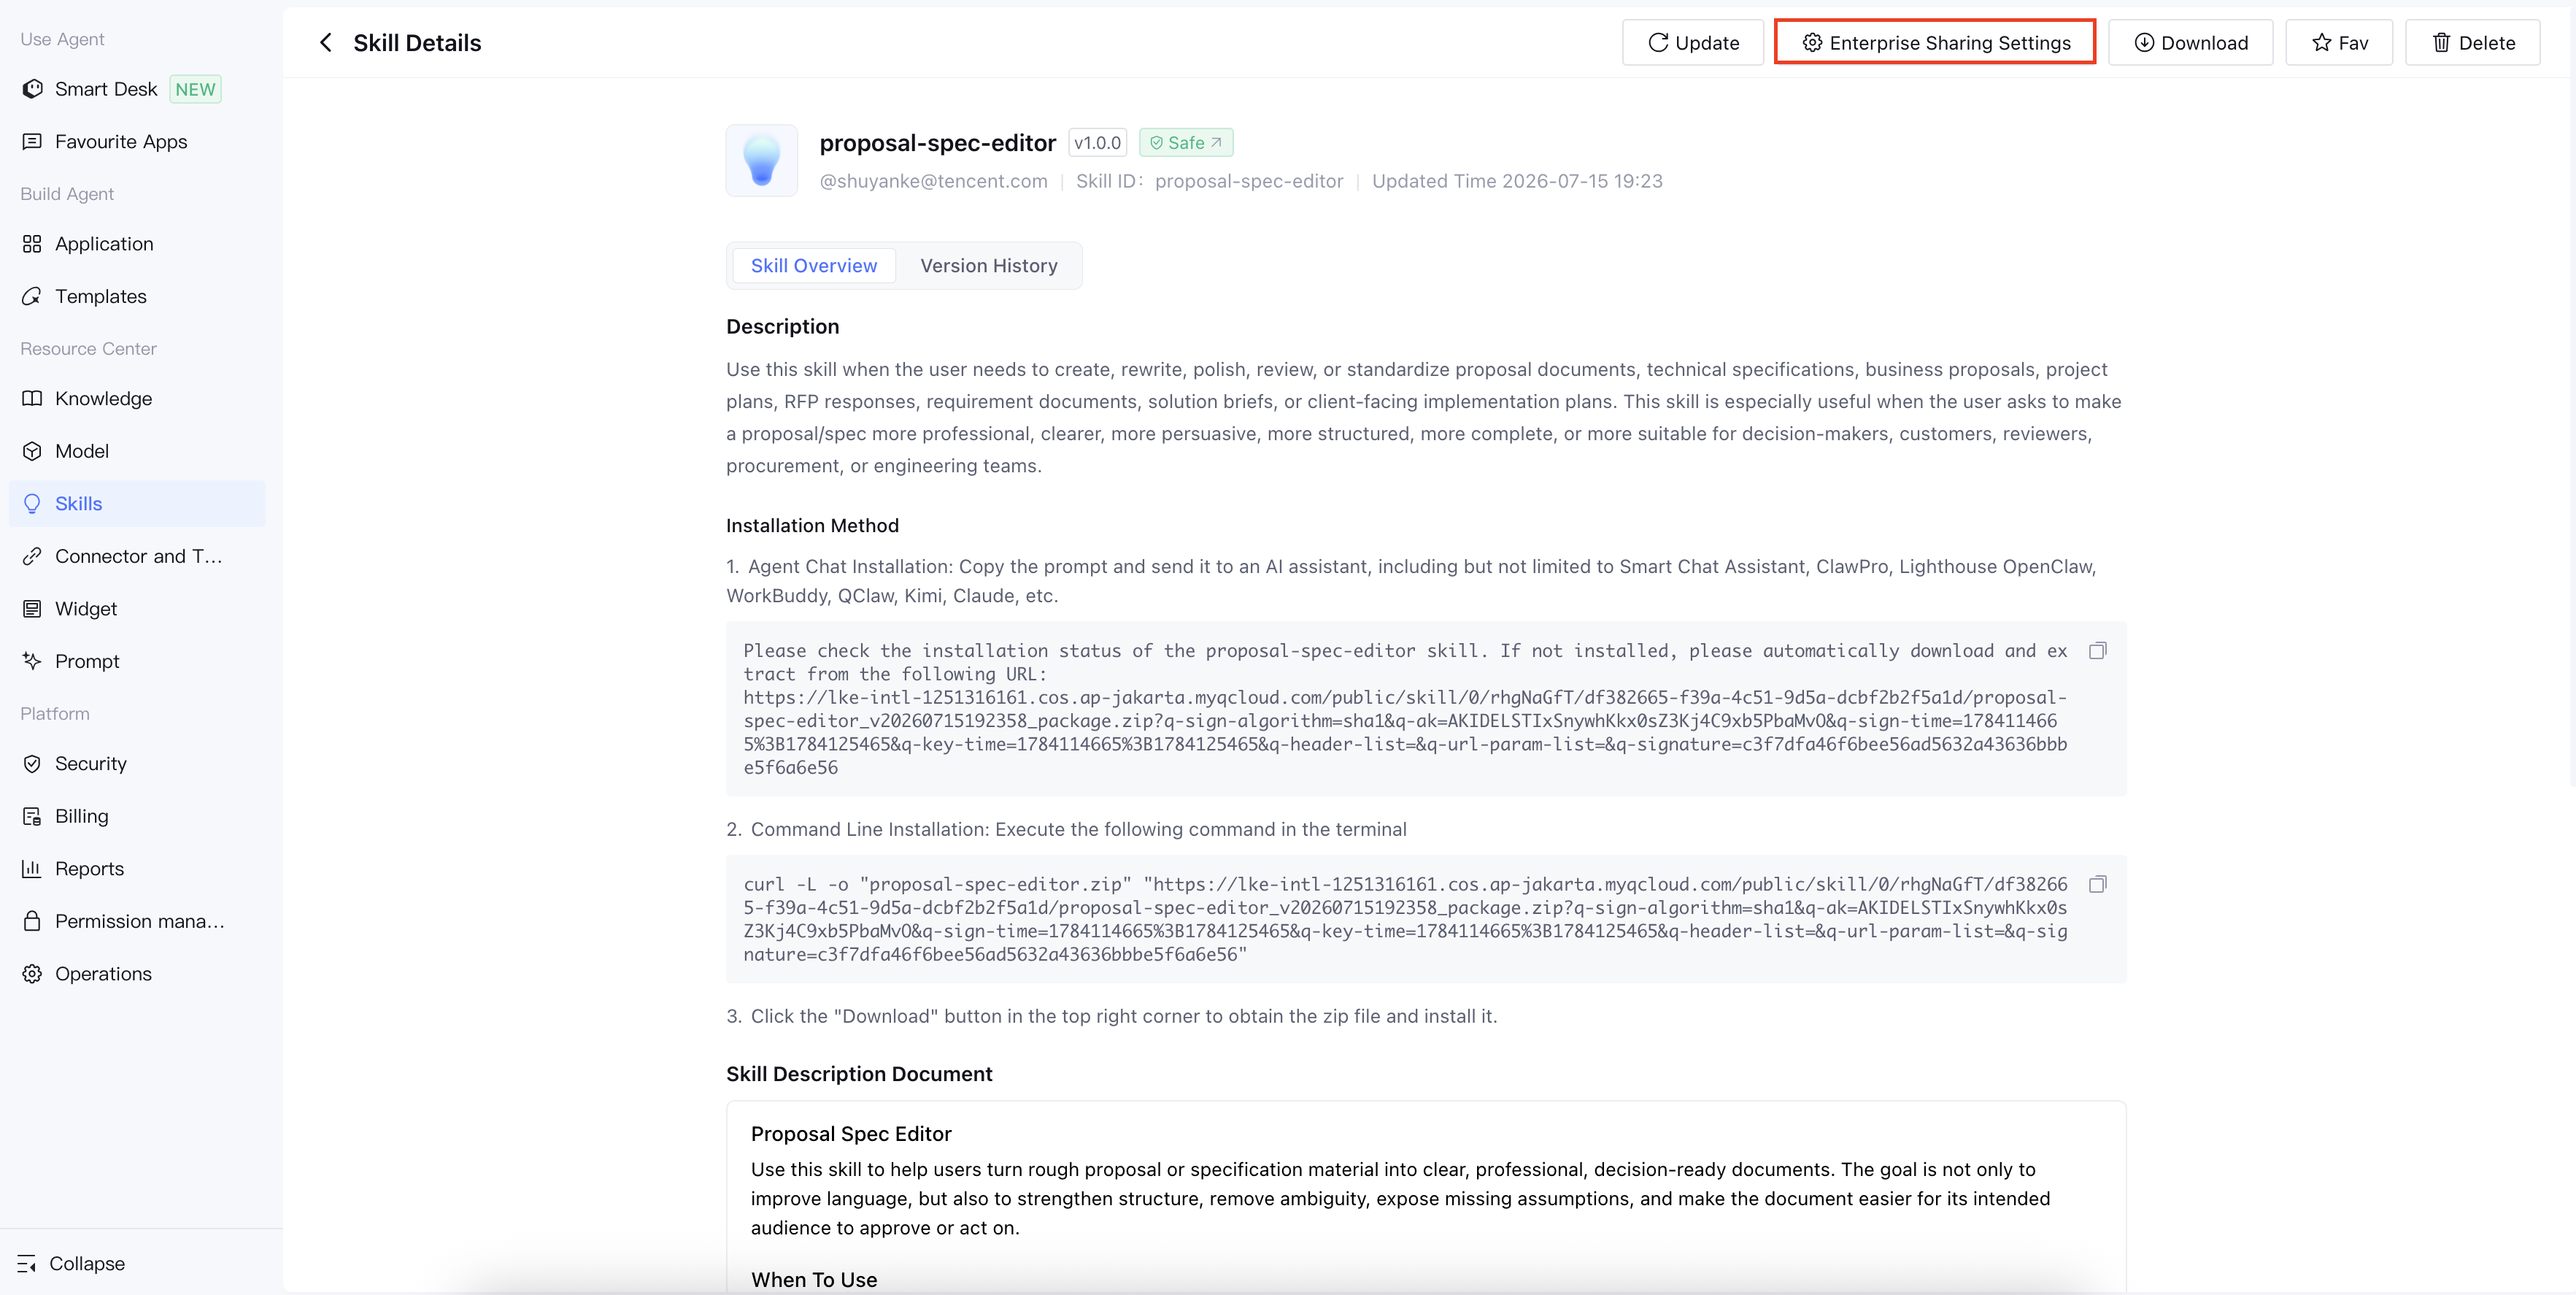
Submit your published custom Skills for enterprise-wide sharing approval. Once approved, they can be viewed and used by all members across all spaces within the enterprise.
Delete custom Skills
Delete custom Skill entity (Note: This is different from "Delete installed Skill". For details, see the description below.).
Submitting Enterprise Shared Skills
If you wish to promote a Custom Skill you have published within your enterprise, you can submit it for enterprise sharing approval. After the approval is granted, the Skill will appear in the Enterprise-shared Skills tab, making it viewable and usable by members of all spaces under the enterprise.
Note:
Enterprise-shared Skills all originate from published Custom Skills. Only a Custom Skill that has been successfully published and passed the security review can be submitted for enterprise sharing by its editor. The security check is not triggered again upon submission, and the security report that was passed during the Skill's publication is reused.
Who Can Submit
Only the editor of a Skill can initiate an enterprise sharing submission, including:
The author of the Skill;
Users within the space who have been granted edit permissions by the space administrator.
Prerequisites
The Skill has been successfully published to Custom Skills (meaning it has passed the security review).
No enterprise sharing approval is currently in progress for this Skill.
Steps
1. In the left sidebar, choose Resource Center > Skills, and then select the Custom Skills tab.
2. Locate the target Skill, and click its card to go to the Skill details page.
3. Click Enterprise Shared Settings in the upper-right corner of the page.
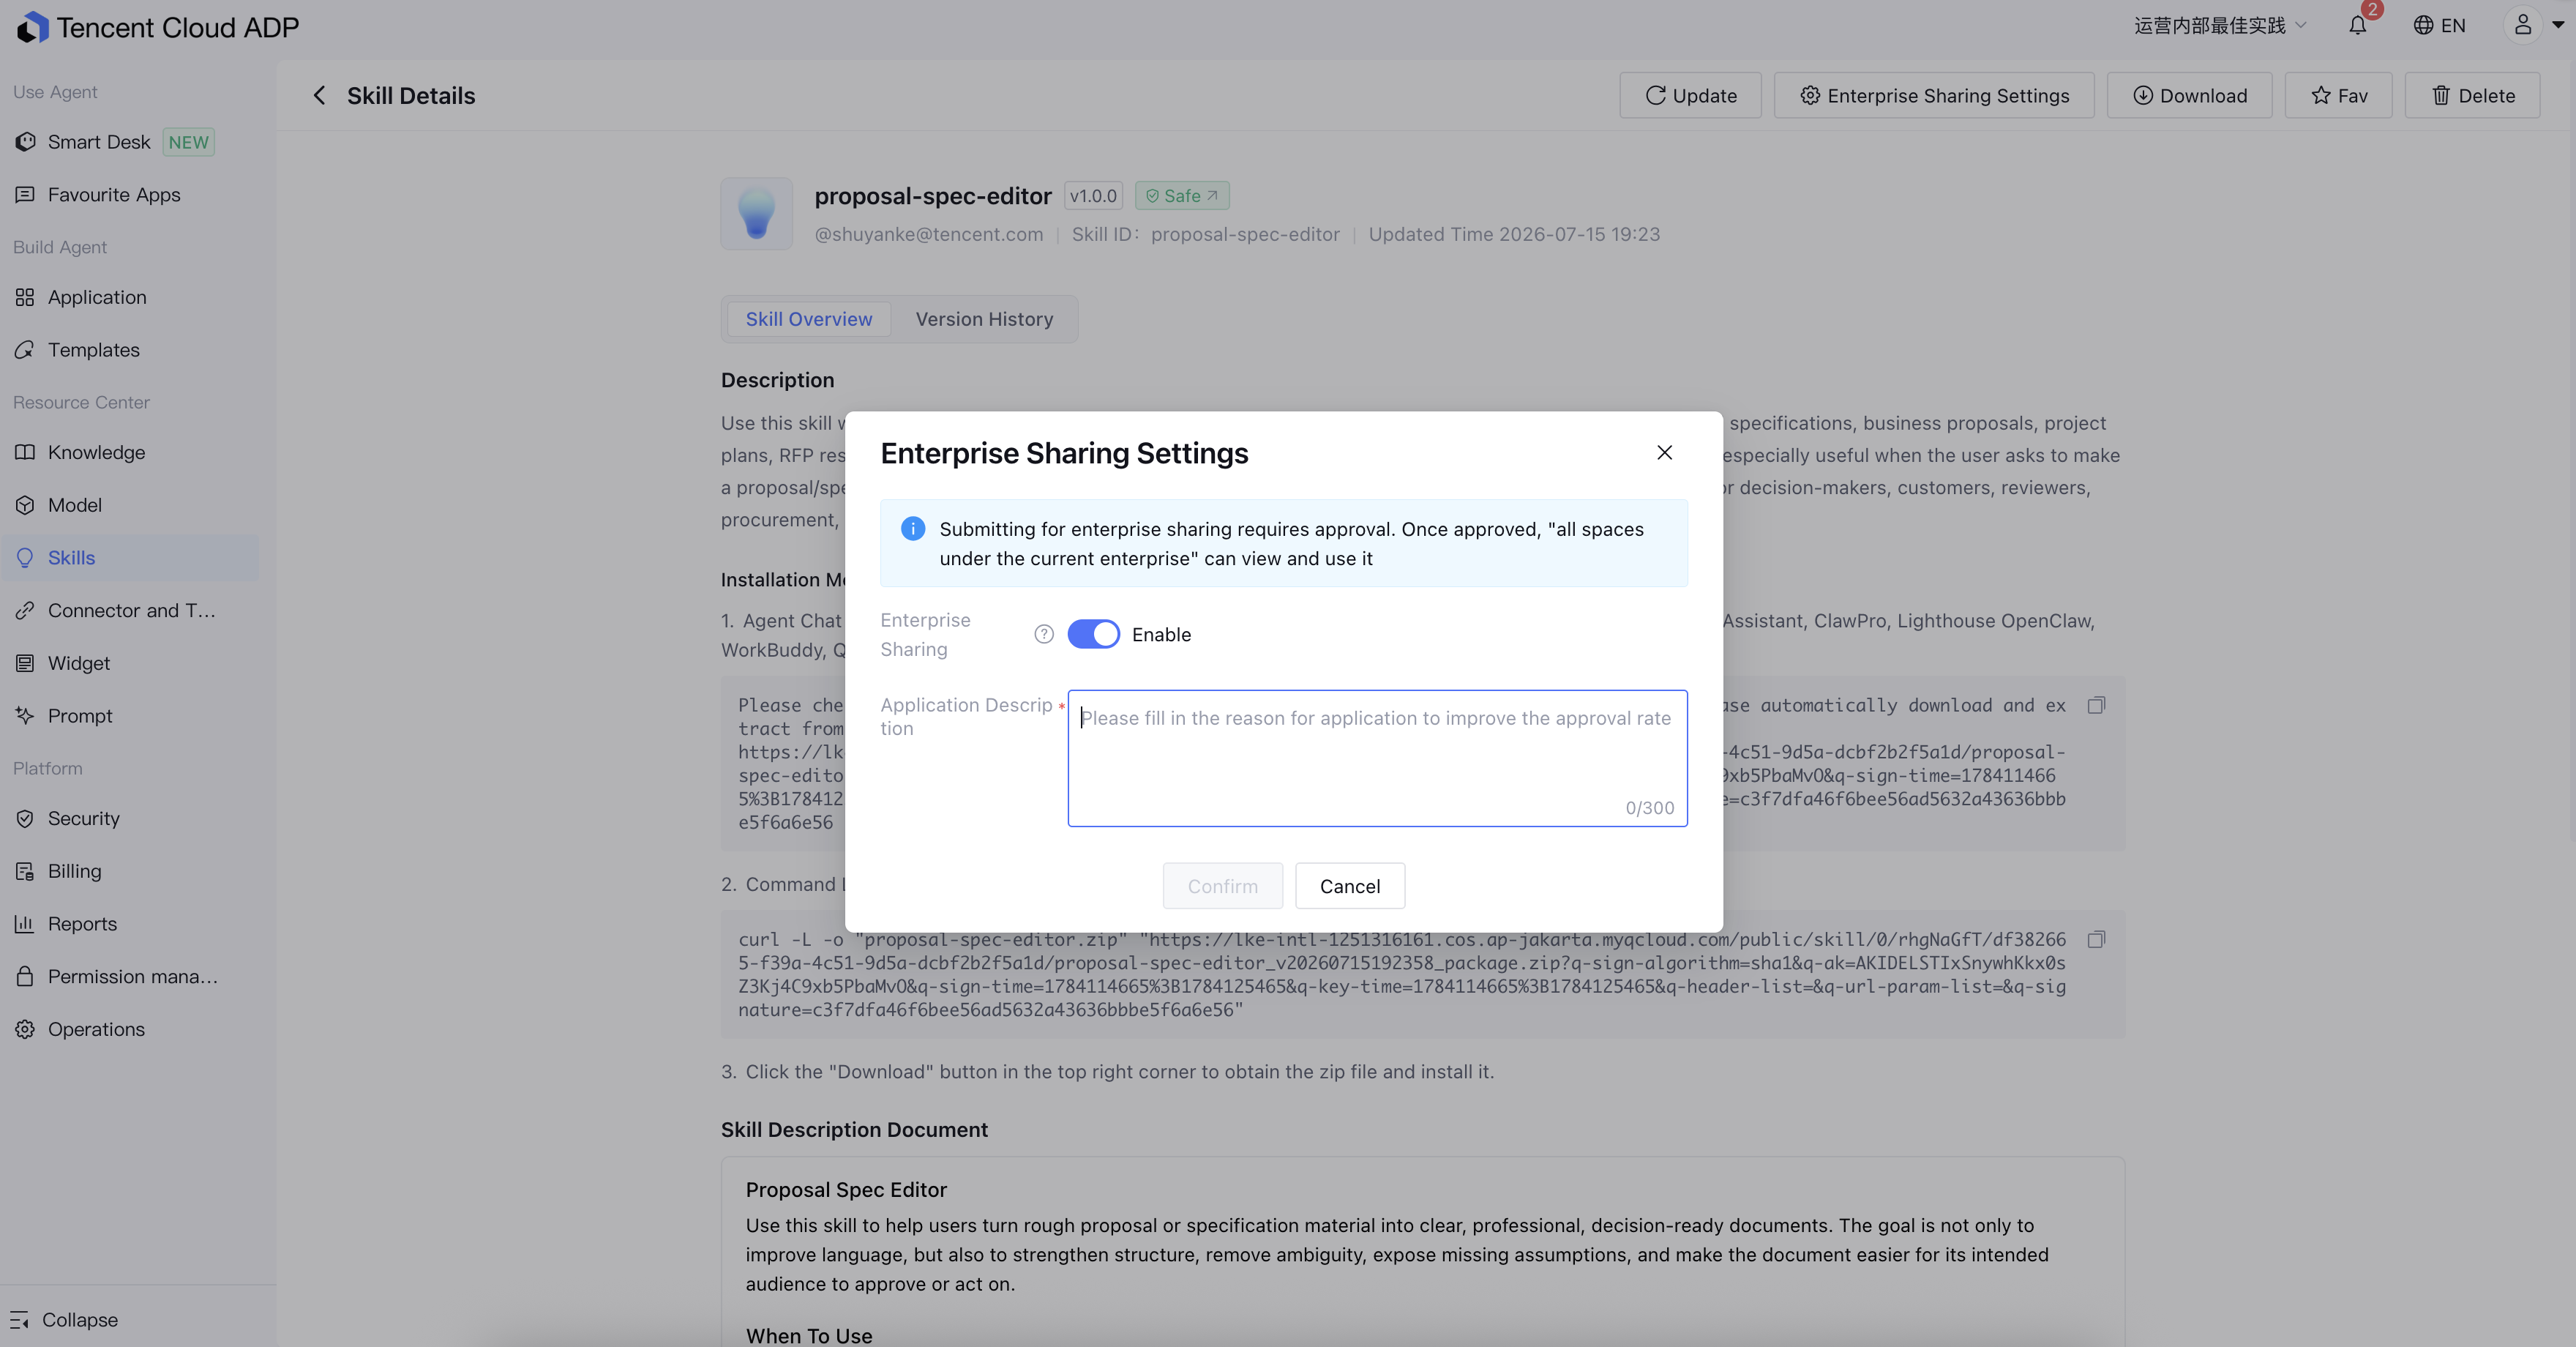
4. In the dialog box that pops up:
Turn on the Enterprise Sharing switch (disabled by default).
In the Application Description input box, enter the reason for the application (required, up to 300 characters). Examples include the Skill's applicable scenarios and the roles within the enterprise it is recommended for, to help the approver make a quick decision.
5. Click OK to submit the application for approval.
Status After Submission
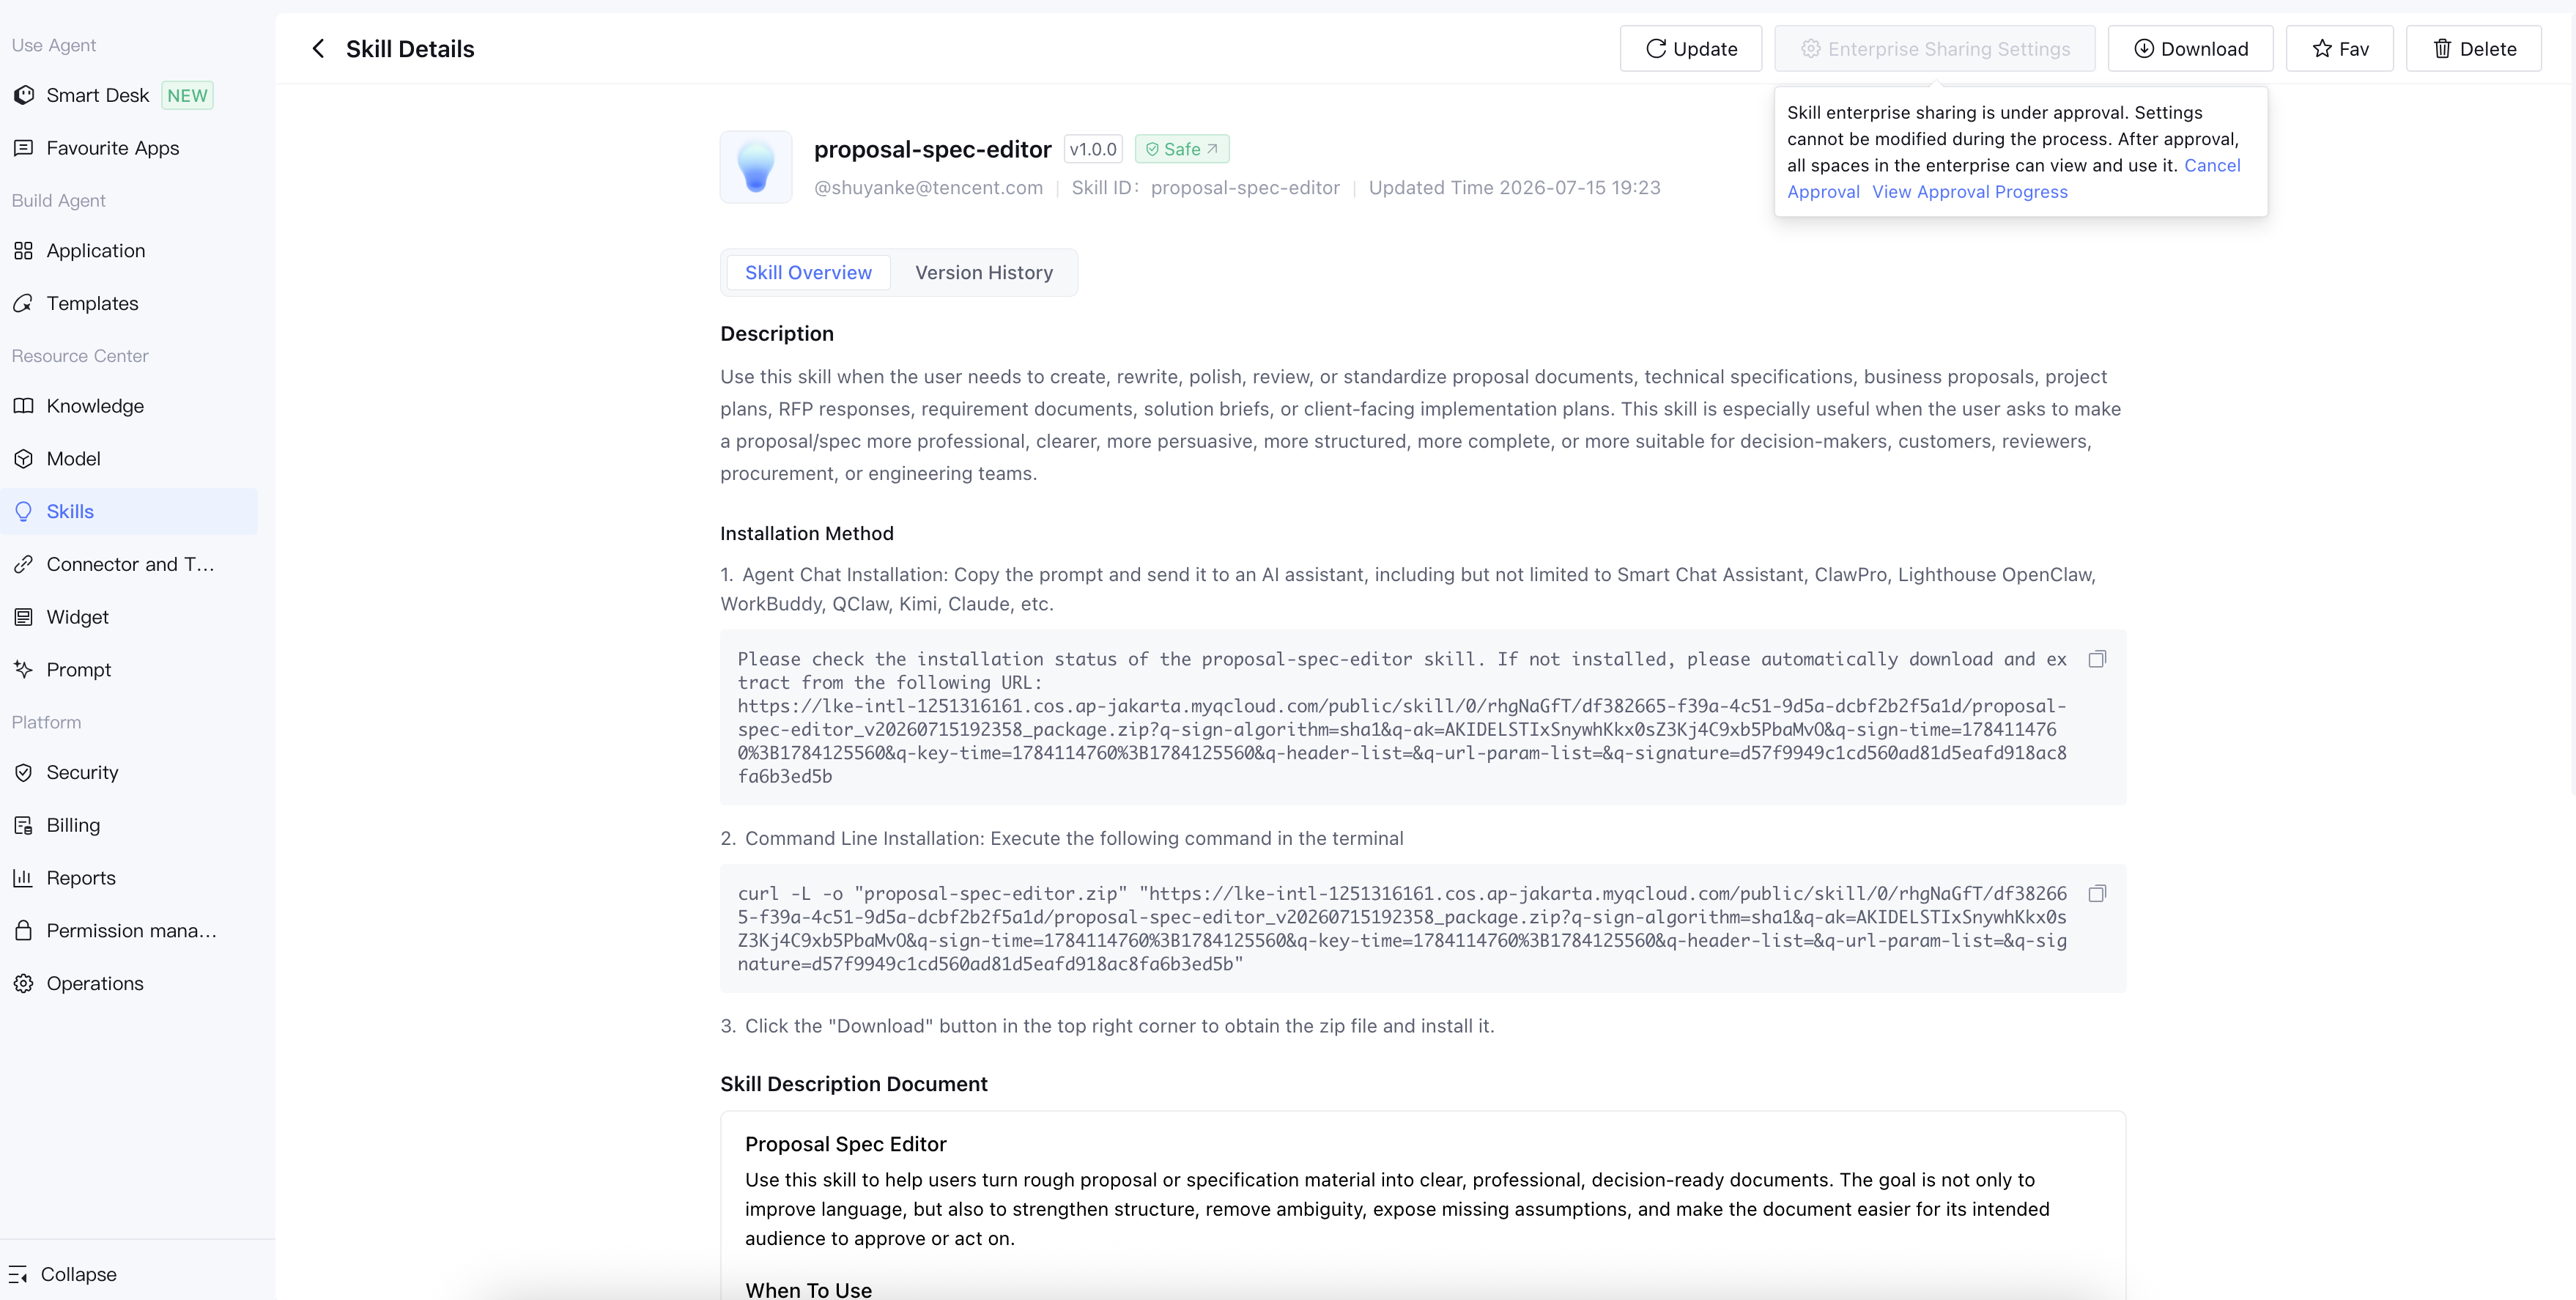
After submitting the application for approval, you can view its processing status on the Skill details page:
Note:
The only entry point for applicants to view the approval progress is View Approval Progress in the hover tip for Enterprise Sharing Settings in the upper-right corner of the Skill details page. The Approval Center in the upper-right navigation is designed for approvers. Therefore, applicants cannot view their own submitted approval records in the Approval Center list for now.
The Cancel Approval entry is also provided only in the hover tip in the upper-right corner of the Skill details page.
Submitting an application for enterprise sharing does not trigger a security check again. The security report that was passed when the Skill was published as a Custom Skill will be reused.
Deleting Custom Skills
In the Custom Skills list, you can delete a published Custom Skill. Deletion is an irreversible operation. To prevent accidental deletion, the platform performs the following two pre-checks:
Check : Enterprise Shared Status
If the Skill is in the <Enterprise Sharing> state (that is, the <Enterprise Sharing> switch is enabled), it cannot be deleted. The platform will display the message <Cannot delete the current Skill> and provide a quick entry for Disabling Enterprise Sharing.
Note:
Deleting a Custom Skill is different from <Deleting an Installed Skill> (uninstalling). The latter only removes the Skill reference from the Smart Desk/application, without deleting the Skill itself from the Skills Hub. For details, see the relevant description in Using Skills.
Custom Skills that have been submitted for Enterprise Sharing approval but have not yet been approved must first have their sharing revoked/disabled before they can be deleted.