Amount of storage space
Download
Focus Mode
Font Size
In the asset management module, both the Software Management > Software List > Software Repository feature and the Software Management > Distribution Management feature require storage space configuration. The storage space configuration methods for the two features are identical. Based on this commonality, this document provides a unified description of the storage space configuration method to improve content conciseness and readability.
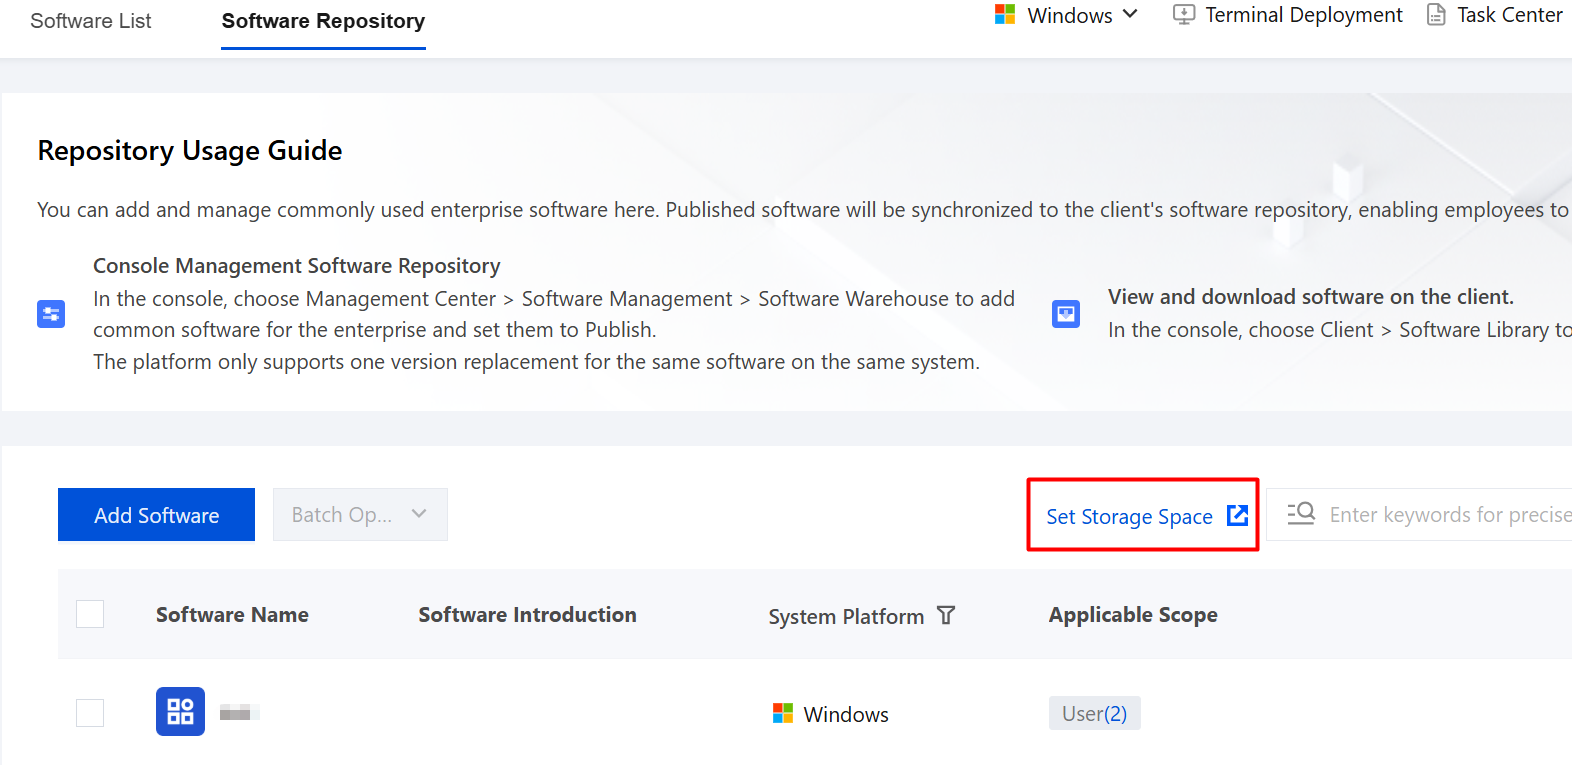
To configure the Software Repository storage plan, log in to the Tencent iOA Zero Trust Security Management System console and choose Software Management > Software List > Software Repository in the left sidebar.
On the Software Repository page, click Set Storage Space.
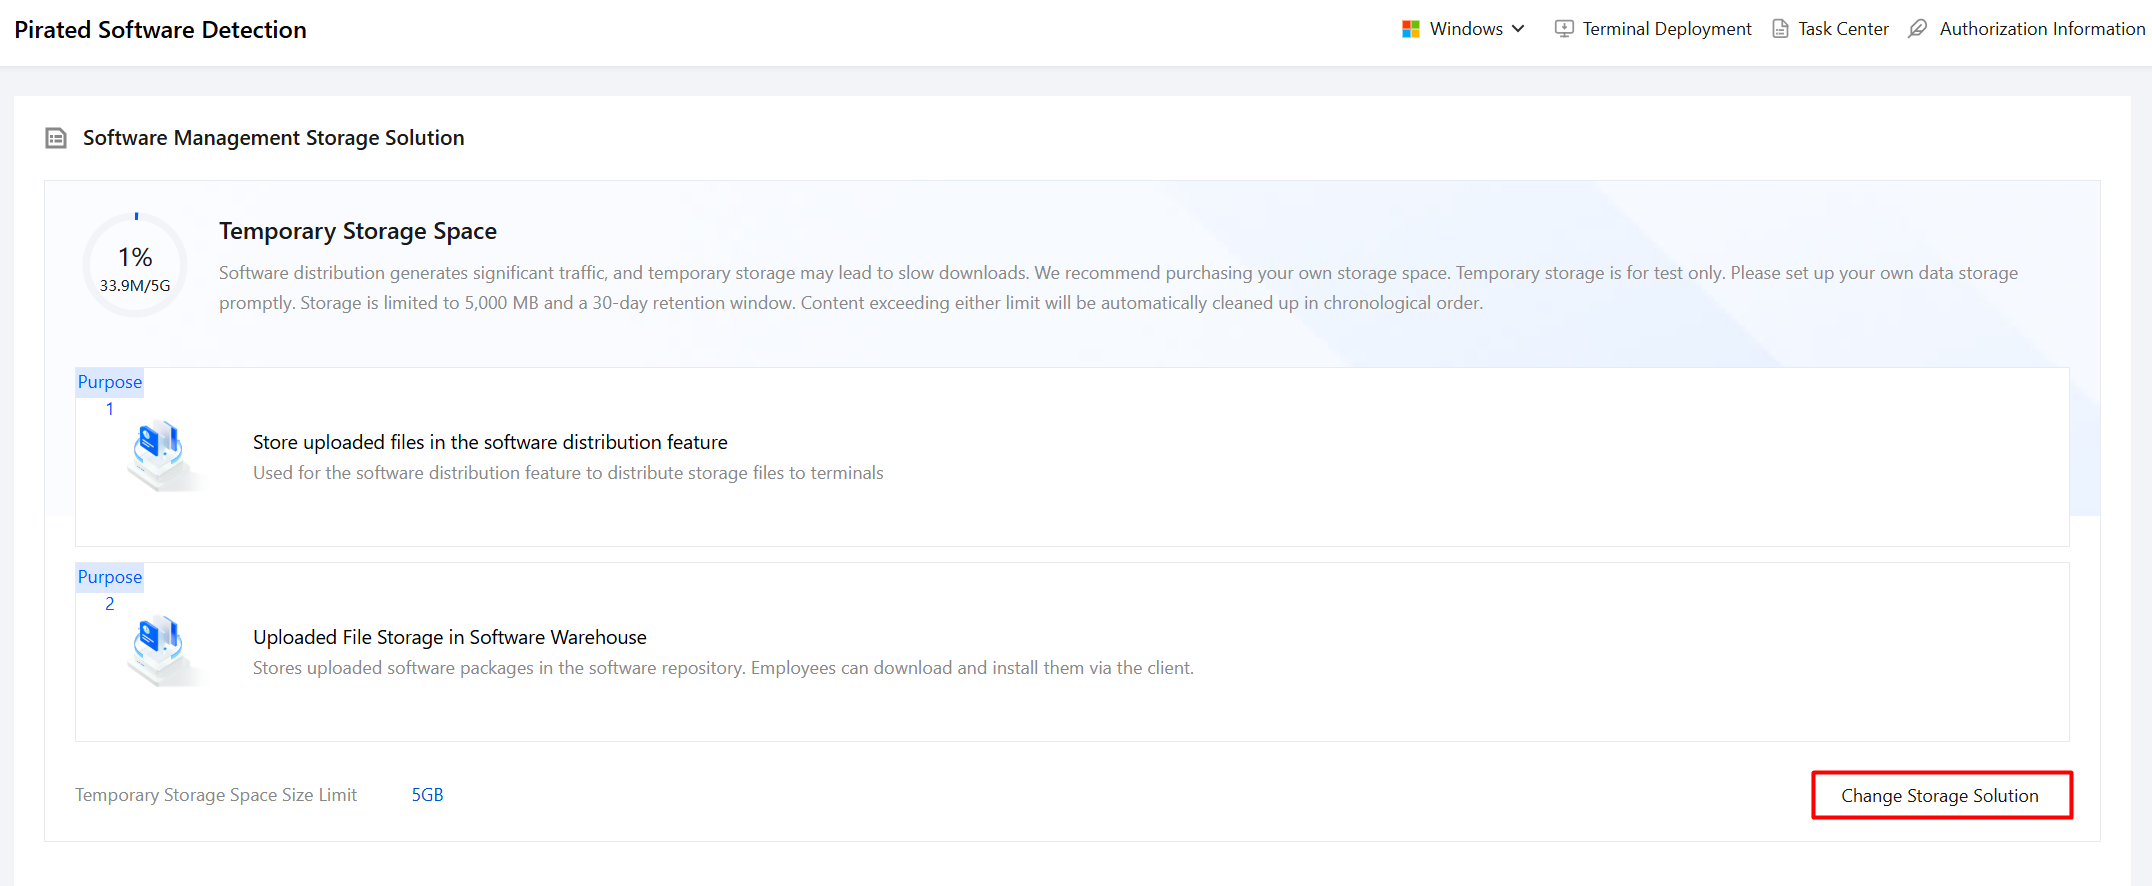
Click Change Storage Solution to configure Tencent Cloud or S3-compatible storage.
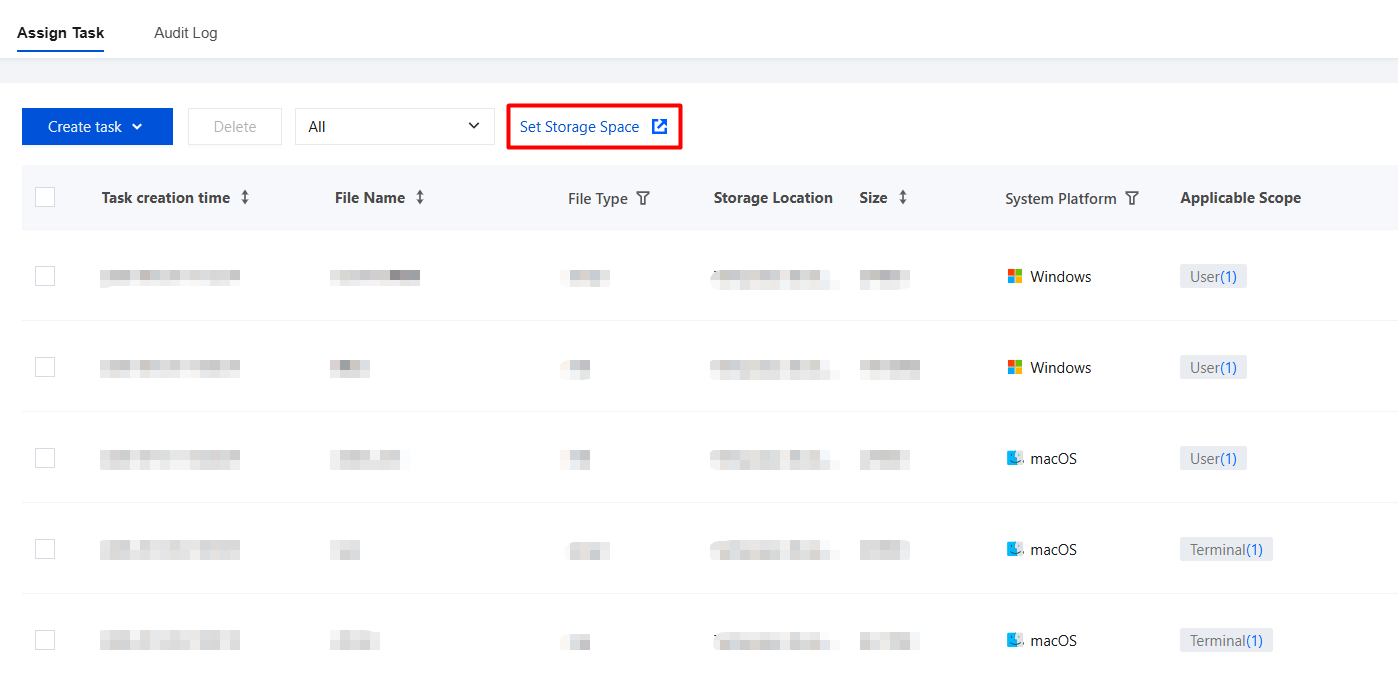
To configure the Distribution Management storage plan, log in to the Tencent iOA Zero Trust Security Management System console and choose Software Management > Distribution Management in the left sidebar.
On the Distribution Control page, select a distribution task and click Set Storage Space.
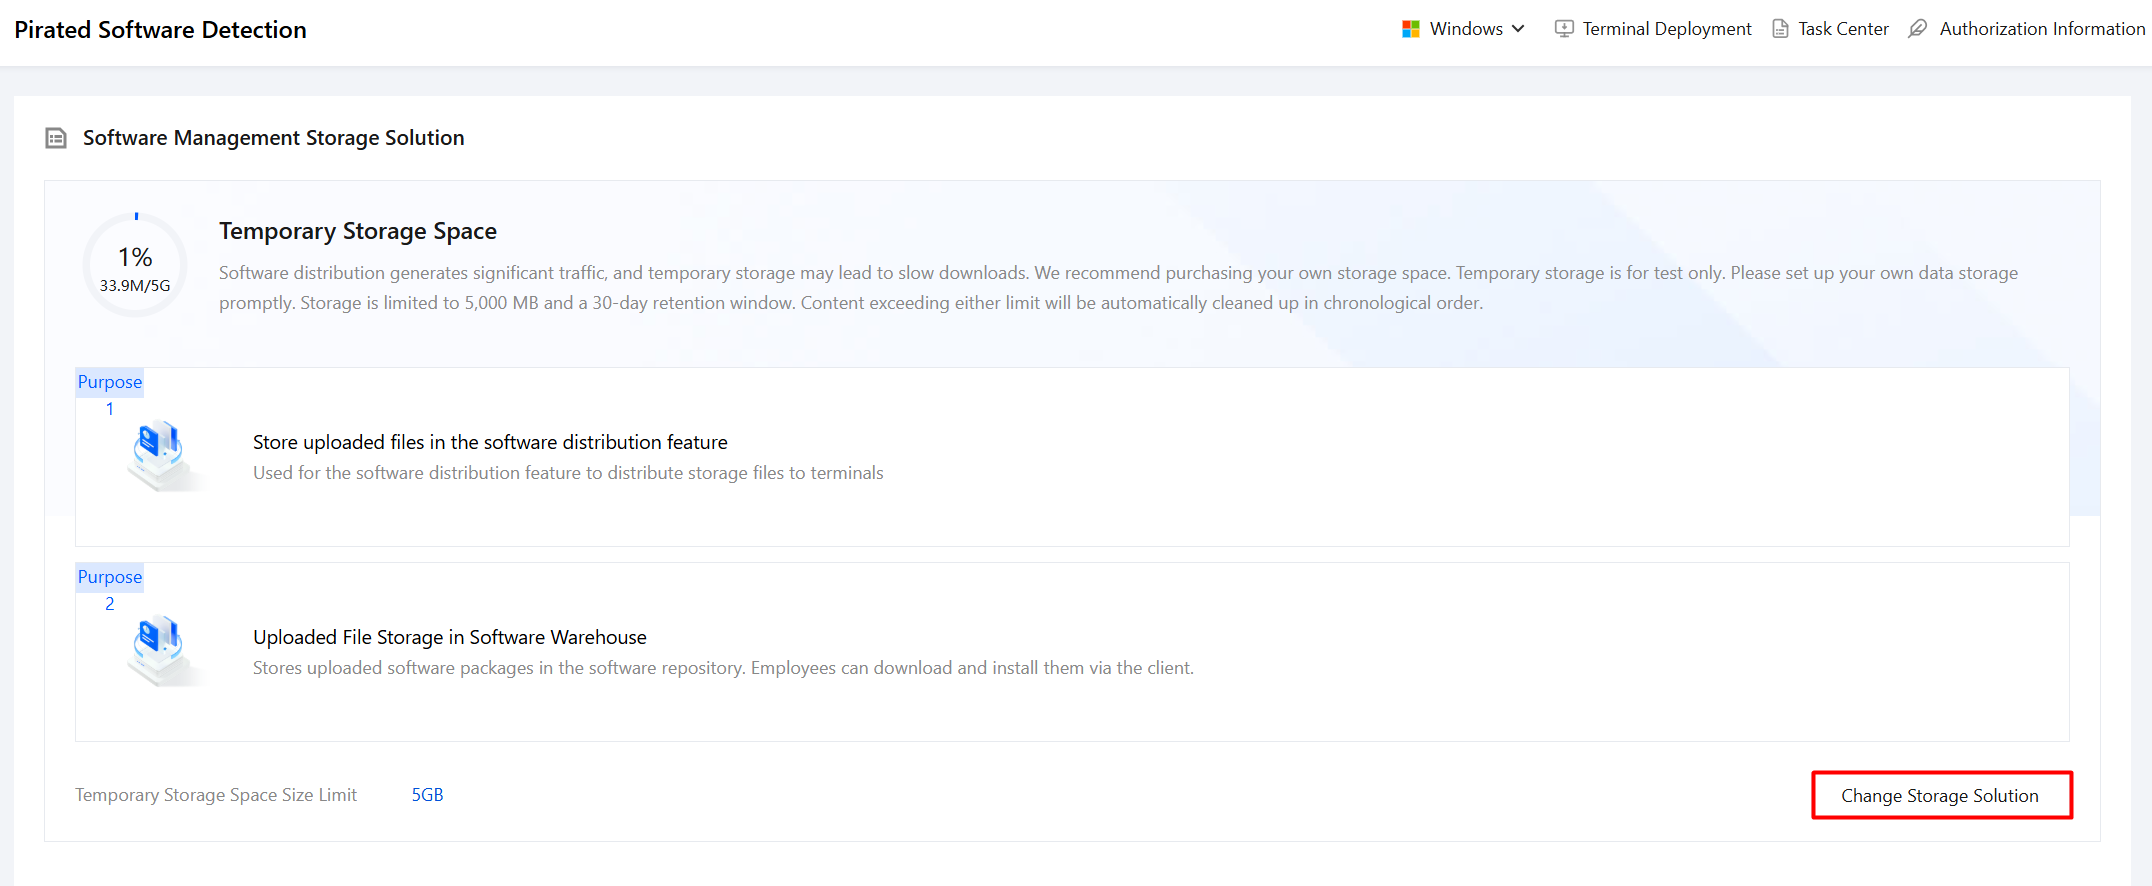
On the Storage Space page, click Change Storage Plan and select Tencent Cloud or S3 Protocol as needed.
Configuring Tencent Cloud Storage Service
Step 1: Creating a Bucket
Buckets are used to store sensitive files and forensic screenshots from iOA audit logs.
Note:
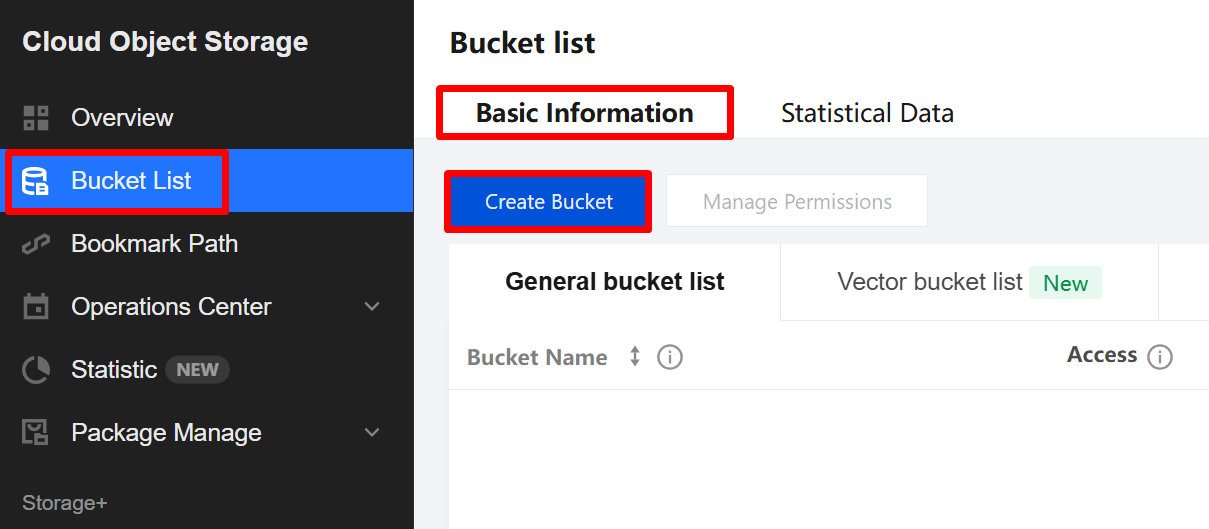
1. Log in to the COS console and choose Bucket List in the left sidebar.
2. On the Bucket List page, click Create Bucket to create a bucket.
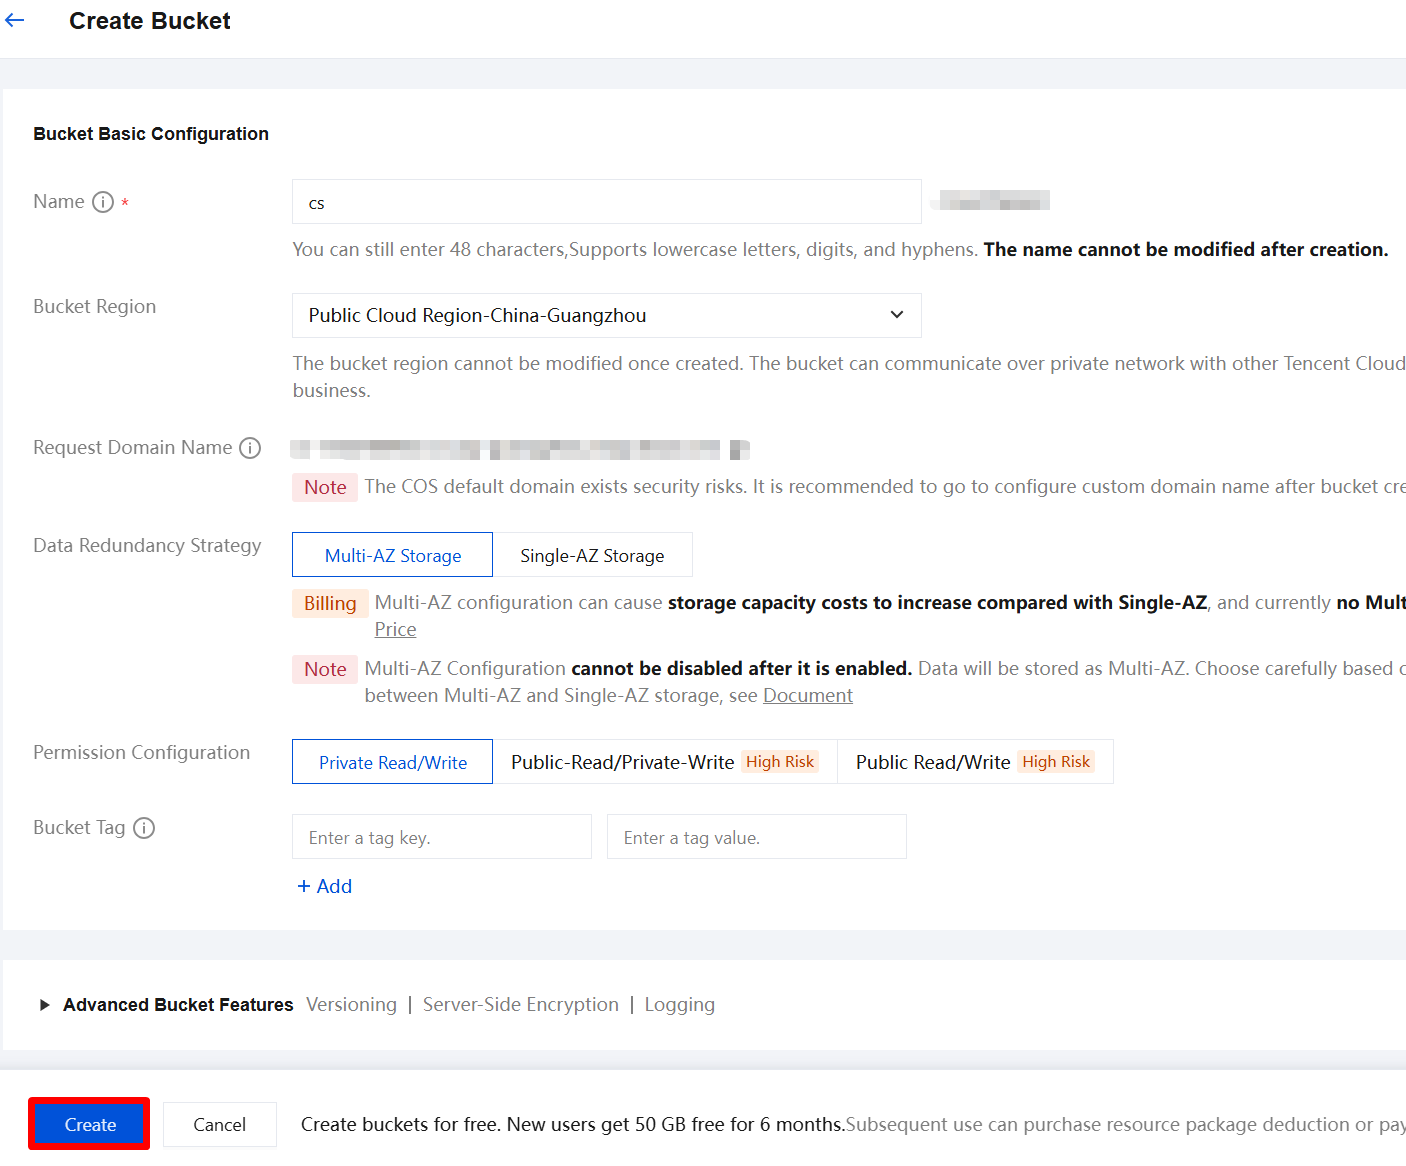
3. In the Create Bucket window, configure the basic information and click Create.
Parameter Name | Description |
Region | Select the region. A bucket can communicate over the private network with other Tencent Cloud services in the same region. Once the region is selected, it cannot be modified. Please select it carefully. |
Name | Enter a bucket name. Once created, the name cannot be modified. Please enter it carefully. |
Access Permission | You can select from three access permissions: private read/write, public read/private write, and public read/write. Recommended configuration: private read/write permission. |
Multi-AZ Feature | Some regions support the multi-AZ feature. For regions that do not support it, you can configure cross-region replication for buckets. The multi-AZ feature allows you to store data in different physical locations within the same geographic region, providing intra-city disaster recovery. It is recommended that you enable this feature. |
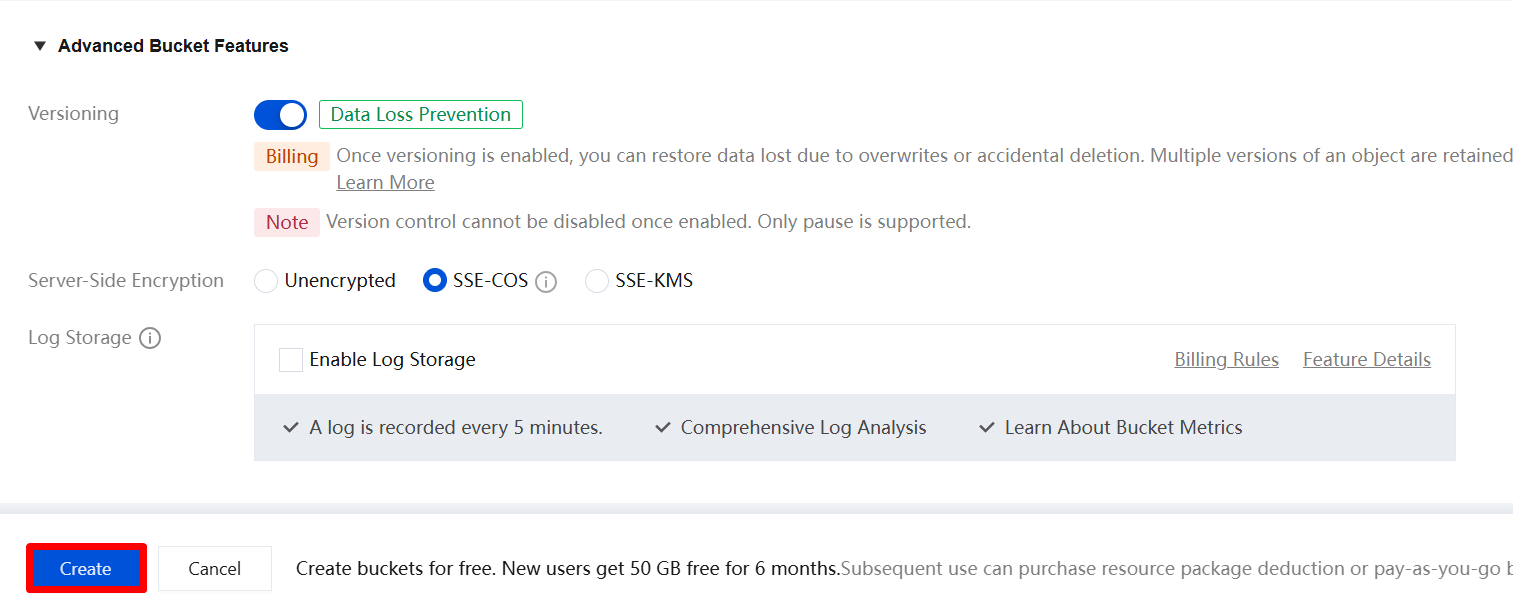
4. On the Advanced Optional Configuration tab, select the features as needed and click Create.
Parameter Name | Description |
Versioning | You can choose whether to enable versioning. After versioning is enabled, you can recover data lost due to overwriting or accidental deletion. |
Smart Compression | Smart Compression is a feature that minimizes image size as much as possible while ensuring image quality. After it is enabled, images in JPG/PNG/GIF format in the bucket are compressed in real time upon each access. |
Log storage | You can choose whether to enable log storage. After it is enabled, various request logs related to bucket operations are recorded. |
Bucket tagging | You can enter tag keys and tag values, and create up to 50 tags. |
Server-Side Encryption | You can choose no encryption or SSE-COS encryption. |
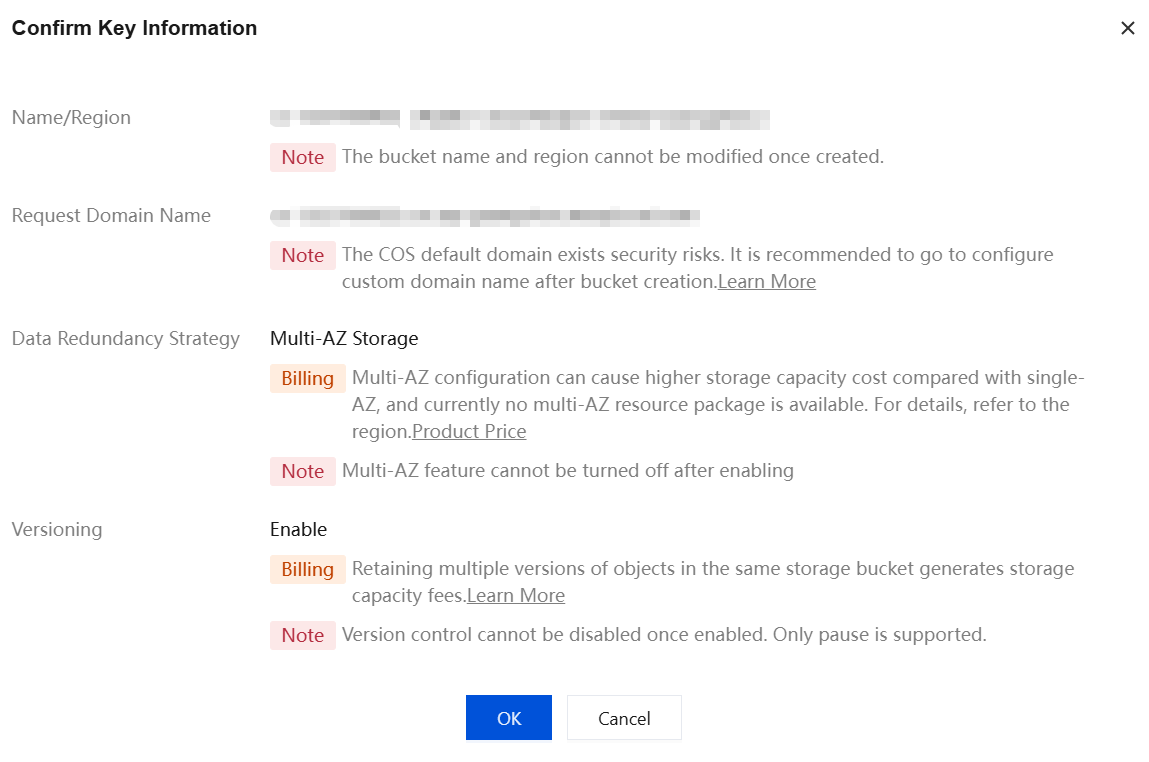
5. After confirming that the configuration information is correct, click OK to complete the bucket creation.
Step 2: Obtaining Bucket and Endpoint Parameters
1. After the bucket is created, click the bucket name on the Bucket List page to go to the bucket details page.

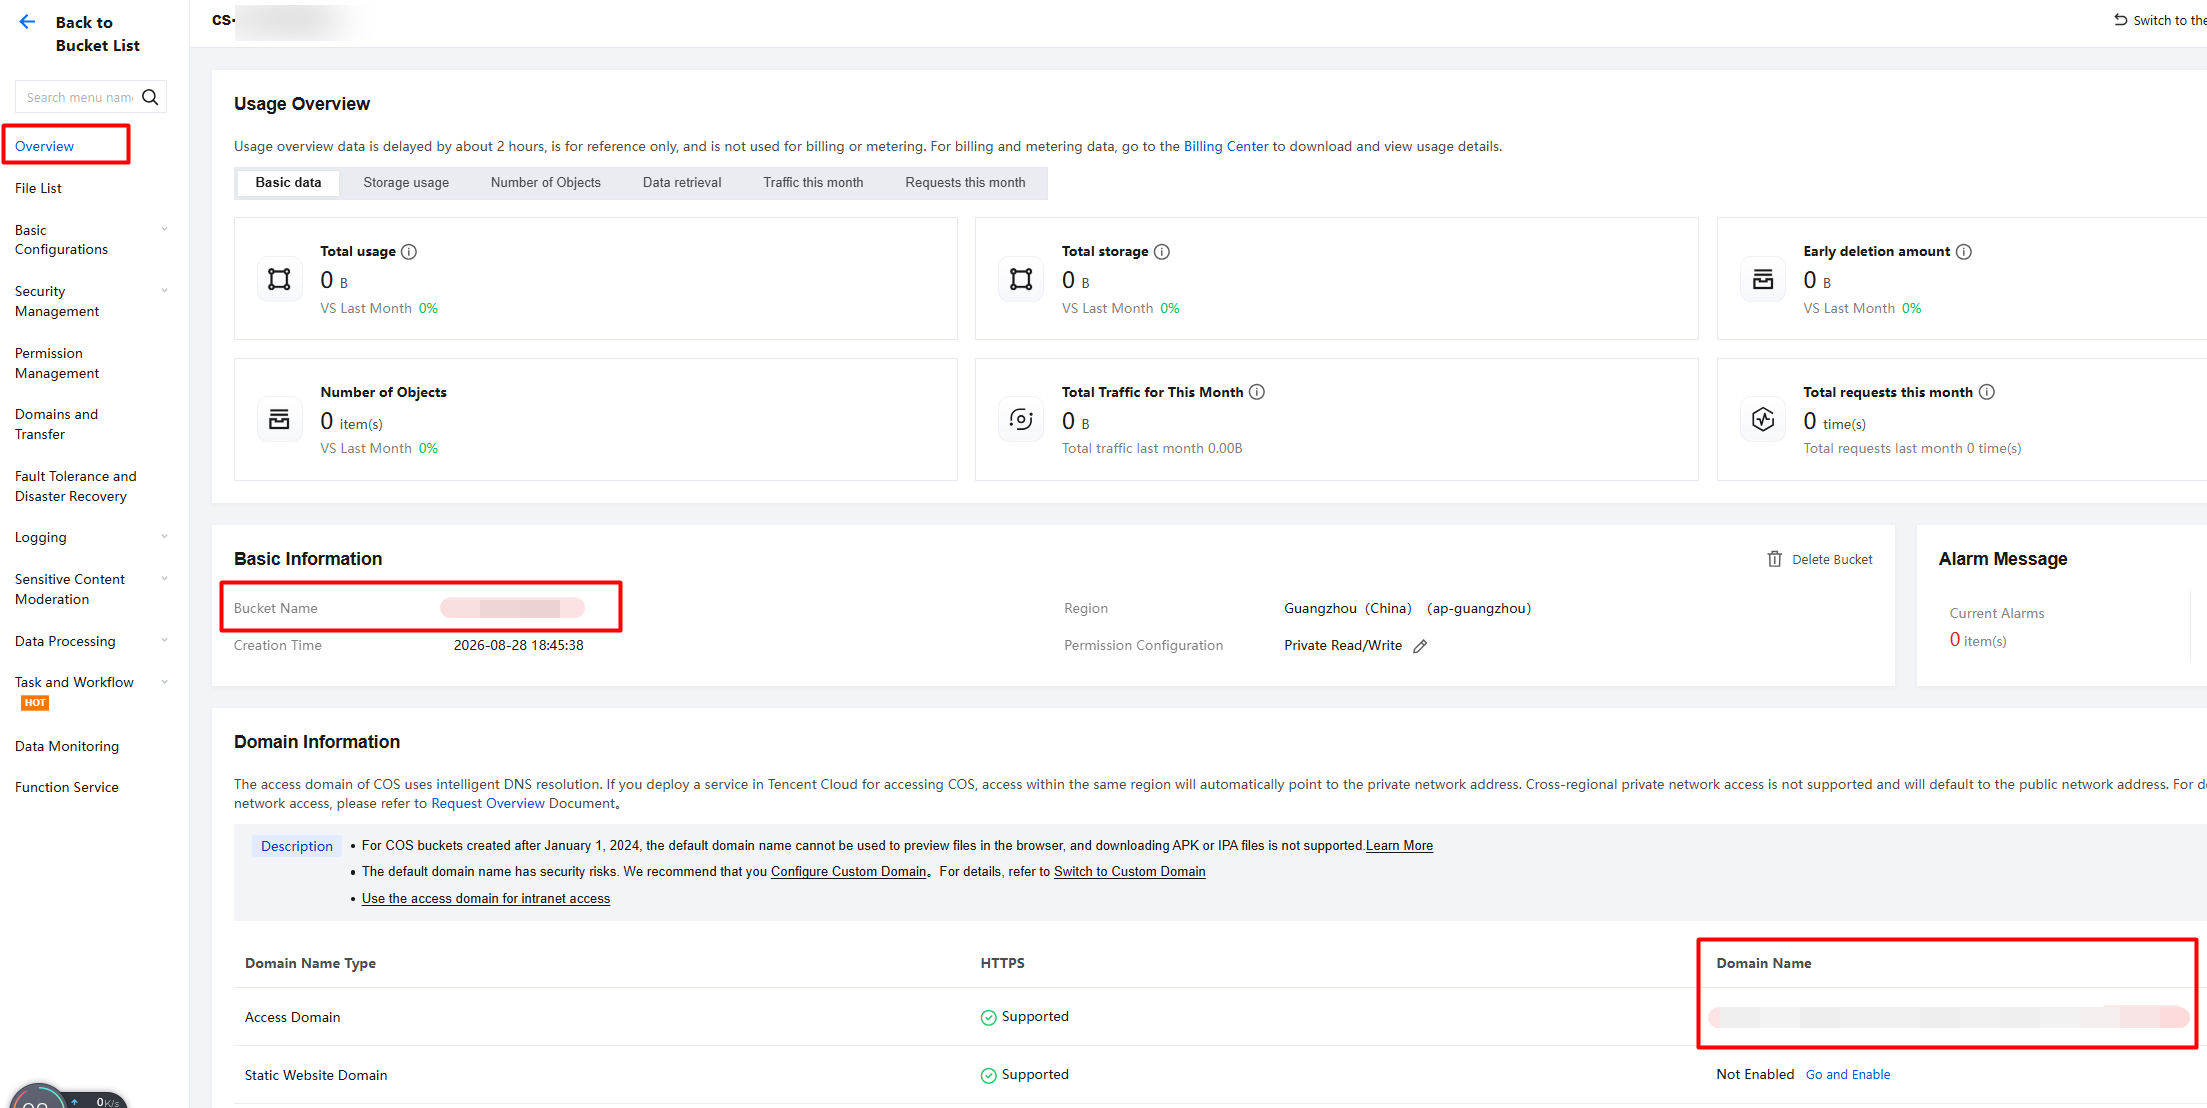
2. Click Overview to view the bucket overview page. Find the bucket name and domain name, and use them as the Bucket and Endpoint parameters respectively.
Step 3: Assigning a Sub-Account with Minimum Permissions to the Bucket
1. After the bucket is created, click the bucket name on the Bucket List page to go to the bucket details page.

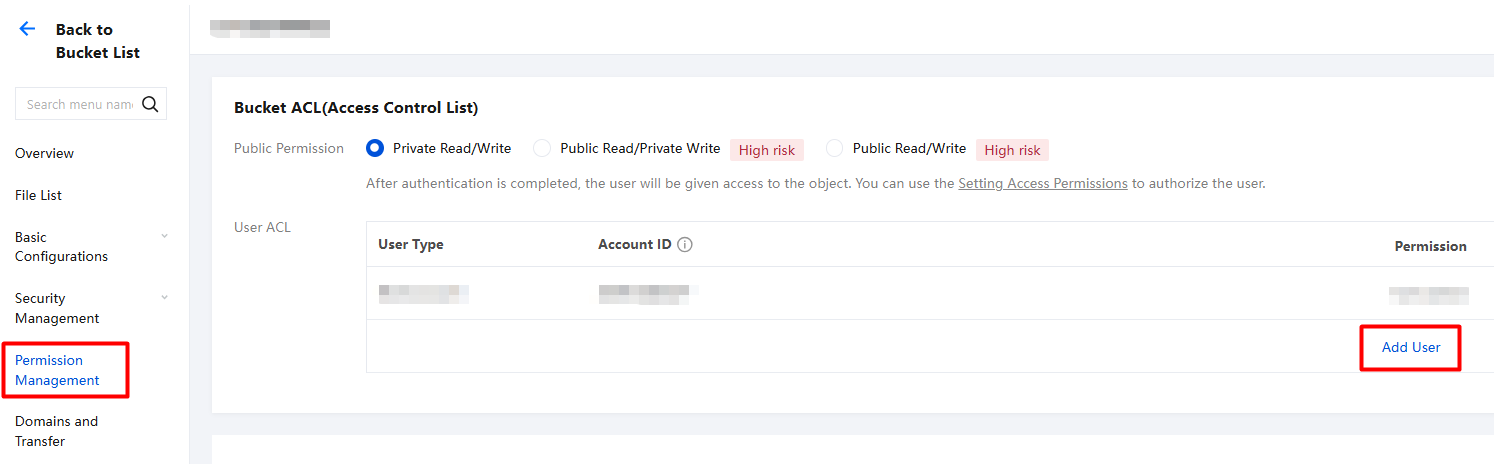
2. On the bucket details page, click Permission Management > Bucket ACL(Access Control List).
3. On the Bucket Access Permission page, click Add User.
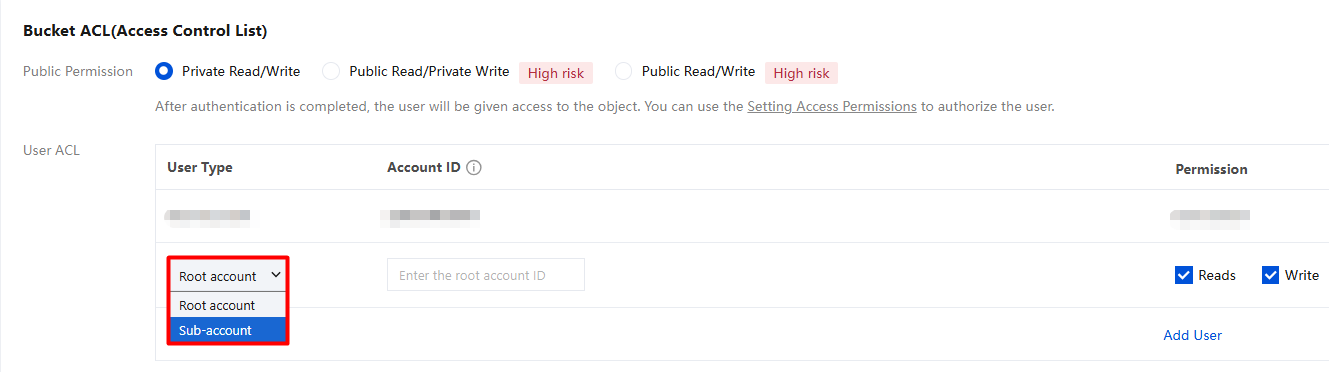
4. When adding a user, select Sub-account, enter the sub-account ID, select the Reads and Write permissions, and click OK. A sub-account with read/write permissions (least privilege) will then be assigned to this bucket.
Step 4: Obtaining the SecretId and SecretKey of the Sub-Account
1. Log in to the CAM console. In the left sidebar, choose Users > User List.
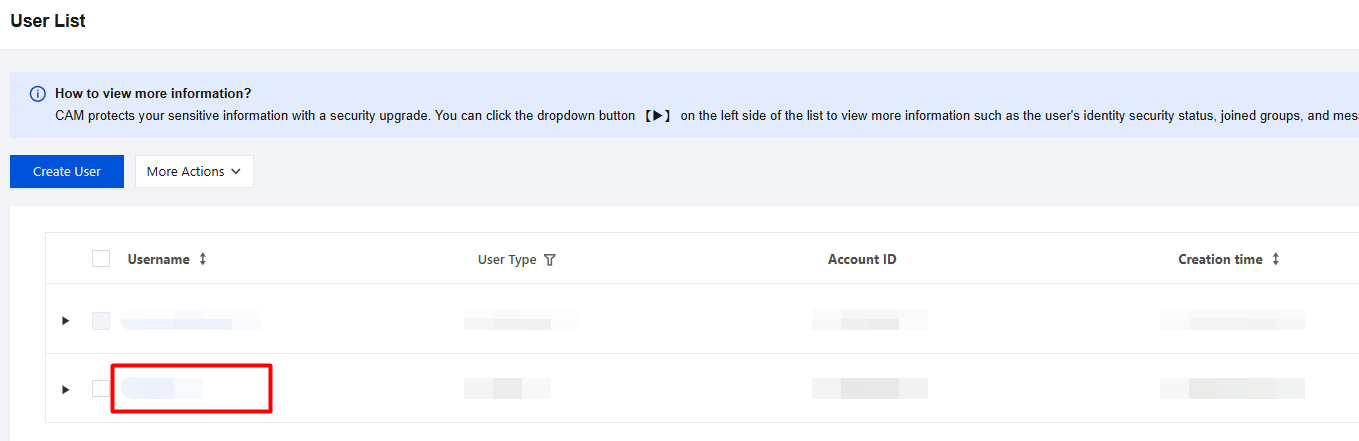
2. On the User List page, find the sub-account you just assigned to the bucket and click the user name.
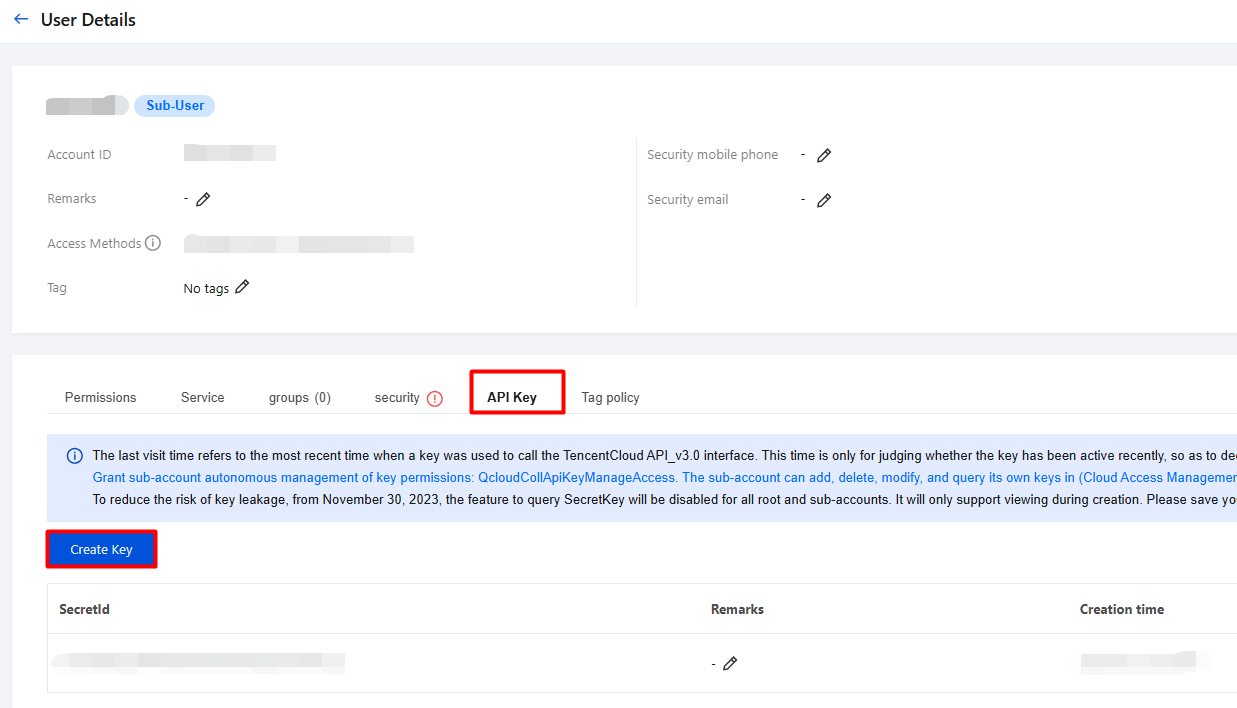
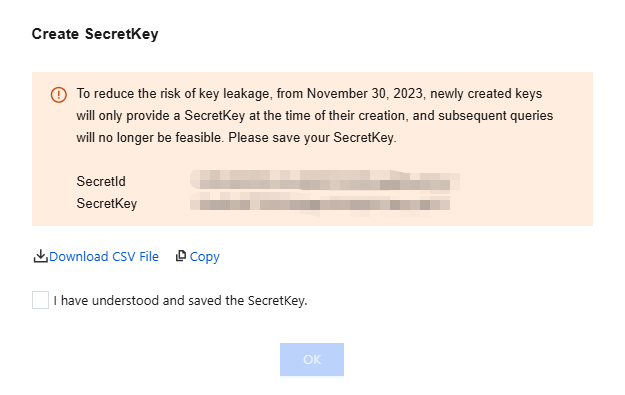
3. On the user details page, click API Key > Create Key to obtain the SecretId and SecretKey of the sub-account.
Attention:
To reduce the risk of key leakage, the SecretKey is provided only when it is created. You are advised to keep the SecretKey safe.
Step 5: Returning to the iOA Console to Test Connectivity
1. After obtaining all parameters, return to the Tencent iOA Zero Trust Security Management System console. In the left sidebar, choose Software Management > Software List > Software Repository, or set the storage space on the Software Management > Distribution Management > Distribution Task page.
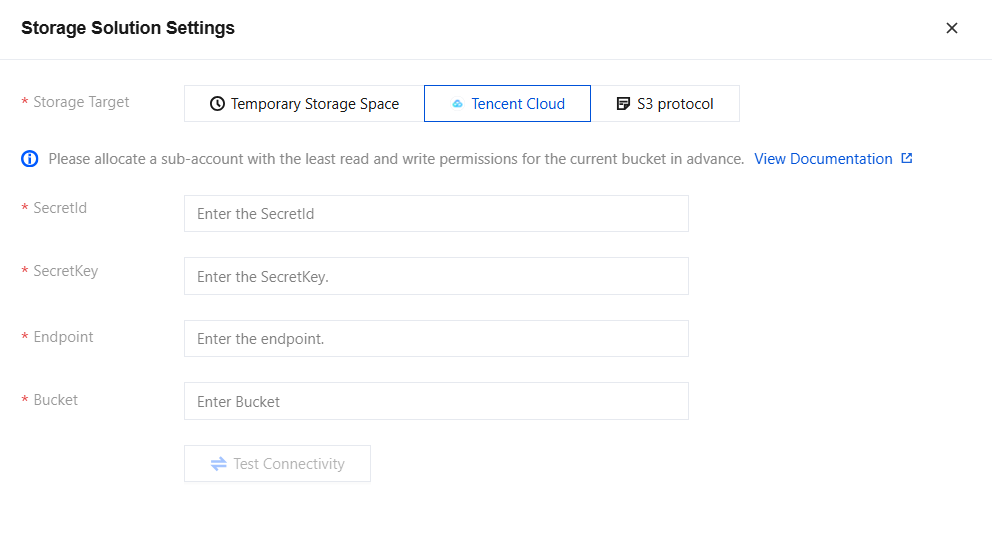
2. Select Tencent Cloud as the storage target and enter the obtained SecretId, SecretKey, Endpoint, and Bucket in order. After filling in these fields, click Test Connectivity. If Test Successful is displayed, the configuration is complete.
3. After configuration, click OK to save.
Configuring the S3 Protocol Storage Service
iOA supports configuring storage services that use the S3 protocol.
Note
Assign in advance a least-privilege sub-account with read/write permissions on the current Bucket.
1. Log in to the Tencent iOA Zero Trust Security Management System console. In the left sidebar, choose Asset Management > Software Management, On the Software Management page, choose the or based on requirements , and click Change Storage Solution.
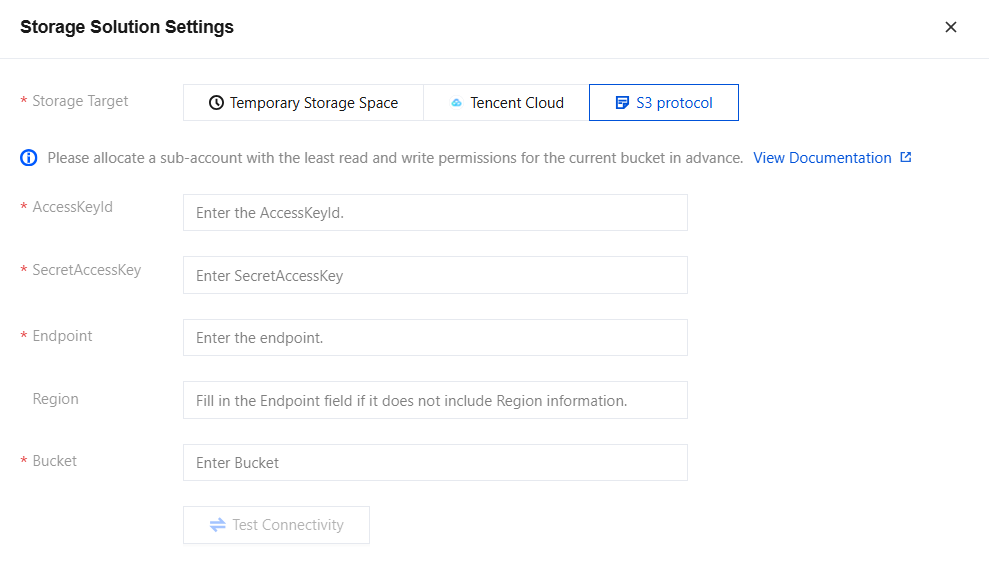
2. Select S3 Protocol as the storage target and enter AccessKeyId, SecretAccessKey, Endpoint, and Bucket in order. Click Test Connectivity. If Test Successful is displayed, the configuration is complete.
Parameter Name | Description |
Target Name | S3 protocol. |
AccessKeyId | A unique identifier used to identify the user or application that accesses the cloud storage service. It is typically used together with SecretAccessKey to provide secure access when authentication with the cloud storage service is performed. |
SecretAccessKey | A private key paired with AccessKeyId and used to authenticate with the cloud storage service. When a new AccessKeyId is created, the system automatically generates a SecretAccessKey associated with it. |
Endpoint | API access point for the cloud storage service. It is a URL that points to a specific region and access path of the service. The client communicates with the cloud storage service through this URL. |
Bucket | Bucket name. A Bucket is a basic container in the cloud storage service, used to store and organize data. |
3. After configuration, click OK to save.
Help and Support
Was this page helpful?
You can also Contact sales or Submit a Ticket for help.
Help us improve! Rate your documentation experience in 5 mins.
Feedback