Provides a centralized management entry for all terminal device assets, enabling one-stop visualized management of device online status, security compliance status, group policies, and batch disposal.
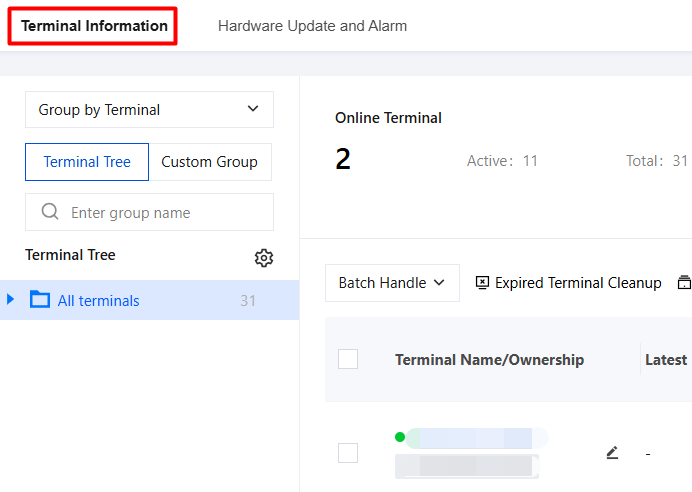
2. On the terminal list page, select Terminal Information.
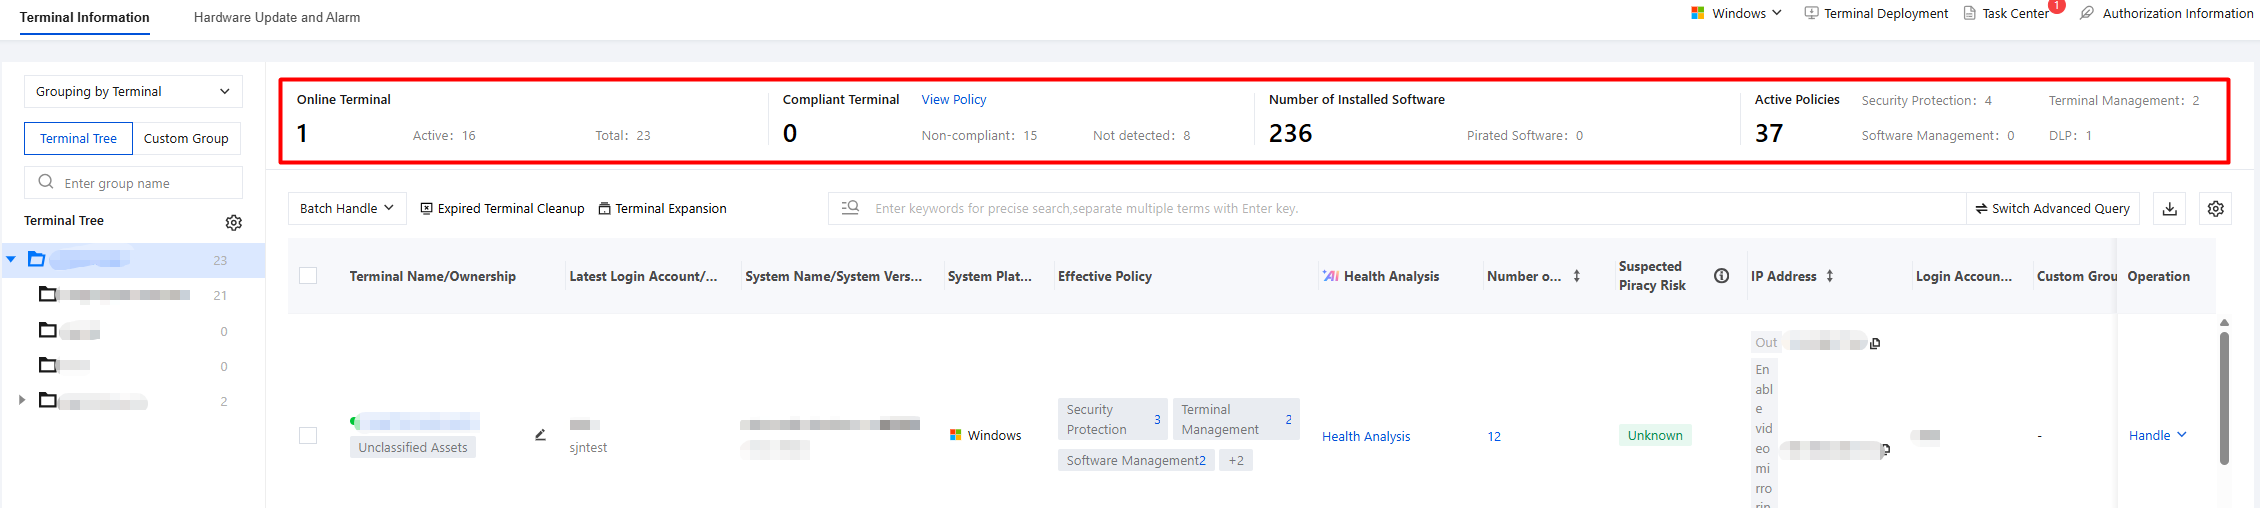
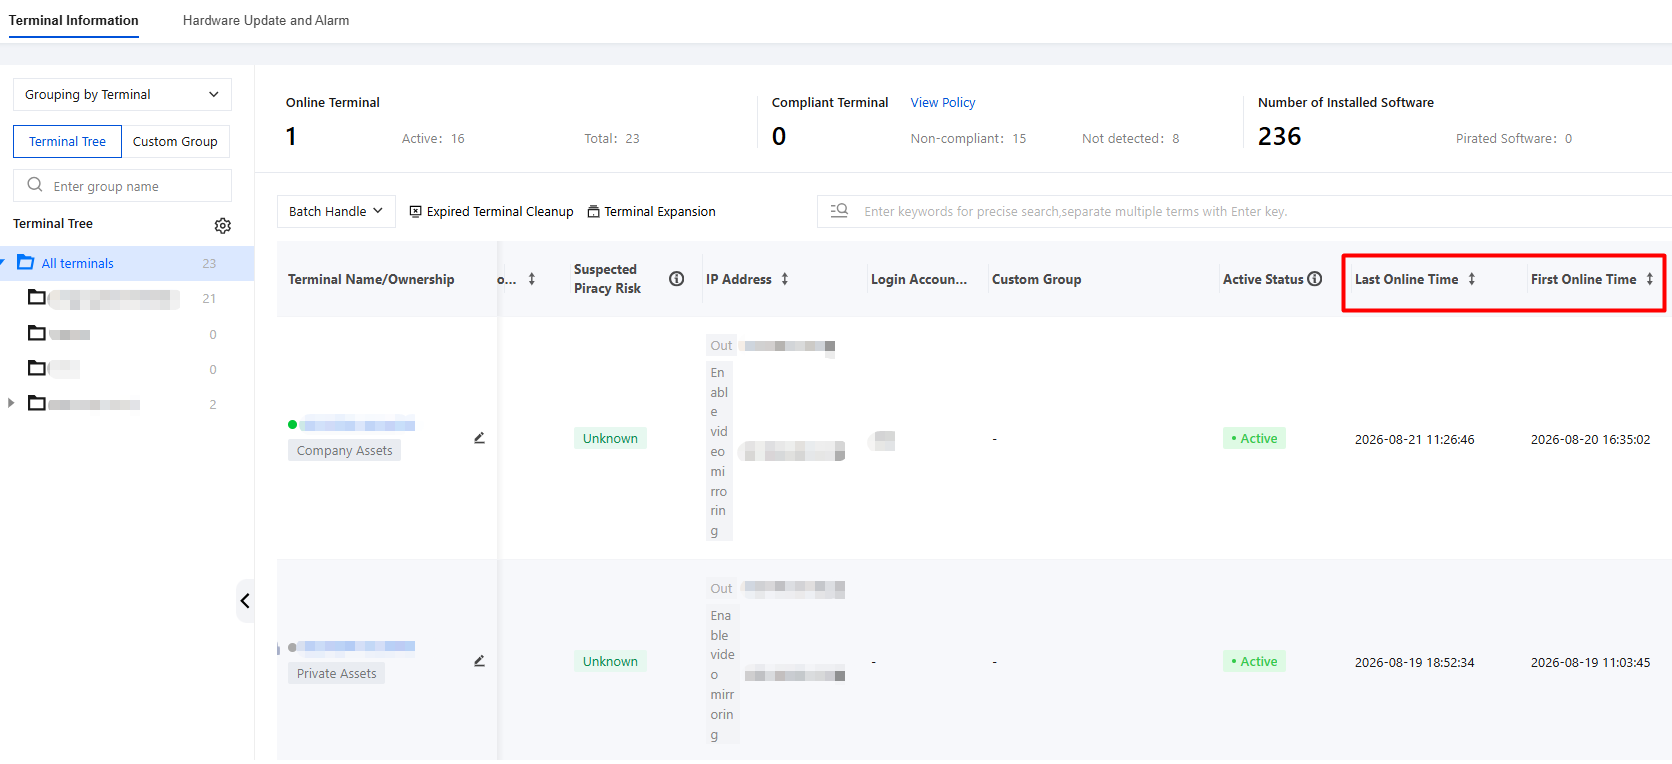
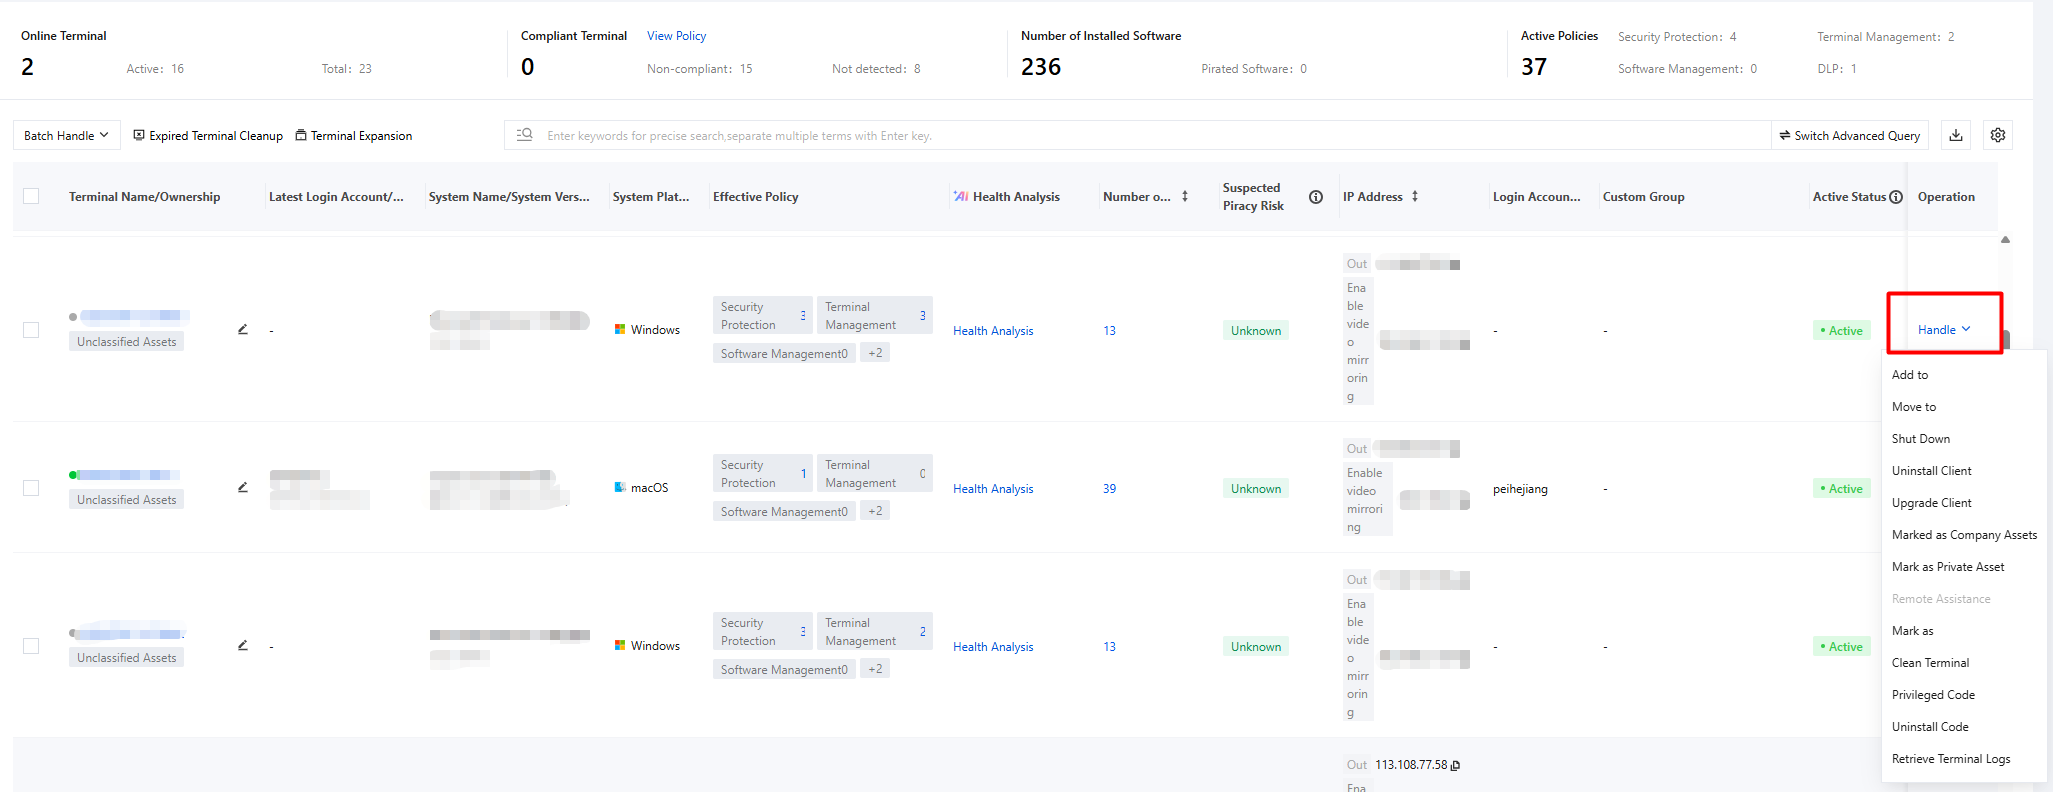
3. At the top of the page, you can intuitively view the overall running status of terminals.
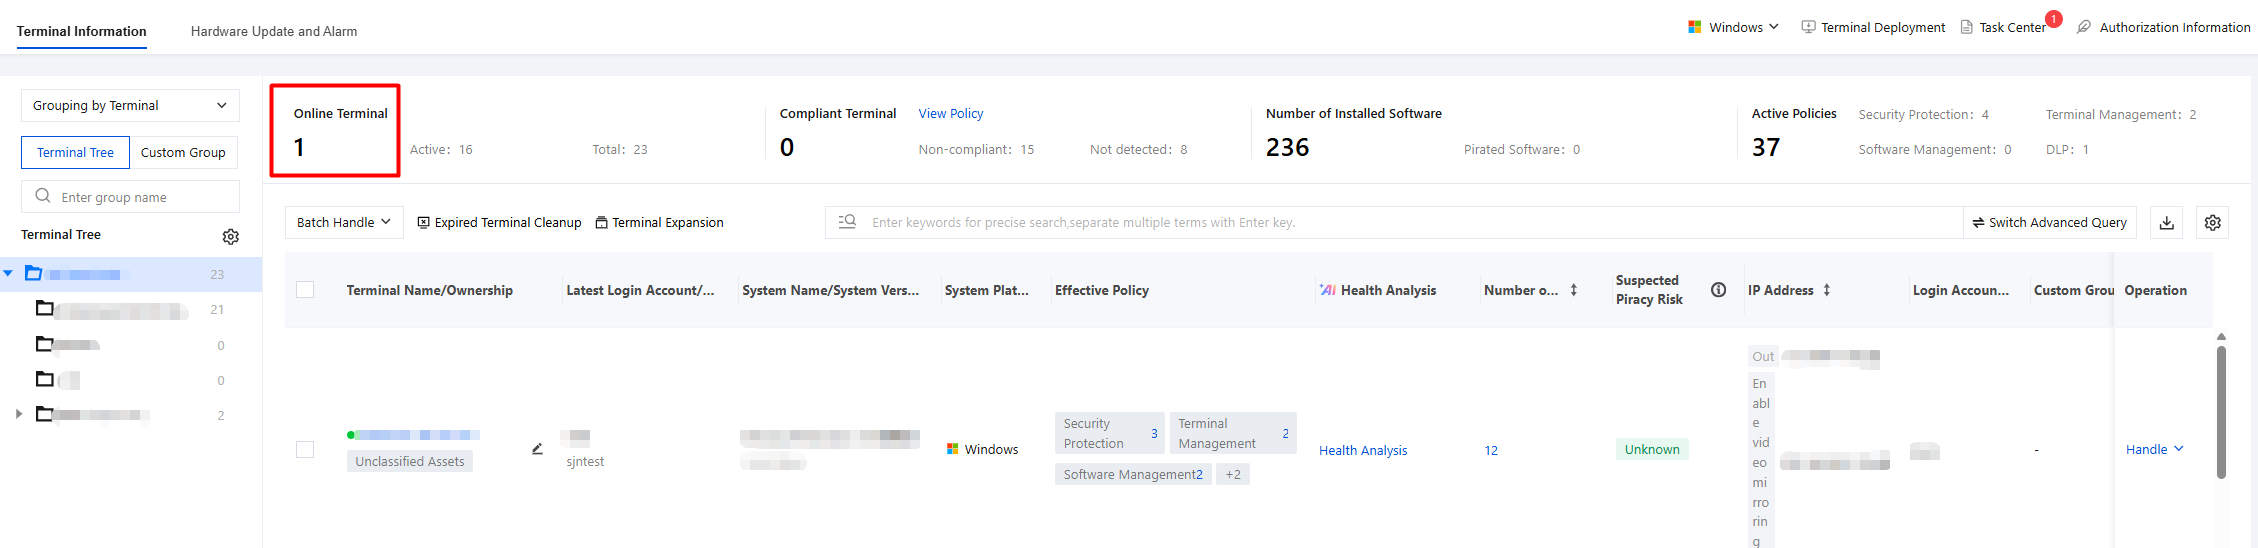
Online terminals: The number of active devices currently connected to the console.
Compliant terminals: The number of terminals that meet enterprise security policy requirements.
Installed software quantity: The total number of software programs currently installed on terminals.
Active policy quantity: The total number of security control policies that have been applied and taken effect on current terminals.
4. At the top of the terminal information page, click the number displayed in <1> to quickly perform linked filtering.
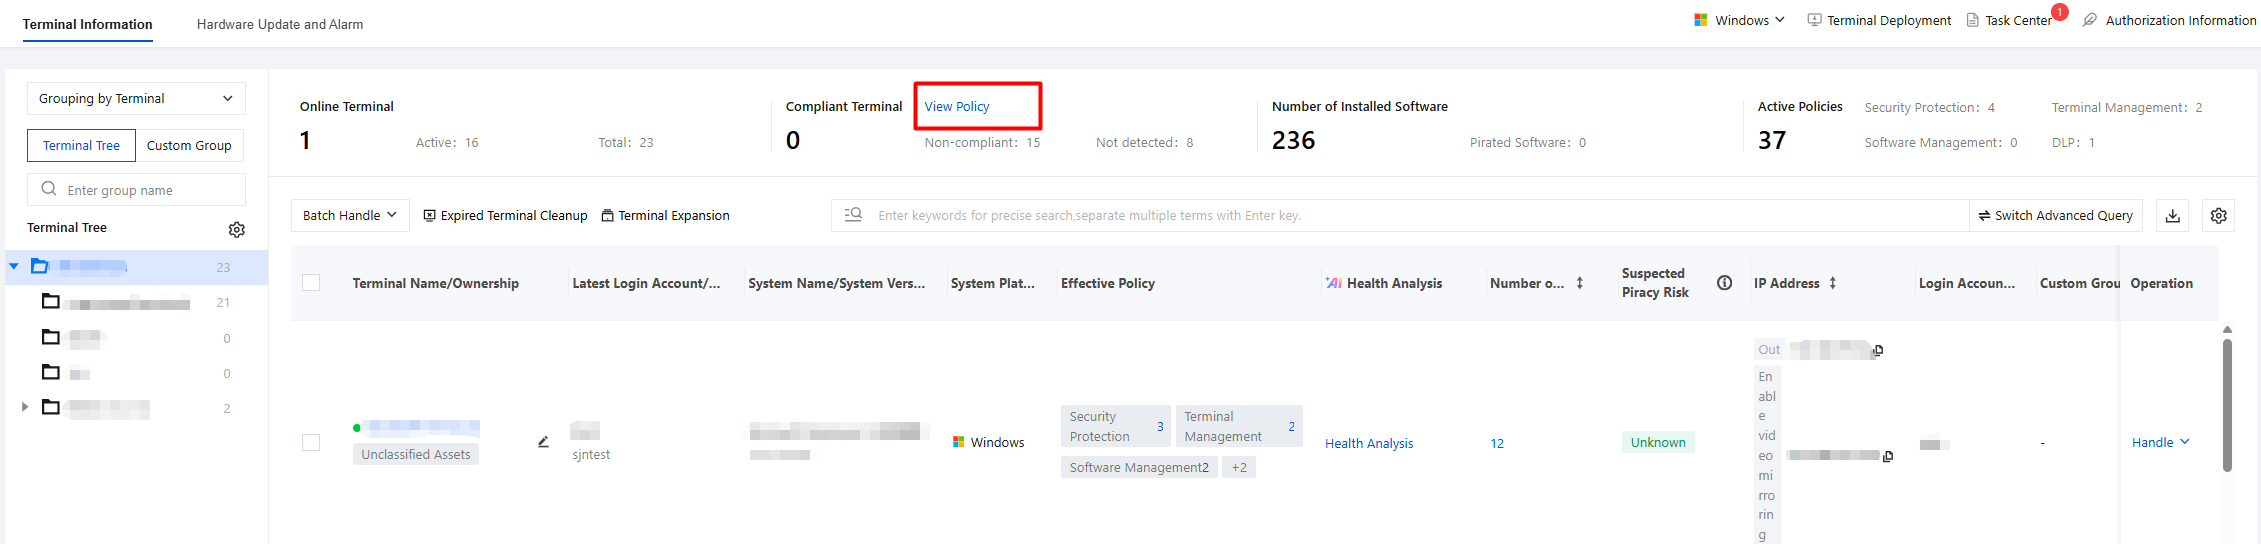
5. Click View Policy to go to the policy details page with one click and view the execution status of all delivered policies.
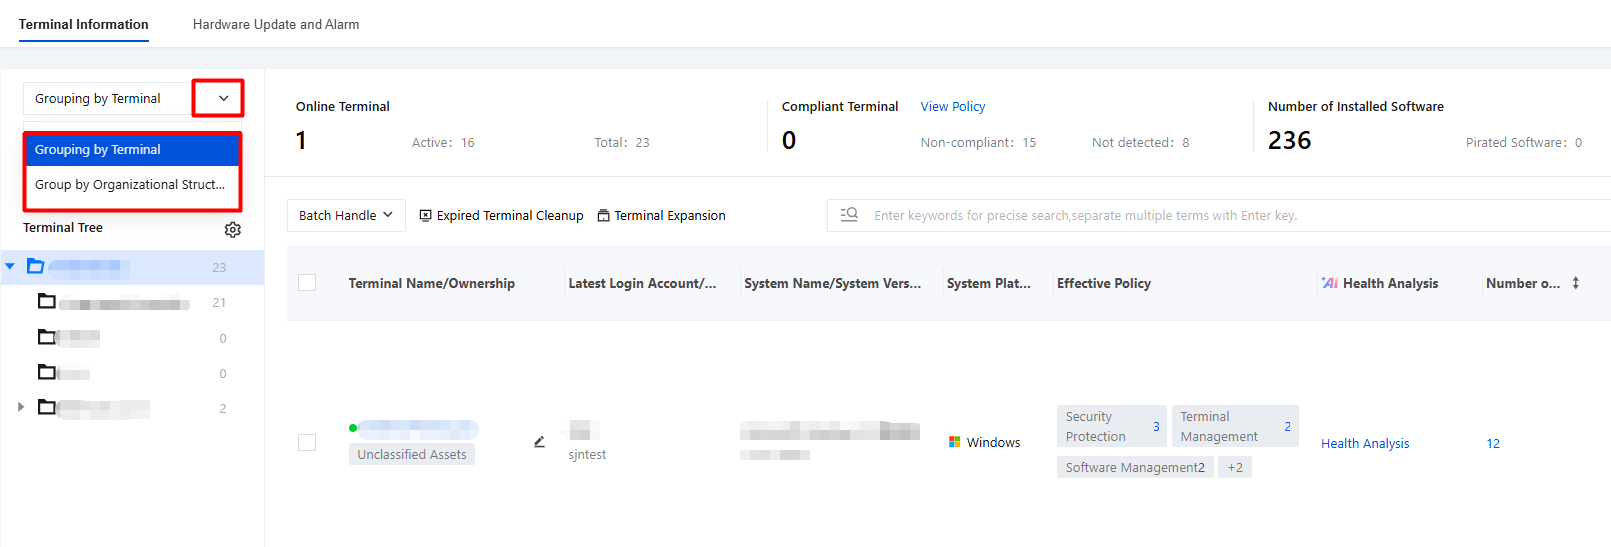
6. Supports displaying terminal information by terminal group and by organizational structure (personnel perspective).
Terminal Group
1. Terminals with iOA deployed for the first time are placed in the "Ungrouped Terminals" group by default. You need to group terminals for easier management.
Note:
If an administrator has configured custom grouping rules, terminals will be automatically assigned to the corresponding groups on a scheduled basis. For detailed configuration, see Custom Grouping.
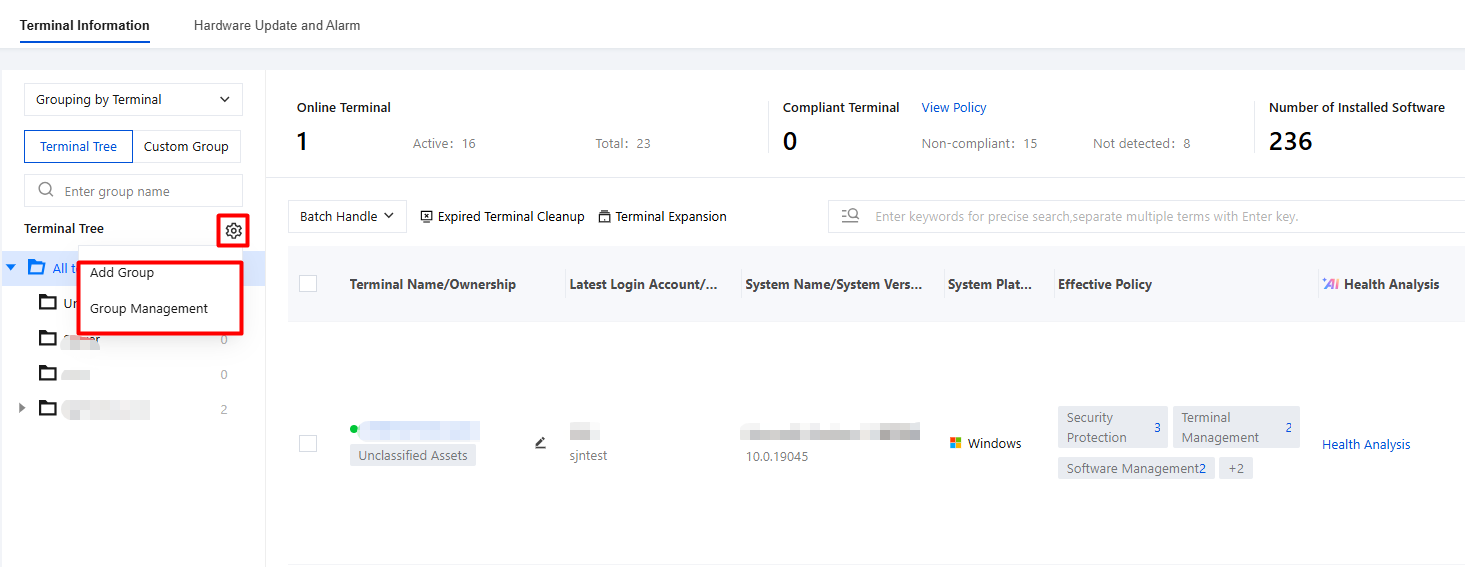
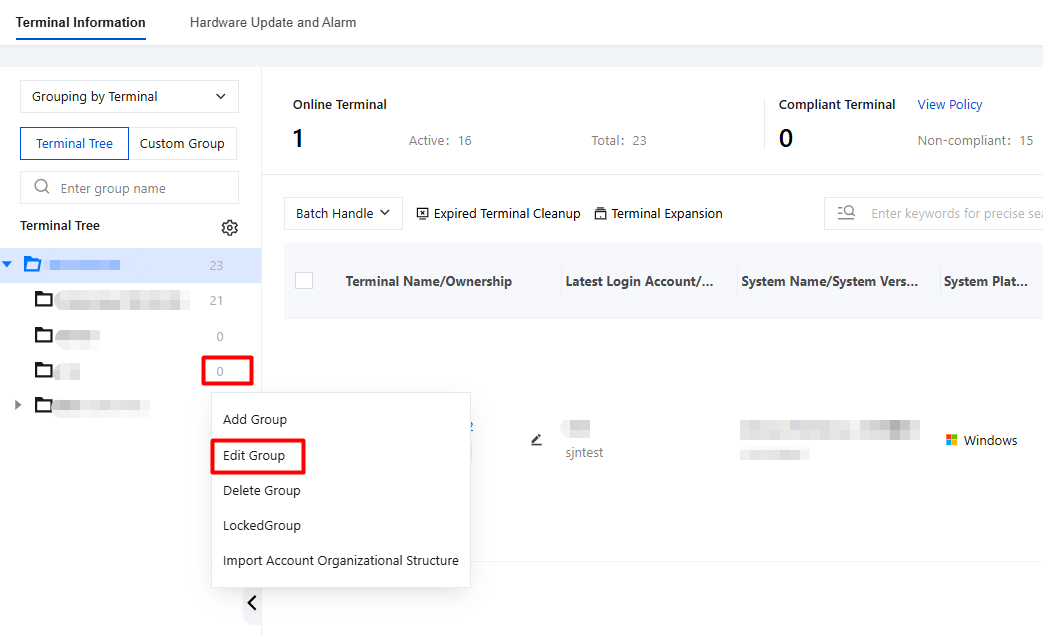
2. Click
and select Add Group.
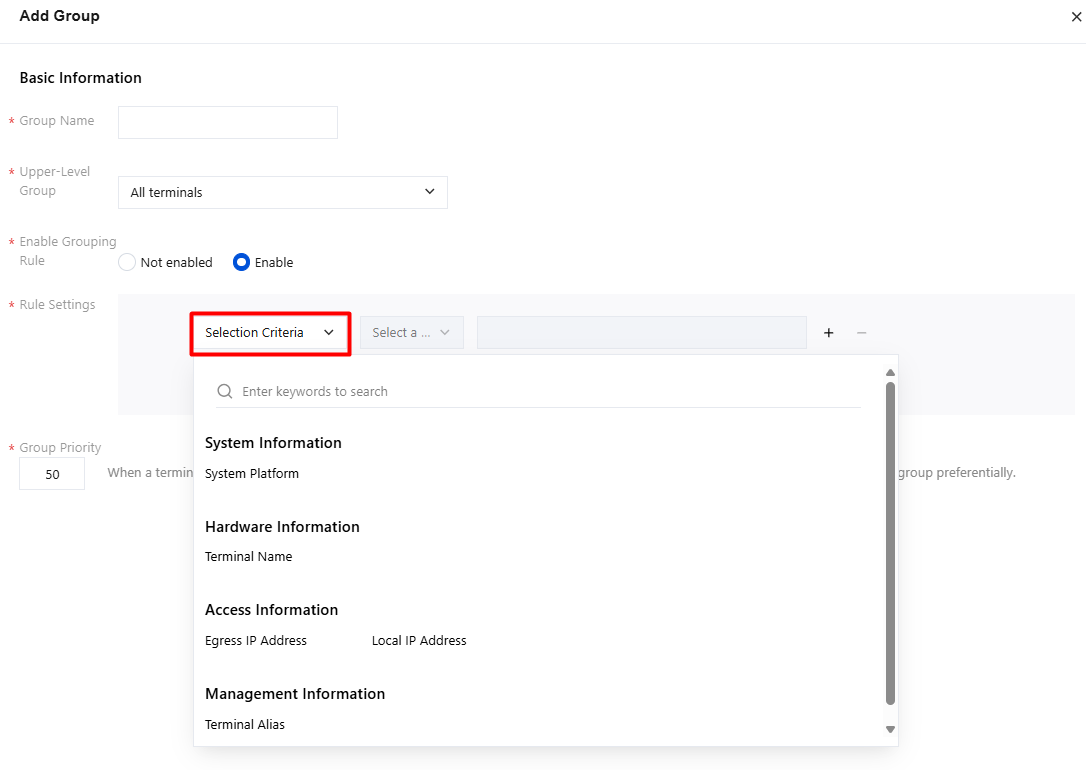
3. Edit the group information. After the configuration is complete, click OK.
Parameter Name
Description
Group name
Custom name, which is the name of the group to which each terminal belongs.
Parent group
Select the parent group to which the terminal belongs from the drop-down list. The default value is all terminals. You can select an existing terminal group as the parent organization of the current group.
Enable group rule.
Disabled: Terminals do not perform automatic grouping.
Enabled: Terminal groups support setting grouping rules based on local IP address, terminal name, and terminal remarks. Terminal devices are automatically assigned to the corresponding specified groups based on these grouping rules.
Group priority
When a terminal meets multiple group rules at the same time, you can set a higher priority to ensure that the terminal joins the target group first. A higher group priority indicates that the terminal is assigned to that group first.
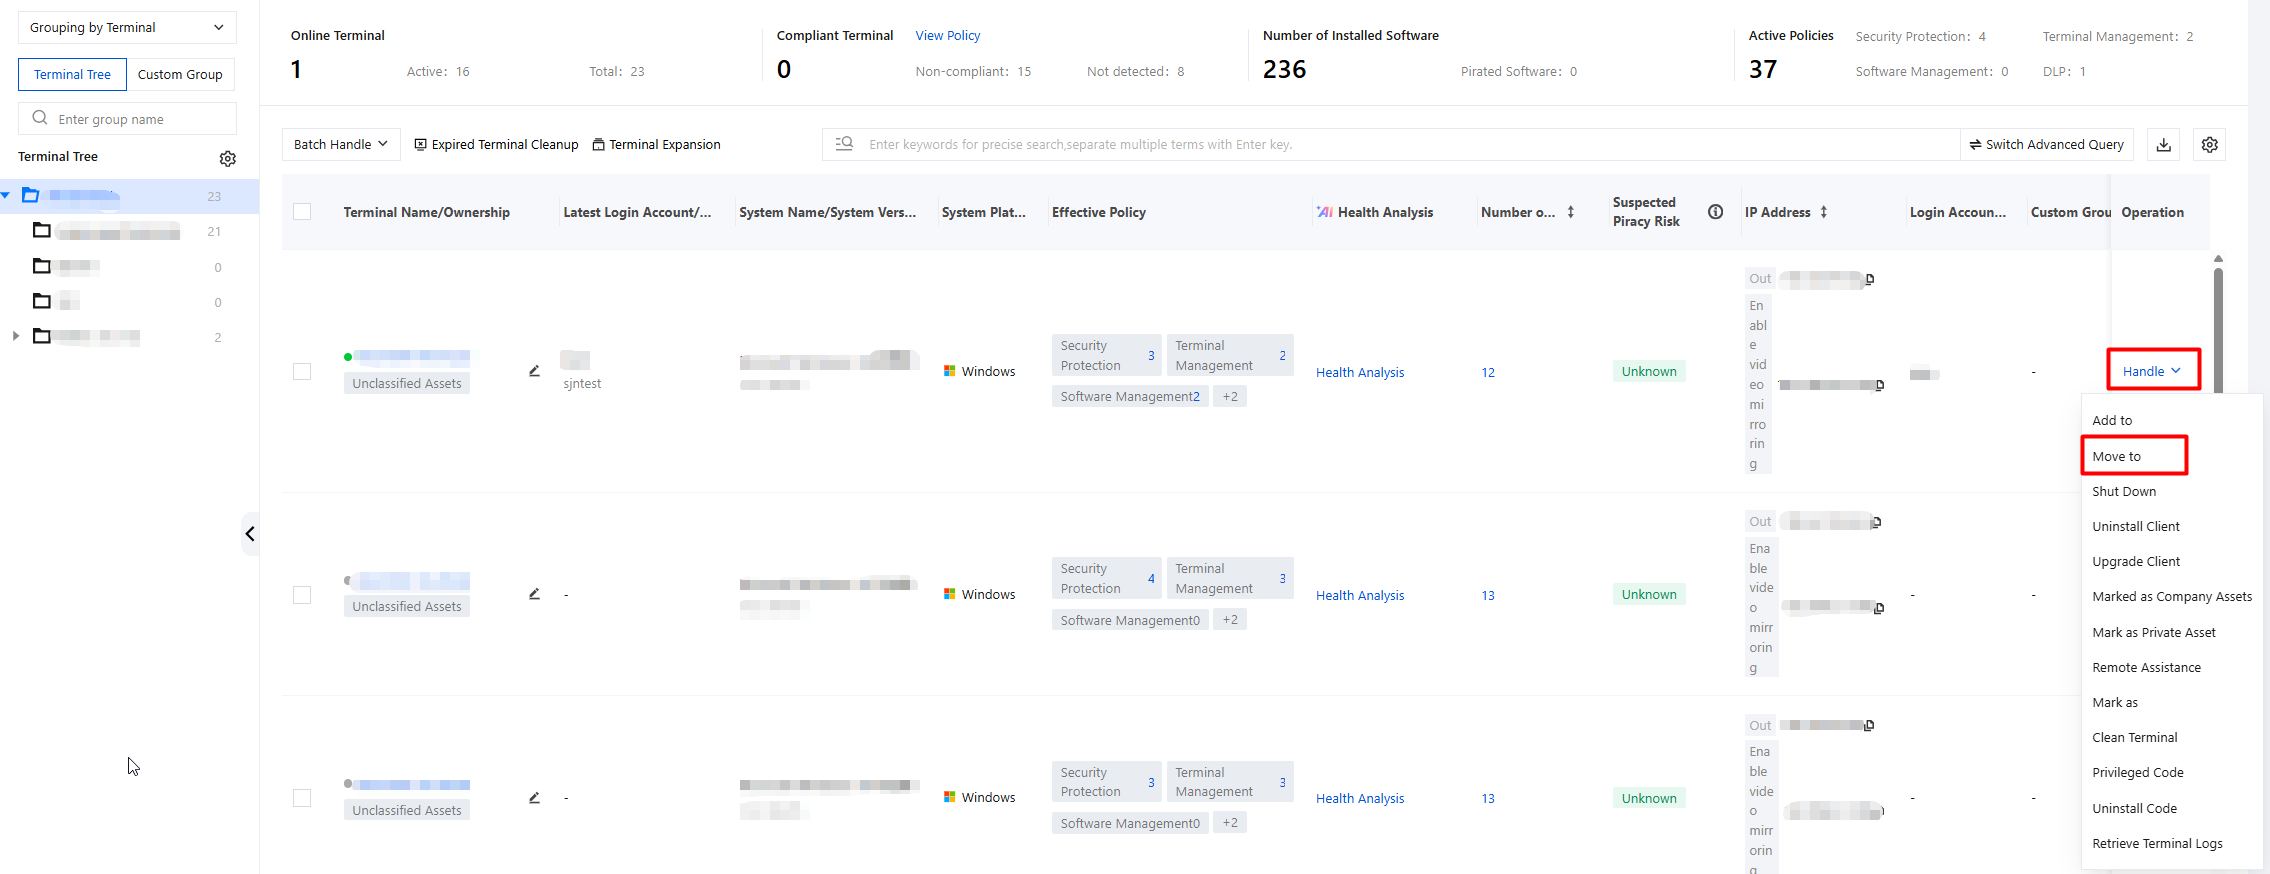
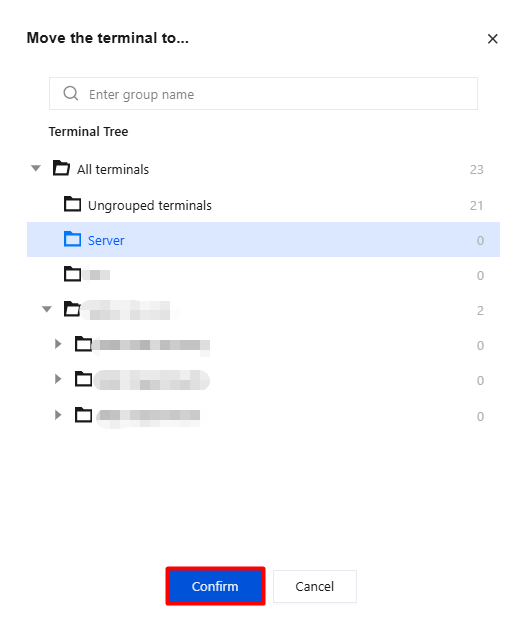
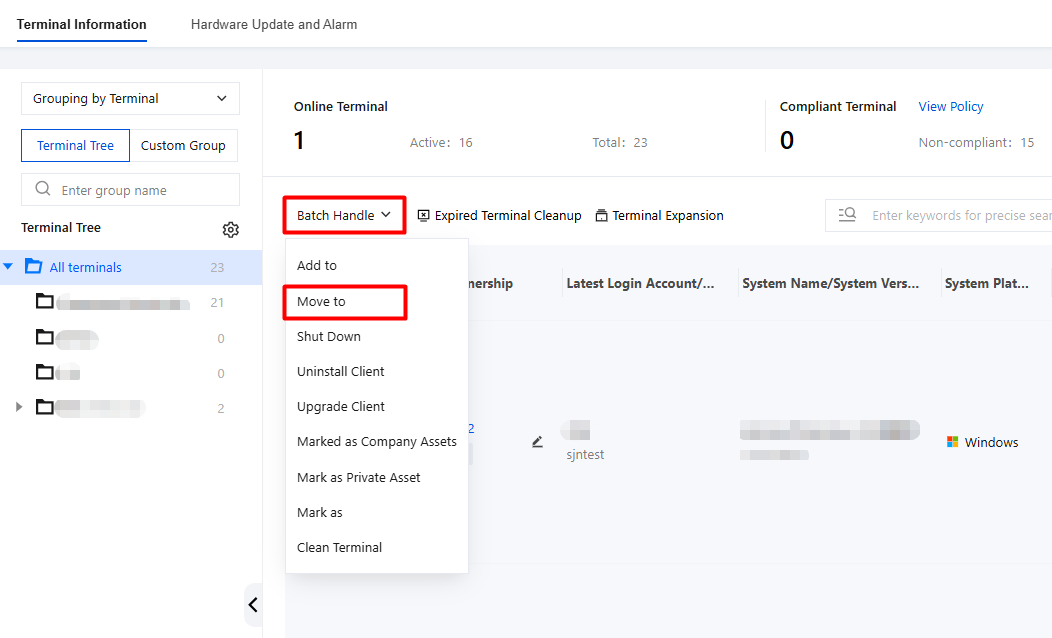
4. After the group is created, you can move ungrouped terminals to the newly created group. Select the terminal names and click Handle > Move to.
5. Select the target group and click Confirm. The terminal is moved to the corresponding group.
Group Management
Terminal Group Manager
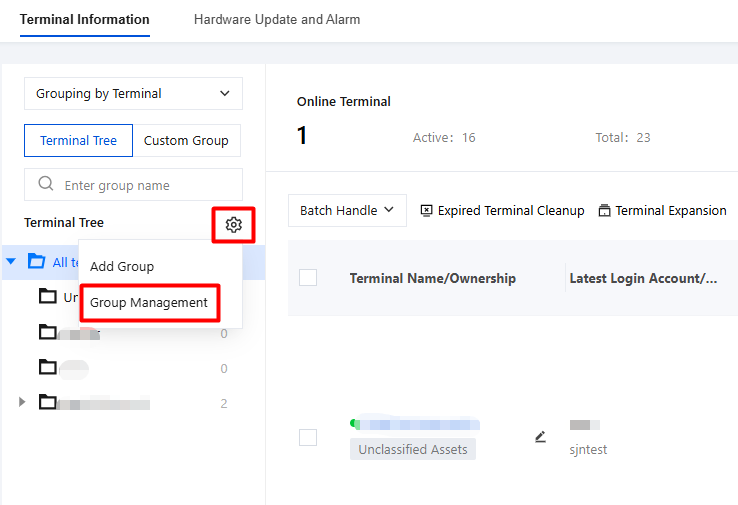
1. Click
and select Group Management.
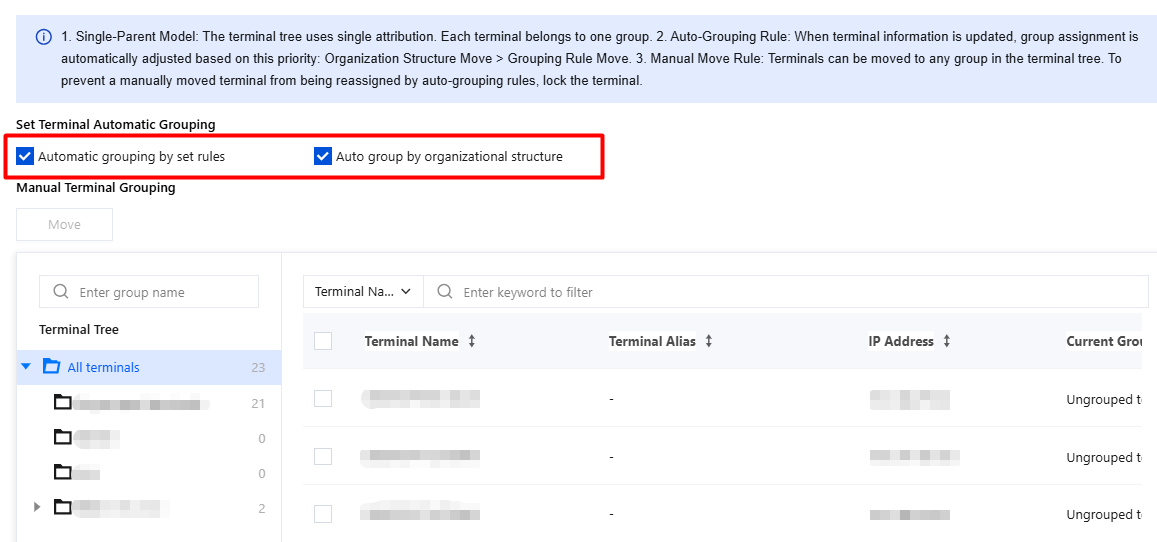
2. Terminal automatic grouping settings: When this option is enabled, terminals are moved to the corresponding groups based on their organizational structure. If this option is not selected, terminals are not moved.
Usage scenario example: After the organizational structure of each department is bound to terminals, employees are automatically moved to the corresponding department after logging in.
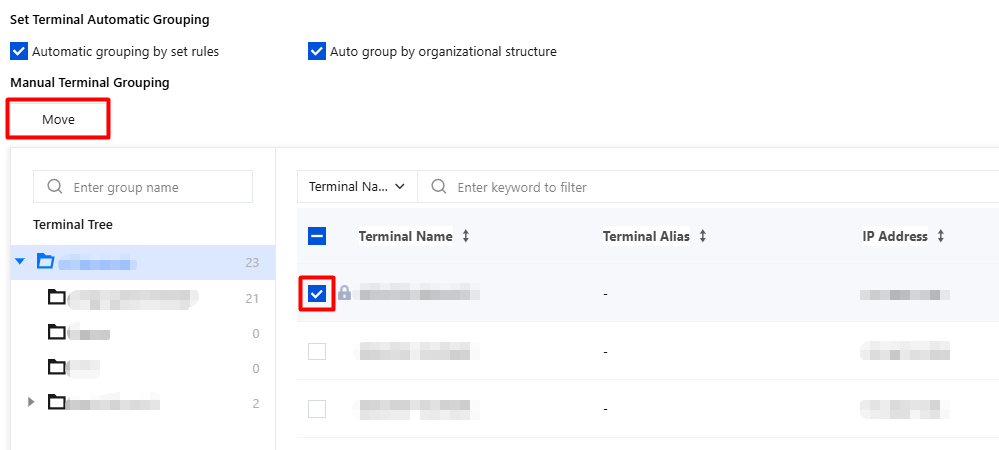
3. Manual terminal grouping: You can move terminals to any static group.
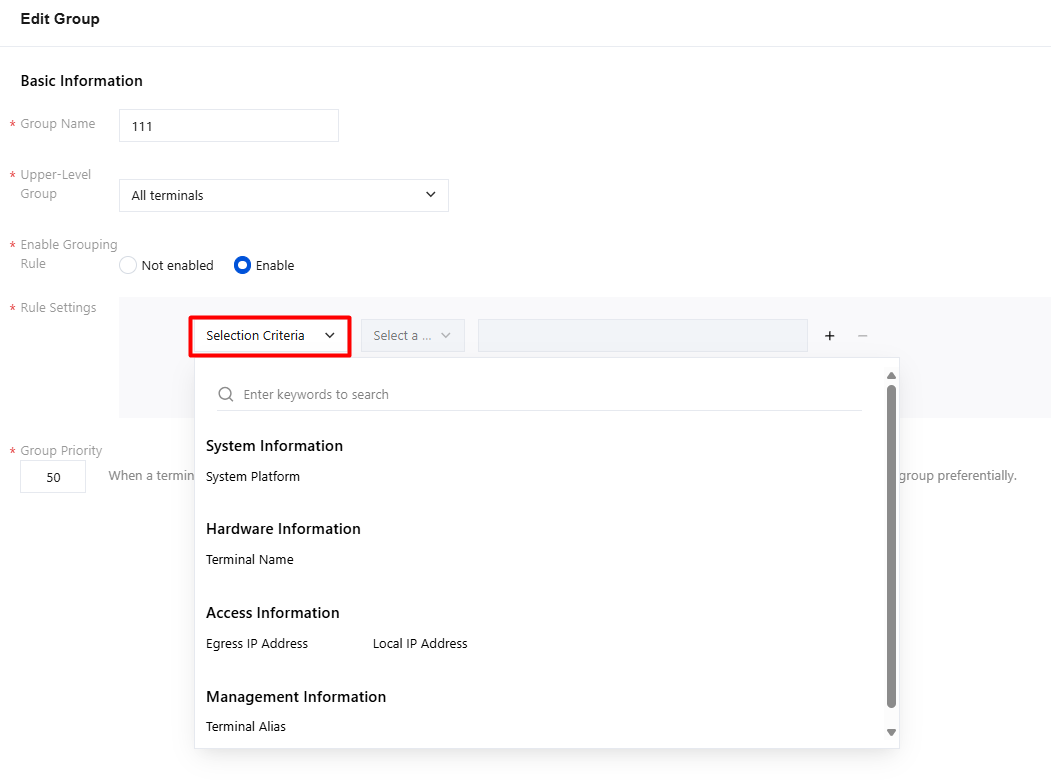
Edit Group
1. Click
and select Edit Group to modify the group name and group information.
Parameter Name
Description
Group name
Custom name.
Parent group
The default value is all terminals. You can select other terminal groups from the drop-down list.
Enable group rule.
Disabled: Terminals do not perform automatic grouping.
Enabled: Terminal groups support setting grouping rules based on local IP address, terminal name, and terminal remarks. Terminal devices are automatically assigned to the corresponding specified groups based on these grouping rules.
Group priority
When a terminal meets multiple group rules at the same time, you can set a higher priority to ensure that the terminal joins the target group first. A higher group priority indicates that the terminal is assigned to that group first.
Delete Group
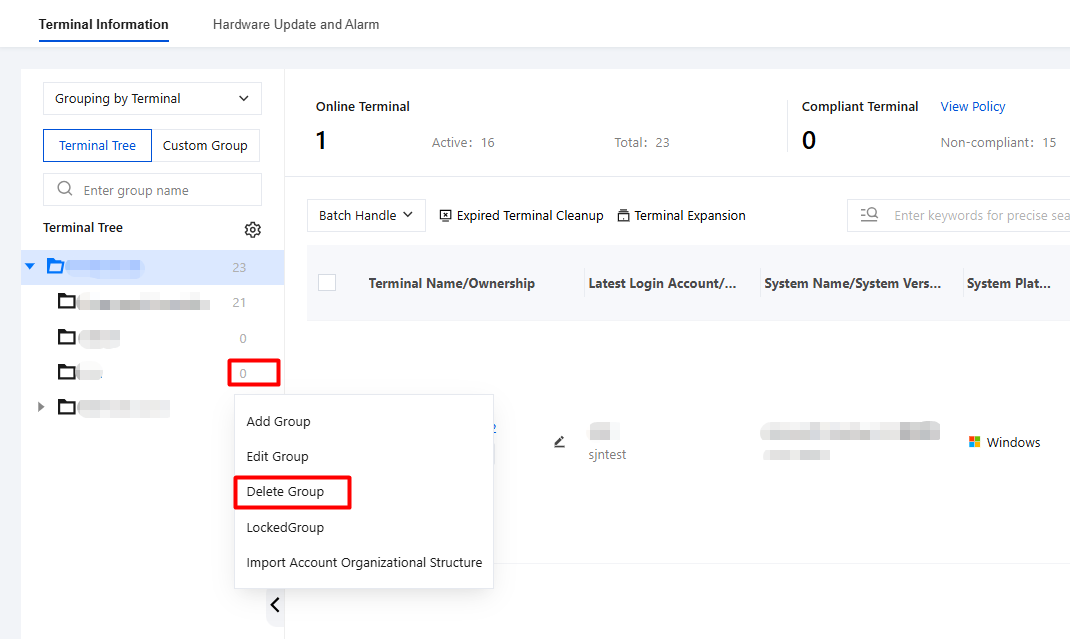
1. After a group is deleted, terminals in the original group need to be reassigned to a new group. Before deleting the group, make sure the terminals are properly categorized.
2. Click
and select Delete Group. After a second confirmation, the current terminal group is deleted. Terminals that lose their group are moved to the group you selected.
Lock Group
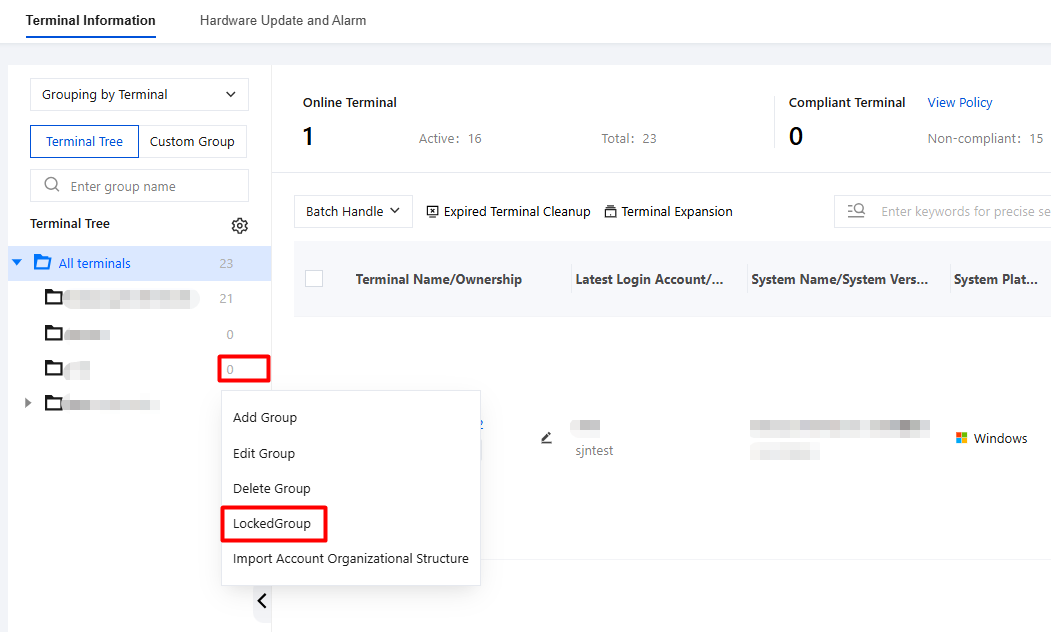
Click
and select Lock Group. A message appears indicating that the group has been locked successfully. After locking, the terminal will not undergo group changes through organizational structure synchronization or other automatic movement policies. Its group can only be changed by manual movement.
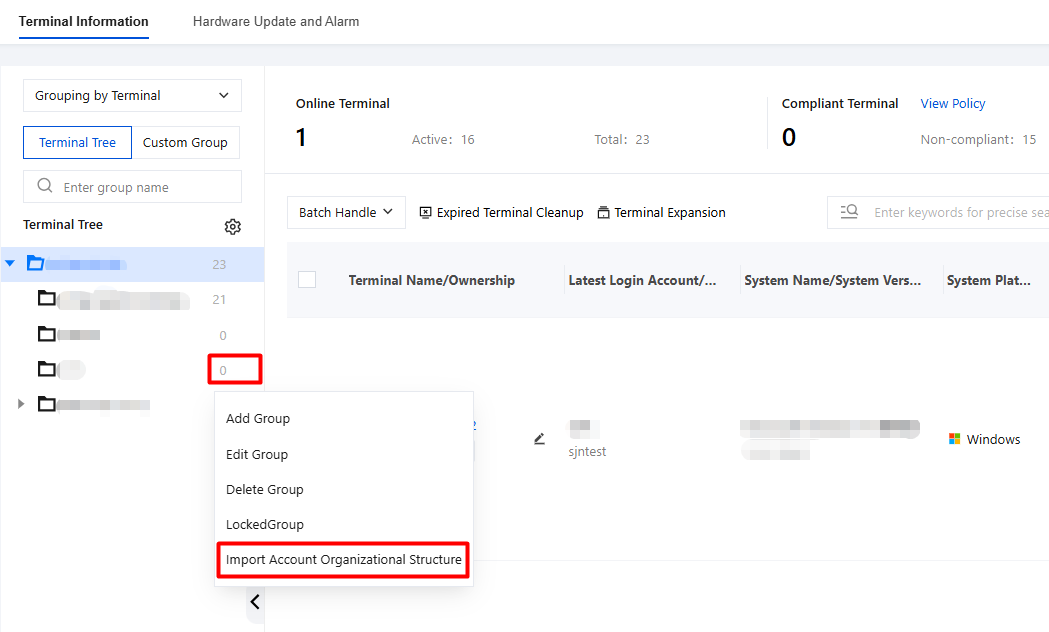
Import Account Organizational Structure
Click
and select Import Account Organizational Structure to import the organizational structure from user permissions management. When a client logs in with an account, the terminal is automatically moved to a group based on the structure associated with the account.
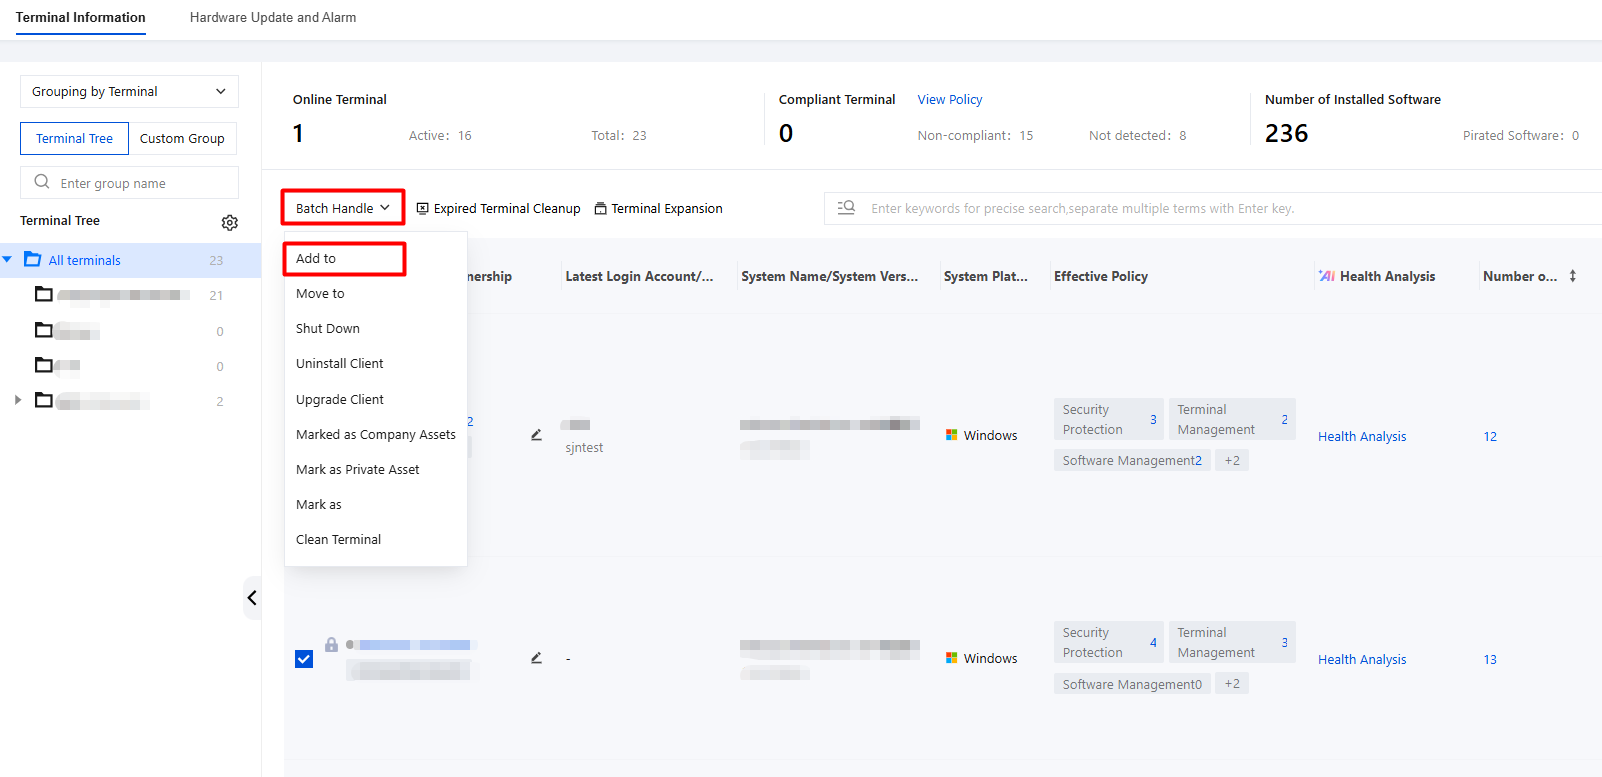
Batch Handling
Add to
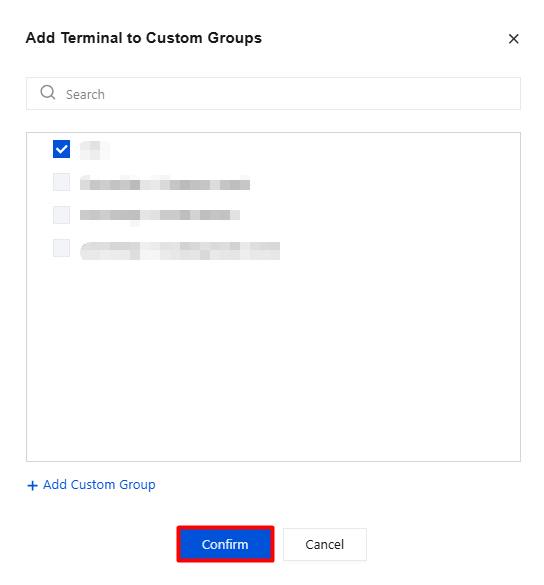
1. To add terminals to a custom group, click Add To. The selected terminals are added to the specified custom group in batches.
2. Select the custom group you created and click Confirm to add the terminals to the custom group.
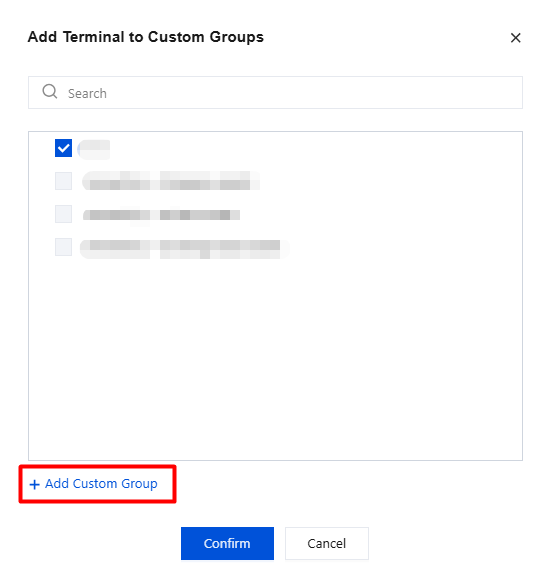
3. If the current terminal groups do not meet your requirements, click Add Custom Group, enter a custom name, and save it. After creating the custom group, select it and add terminals to it.
Move to
To move a terminal to the corresponding group, select the target group and click OK.
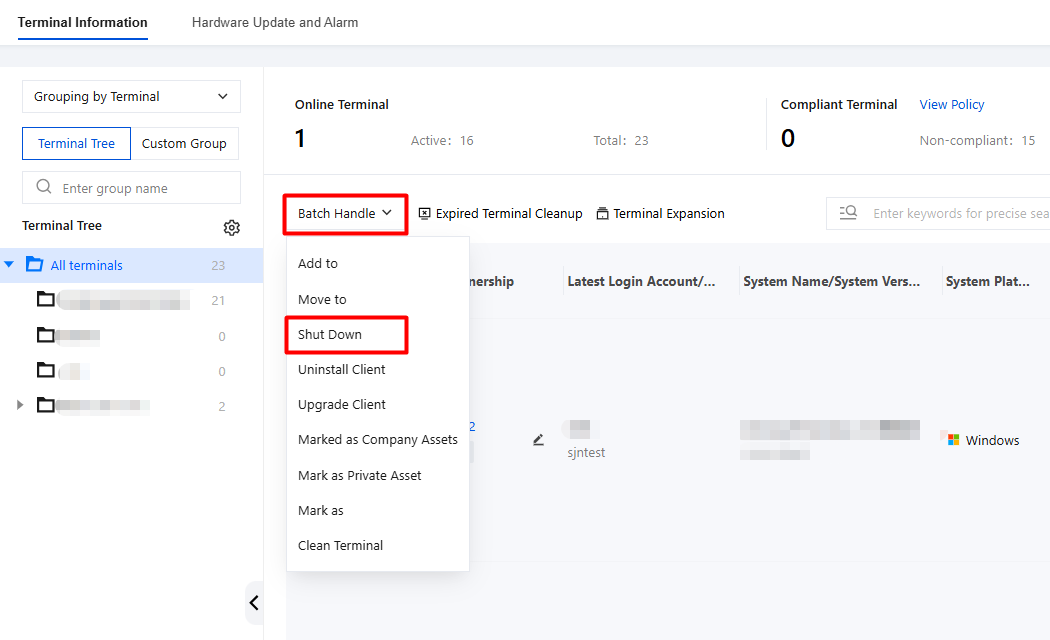
Shut Down
To remotely shut down terminals, select the terminals you want to shut down, and click Shut Down.
Parameter Name
Description
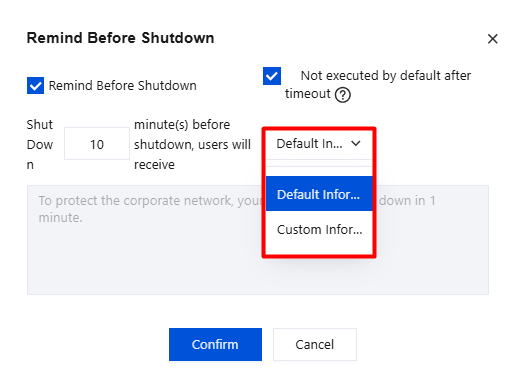
Reminder before shutdown
Select Remind Before Shutdown. A pop-up window appears on the terminal before shutdown to remind the user that the computer will shut down in ** minutes.
If Remind Before Shutdown is not selected, the terminal shuts down directly when the specified time arrives, without displaying a pop-up notification.
No execution by default after timeout
Select Do Not Execute by Default After Timeout. If the user does not respond within the prompt time, shutdown is not executed by default.
If Do Not Execute by Default After Timeout is not selected and the user does not respond within the shutdown reminder time, the shutdown is executed.
The user receives a ** message ** minutes before shutdown.
Specify a custom time. After it is set, the terminal automatically shuts down when the specified time arrives.
For Custom Message, select a custom message from the drop-down list to edit the pop-up content on the terminal.
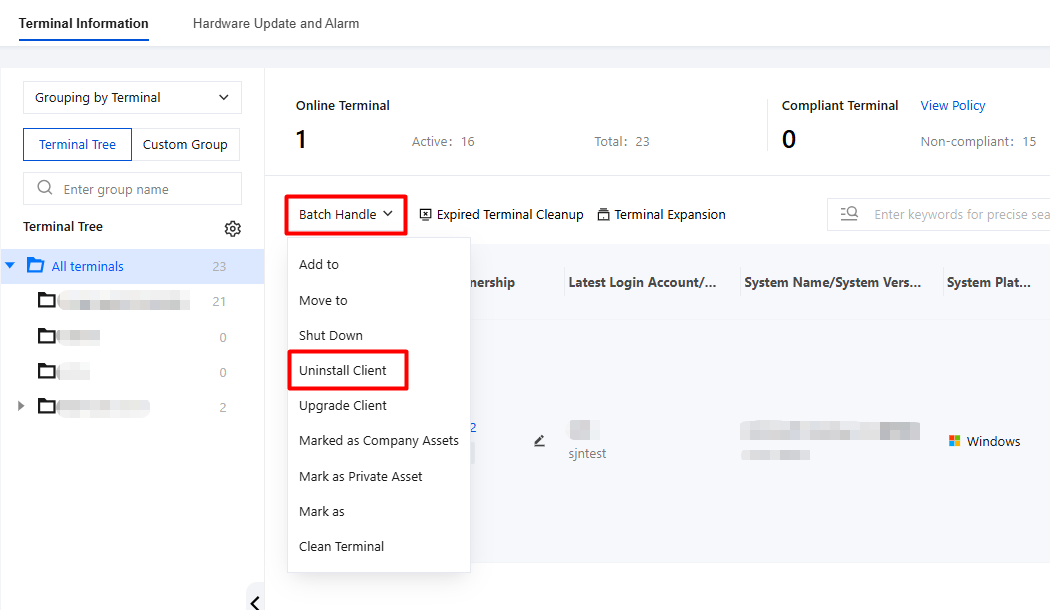
Uninstall Client
1. Select the terminals from which you want to uninstall the iOA client, and click Uninstall Client.
2. The task center dispatches an uninstall task. After receiving the task, the terminal performs the uninstall operation.
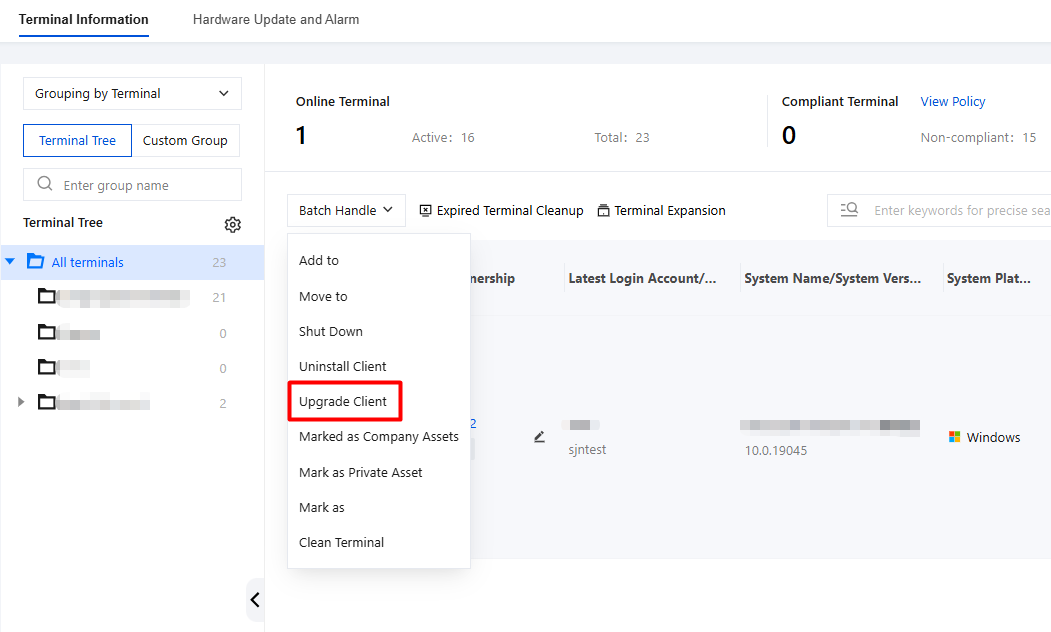
Upgrade Client
1. The system can check the iOA version on terminals. If the version is not the latest, an upgrade prompt is sent. Select the terminals that need an upgrade and click Upgrade Client.
2. A message appears indicating that the task has been created successfully. Click Task Center to view the upgrade task.
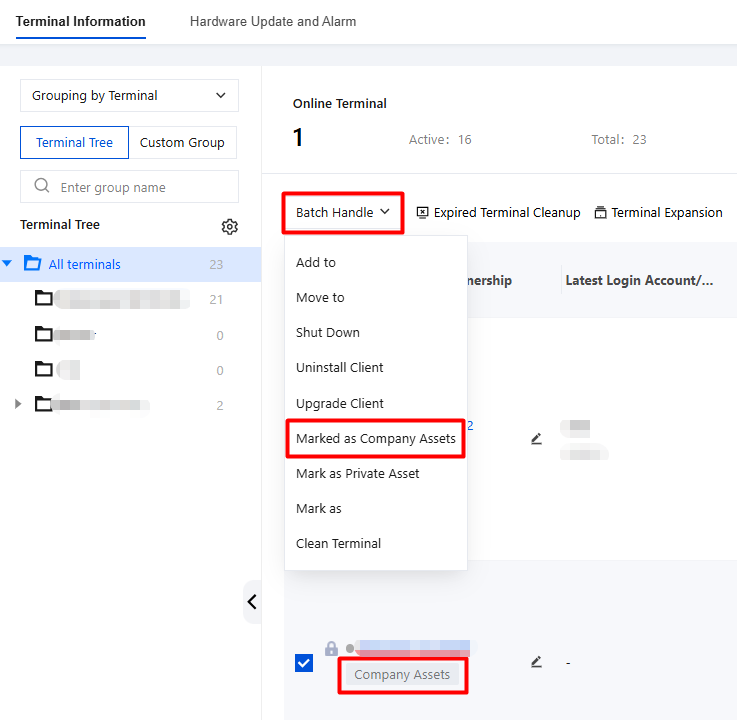
Mark as Company Asset
For terminals marked as company assets, the marker of uncategorized assets/private assets is changed to company asset.
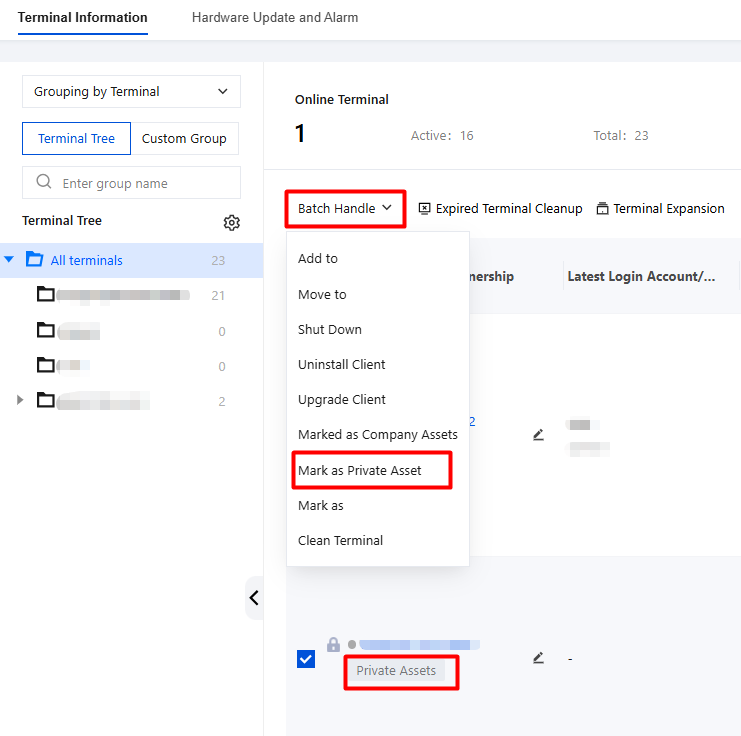
Mark as Company Asset
For terminals marked as private assets, the marker of uncategorized assets/company assets is changed to private asset.
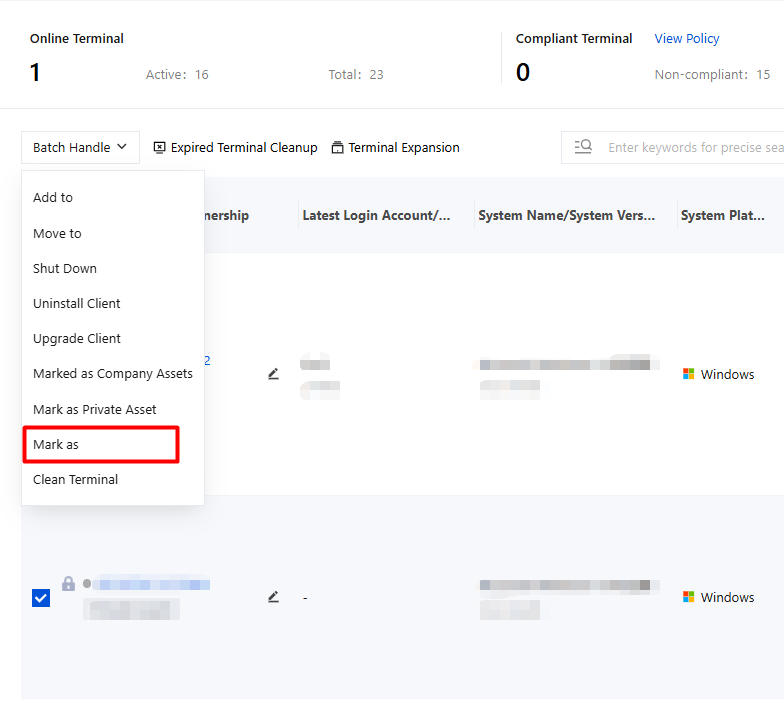
Mark as
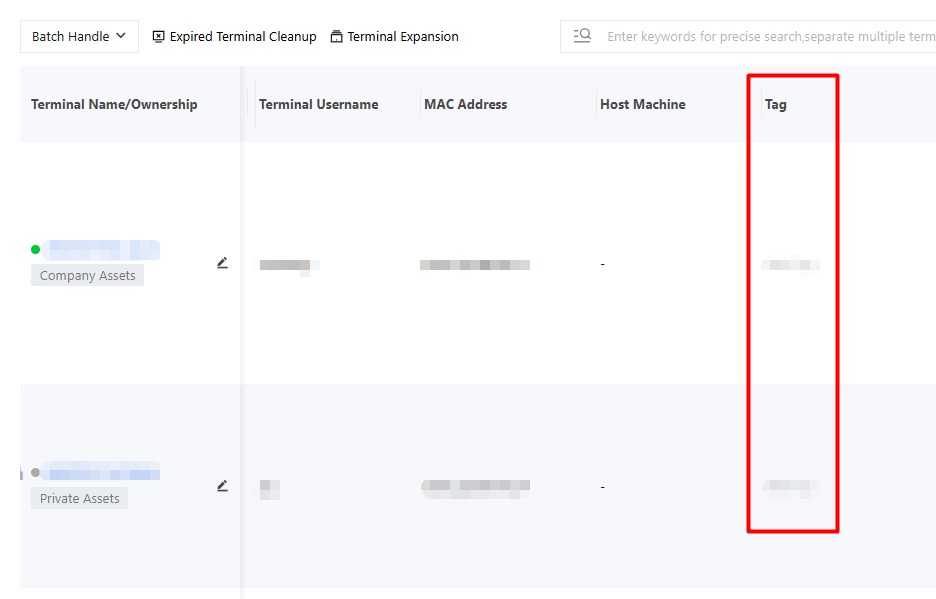
1. Add tags to terminals so that terminals can be searched by tag information. Click Mark As, edit the tag, and save it.
2. After marking, you can view the tag in the terminal list.
Clean Up Terminals
1. After a terminal is cleaned up, it will be removed from the terminal list and will no longer be managed by the console.
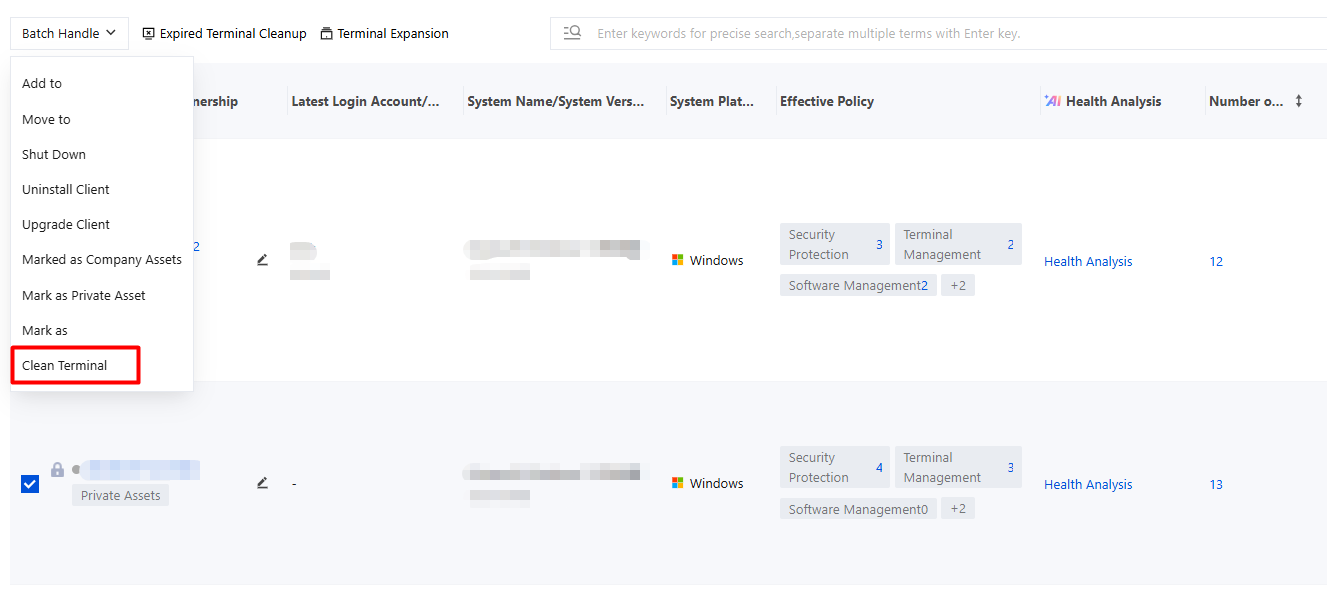
2. When the terminal is offline, click Batch Actions and select Clean Up Terminal.
3. After the second confirmation, the terminal is cleaned up and removed from the invisible state, and the associated license is reclaimed.
4. When a cleaned-up terminal comes online again, the license will be automatically restored.
Cleaning Up Inactive Terminals
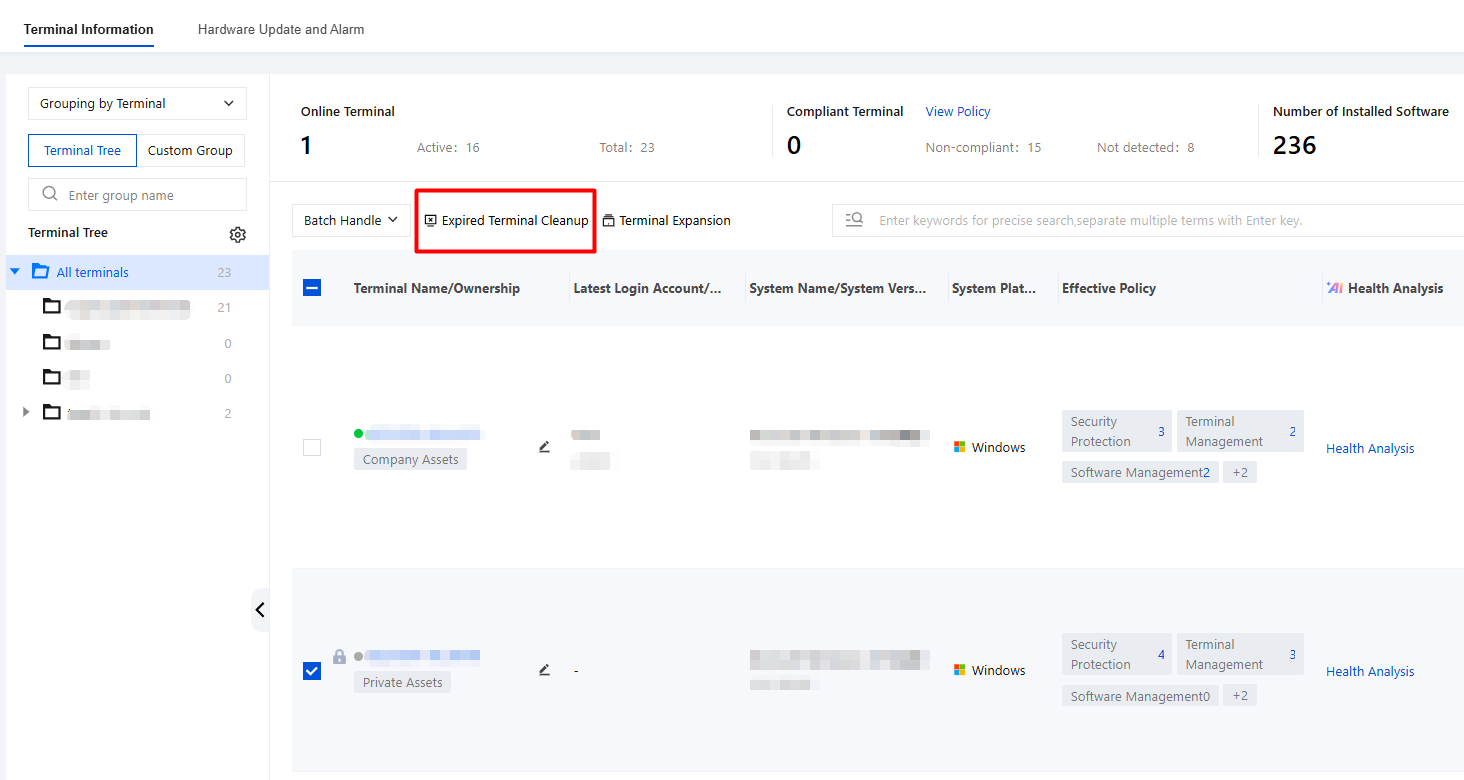
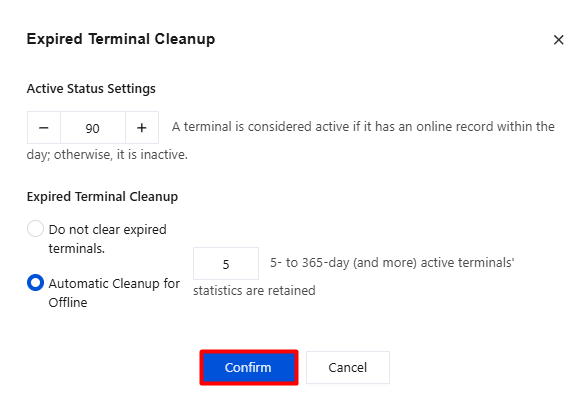
1. Clean up expired terminals to release licenses, and click Expired Terminal Cleanup.
Attention:
The device data on the NGN > trusted access management > access device management page will also be cleaned up.
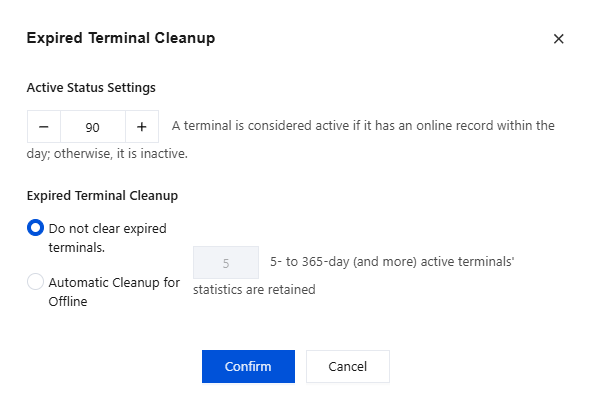
2. Active status setting: custom number of days. If a terminal has login records within X days, it is determined as active. Otherwise, it is determined as inactive.
3. Expired terminal cleanup: By default, it is set to "Do not clean up expired terminals". If you configure automatic cleanup for terminals that have been offline for X days (example: 5 days) or more, the system will clean up terminals on a scheduled basis within the specified time period (starting on the hour and half hour, not in real time). After configuration, click Confirm to save.
4. After the cleanup is complete, open the Terminal Information page again. Terminals whose last online time was more than 5 days ago will be cleaned up and no longer displayed.
Note:
After a terminal is cleaned up and comes online again, it will be displayed in the terminal information again.
After a terminal is cleaned up, if there are terminals exceeding the authorized limit, they will also be displayed as online.
Adding Criteria
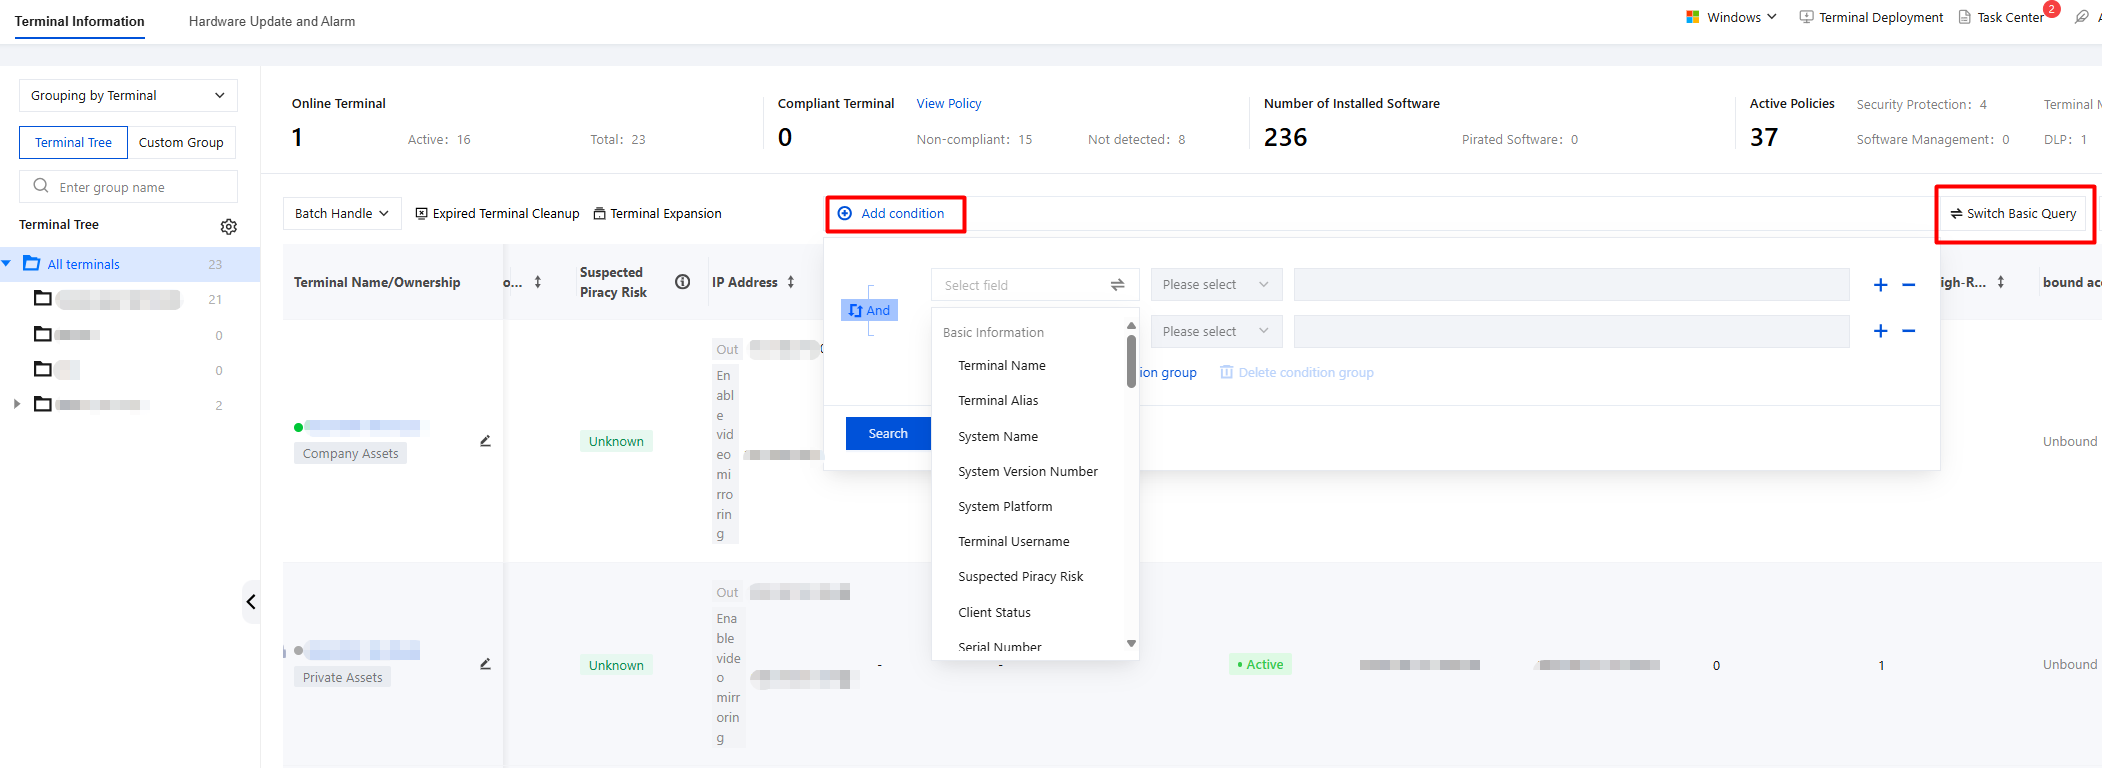
1. Allows administrators to locate target devices from a large number of terminal devices by combining multiple conditions. It supports cross-filtering by multiple dimensions such as terminal name, IP address, account, department, and system attributes.
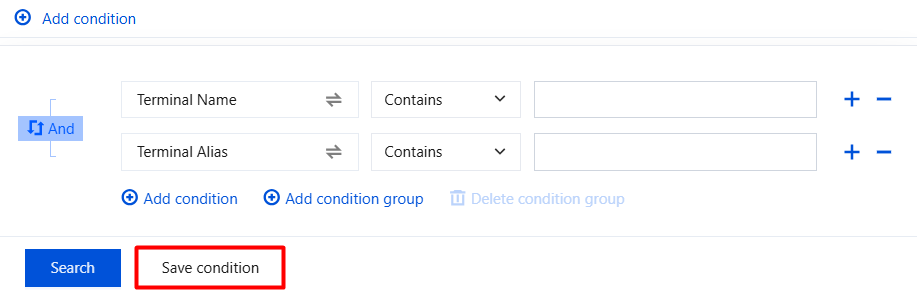
2. Add filtering criteria: In advanced query mode, click Add Criteria, select a dimension from the field list (such as "Terminal Name" or "Department"), and set a specific value on the right (such as entering a terminal name or selecting a department). You can create "AND/OR" logical groups.
3. Combine complex conditions: In advanced query mode, click Add Condition Group to create "AND/OR" logical groups for more complex multi-condition queries.
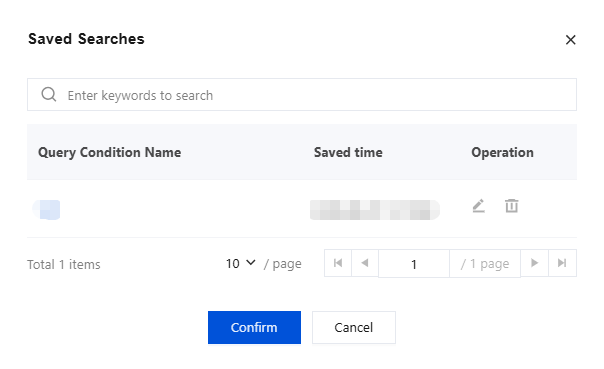
4. Execution and saving: After the conditions are set, click Search to view the results. If you frequently use this combination, click Save Conditions and name it.
5. Click a saved query
to directly select a query condition name (click the blue query condition name) and query the terminals within the scope of that condition.
Exporting
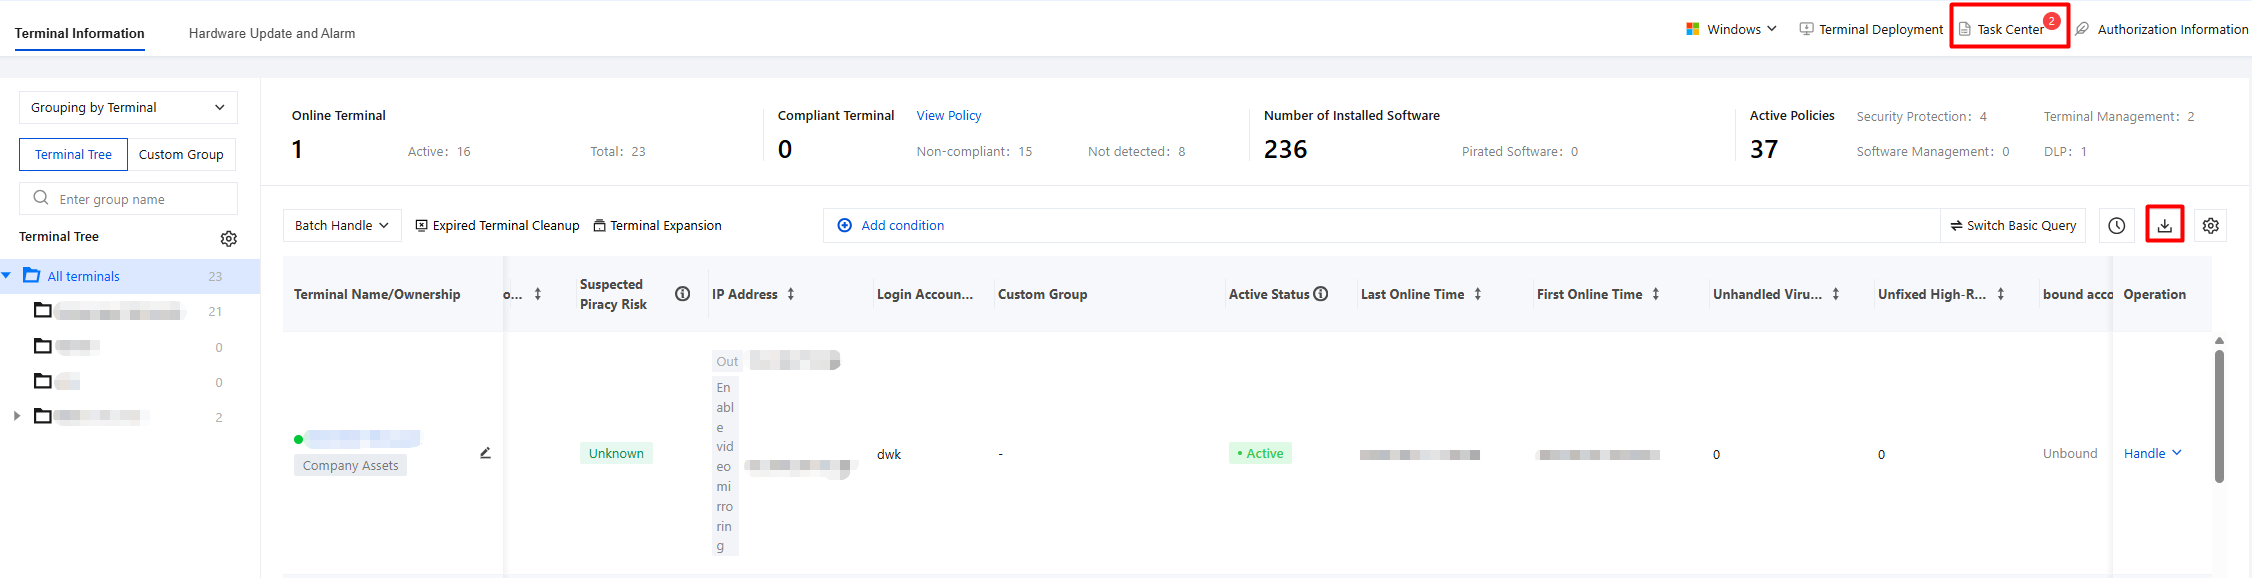
1. Click the export button
to export the terminal information table. You can go to the Task Center to view the progress and download the data.
2. In the Task Center, click Download to view the exported terminal data.
Custom List Management
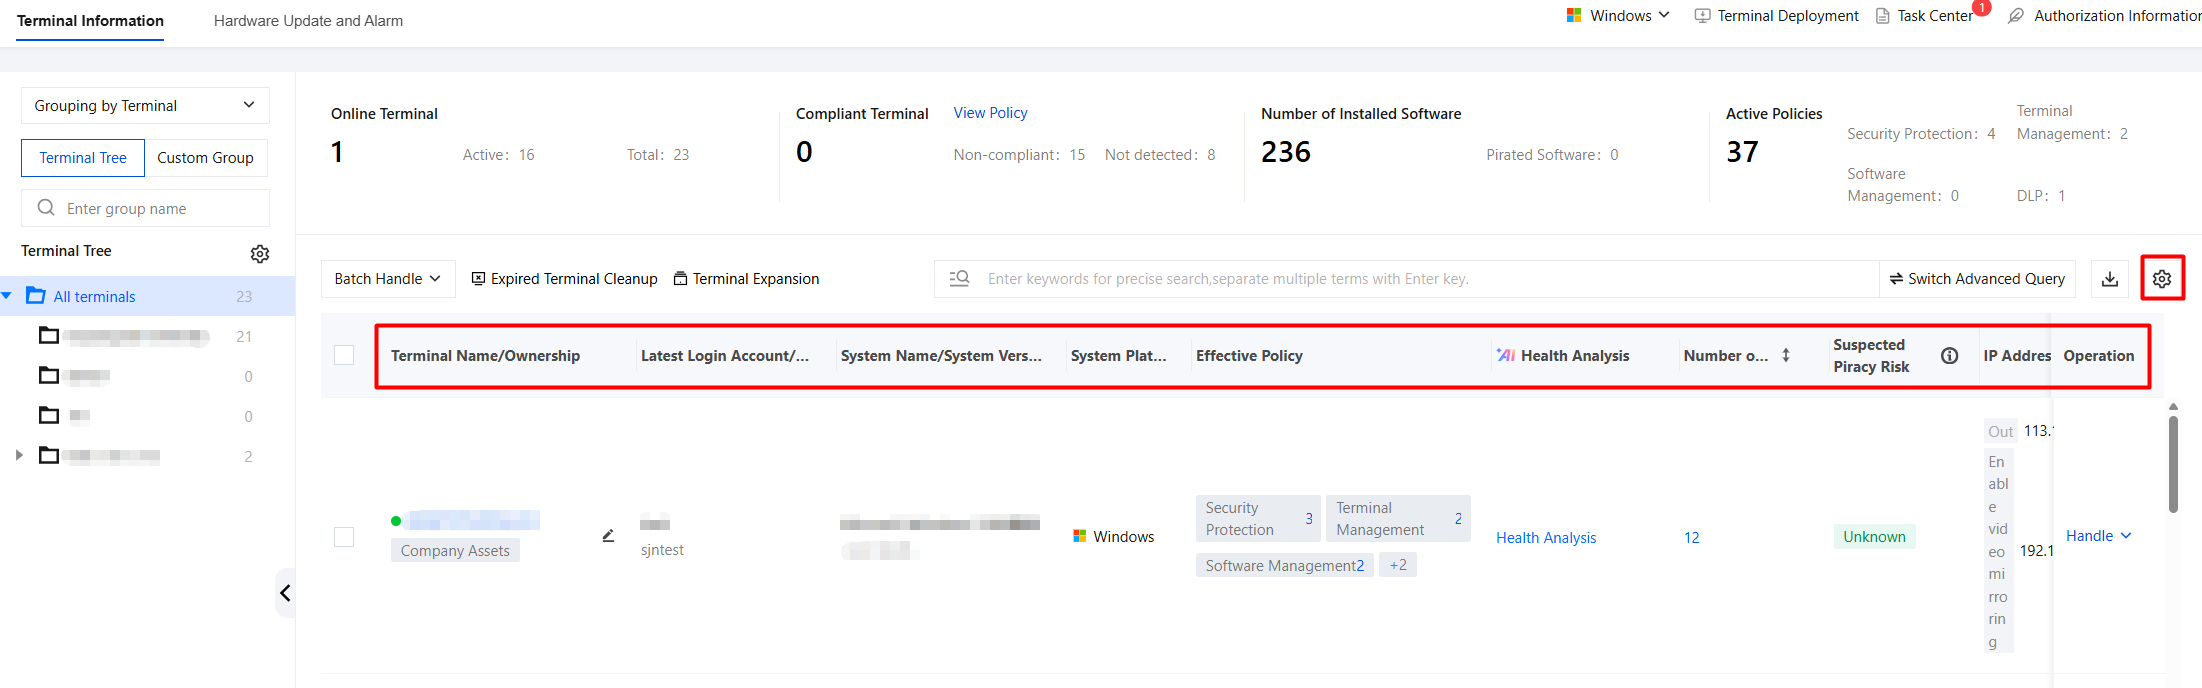
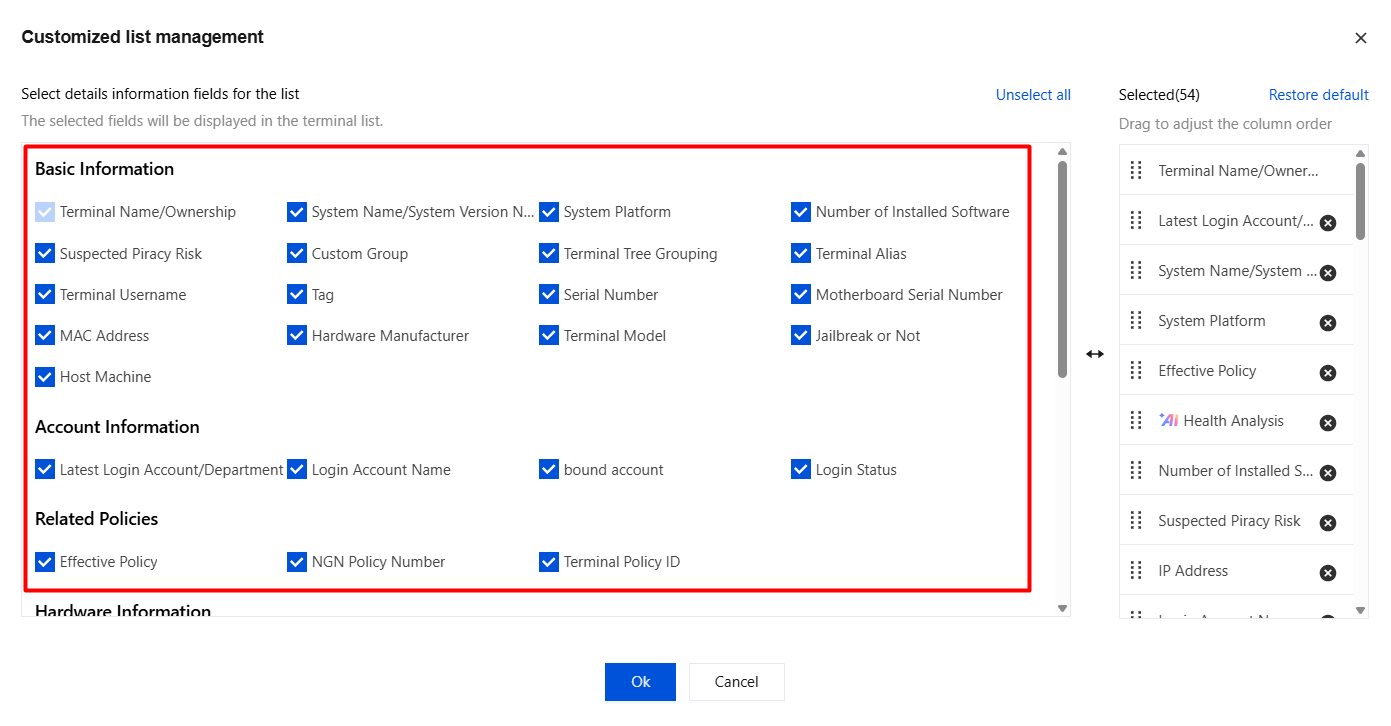
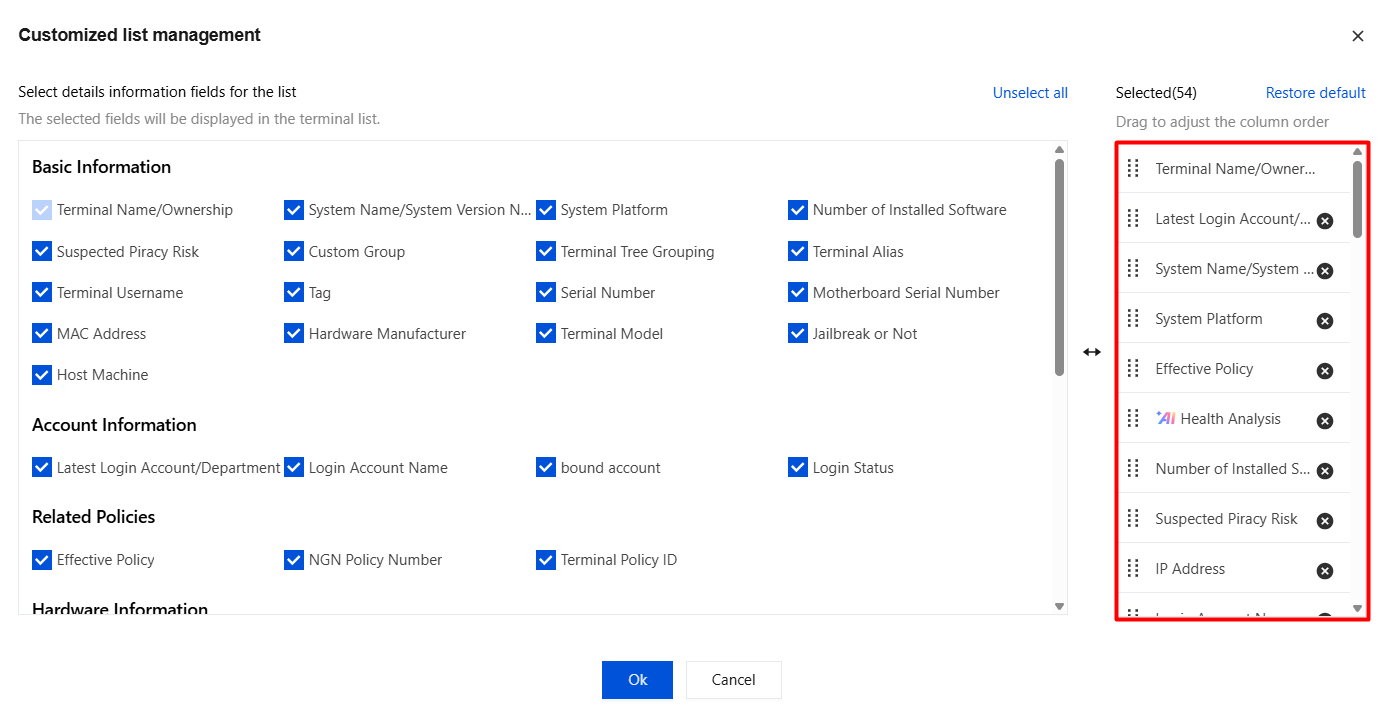
1. You can customize whether fields in the terminal tree list are displayed. Click Settings.
2. Fields in the terminal list can be displayed by category. Selected fields are shown in the list, while unselected fields are not displayed.
3. You can set the order of fields in the list. Drag a field name to adjust its display order in the list.
Renaming a Terminal
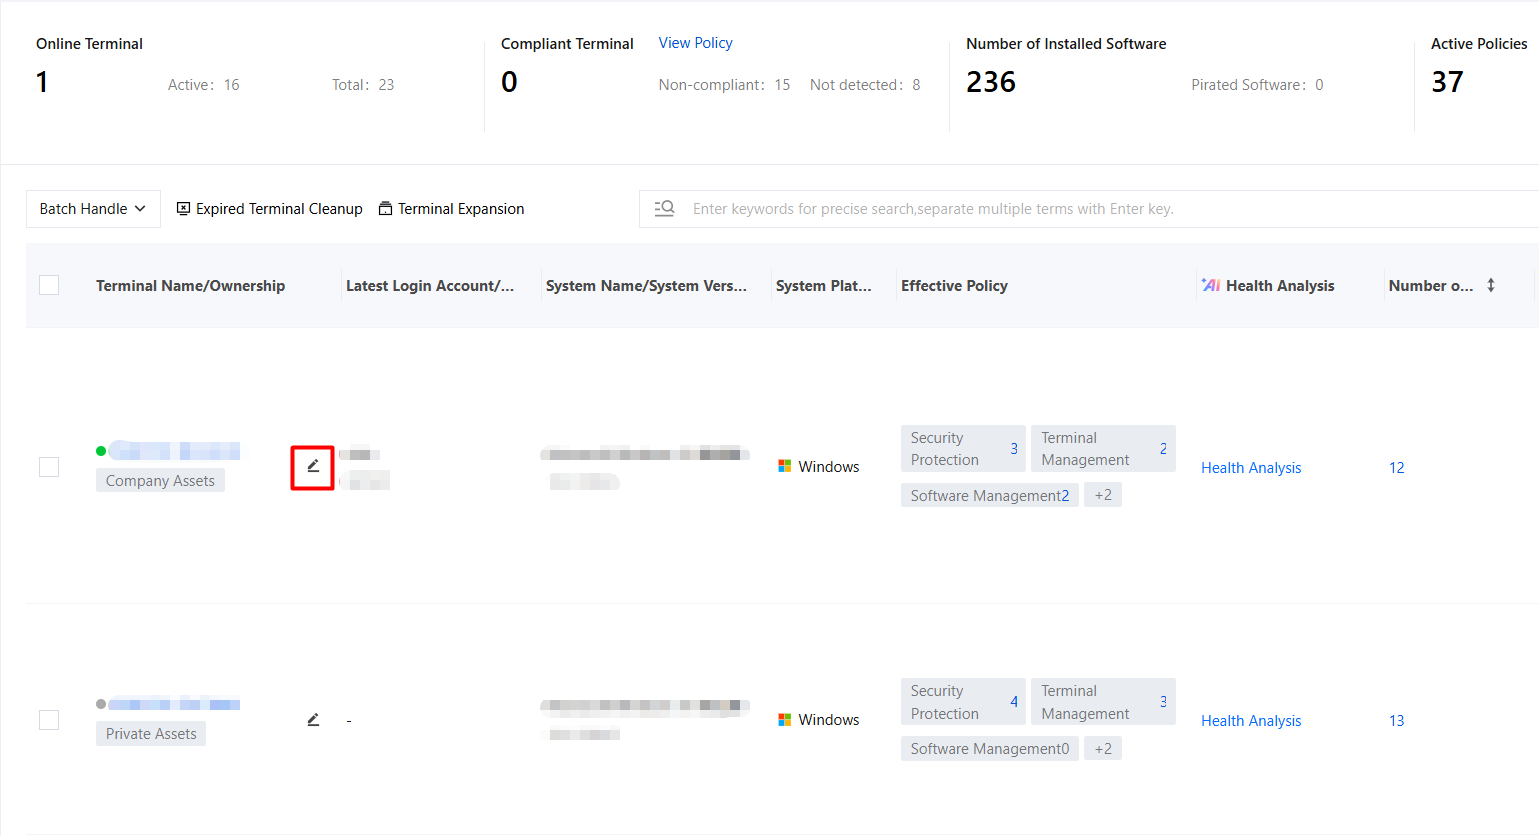
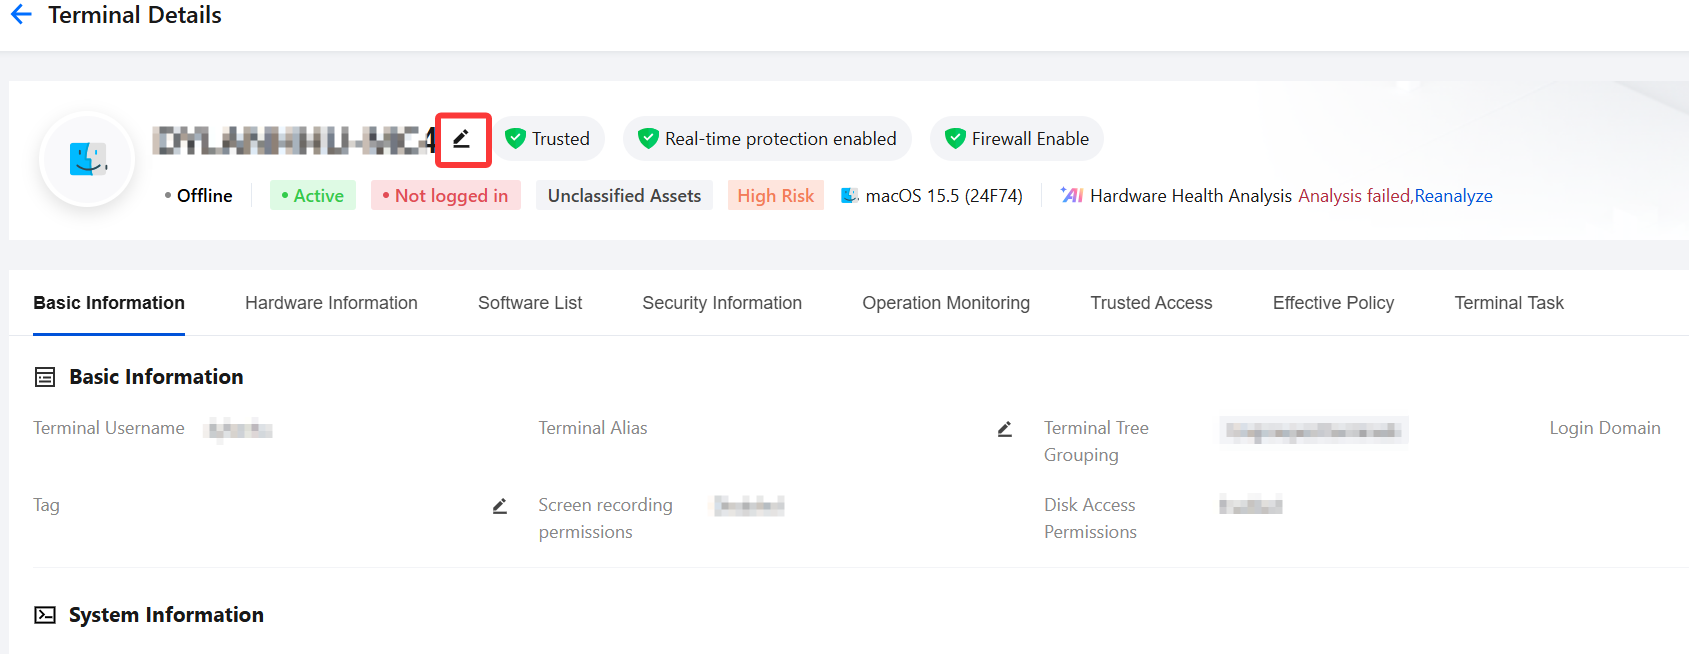
The terminal list/terminal details pages support terminal name modification. After you edit a new name, a name change command is sent to the terminal, and the new name takes full effect after the terminal restarts. Administrators can manage terminal names centrally without logging in to each terminal device individually.
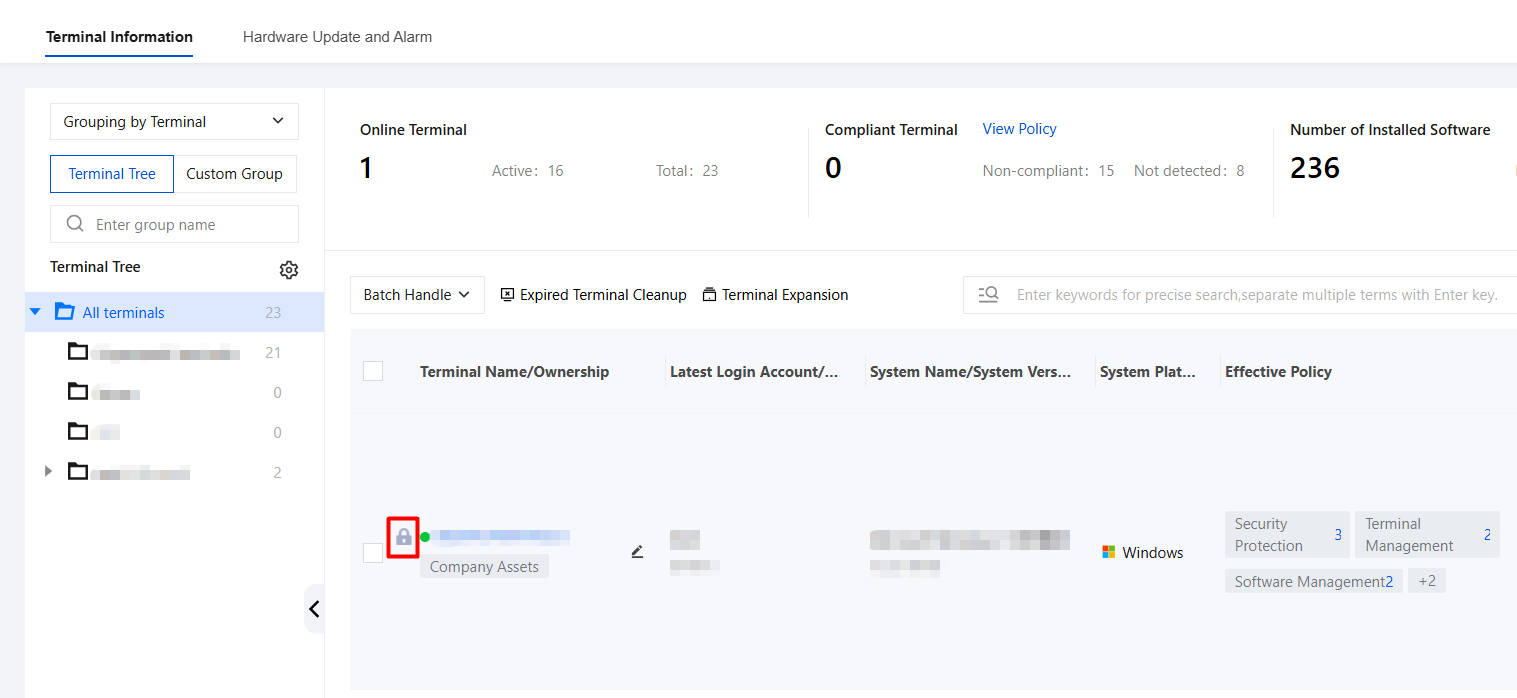
Locking a Terminal
After locking, the terminal will not be moved automatically (unaffected by organizational structure updates and IP address-based automatic grouping). It can only be moved manually.
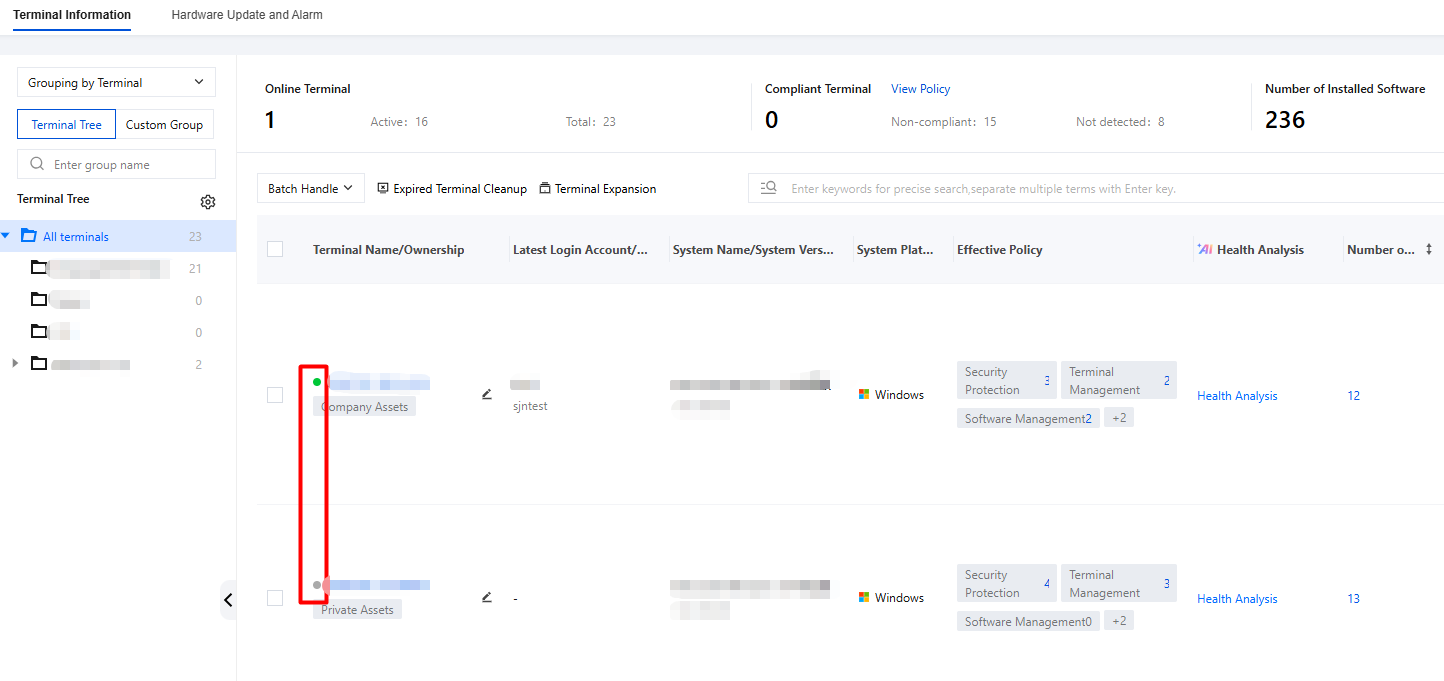
Online Terminal Identifier
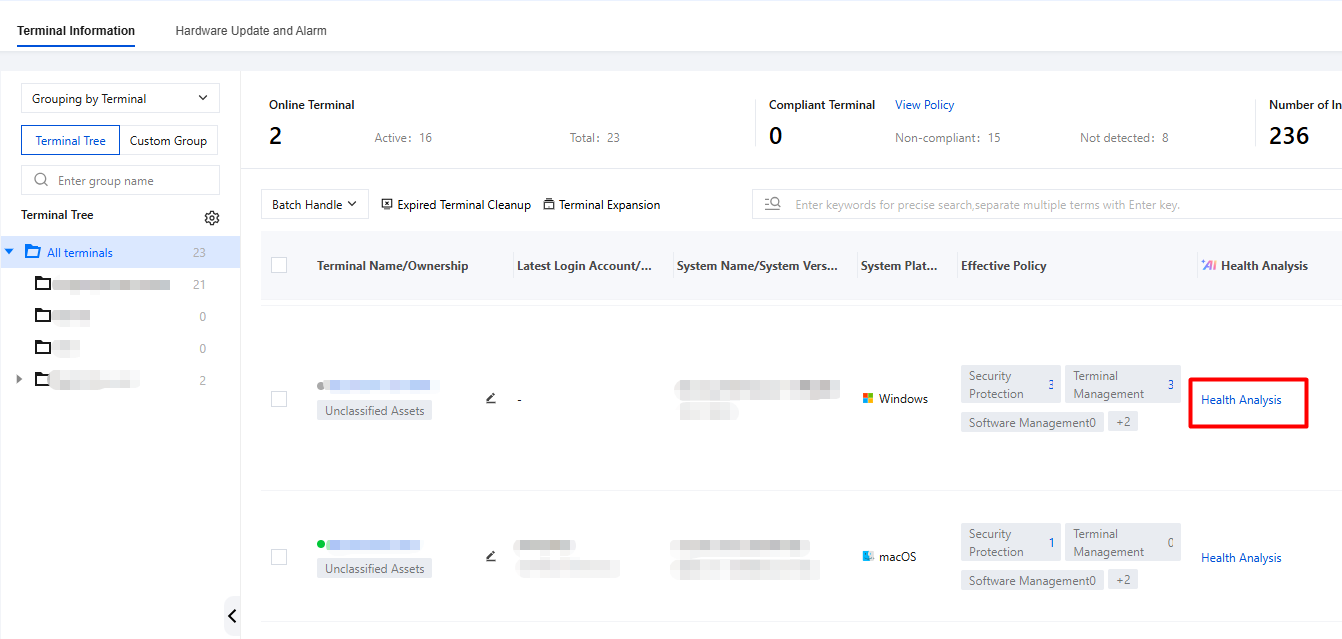
Online terminals are indicated by a green circular icon, while offline terminals are indicated by a gray circular icon.
AI Health Analysis
AI health analysis is supported. By combining terminal hardware information with recent performance monitoring data, the system can analyze the hardware health of specified terminals and provide replacement recommendations (with result export supported), helping IT administrators identify/analyze aging assets and reduce asset operation costs.
For terminals that have not been analyzed: click Health Analysis to analyze the health of the terminal and output the results.
For terminals that have been analyzed: the last analysis result and AI analysis details are displayed. You can regenerate the current result or copy it.
For terminals that have been analyzed and detected with hardware information updates: the last analysis result is displayed, and a notification indicates that hardware information has been updated.
Handling
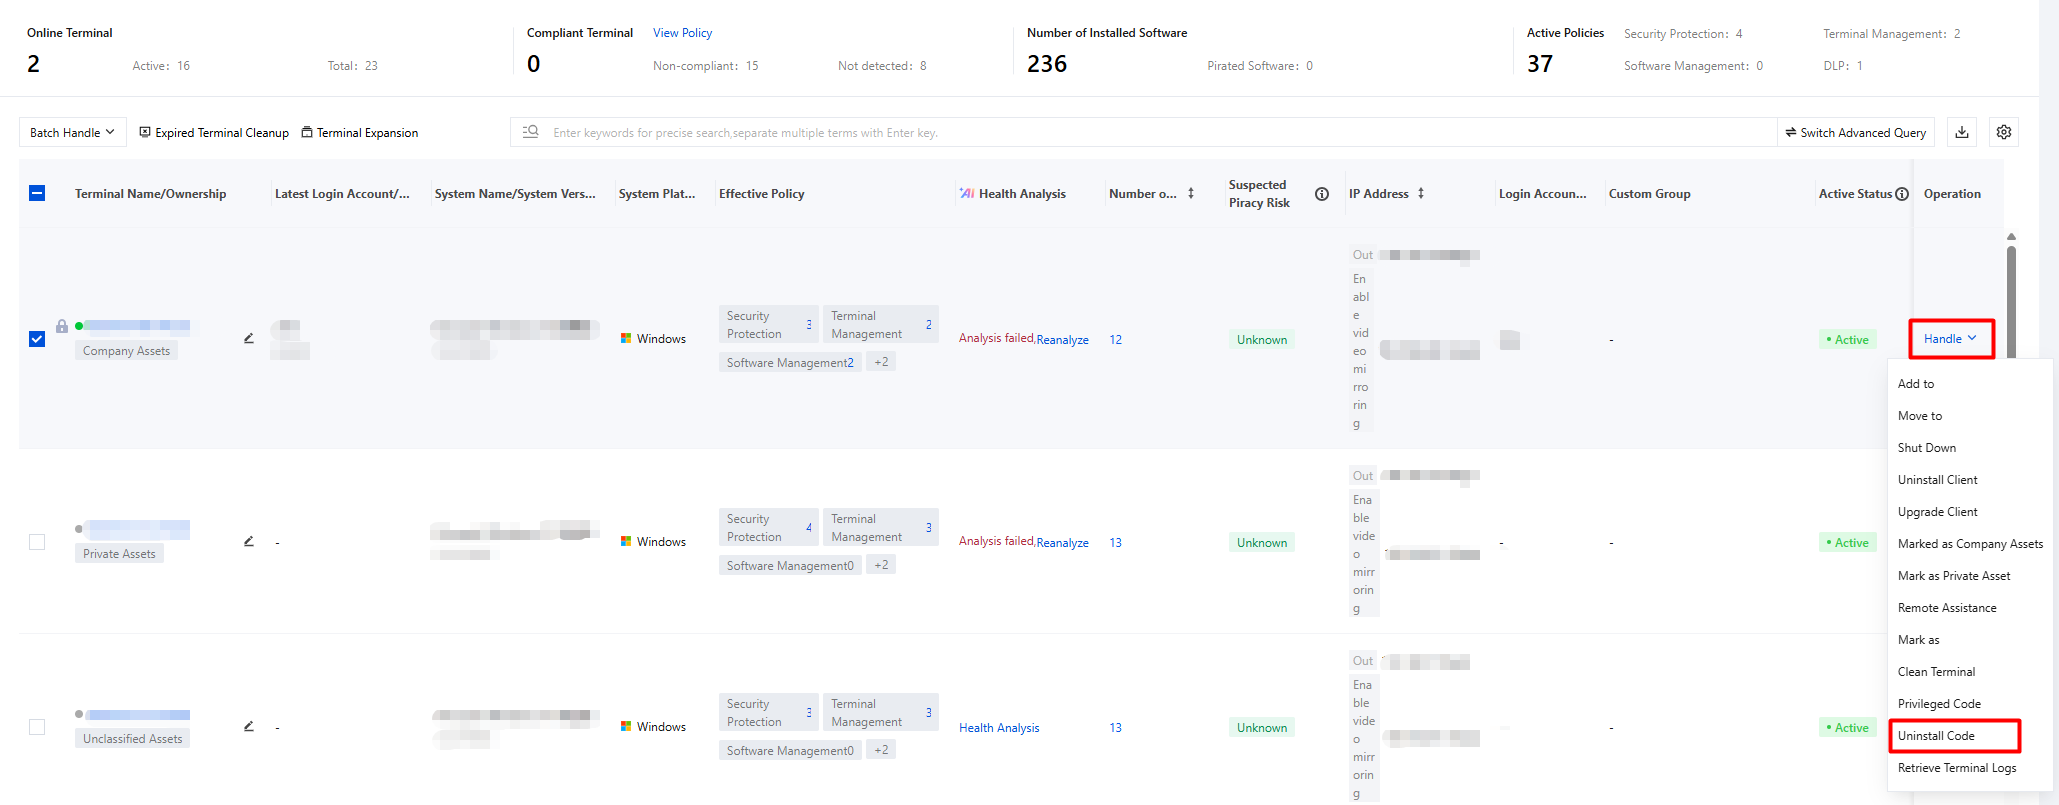
Pull down the action menu to perform various operations on selected objects, such as adding, moving, shutting down, and uninstalling the client.
Adding a Privilege Code
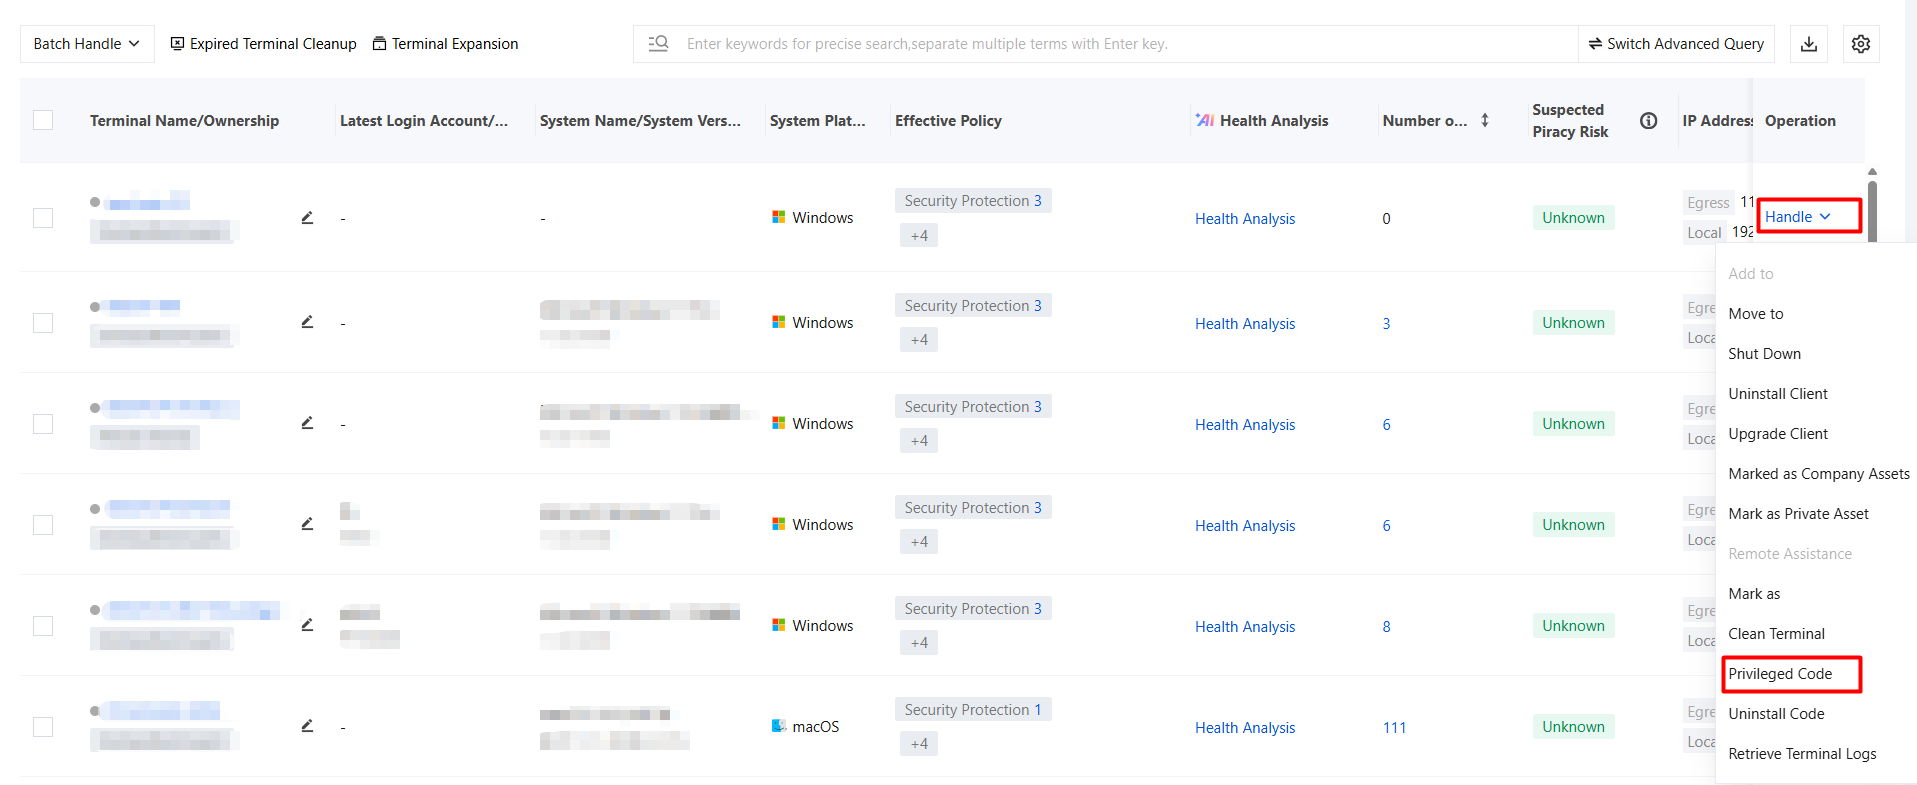
1. Click Privileged Code to obtain the terminal privilege code information.
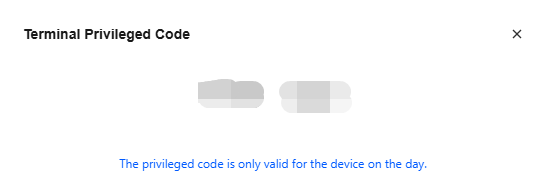
2. The privilege code is valid only for the device on the current day. You need to send the privilege code to the user. After the user enters the privilege code on the terminal device, the terminal enters privileged mode, which completely blocks all security, management, and other policies to simulate an uninstalled environment for client troubleshooting. For detailed configuration, see Allowing Clients to Enter Privileged Mode.
Uninstallation Code
Click Uninstallation Code to obtain the terminal uninstallation code information. The uninstallation code is valid only for the device on the current day. You need to send the uninstallation code to the user. After the user enters the uninstallation code on the terminal device, the iOA client is successfully uninstalled. For detailed configuration, see Allowing Client Uninstallation.
Obtaining Terminal Logs
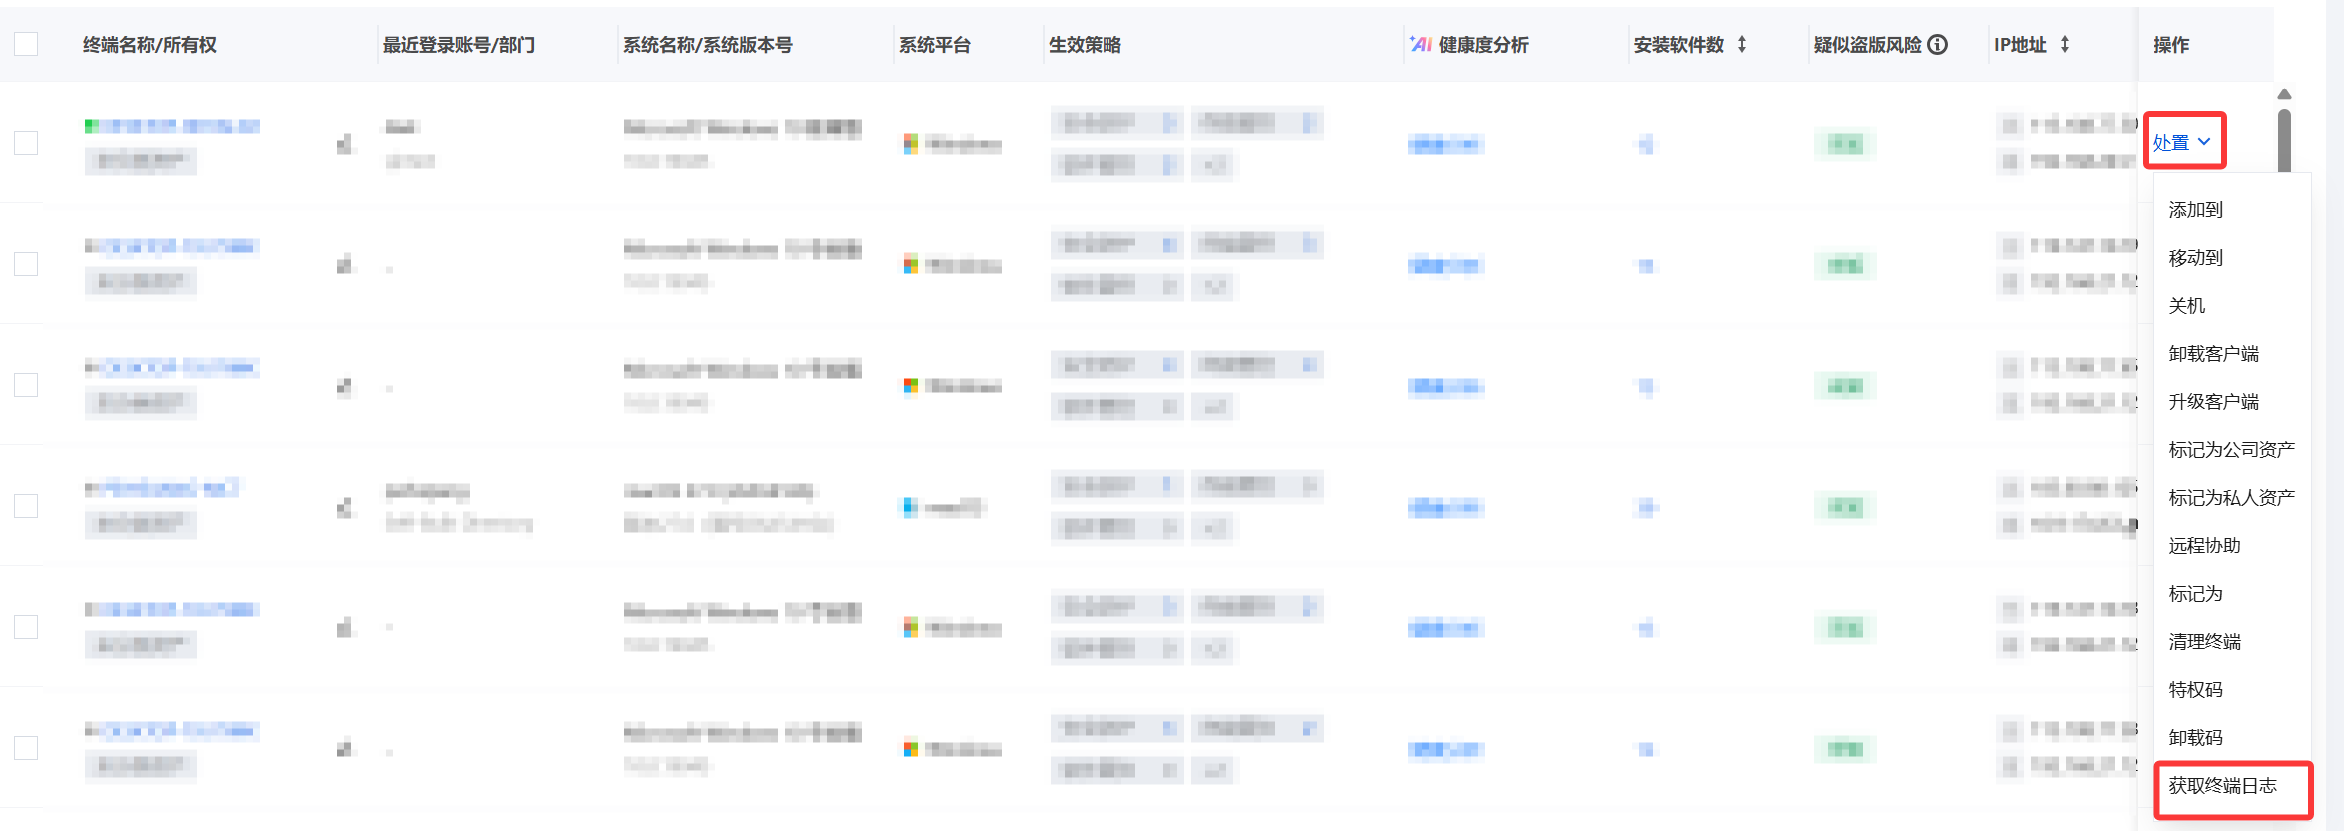
Click Obtain Terminal Logs to obtain the full terminal log information.
Terminal Details
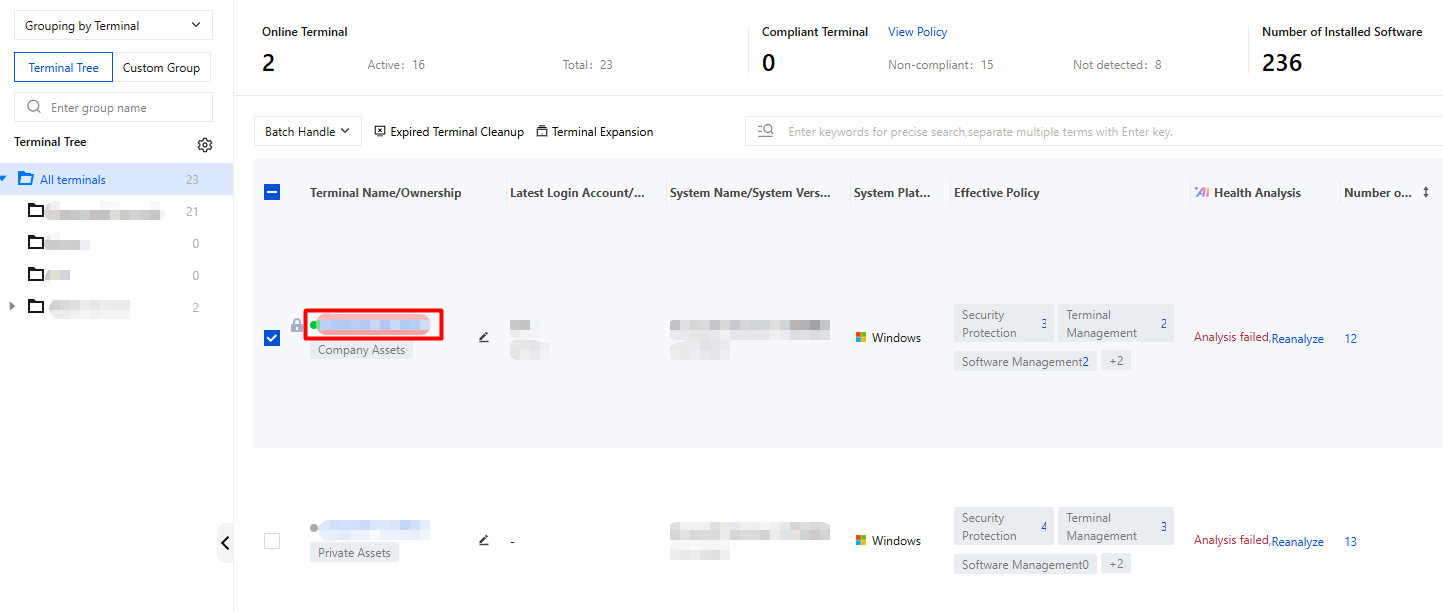
1. Click Terminal Name (in blue) to go to the terminal details.
2. The terminal name on the terminal details page can be modified. After modifying the terminal name, you can go to Asset Management > Terminal List > Hardware Changes and Alerts > to view the operation logs. The before and after terminal names are displayed in Hardware Changes, allowing administrators to trace the history of terminal name modifications.
3. The terminal details page contains information such as terminal cleanup, basic information, hardware information, software inventory, security information, run monitoring, trusted access, effective policies, and terminal tasks. The iOA client supports real-time synchronous collection of terminal performance parameters and uploads them to the server for data display, making it easier to observe terminal usage and providing a basis for troubleshooting related issues and device replacement.
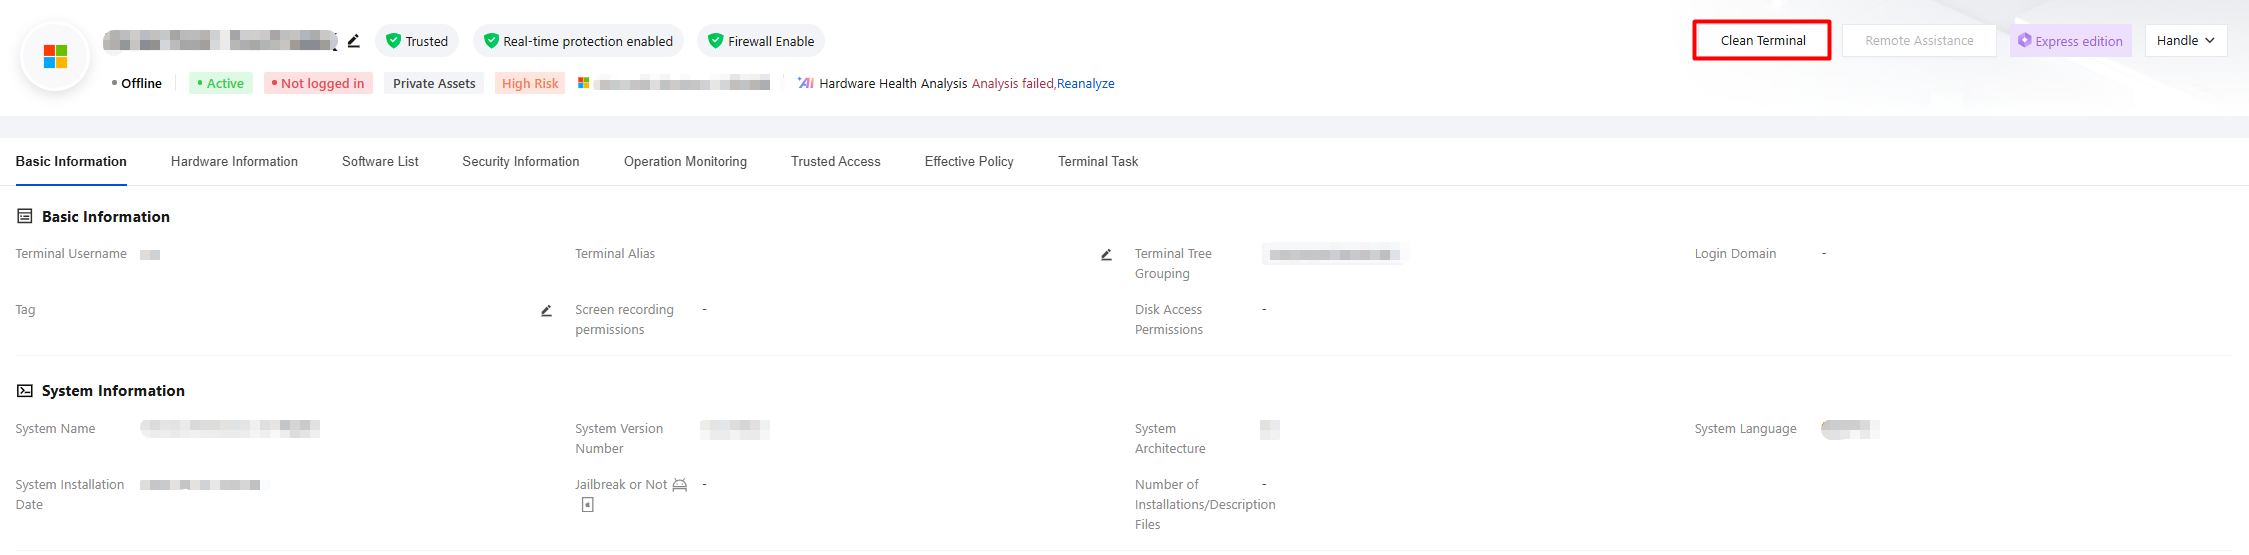
4. Clean up terminal: When the terminal is offline, you can click Clean Terminal. After cleanup, the terminal is removed and becomes invisible, and its license is reclaimed.
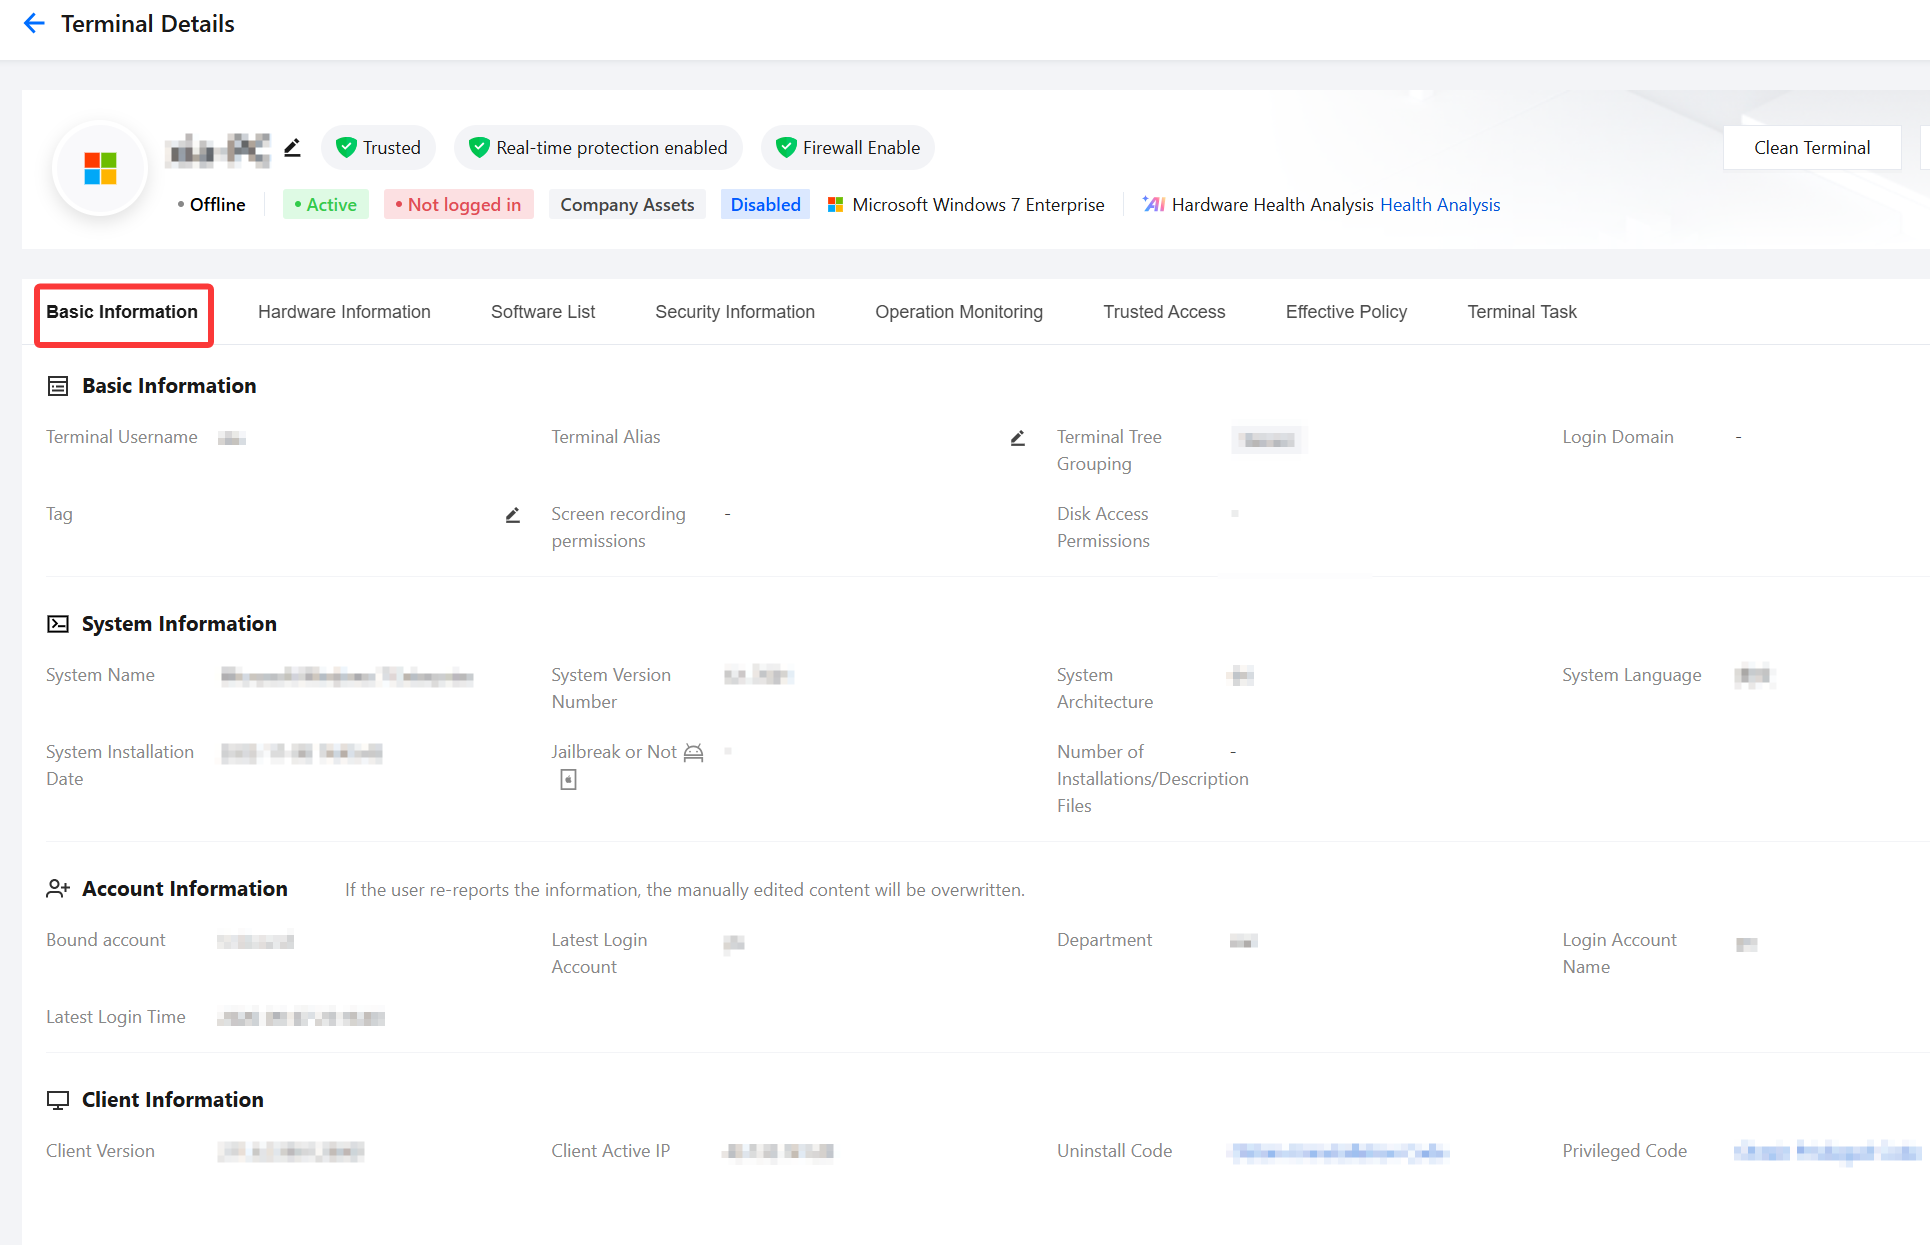
Basic information
Terminal basic information displays hardware information, system information, account information, and client information. You can obtain the uninstallation code and privilege code for the terminal on the terminal details page.
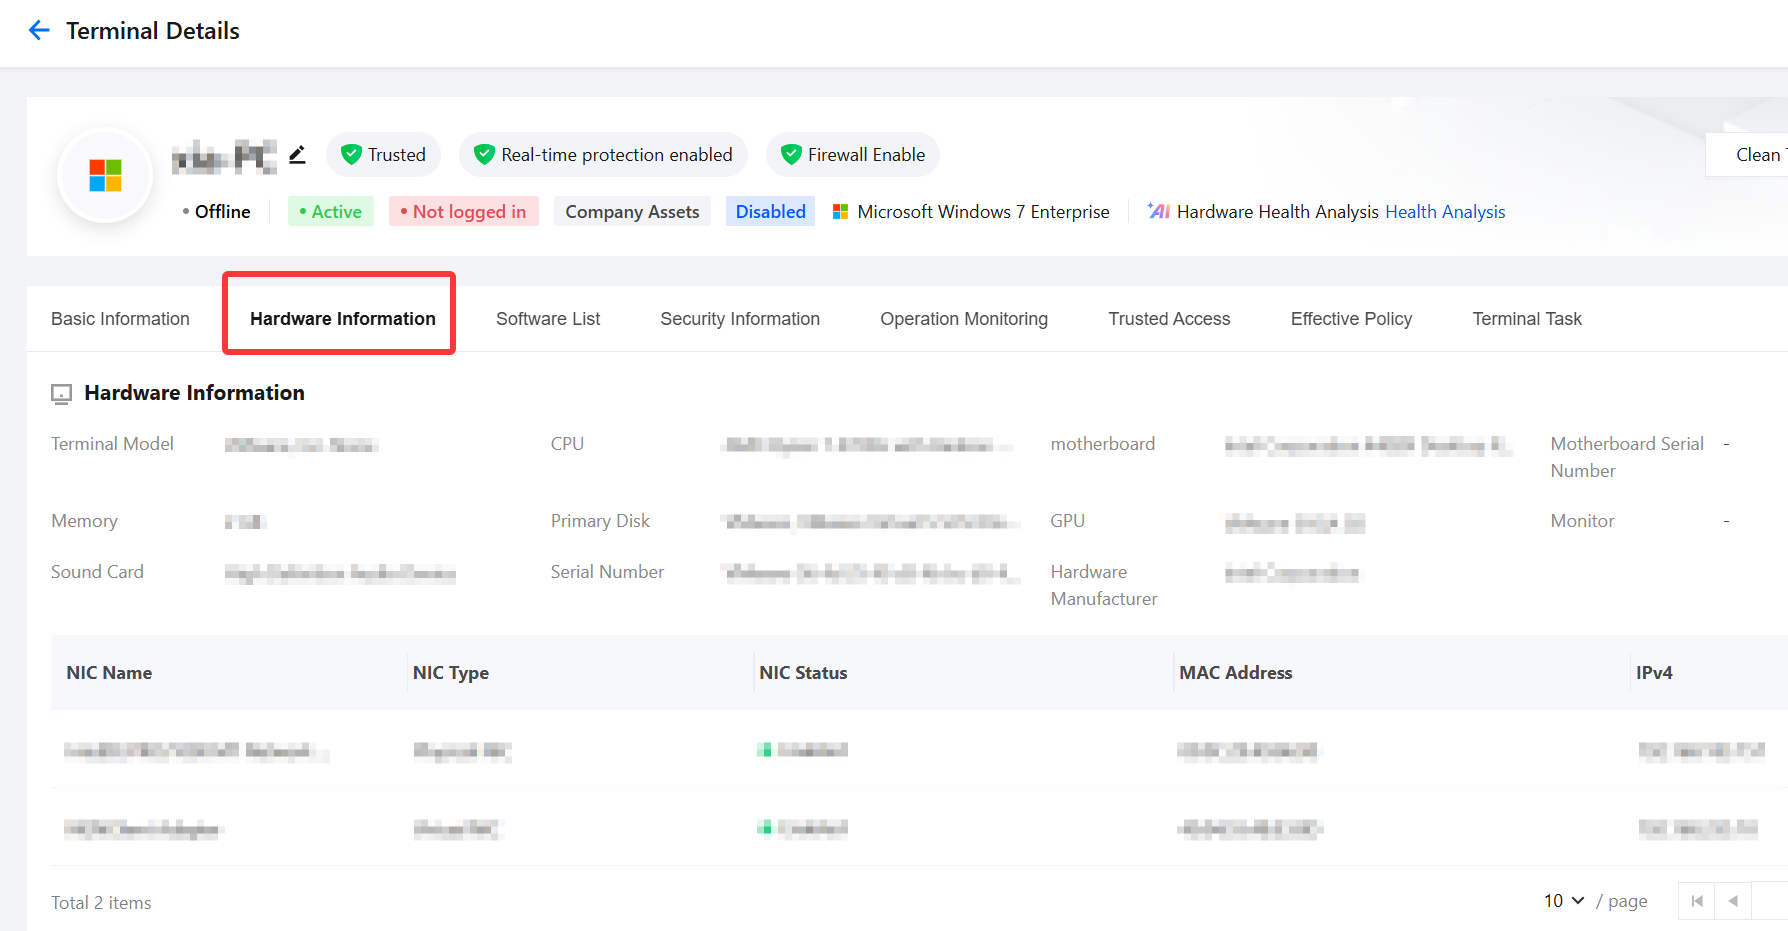
Hardware Information
1. Hardware Information: Displays the detailed configuration of the terminal device, including key components such as CPU, memory, hard disk, graphics card, motherboard, network adapter, and sound card.
2. Hardware information supports the display of multiple network adapter/graphics card information.
3. Hardware Change Information: Records the change history of hardware configurations. You can filter and view change details by time range (Last 24 Hours/Last 7 Days/Last 30 Days/Custom).
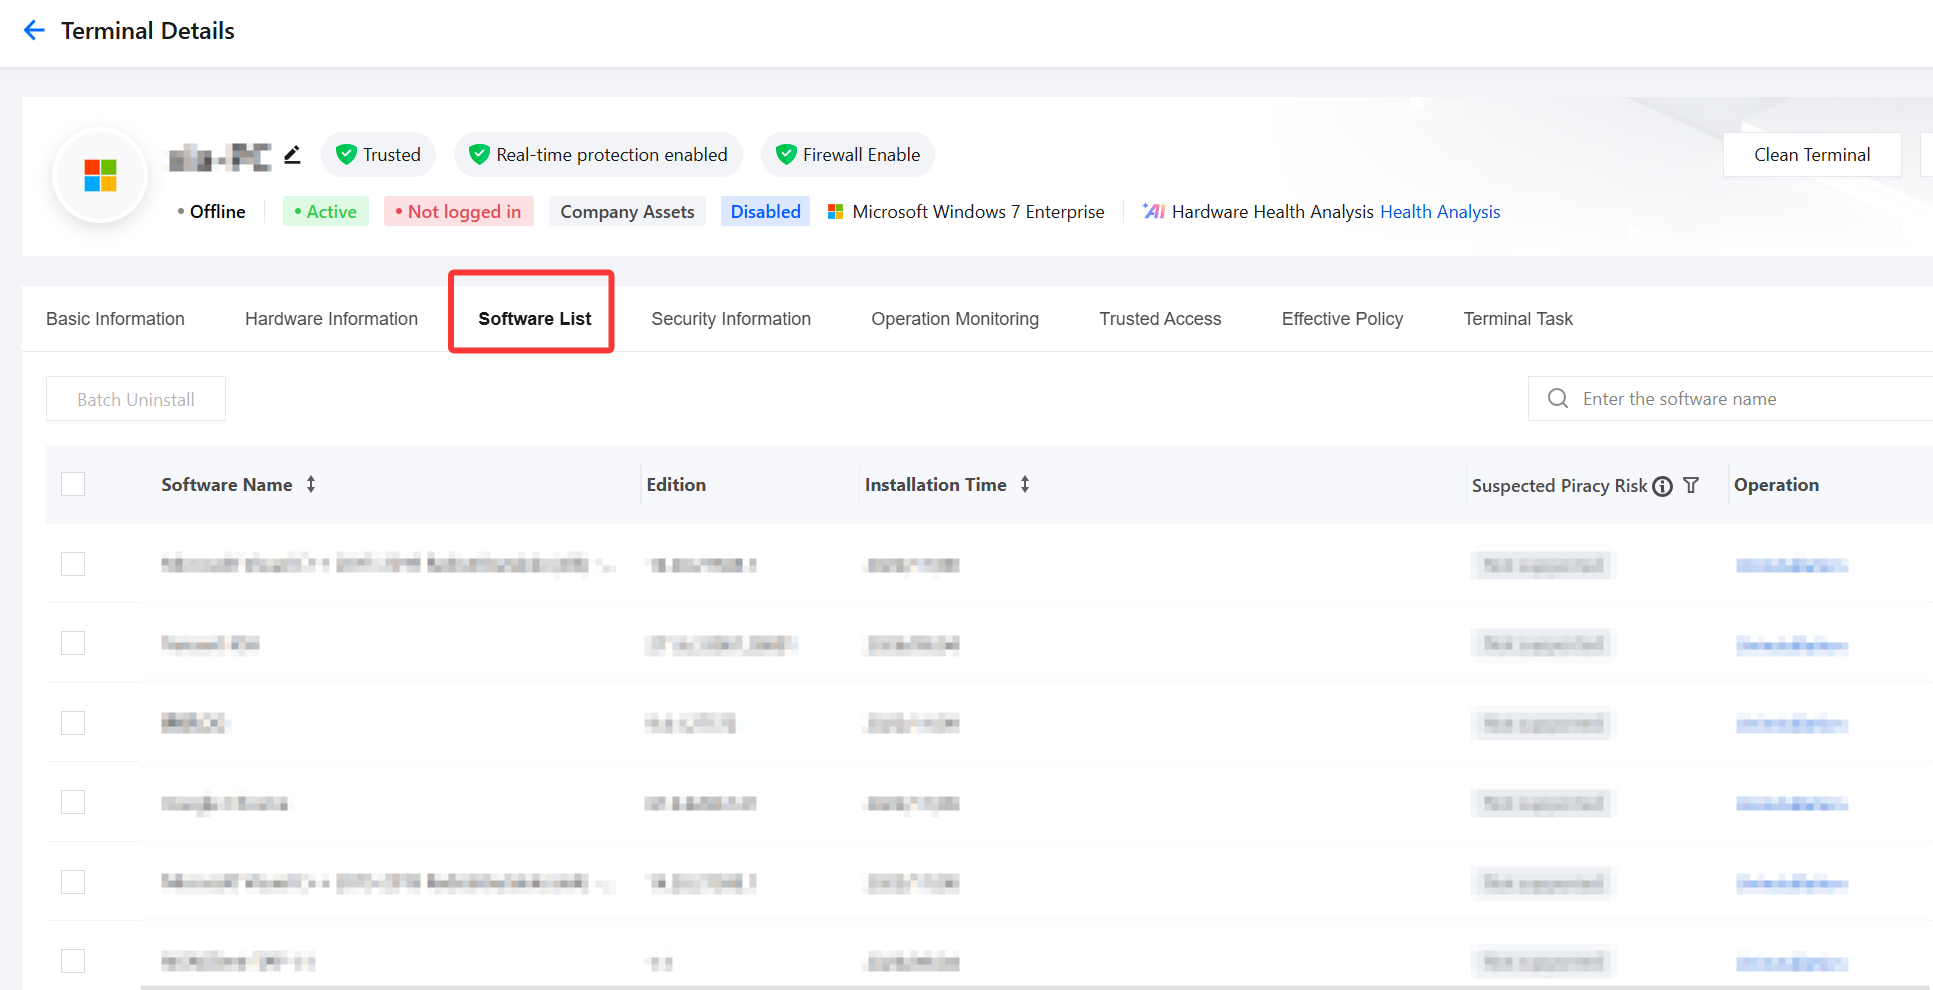
Software Inventory
Displays the list of software installed on the terminal, supports batch uninstallation and search by software name, and also supports suspected software piracy risk detection.
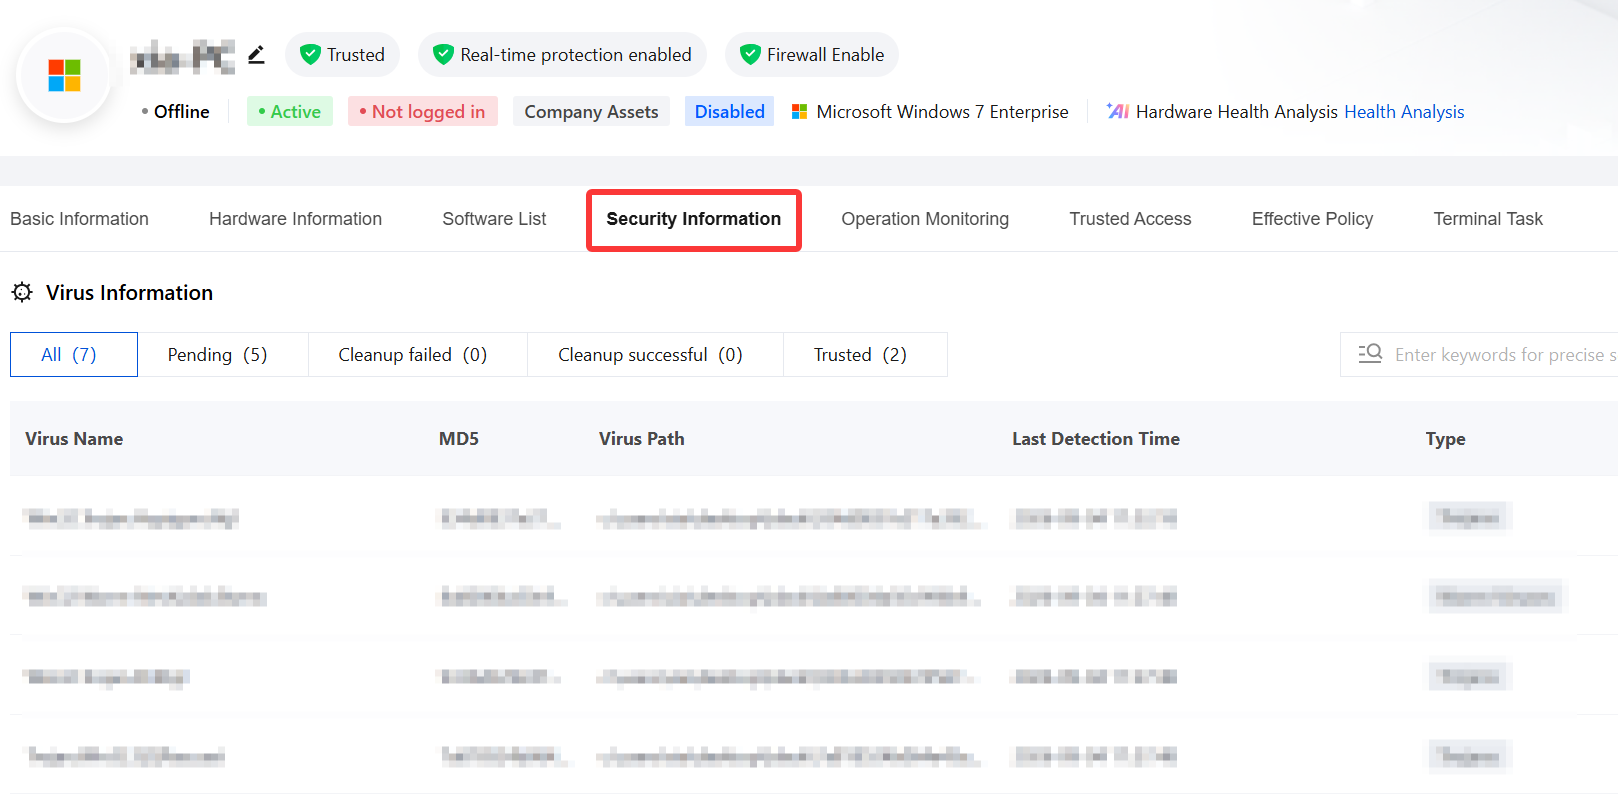
Security Information
Centrally displays virus detection records, system vulnerability remediation status (including high-risk vulnerability indicators), and security component running status. It supports filtering and querying by processing status.
Running Monitoring
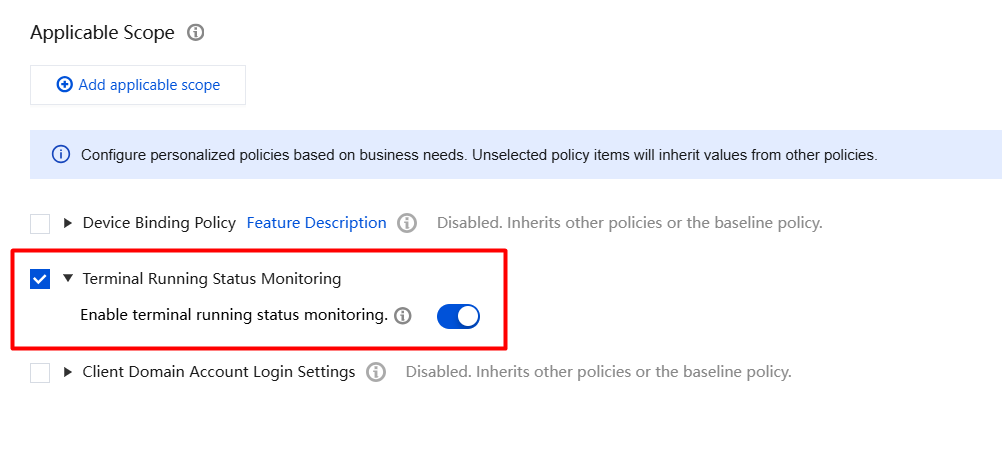
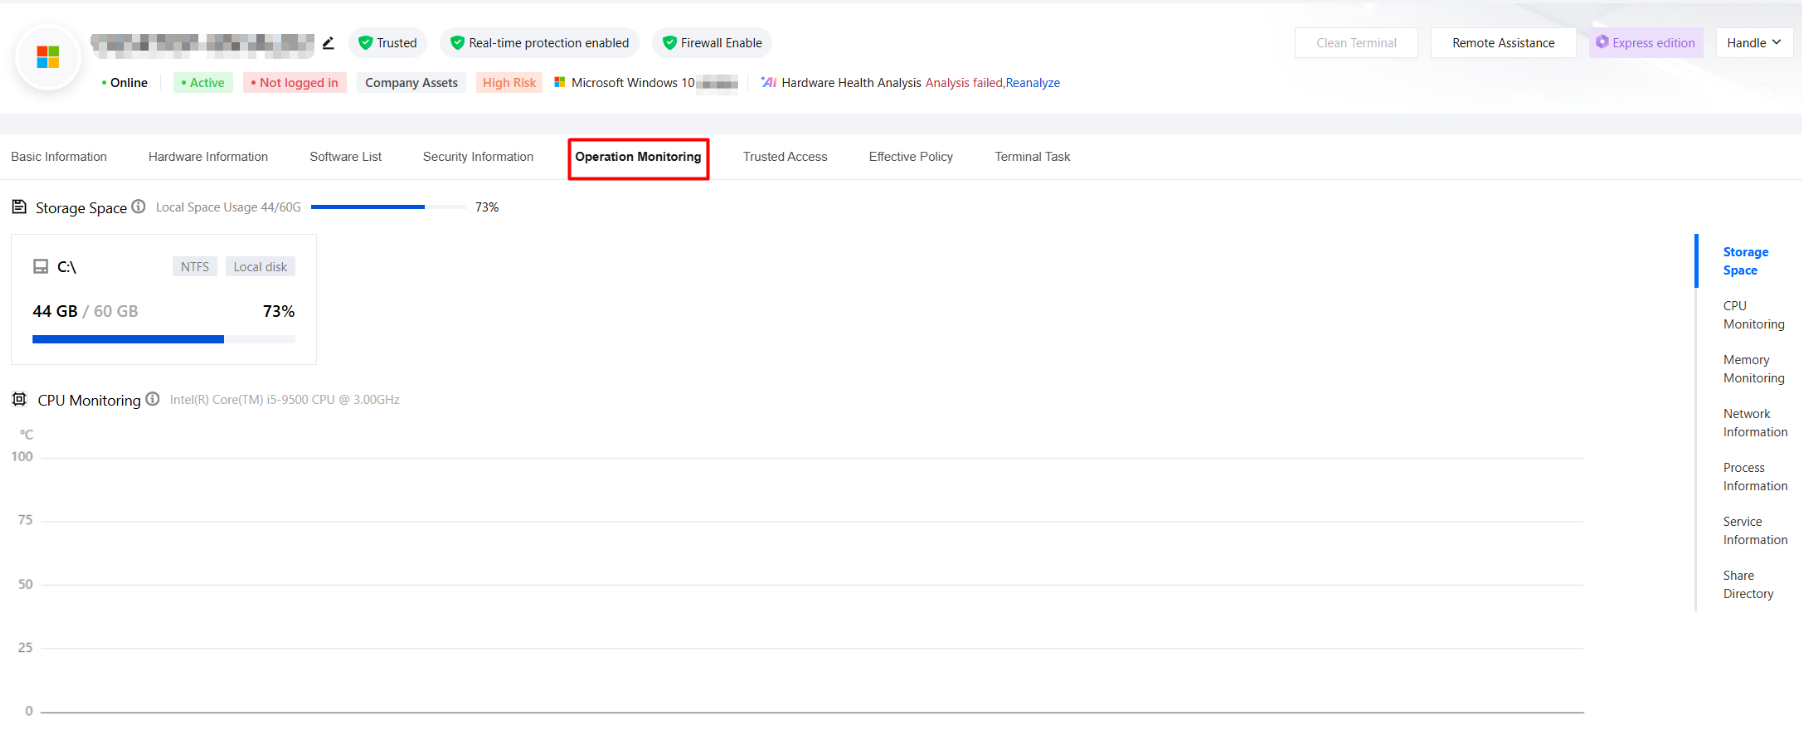
1. To use the run monitoring feature, enable terminal run status monitoring in Client Management > Client Policies > Client General Settings > Terminal Run Status Monitoring. After it is enabled, terminals that receive this policy will report and display local CPU, memory, and storage usage in Terminal Information > Terminal Details > Run Monitoring.
2. Run monitoring supports viewing storage space, CPU monitoring, memory monitoring, network information, process information, service information, and shared directories.
Monitoring Type
Description
Storage Space
Display disk storage usage.
The storage space calculation methods vary by platform.
Windows: 1GB=1024MB
macOS: 1GB=1000MB
CPU monitoring
To obtain terminal CPU temperature monitoring, enable Terminal Run Status Monitoring in Client Management > Client Policies > Client General Settings > Terminal Run Status Monitoring. After the device is restarted, the terminal updates data every fifteen minutes.
When the device is a virtual machine, the CPU temperature displays as 0. Reason: Obtaining the CPU temperature depends on hardware support. If the device is a virtual machine, which is not real hardware, it cannot simulate the temperature characteristics of physical hardware. It is also difficult to penetrate the virtual environment to read the temperature data of the actual physical machine hardware.
Memory monitoring
Memory monitoring information includes memory usage, iOA memory usage, and CPU utilization.
To obtain memory monitoring data, enable Terminal Run Status Monitoring in Client Management > Client Policies > Client General Settings > Terminal Run Status Monitoring. After the device is restarted, the terminal updates data every fifteen minutes.
Network information
Displays protocol, process name, local address, local port, remote address, remote port, and status information. Network information is supported only on Windows systems. Data on this page needs to be obtained in real time. Ensure that the terminal is online.
Process Information
Displays process name, user, command line, memory usage, and process path information. Process information is supported only on Windows systems. Data on this page needs to be obtained in real time. Ensure that the terminal is online.
Service information
Displays service name, description, user, startup type, status, and command line information. Service information is supported only on Windows systems. Data on this page needs to be obtained in real time. Ensure that the terminal is online.
Shared Directory
Shared directory audit must be enabled in Terminal Control > File Control > Policy Settings. After it is enabled, terminals that receive this policy will enumerate and display local shared folders on their terminal details page.
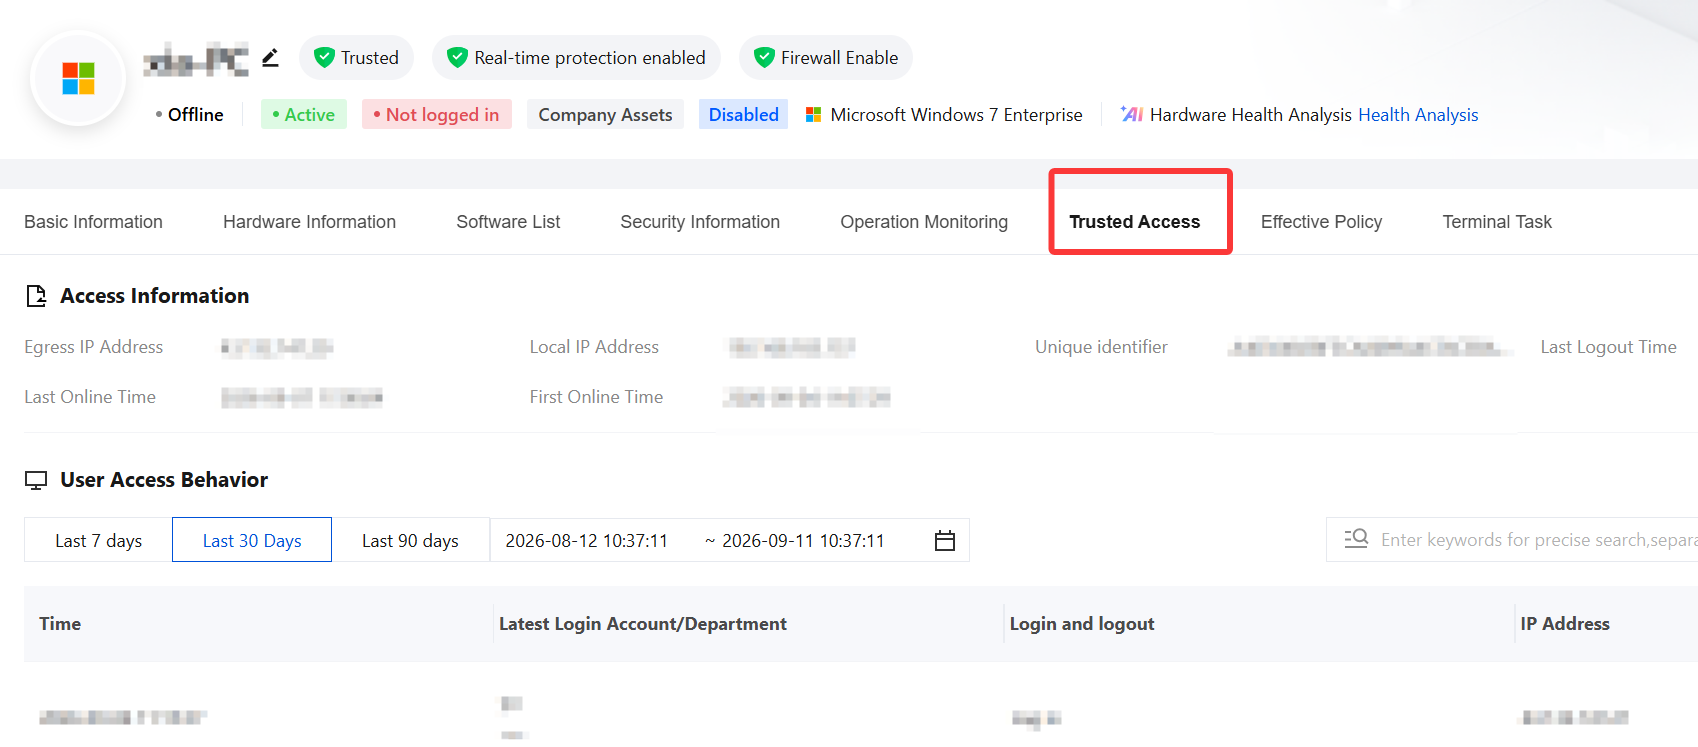
Trusted Access
Display account information, access information (egress IP address and local IP address), and other information.
Policy Effectiveness
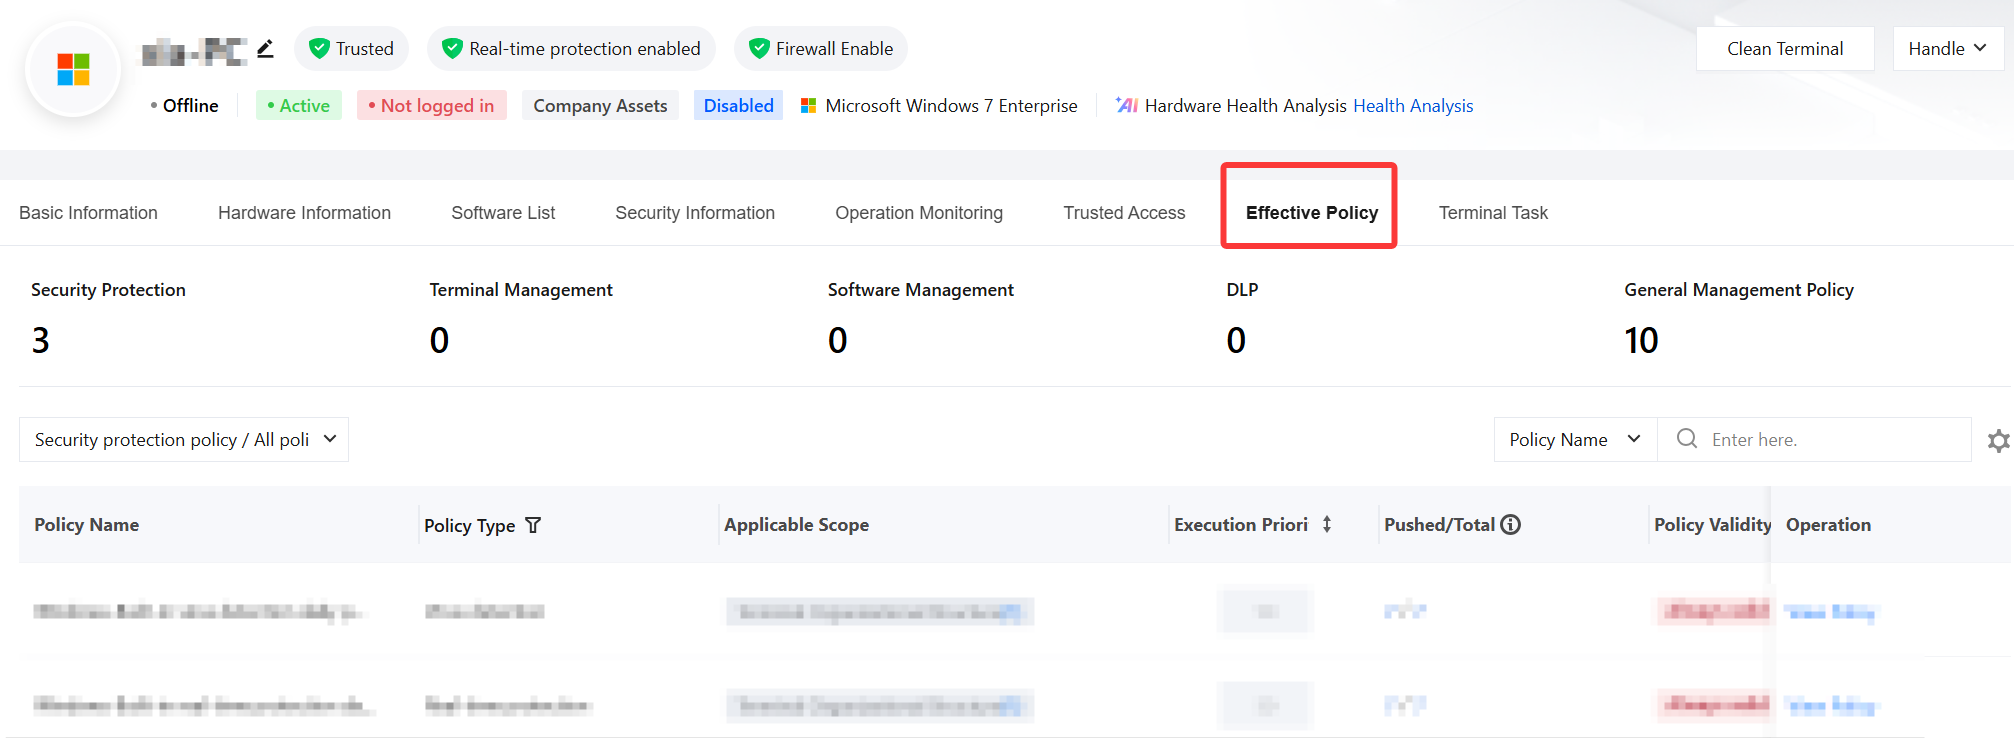
View the security protection policies, terminal management policies, software management policies, data loss prevention policies, and client management policies associated with the terminal. This is commonly used for troubleshooting, such as viewing which policies affect the terminal to quickly identify and resolve issues.
Terminal Tasks
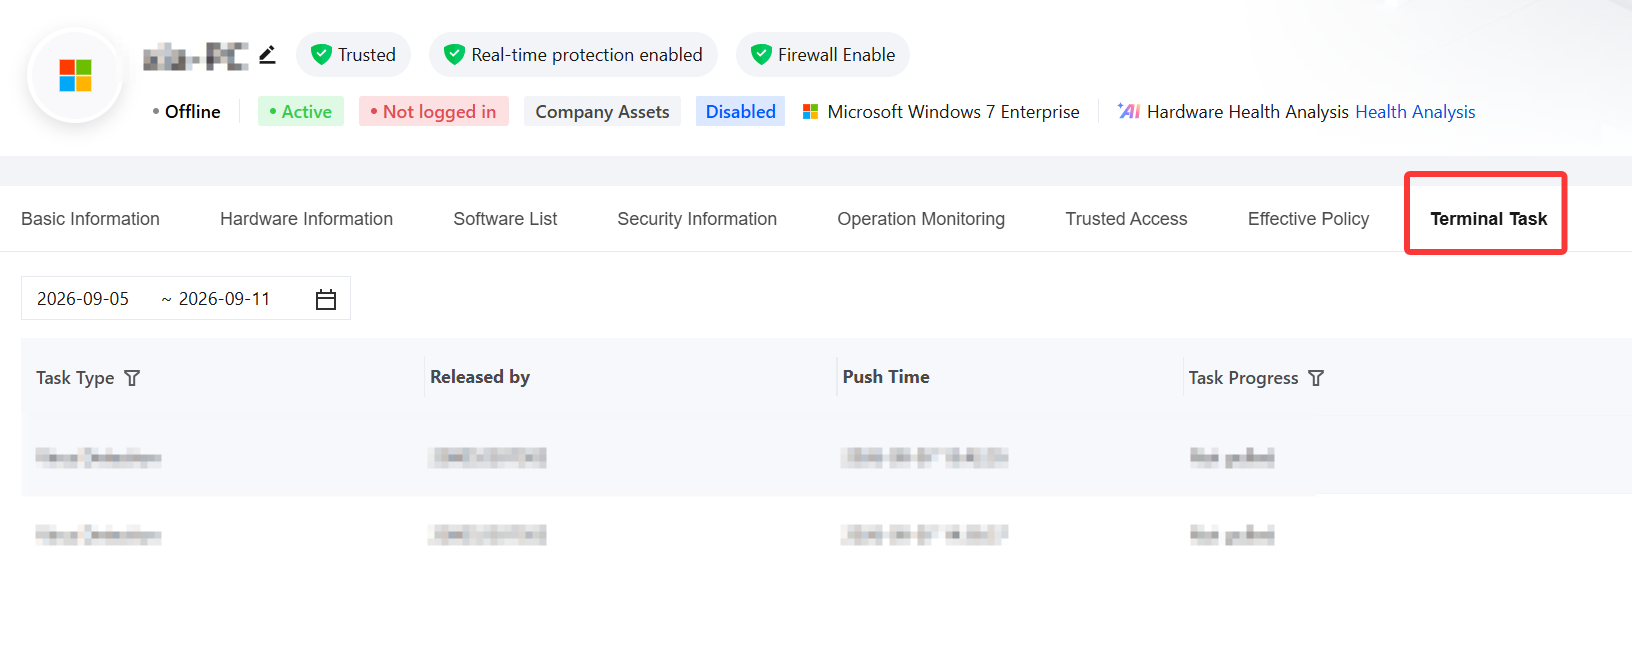
View the task execution status of terminals. You can download task files.
Custom Groups
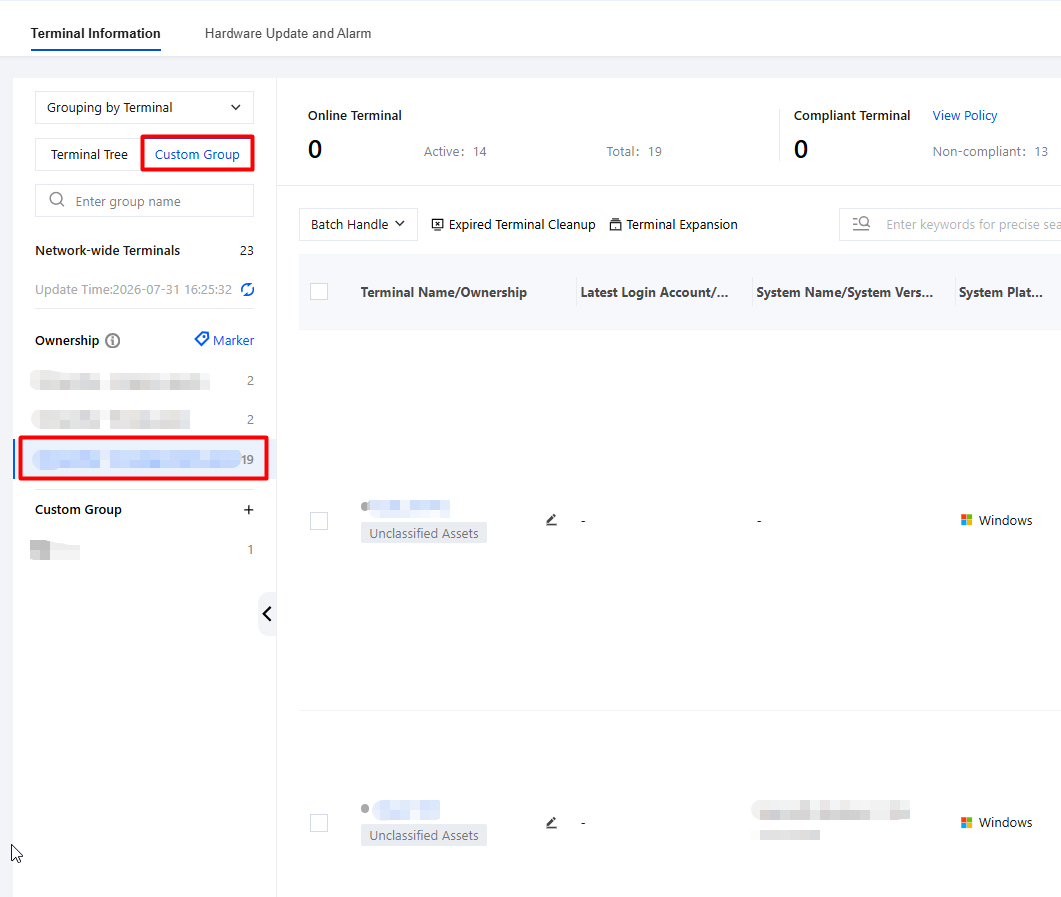
1. The system automatically groups terminals based on conditions such as ownership, login status, real-time protection, and internal or public network. Click Group to quickly view the terminals in that group.
2. Supports marking ownership and custom grouping. The configuration method is as follows:
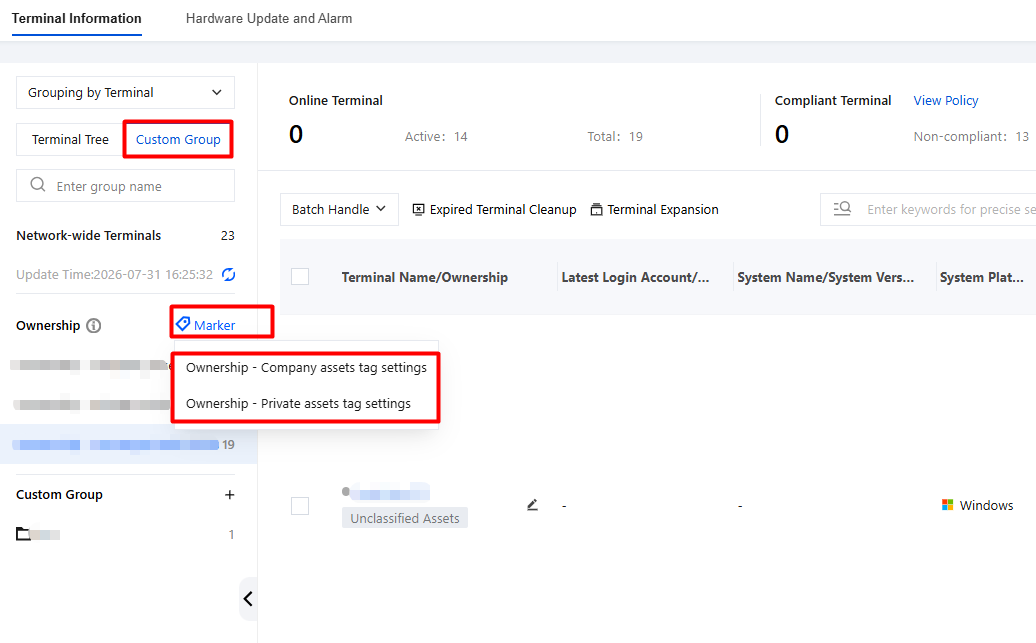
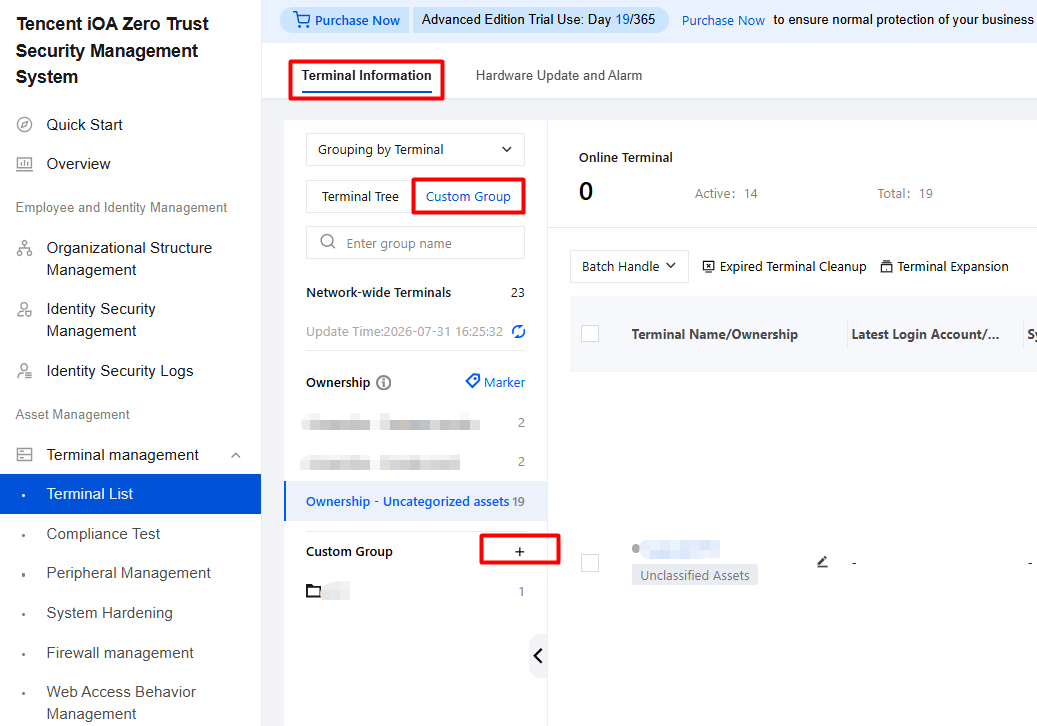
2. On the Terminal Information page, select Custom Group and click Marker.
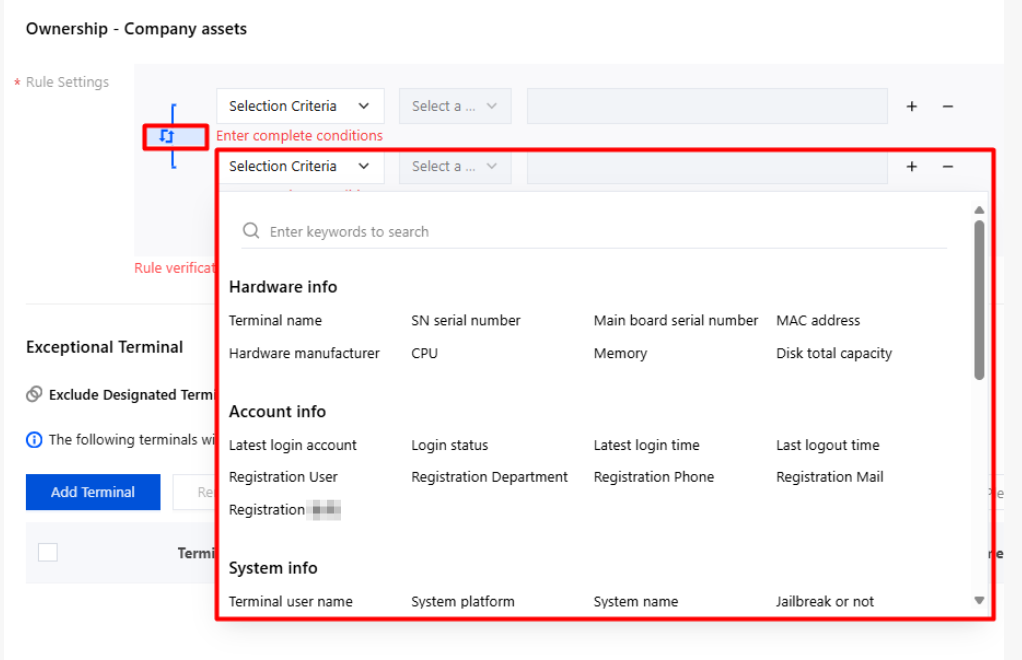
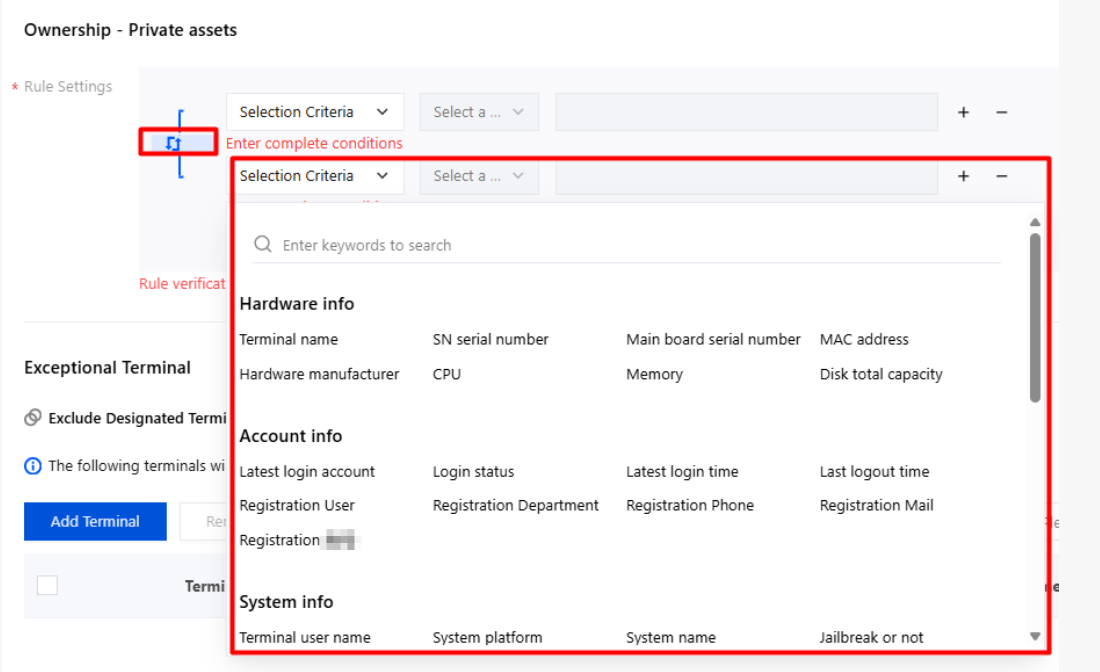
3. Click Marker and set the company assets and personal assets.
Company asset marking settings: Configure rules for company assets. When a terminal matches the rules, it is marked as a company asset. Multiple condition combinations are supported, and AND/OR conditions can be configured.
Personal asset marking settings: Configure rules for personal assets. When a terminal matches the rules, it is marked as a personal asset. Multiple condition combinations are supported, and AND/OR conditions can be configured.
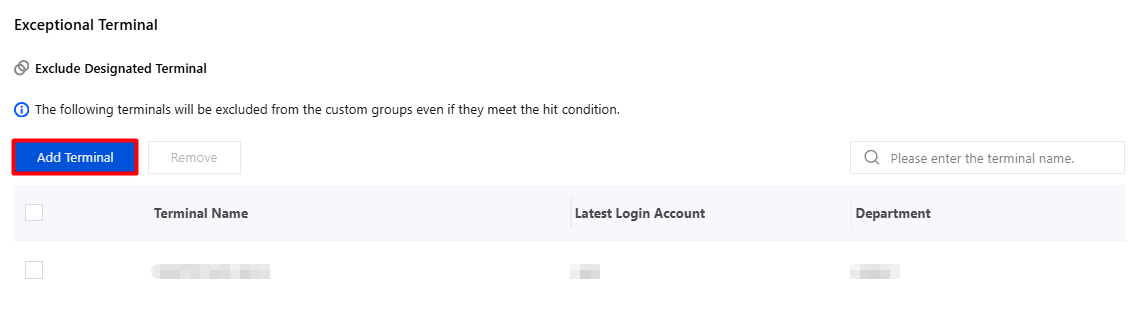
4. Exclude specified terminals: Click Add Terminal, select the terminals to exclude, and click OK. Terminals are excluded from this built-in group even if they hit the conditions.
Custom Groups
When you need to deliver policies to terminals that share common characteristics but are scattered across different terminal groups, you can resolve this issue by creating a custom group.
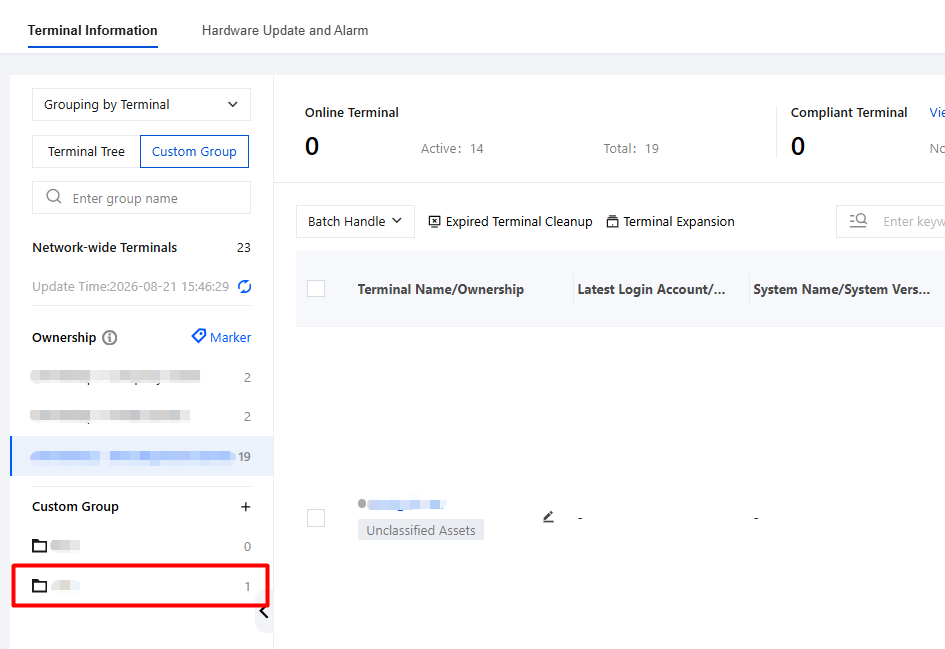
2. On the Terminal Information page, select Custom Group and click
to add a custom group.
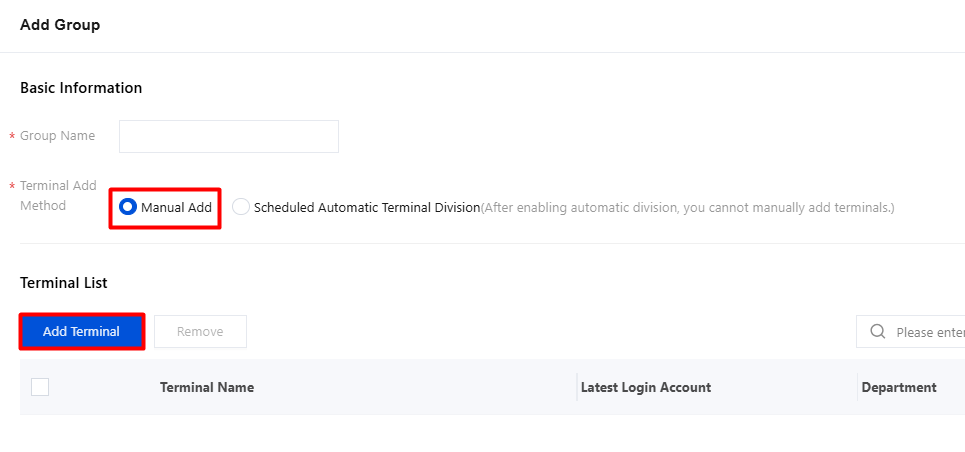
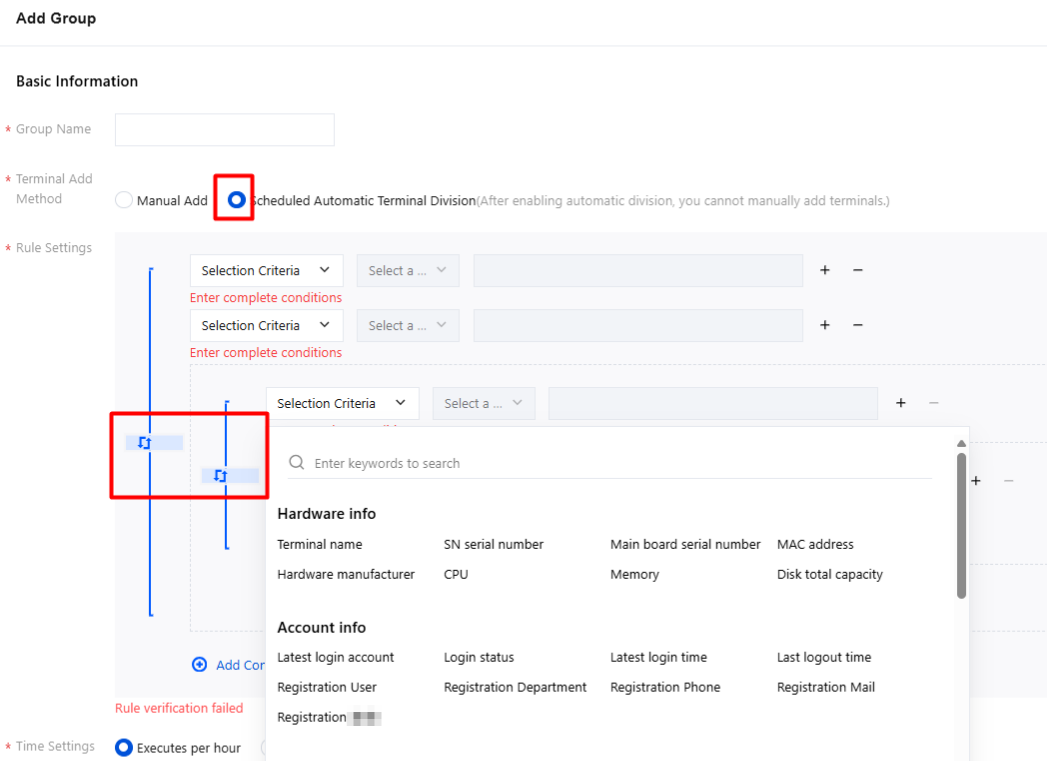
3. Edit the group name and select how terminals are added (manual addition or automatic scheduled grouping).
Manual Addition
1. For the terminal addition method, select Manual Addition and click Add Terminal.
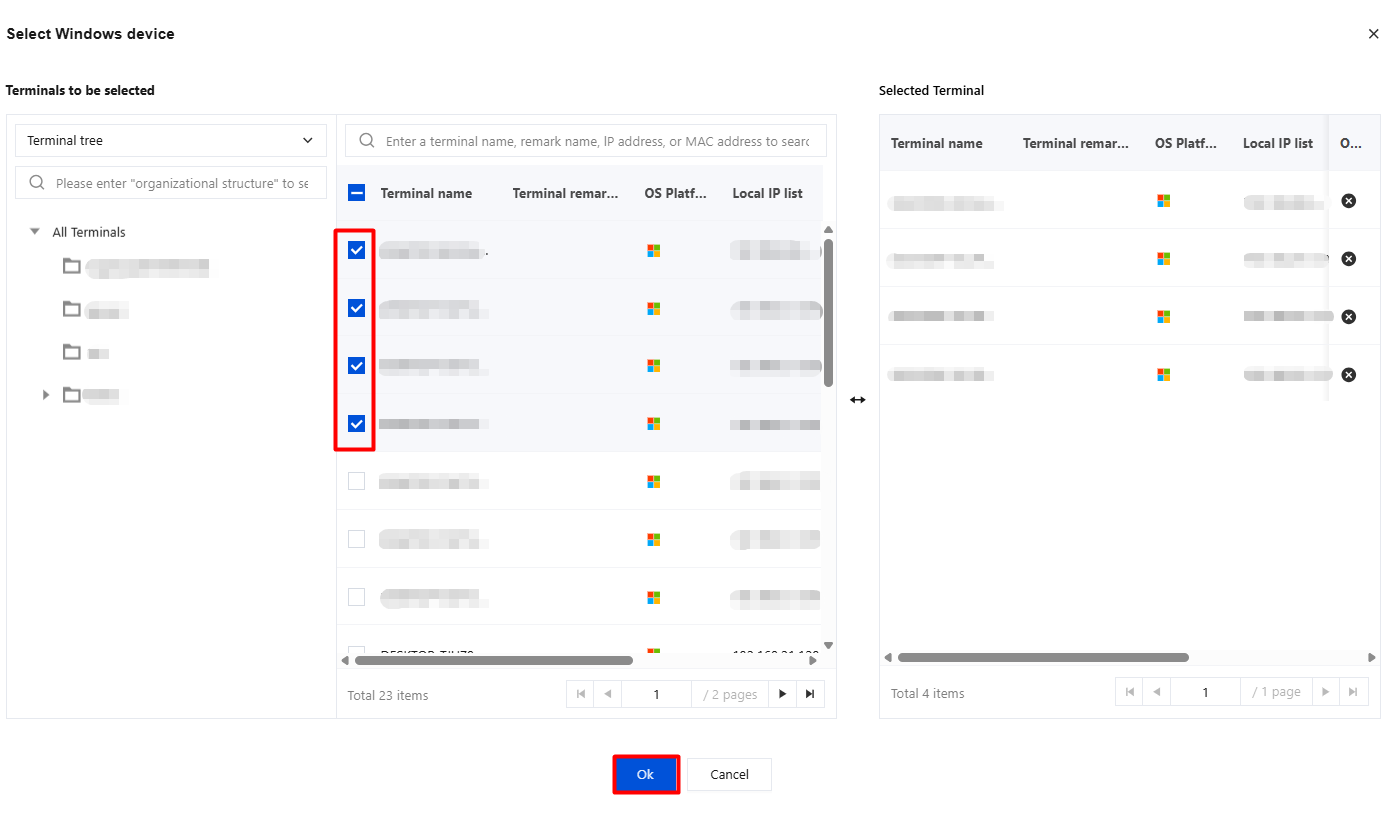
2. You can filter terminals by terminal tree or custom group, select the terminals to add to the custom group (multiple selections supported), and click OK.
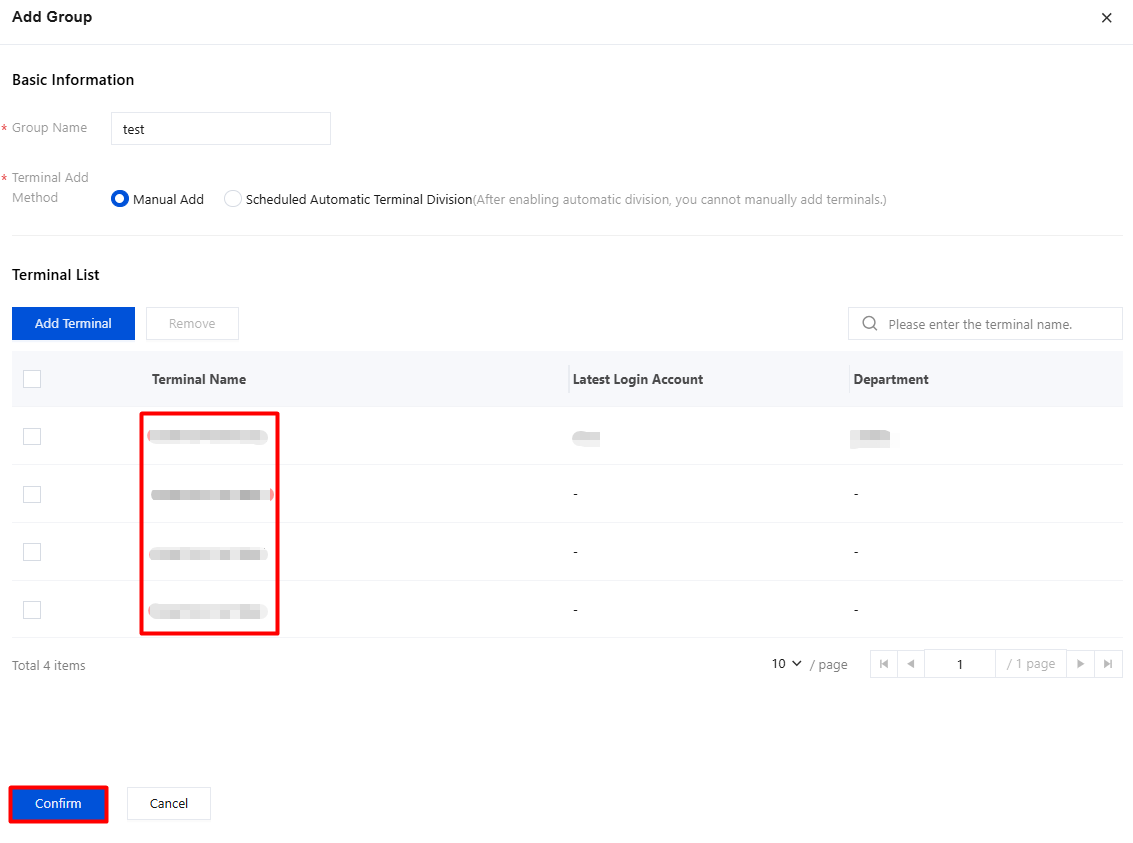
3. The selected terminals are displayed in the custom group. Click OK to save and manually add the terminals to the custom group.
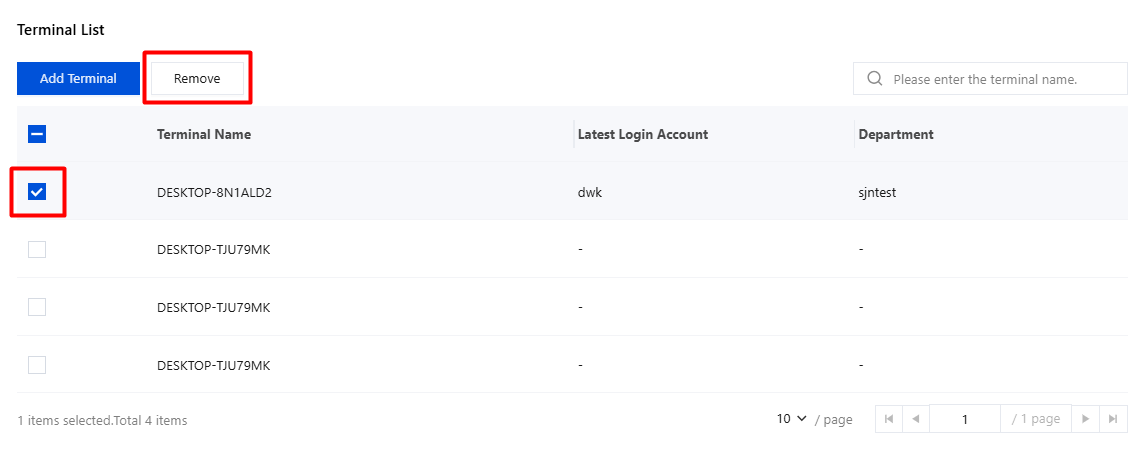
4. To remove terminals, select the terminal names to remove and click Remove.
Scheduled Terminal Auto-Classification
1. For the terminal addition method, select Scheduled Automatic Terminal Division, configure the grouping rules, and click OK to save after the configuration is complete.
You can configure rules based on terminal name, login account, IP address, number of unresolved risks, login domain, and terminal remarks.
You can add multiple grouping rules and modify the AND/OR relationships between them to customize groups, enabling flexible rule combinations for efficient terminal device management.
Time Setting
Supports execution once per hour or once per day, and allows custom execution periods. After configuration, terminals are automatically assigned to corresponding groups based on grouping rules.
Note:
Custom intervals support increments in units of five minutes. If the entered value is not divisible by 5, it is rounded up. For example, 6 minutes is converted to 10 minutes, 11 minutes is converted to 15 minutes, and so on.
Exception terminal
Supports custom terminal exclusion and addition of specified terminals, facilitating differentiated management policies for different groups and improving management efficiency.
2. Terminals are automatically grouped based on the grouping rules.