How to Use SCF for Scheduled Database Operations
Download
포커스 모드
폰트 크기
This document introduces how to use SCF for scheduled database tasks.
Prerequisites
A TencentDB for PostgreSQL instance has been created.
Operation Steps
Creating and Configuring an Event Function
Enter the SCF console and create an Event-Triggered function. For specific steps, please refer to Creating Event Function in Console.
Note:
Function name, region, namespace, and runtime environment cannot be modified after creation. Please ensure they are filled in correctly. The example usage in this document uses Node.js as the runtime environment.
The trigger is the core for implementing scheduled operations. SCF provides preset options to execute every 1 minute, every 5 minutes, every half hour, every 1 hour, or every 1 day. You can also select a custom trigger period and use a cron expression for scheduling. For details, please refer to cron expression usage.
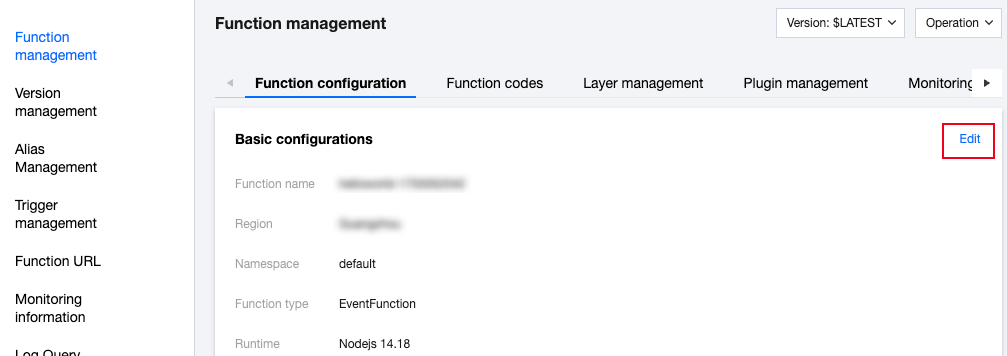
Creation complete. On the console, click the function ID to enter the Function management > Function configuration page, then click Edit.
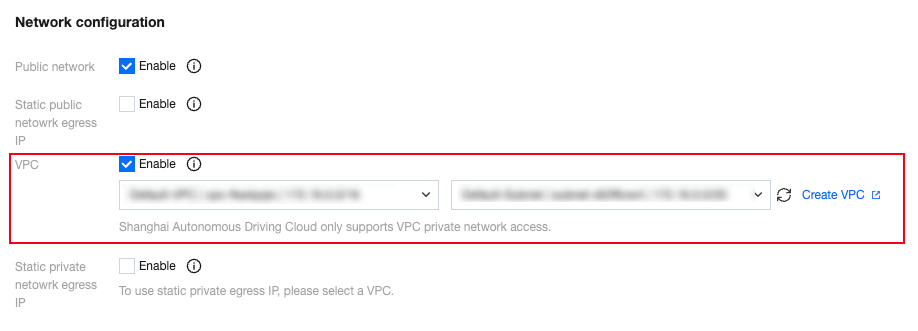
In network configuration, enable the Virtual Private Cloud (VPC), select the same VPC as the database instance requiring operation, and specify a subnet.
Note:
Note: SCF must be consistent with the database instance in the same VPC. Otherwise, connection failure may occur.
Editing SCF Function Code
Method One: Online Editing Code
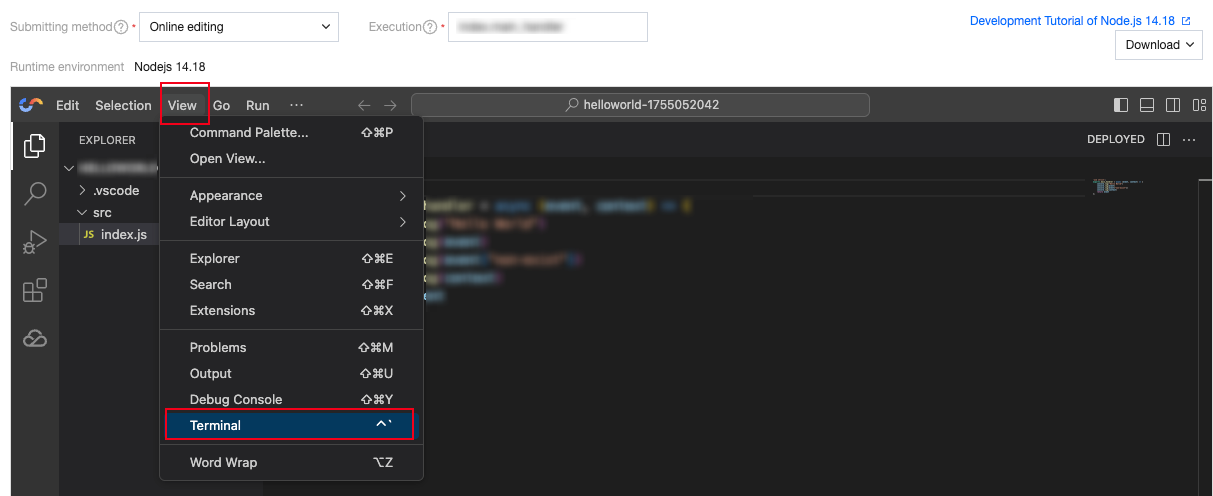
Enter the Function management > Function code page and select the submission method as online editing.

Installing Dependency Packages
To connect to TencentDB for PostgreSQL, you need to install the pg dependency package first. In the editor, click View > Terminal to open the terminal.
Enter the following commands sequentially in the terminal to install dependencies.
cd srcnpm install pg
Editing Code
Start editing the function in index.js under the src folder. The following example inserts a piece of data (user_id) into the target instance, with the execution method name as index.main_handler.
const { Client } = require('pg');exports.main_handler = async (event, context) => {// Read database connection information from environment variablesconst dbConfig = {host: process.env.DB_HOST,port: process.env.DB_PORT ? parseInt(process.env.DB_PORT) : 5432,database: process.env.DB_NAME,user: process.env.DB_USER,password: process.env.DB_PASSWORD,};// Simple validationif (!dbConfig.host || !dbConfig.database || !dbConfig.user || !dbConfig.password) {return {error: 'Database connection information is incomplete, check environment variables'};}const client = new Client(dbConfig);try {await client.connect();// Generate a numeric string user_id, such as current timestamp stringconst userId = Date.now().toString();// Insert data SQLconst sql = `INSERT INTO student_info_b0 (user_id) VALUES ($1);`;const res = await client.query(sql, [userId]);await client.end();return {message: 'data inserted successfully',insertedUserId: userId,rowCount: res.rowCount,};} catch (error) {if (client) {await client.end();}return {error: error.message,};}};
Configuring Environment Variables
Enter the Function management > Function configuration page, then click Edit.
Note:
DB_HOST: The private IP address of the target instance.
DB_NAME: The target database name.
DB_USER: The account name used for the connection.
DB_PASSWORD: The account password used for the connection.
DB_PORT: The port number used for the connection. TencentDB for PostgreSQL uses 5432 by default.

Modified. Click Save.
Return to the Function management > Function codes page and click Test. If the test is successful, the timing function is successfully created.
Method Two: Upload Code File
SCF supports local upload of zip packages, local folder upload, and upload of zip packages via COS.

After uploading, ensure to install dependencies for the code to run properly.
For Node.js, the system can automatically install dependencies. Refer to online dependency installation.
For other runtime environments, manually install dependencies.
After uploading and installing dependencies, click Test. If the test is successful, the scheduled function is created successfully.
Managing Scheduled Configuration
For triggers, you may create and delete them on the trigger management page. Triggers cannot be modified. You can delete the original trigger and reestablish it.
Click Create trigger, enter information, and submit.

For unnecessary triggers, click Delete in the upper right corner.
Test Database Connection
If the SCF execution fails, use this method to check if successfully connected to the instance.
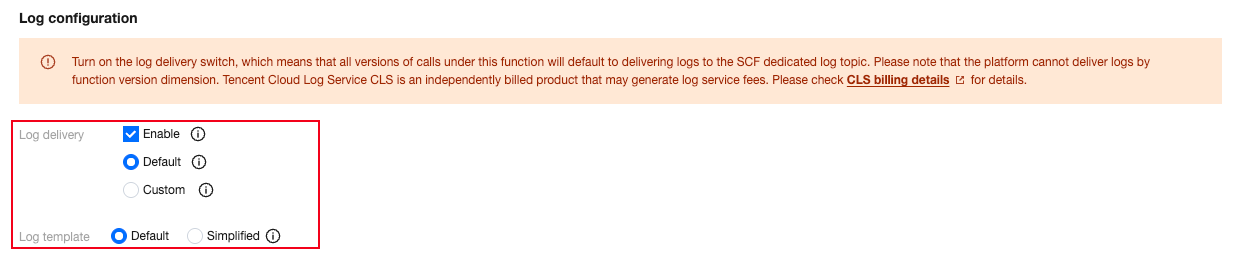
In Function management > Function configuration, click Edit, enable log shipping in the logging configuration, then click Save. For details about log billing, see CLS Billing Overview.
Paste the following content into index.js under the src folder.
const { Client } = require('pg');exports.main_handler = async (event, context) => {console.log('Function execution started');const client = new Client({host: process.env.DB_HOST, // database addressport: Number(process.env.DB_PORT), // database portuser: process.env.DB_USER, // database usernamepassword: process.env.DB_PASSWORD, // database passworddatabase: process.env.DB_NAME, // database name});try {console.log('Connecting to the database');await client.connect();console.log('Database connected successfully');console.log('Query execution started');const res = await client.query('SELECT NOW()');console.log('Query result:', res.rows[0]);await client.end();console.log('Database connection closed');console.log('Function execution completed, preparing to return result');return {statusCode: 200,body: JSON.stringify({message: 'query succeeded',time: res.rows[0],}),};} catch (err) {console.error('Function execution error:', err);return {statusCode: 500,body: JSON.stringify({message: 'failure of function execution',error: err.message,}),};}};
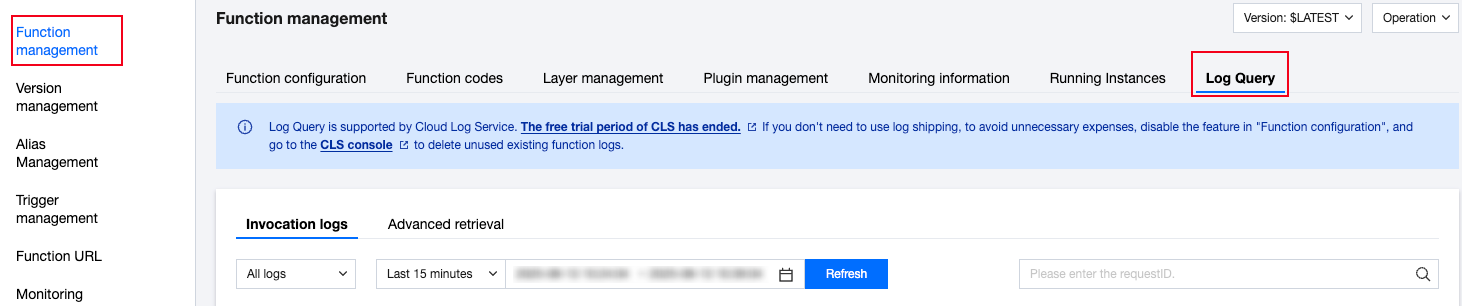
Click Test, view running logs in log query, locate issue based on log information, thereby further addressing it.
피드백