Integrating Avatars
Download
Focus Mode
Font Size
Avatars are a capability of the Tencent Effect SDK. To use it, you need to integrate the SDK first and then add the avatar materials. For how to integrate the SDK, see Integrating Tencent Effect SDK.
Step 1. Copy the Avatar Materials
1. Integrate the Tencent Effect SDK.
2. Download the demo project from our website and decompress it.
3. Copy
BeautyDemo/bundle/avatarMotionRes.bundle in the demo to your project.Step 2. Integrate the Demo UI
Directions
1. Do the following to use the same avatar UI in your project as that in the demo:
2. Copy all the classes in the
BeautyDemo/Avatar folder of the demo to your project and add the following code:AvatarViewController *avatarVC = [[AvatarViewController alloc] init];avatarVC.modalPresentationStyle = UIModalPresentationFullScreen;avatarVC.currentDebugProcessType = AvatarPixelData; // Image or texture ID[self presentViewController:avatarVC animated:YES completion:nil];
Demo UI
1. Demo UI view
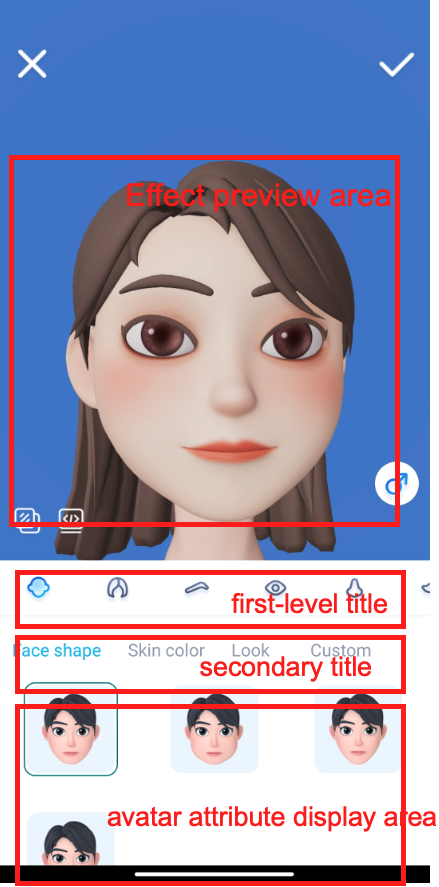
2. Using the demo UI
The data of the operation panel is obtained by parsing a
JSON file
. You can find this file in the BeautyDemo/Avatar/ directory of the demo.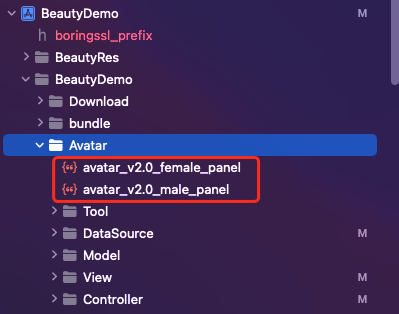
Mappings between the JSON structures and panel elements
head corresponds to the first icon of the top-level menu: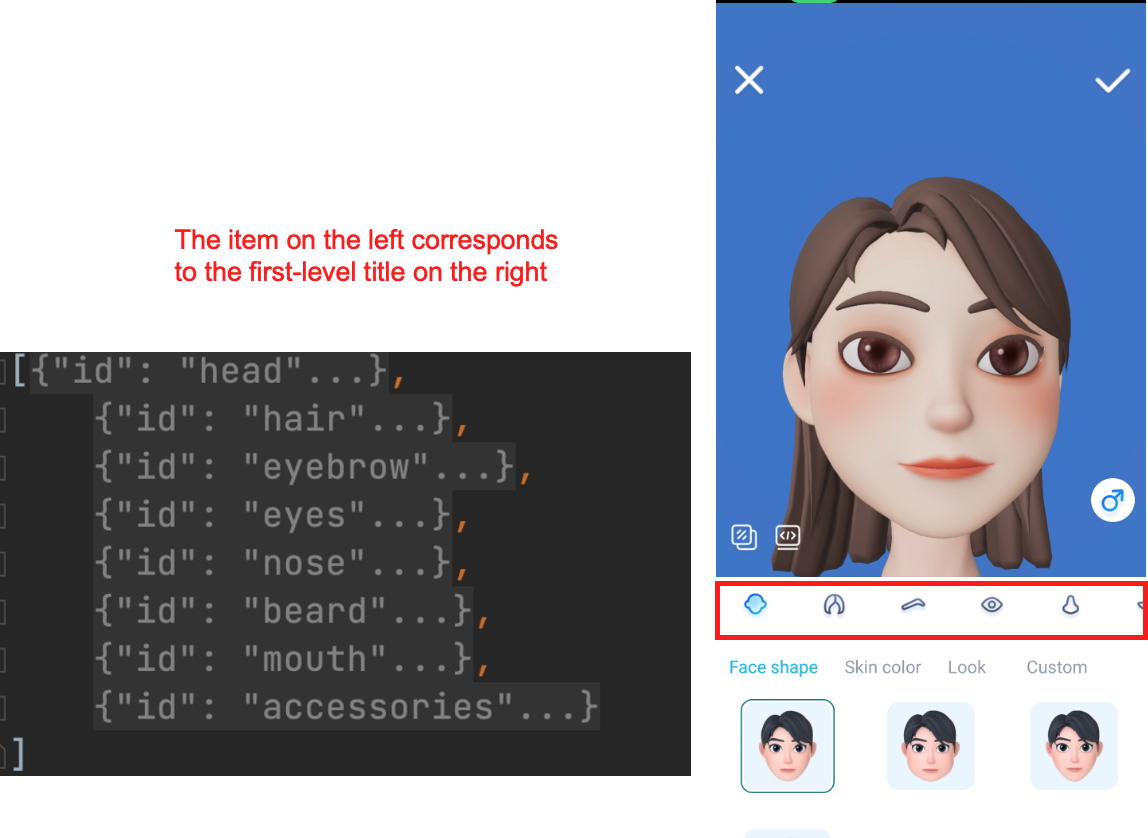
subTabs corresponds to the second-level menu: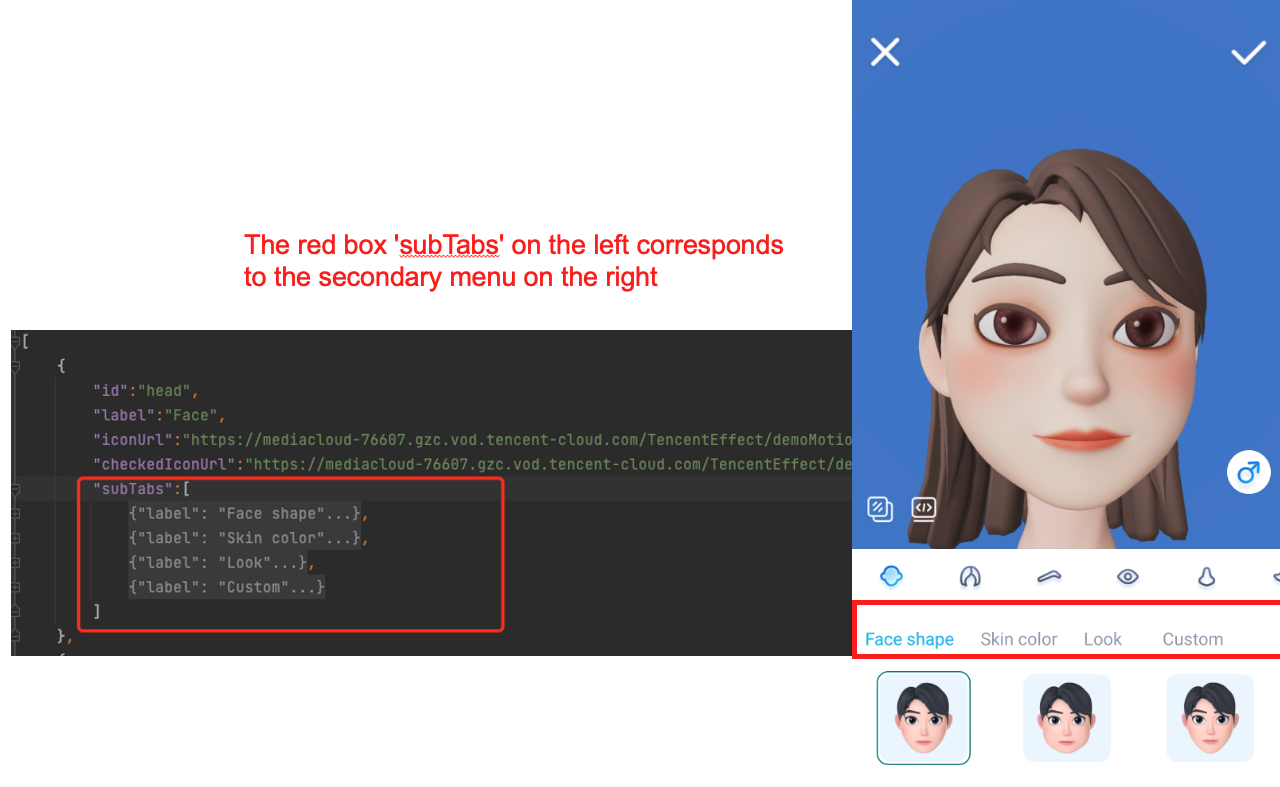
items corresponds to the third-level menu: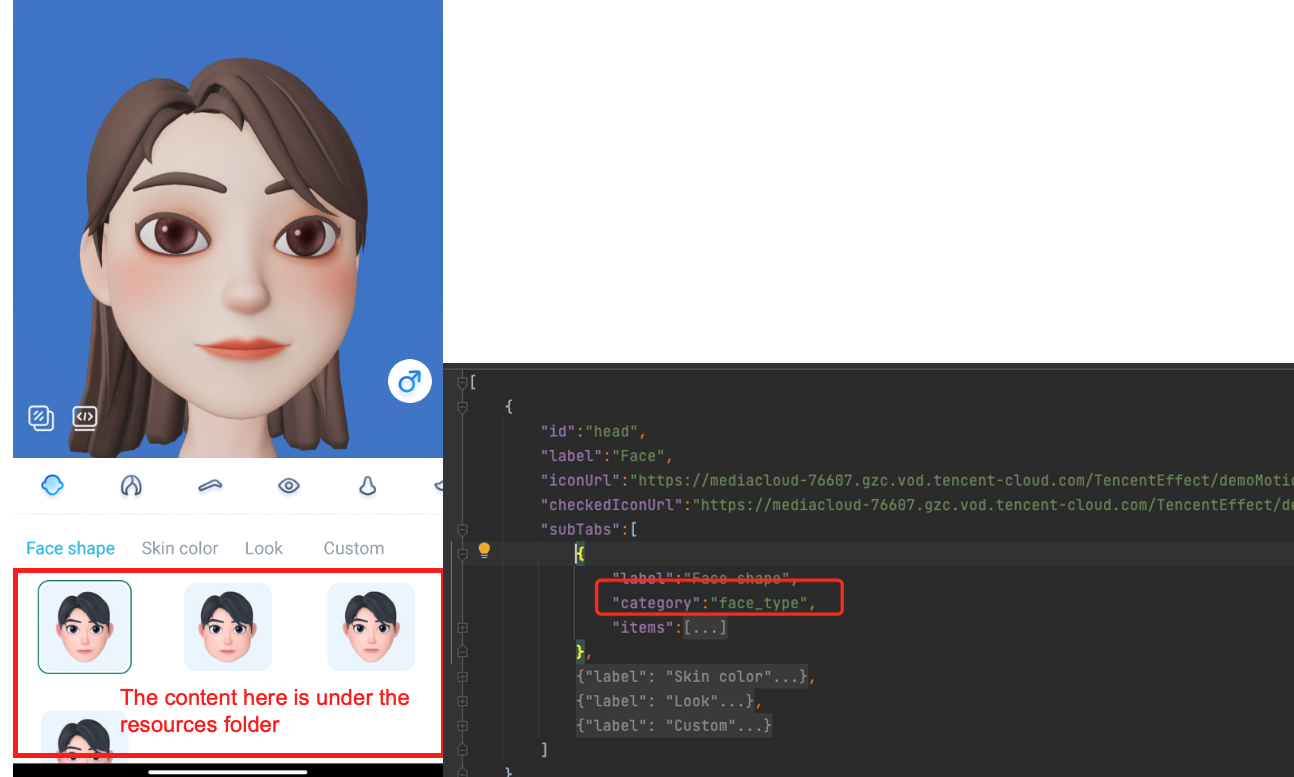
Using the panel data to determine the avatar object data passed in to the SDK API
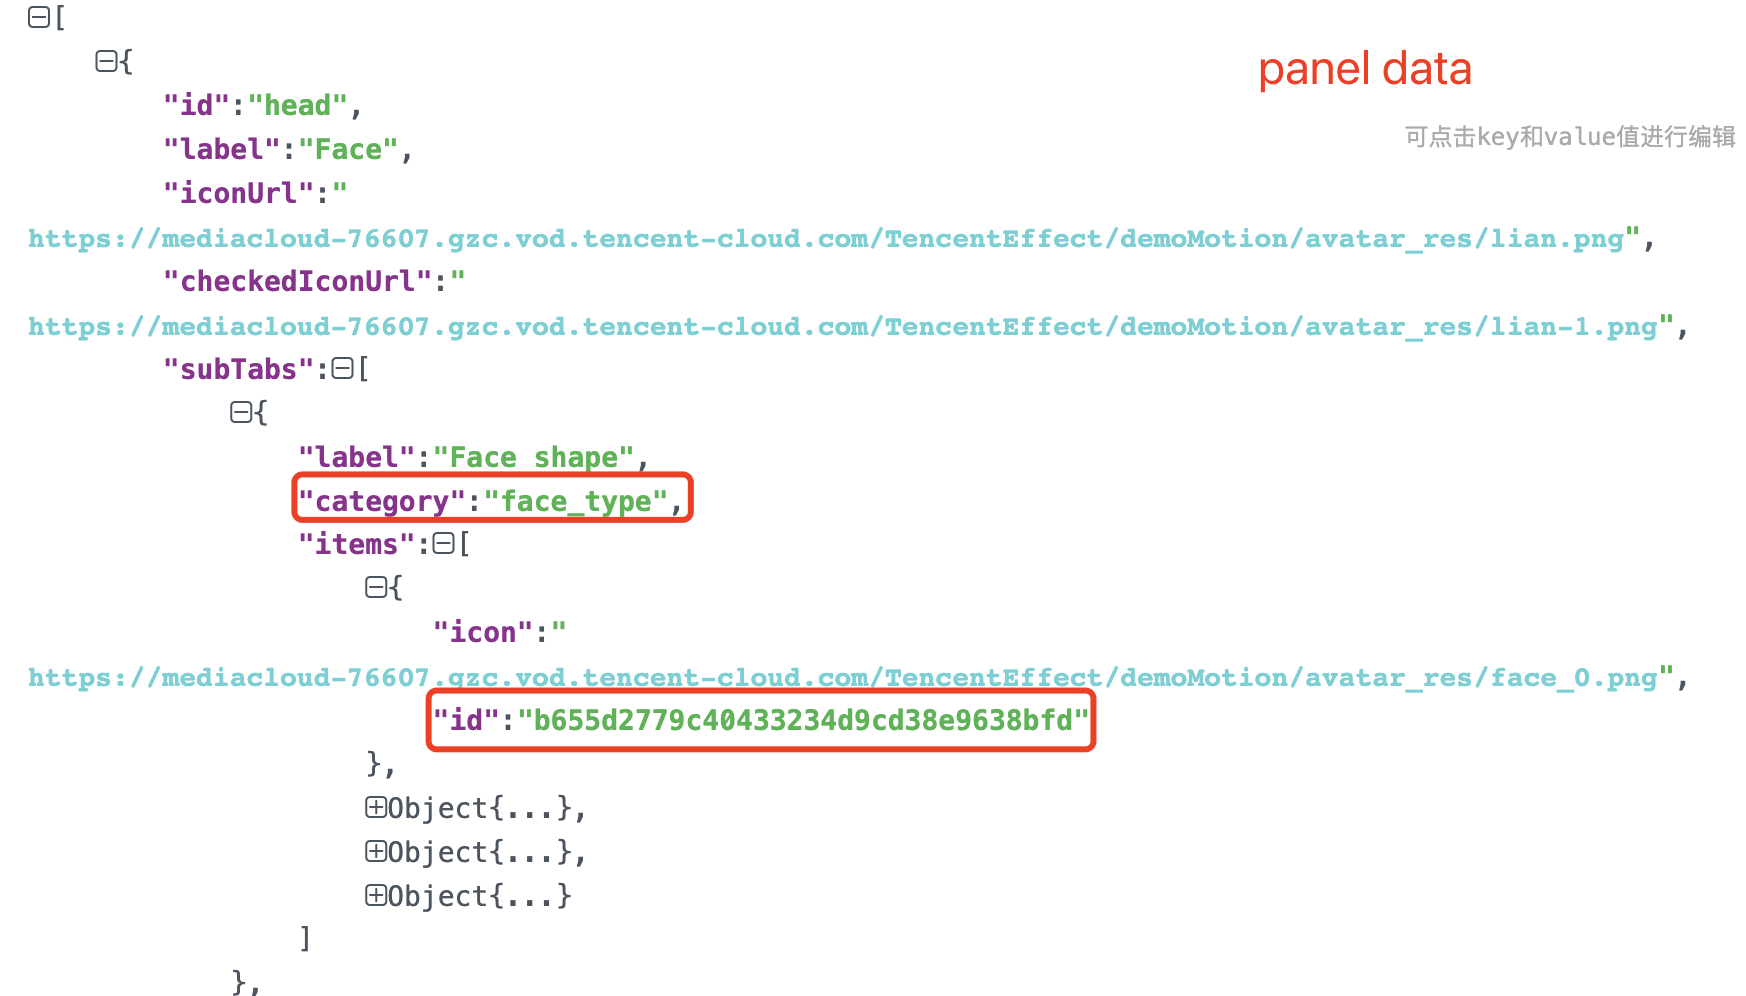
The first screenshot below is the avatar dictionary obtained by the SDK (
key indicates the category and value is an avatar data array). The second screenshot is the panel data. When the user taps an icon on the panel, get the category from the second-level heading (red box), and in the avatar dictionary returned by the SDK, get the avatar data array of the category. Get the ID from the third-level heading (blue box), and then find the avatar object in the avatar data array of the category. Pass the object to the updateAvatar API of the SDK to edit the avatar.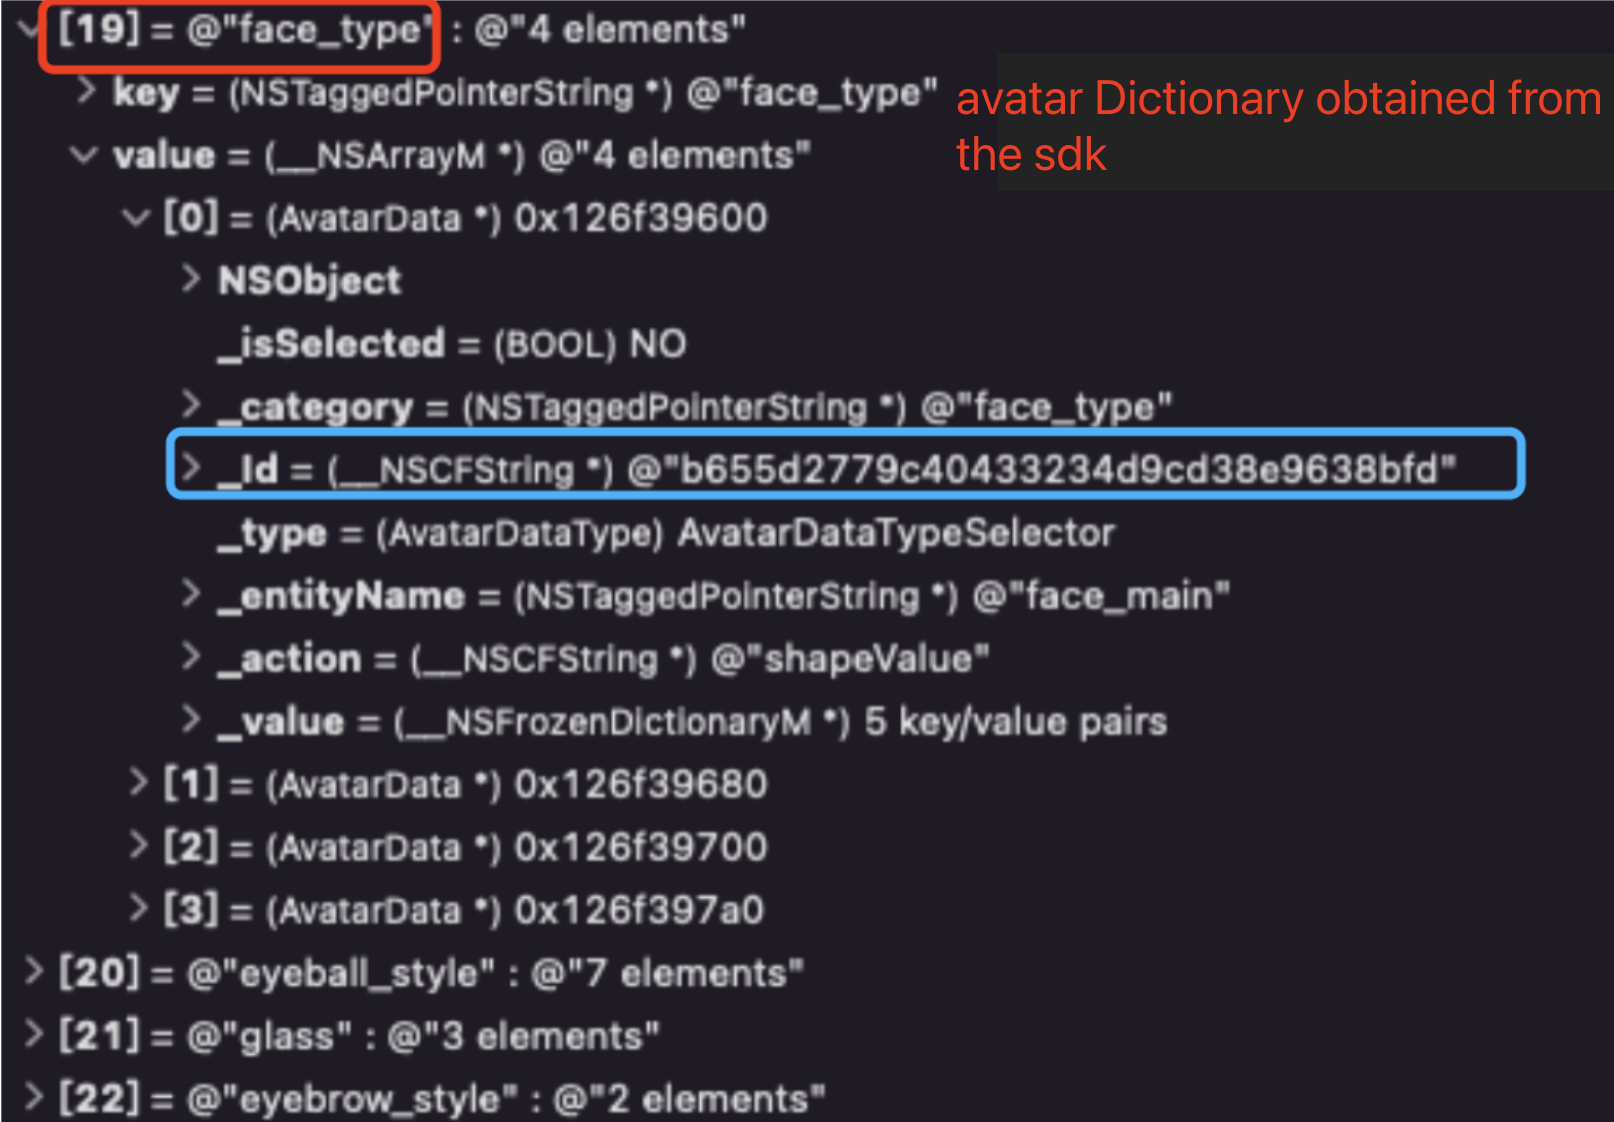
3. Changing icons/headings
You can modify the above JSON file of the demo to change an icon or heading of the UI. For example, to change the head icon in the top-level menu, just modify the value of
iconUrl or checkedIconUrl.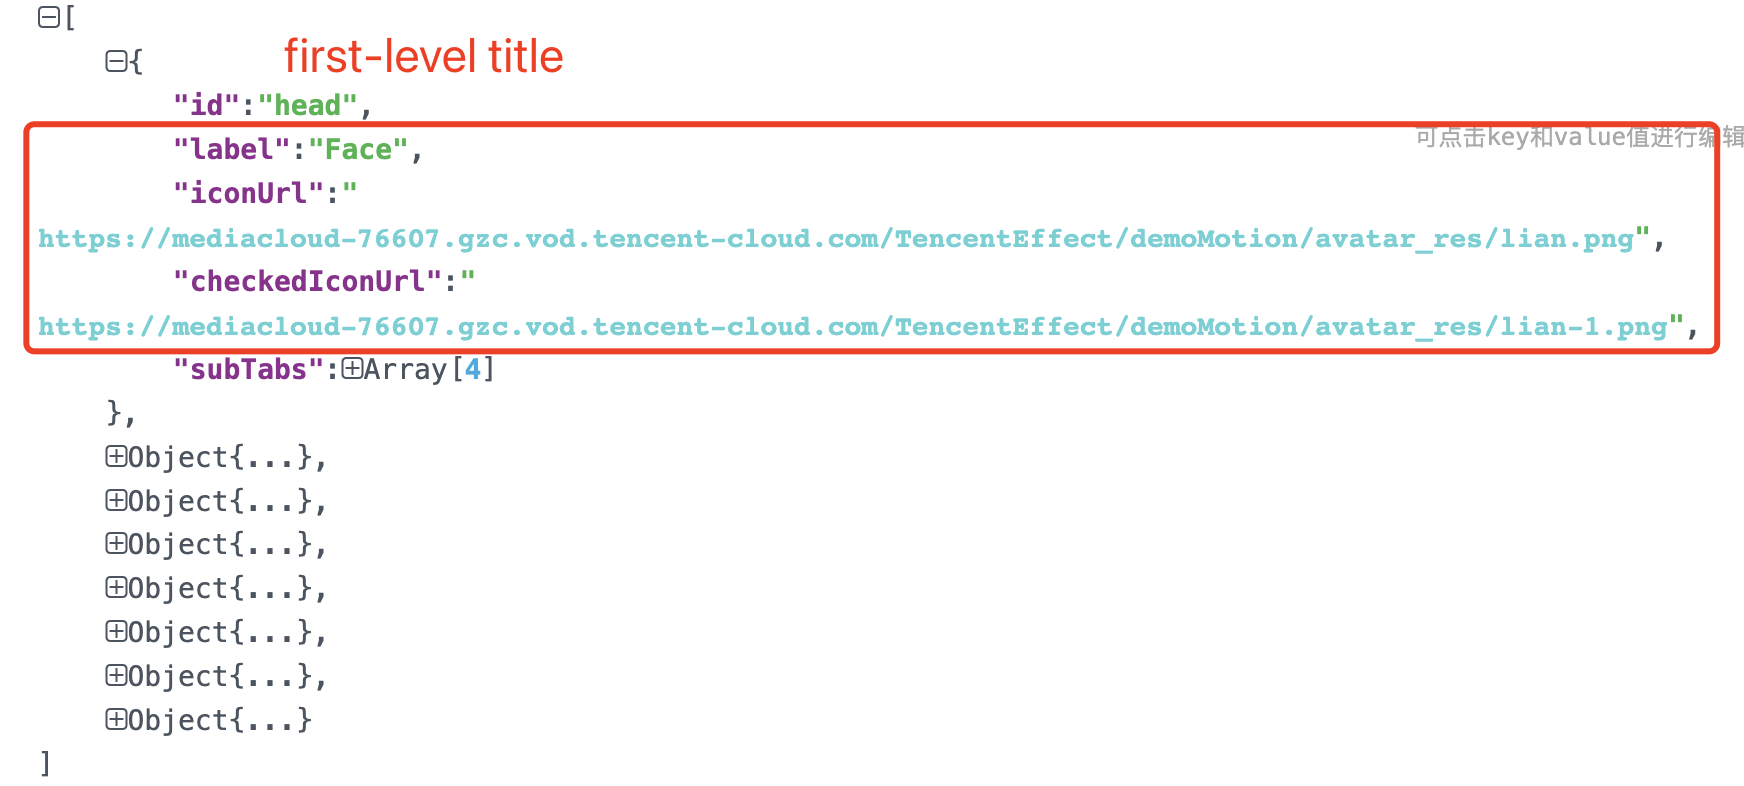
Step 3. Customize Avatar Features
You can refer to the AvatarViewController code in
BeautyDemo/Avatar/Controller.Note:
1. Create an
xmagic object and configure the default avatar template.- (void)buildBeautySDK {CGSize previewSize = CGSizeMake(kPreviewWidth, kPreviewHeight);NSString *beautyConfigPath = [NSSearchPathForDirectoriesInDomains(NSDocumentDirectory, NSUserDomainMask, YES) lastObject];beautyConfigPath = [beautyConfigPath stringByAppendingPathComponent:@"beauty_config.json"];NSFileManager *localFileManager=[[NSFileManager alloc] init];BOOL isDir = YES;NSDictionary * beautyConfigJson = @{};if ([localFileManager fileExistsAtPath:beautyConfigPath isDirectory:&isDir] && !isDir) {NSString *beautyConfigJsonStr = [NSString stringWithContentsOfFile:beautyConfigPath encoding:NSUTF8StringEncoding error:nil];NSError *jsonError;NSData *objectData = [beautyConfigJsonStr dataUsingEncoding:NSUTF8StringEncoding];beautyConfigJson = [NSJSONSerialization JSONObjectWithData:objectData options:NSJSONReadingMutableContainerserror:&jsonError];}NSDictionary *assetsDict = @{@"core_name":@"LightCore.bundle",@"root_path":[[NSBundle mainBundle] bundlePath],@"tnn_"@"beauty_config":beautyConfigJson};// Init beauty kitself.beautyKit = [[XMagic alloc] initWithRenderSize:previewSize assetsDict:assetsDict];// Register log[self.beautyKit registerSDKEventListener:self];[self.beautyKit registerLoggerListener:self withDefaultLevel:YT_SDK_ERROR_LEVEL];// Pass in the path of the avatar materials to load the default avatarAvatarGender gender = self.genderBtn.isSelected ? AvatarGenderFemale : AvatarGenderMale;NSString *bundlePath = [self.resManager avatarResPath:gender];[self.beautyKit loadAvatar:bundlePath exportedAvatar:nil];}
2. Get the source data of the avatar materials.
@implementation AvatarViewController_resManager = [[AvatarResManager alloc] init];NSDictionary *avatarDict = self.resManager.getMaleAvatarData;@end@implementation AvatarResManager- (NSDictionary *)getMaleAvatarData{if (!_maleAvatarDict) {NSString *resDir = [self avatarResPath:AvatarGenderFemale];NSString *savedConfig = [self getSavedAvatarConfigs:AvatarGenderMale];// Call an API of the SDK to parse the source data_maleAvatarDict = [XMagic getAvatarConfig:resDir exportedAvatar:savedConfig];}return _maleAvatarDict;}@end
3. Edit the avatar.
// Get the desired avatar object from the material source data parsed by the SDK API and pass it in to the SDK.NSMutableArray *avatars = [NSMutableArray array];// `avatarConfig` is an avatar object obtained by the `getAvatarConfig:exportedAvatar:` API.[avatars addObject:avatarConfig];// Call the following API to edit the avatar (face editing, dress up) in real time[self.beautyKit updateAvatar:avatars];
4. Export the avatar object as a string.
Export the configured avatar object as a string. You can store it in a custom location.
- (BOOL)saveSelectedAvatarConfigs:(AvatarGender)gender{NSMutableArray *avatarArr = [NSMutableArray array];NSDictionary *avatarDict = gender == AvatarGenderMale ? _maleAvatarDict : _femaleAvatarDict;// 1. Traverse to find the selected avatar object.for (NSArray *arr in avatarDict.allValues) {for (AvatarData *config in arr) {if (config.type == AvatarDataTypeSelector) {if (config.isSelected) {[avatarArr addObject:config];}} else {[avatarArr addObject:config];}}}// 2. Call an SDK API to export the selected avatar object as a string.NSString *savedConfig = [XMagic exportAvatar:avatarArr.copy];if (savedConfig.length <= 0) {return NO;}NSError *error;NSString *fileName = [self getSaveNameWithGender:gender];NSString *savePath = [_saveDir stringByAppendingPathComponent:fileName];// Check whether the directory exists; if not, create one.BOOL isDir;if (![[NSFileManager defaultManager] fileExistsAtPath:_saveDir isDirectory:&isDir]) {[[NSFileManager defaultManager] createDirectoryAtPath:_saveDir withIntermediateDirectories:YES attributes:nil error:nil];}// 3. Write the exported string to the sandbox for subsequent use.[savedConfig writeToFile:savePath atomically:YES encoding:NSUTF8StringEncoding error:&error];if (error){return NO;}return YES;}
5. Use a virtual background
- (void)bgExchangeClick:(UIButton *)btn{btn.selected = !btn.isSelected;NSDictionary *avatarDict = self.resManager.getFemaleAvatarData;NSArray *array = avatarDict[@"background_plane"];AvatarData *selConfig;// A background is also an avatar object (its category is `background_plane`). Changing the background is essentially using a different avatar object.for (AvatarData *config in array) {if ([config.Id isEqual:@"none"]) {if (btn.selected) {selConfig = config;break;}} else {selConfig = config;}}[self.beautyKit updateAvatar:@[selConfig]];}
Help and Support
Was this page helpful?
You can also Contact sales or Submit a Ticket for help.
Help us improve! Rate your documentation experience in 5 mins.
Feedback