Identity source: The WeCom organization whose organizational structure you import is bound to the iOA product in use. You can create multiple identity directories for the imported WeCom identity source for synchronization.
Authentication source: The WeCom authentication source you create must remain consistent with the WeCom identity source you import. You can create multiple authentication sources for the same WeCom, and they are not affected by this requirement.
Note:
To use WeCom integration on iOS, contact the iOA project technical support team. We need to configure the login parameters in the backend and can provide an iOS login Demo.
1. Implementation Effect
Type, Operation Step
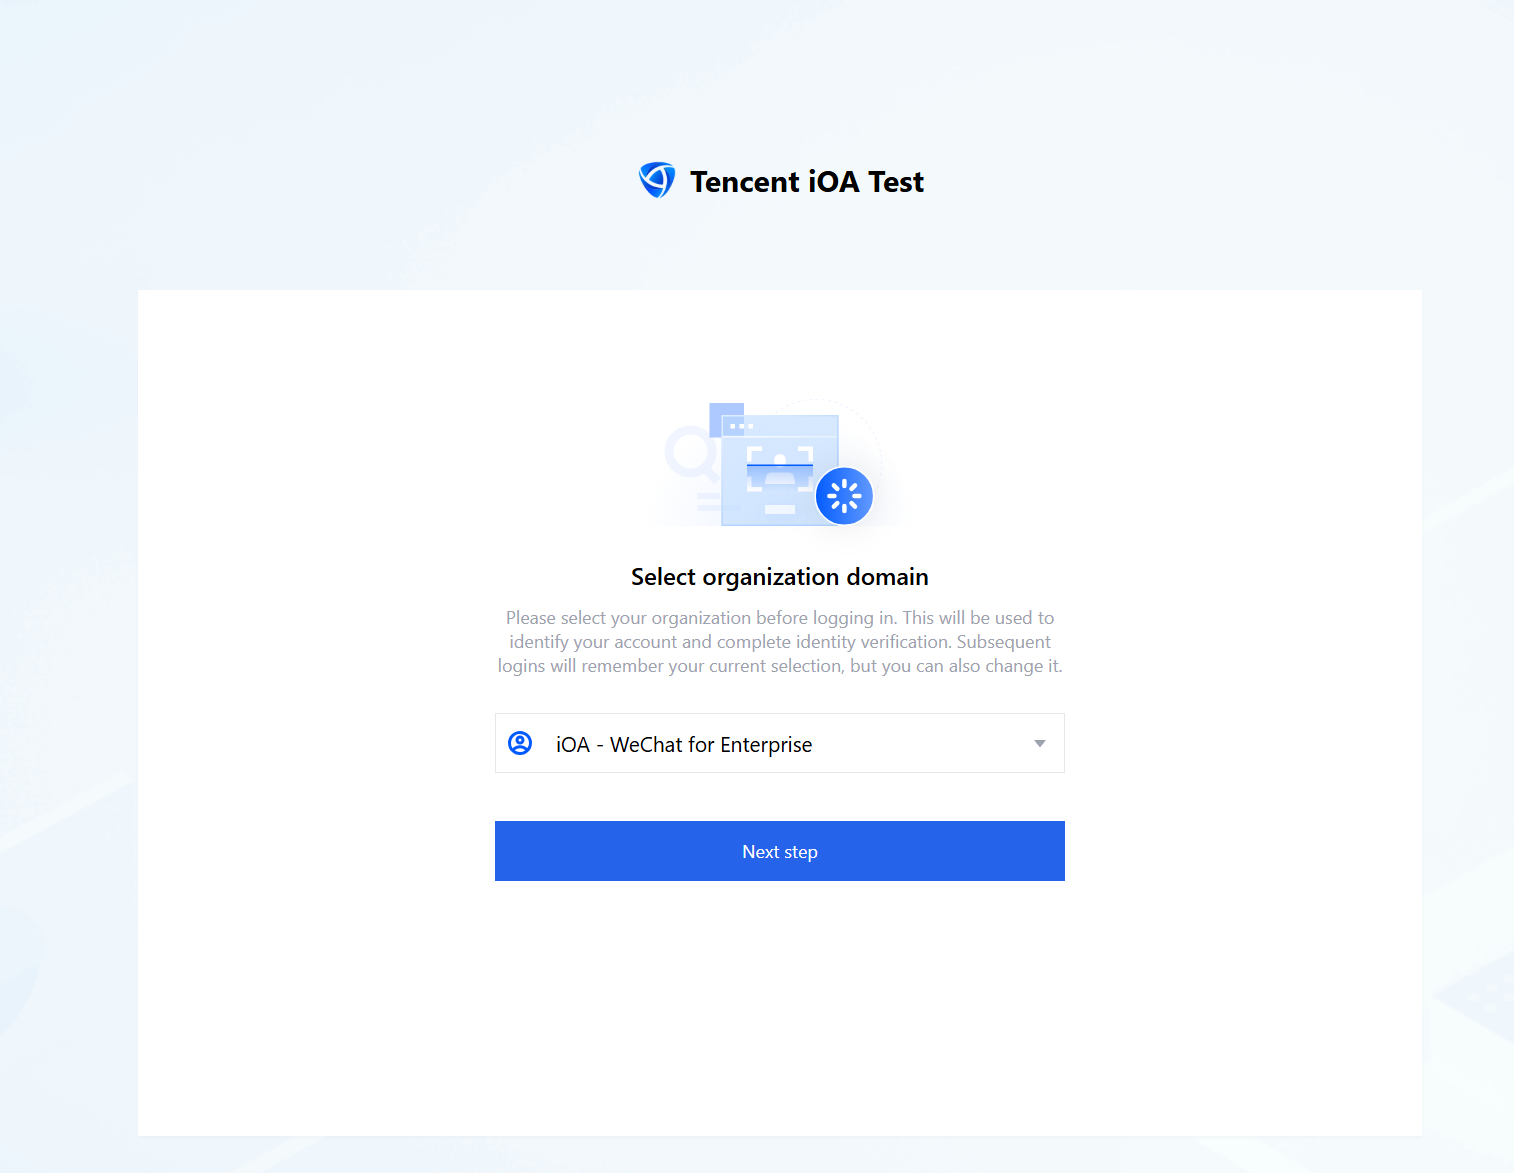
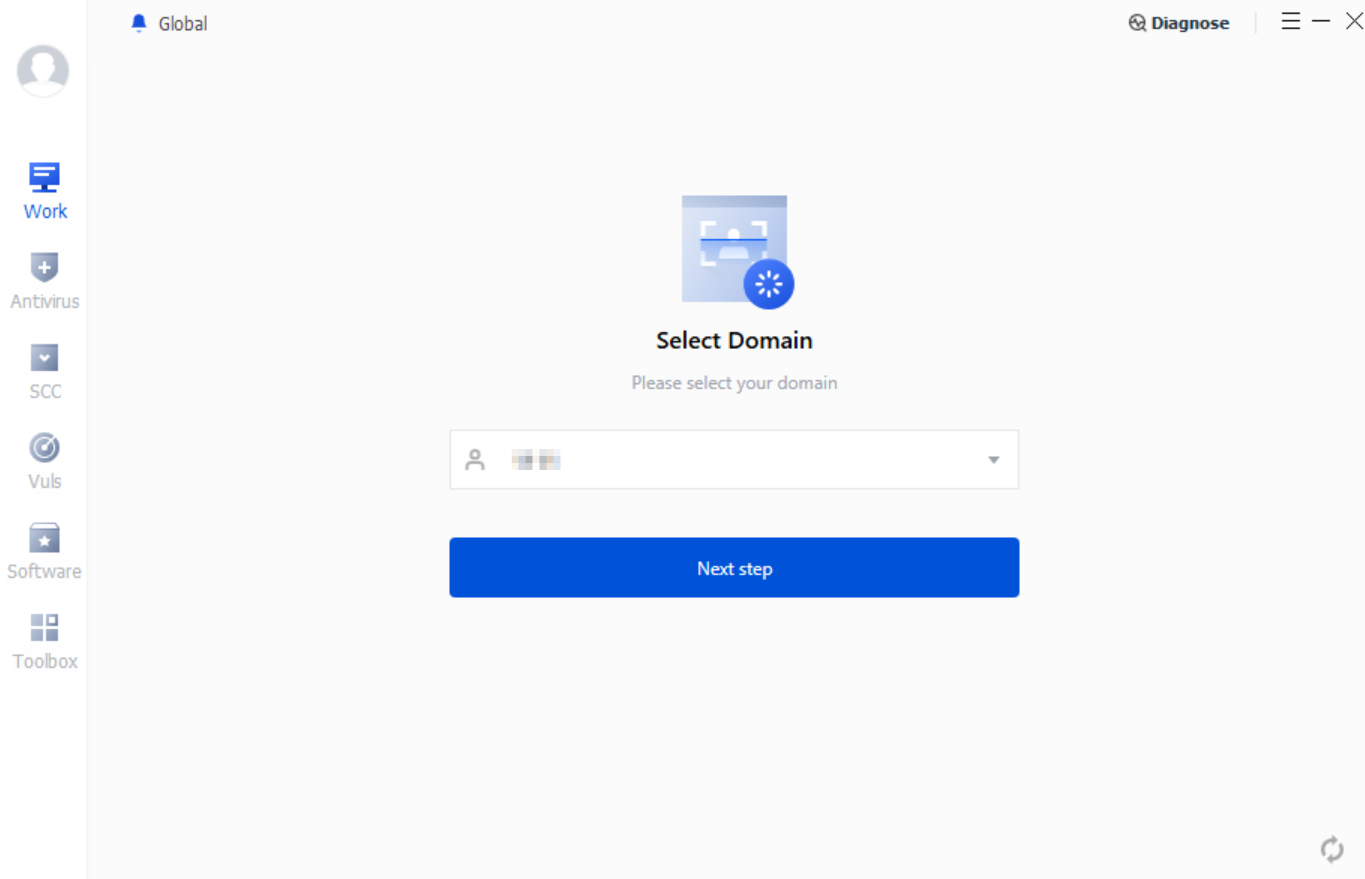
Select Organization Domain
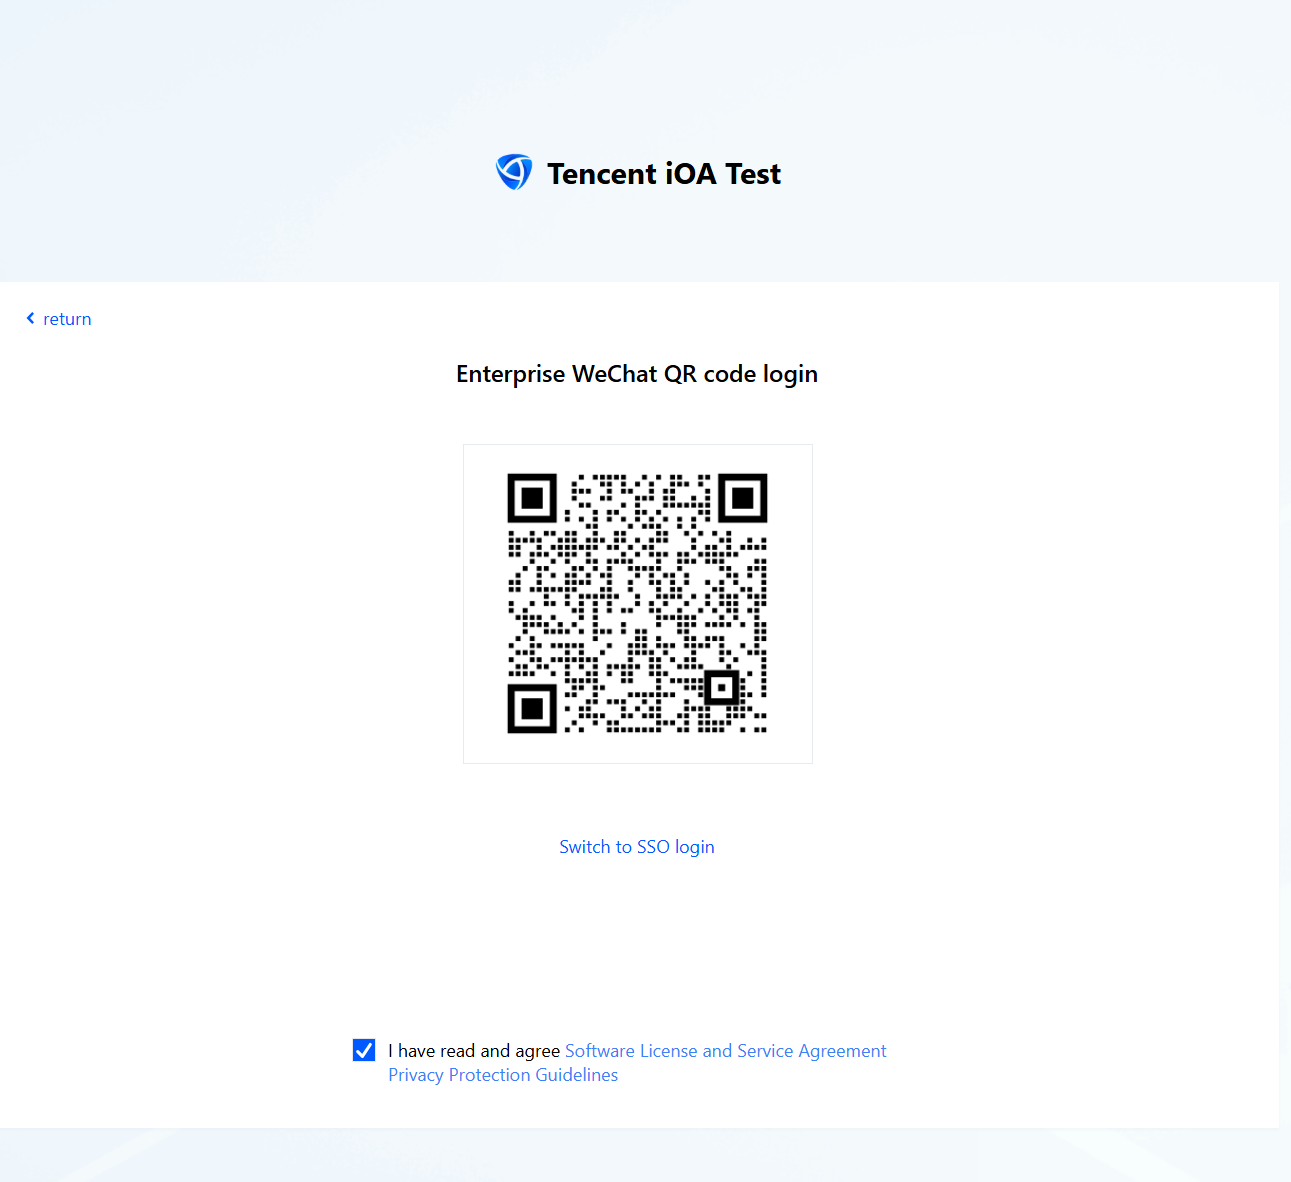
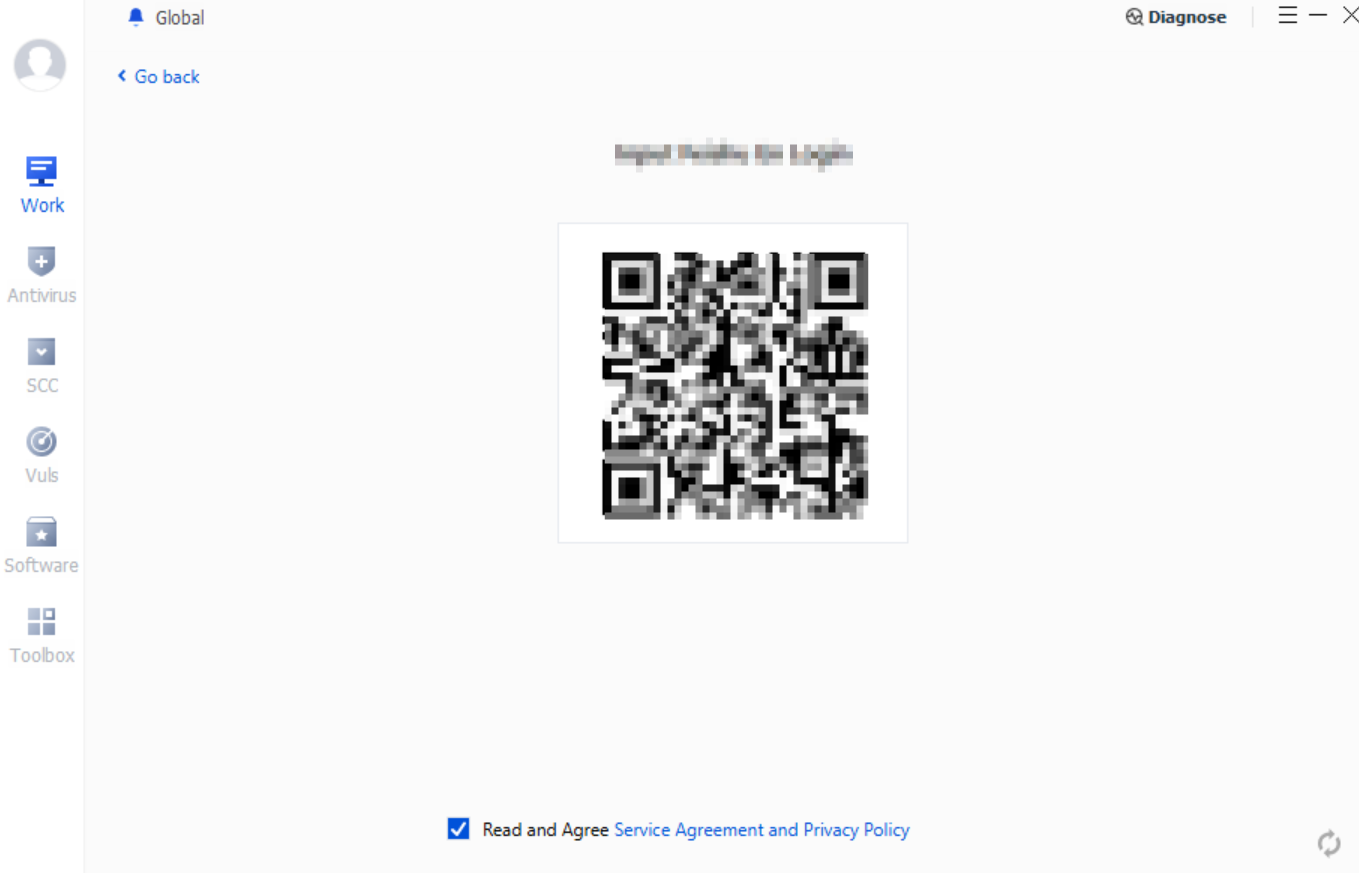
Select Login Method
Browser Login Effect
Client
2. WeCom Authentication Preparation
2.1 Resource Preparation
You need to prepare the following in advance because WeCom integration requires a trusted domain:
If you already have a second-level domain that has passed ICP filing, you can skip steps 1 and 2 below.
If the egress firewall has strict internet access policies configured and blocks the WeCom API synchronization domain, the integration will fail. You need to allow access from the connector server to qyapi.weixin.qq.com:443 on the internet. Otherwise, a timeout error will be reported.
Step 4: Prepare a server for connector deployment (recommended configuration: CentOS 7.6, 2-4 CPU cores, 4-8 GB of memory, and 100 GB or more of disk space).
2.2 Configuring a WeCom Self-Built Application
2.2.1 Creating a Self-Built Application
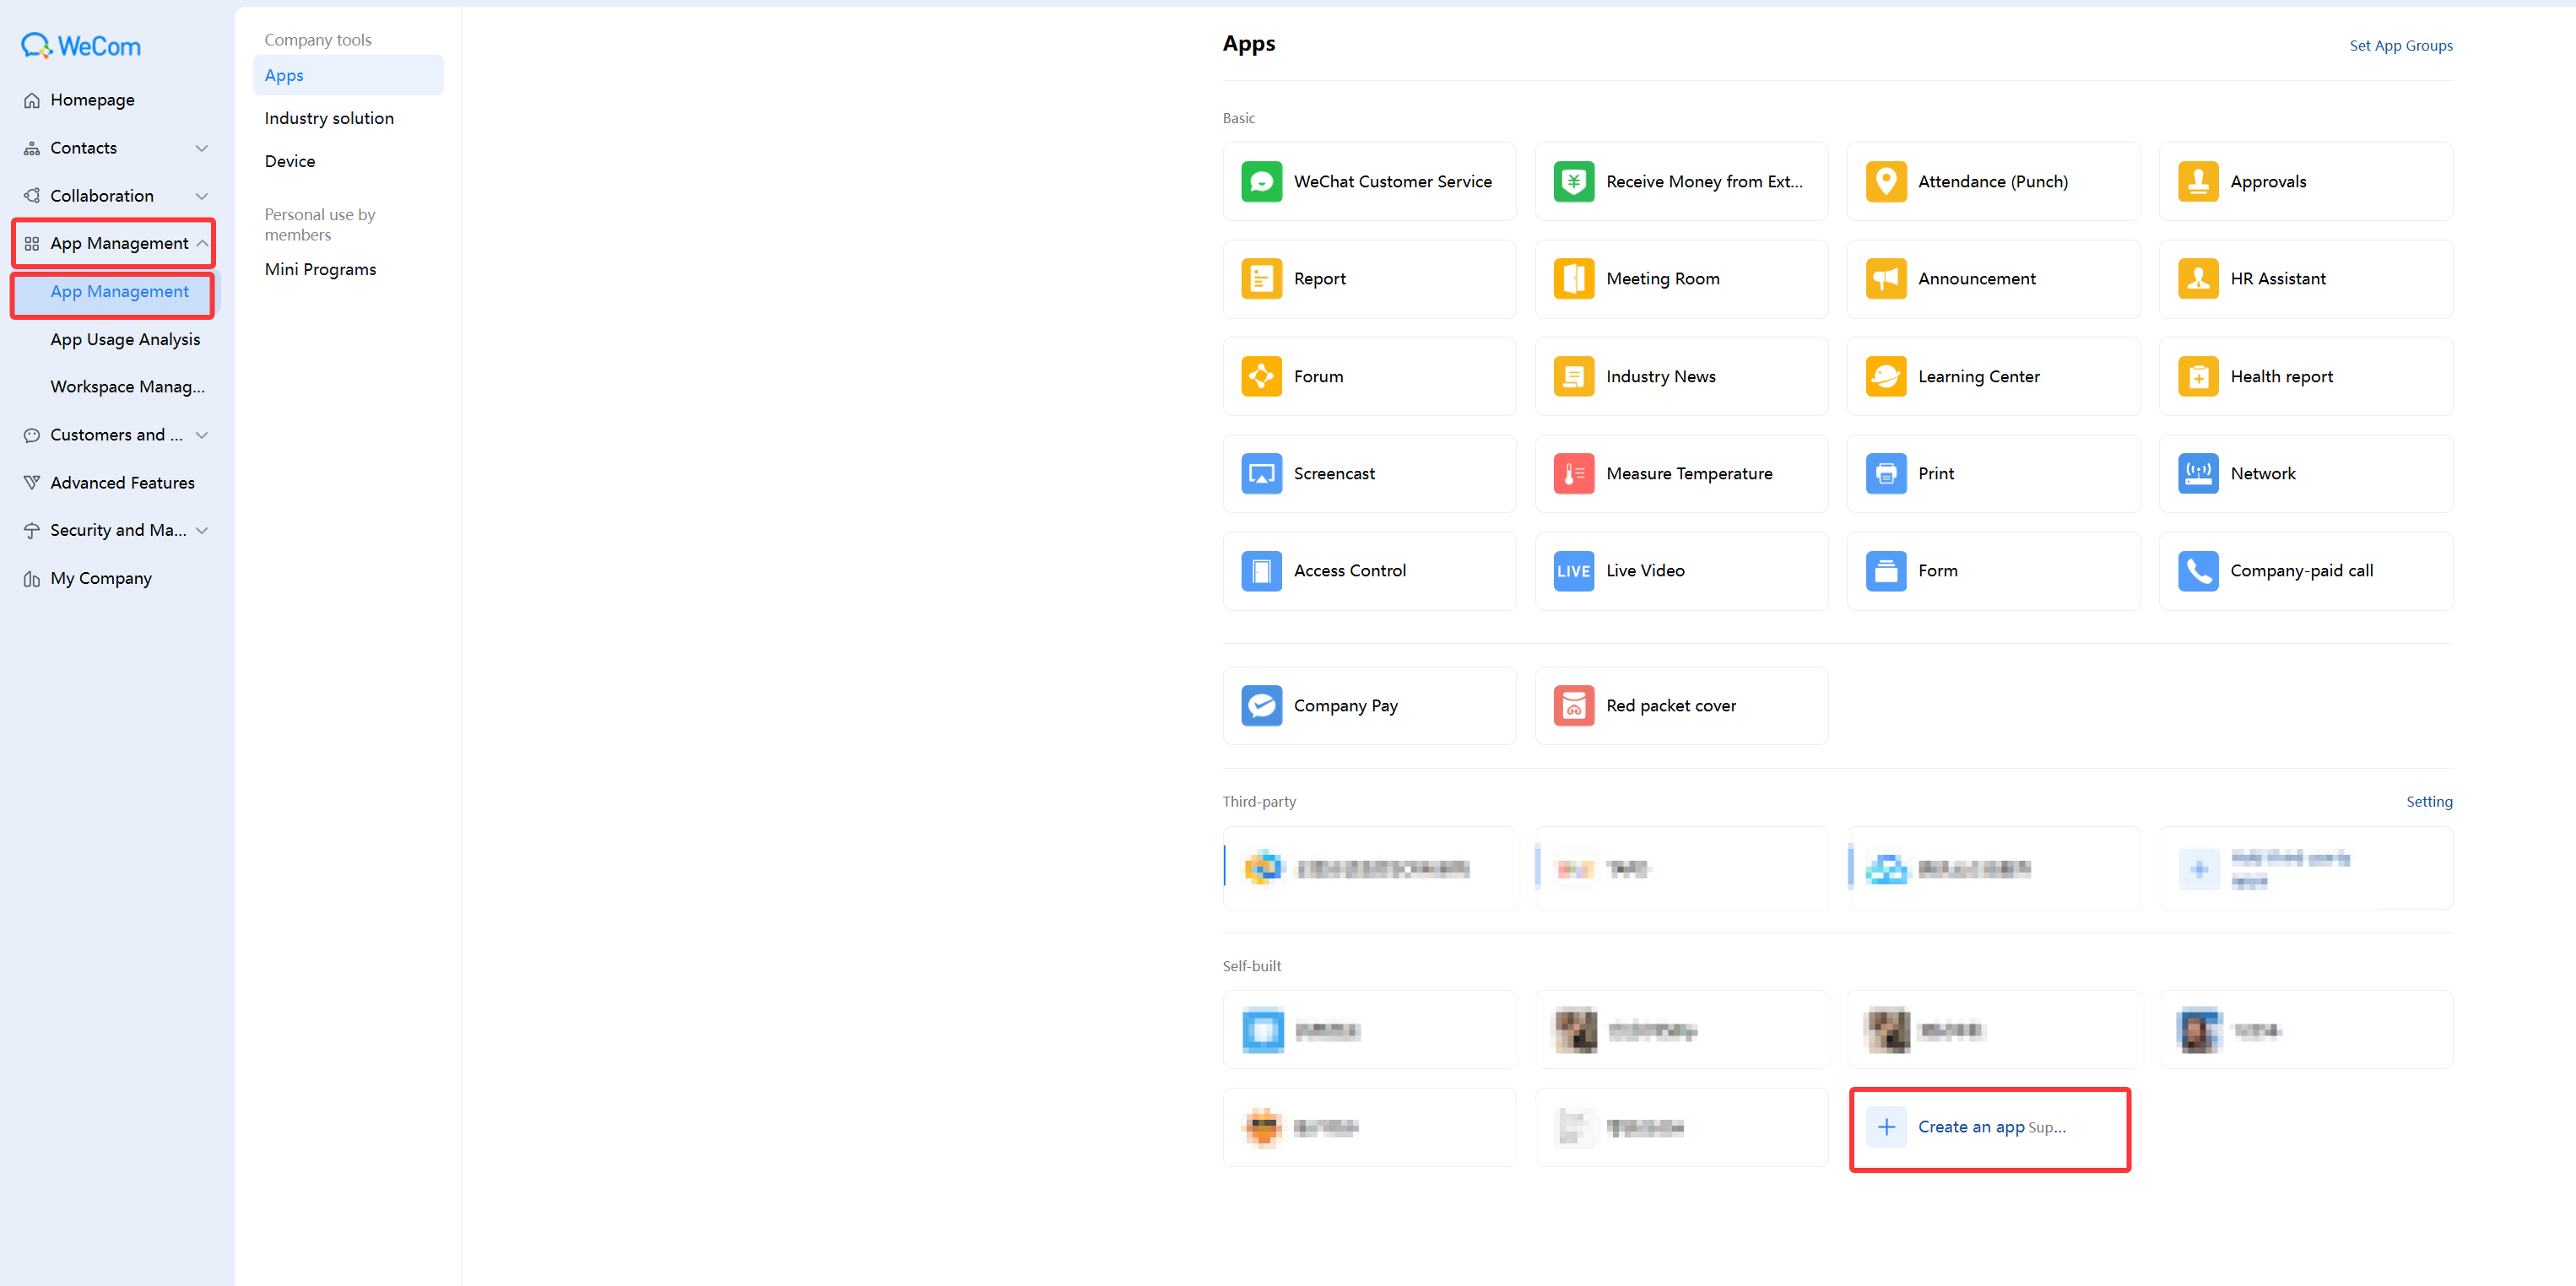
1. Log in to the WeCom admin console and click App Management in the left sidebar.
2. On the App Management page, click Self-built > Create an app.
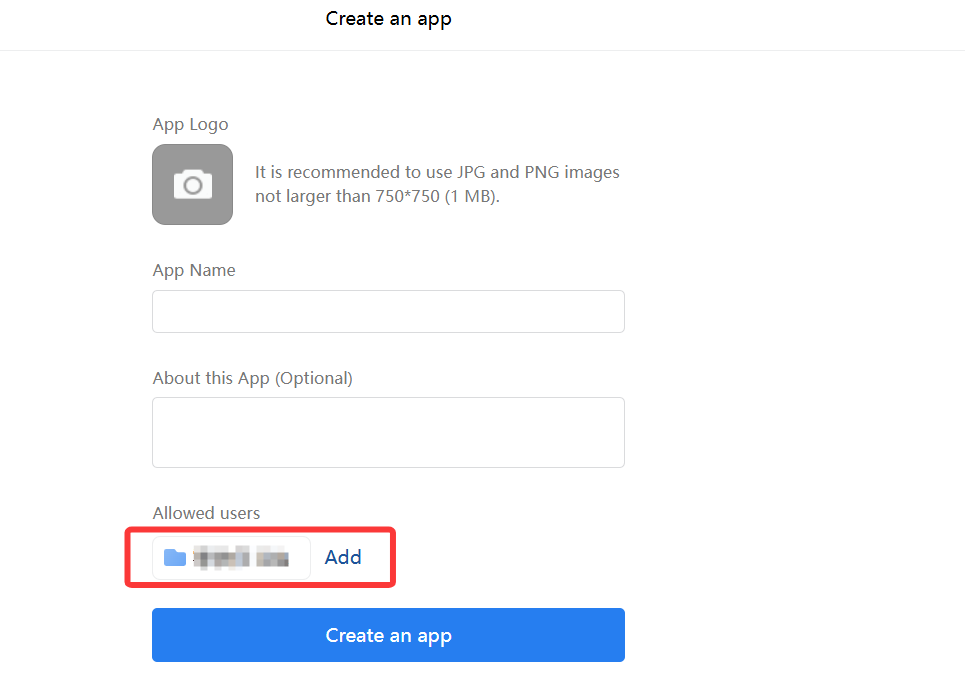
3. On the Create Application page, configure the relevant parameters and click Create an app.
Attention:
Ensure that the visible scope includes the organizational scope that needs to be synchronized. Otherwise, organizations cannot be synchronized. It is recommended to set it to the root directory.
2.2.2 Setting a Trusted Domain
1. Log in to the WeCom admin console, click App Management in the left sidebar, and then click the self-built application you just created on the application page.
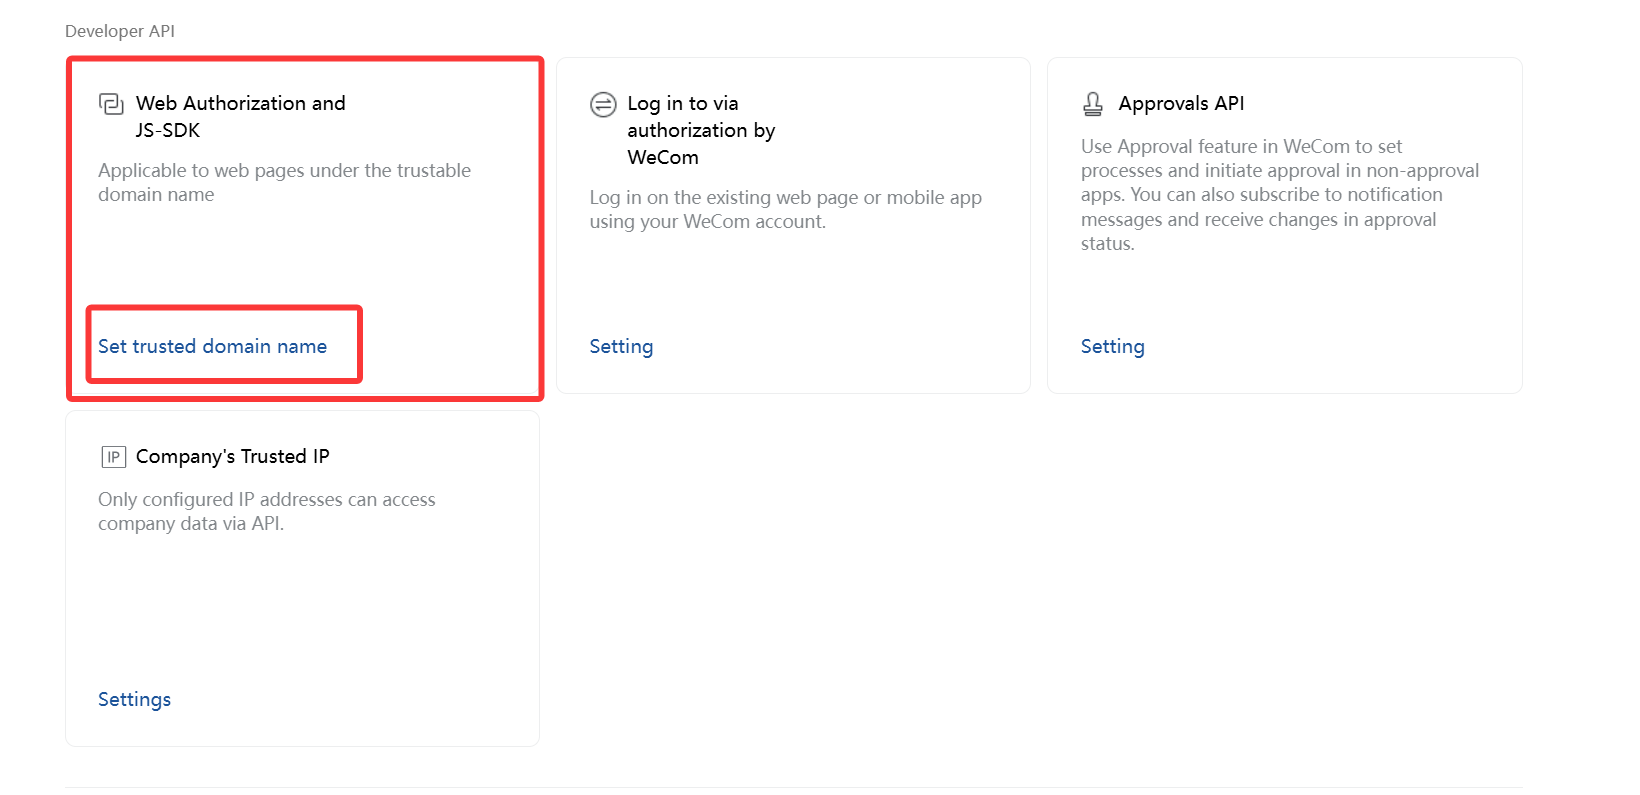
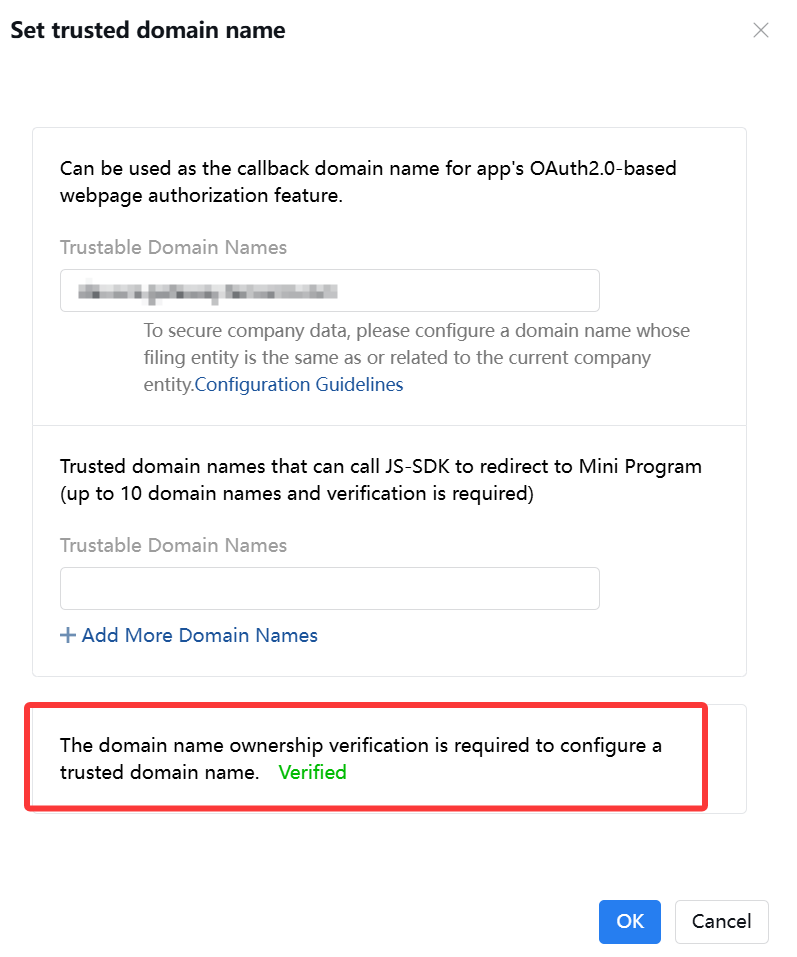
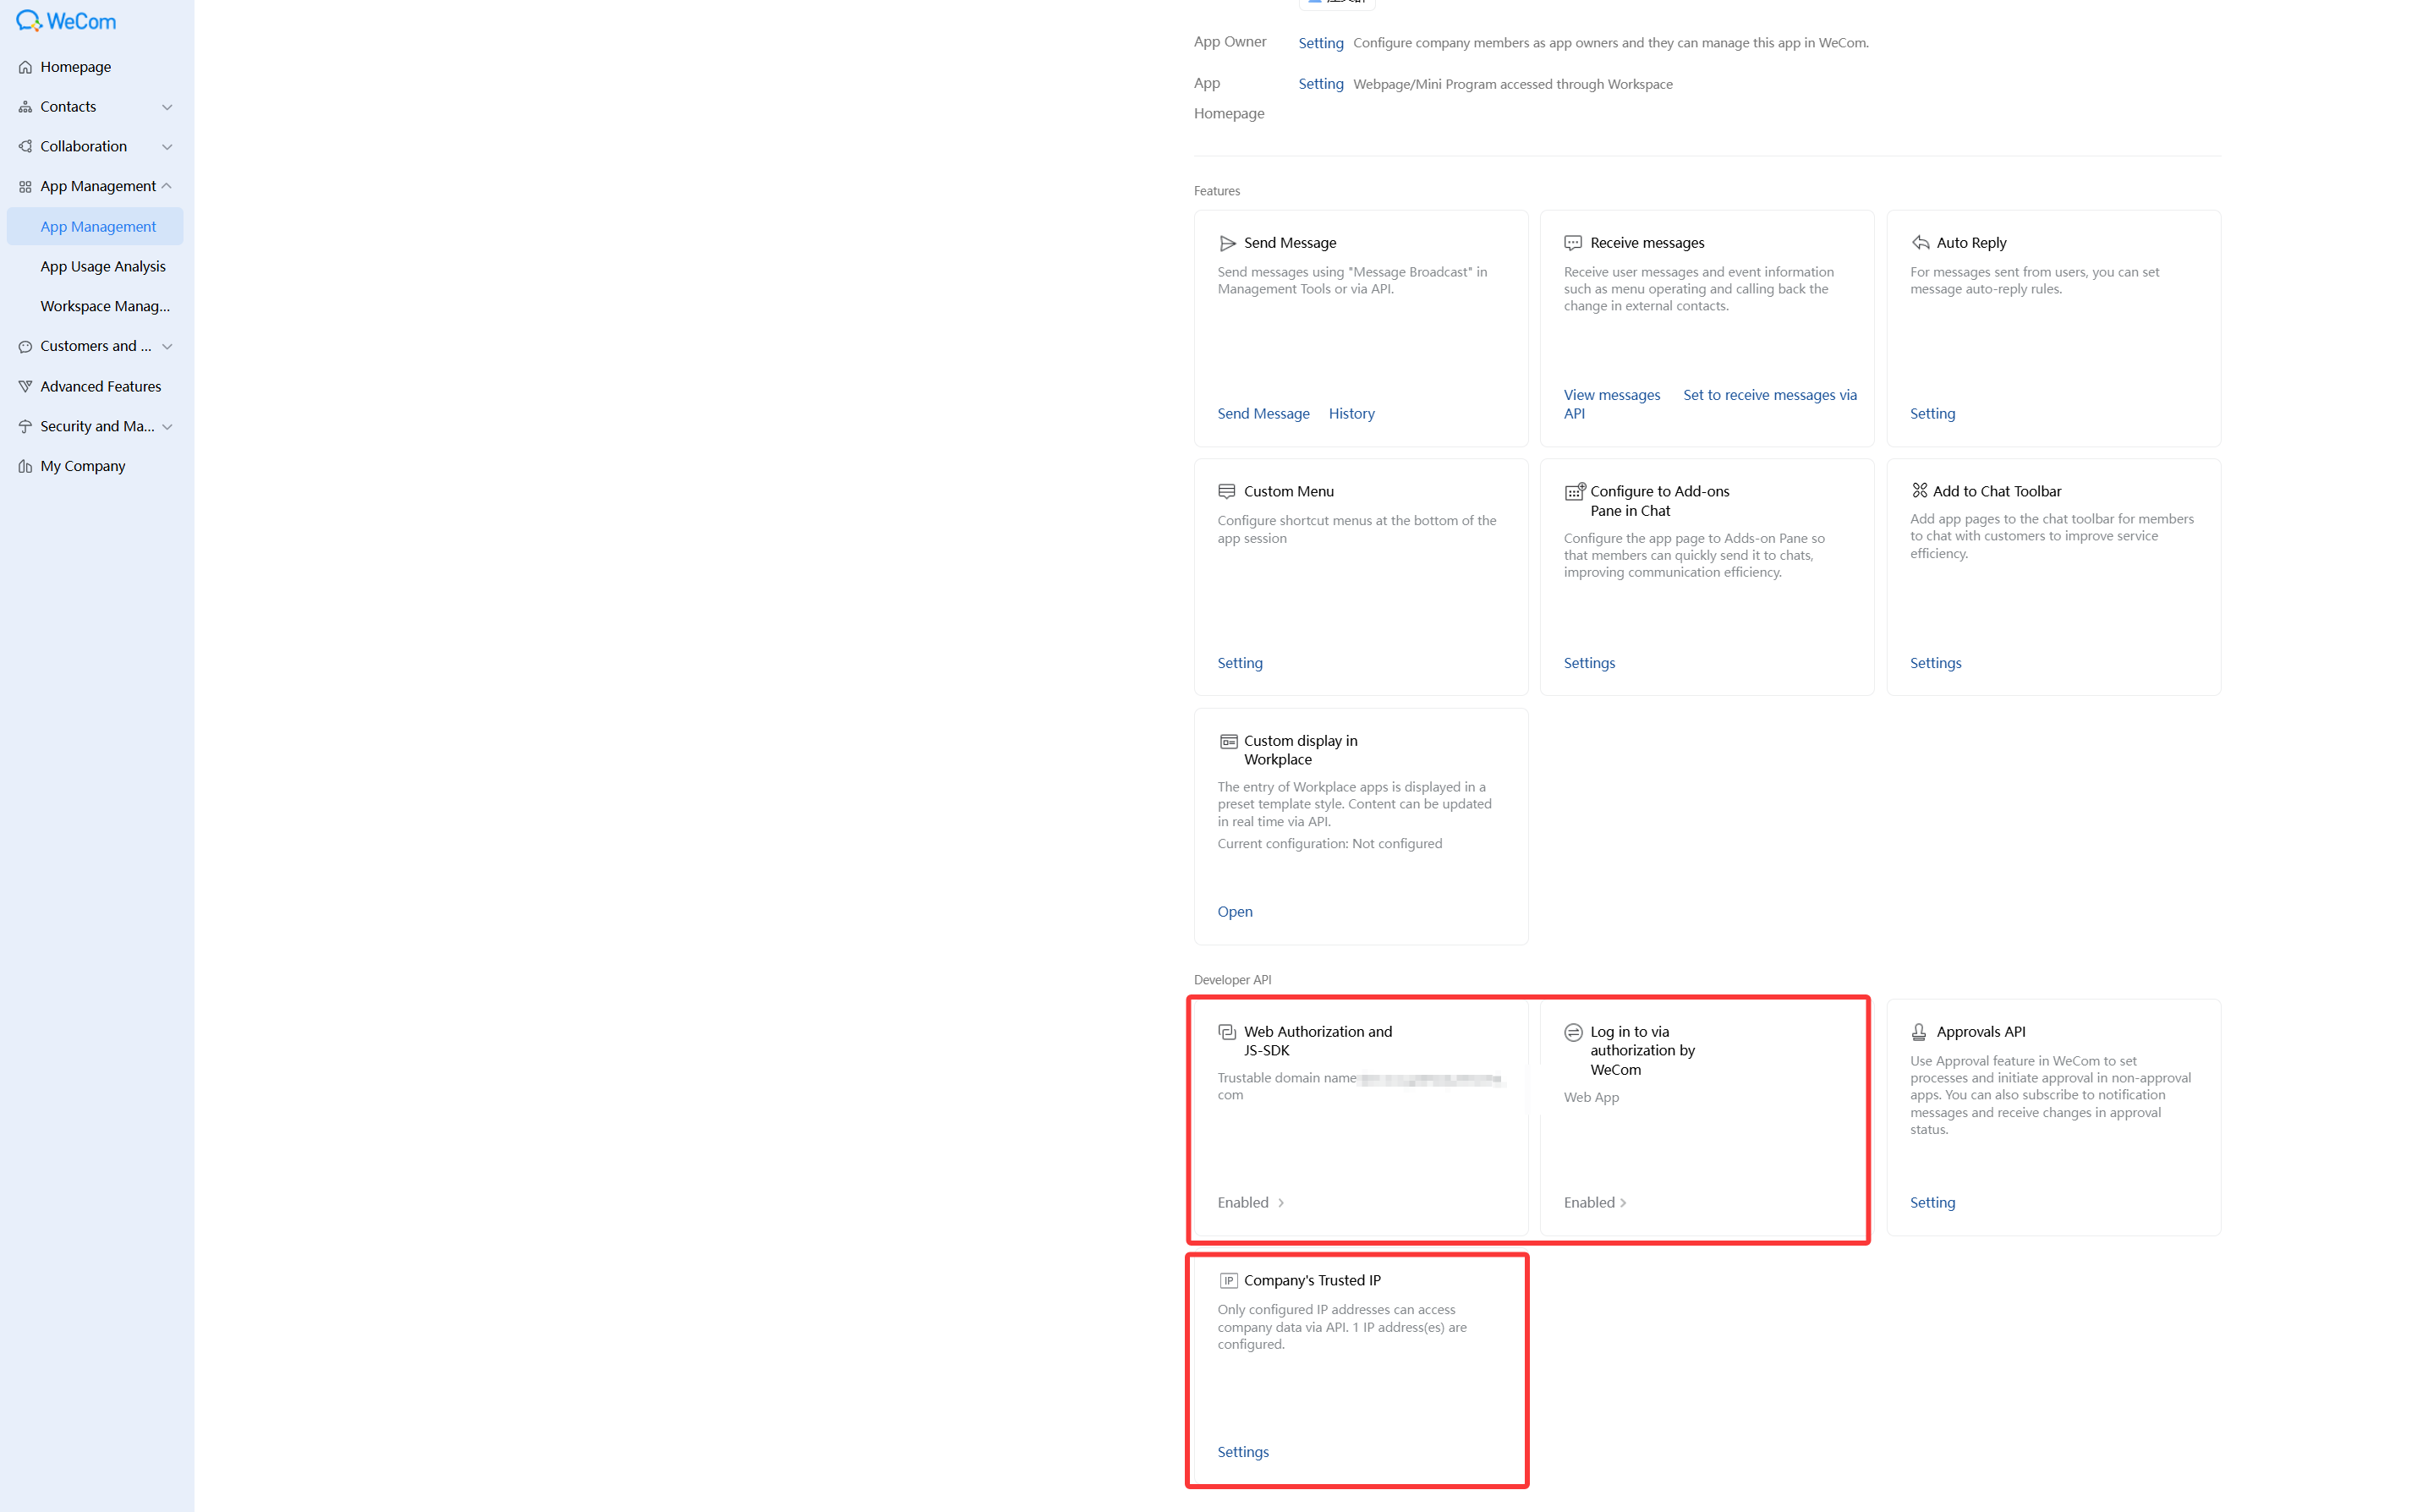
2. On the application details page, select Web Authorization and JS-SDK and click Set trusted domain name.
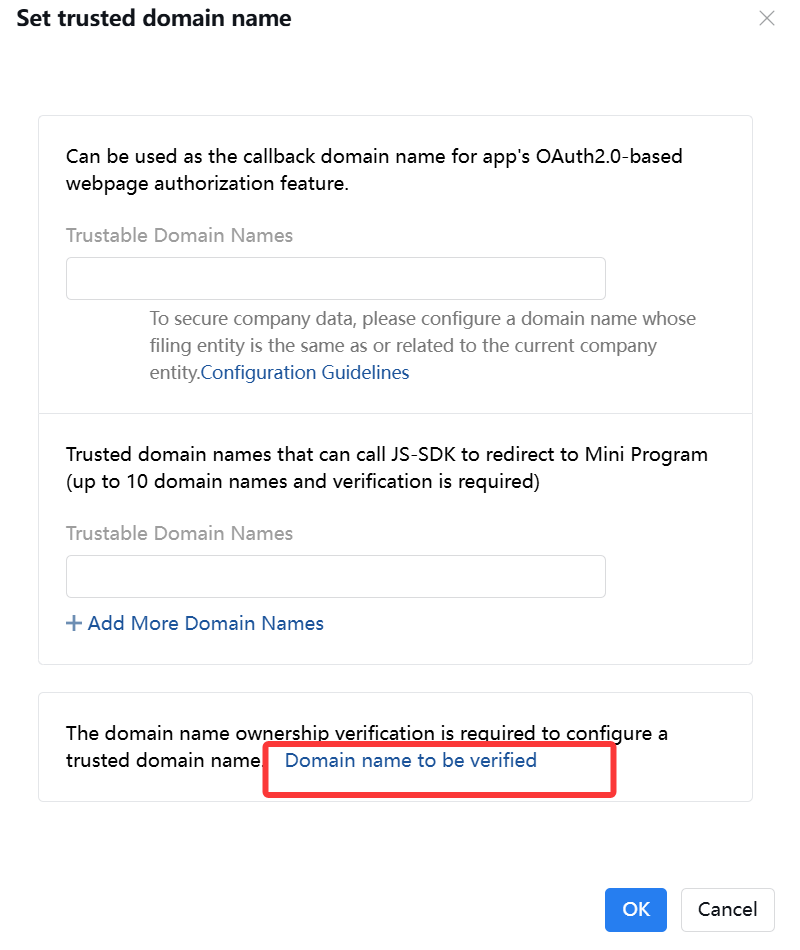
3. In the Set Trusted Domain window, click Domain name to be verified.
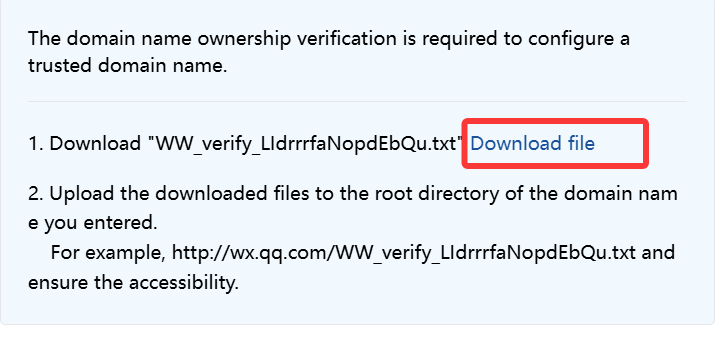
4. In the Set Trusted Domain window, click Download file.
5. You can close the page first. After the iOA SaaS console configuration is complete, enter the trusted domain, click OK, and complete the trusted domain verification.
Note:
The trusted domain is obtained after 3.2 Authentication Source Configuration is configured, and then entered here for trusted domain verification. Therefore, skip this trusted domain entry step for now.
2.2.3 Setting Corporate Trusted IPs
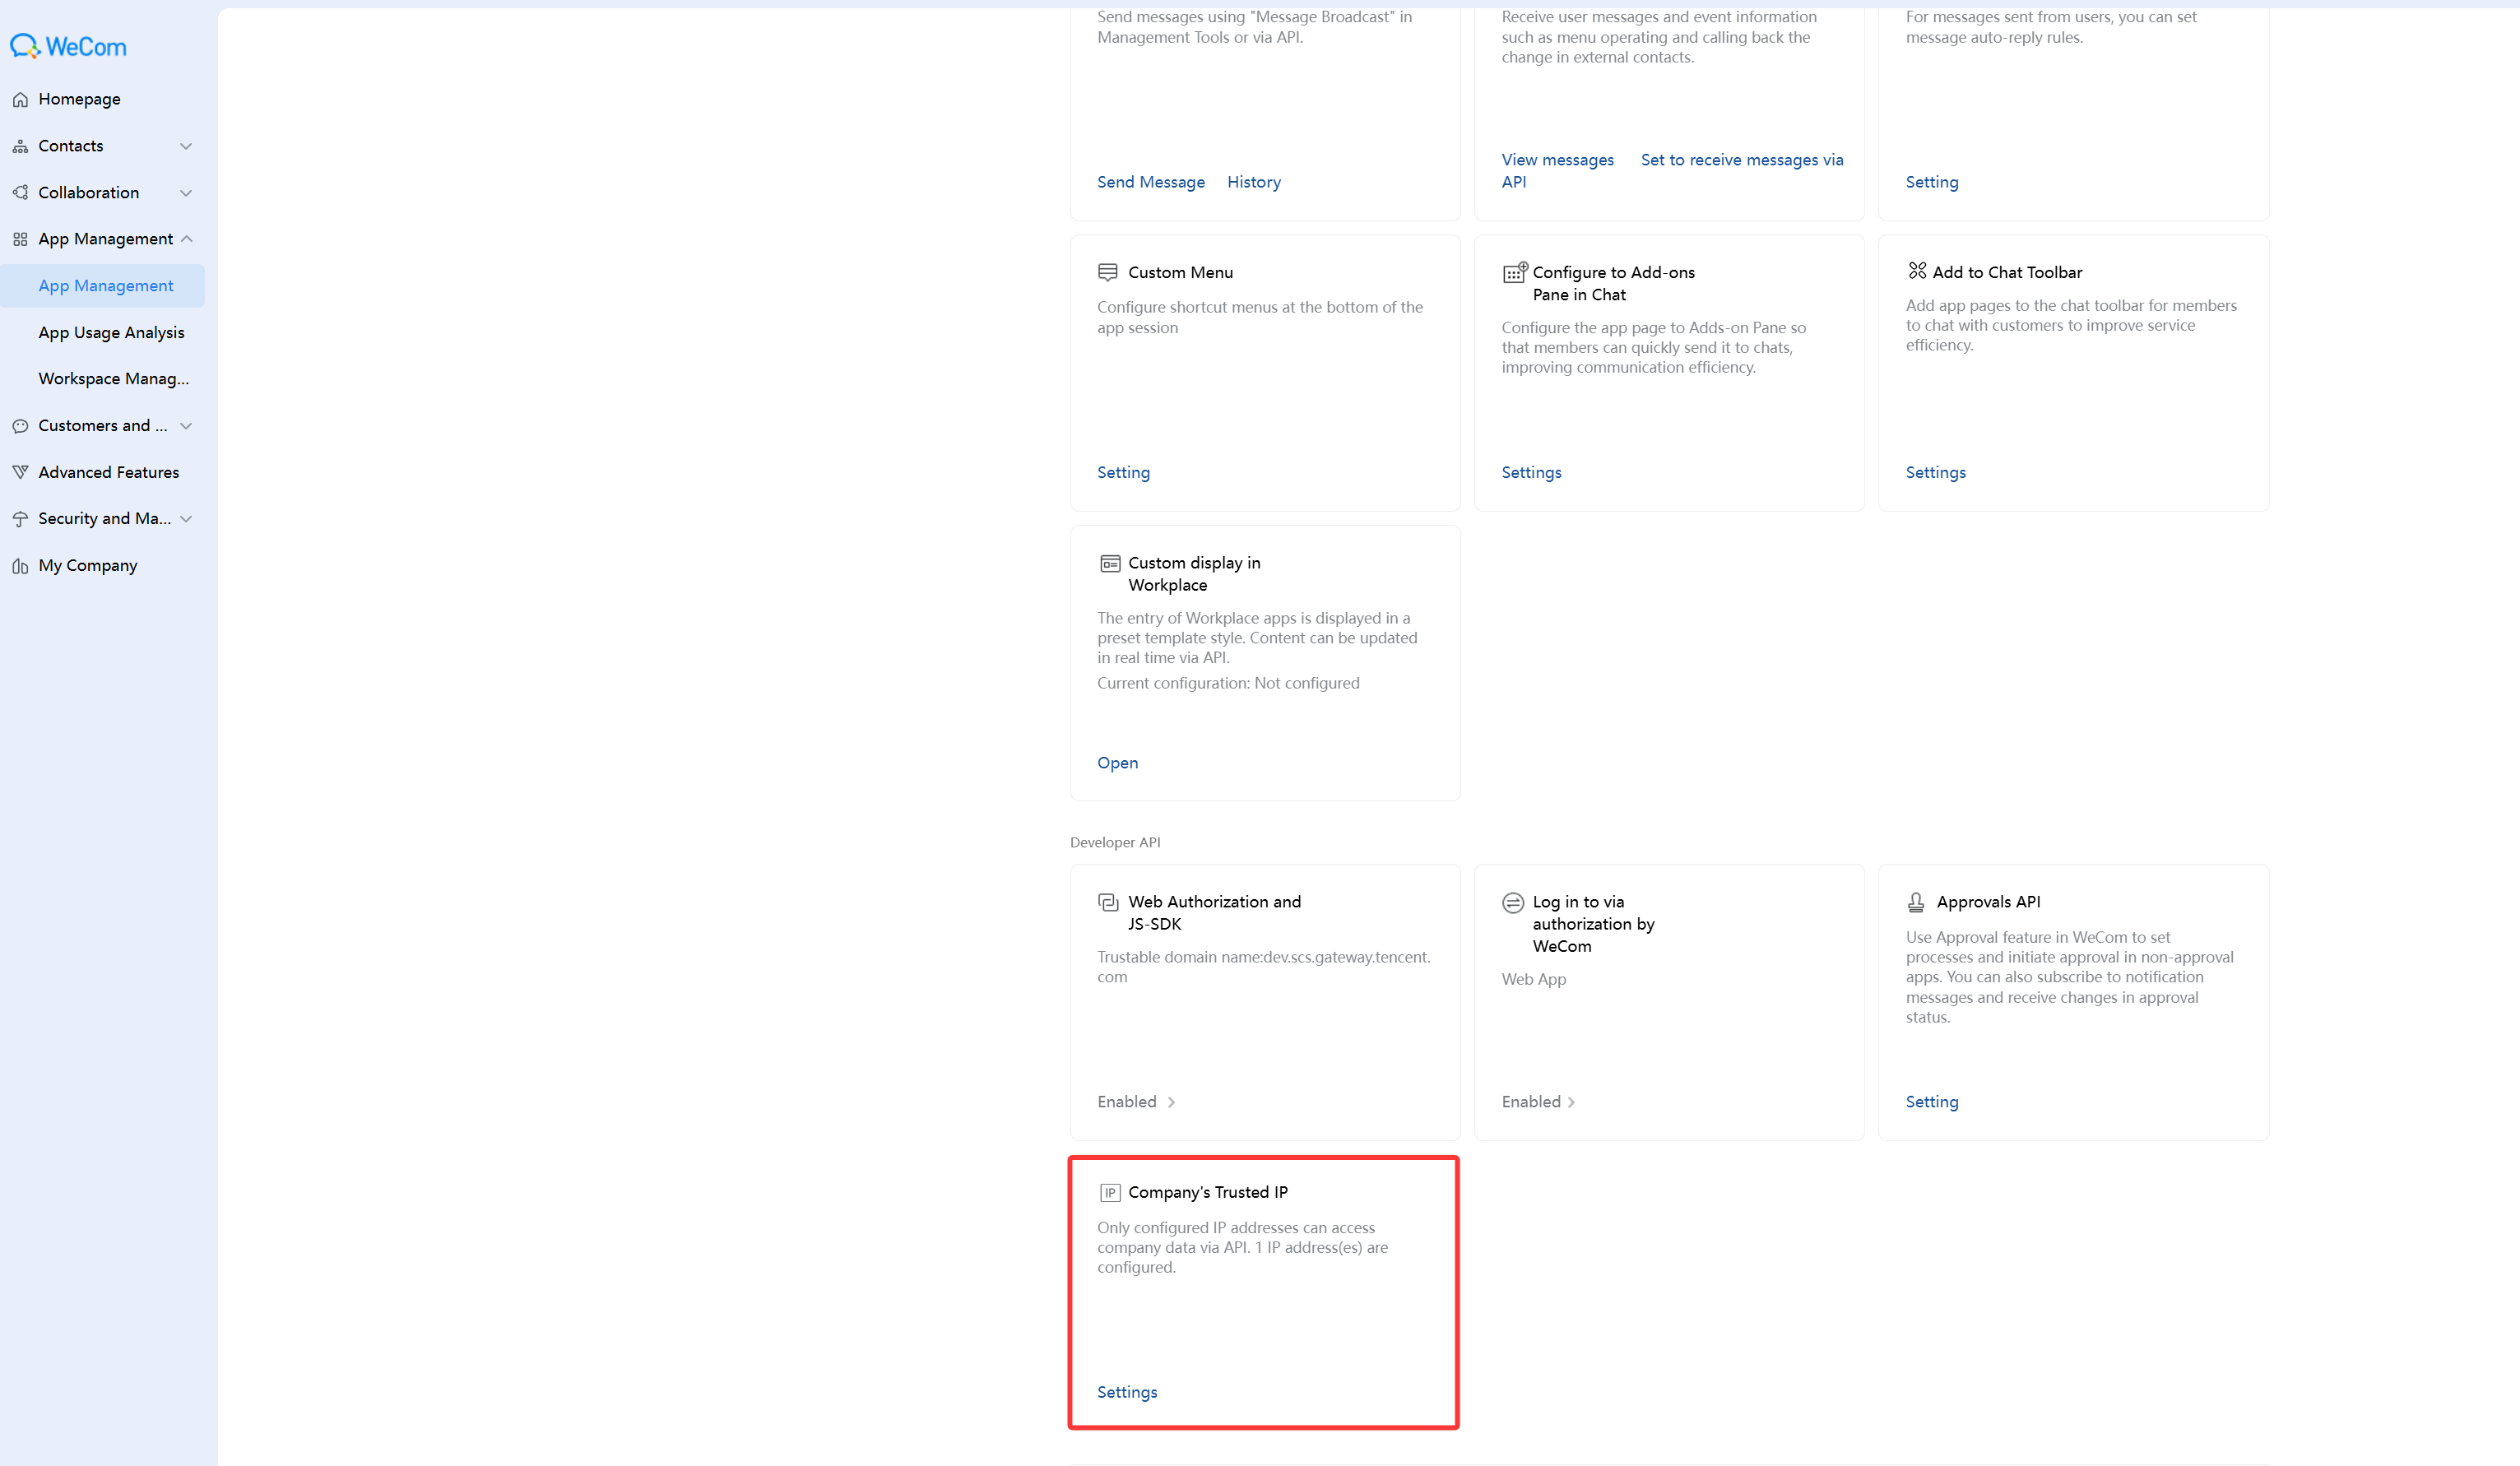
1. On the application page, click the self-built application you just created.
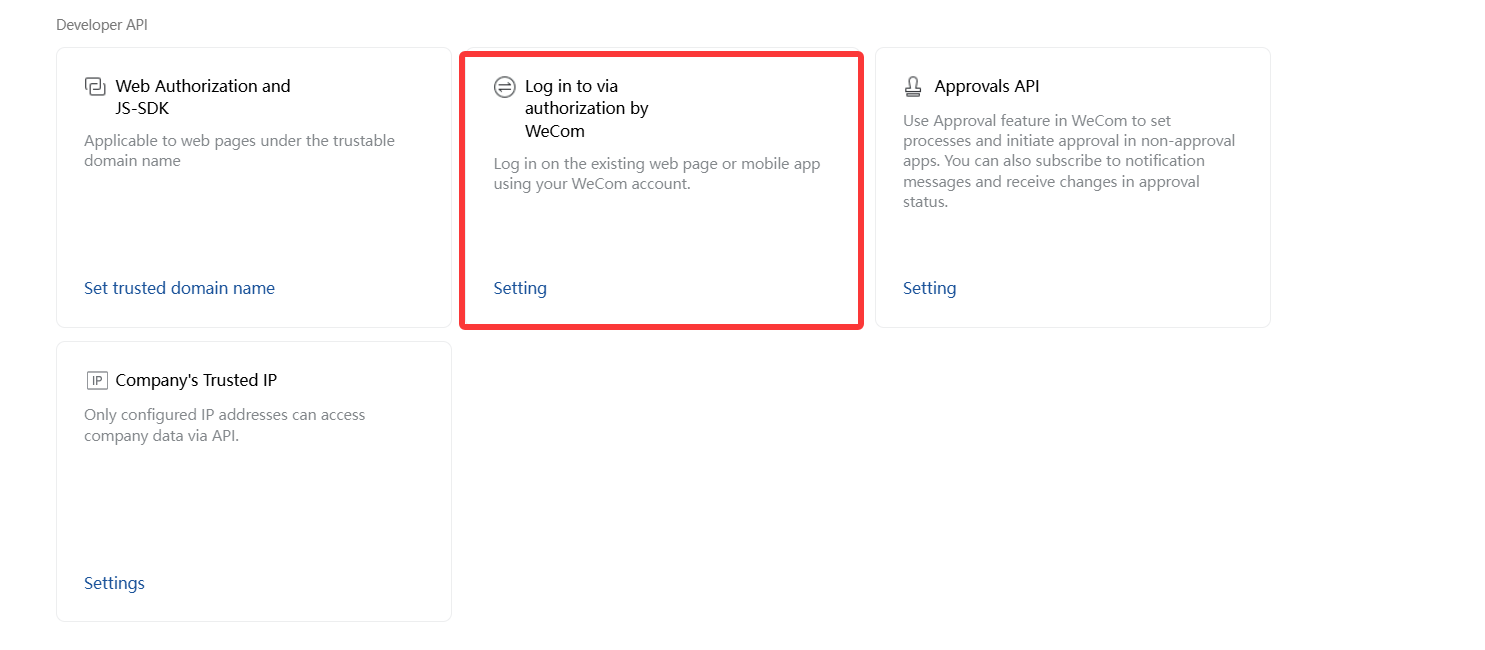
2. On the application details page, select Developer API and click Settings in Company's Trusted IP.
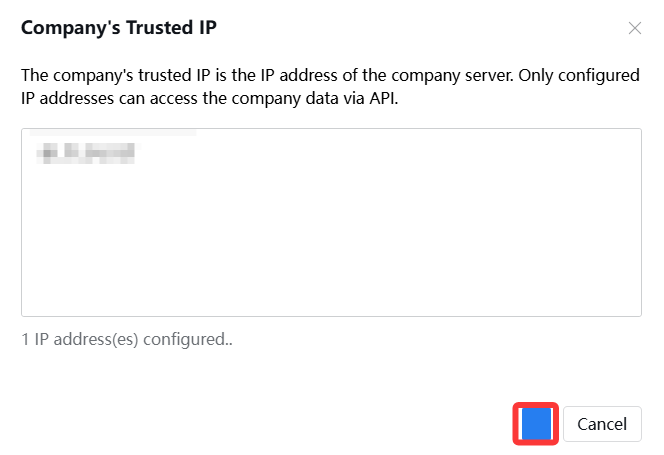
3. In the Enterprise Trusted IPs window, enter the IP address and click OK.
Note:
The trusted IP address is obtained after 3.2 Authentication Source Configuration and then entered here. Therefore, skip this enterprise trusted IP address entry step for now.
2.2.4 Setting the WeCom Authorization Callback Domain
1. On the application page, click the self-built application you just created.
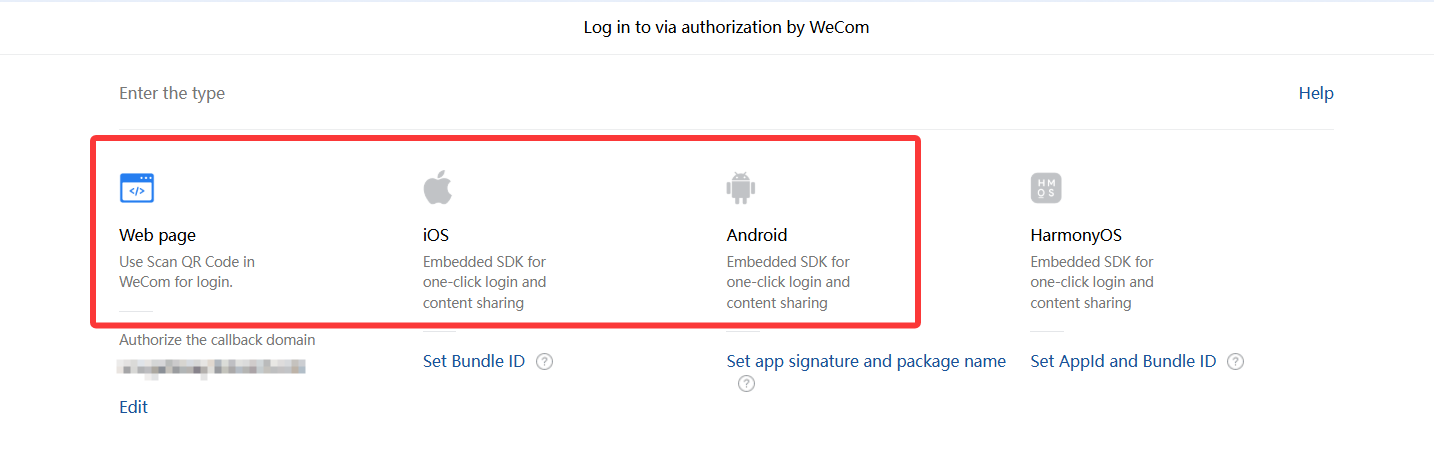
2. On the application details page, select Developer API, and then select Log in to via authorization by WeCom.
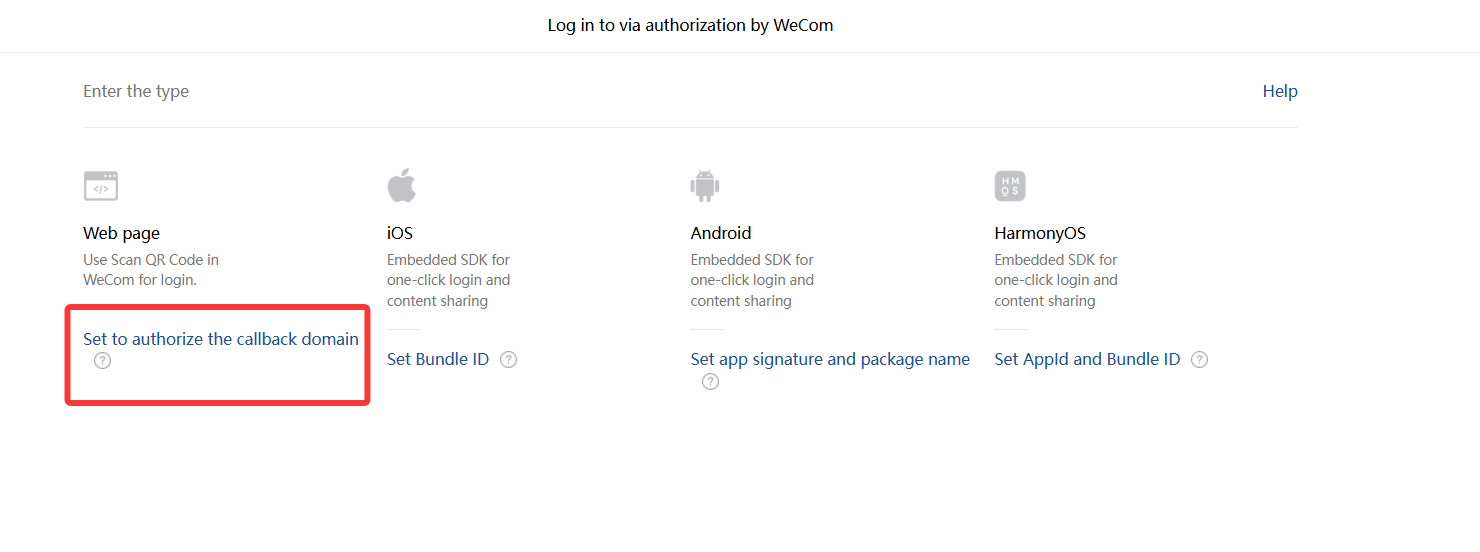
3. Click Set to authorize the callback domain and enter the web authorization callback domain: scs.gateway.tencent.com.
2.3 Obtaining the Enterprise ID, Self-Built Application AgentId, and Secret
2.3.1 Obtaining the Enterprise ID
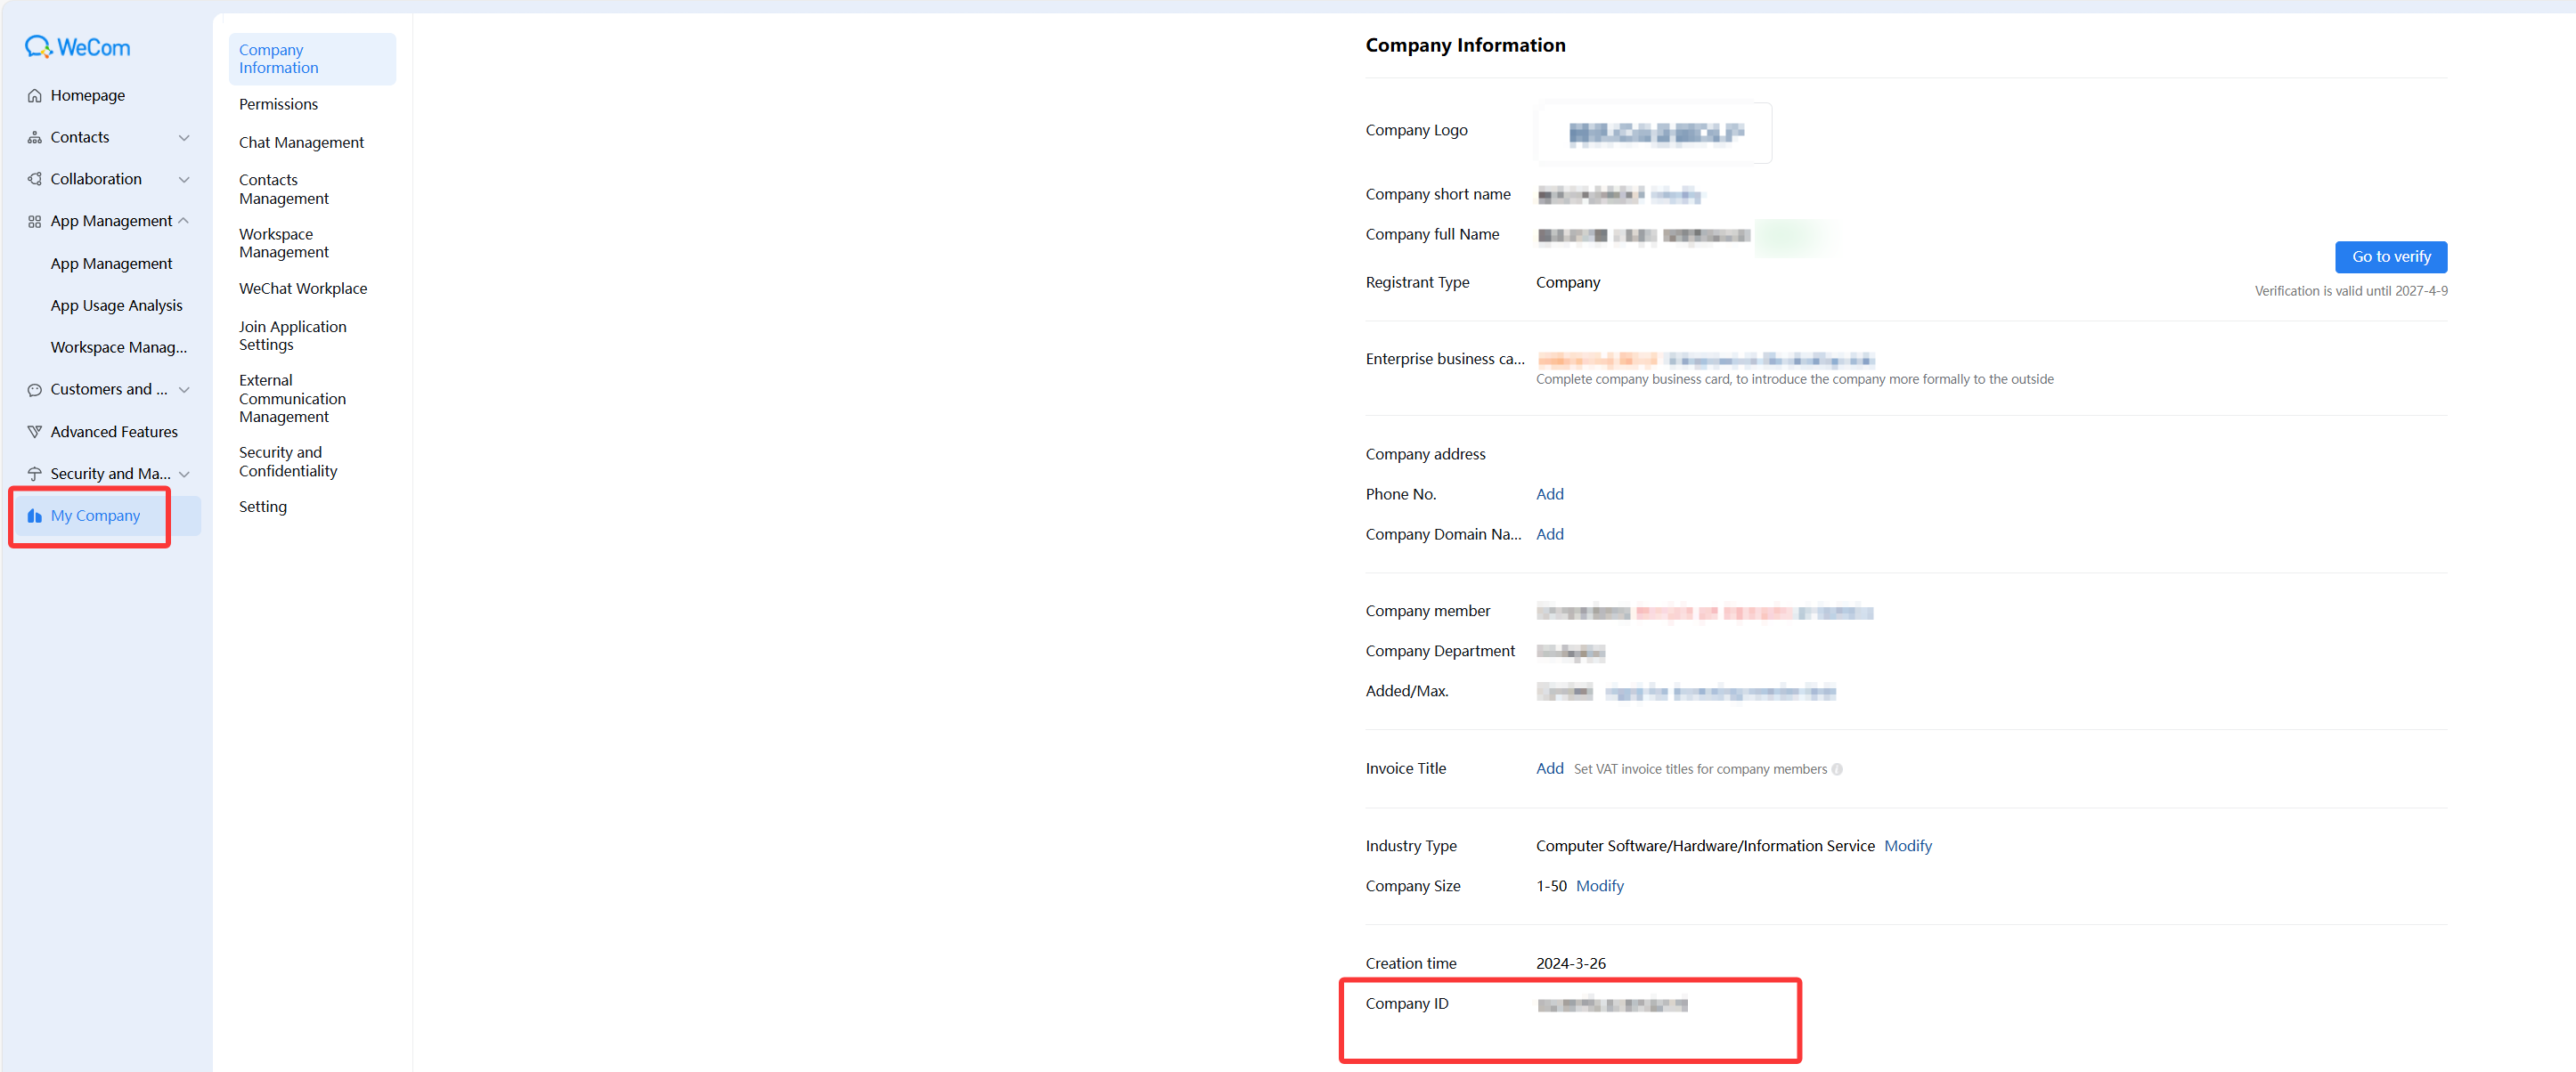
1. Log in to the WeCom admin console, click My Company in the left sidebar, and go to the company information page.
2. Obtain the enterprise ID at the bottom of the company information page.
2.3.2 Obtaining the Self-Built Application AgentId and Secret
1. Log in to the WeCom admin console, click App Management in the left sidebar, and select the self-built application you just created.
2. On the application details page, view the AgentId, click View next to Secret, and copy and save the Secret content.
Attention:
To ensure data security, confirm that it is for internal enterprise use only, and never disclose the Secret to any third party.
2.3.3 Obtaining the Self-Built Application Schema
1. Log in to the WeCom admin console, click App Management in the left sidebar, and select the self-built application you just created.
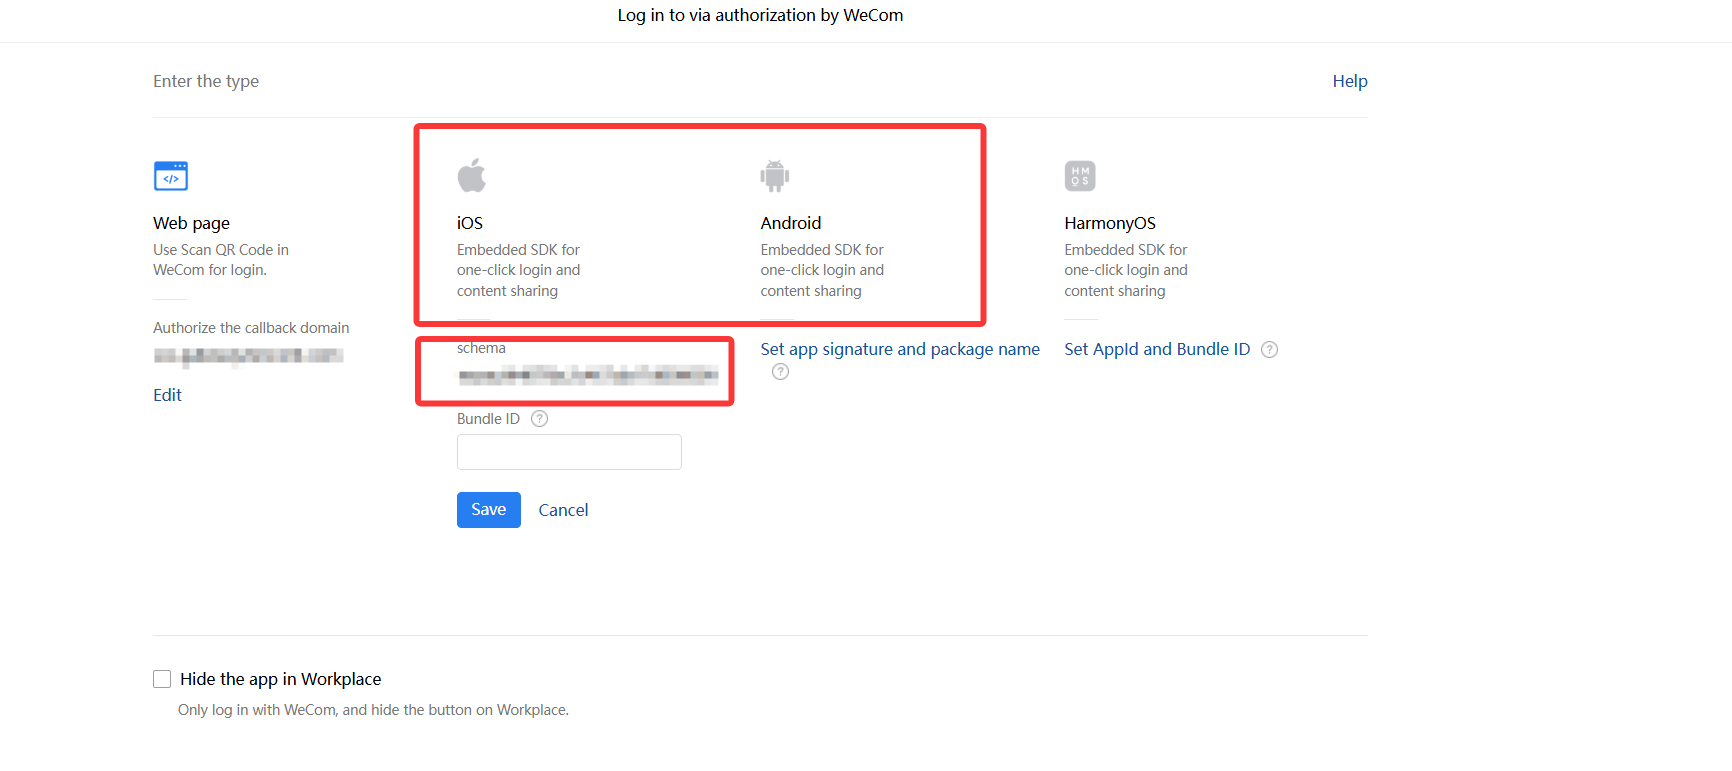
2. On the application details page, go to "WeCom Authorization Login". The Schema parameter is automatically generated by the WeCom platform, so you can obtain it directly. Copy and save the Schema content.
3. Enter the WeCom authorization login information.
Web page: Set the authorization callback domain to scs.gateway.tencent.com.
iOS: Set the Bundle ID to com.tencent.ioa.saas.
Android: Set the app signature to 9e4e6594cd64562c6ae8e3ae0288dd5a and the app package name to com.tencent.ioa.saas.
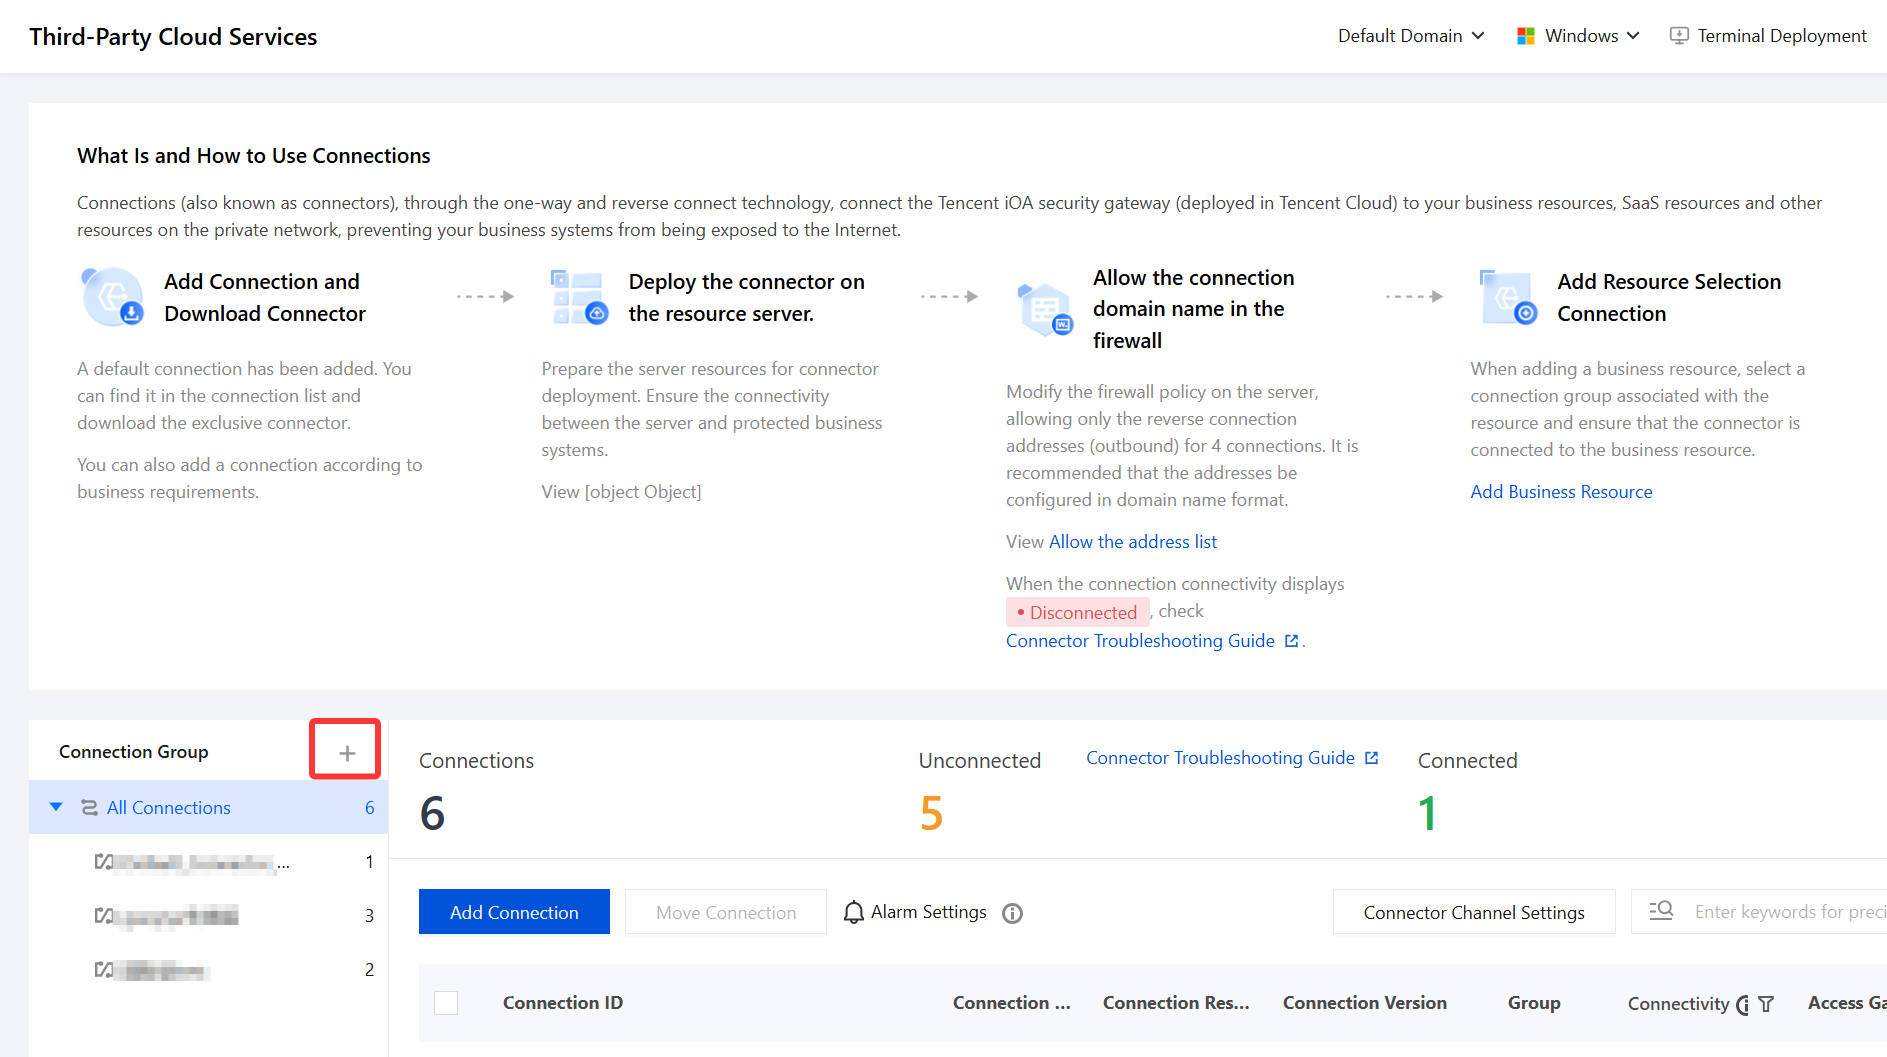
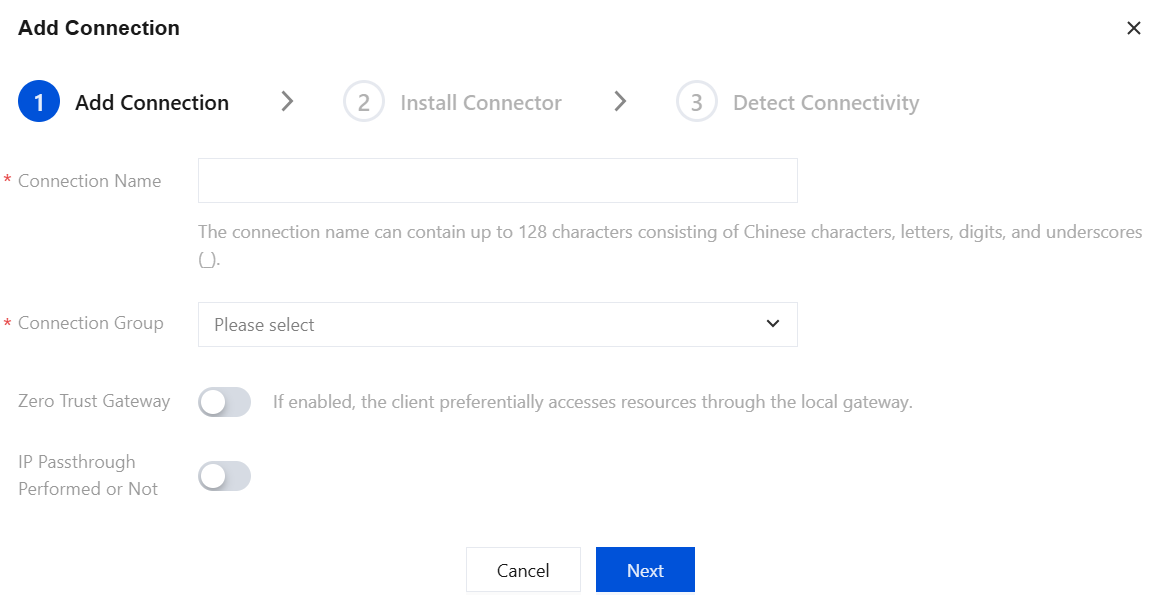
3. Edit the connection group name. Example: WeCom integration. Select the connection group and click Next.
4. Deploy the connector by following the prompts. For detailed steps, see Connector Deployment.
Note:
After deployment is completed, we recommend not adding more connections to this connection group. If you need to add a connection, add the egress IP address of the new connector to the trusted IP address list of the WeCom self-built application.
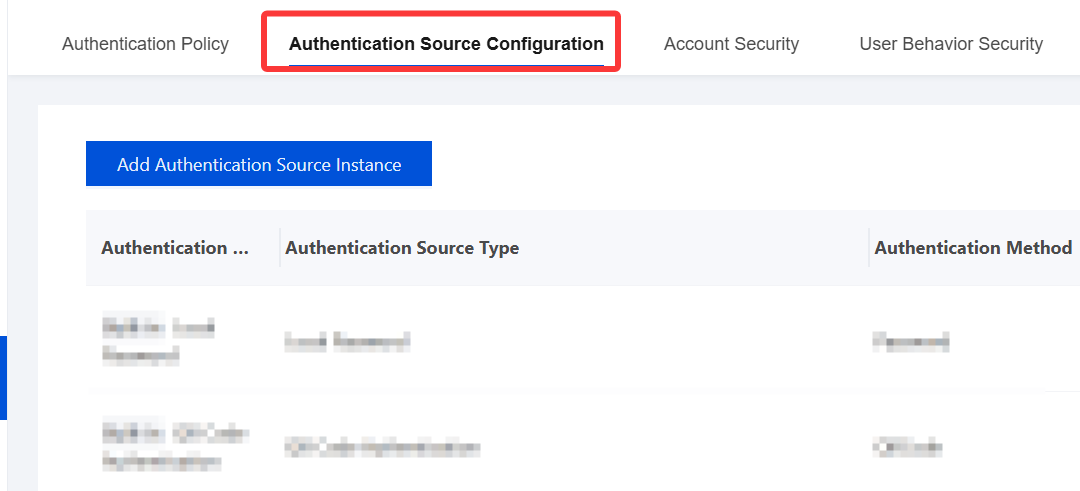
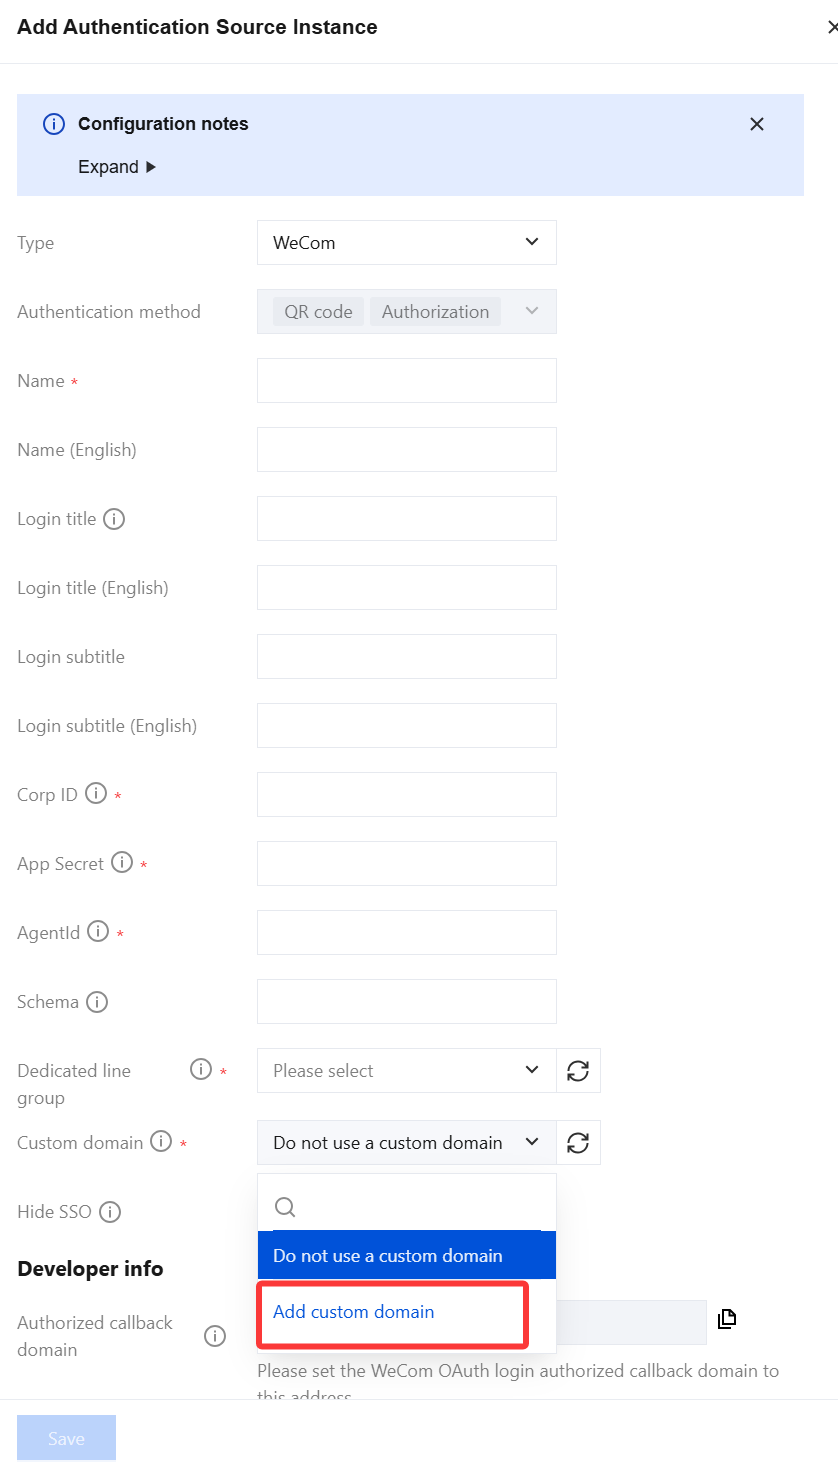
2. On the authentication source configuration page, click Add Authentication Source Instance.
Note:
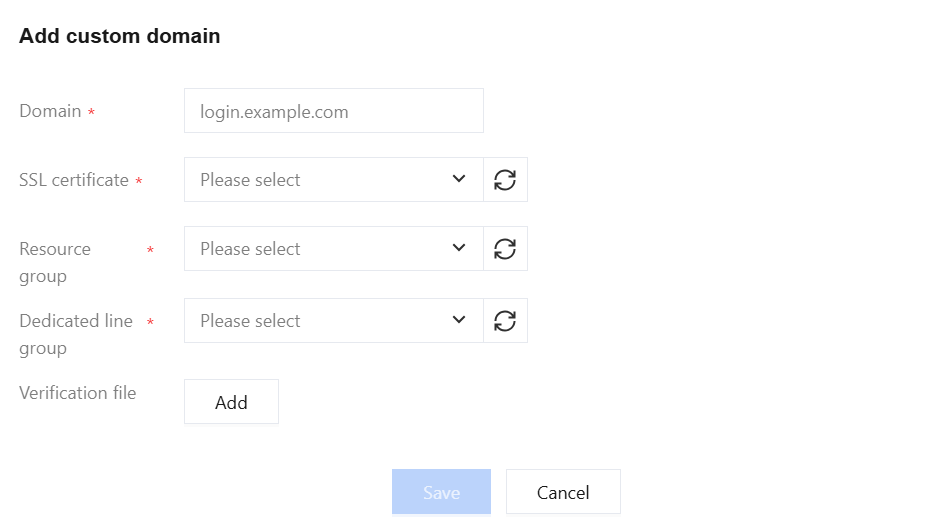
Tencent iOA Advanced Edition and Remote Access Pro Edition support configuration of custom domain names.
Tencent iOA Terminal Security Pro Edition does not support custom domain names. You need to prepare a domain name that has passed trusted domain verification.
Parameter Name
Description
Type
WeCom.
Authentication Method
QR code authentication, authorization authentication.
Enter the verification file name obtained in 2.2.2 Setting a Trusted Domain (including the extension, such as WW_xx.txt) and the file content.
Note:
Note: After you add a custom domain name, two web resources will be automatically generated under the selected resource group. These resources cannot be modified. We recommend that you create a resource group to store them.
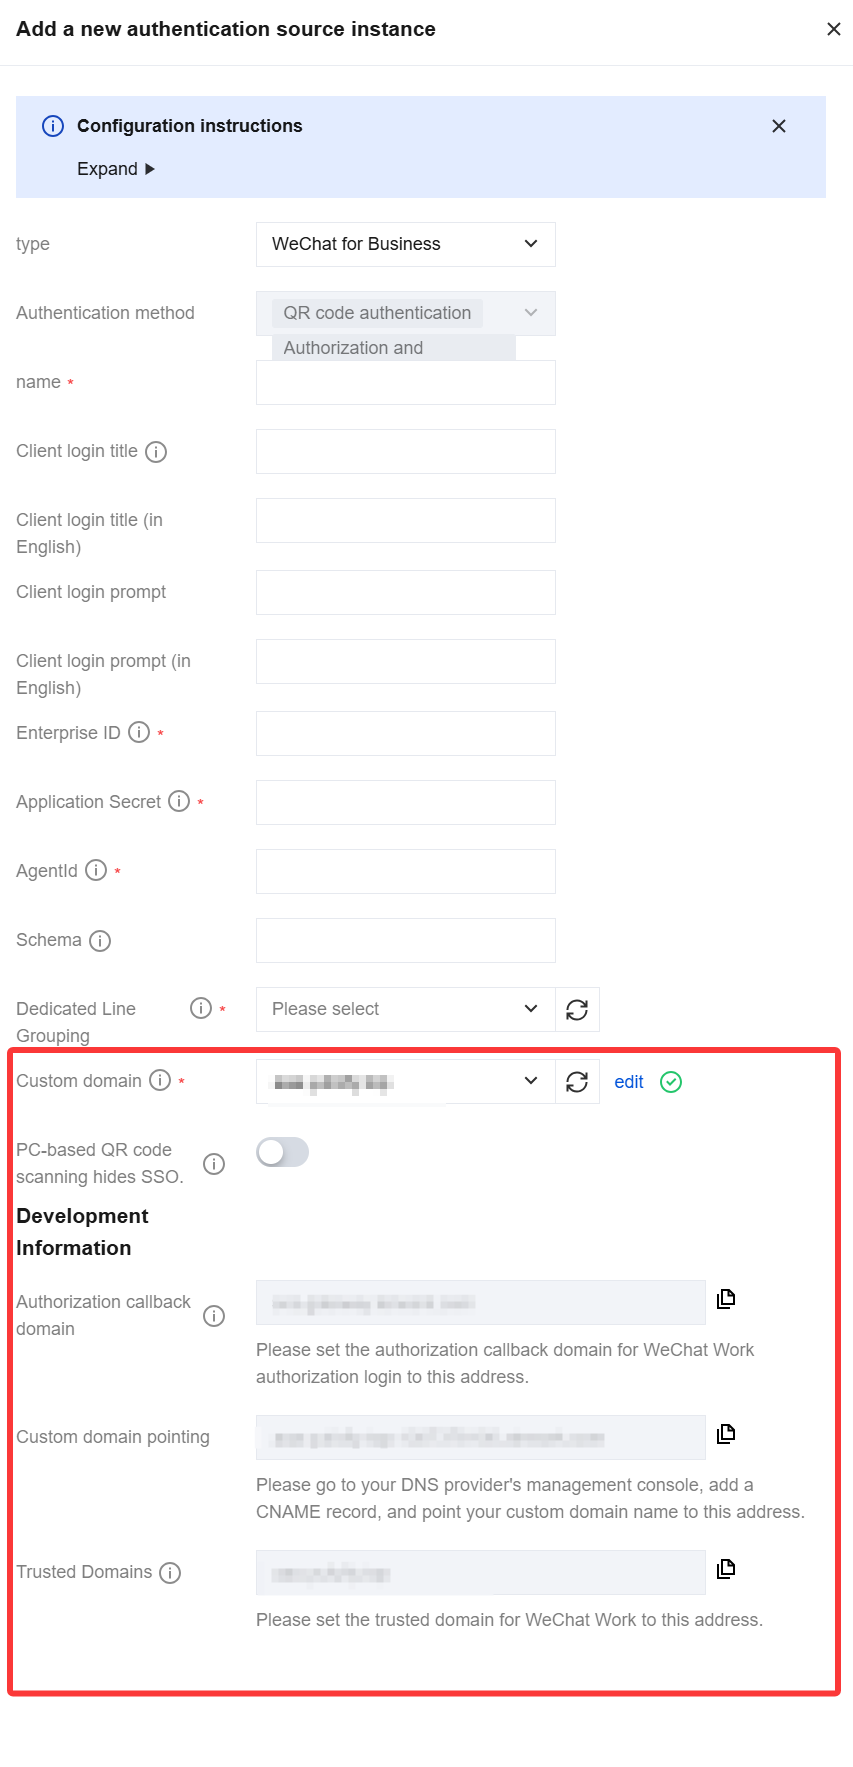
3. Keep the information generated below and click Save.
Modify the CNAME resolution of the custom domain name to point to the domain name specified in 'Custom Domain Name Target'.
After the resolution takes effect, go back to 2.2 Configure WeCom Self-built Application and enter the authorization callback domain and trusted domain in the WeCom self-built application.
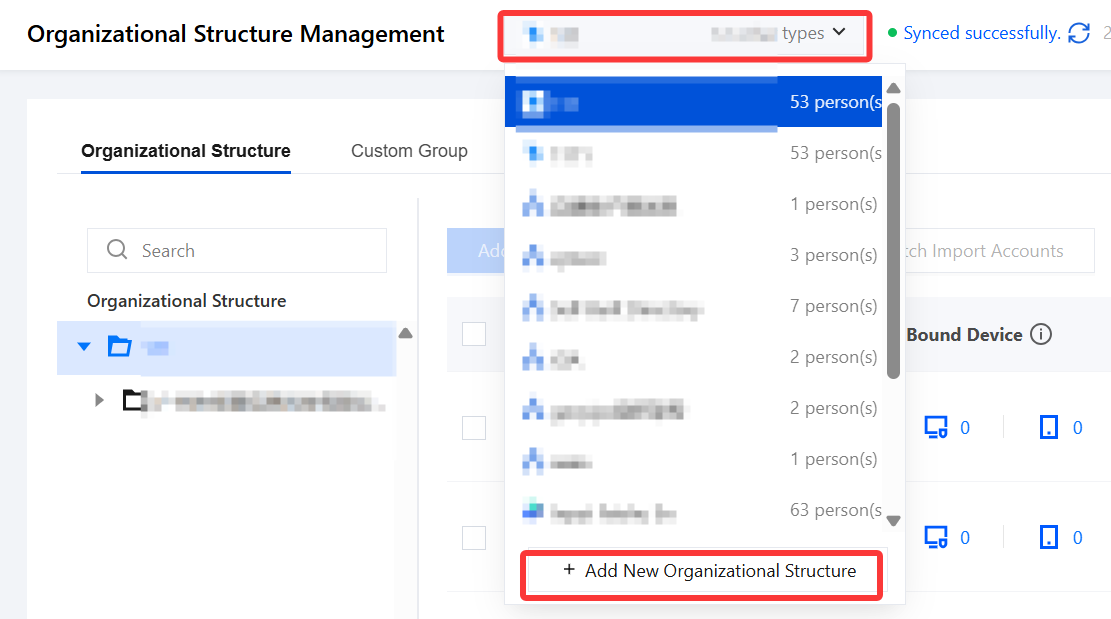
2. On the Organizational Structure Management page, click Add New Organizational Structure.
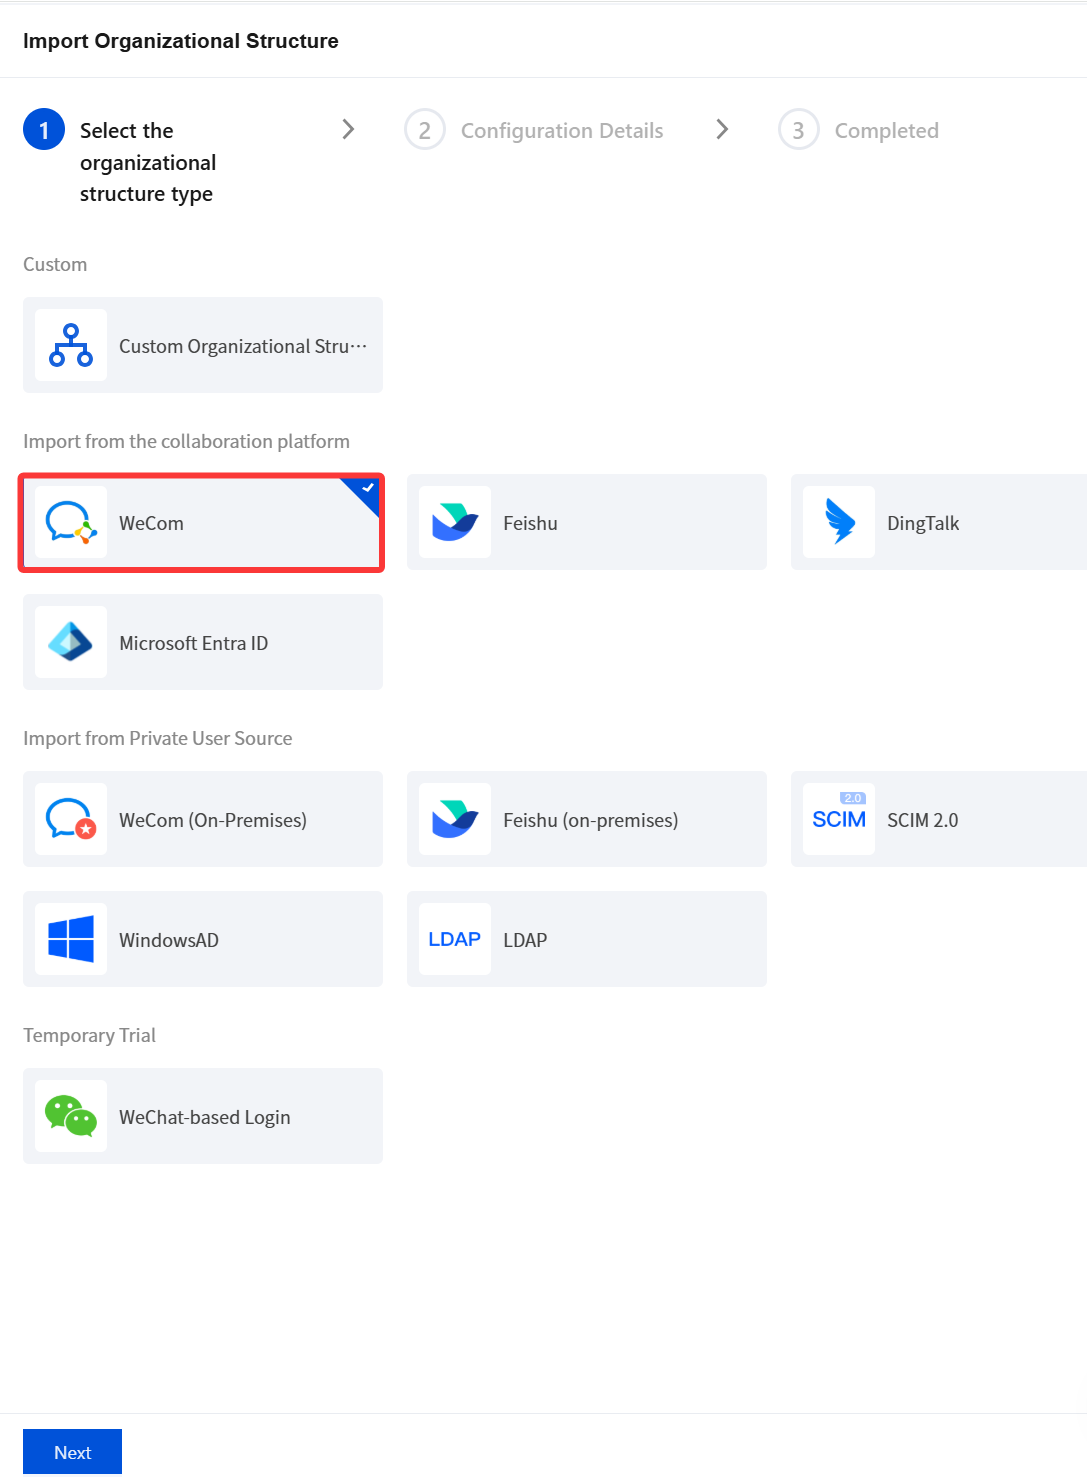
3. On the Import Organizational Structure page, select WeCom and click Next.
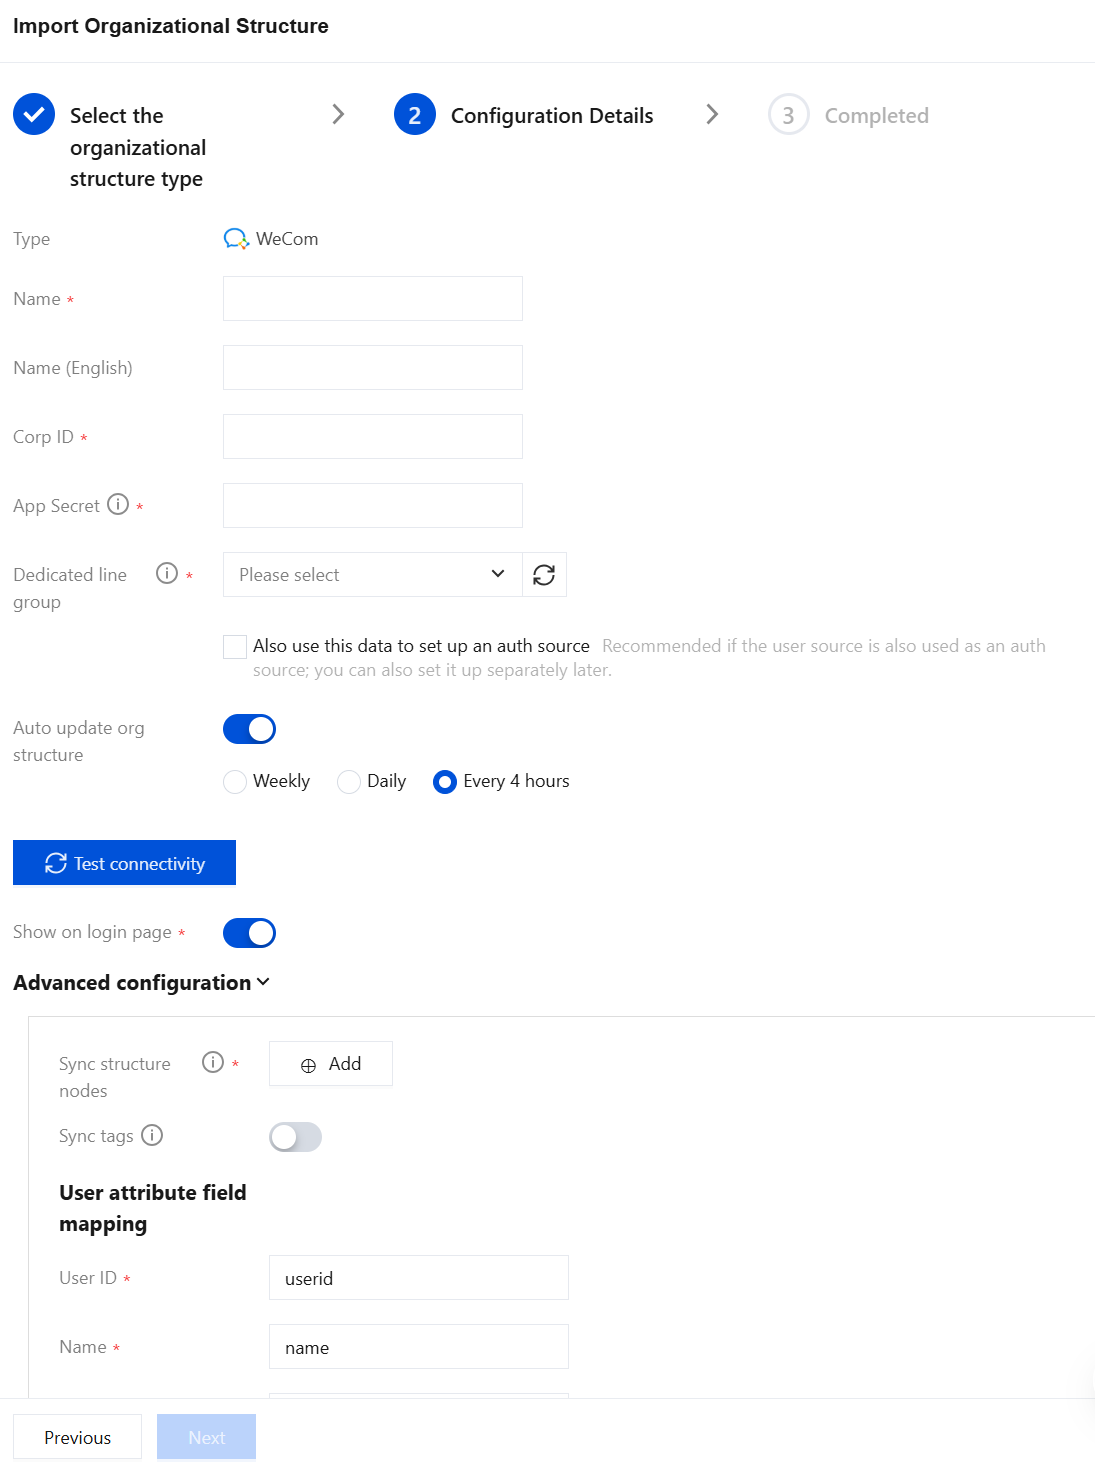
4. On the organizational structure configuration page, configure the relevant parameters.
Attention:
Make sure you have prepared the enterprise self-built application and the connector has been deployed. Specific steps:
After entering the enterprise ID and enterprise self-built application Secret and selecting a connection group, you can run a connectivity test, which also checks whether the basic configurations are valid. For details about the enterprise ID and application Secret, see 2.3 Obtain Enterprise ID, Self-built Application AgentId, and Secret.
If the status field is not mapped, the system-defined status will be used, where 0 indicates an abnormal user status and 1 indicates a normal user status. Mapping supports three data types, and you must specify the value for the normal status.
① For Bool and String types, identical values are mapped to status 1, and different values are uniformly mapped to 0.
② For the Int type, identical values are mapped to status 1, and other values are retained by default.
In attribute mapping, if the mapping field does not exist or you do not want to synchronize the corresponding field, enter any non-existent attribute name. During synchronization, the corresponding attribute will be set to empty.
You can create multiple authentication sources for the same WeCom.
After entering the enterprise ID, application Secret, and connection group, you can perform a connectivity test, which also checks whether the basic configuration is valid.
Automatically update organizational structure
Set as needed.
Client login display
Whether to display the WeCom organizational structure entry on the iOA client login page.
Enable: The iOA client login page displays the WeCom login option, allowing users to log in with WeCom.
Disable: The iOA client login page does not display the WeCom login option, and users cannot log in with WeCom.
Sync architecture nodes
Supports on-demand synchronization of the organizational structure based on department IDs. Click Add to select the departments to synchronize, and query and expand level by level in real time without synchronizing the entire organizational structure.
Root department ID: If only a specific department is needed, enter the correct department ID. Do not change it unless necessary, because arbitrary changes may cause data exceptions when data is already being synchronized normally.
Department hierarchy completion: Click
to enable this feature. After it is enabled, the system automatically completes all parent department hierarchies of the selected department. If it is disabled, only the synchronized departments are mounted under the root node.
Sync Tags or Not
Synchronized tag data will be written to the custom group.
User Attribute Field Mapping
Do not modify unless necessary.
If a field is not mapped, the system-defined status will be used, where 0 indicates an abnormal user status and 1 indicates a normal user status.
Mapping supports three data types, and the value for the normal status must be specified:
1. For Bool and String types, identical values are mapped to status 1, and different values are uniformly mapped to 0.
2. For the Int type, identical values are mapped to status 1, and other values are retained by default.
In attribute mapping, if a mapped field does not exist or you do not want to synchronize the corresponding field, enter any non-existent attribute name, and the corresponding attribute will be set to null during synchronization.
5. After the configuration is complete, click Next and then Save.
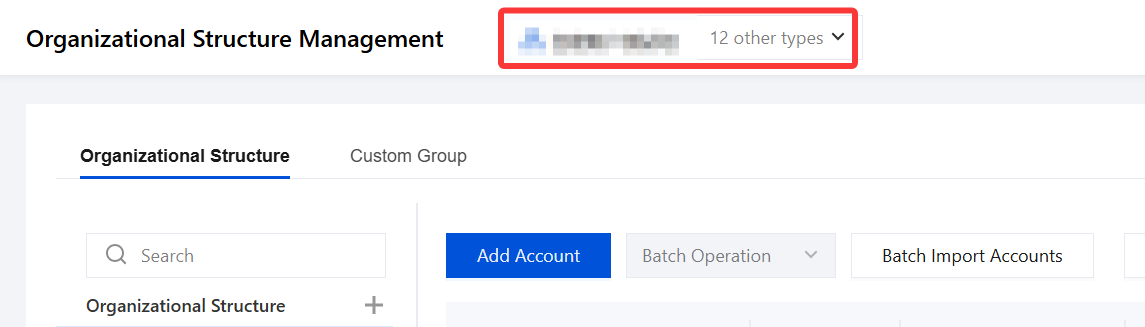
6. On the organizational structure management page, find the directory you just created and click Directory Management to view the organizational structure information.
3.4 Authentication Policy Configuration
Note:
The WeCom authentication source must remain consistent with the WeCom identity source (directory) you import.
You can configure different authentication policies for different identity sources (directories), and these policies do not affect each other.
To add a primary authentication source for a single identity source (directory), add the authentication source in Basic Policy of that identity source (directory).
1. On the Identity Security Management > Authentication Policy page, select the target directory and click Edit.
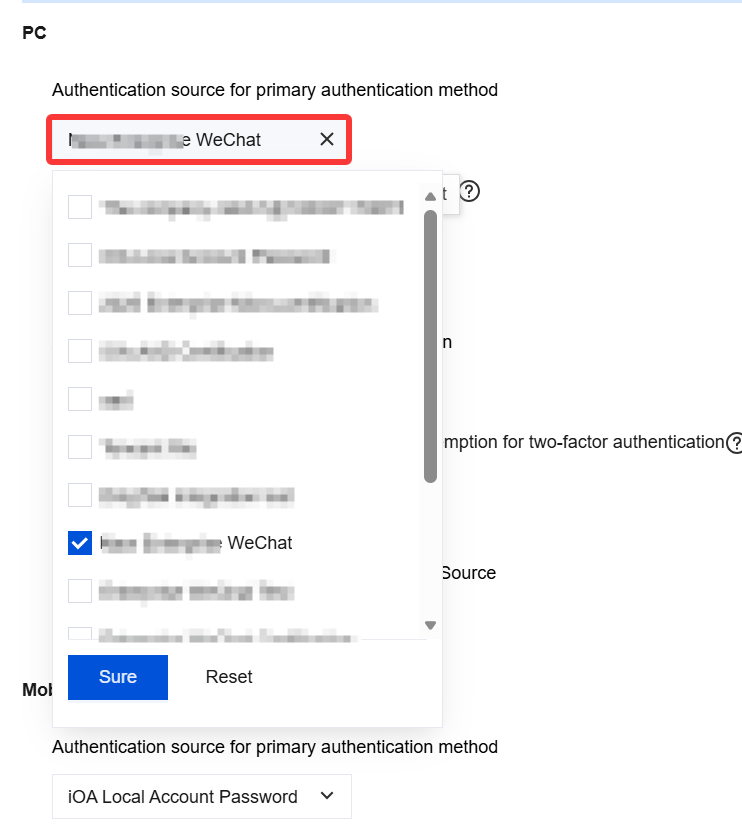
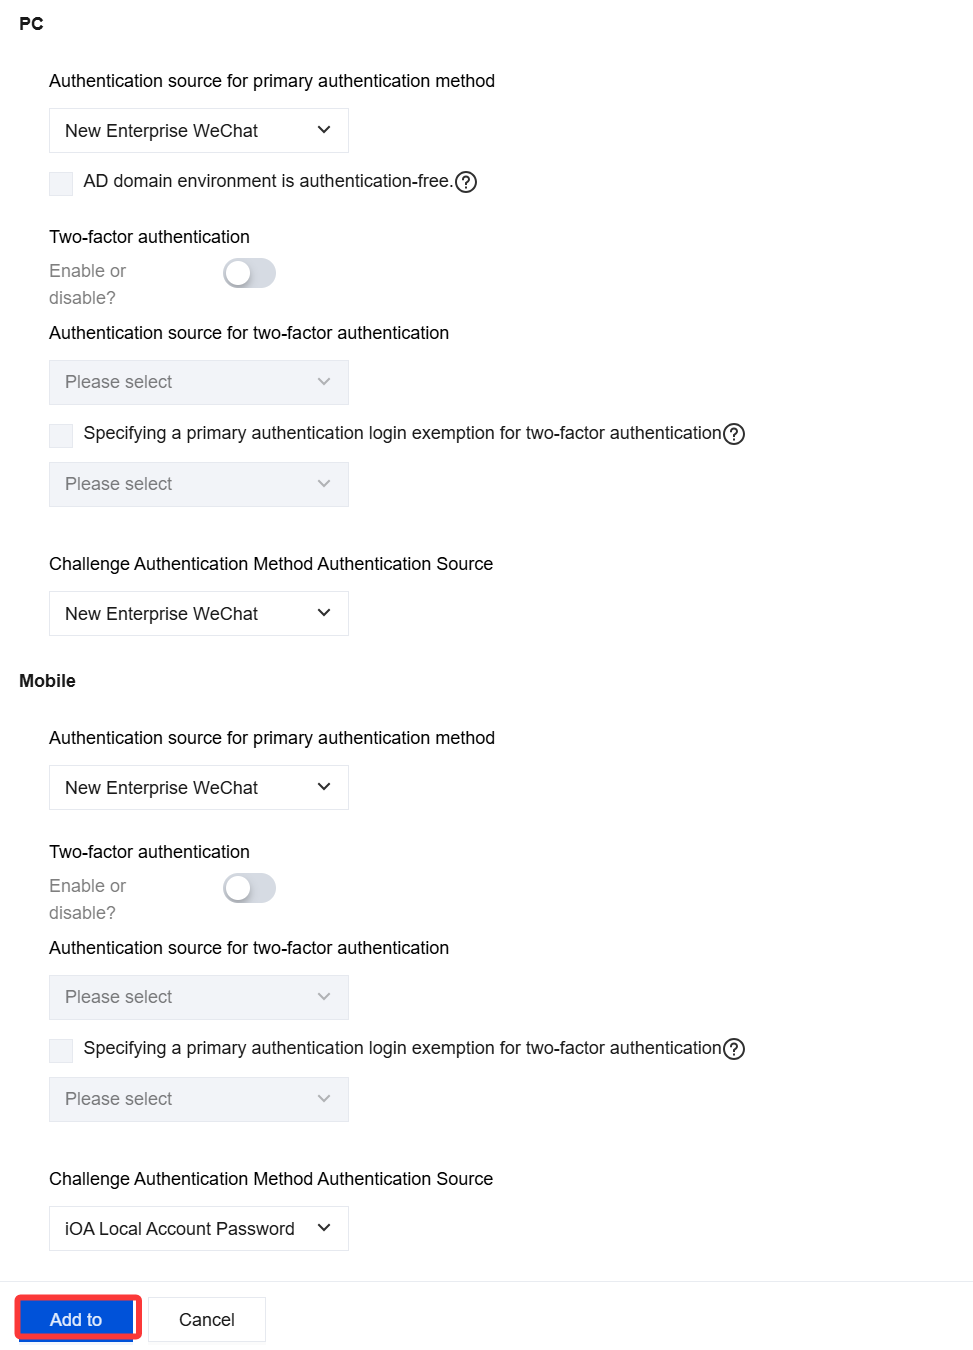
2. On the Edit Authentication Policy page, set the newly added WeCom authentication source as the primary authentication method on the PC client.