tencent cloud

SSL Certificates

Release Notes
Announcements
Notice on price adjustment of DigiCert and its affiliated brands'SSL certificates​
Price Change to DigiCert SSL Certificates
TrustAsia Root Certificate Update
Domain Validation Policy Update
SSL Certificate Service Console
Multi-Year SSL Certificate and Automatic Review
Notice on Stopping the Issuance of 2-Year SSL Certificates by CAs Starting from September 1, 2020
Announcement on Stop Using the Symantec SSL Certificate Name After 30 April 2020
Notice on Certificate Revocation Due to Private Key Compromises
Notice on Application Limits for DV SSL Certificates
Notice on Adjustment of Free SSL Certificates Policy
Let's Encrypt Root Certificate Expired on September 30, 2021
Product Introduction
Overview
Introduction to Tencent Cloud SSL Certificates
Strengths
Advantages of HTTPS
Browser Compatibility Test Report
Multi-Year SSL Certificate and Automatic Review Overview
SSL Certificate Security
Purchase Guide
Pricing
SSL Certificate Purchase Process
SSL Certificate Selection
Paid SSL Certificates Renewal
SSL Certificate Renewal Process
SSL Certificate Refund Process
Getting Started
Certificate Application
Information Submission Process for Paid SSL Certificates
Domain Ownership Validation
Domain Validation Method Selection
Automatic DNS Addition
DNS Validation
File Validation
Automatic DNS Validation
Automatic File Validation
Validation Result Troubleshooting Guide
Operation Guide
Domain Ownership Verification
Uploading Certificates
Secured Seal
CSR Management
Certificate Installation
Installing an SSL Certificate on a Tencent Cloud Service
Installation of International Standard Certificates
Selecting an Installation Type for an SSL Certificate
Certificate Management
Instructions on SSL Certificate Auto-Renewal
Certificate Hosting
Uploading (Hosting) an SSL Certificate
Reminding Reviewers to Review an SSL Certificate Application
Revoking an SSL Certificate
Deleting an SSL Certificate
Reissuing an SSL Certificate
Ignoring SSL Certificate Notifications
Customizing SSL Certificate Expiration Notifications
API Documentation
History
Introduction
API Category
Making API Requests
Certificate APIs
Certificate Renewal (Certificate ID Unchanged) APIs
CSR APIs
Data Types
Error Codes
Use Cases
Automatic Solution for Implementing and Issuing Multi-Year Certificates and Binding Resources
Apple ATS Server Configuration
Quickly Applying for a Free SSL Certificate via DNSPod
Enabling Tencent Cloud DDNS and Installing Free Certificates for Synology NAS
Batch Applying for and Downloading Free Certificates Using Python-based API Calls
Profile Management
Adding Organization Profile
Adding Administrator
Adding Domain
Troubleshooting
Domain Validation Failed
Domain Security Review Failed
Website Inaccessible After an SSL Certificate is Deployed
404 Error After the SSL Certificate is Deployed on IIS
“Your Connection is Not Secure” is Displayed After the SSL Certificate is Installed
Message Indicating Parsing Failure Is Displayed When a Certificate Is Uploaded
Automatic DNS Validation Failed for a Domain Hosted with www.west.cn
Host Name Field Cannot Be Edited in IIS Manager When Type Is Set to https
Message Indicating Intermediate Certificates Missing in Chain Is Displayed When a Free SSL Certificate Is Deployed on IIS
FAQs
SSL Certificate Selection
SSL Certificate Application
SSL Certificate Management
SSL Certificate Installation
SSL Certificate Region
SSL Certificate Review
SSL Certificate Taking Effect
SSL Certificate Billing and Purchase
SSL Certificate Validity Period
Related Agreement
SSL Service Level Agreement
Contact Us
Glossary

DNS Validation

PDF
Focus Mode
Font Size
Last updated: 2024-10-31 15:12:34

Overview

This document describes how to validate a domain when you apply for a certificate or add a domain in the certificate management console and the domain validation mode is DNS validation.

Directions

Step 1. View validation information

1. Log in to the SSL Certificates console.
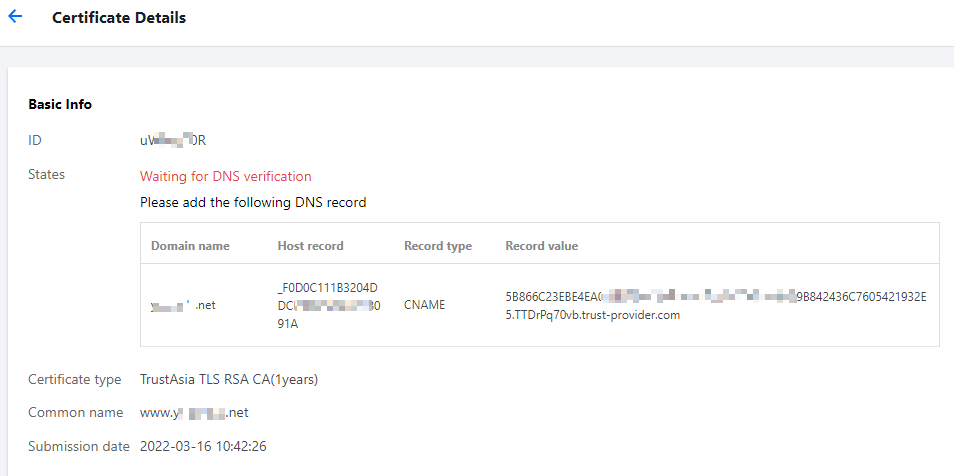
2. Select a certificate in the Validating state. On the Validate Domain page displayed, obtain the host record and record value. See the figure below.
Note:
Take note of the host record and record value before you go to step 2 to add a DNS record.


Step 2. Add a DNS record

Note:
The following operations apply only to domain names hosted with Tencent Cloud. For domain names hosted with other platforms, go to the corresponding DNS service provider for DNS. To query DNS service providers, go to DNS.TECH.
1. Obtain the host record and record value, which can be obtained on the Validate Domain page, as described in step 1.
2. Log in to the DNSPod console to view the domain name for which a certificate has been applied, and then click DNS in the Operation column to go to the Record Management page. See the figure below.


3. Click Add Record and add a DNS record depending on the certificate type.
Note:
Only the CNAME and TXT types of DNS records are supported, and they are applicable for certificates of different brands. Please select the DNS record type as needed.
TrustAsia and WoTrus Certificates
Certificates of Other Brands
For TrustAsia and WoTrus certificates, enter a DNS record of the CNAME type. See the figure below:


Host: enter the host record obtained in step 1.
Type: select CNAME.
Split Zone: select Default. Otherwise, the corresponding CA will not be able to review the DNS record.
Value: enter the record value obtained in step 1.
MX Priority: leave it empty.
TTL: it refers to the time to live. The smaller the value is, the less the time cost for record changes to take effect globally. The default value is 600 seconds.
For certificates of other brands, enter a DNS record of the TXT type. See the figure below.


Host: enter the host record obtained in step 1.
Type: select TXT.
Split Zone: select Default. Otherwise, the corresponding CA will not be able to review the DNS record.
Value: enter the record value obtained in step 1.
MX Priority: leave it empty.
TTL: it refers to the time to live. The smaller the value is, the less the time cost for record changes to take effect globally. The default value is 600 seconds.
4. Click Save.
5. After the record is added, the system periodically checks for the record value. If the record value is detected and matches the specified value, the domain ownership verification will be completed. Please wait for the CA's review.
Note:
DNS usually takes effect within 10 minutes to 24 hours. The actual time depends on the ISP refresh time.
After the certificate is issued or the domain name information is approved, you can manually clear the DNS record.

Help and Support

Was this page helpful?

Help us improve! Rate your documentation experience in 5 mins.

Feedback