Terminal Extension
Unduh
Mode fokus
Ukuran font
1. Log in to the Tencent iOA Zero Trust Security Management System console and choose Terminal Control > Terminal List. in the left sidebar.
2. On the terminal list page, select Terminal Information and click Terminal Extension.
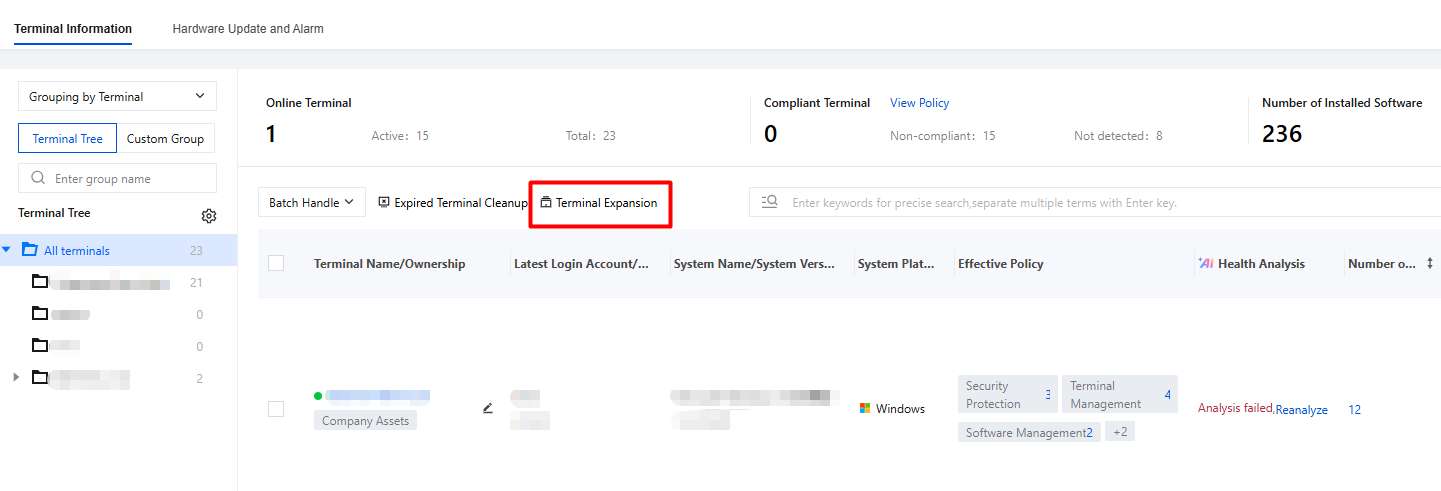
3. The terminal extension page displays terminal registration and client self-registration information.
Terminal Registration
Terminal registration is primarily used to distinguish between corporate devices and personal devices, and supports batch import and reporting of terminal and grouping information.
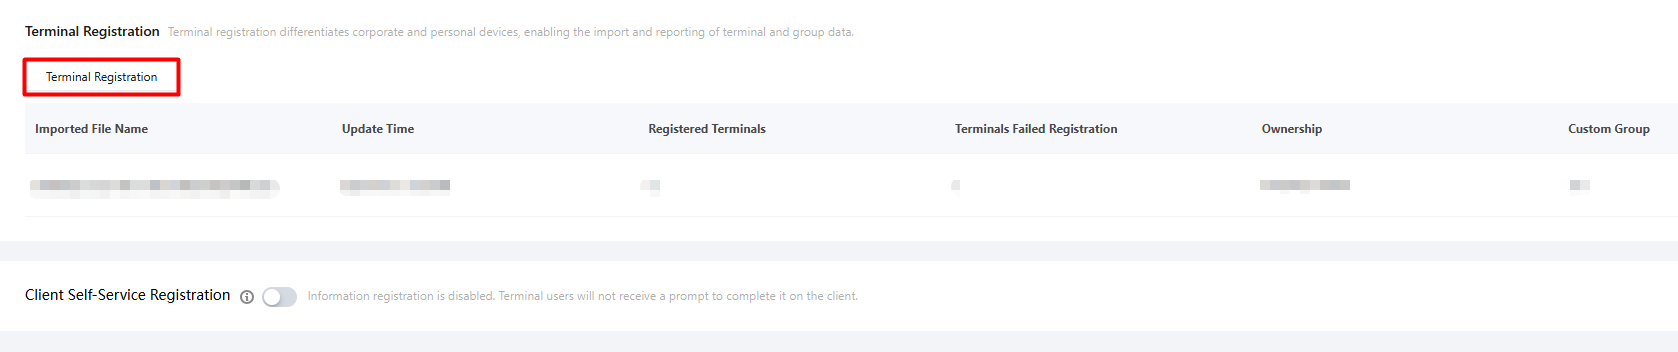
1. On the terminal extension page, click Terminal Registration and configure parameters such as the terminal identification field.
Parameter Name | Description |
Configure terminal identifier fields | You can select MAC address / SN / terminal name. Example: If only MAC address is selected, when the imported table contains MAC address, SN, and terminal name, the MAC address column in the imported table is used for matching. 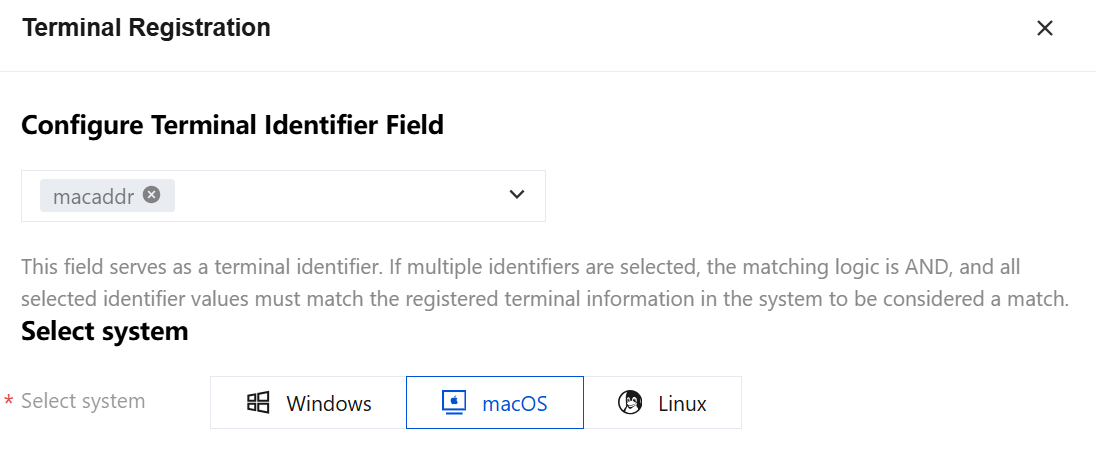 If MAC address, SN, and terminal name are selected, the MAC address, SN, and terminal name columns in the imported table are used for matching. 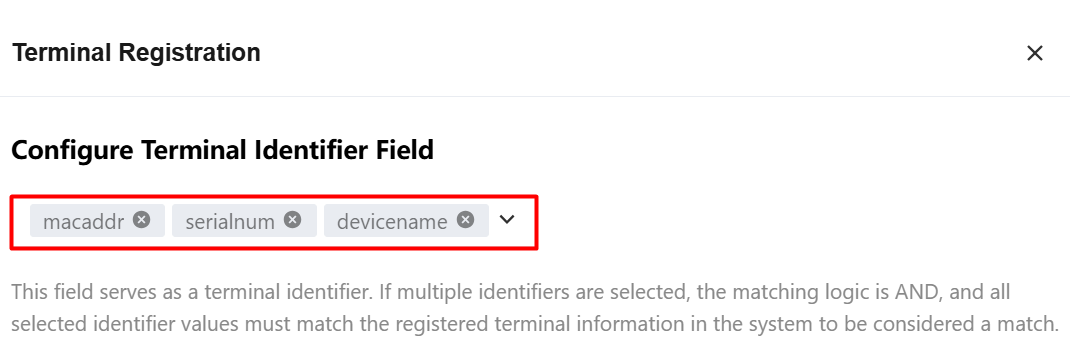 |
Select System | Import terminals running Windows/macOS/Linux. |
Uploads files. | 1. First click Download Import Template. 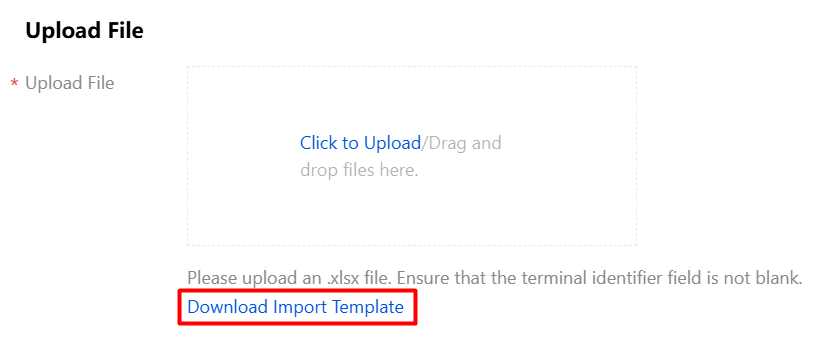 2. Fill in the data to be imported according to the template information. 3. If multiple identification fields are selected, the relationship between them is AND. A terminal is considered matched when the values of these identification fields match the registered terminal information in the system. 4. To avoid matching failures, ensure that the value of "Terminal Identification Field" is not empty. Note: When a terminal identification field is selected, ensure that the selected field contains data in the import file. Example: If MAC address and SN are selected, the MAC address and SN fields in the imported file cannot be empty, otherwise the matching will fail. 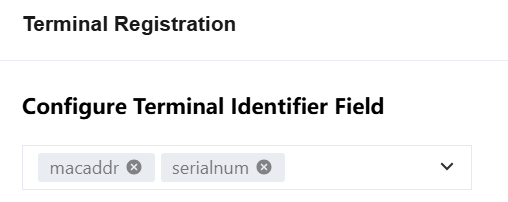 5. Click Upload .xlsx files. |
Terminal pre-grouping - ownership | Which category the groups of these imported terminals belong to: company assets/personal assets/uncategorized assets. |
Custom group | You can select an existing group or create a custom group. After configuration, the terminal will be placed under Terminal Management > Terminal List > Terminal Information > Custom Groups. 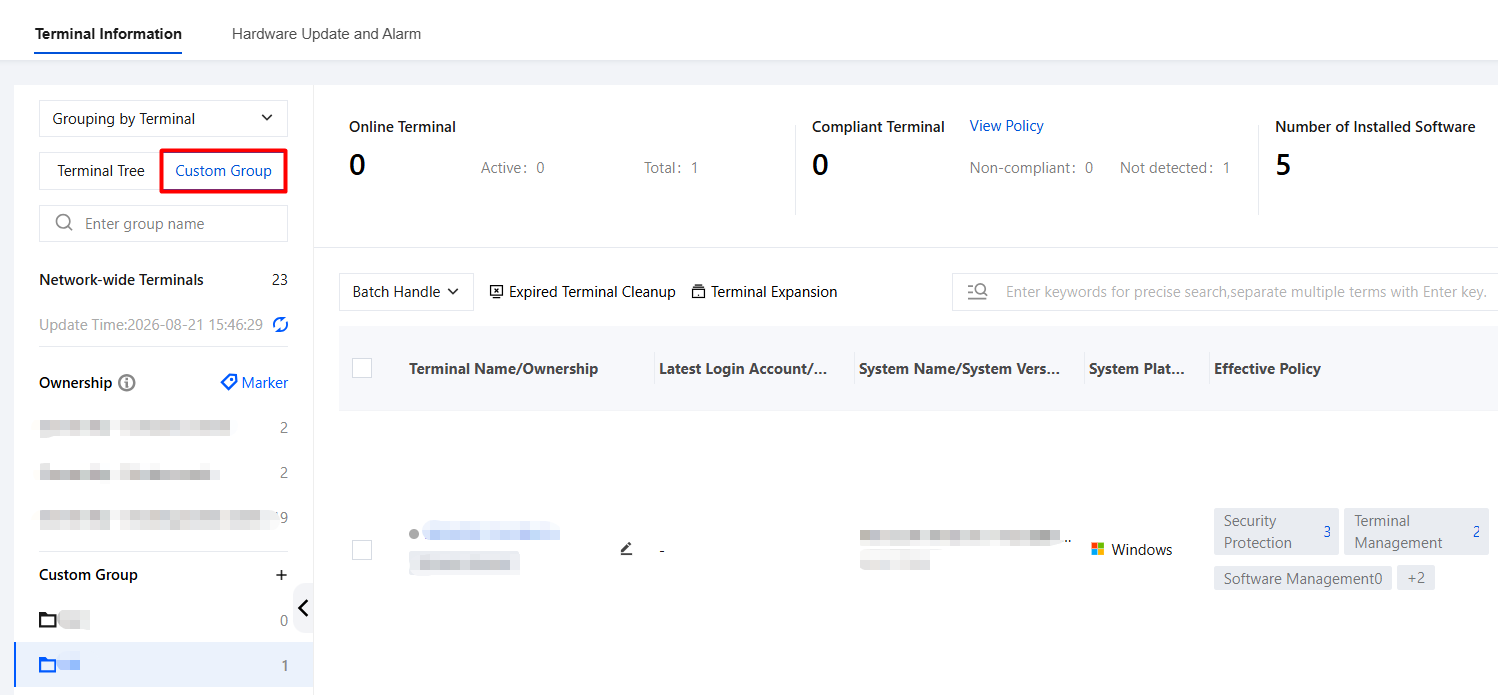 |
2. After configuration, click Save. The terminal registration page displays the imported information.

3. Click Update Group. The system will re-match registered terminals with uploaded terminals and update the custom groups and ownership of successfully matched terminals.

4. Click View Logs. The system navigates to Terminal Control > Other Terminal Control Logs > Terminal Registration Logs, where you can view the terminal registration details.

Client Self-Registration
Configure client self-registration rules. After users fill in the required information, the terminal registration details are automatically reported to the iOA console and displayed in real time in the Terminal Control > Terminal List > Terminal Information list.
Note:
The client self-registration feature is interoperable across multiple platforms (Windows and macOS). After configuration, it takes effect on all platforms simultaneously.
1. Log in to the iOA Zero Trust Management Platform console and choose Terminal Control > Terminal List > Terminal Information. in the left sidebar.
2. On the terminal information page, click Terminal Extension.
3. On the Terminal Extension page, click Edit for Client Self-Registration Information.
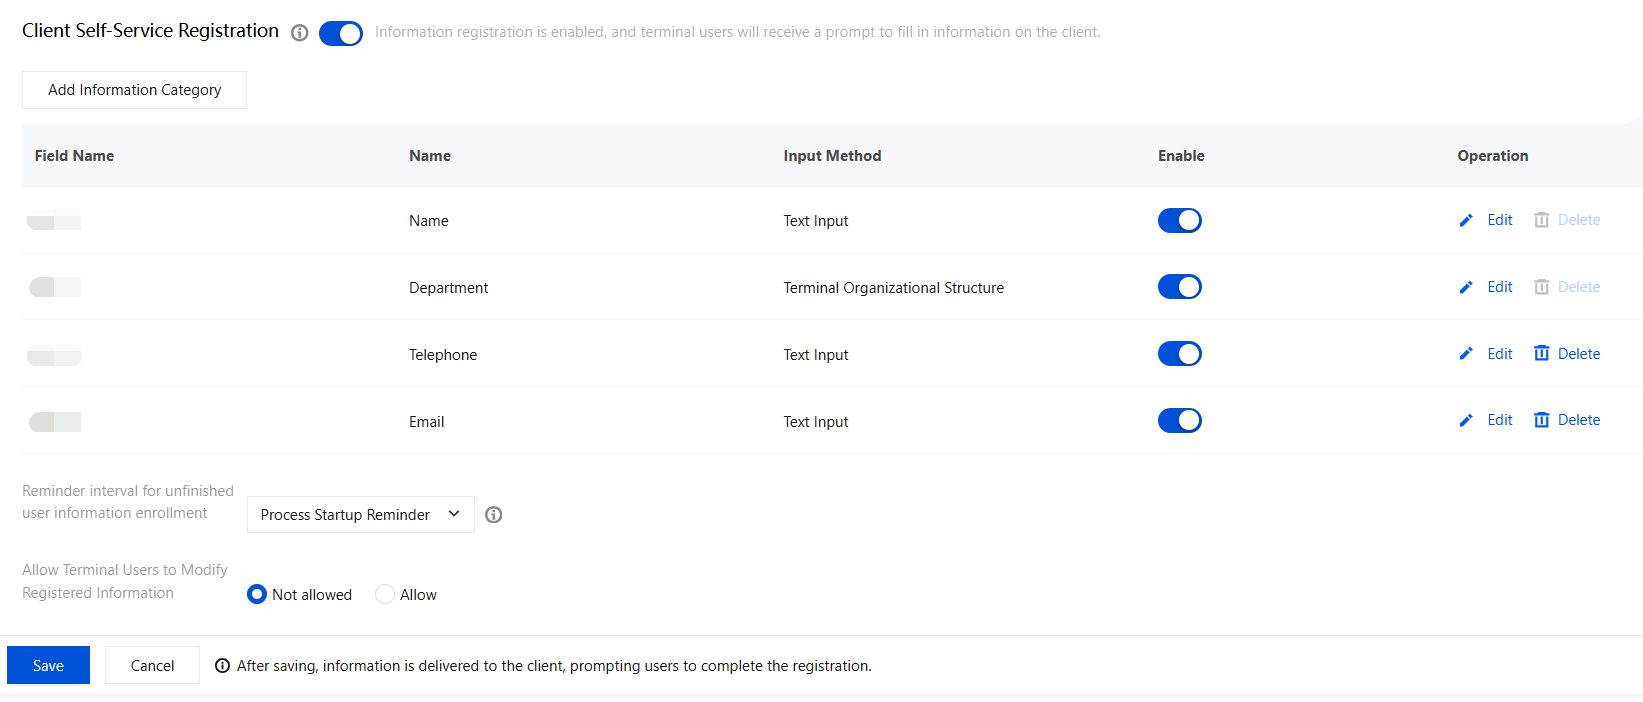
4. Select a system built-in field and click Edit.
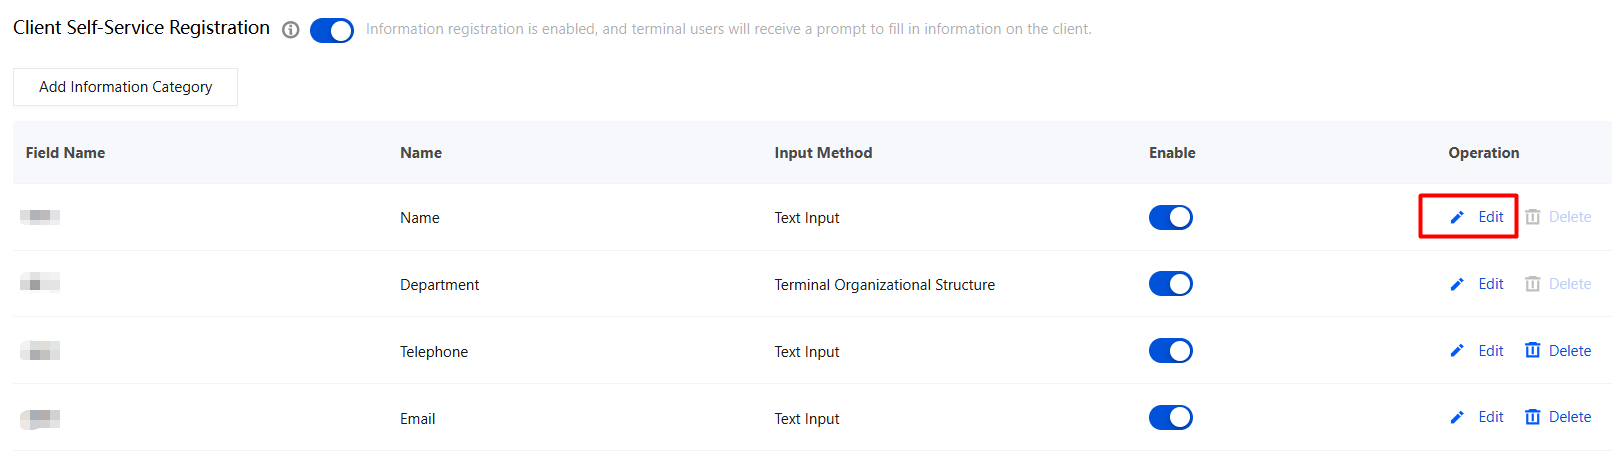
Parameter Name | Description | |
Name | Name | Automatically obtain the client name. |
| English Name | Automatically obtained. |
| Required or Not | Defaults to Yes. |
| Enable or Not | Yes: enable this field. No: This field is not enabled. Example: This field is not enabled (user information for this field is not collected).  |
| Input Type | The input type cannot be modified after the information category is created. Select it carefully. Input box: An iOA client pop-up window supports self-service registration, with a text input box displayed in the Name field. Dropdown box: The Name field does not support dropdown boxes. |
Department | Name | Automatically obtained. |
| English Name | Automatically obtained. |
| Required or Not | Defaults to Yes. |
| Enable or Not | Yes: enable this field. Example: enable this field (collect user information for this field). No: This field is not enabled.  |
| Input Type | The input type cannot be modified after the information category is created. Select it carefully. Terminal organizational structure: Supports displaying the corresponding terminal tree groups in a dropdown. After users manually select a group, the terminal will be assigned to that group. a. Configuration example: Select the terminal organizational structure and click OK to save. 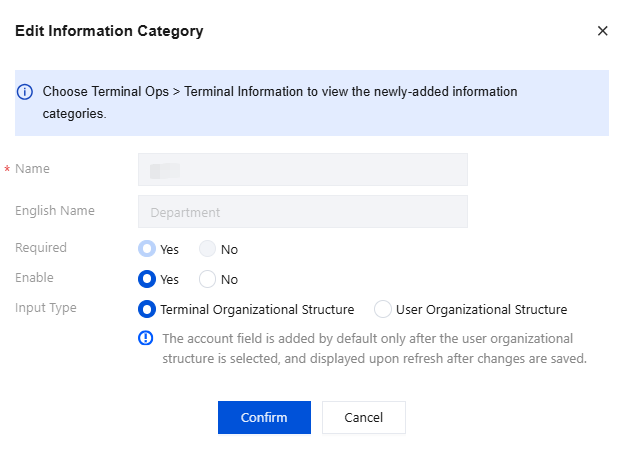 b. The information is delivered to the client, and a "Terminal Information Registration" dialog is displayed on the client. In the registration information, "Department" can be filtered by terminal organizational structure. c. Example of the corresponding console terminal organizational structure: 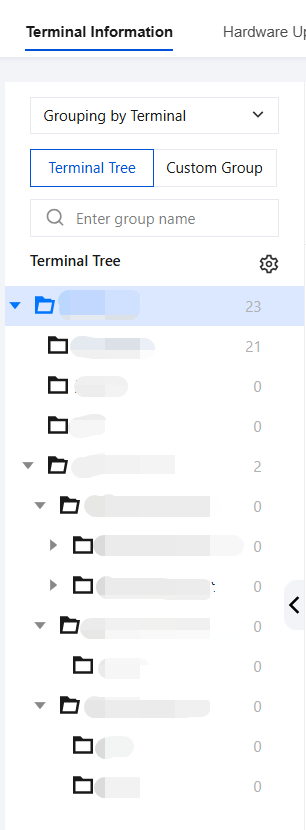 User Organizational Structure: a. Configuration example: Select the user organizational structure and click OK to save. 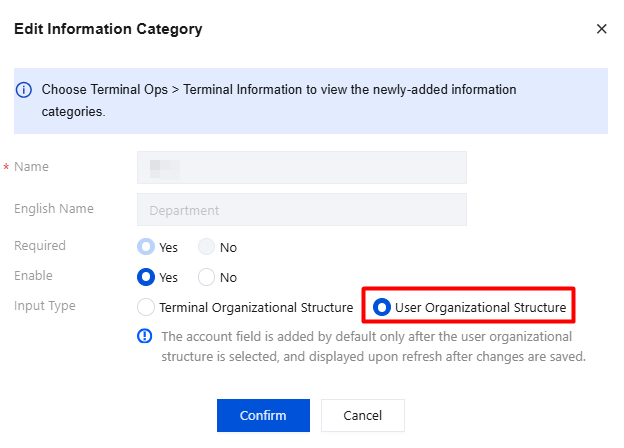 b. The information is delivered to the client, and a "Terminal Information Registration" dialog is displayed on the client. After the name is entered, the user's organizational structure department information is automatically populated (the department is automatically filled in). Client example: 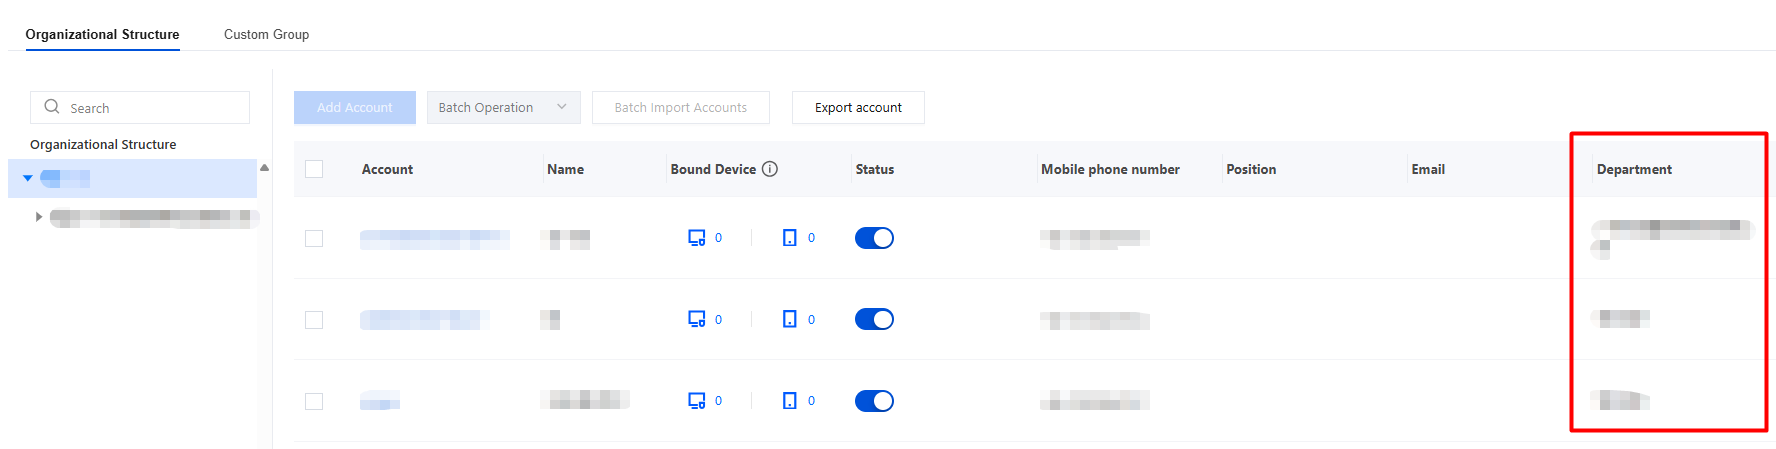 |
Account | Name | When the input type of "Department" is configured as Terminal Organizational Structure and saved, the Terminal Extension page will not display the "Account" field. (The "Account" field is displayed only when the input type of "Department" is configured as User Organizational Structure and saved.) 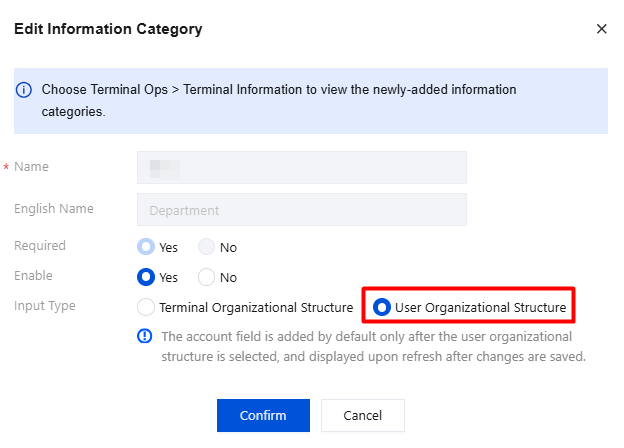 The name is automatically obtained. |
| English Name | Automatically obtained. |
| Required or Not | Custom. |
| Enable or Not | Yes: enable this field. No: This field is not enabled. Example: This field is not enabled (user information for this field is not collected). |
| Input Type | Defaults to user organizational structure. |
5. You can deliver custom fields to terminal users. Terminal users can independently report and complete this information through the iOA client. Click Add Information Category and enter the name and other information to be delivered.
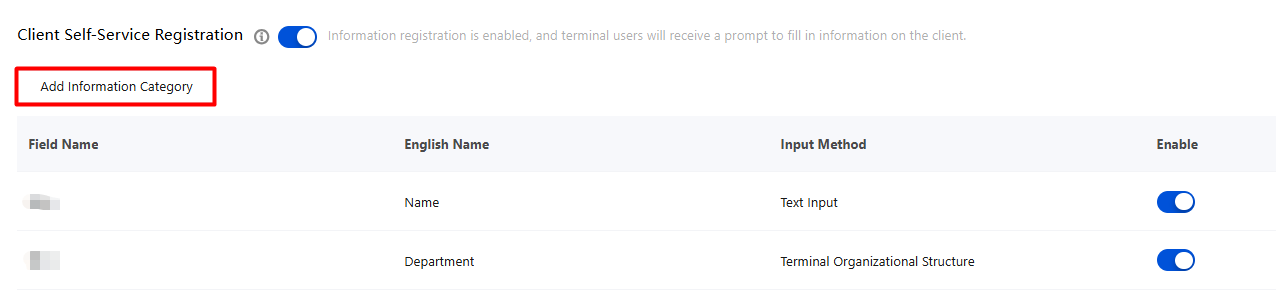
Parameter Name | Description |
Name | Fill in the name field of the information to be delivered to the client for registration. Example: Computer Type. |
English Name | Fill in the corresponding English name. Example: Computer Type. |
Required or Not | Yes/No. |
Enable or Not | Yes: enable this field. No: This field is not enabled. 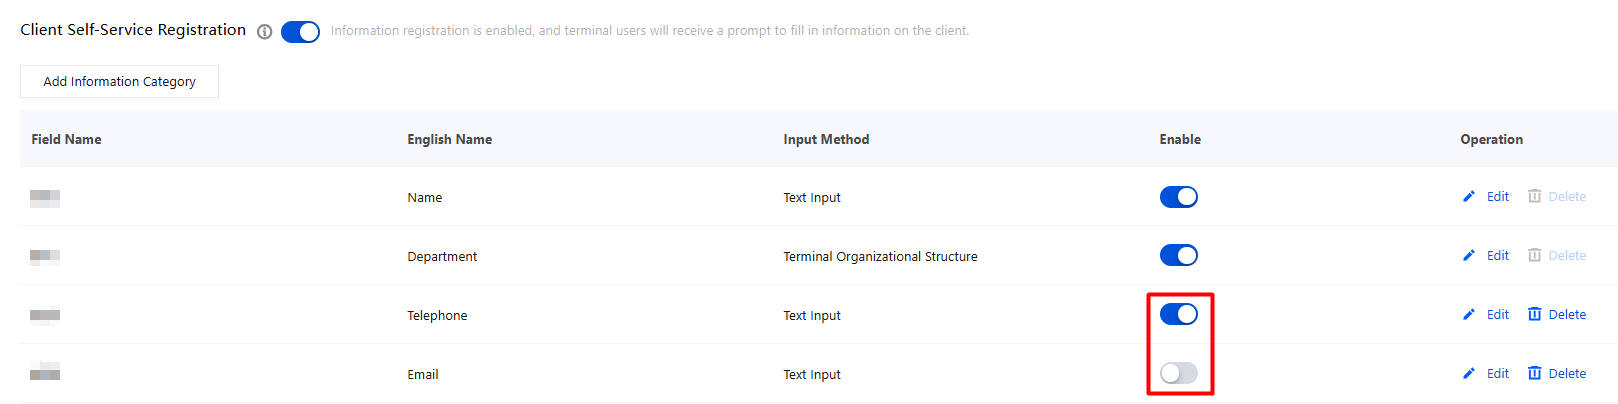 |
Input Type | The input type cannot be modified after the information category is created. Select it carefully. Input box: A text input box is displayed for self-registration in the client. Dropdown box: A dropdown selection field for self-registration in the client. Example: office computers, servers. 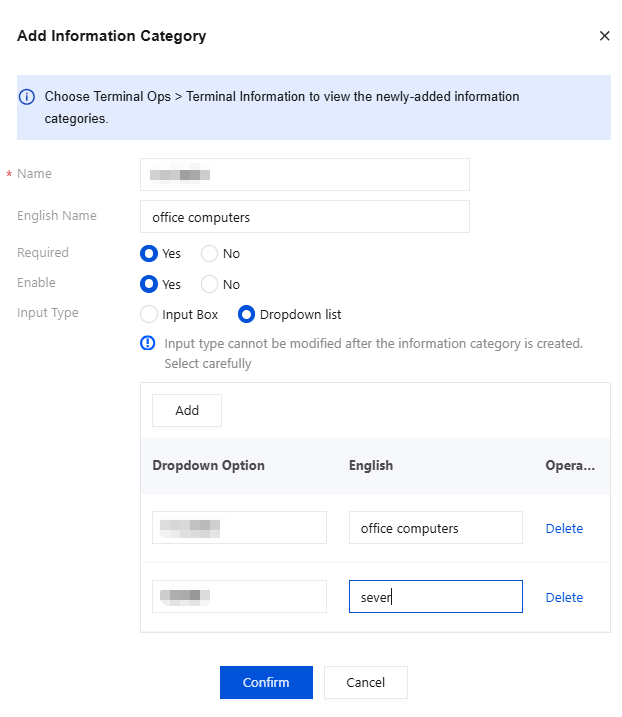 After configuration is complete, click Confirm to save. |
6. Reminder frequency for incomplete user information entry: Customize the reminder frequency.
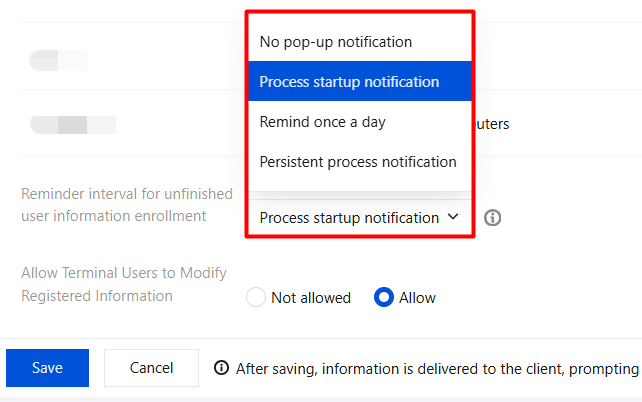
Parameter Name | Description |
No Pop-up Reminder | No pop-up reminder is displayed. |
Process Startup Reminder | A reminder is displayed when Windows starts, and when the macOS process starts for the first time or restarts. |
Remind Once Daily | A pop-up reminder is displayed once daily at 16:00. |
Process-resident Reminder | The client pop-up hides the "Cancel" button, and users must fill in and save the information before closing the pop-up. |
7. Terminal users are allowed to modify registered information.
Allowed: Once the registration information is reported, if the administrator delivers this information again, the client automatically displays a "Terminal Self-Registration" window, allowing the user to modify the registered content again.
Not allowed: After the registration information is reported, the user cannot modify it again (grayed out).
Note:
Set to disallow users from modifying registered information. When the administrator re-delivers client self-registration information, if the registered content changes (such as adding, deleting, or adjusting information categories and fields), the client still automatically displays the "Terminal Self-Registration" window.
8. After configuration is complete, click Save. The information is then delivered to the client, where a pop-up window reminds the user to complete the registration. Click Fill In Now.
9. After the terminal user information is completed, click Save.
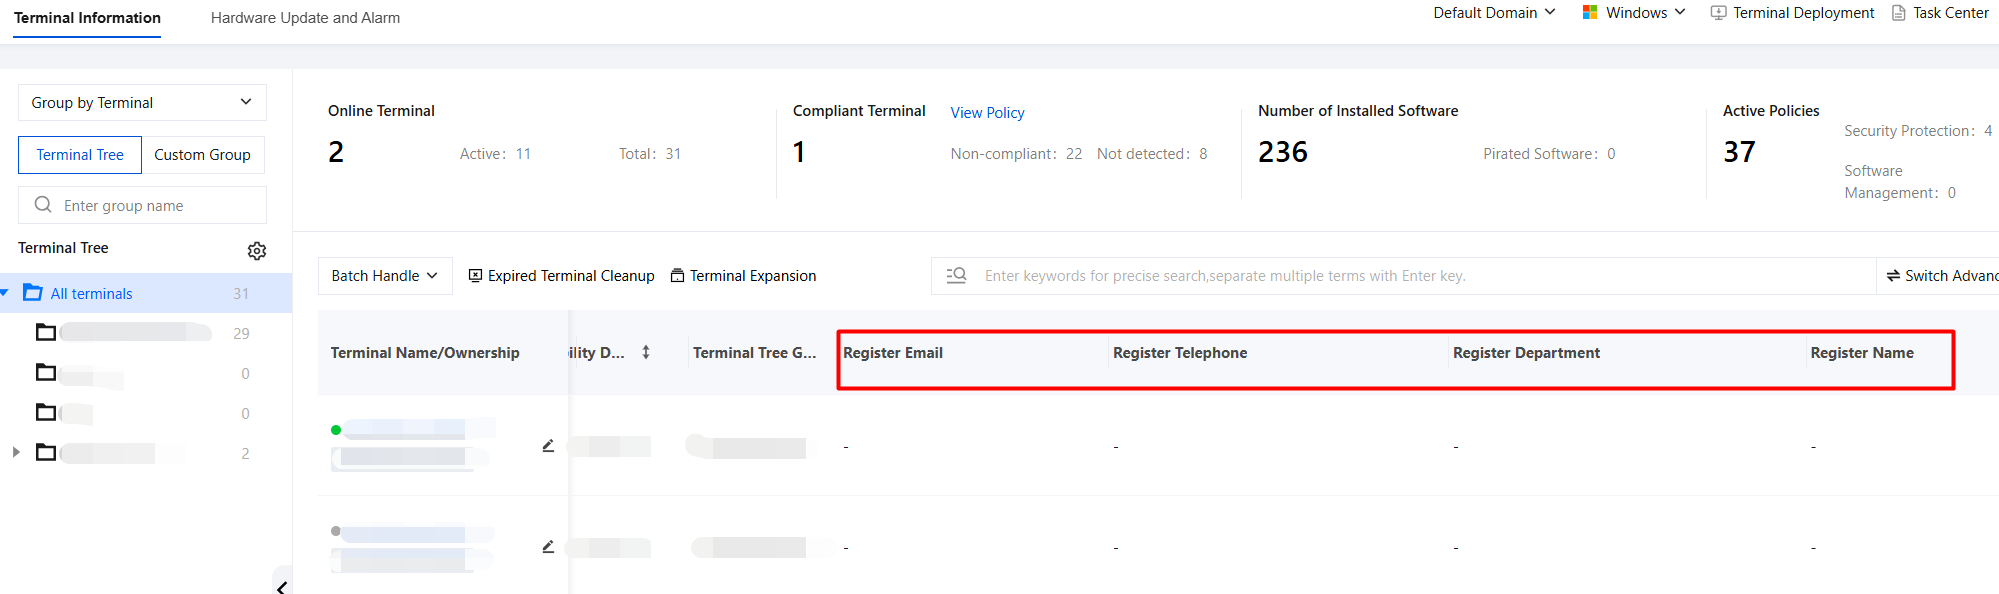
10. The administrator navigates to Terminal Control > Terminal List > Terminal Information to view the information reported by users.
Note:
If the terminal information list does not display your custom fields, click Custom List Management. The selected fields will be displayed in the terminal list.

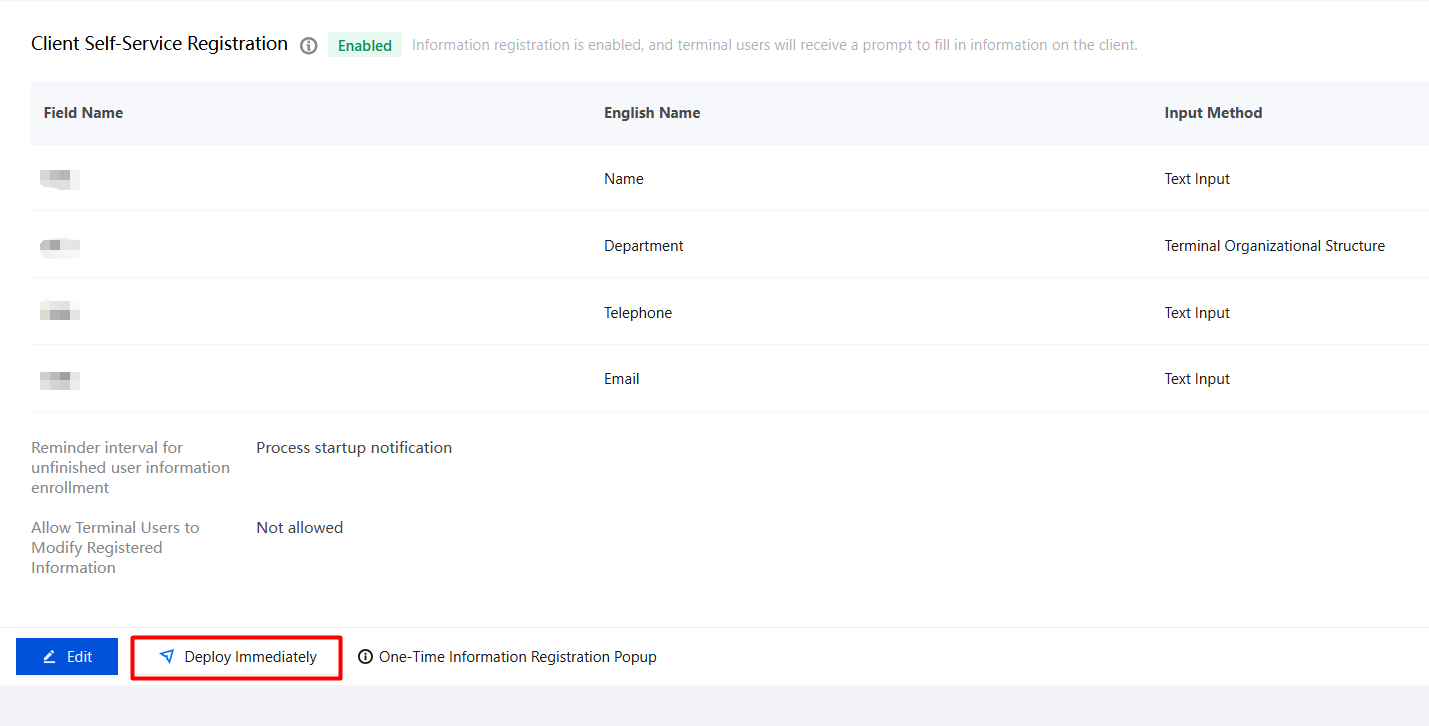
11. Client self-registration information supports manual delivery. After Deploy lmmediately is clicked, the client will receive the corresponding registration pop-up window.
Note:
Use case: After the client registration fields are modified and the changes are saved, the system automatically delivers a registration pop-up window. If the administrator has not modified the field content but still wants users to fill in the information again, they can click Deliver Now to push the registration pop-up window.
The Deliver Now feature performs manual delivery to all terminals and does not currently support manual delivery to individual terminals.
The Deliver Now feature requires client version 10.11.1 or later. If the client version is earlier than 10.11.1, upgrade the client.
Bantuan dan Dukungan
Apakah halaman ini membantu?
Anda juga dapat Menghubungi Penjualan atau Mengirimkan Tiket untuk meminta bantuan.
masukan