Using a Container Image in a TCR Enterprise Instance to Create a Workload
Download
Focus Mode
Font Size
Last updated: 2025-09-25 15:39:46
Overview
The Tencent Container Registry (TCR) Enterprise Edition provides enterprise-grade exclusive and secure image hosting services for enterprise-grade container customers who have strict data security and compliance requirements, businesses distributed across multiple regions, and large cluster scales. Compared with the TCR Personal Edition, the TCR Enterprise Edition supports container image secure scanning, cross-region automatic synchronization, Helm chart hosting, network access control, and other features. For more information, see Tencent Container Registry.
This document describes how to use a private image hosted in TCR to deploy applications in Tencent Kubernetes Engine (TKE).
Prerequisite
Before you use a private image hosted in TCR to deploy applications in TKE, ensure that you have completed the following operations:
You have created a TCR Enterprise Edition instance in the TCR console. If you have not created a TCR Enterprise Edition instance, create one. For more information, see Creating an Enterprise Edition Instance.
A new TCR Enterprise Edition instance does not have a default namespace, and a namespace cannot be automatically created through the pushed image. Therefore, create a namespace as required. For more information, see Managing Namespaces.
We recommend that the namespace be named based on the project or team name. In this document, docker is used as an example. The following page appears after the namespace is created.
Creating an image repository (optional)
Container images are hosted in specific image repositories. Create an image repository as required. For more information, see Creating an Image Repository. Set the image repository name to the name of the container image to be deployed. In this document, getting-started is used as an example. The following page appears after the image repository is created.
Note:
Use Docker CLI or another image tool, such as jenkins, to push the image to the TCR Enterprise Edition instance. If no image repository exists, an image repository will be automatically created. You do not need to create one in advance.
Pushing a container image
You can use Docker CLI or another image, such as jenkins to push an image to a specific image repository. Here, the Docker CLI is used to push images. To push a container image, you need to use a CVM or physical server with Docker installed and ensure that the Client is allowed to access the instance. For more information, see Network Access Control Overview.
1. Obtain an access credential for the TCR Enterprise Edition instance and run the Docker login command to log in to the instance. For more information on how to obtain an instance access credential, see Obtaining an Instance Access Credential.
2. After successful login, create a container image on the local server or obtain a public image from Docker Hub for testing.
This document uses the latest Nginx image on the official Docker Hub website as an example. In the command-line tool, run the following commands sequentially to push this image. Note to replace demo-tcr, docker, and getting-started with the actual instance, namespace, and image repository names that you created.
docker tag getting-started:latest demo-tcr.tencentcloudcr.com/docker/getting-started:latest
After the image is pushed, you can go to the "Image Repository" page in the TCR console and select a repository name to view details.
Configure TKE cluster access TCR instance
TCR Enterprise Edition instances support network access control and deny all external access by default. You can select a public network or private network for a TKE cluster to access a specific instance and pull the container image based on the network configuration of the TKE cluster. If the TKE cluster and TCR instance are deployed in the same region, we recommend that the TKE cluster pull the container image through a private network to accelerate pulling and reduce public network traffic costs.
Using the TCR add-on for quick access configuration (recommended)
1. Log in to the TKE console and select Cluster in the left sidebar.
2. On the Cluster Management page, click the ID of the target cluster to go to the cluster details page.
3. On the cluster details page, click Add-on Management in the left sidebar to go to the Add-on Management page and click Create.
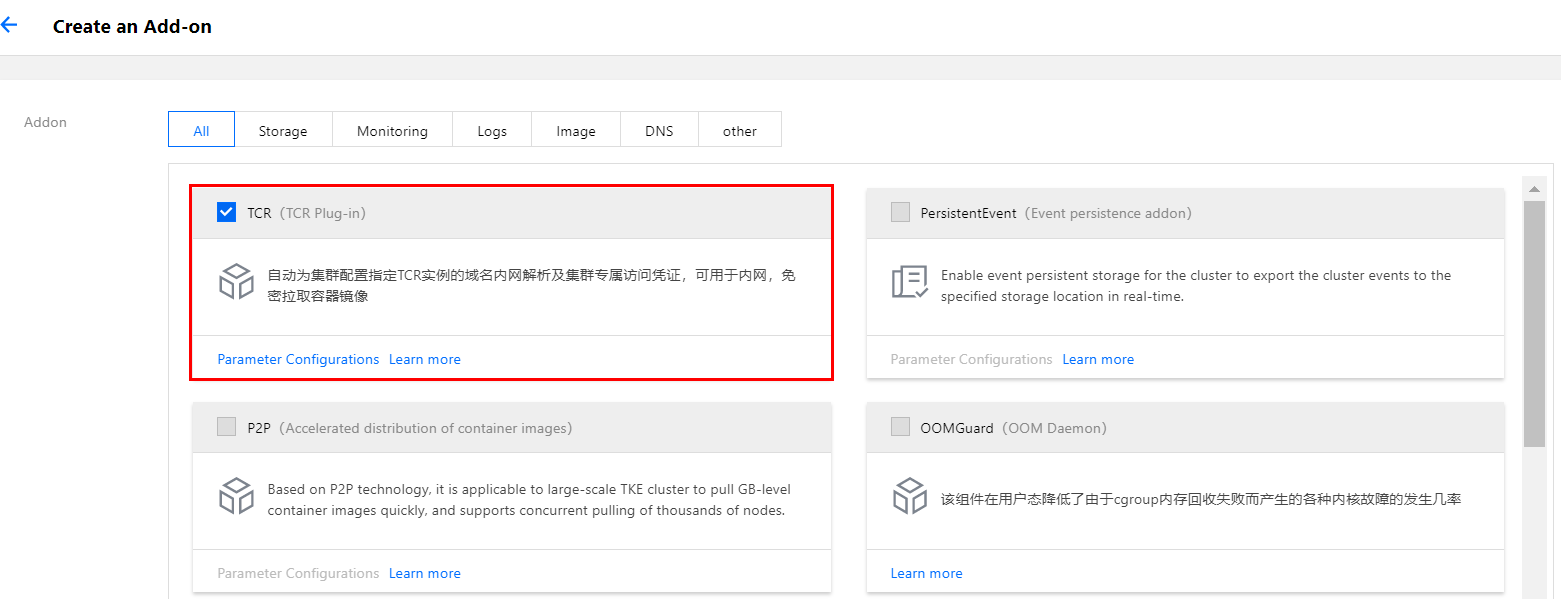
4. On the Create an add-on page, select TCR, as shown below.
Note:
Currently, the TCR add-on only supports clusters in Kubernetes 1.12, 1.14, 1.16, 1.18 and 1.20. If you are using another cluster version, manually configure the access method or upgrade the cluster version.
Click View Details to view the add-on features and configuration description.
Click Parameter Configurations to configure the add-on.
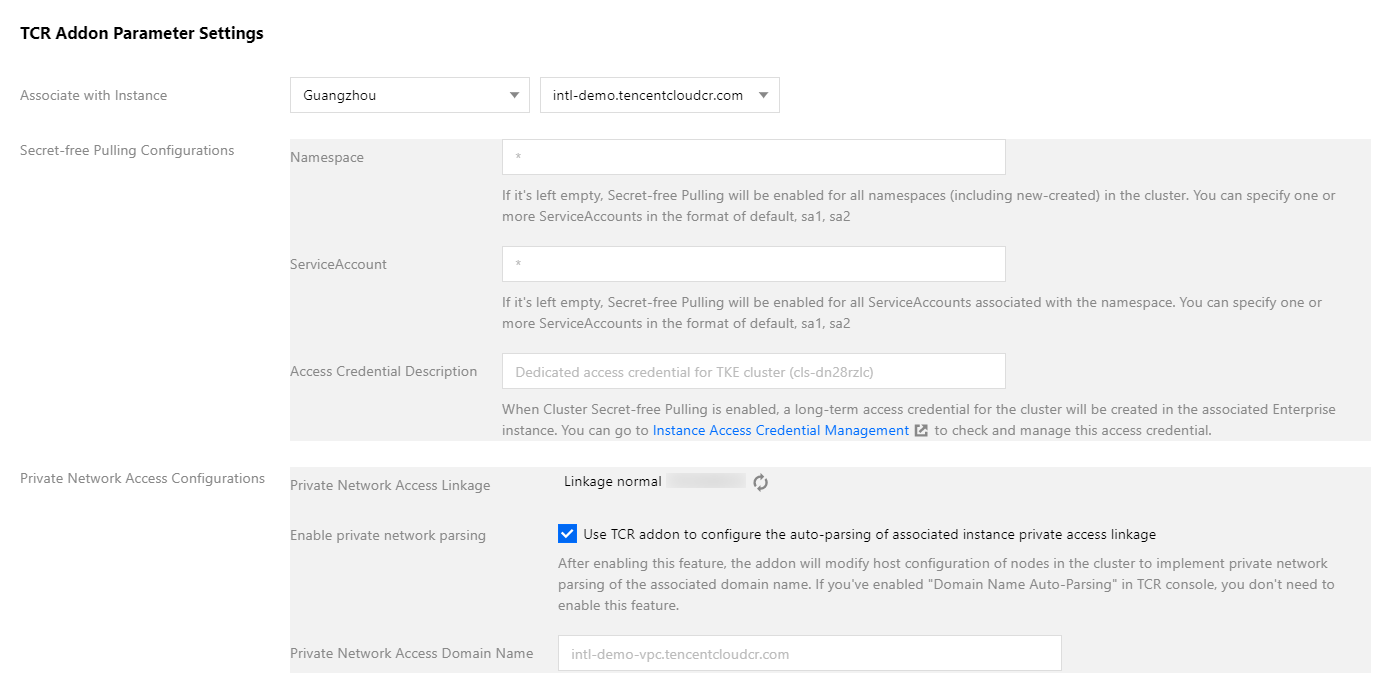
5. On the TCR Add-on Parameter Settings page, configure related parameters based on the add-on configuration method described in View Details, as shown below:
Associate with Instance: select a TCR instance in the same region as the TKE cluster.
Password-free Pulling: retain the default setting.
Private Network Access Configurations: this is an optional feature. If the TCR instance has accessed to the VPC where the cluster is in and has enabled auto-parsing, the nodes in the cluster can access the TCR instance through the private network without using this feature. Because the auto-parsing feature of the TCR instance is dependent on PrivateDNS, you can use this configuration to implement private network access if PrivateDNS has not been supported in the region where the cluster is located. If "Linkage normal" is not displayed in the private network access linkage, you need to configure the private network linkage of the VPC where the TCR instance and the TKE cluster are located in. For more information, see Private Network Access Control.
6. Click OK to go back to add-on selection page.
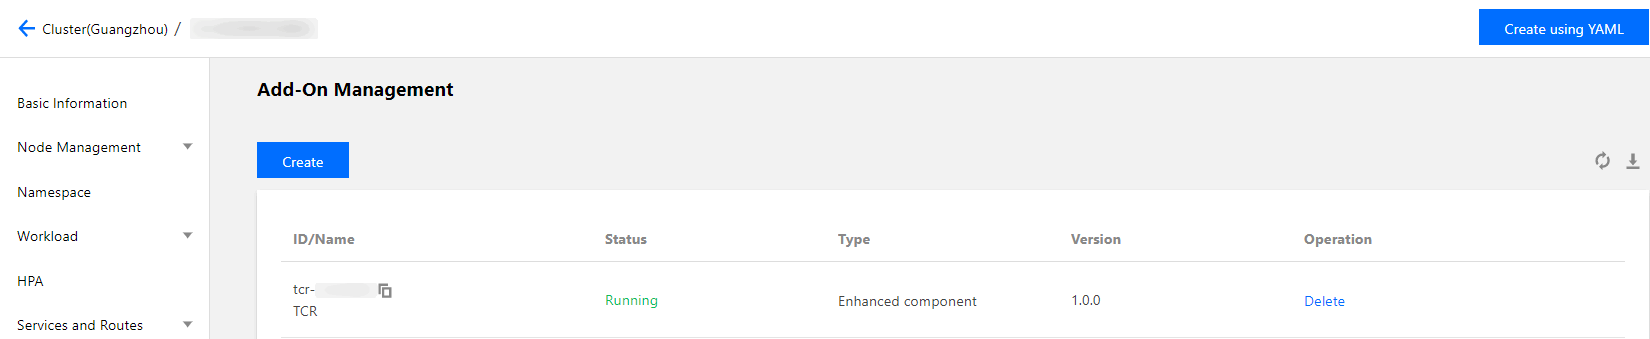
7. On the add-on selection page, click Done to install the TCR add-on for the cluster.
8. After the add-on is installed, the cluster can pull images from the associated instance without needing a password through a private network, as shown below.
Manually configuring private network access and the access credential
1. Configuring private network access
1. Configure a private network linkage of the VPC where the TCR instance and the TKE cluster are located in and enable auto-parsing. For more information, see Private Network Access Control.
2. If auto-parsing is not supported in the region where the current TCR instance is located, you can configure the domain name parsing for the TCR instance in the TKE cluster. You can choose from the following solutions based on the actual needs:
Configuring the node host when creating the cluster
In the "CVM Configuration" step during the TKE cluster creation process, select Advanced Settings and enter the following content in "Node Launch Configuration":
Replace 172.21.17.69 and demo.tencentcloudcr.com with the private network resolution IP address and TCR instance domain name that you use.
2. Configuring access credential
When creating a namespace, follow the steps below to deliver an access credential:
1. Log in to the TKE console and select Cluster in the left sidebar.
2. On the Cluster Management page, click the ID of the target cluster to go to the cluster details page.
3. Click Namespace in the left sidebar to go to the Namespace page and click Create.
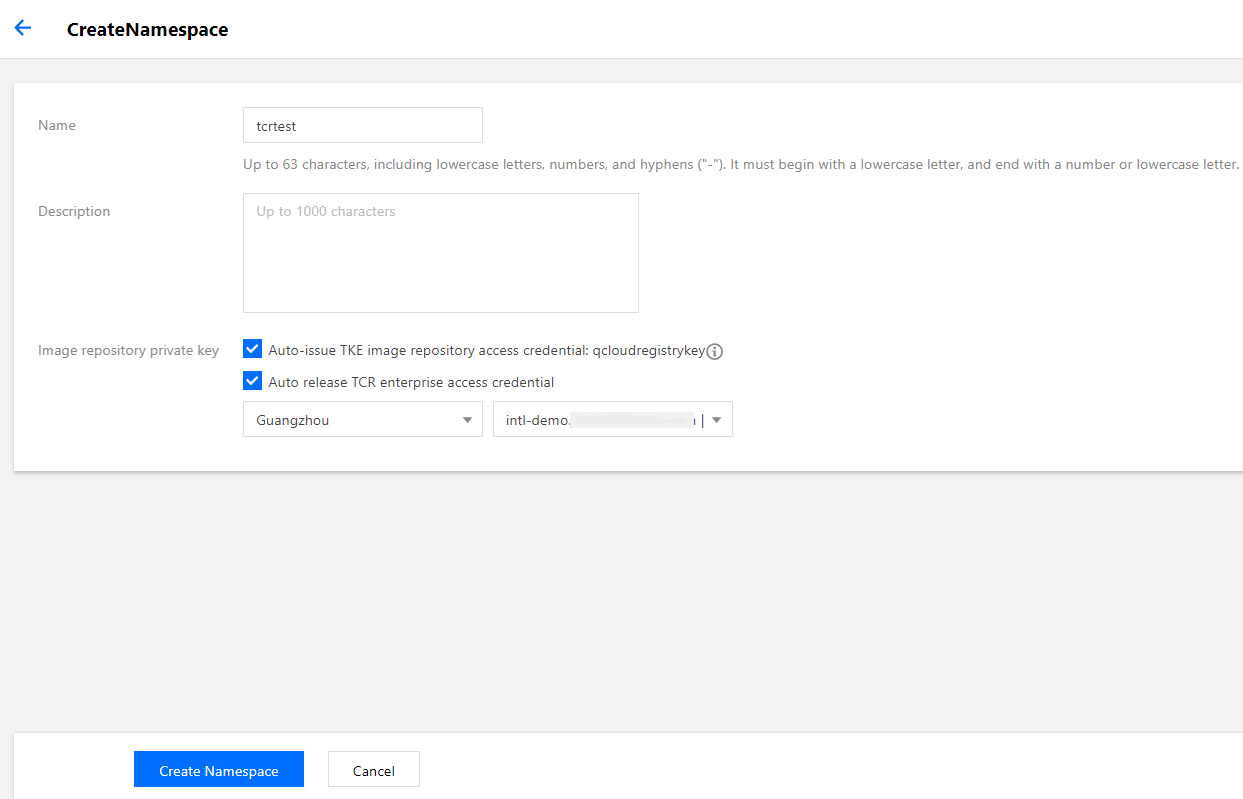
4. On the CreateNamespace page, select Auto-issue TKE image repository access credential and select the TCR instance that the cluster needs to access, as shown below.
5. Click Create Namespace.
After the namespace is created, the access credential of the instance is automatically delivered to the namespace. To view the access credential, for example, 1000090225xx-tcr-m3ut3qxx-dockercfg, choose Configuration Management > Secret. 1000090225xx indicates the UIN of the sub-account used to create the namespace, and tcr-m3ut3qxx indicates the ID of the selected instance.
Perform the following steps to deliver the access credential to an existing namespace:
2. On the cluster details page, choose Configuration Management > Secret in the left sidebar to go to the Secret page.
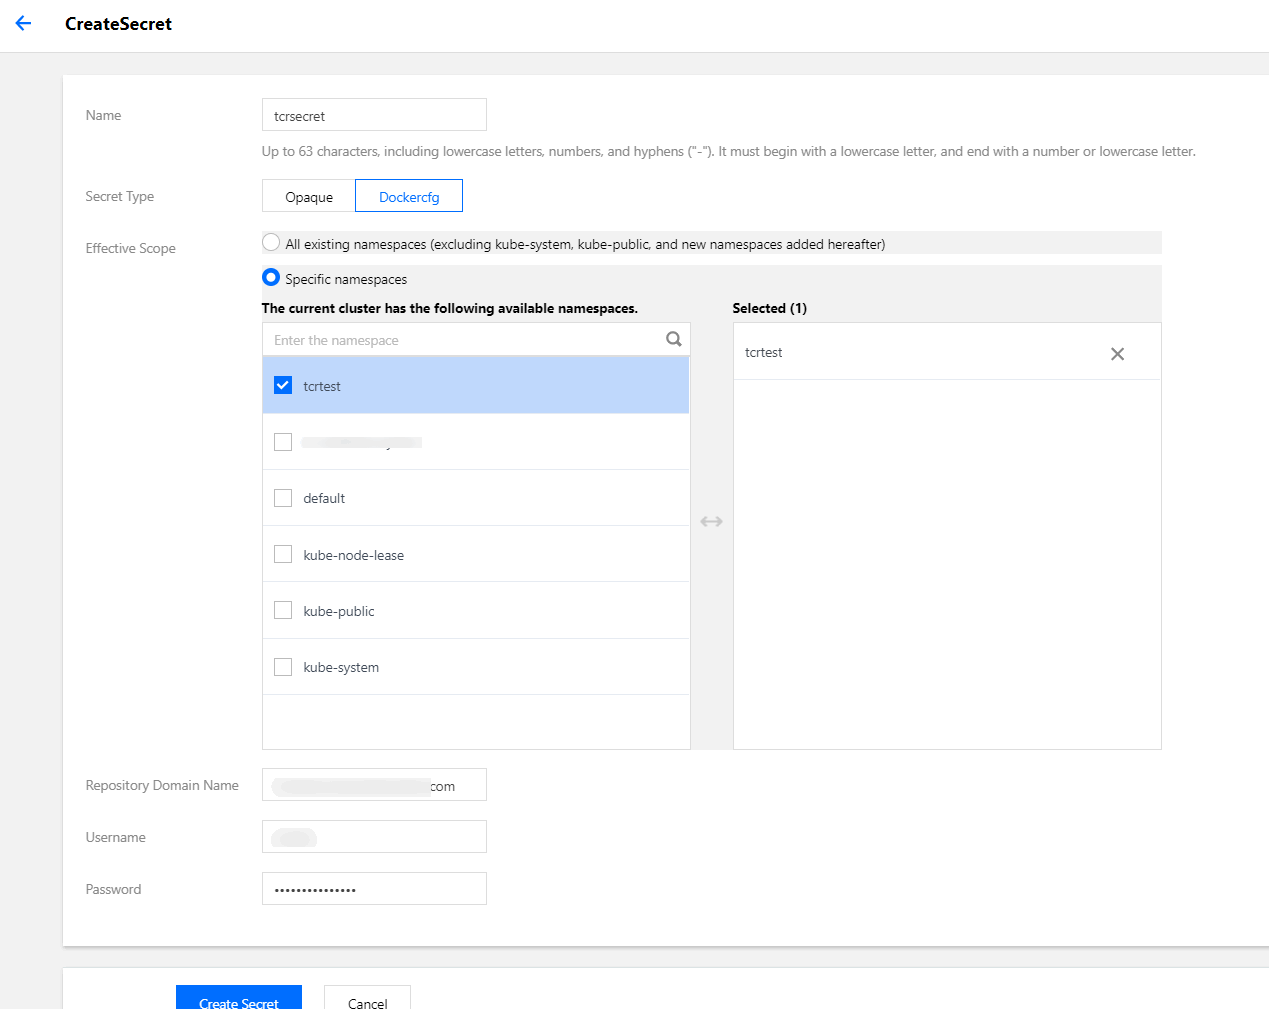
3. On the Secret page, click Create to go to the CreateSecret page, as shown below. Refer to the following information to deliver the access credential.
The main parameters are described as follows:
Secret Type: select Dockercfg.
Effective Scope: select the namespace to which the access credential is delivered.
Repository Domain Name: enter the access domain name of the TCR instance.
Username and Password: enter the username and password obtained in Step 1.
4. Click Create Secret to deliver the access credential.
Using the container image in the TCR instance to create a workload
1. On the cluster details page, select Workload > Deployment in the left sidebar.
2. On the Deployment page, click Create.
3. On the CreateWorkload page, set the following parameters to create a workload.
The main parameters are described as follows:
Namespace: select the namespace to which the access credential is delivered.
Containers in the Pod:
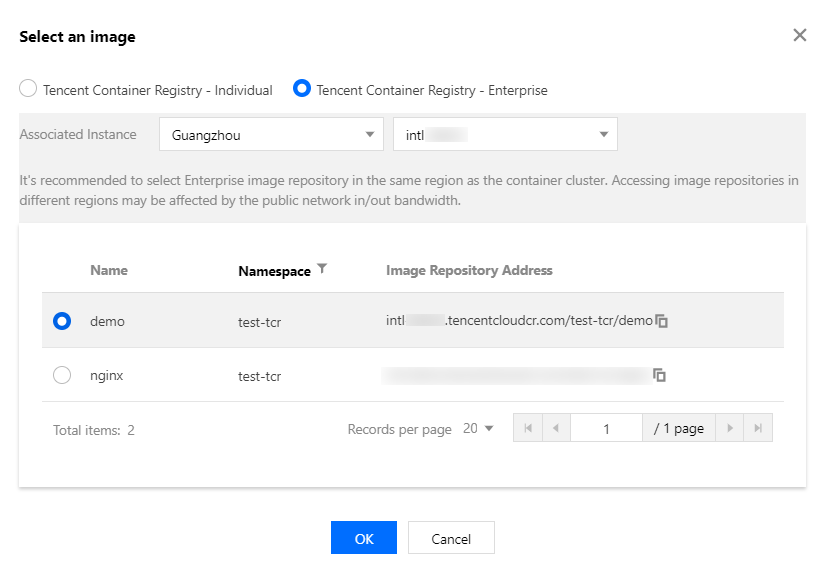
Image: click Select Image, select Tencent Container Registry - Enterprise in the pop-up, and select region, instance and image repository based on your needs. See the figure below:
Image Tag: after you select an image, click Select Image Tag, and select a tag for the image repository based on your needs in the pop-up. If you do not select, the latest will be used by default.
Image Access Credential:
If the cluster has the TCR add-on installed, it does not need to be configured.
If the cluster does not have the TCR add-on installed, click Add Image Access Credential and select the access credential delivered in the step of Configuring the access credential. See the figure below:
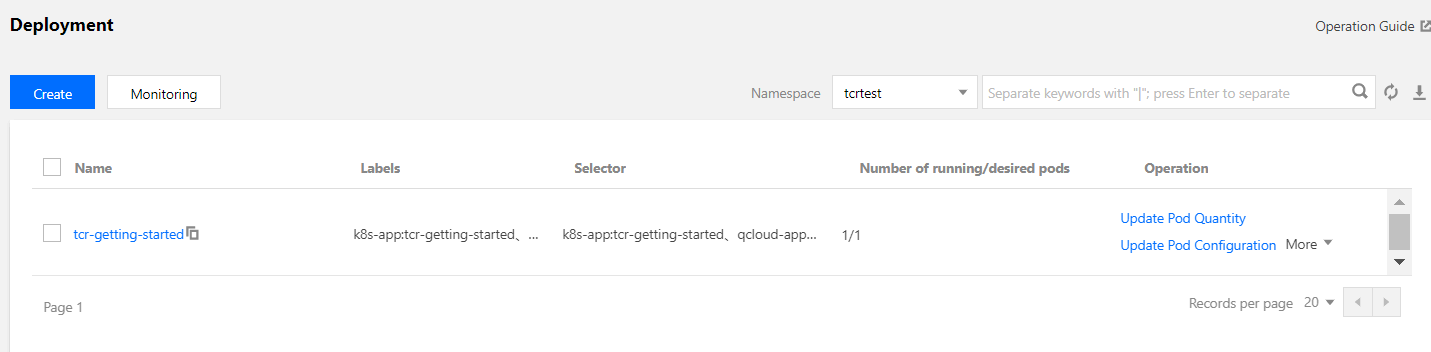
4. After other parameters are set, click Create Workload and view the workload deployment progress.
After the workload is deployed, "Number of Running/Desired Pods" for the workload becomes "1/1" on the Deployment page, as shown in the figure below: