- 소식 및 공지 사항
- 제품 소개
- 구매 가이드
- 신규 사용자 가이드
- Demo 체험
- Video Calling (Including UI)
- Voice Chat Room (with UI)
- 통합(UI 없음)
- 고급 기능
- 서버 API
- 콘솔 가이드
- Solution
- FAQs
- Protocols and Policies
- TRTC 정책
- 용어집
- 소식 및 공지 사항
- 제품 소개
- 구매 가이드
- 신규 사용자 가이드
- Demo 체험
- Video Calling (Including UI)
- Voice Chat Room (with UI)
- 통합(UI 없음)
- 고급 기능
- 서버 API
- 콘솔 가이드
- Solution
- FAQs
- Protocols and Policies
- TRTC 정책
- 용어집
TUIVoiceRoom (iOS) 통합
마지막 업데이트 시간:2022-09-06 14:16:52
컴포넌트 개요
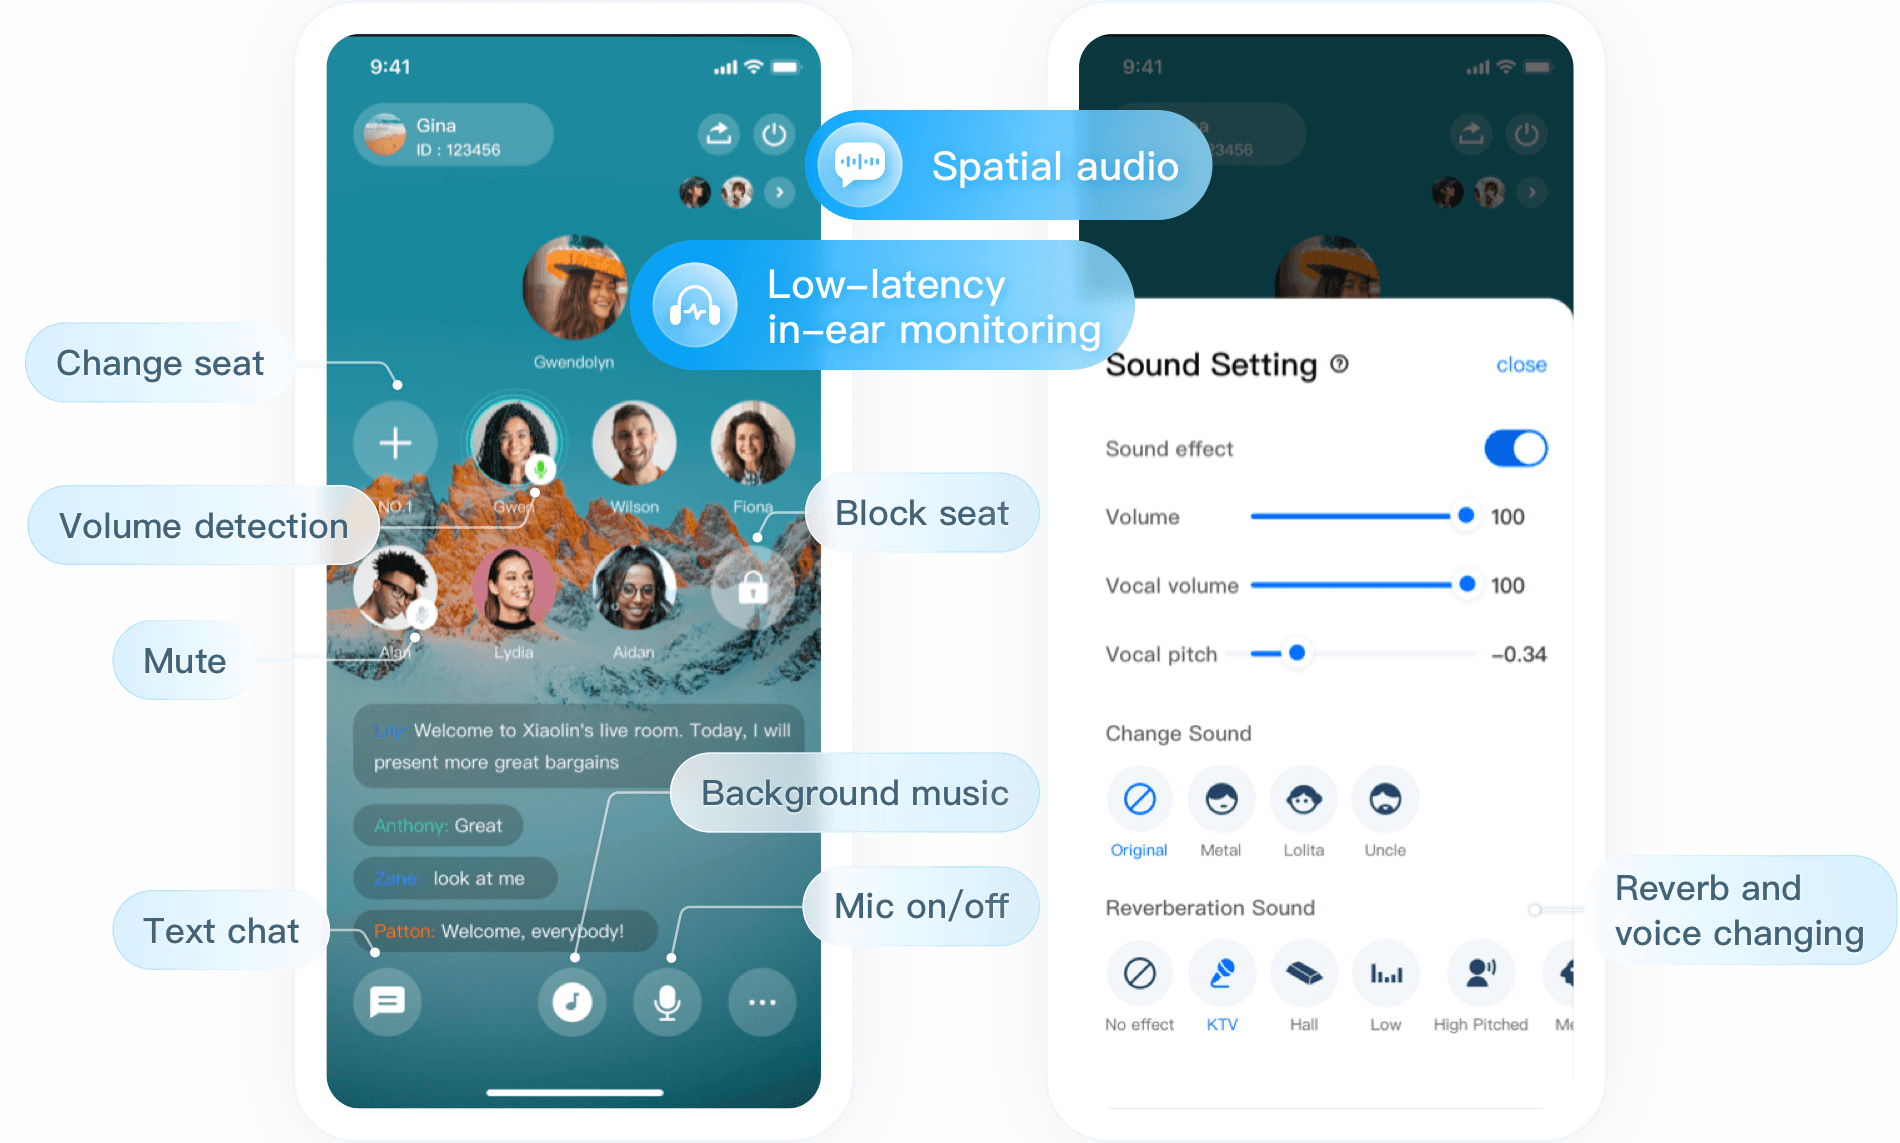
TUIVoiceRoom은 오픈 소스 오디오/비디오 UI 컴포넌트입니다. 프로젝트에 통합한 후 몇 줄의 코드 작성만으로 App에서 ‘그룹 오디오 채팅’ 시나리오를 추가할 수 있습니다. 동시에 Android 플랫폼도 지원합니다. 기본 기능은 다음과 같습니다.
설명:TUIKit 시리즈 컴포넌트는 Tencent Cloud의 두 가지 기본 PaaS 서비스, 즉 Tencent Real-Time Communication 및 Instant Messaging을 사용합니다. TRTC를 활성화하면 IM과 IM SDK 평가판(100 DAU만 지원)이 자동으로 활성화됩니다. IM 과금 내역은 요금 안내를 참고하십시오.
 |
컴포넌트 통합
1단계: TUIVoiceRoom 컴포넌트 다운로드 및 가져오기
xcode 프로젝트의 Podfile과 동일한 수준에 TUIVoiceRoom 폴더를 만들고 GitHub 리포지토리의 iOS 디렉터리에서 TXAppBasic, Resources, Source 및 TUIVoiceRoom.podspec 파일을 폴더로 복사하고 다음 가져오기 작업을 완료합니다.
프로젝트의 Podfile을 열고 다음과 같이 TUIVocieRoom.podspec을 가져옵니다.
# path는 Podfile에 상대적인 TXAppBasic.podspec의 경로
pod 'TXAppBasic', :path => "TUIVoiceRoom/TXAppBasic/"
# path는 Podfile에 대한 TUIVoiceRoom.podspec의 경로
pod 'TUIVoiceRoom', :path => "TUIVoiceRoom/", :subspecs => ["TRTC"]
터미널을 열고 Podfile 디렉터리로 들어가
pod install을 실행합니다.pod install
2단계: 권한 요청 및 난독화 규칙 구성
info.plist 파일에 Privacy > Microphone Usage Description을 추가해 마이크 권한을 신청해야 합니다.
<key>NSMicrophoneUsageDescription</key>
<string>VoiceRoomApp은 오디오가 포함된 비디오를 녹화하려면 마이크에 액세스해야 함</string>
3단계: 컴포넌트 초기화 및 로그인
// 초기화
let mTRTCVoiceRoom = TRTCVoiceRoom.shared()
// 로그인
mTRTCVoiceRoom.login(sdkAppID: SDKAppID, userId: userId, userSig: userSig) { code, message in
  if code == 0 {
      //로그인 성공
  }
}
매개변수 설명:
- SDKAppID: TRTC 애플리케이션 ID입니다. TRTC 서비스를 활성화하지 않은 경우 TRTC 콘솔에 로그인하여 TRTC 애플리케이션을 생성하고 애플리케이션 정보를 클릭합니다. SDKAppID는 아래와 같습니다.
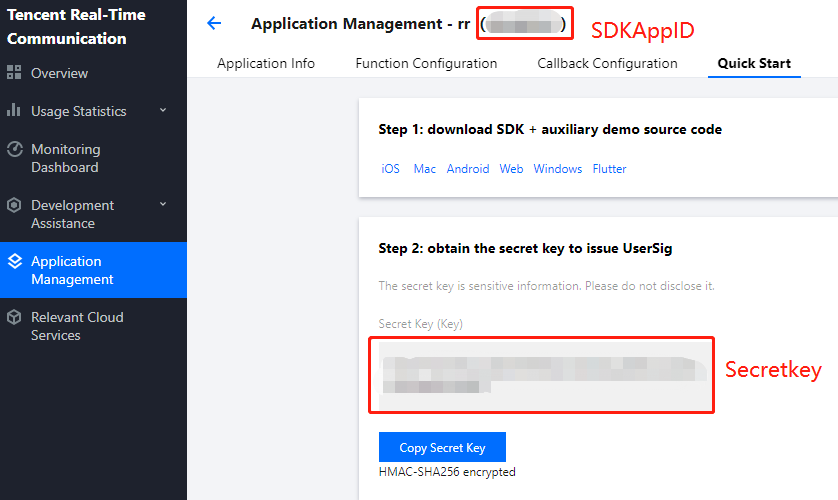
- Secretkey: SDKAppID에 해당하는 TRTC 애플리케이션 키. TRTC 콘솔의 애플리케이션 관리 페이지에서 SecretKey는 아래와 같습니다.
- userId: 현재 사용자의 ID로, 문자(a-z 및 A-Z), 숫자(0-9), 하이픈(-) 및 언더바(_)만 포함할 수 있는 문자열입니다. 사용자 계정 시스템과 일관성을 유지하는 것이 좋습니다.
- userSig: SDKAppId, userId 및 Secretkey를 기반으로 계산된 보안 보호 서명입니다. 여기를 클릭하여 디버깅 userSig를 온라인으로. 자세한 내용은 UserSig를 참고하십시오.
4단계: 음성 채팅방 구현
방 주인은 TRTCVoiceRoom#createRoom을 통해 음성 대화방 생성
// 오디오 채팅방 매개변수 초기화
let roomParam = VoiceRoomParam()
roomParam.roomName = "방 이름"
roomParam.needRequest = false // 청취자 마이크 활성화 시 방 주인 동의 필요 여부
roomParam.coverUrl = "방 커버 이미지의 URL"
roomParam.seatCount = 7 // 방의 자리 수, 총 7개로 설정하고 방 주인이 한 개를 점유한 후 시청자가 남은 6개 자리 점유
roomParam.seatInfoList = []
// 좌석 정보 초기화
for _ in 0..< param.seatCount {
let seatInfo = VoiceRoomSeatInfo()
param.seatInfoList.append(seatInfo)
}
// 방 생성
mTRTCVoiceRoom.createRoom(roomID: yourRoomID, roomParam: roomParam) { (code, message) in
if code == 0 {
    // 생성 성공
}
}
청취자는 TRTCVoiceRoom#enterRoom을 통해 오디오 대화방에 입장
// 1.청취자가 API를 호출하여 방에 입장
mTRTCVoiceRoom.enterRoom(roomID: roomID) { (code, message) in
// 방 입장 결과 콜백
if code == 0 {
   // 방 입장 성공
}
}
청취자는 TRTCVoiceRoom#enterSeat를 통해 마이크를 켬
// 1: 청취자가 마이크를 켜기 위해 API 호출
let seatIndex = 2; //좌석 index
mTRTCVoiceRoom.enterSeat(seatIndex: 2) { (code, message) in
if code == 0 {
    // 마이크가 성공적으로 켜짐
}
}
// 2.onSeatListChange 콜백 수신, 마이크 위치 리스트 새로고침
@Override
func onSeatListChange(seatInfoList: [VoiceRoomSeatInfo]) {
// 새로 고친 좌석 리스트
}
방 주인은 TRTCVoiceRoom#pickSeat를 통해 청취자 마이크 활성화
// 1: 방 주인이 청취자를 초대
let seatIndex = 2; //좌석 index
let userId = "123"; //발언할 사용자의 id
mTRTCVoiceRoom.pickSeat(seatIndex: 1, userId: "123") { (code, message) in
if code == 0 {
}
}
// 2.onSeatListChange 콜백 수신, 마이크 위치 리스트 새로고침
func onSeatListChange(seatInfoList: [VoiceRoomSeatInfo]) {
// 새로 고친 좌석 리스트
}
청취자가 TRTCVoiceRoom#sendInvitation을 통해 발언 요청
// 청취자 앵글
// 1.청취자가 API를 호출하여 말하기 요청
let seatIndex = "1"; //좌석 index
let userId = "123"; //사용자 id
let inviteId = mTRTCVoiceRoom.sendInvitation(cmd: "takeSeat", userId: ownerUserId, content: "1") { (code, message) in
// 발송 결과 콜백
}
// 2.초대가 수락된 후 사용자를 자리에 앉힘
func onInviteeAccepted(identifier: String, invitee: String) {
if identifier == selfID {
    self.mTRTCVoiceRoom.enterSeat(seatIndex: ) { (code, message) in
        // 결과 콜백
    }
}
}
// 방 주인 앵글
// 1. 방 주인이 요청을 수신함
func onReceiveNewInvitation(identifier: String, inviter: String, cmd: String, content: String) {
if cmd == "takeSeat" {
    // 2.방 주인이 청취자 요청에 동의
    self.mTRTCVoiceRoom.acceptInvitation(identifier: identifier, callback: nil)
}
}
방 주인은 TRTCVoiceRoom#sendInvitation을 통해 청취자 초대
// 방 주인 앵글 // 1.sendInvitation을 호출하여 사용자 ‘123’ 을 좌석 2로 초대 let inviteId = self.mTRTCVoiceRoom.sendInvitation(cmd: "pickSeat", userId: ownerUserId, content: "2") { (code, message) in // 발송 결과 콜백 } // 2.초대가 수락된 후 사용자를 자리에 앉힘 func onInviteeAccepted(identifier: String, invitee: String) { if identifier == selfID { self.mTRTCVoiceRoom.pickSeat(seatIndex: ) { (code, message) in // 결과 콜백 } } } // 청취자 앵글 // 1.청취자가 요청을 수신함 func onReceiveNewInvitation(identifier: String, inviter: String, cmd: String, content: String) { if cmd == "pickSeat" { // 2.청취자의 방 주인 요청 수락 self.mTRTCVoiceRoom.acceptInvitation(identifier: identifier, callback: nil) } }TRTCVoiceRoom#sendRoomTextMsg를 통한 문자 채팅 구현
// 발신측: 텍스트 메시지 발송 self.mTRTCVoiceRoom.sendRoomTextMsg(message: message) { (code, message) in } // 수신측: 텍스트 메시지 수신 func onRecvRoomTextMsg(message: String, userInfo: VoiceRoomUserInfo) { //수신한 message 정보 처리 방법 }TRTCVoiceRoom#sendRoomCustomMsg를 통한 화면 댓글 구현
// 예시: 발신측: 사용자 정의 Cmd를 통해 댓글 자막과 '좋아요' 메시지 구분 가능
// eg: "CMD_DANMU": 댓글 자막 메시지, "CMD_LIKE": '좋아요' 메시지
self.mTRTCVoiceRoom.sendRoomCustomMsg(cmd: “CMD_DANMU”, message: "hello world", callback: nil)
self.mTRTCVoiceRoom.sendRoomCustomMsg(cmd: "CMD_LIKE", message: "", callback: nil)
// 수신측: 사용자 정의 메시지 수신
func onRecvRoomCustomMsg(cmd: String, message: String, userInfo: VoiceRoomUserInfo) {
if cmd == "CMD_DANMU" {
    // 댓글 자막 메시지 수신
}
if cmd == "CMD_LIKE" {
    // '좋아요' 메시지 수신
}
}
FAQ
요구 사항이나 피드백은 colleenyu@tencent.com으로 문의하십시오.

 예
예
 아니오
아니오
문제 해결에 도움이 되었나요?