When using TDMQ for RocketMQ, customers often face the challenge of migrating the existing business, for example, migrating business from self-built RocketMQ clusters or managed RocketMQ clusters on other platforms to TDMQ for RocketMQ. Self-built RocketMQ clusters support only version 4.x, though more versions may be supported in the future based on customer demand.
When performing migration, customers are generally offered two types of migration methods: disruptive migration and seamless migration.
Disruptive migration involves first importing and exporting metadata, followed by switching the access addresses for consumers and producers in sequence according to the data flow migration guide. However, this method is intrusive to online business operations, as switching access points may impact online business operations. Thus, it is more suitable for scenarios where business continuity is not critical or not required.
Scenarios
Tencent Cloud TDMQ for RocketMQ supports migrating entire clusters without interrupting business operations. Throughout the various stages of migration, customers can visually monitor the progress of migration tasks in the console, with support for pausing and rolling back tasks.
This guide walks you through seamless migration of an open-source RocketMQ cluster to Tencent Cloud TDMQ for RocketMQ.
Migration Steps
Prerequisites
CAM Permissions Configuration
If you use a sub-account to run a seamless migration task, before performing task operations in the console, you need to configure permissions for the cloud API operations involved in seamless migration. For more information, see Access Authorization for Sub-Account.
The cloud API operations involved in seamless migration are as follows:
API Name
API Description
ChangeMigratingTopicToNextStage
Advances a migrating topic to the next stage.
DescribeMigratingTopicList
Queries the list of topic migration statuses.
DescribeMigratingTopicStats
Queries real-time data for migrating topics.
DescribeSmoothMigrationTaskList
Queries the list of hitless migration tasks.
DescribeSourceClusterGroupList
Obtains the consumer group list from the source cluster during hitless migration.
DoHealthCheckOnMigratingTopic
Performs health checks on migrating topics. Only topics in a normal status can advance to the next migration stage.
ImportSourceClusterConsumerGroups
Imports the list of consumer groups from the source cluster.
ImportSourceClusterTopics
Imports the list of topics from the source cluster.
RollbackMigratingTopicStage
Rolls back a migrating topic to the previous stage.
DeleteSmoothMigrationTask
Deletes a hitless migration task. Only canceled tasks can be deleted.
DescribeMigratingGroupStats
Views real-time information of migrating consumer groups.
RemoveMigratingTopic
Removes a topic from the migration list. This is effective only when the topic is in the initial status.
Creating a Task
Before starting the migration, you need to select a task of type New Cluster Seamless Migration on the Migrate to Cloud page, and specify the relevant information of the task according to the following instructions. We recommend that you evaluate the current traffic of your source cluster and select a suitable TDMQ for RocketMQ cluster on Tencent Cloud to purchase before you create the task. This helps prevent traffic throttling issues after cloud migration due to insufficient cluster specifications.
Task Name: The name of the migration task. Specify a name based on your actual business scenario.
Source Cluster Type: Self-built 4.x and 5.x clusters are supported. Make sure that the specified cluster type matches the version of your self-built cluster to avoid errors that may occur when you proceed with the task.
Source Cluster Name: The name of your self-built cluster. Specify a name based on your actual business scenario.
Target Cluster Type: RocketMQ 4.x exclusive clusters and general clusters, and RocketMQ 5.x clusters are supported.
Target Cluster Region: Select a region based on your business requirements. Only regions where target clusters exist are displayed.
Target Cluster: Select a RocketMQ 4.x general cluster or exclusive cluster, or a RocketMQ 5.x cluster as needed. Make sure that the specifications of the target cluster can fully handle the traffic from the source cluster.
Note:
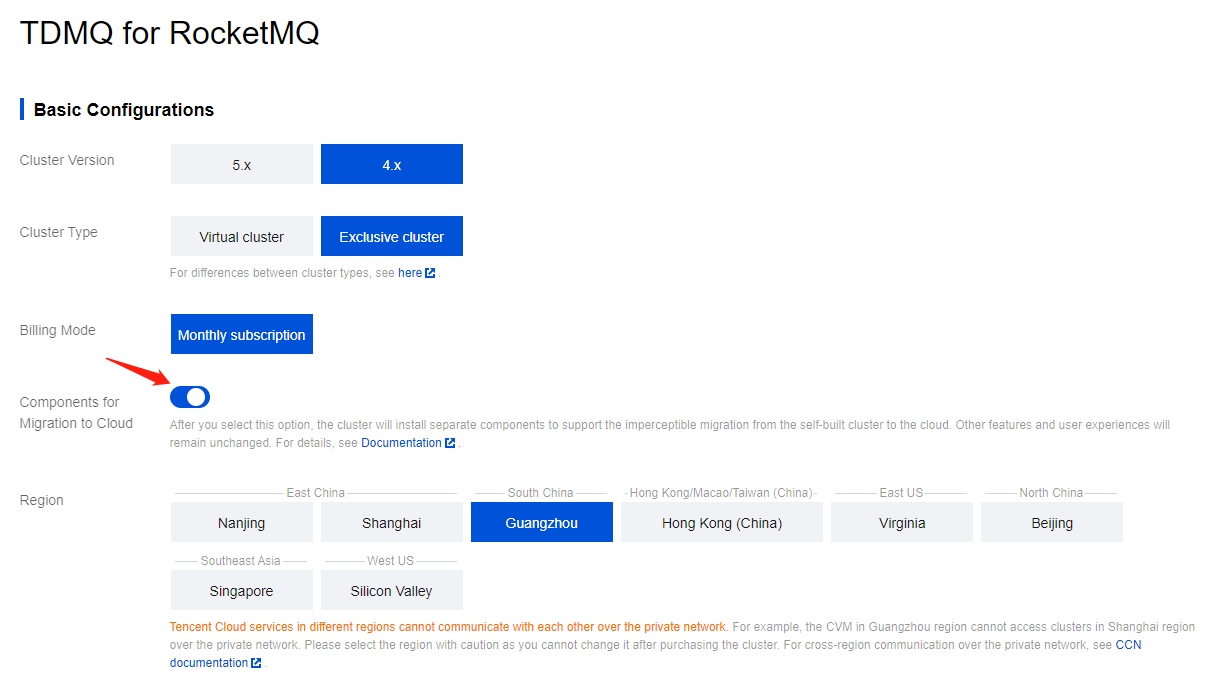
Since clusters adapted for cloud migration require the separate installation of migration components, you need to purchase a 4.x exclusive cluster that supports seamless migration. Alternatively, you can enable the Components for Migration to Cloud switch when you purchase an exclusive cluster, as shown in the following figure. Note that RocketMQ 4.x general clusters and all 5.x series clusters do not require the installation of migration components. You can directly connect your existing clusters of these types for migration.
After you complete the configuration, click Create Task to go to the first step of the task.
On the task details page, you can view the progress of the created task and the current architecture diagram at any time.
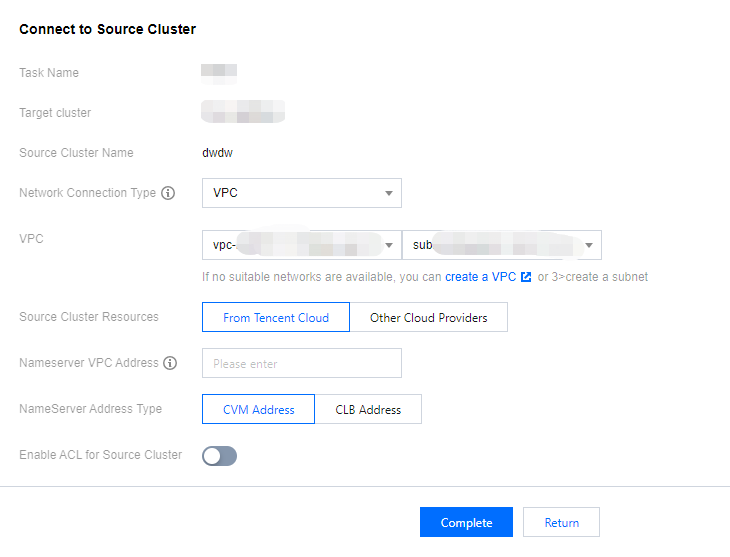
Step 1: Connecting to the Source Cluster
In this step, you need to confirm the network connection type and provide information about the source cluster:
Network Connection Type: The network connection type used when the RocketMQ cluster on Tencent Cloud connects to the source cluster. You can select the public network or Virtual Private Cloud (VPC) network based on your actual setup. The connection will be verified in subsequent steps. If you select the VPC network, you need to further specify the VPC and subnet.
Note:
If you use a public network, to ensure smooth migration, you need to allow Tencent Cloud to access resources within the network. You can select your region from the following table and add Tencent Cloud's IP addresses for the region to the public network allowlist of your self-built cluster.
Source Cluster Region
Public IP Ranges to Be Allowed
Beijing
152.136.0.0/16
81.70.0.0/16
Shanghai
121.4.0.0/16
106.54.0.0/16
49.234.0.0/16
49.235.0.0/16
175.24.0.0/16
Guangzhou
119.29.0.0/16
106.52.0.0/16
106.53.0.0/16
106.55.0.0/16
118.89.0.0/16
81.71.0.0/16
42.194.0.0/16
Nanjing
119.45.0.0/16
129.211.0.0/16
146.56.0.0/16
175.25.0.0/16
Hong Kong (China)
119.28.0.0/16
101.32.0.0/16
Singapore
43.134.0.0/16
101.32.0.0/16
Silicon Valley
170.106.0.0/16
49.51.0.0/16
Virginia
43.130.0.0/16
170.103.0.0/16
Shanghai Finance
212.129.0.0/16
NameServer Address: Based on the network connection type selected in the previous step, enter the NameServer address of the source cluster in the format of IP address + port number. Separate multiple addresses with semicolons (;).
NameServer Address Type: This field is required only when you use a VPC network to access the source cluster. Depending on different user preferences, the NameServer address may be a Cloud Virtual Machine (CVM) address or Cloud Load Balancer (CLB) address on Tencent Cloud. Provide the actual address used. This information is solely used to distinguish between network connectivity scenarios and does not affect subsequent operations.
Enable ACL for Source Cluster: Specify whether to enable the access control list (ACL) for the source cluster. If your source cluster has ACL management enabled for the Admin API, you need to provide the source cluster's AccessKey and SecretKey to ensure a successful migration. (These credentials are specifically for calling the Admin API, and are different from the AccessKey and SecretKey used for message sending and receiving.)
Note:
In migration scenarios that vary across different customers, there may be scenarios where multiple source clusters are migrated to the same Tencent Cloud RocketMQ cluster (the target cluster). In such scenarios, the following issues need to be noted:
1. A target cluster can only be involved in one migration task at a time. Therefore, if the above situation occurs, multiple source clusters should be migrated in batches.
2. When multiple migration tasks are executed, different source clusters (for example, Source Cluster A and Source Cluster B) may have different ACL enabling statuses. Suppose during the first migration task, Source Cluster A is migrated, and the ACL switch for Source Cluster A is enabled in the task creation stage. In this case, the ACL switch of the actual target cluster is also enabled. During the second migration task for Source Cluster B, the page will require ACL information by default when connecting to Source Cluster B. If Source Cluster B does not actually use ACL, then during the subsequent traffic switching process, it will be necessary to supplement the AccessKey and SecretKey configurations for all clients of Source Cluster B.
3. If in the above migration scenario, the ACL switch for Source Cluster A is not enabled during the first migration task, then by default, AccessKey and SecretKey verification will not be enforced for the clients of Source Cluster B either.
After you complete the preceding configuration, you can click Complete Network Configuration at the bottom of the page. The migration component of TDMQ for RocketMQ will then attempt to connect to the source cluster. If the connection is successful, you can click to proceed to the next step. If a connection error occurs, the page will display the cause of the error. Common error causes and solutions include:
Error Cause
Solution
Connection error to NameServer
Verify that the entered NameServer address is correct.
If you are using a public network connection, make sure that the public network allowlist for the NameServer includes Tencent Cloud's IP addresses and the allowlist configuration is correct.
If you are using a public network connection, make sure that the target cluster (the TDMQ for RocketMQ cluster on Tencent Cloud you purchased) has the public network connection enabled.
Authentication error
Check whether access control is enabled on the source cluster. If it is enabled, verify that the entered AccessKey and SecretKey are correct.
Step 2: Importing the Metadata
After successfully connecting to the source cluster's NameServer, you can synchronize the source cluster's metadata to the target cluster.
The migration tool will automatically scan the relevant metadata from the source cluster, such as topics and groups. As shown in the following figure, you can review the details of the topics and groups on the page. After verification, you can click Confirm and Import in the Operation column to proceed. You can also perform batch imports by clicking
in front of the list.
Must-knows for metadata migration:
If you cannot find topics or groups created on the source cluster in the current list, you can click the refresh button in the upper-right corner to refresh.
If certain topics or groups from the source cluster are still missing after refreshing, you can click New to create topics or groups.
The number of queues for a topic match the number of queues in the source cluster by default. For stability reasons, if the number of queues for a topic in your source cluster falls outside the TDMQ for RocketMQ queue range (for example, exceeding 16 queues or is less than 3 queues), RocketMQ will make slight adjustments to the number of queues, and a prompt will be displayed on the page.
By default, migrated groups use Transmission Control Protocol (TCP). If you need to create a group that supports Hypertext Transfer Protocol (HTTP), you can create it separately on the target cluster page.
For target clusters that are 4.x exclusive clusters, if the source cluster uses namespaces, the migration tool extracts the field before the percent sign (%) in the topic or group name as the namespace name by default. If your source cluster does not use namespaces, the migration tool imports all topics and groups into a default namespace named Default by default.
In the metadata import stage, you can also add cluster roles and their corresponding AccessKey and SecretKey for message sending and receiving. If there are too many roles, you can click the
icon in the upper-right corner to perform batch imports.
After the metadata is imported, if you need to create topics or groups or perform operations on existing topics or groups, go to the target cluster in the TDMQ for RocketMQ console to create them.
Note:
If metadata format compatibility issues arise during migration, or if the target cluster has not fully obtained the metadata information from your source cluster, you can contact us by submitting a ticket.
Step 3: Modifying the Access Points of the Source Cluster
After confirming that all the metadata to be migrated has been imported, you need to modify the access point addresses for all clients according to the instructions on the page.
Once the clients' access points are updated, the migration tool will forward traffic to the source cluster. Since the clients still actually connect to the source cluster at this stage, this step carries no risk. Before clicking to proceed to the next step, you need to make sure that all clients (including consumers and producers) have completed the access point switch. Otherwise, during the next step of grayscale migration for topics, clients that have not switched access points will be unable to connect to the target cluster and thus cannot participate in the grayscale migration.
On the Access Point Modification Details list page, the number of clients connected under each group for both the source and target clusters is displayed for comparison. This allows you to quickly identify consumer clients that have not completed the modification. As shown in the following figure, the list page displays groups with inconsistencies between the source and target clusters and automatically expands the client lists on both sides for comparison. You can quickly identify the cause in the Remarks column.
If you confirm that all clients' access points have been modified, you can click Next to proceed to the traffic switching stage. Before you proceed to this stage, if any client access points remain unmodified, the page will display a pop-up window. If no pop-up window appears, you can assume that all consumer client access points have been switched.
Step 4: Grayscale Migration of Messages
In the grayscale migration stage, the migration tool migrates messages at the topic level one by one. The process follows this sequence: Initial status (reading from and writing to the source cluster) > Enabling dual-read (writing to the source cluster with dual-read) > Dual reading and writing > Traffic switching in progress (writing to the target cluster with dual-read) > Traffic switching completed (reading from and writing to the target cluster). Each status can be rolled back to the previous one during migration.
Initial status: Reading from and writing to the source cluster. This is the starting status of migration. Read and write traffic is forwarded through the migration component proxy and still accesses the source cluster, thus being non-intrusive to your business.
Enabling dual-read: Message producer clients write to the source cluster. Simultaneously, consumers read traffic from both the source and target clusters.
Dual reading and writing: Messages sent by producer clients are randomly routed to either the source or target cluster. You can monitor the traffic distribution for each cluster on the monitoring page. Simultaneously, consumers read traffic from both the source and target clusters.
Traffic switching in progress: Message producer clients write to the target cluster. Simultaneously, consumers read traffic from both the source and target clusters. You need to verify that the new message sending and receiving linkages have no exceptions during this phase, and wait for the consumption of remaining messages in the source cluster to complete.
Traffic switching completed: After confirming that the new message sending and receiving linkages meet expectations in the previous step and verifying that all messages in the source cluster have been consumed with no backlog, the system enters the status of reading from and writing to the target cluster. All read and write traffic exclusively switches to the target cluster.
As shown in the figure above, you can check whether a topic is ready for migration by viewing the Readiness Status column. The migration tool performs batch scans at regular intervals. You can also click Health Check in the Operation column to perform a real-time check on a single topic. Topics that reach the Ready status can proceed to the next stage. During the traffic switching process, you can also click Roll Back to revert the status of a single topic or perform batch rollbacks.
During topic traffic switching, you can view the traffic and operation status of the entire cluster or a single topic on the Migration Monitoring tab. Only topics in the initial status can be removed from the migration task.
During traffic switching, you can freely compare the number of consumer groups and clients between the target and source clusters. As shown in the figure above, the system shows which groups in the source cluster have not completed the switching.
During traffic switching, you can also view traffic changes between the source and target clusters on the Migration Monitoring tab. The monitoring data is displayed using different chart legends.
Step 5: Completing the Migration
After all topics reach the Traffic Switching Completed status, you can proceed to the next step to finalize the entire migration process. Once migration is complete, all topics and clients have been migrated, and all message traffic is running on TDMQ for RocketMQ. You can monitor both the target and source clusters, and subsequently eliminate the source cluster gradually.