Inter-VPC firewall rules provide multiple access control lists (ACLs), each of which is associated with a pair of connected VPCs and an inter-VPC firewall toggle. This topic describes how to set up inter-VPC firewall rules on the Cloud Firewall console.
Operation guide
1. Log in to the Cloud Firewall console, select Access Control in the left navigation pane, and then select Inter-VPC firewall rules.
2. In the upper left corner of the Inter-VPC firewall rules page, you can switch between different inter-VPC ACLs from the drop-down list of "Firewall toggle name".
Note
Unlike the edge firewall and NAT firewall ACLs, inter-VPC ACLs have no direction limitations.
The local and peer VPCs are equivalent. When configuring rules, you can determine the VPC based on the CIDR block where the access source and destination are located to differentiate the direction.
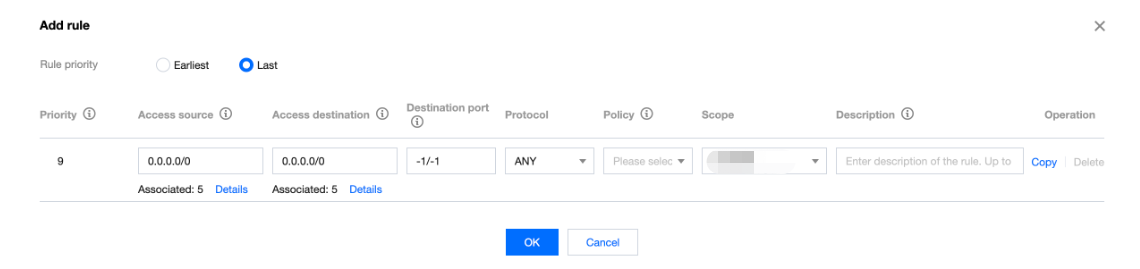
3. On the Inter-VPC firewall rules page, click Add rule.
4. On the Add rule page, the information of local and peer VPCs and firewall toggle of the inter-VPC ACLs is already available. You only need to enter the access source IP, access destination IP, destination port, and other information to complete the configuration.
Field description:
Priority: The priority of the access control rule, which is independent of that of the rule list for the firewall toggles. The outbound and inbound rules are executed independently. The rule with the highest priority is evaluated first. If a given rule is matched, rules with lower priorities will not be evaluated. When you modify the priority of a given rule, the priorities of the original rule with that priority and all the subsequent rules will increase by 1. When you delete a given rule, the priorities of all the subsequent rules will decrease by 1.
Access source: It can be an IP in the CIDR block of the local/peer VPC or a subnet range of it. Note that it cannot be in the same VPC network range as the access destination. You can also enter 0.0.0.0/0 as a wildcard access source.
Access destination: It can be an IP in the CIDR block of the local/peer VPC or a subnet range of it. Note that it cannot be in the same VPC network range as the access source. You can also enter 0.0.0.0/0 as a wildcard access destination.
Destination port: Supports single port numbers (e.g., "80"), port ranges (e.g., "80/80", "-1/-1", "0/65535"), and discrete port numbers separated with commas (e.g., "80,443,3380/3389").
Protocol: The current CFW edition supports UDP, TCP, and ICMP.
Policy description:
Allow: Allow the matched traffic and record the hit count and traffic logs, but not access control logs.
Observe: Allow the matched traffic and record the hit count, access control logs, and traffic logs.
Block: Block the matched traffic and record the hit count and access control logs, but not traffic logs.
Description: The rule description with up to 50 characters. You can use a pair of # to insert special settings. Your current CFW edition supports #long connection#.
Inter-VPC wildcard rules: For more information about the IP address ranges that support wildcard, please see the wildcard rules in Edge Firewall Rules.
Caution
The CIDR blocks of the local and peer VPCs cannot be the same or overlap. Otherwise, the firewall cannot be enabled.
In the inter-VPC access control rules, the access source and access destination can only be an IP in the CIDR block of the local/peer VPC or a sub-network range of it. As the CIDR blocks of the local and peer VPCs cannot be the same, the direction of the traffic controlled by a rule can be distinguished by the "Access source" or "Access destination".
The rule will not take effect if you enter an address other than those in the CIDR block of the local or peer VPC.
If you enter 0.0.0.0/0 for "Access source" and "Access destination", it indicates all the addresses of the VPC.
5. Click Copy in the action column on the right to add multiple rules.
Note
In the Add inbound rule window, one rule uses one line, and a new rule is added to the end of the list by default. The last rule added has the largest priority number or the lowest priority.
Scenario 1: You have configured the rule list, and need to add rules in batch.
5.1 Click Copy in the action column on the right to add a rule to the next line of the current rule. A maximum of 10 rules can be added at a time.
5.2 Complete all fields in the list.
5.3 Check whether the priority of the rules added in batch meets your expectations.
5.4 Click OK to submit the rules configured.
Scenario 2: You need to configure multiple rules for an IP address.
5.1 Edit a rule to fill in the fields that need to be input repeatedly.
5.2 Click Copy in the action column on the right to add a rule to the next line of the current rule, with the fields automatically populated with the same values as from the edited rule. A maximum of 10 rules can be added at a time.
5.3 Complete other fields in the list.
5.4 Check whether the priority of the rules added in batch meets your expectations.
5.5 Click OK to submit the rules configured.
6. After the rules are added, you can view them in the rule list.
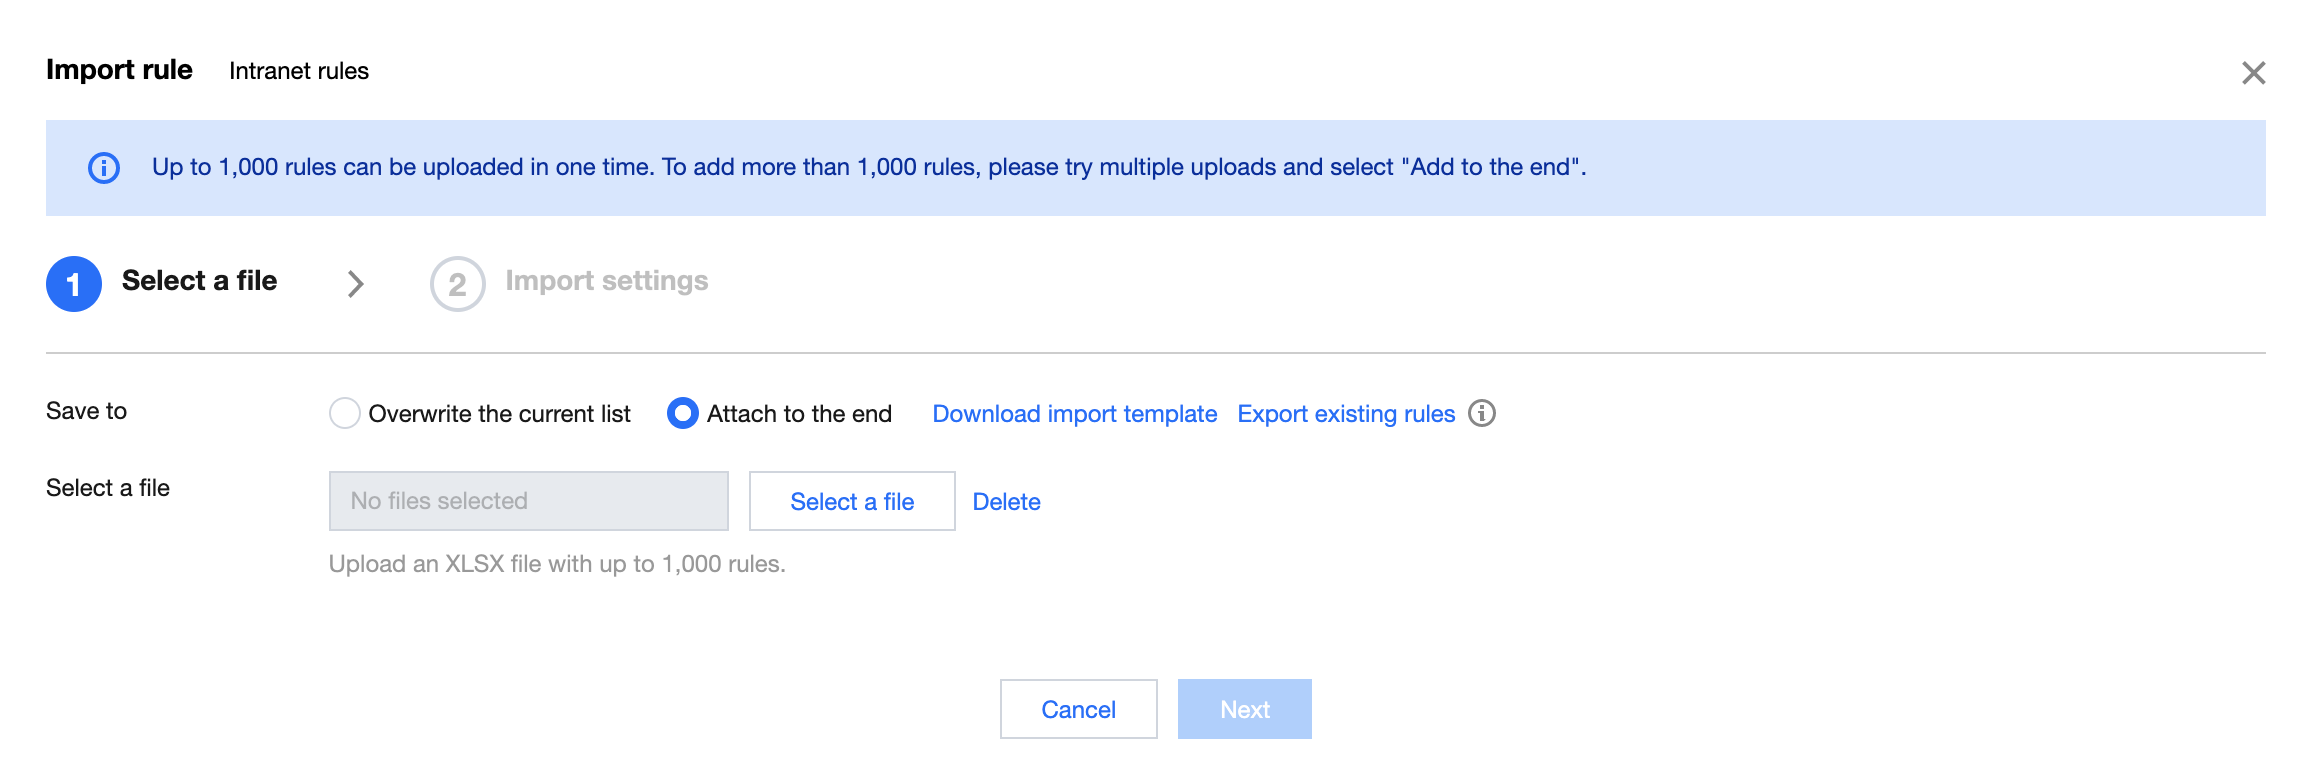
7. Import rules: Click Import rule to import rules from a local file. You can specify the import location, download the import template, or export existing rules.
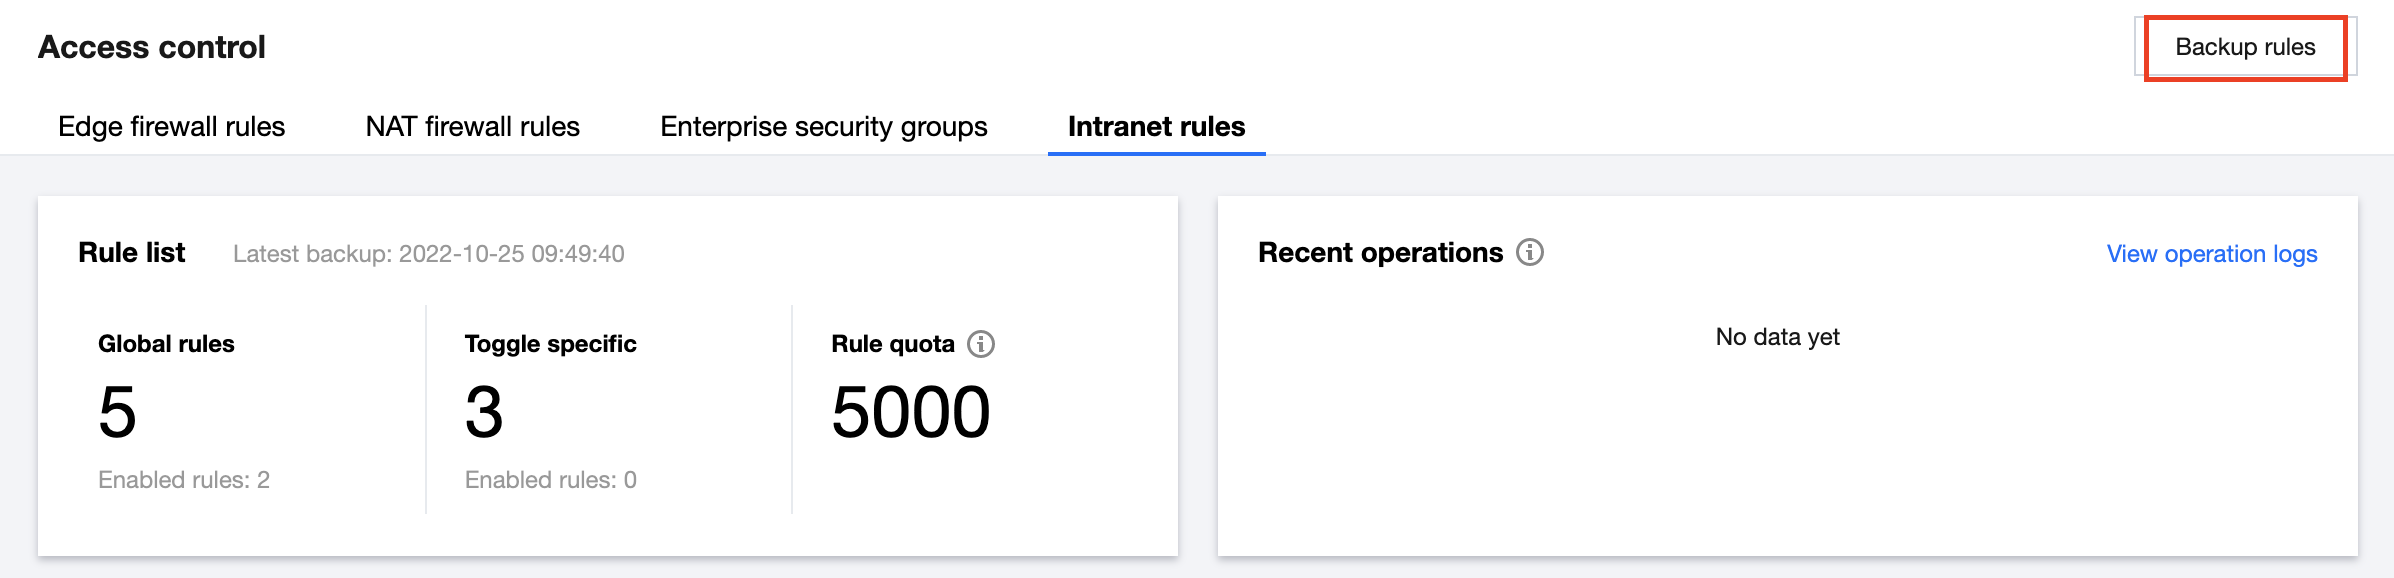
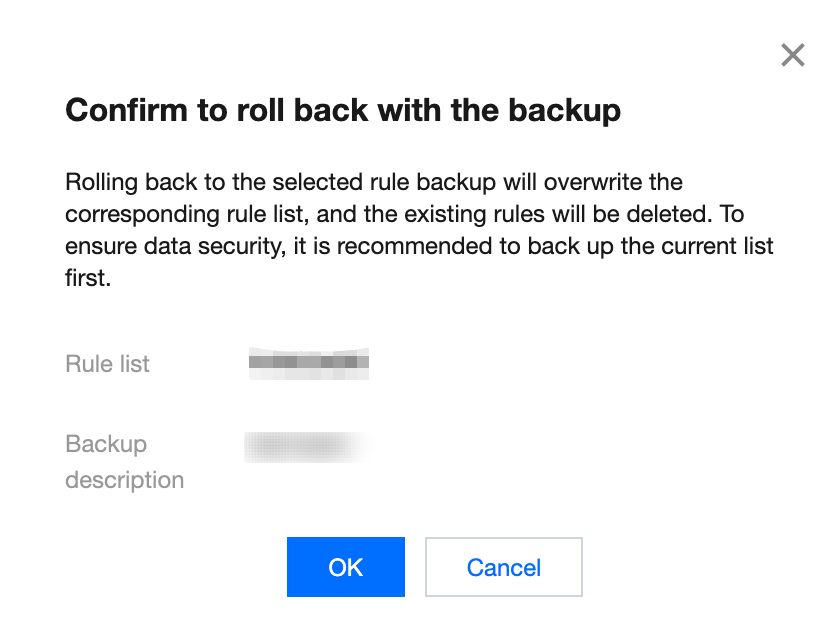
8. Back up and roll back rules: Click Backup rules in the upper right corner to back up existing NAT firewall rules. When the rules are greatly changed, you can click Roll back to the right of the backup file to recover the rules.
1. Click Backup rules in the upper right corner to enter the Back up and roll up rules page. Click Create backup, select Inter-VPC firewall rule group from the drop-down list and enter a description, and then click OK to complete the backup.
2. To roll back rules, click Roll back on the right side of the backup file, and you can recover the rules after confirmation.
More information
For the information about how to control the inbound and outbound traffic over the edge firewall on the Cloud Firewall console, please see Edge Firewall Rules.
For the information about how to control the inbound and outbound traffic over the NAT firewall on the Cloud Firewall console, please see NAT Firewall Rules.
For the special scenarios of the Cloud Firewall access control feature, please see Special Scenarios.
For questions about inter-VPC firewall rules, please see Inter-VPC Firewall.


 Yes
Yes
 No
No
Was this page helpful?